Easy Designing of Copper Pipe Industrial Style Furniture
by andrei.erdei in Workshop > Furniture
8492 Views, 17 Favorites, 0 Comments
Easy Designing of Copper Pipe Industrial Style Furniture

Making pieces of furniture with copper pipes and fittings that you can find in plumbing supplies stores is not a new idea. Their crude unfinished appearance and monochrome color marks the so-called industrial design. This style began to reach the general public more and more at the beginning of the 2000's but until today it enjoys a great popularity. There are thousands of projects on the Internet that present desk lamps, shelves, tables, candle holders, all kinds of stands, frames, other pieces of furniture, elements of artistic decoration. I have also found here on instructables some projects like this, for example:
- Copper Pipe Candelabra
- Copper Pipe Table Lamp
- Copper Pipe Towel Rail
- Copper Pipe Candlesticks
- Easy Copper Pipe and Reclaimed Wood Table
- Copper Pipe Wine Rack
- Copper pipe photo frames
- No Solder Copper Pipe Stool
- How to Make an IPad Holder Out of Copper Pipe
As you can see there are many projects!
Their practical implementation is described in extenso and I could not add any more details on this. However, an important part that I noticed is under silence is the design phase. All the projects I found start with "we need the following components and we'll assemble them according to this plan ..." But nothing about how they got there is specified. I would like with this article to come to fill this huge gap :)
Benefits:
- using the 3D design program proposed by me I always have the object that I will achieve in front, I can intervene easily, I can also change anything until I reach the desired result;
- copper and copper elements are not really cheap, but with a correct design I can calculate exactly why and how much I need thus avoiding the extra cost;
- I can easily design objects with a complicated design, which is almost impossible to do with paper and pencil. I would like to point out that the vast majority of the projects on the net are minimalist, simple, easy to "decipher" but if you want something special, more personal, just read my article ...
- last but not least, rendering projects, seeing the objects as close to reality as possible is a very useful thing, especially if we want to show our project to other people, to receive the approval of a possible client - or my wife :) Additionally, I would like to mention that I used the rendering in many of my articles here on instructables and the simulations also helped me in designing my kitchen and my bathroom furniture.
I wish that this article will be an inspiration for you to start making furniture projects.
I look forward for your opinions, criticisms, proposals both here in the comments section or in private messaging.
Working With OpenSCAD
At one point I was looking for a simple 3D printable maze generator and I found at thingiverse.com a page with an article called "3d Marble Maze costumizable". Between the project files I found a script for OpenSCAD written by the user "3D_Corpsman". This script was written for generating mazes in a 3x3 cube. I adapted this script for the purpose I described at the beginning of the article and you will see bellow exactly how.
OpenSCAD is a free, opensource, CAD modeler but with a twist. There is no interactivity, I'm not drawing anything. I must provide a script with a three-dimensional description of your object (s) and OpenSCAD will interpret this description and will display the programmed object (s). To start, I downloaded and installed OpenSCAD. I downloaded the zip archive because I only have to unzip it somewhere in a directory and it will run without installation. If I want to get rid of it, I can just delete this directory and the program will disappear without a trace. I started the program and uploaded the following script:
/*
 * Inspired by <a href="https://www.thingiverse.com/thing:2893570">  which is
 *  a remix of <a href="https://www.thingiverse.com/thing:1498778"> :)
 */
$fn=36;
/*
 * use the two following parameters to adjust the pipe segments
 * to your pipe size
 */
// the pipe diameter
pipediameter=28;
// the grid on which the pipes are being placed
grid=140;
pipes_grid(); // to see the pipes grid
//
module pipes_grid()
{
  intersection()
  {
    translate([-grid/2,-grid/2,-grid/2])cube([20*grid,20*grid,20*grid]);
    pipe_segments();
  }
}
module pipe_segments()
{
    segment([0,0,0],[0,1,0]);//here we can add our segments
}
module segment(p1,p2)
{
  hull()
  {
    translate([p1[0]*grid,p1[1]*grid,p1[2]*grid ]) sphere(r=pipediameter/2);
    translate([p2[0]*grid,p2[1]*grid,p2[2]*grid ]) sphere(r=pipediameter/2);
  }
}
What do you need to know about this script?
- You can change the smoothness of the objects generation by changing the value of $fn (more about this here);
- You can change two parameters: the diameter of the pipes and the grid unit length of a segment of pipe (in OpenScad the units are considered to be in millimeters);
- The maximum size of an object can be 20 units ("20 * grid") but you can change it as you wish;
- In the function "module pipe_segments ()" you can add the description of the pipe pieces for your project (see also the next step).
In the pictures below you can see how you can define a segment of pipe on the Y axis, a square and a cube. Experiment a little with the definitions to become familiar with how OpenSCAD and the script works.
Segment of pipe, one grid unit long, on Y axis

module pipe_segments(){
    segment([0,0,0],[0,1,0]);
}
A square one grid unit long/side

module pipe_segments(){
    segment([0,0,0],[0,1,0]);
    segment([0,1,0],[1,1,0]);
    segment([1,1,0],[1,0,0]);
    segment([1,0,0],[0,0,0]);
}
A cube one grid unit long/side

module pipe_segments(){
    segment([0,0,0],[0,1,0]);
    segment([0,1,0],[1,1,0]);
    segment([1,1,0],[1,0,0]);
    segment([1,0,0],[0,0,0]);
    segment([0,0,0],[0,0,1]);
    segment([0,1,0],[0,1,1]);
    segment([1,1,0],[1,1,1]);
    segment([1,0,0],[1,0,1]);
    segment([0,0,1],[0,1,1]);
    segment([0,1,1],[1,1,1]);
    segment([1,1,1],[1,0,1]);
    segment([1,0,1],[0,0,1]);
}
If the pipe diameter is 28 and the grid is 140 one unit dimensions in millimeters are like in the picture below.

Remarks:
- For preview, press the
 button;
 - To save the 3d object in STL format it is necessary first to render with the
 button;
 - Save in STL format by pressing the
 button;
Proposed Projects
The projects I propose below can be realized with only three elements of copper installations: tees, elbows at 90 degrees and of course straight copper pipe.

The STL files of the projects are attached above. I tried to attach also the .scad files that generates the STL files but I was unable to do that. So I added bellow the parameters and the grid definitions for each project, you can copy this definitions in the module pipe_segments() function of the script from the step 1.
Desk Lamp

Inside the structure, a light bulb or a cylindrical or rectangular lampshade on a wooden support can be mounted
pipediameter=18;
grid=54;
    segment([0,0,0],[0,4,0]);
    segment([0,4,0],[4,4,0]);
    segment([4,4,0],[4,0,0]);
    segment([4,0,0],[0,0,0]);
    segment([0,1,0],[0,1,1]);
    segment([1,0,0],[1,0,1]);
    segment([1,1,0],[3,1,0]);
    segment([4,1,0],[4,1,1]);
    segment([3,0,0],[3,0,1]);
    segment([1,1,0],[1,3,0]);
    segment([1,4,0],[1,4,1]);
    segment([0,3,0],[0,3,1]);
    segment([1,3,0],[3,3,0]);
    segment([3,4,0],[3,4,1]);
    segment([4,3,0],[4,3,1]);
    segment([3,1,0],[3,3,0]);
    segment([1,0,1],[1,4,1]);
    segment([3,0,1],[3,4,1]);
    segment([0,1,1],[1,1,1]);
    segment([3,1,1],[4,1,1]);
    segment([0,3,1],[1,3,1]);
    segment([3,3,1],[4,3,1]);
    //segment([0,2,0],[1,2,0]);
    //segment([3,2,0],[4,2,0]);
    segment([2,1,0],[2,1,2]);
    segment([2,3,0],[2,3,2]);
    segment([1,1,2],[1,3,2]);
    segment([1,3,2],[3,3,2]);
    segment([3,3,2],[3,1,2]);
    segment([1,1,2],[3,1,2]);
    segment([1,2,1],[1,2,2]);
    segment([3,2,1],[3,2,2]);
    //segment([2,0,0],[2,0,1]);
    //segment([2,0,1],[2,1,1]);
    //segment([2,4,0],[2,4,1]);
    //segment([2,4,1],[2,3,1]);
Shelves

On the copper structure, two planks of wood can be placed, this planks would effectively constitute the shelves
pipediameter=22;
grid=88;
    segment([0,0,0],[10,0,0]);
    segment([0,0,0],[0,2,0]);
    segment([0,2,0],[2,2,0]);
    segment([2,2,0],[2,0,0]);
    segment([4,0,0],[4,2,0]);
    segment([4,2,0],[6,2,0]);
    segment([6,2,0],[6,0,0]);
    segment([8,0,0],[8,2,0]);
    segment([8,2,0],[10,2,0]);
    segment([10,2,0],[10,0,0]);
    segment([0,1,0],[0,1,1]);
    segment([2,1,0],[2,1,1]);
    segment([4,1,0],[4,1,1]);
    segment([6,1,0],[6,1,1]);
    segment([8,1,0],[8,1,1]);
    segment([10,1,0],[10,1,1]);
    segment([0,1,1],[10,1,1]);
    segment([1,0,0],[1,0,3]);
    segment([3,0,0],[3,0,1]);
    segment([5,0,0],[5,0,3]);
    segment([7,0,0],[7,0,1]);
    segment([9,0,0],[9,0,3]);
    segment([0,0,3],[10,0,3]);
    segment([1,2,0],[1,2,1]);
    segment([1,2,1],[1,1,1]);
    segment([3,1,1],[3,0,1]);
    segment([5,2,0],[5,2,1]);
    segment([5,2,1],[5,1,1]);
    segment([7,1,1],[7,0,1]);
    segment([9,2,0],[9,2,1]);
    segment([9,2,1],[9,1,1]);
    segment([0,0,3],[0,2,3]);
    segment([0,2,3],[2,2,3]);
    segment([2,2,3],[2,0,3]);
    segment([4,0,3],[4,2,3]);
    segment([4,2,3],[6,2,3]);
    segment([6,2,3],[6,0,3]);
    segment([8,0,3],[8,2,3]);
    segment([8,2,3],[10,2,3]);
    segment([10,2,3],[10,0,3]);
    segment([0,1,3],[0,1,4]);
    segment([2,1,3],[2,1,4]);
    segment([4,1,3],[4,1,4]);
    segment([6,1,3],[6,1,4]);
    segment([8,1,3],[8,1,4]);
    segment([10,1,3],[10,1,4]);

    segment([0,1,4],[10,1,4]);

    segment([1,2,3],[1,2,4]);
    segment([1,2,4],[1,1,4]);
    segment([5,2,3],[5,2,4]);
    segment([5,2,4],[5,1,4]);
    segment([9,2,3],[9,2,4]);
    segment([9,2,4],[9,1,4]);

    segment([3,0,3],[3,0,5]);
    segment([7,0,3],[7,0,5]);
    segment([3,0,5],[7,0,5]);
    segment([3,0,4],[3,1,4]);
    segment([7,0,4],[7,1,4]);
Stool

Over the copper structure, a seat made of plywood, a piece of sponge glued to it and a textile material that covers the sponge and the plywood can be attached.
pipediameter=22;
grid=88;
    segment([0,0,0],[5,0,0]);
    segment([5,0,0],[5,5,0]);
    segment([5,5,0],[0,5,0]);
    segment([0,5,0],[0,0,0]);

    segment([1,0,0],[1,0,1]);
    segment([2,0,0],[2,2,0]);
    segment([3,0,0],[3,2,0]);
    segment([4,0,0],[4,0,1]);
    segment([5,1,0],[5,1,1]);
    segment([5,2,0],[3,2,0]);
    segment([5,3,0],[3,3,0]);
    segment([5,4,0],[5,4,1]);
    segment([4,5,0],[4,5,1]);
    segment([3,5,0],[3,3,0]);
    segment([2,5,0],[2,3,0]);
    segment([1,5,0],[1,5,1]);
    segment([0,4,0],[0,4,1]);
    segment([0,3,0],[2,3,0]);
    segment([0,2,0],[2,2,0]);
    segment([0,1,0],[0,1,1]);

    segment([0,0,1],[5,0,1]);
    segment([5,0,1],[5,5,1]);
    segment([5,5,1],[0,5,1]);
    segment([0,5,1],[0,0,1]);

    segment([2,0,1],[2,0,3]);
    segment([3,0,1],[3,0,3]);
    segment([5,2,1],[5,2,3]);
    segment([5,3,1],[5,3,3]);
    segment([2,5,1],[2,5,3]);
    segment([3,5,1],[3,5,3]);
    segment([0,2,1],[0,2,3]);
    segment([0,3,1],[0,3,3]);

    segment([0,0,3],[5,0,3]);
    segment([5,0,3],[5,5,3]);
    segment([5,5,3],[0,5,3]);
    segment([0,5,3],[0,0,3]);

    segment([1,0,3],[1,0,4]);
    segment([4,0,3],[4,0,4]);
    segment([5,1,3],[5,1,4]);
    segment([5,4,3],[5,4,4]);
    segment([4,5,3],[4,5,4]);
    segment([1,5,3],[1,5,4]);
    segment([0,4,3],[0,4,4]);
    segment([0,1,3],[0,1,4]);

    segment([0,0,4],[5,0,4]);
    segment([5,0,4],[5,5,4]);
    segment([5,5,4],[0,5,4]);
    segment([0,5,4],[0,0,4]);

    segment([2,0,4],[2,2,4]);
    segment([3,0,4],[3,2,4]);
    segment([5,2,4],[3,2,4]);
    segment([5,3,4],[3,3,4]);
    segment([3,5,4],[3,3,4]);
    segment([2,5,4],[2,3,4]);
    segment([0,3,4],[2,3,4]);
    segment([0,2,4],[2,2,4]);
    segment([2,0,2],[2,1,2]);
    segment([3,0,2],[3,1,2]);
    segment([5,2,2],[4,2,2]);
    segment([5,3,2],[4,3,2]);
    segment([3,5,2],[3,4,2]);
    segment([2,5,2],[2,4,2]);
    segment([0,3,2],[1,3,2]);
    segment([0,2,2],[1,2,2]);

    segment([2,1,0],[2,1,4]);
    segment([3,1,0],[3,1,4]);
    segment([4,2,0],[4,2,4]);
    segment([4,3,0],[4,3,4]);
    segment([2,4,0],[2,4,4]);
    segment([3,4,0],[3,4,4]);
    segment([1,2,0],[1,2,4]);
    segment([1,3,0],[1,3,4]);
Coffee Table

A piece of transparent or smoked glass can be placed over the metal structure, so that the copper pipes remain visible
pipediameter=28;
grid=140;
    segment([0,0,0],[0,2,0]);
    segment([0,2,0],[1,2,0]);
    segment([1,2,0],[1,0,0]);
    segment([1,0,0],[2,0,0]);
    segment([2,0,0],[2,2,0]);
    segment([2,0,0],[3,0,0]);
    segment([0,2,0],[0,3,0]);
    segment([1,3,0],[4,3,0]);
    segment([0,3,1],[1,3,1]);
    segment([2,2,0],[2,3,0]);
    segment([2,1,0],[3,1,0]);
    segment([3,1,0],[3,3,0]);
    segment([1,1,1],[1,0,1]);
    segment([3,0,0],[3,0,1]);
    segment([3,0,1],[3,1,1]);
    segment([3,1,1],[3,1,2]);
    segment([3,1,2],[3,3,2]);
    segment([3,2,2],[2,2,2]);
    segment([3,1,1],[3,1,2]);
    segment([4,0,0],[4,0,1]);
    segment([3,0,0],[4,0,0]);
    segment([3,0,0],[4,0,0]);
    segment([3,0,2],[4,0,2]);
    segment([4,0,1],[4,2,1]);
    segment([4,2,1],[4,2,2]);
    segment([4,2,1],[4,3,1]);
    segment([3,3,1],[2,3,1]);
    segment([4,0,2],[4,1,2]);
    segment([4,1,1],[4,1,2]);
    segment([4,3,0],[4,3,1]);
    segment([3,3,2],[5,3,2]);
    segment([4,2,2],[4,3,2]);
    segment([3,0,0],[4,0,0]);
    segment([3,0,0],[3,0,2]);
    segment([3,2,0],[3,2,1]);
    segment([3,2,1],[3,3,1]);
    segment([1,3,0],[1,3,1]);
    segment([1,1,0],[1,1,1]);
    segment([0,0,0],[0,0,1]);
    segment([0,0,1],[2,0,1]);
    segment([2,0,1],[2,1,1]);
    segment([0,1,0],[0,1,1]);
    segment([2,3,1],[2,3,2]);
    segment([1,3,2],[1,2,2]);
    segment([2,3,2],[1,3,2]);
    segment([0,3,0],[0,3,2]);
    segment([0,3,2],[0,2,2]);
    segment([2,1,1],[2,1,2]);
    segment([2,1,2],[2,0,2]);
    segment([2,2,0],[2,2,2]);
    segment([2,2,1],[1,2,1]);
    segment([1,1,1],[1,2,1]);
    segment([0,1,1],[0,2,1]);
    segment([0,2,1],[0,2,2]);
    segment([0,1,1],[0,1,2]);
    segment([0,0,2],[0,1,2]);
    segment([0,0,2],[1,0,2]);
    segment([1,0,2],[1,2,2]);
    segment([1,2,2],[2,2,2]);
    segment([4,0,0],[6,0,0]);
    segment([4,3,0],[6,3,0]);
    segment([6,1,0],[6,1,1]);
    segment([6,2,0],[6,2,1]);
    segment([6,2,0],[5,2,0]);
    segment([4,0,2],[5,0,2]);
    segment([5,0,0],[5,0,2]);
    segment([6,0,0],[6,0,2]);
    segment([6,0,2],[6,1,2]);
    segment([6,1,2],[5,1,2]);
    segment([5,3,0],[5,3,1]);
    segment([5,3,1],[5,0,1]);
    segment([5,2,1],[5,2,2]);
    segment([5,3,2],[5,1,2]);
    segment([3,1,0],[6,1,0]);
    segment([4,1,0],[4,2,0]);
    segment([4,2,0],[5,2,0]);
    segment([5,1,0],[5,1,1]);
    segment([6,3,0],[6,3,2]);
    segment([6,3,2],[6,2,2]);
    segment([6,2,2],[6,2,1]);
    segment([6,2,1],[6,0,1]);
    segment([1,0,2],[2,0,2]);
segment([1,3,1],[2,3,1]);The Renderings


As I mentioned at the beginning of my article, rendering the STL files exported from OpenSCAD can be a big plus. It's great to your project as close to reality as possible.
For rendering I used Autodesk Fusion 360, a 3D modeling, CAD, CAM program, free for non-commercial projects. Fusion 360 is a very good tool although it is relatively difficult to master by beginners of computer assisted design.This is the reason why it is good to follow some tutorials in the first phase. There are many of them on Fusion 360 support site or on Youtube. There is also a good class here on Instructables - 3D Design Class and a great tutorial about renderings - Render Models in Fusion 360.
I attached above the renderings I made of the four projects, bellow there are a turntable video of the "coffee table" project and also a short video on how I worked in Fusion 360 to render the same project (turn on closed captions for comments).
Some Final Thoughts
- this design method, which consists of creating a virtual object, saves you from spending to much money and time approaching a real construction;
- the script can be improved a lot; - this designing method can be used of course also for other kind of pipes: PVC, steel etc. - I think there is also room for using other types of fittings (for example an 45 degrees angle elbow); - some really intricate objects can be designed with my method;
Later Edit - an Example of Practical Realization


Below I would like to show you how a practical implementation of the first project (the office lamp) from step 2 would look.
Although for the project I proposed pipe and fittings with 18mm diameter eventually I used 15mm diameter material. For cutting I used a device as in the photo above. For gluing the pieces I bought two types of adhesives, I will experiment with them later which of them is a better solution. So far I have cut the necessary pieces and built everything as a puzzle. Because of this it is noticeable that not all connections are at 90 degrees or perfectly parallel :) I'm still thinking how to design some devices or templates to help me to glue the components. To make the lamp may not be necessary these templates but the execution of more complicated projects would not be possible without them.
You can see that for this project what copper parts were needed(photo above):
- 20 pcs 90 degree elbows,
- 20 pcs tees,
- 8 pipe pieces 90mm long,
- 42 pipe pieces 36mm long.
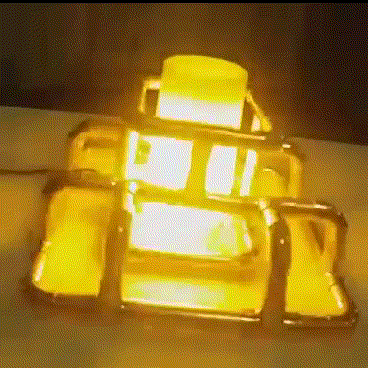
Inside the copper structure I put a simple lamp, with white lampshade. I found also a lamp, (made from plastic) that can be powered by a USB source or three AAA batteries. What I liked most is that it has a sort of candle effect. Together with copper it seems to me that it looks nice, you can see this in the short gif bellow.
As for how close to reality is the rendering of the project I will let you judge through the above photos. :)