Burning Atmega328-pu and Atmega328p-pu Bootloader
by shaditheman123 in Circuits > Microcontrollers
78744 Views, 58 Favorites, 0 Comments
Burning Atmega328-pu and Atmega328p-pu Bootloader
Burning the boot loader in an atmega328 could be somewhat tricky but if u follow these steps correctly youll be able to bootload any type of atmega328 micro controller ..
.
.
.
"setting Up the Hardware"

-List of stuff you'll need:
- An Arduino board (any type)
- 18-22pf capacitors (x2)
- 16 MHZ oscilator
- Breadboard
- 10 Kohm resistor
- Jumper wires
- ATMEGA328-PU or ATMEGA328P-PU
- Bread board
.
.
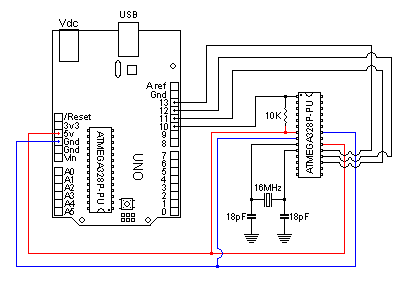
Assemble everything as shown in the figure (on a bread board) :
- arduino board (pin10)->breadboard (pin1)
- arduino board (pin11)->breadboard (pin17)
- arduino board (pin12)->breadboard (pin18)
- arduino board (pin13)->breadboard (pin19)
- (pin 7 ) and (pin20) of breadboard ->+5v of arduino board
- (pin8) and (|pin 22) of breadboard ->gnd of arduino board
- 10 Kohm resistor from(pin 1 ) to +5V
-16 MHZ oscilator from (pin 9 ) to (pin 10)
- 18-22pf caps : first one from (pin 9) to gnd ,second one from pin 10 to gnd
.
.
.
.
..
Now for the hard part made easy .
.
.The software.
"The Software''

Now just unplug the +5v and gnd jumper wires before u upload the Arduino isp code.
To upload the code just open the Arduino IDLE which is the place where u type codes.
click on files/examples/Arduino ISP and another screen pops up make sure u have the correct board selected (not the atmega microcontroller on the breadboard).
in my case its arduino uno and press upload after uploading remove the usb cable of the arduino ..
now before plugging the wires back u have to make some changes to some specific files ....
make a copy of the arduino software not the IDLE but the intire file uve installed so that the changes won effect the origonal copy.
ok now enter the copied arduino file go to examples than arduino ull c a file called boards , just delete it and replace it with the one attached in this step.
now one last thing ,go back once enter tools /avr/etc replace that avrdude file with the one i attached .
.
.
.
.
.Now close everything and enter the copied arduino file go to tools / boards and u should get Atmega 328 on a breadboard(8 HZ internal clock),select it than scroll down to programmer(in tools also) and select arduino as isp...sellect the correct comm port...
.
.
.
.after uve prepared all of that softaware plug in the usb and the +5v and gnd wires wait for the com port to appear sellect it and select bootloader and voila !!!!! it should upload..
.
.
.
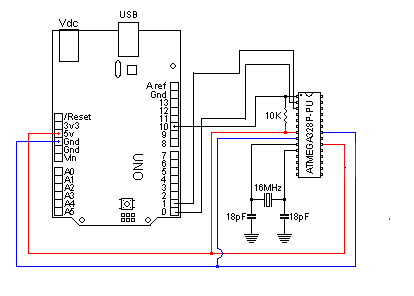
.now to make sure it works keep all the wires as they are :
- just remove the 3 wires..''arduino board (pin11)->breadboard (pin17), arduino board (pin12)-> breadboard (pin18), arduino board (pin13)->breadboard (pin19)'' shown in step one ,and connect (pin 0) of arduino board to(pin 2 ) of breadboard ,and pin(1) of arduino board to (pin 3) of breadboard.
- and most importantly gently remove the micro controller from ur arduino board.
.
.
.
.now go to examples /basics /blink ....change ( pin 13) in the code to (pin 2).(make sure u restore the programmer to AVRISP mkII in the tools) and connect a led positive end on pin 4 of breadboard to gnd and upload ...it should start blinking ......
.
.
.
if u want to keep uploading the arduino this way u have to repeat step 2 all over again everytime u want to upload something new ...but u can simply remove the atmega from the breadboard and replace it with the one on the arduino board but sellect the micro controller specifications not that of the board(which is atmega328 on breadboard(8 MHZ internal clock)).
.
.
.
plz comment and update me on ur progress.