You & Me - Bronze Statuettes
by trompevenlo in Craft > Parties & Weddings
4711 Views, 25 Favorites, 0 Comments
You & Me - Bronze Statuettes
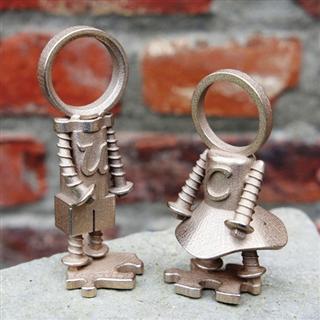
Prerequisites

Here is what you need:
Designing a 3D model can be a complex and time-consuming task and a description of the entire process would be too much for a single instructable. Therefore, I have prepared a low-poly version of the »You & Me« statuettes and made it available for download. This can give you a head-start on 3D modelling and for access to the 3D files, I am only asking that you
As soon as your email address is registered with the file, you are ready to proceed to the next step.
-
3D design:
A copy of Google Sketchup from http://sketchup.google.com/download/ -
File format conversion and print preparation:
(a) A copy of Meshlab from http://meshlab.sourceforge.net/
(b) A copy of Netfabb Studio from http://www.netfabb.com/download.php
Designing a 3D model can be a complex and time-consuming task and a description of the entire process would be too much for a single instructable. Therefore, I have prepared a low-poly version of the »You & Me« statuettes and made it available for download. This can give you a head-start on 3D modelling and for access to the 3D files, I am only asking that you
-
request an invitation at: http://www.indiegogo.com/you-n-me?c=comments&a=560703
Please mention your email address in the comment field. It is recommended to check the "keep private" checkbox.
As soon as your email address is registered with the file, you are ready to proceed to the next step.
3D Design
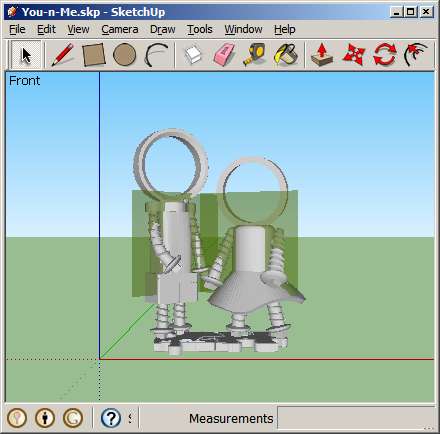
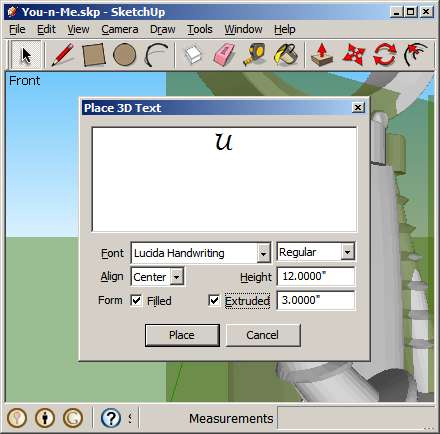
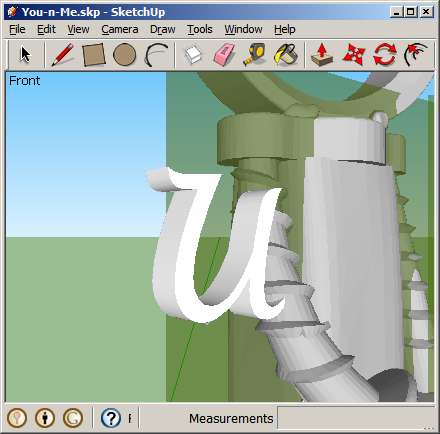
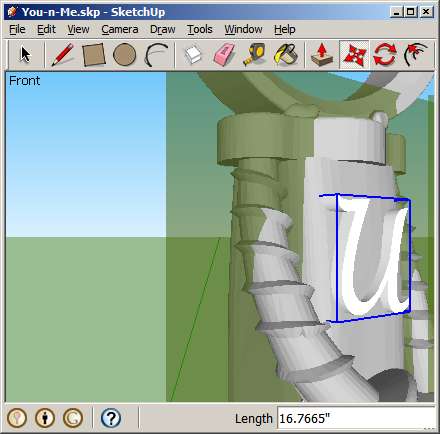
In this step, you will work in Google Sketchup to personalize the base model with your initials.
-
Download and open the model file from
http://sketchup.google.com/3dwarehouse/details?mid=eb546db845a53579afd3d1af2f3ec608 -
Click Edit - Unhide - All
Two green helper planes will appear. These planes will make it easy to position the initials that you will be adding now. -
Click Tools - 3D Text
to open the 3D text dialog. Type your initial into the large input field and set the remaining parameters:- Font: Lucida Handwriting (or any other font of your choice)
- Align: Center
- Height: 12.0"
- Extruded: 3.0"
- Click [Place] and move the mouse cursor to a spot on the green helper plane, but do not try to position the letter directly on the body. Click to lock the letter on the green plane.
- Click the letter and use the mouse to move it to the desired spot on the body. Click again to lock it in its new position.
- Repeat step 3-5 with the second initial on the other plane and body.
- When satisfied with the positions of the initials, click the black arrow on the toolbar, followed by a click on one of the green planes. They are no longer needed. Press the [Delete] key to remove them.
- Save your model file.
Prepare for 3D Printing
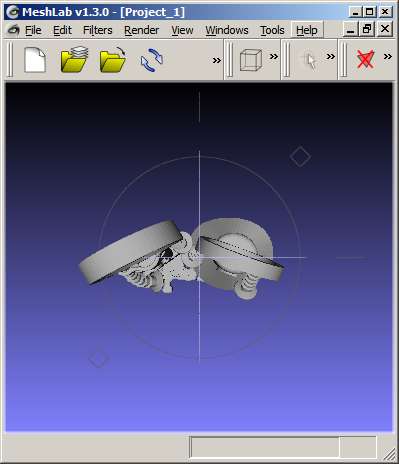
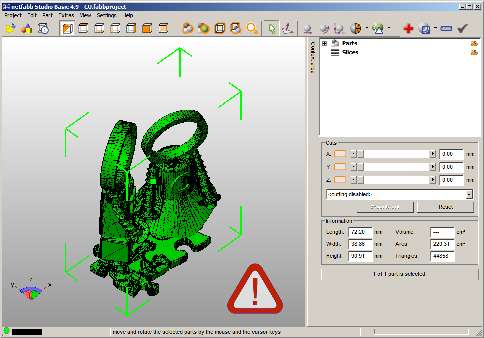
In this step, you will convert the Google Sketchup file into the proper file format and size for printing.
- While still in Google Sketchup, click File - Export and save the file in the "COLLADA / .DAE" format. You may now close Sketchup.
- Open Meshlab, click File - Import Mesh and open the previously saved .DAE file.
- Click Export Mesh As ... and resave the file in the "Alias Wavefront Object (*.obj)" format. You may now close Meshlab.
- Open Netfabb Studio, click Project - Open and open the previously saved .OBJ file.
- The file is not ready for printing, yet. Click the red cross on the toolbar, followed by [Automatic Repair], followed by [Apply Repair].
- Click Part - Export part - as STL. Another repair dialog may come up. Click [Repair] again, followed by [Export]. You may now close Netfabb Studio.
Submit to 3D Printing Service
The STL file from the previous step can now be uploaded to a 3D printing provider. I am currently aware of these three providers of metal printing:
All providers use the same process for creating a metal object from digital files. The following 5 min video describes the process in detail::
When you upload your file to one of the service providers, you will immediately recognize that 3D metal printing is not cheap at all. Your model will likely also be more expensive than what I am offering at my campaign.
Before ordering your model from one of the service providers, please recognize that the instructable was written for educational purposes only. In that context, the file size and resolution of the downloadable 3D model has been starkly reduced.
As a consequence, triangular artifacts (three-dimensional "pixels") will be visible on all statuettes printed from the downloaded 3D file. If you want a high-quality model without visible artifacts, please consider contributing to my funding campaign where I show and offer the same statuettes in a considerably higher resolution.
- i.materialise http://i.materialise.com
- Shapeways http://www.shapeways.com
- Ponoko http://www.ponoko.com
All providers use the same process for creating a metal object from digital files. The following 5 min video describes the process in detail::
Concluding remarks
When you upload your file to one of the service providers, you will immediately recognize that 3D metal printing is not cheap at all. Your model will likely also be more expensive than what I am offering at my campaign.
Before ordering your model from one of the service providers, please recognize that the instructable was written for educational purposes only. In that context, the file size and resolution of the downloadable 3D model has been starkly reduced.
As a consequence, triangular artifacts (three-dimensional "pixels") will be visible on all statuettes printed from the downloaded 3D file. If you want a high-quality model without visible artifacts, please consider contributing to my funding campaign where I show and offer the same statuettes in a considerably higher resolution.