Windows 7 Installation Instructable
by BrianC96 in Circuits > Microsoft
1354 Views, 7 Favorites, 0 Comments
Windows 7 Installation Instructable
Table of Content
- Introduction
- Data Backup
A) Backing up files on USB drive (Go to step 3)
B) Backing up files to DVD (Go to step 12)
C) Backing up files online (Go to step 18)
- Image Burning (if needed) (Go to step 25)
- Windows Installation (Go to step 38)
- Installing Antivirus (Go to step 60)
- Putting Files Back
A) Extracting files from USB drive (Go to step 79)
B) Extracting files from DVD (Go to step 87)
C) Extracting files from online (Go to step 93) - Conclusion
Introduction
Reinstalling windows is a full proof and easy way of fixing your software related computer issues. After a while, most computers start to slow down whether it’s due to viruses, malware, or just months or years of piled up junk from applications. Sometimes, your computer speed is fine but something is making it crash and you can’t pinpoint the cause. For all these issues, and many more, the decision to re-install Windows might be the best solution to start a fresh computer usage experience. It’s worth mentioning right off the bat that this process will delete ALL of your files. This is why it’s imperative for you to backup all of your important data beforehand. This tutorial will walk you through the process, and you’ll be able to do this quickly and effectively. Also, make sure to carefully read the required materials/information section before you start. From beginning to end, you should set aside about 90 minutes of your time to be on the safe side. Don’t worry, you don’t have to sit in front of your screen the entire time!
Backing Up Files
A) Backing Up Files to USB Drive
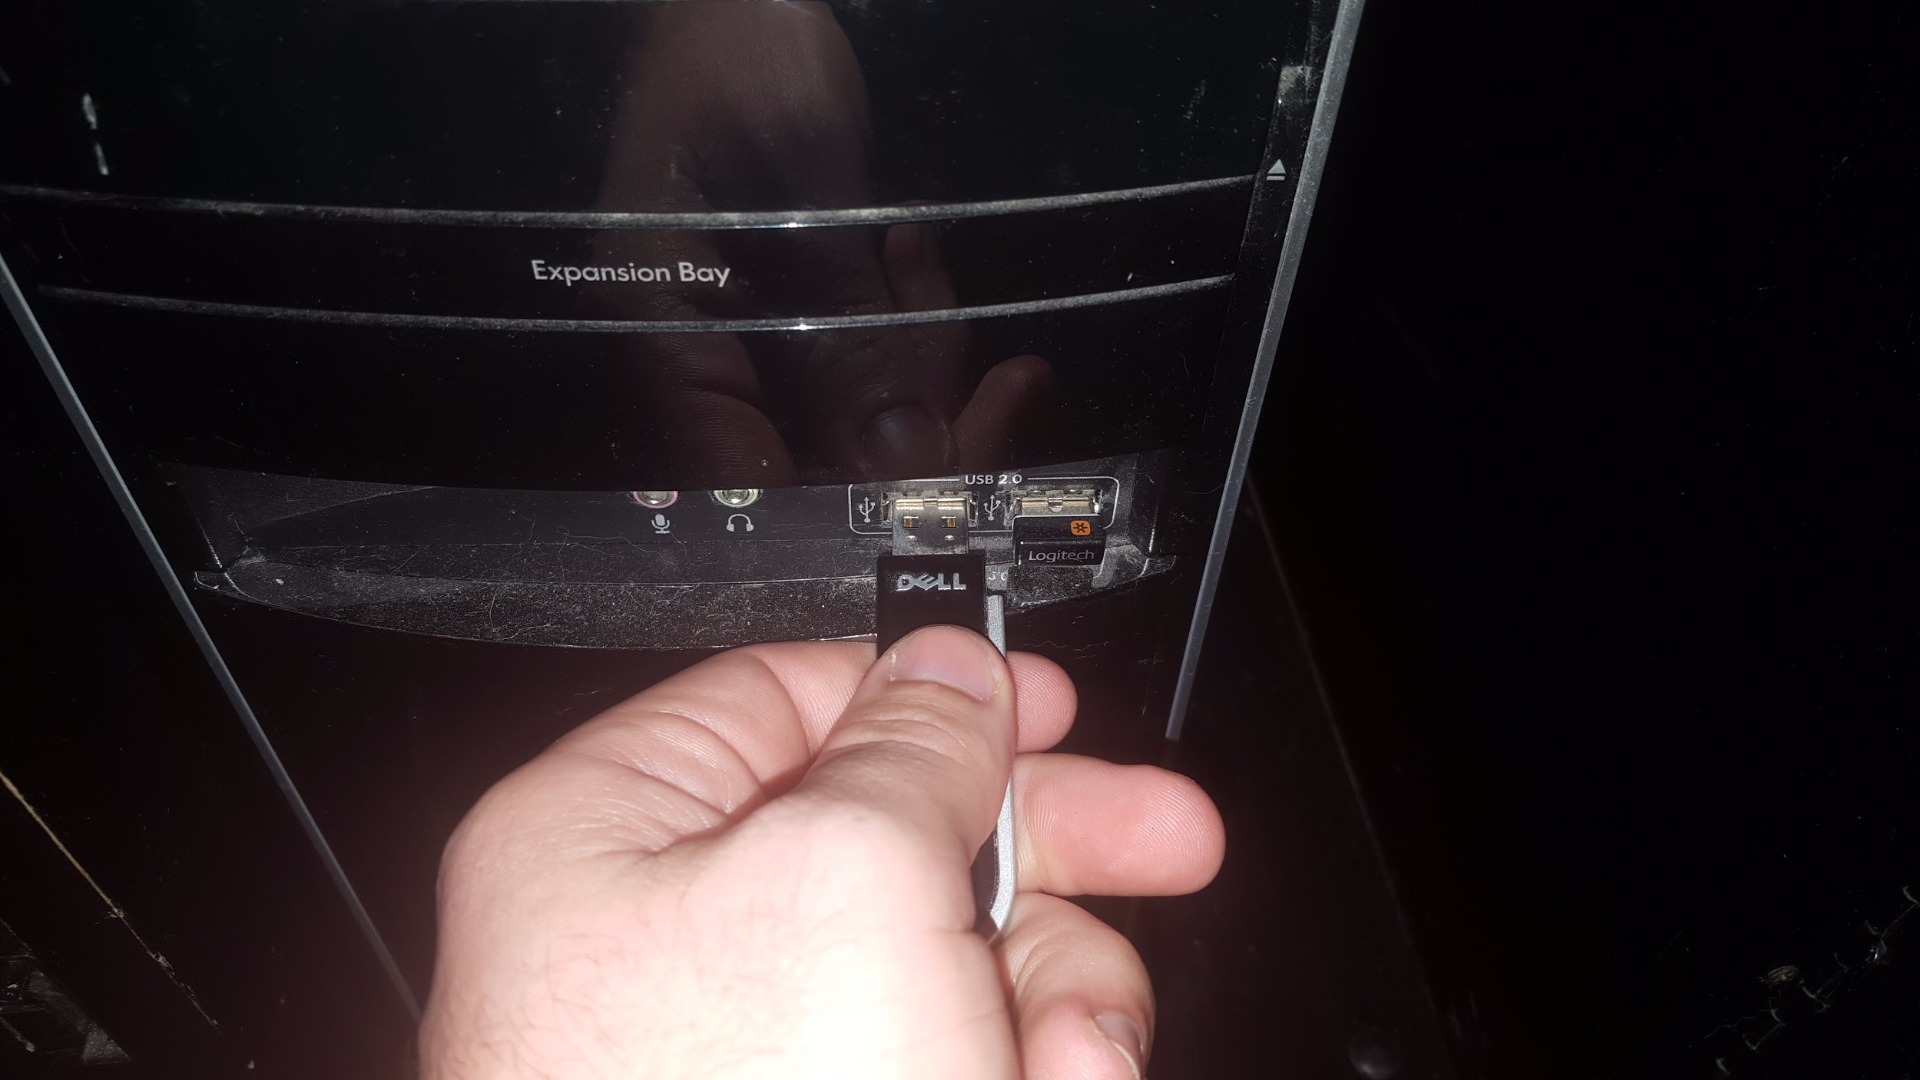
- Plug the USB drive into the computer's port (port may be in the back of the computer)
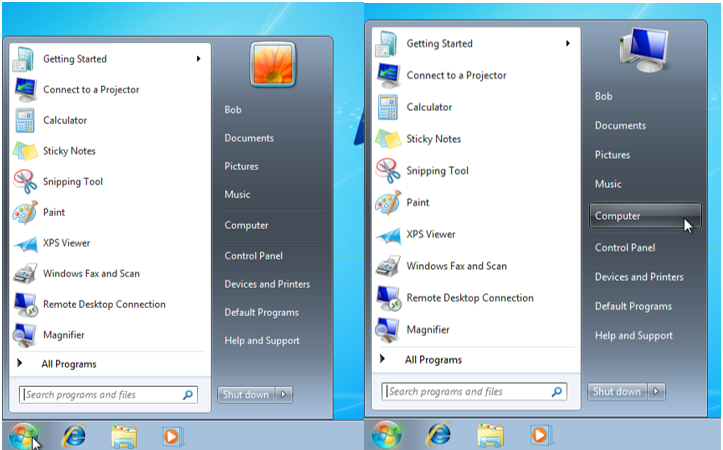
- Open "My Computer" from the start menu.
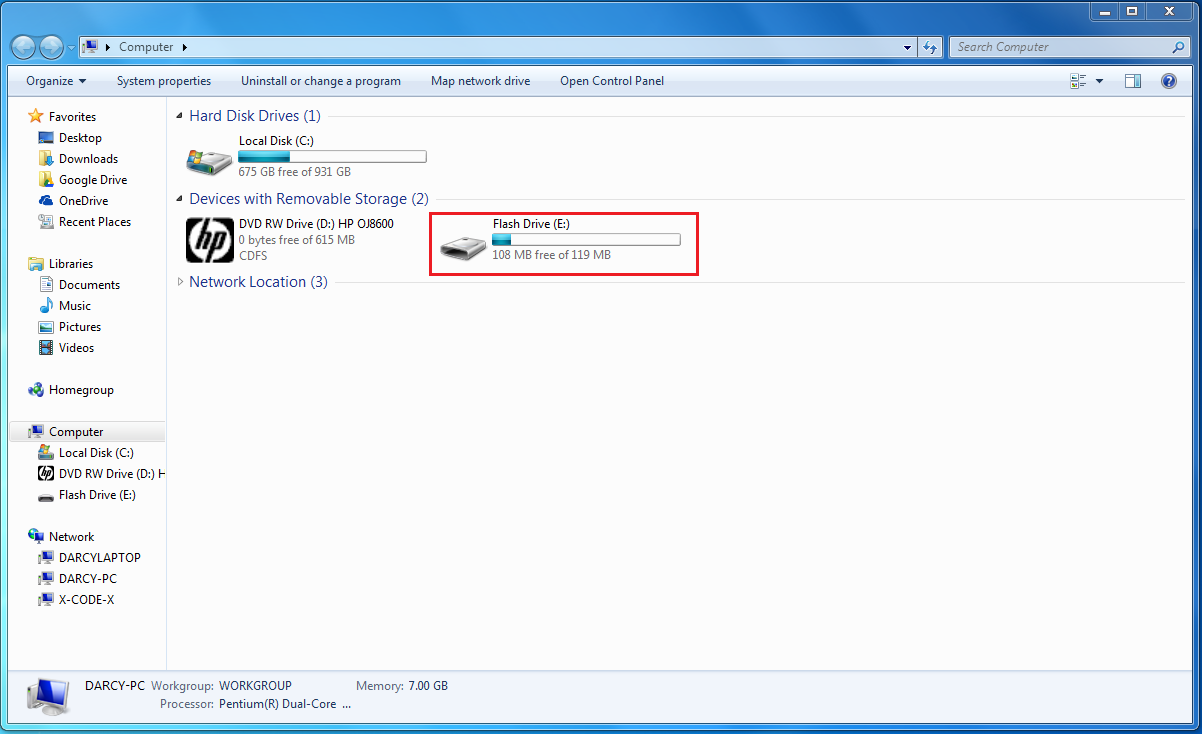
Note: This window should pop up on the screen.
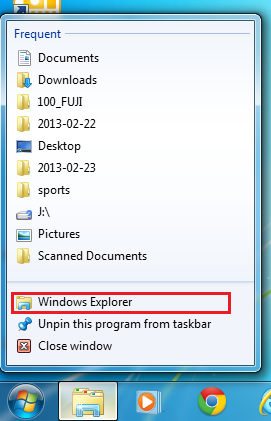
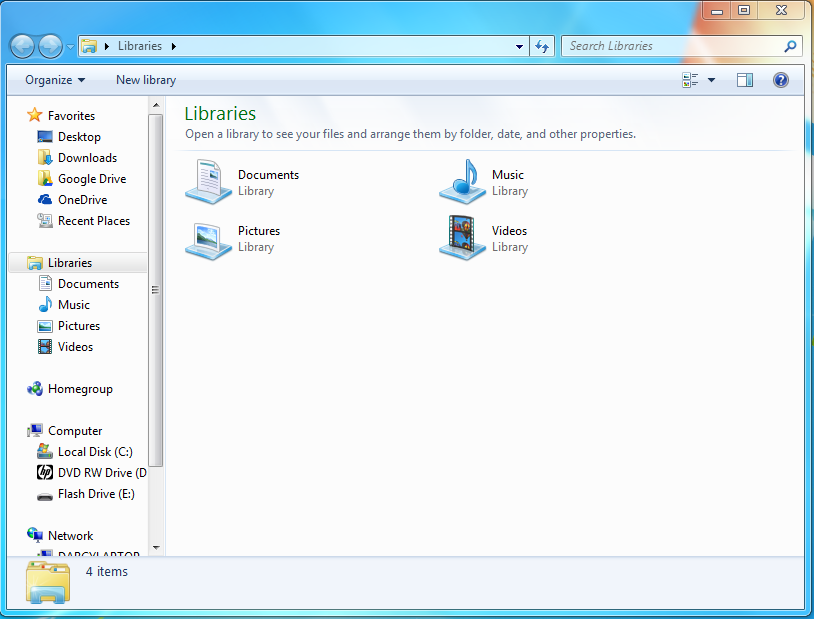
- Open up a secondary "My Computer" by right clicking folder icon then left clicking on Windows Explorer.
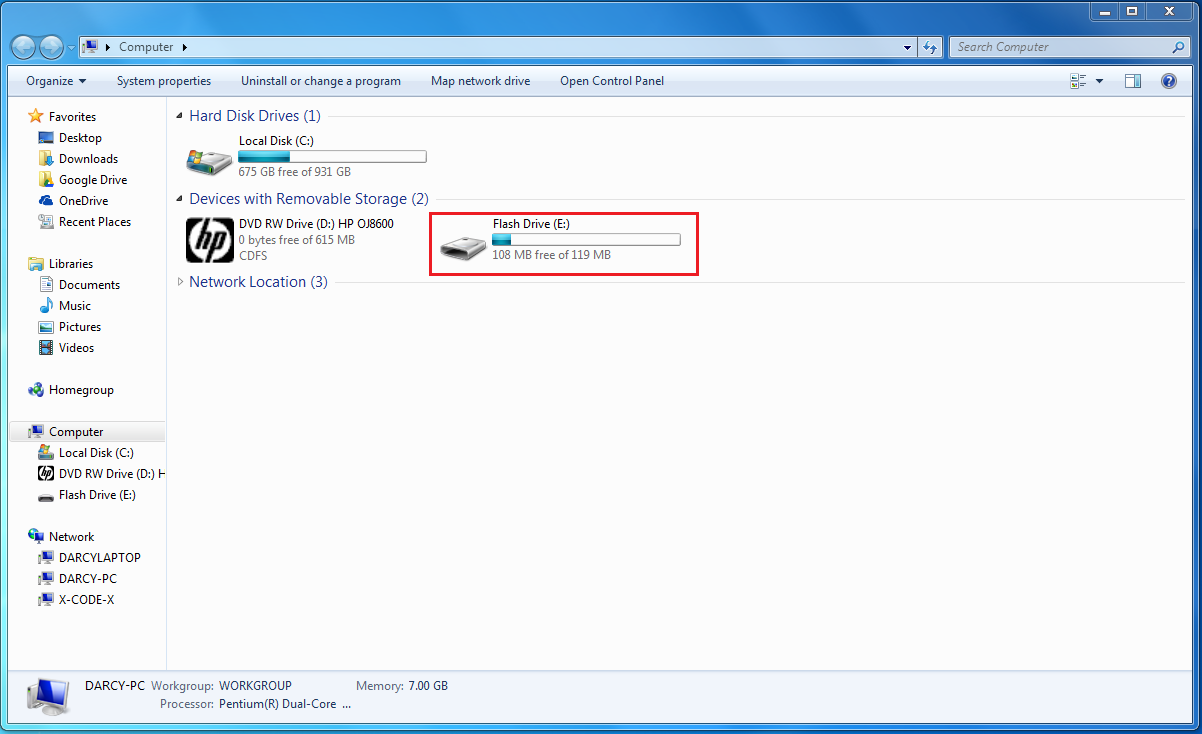
- Navigate to the usb drive on one of the windows.
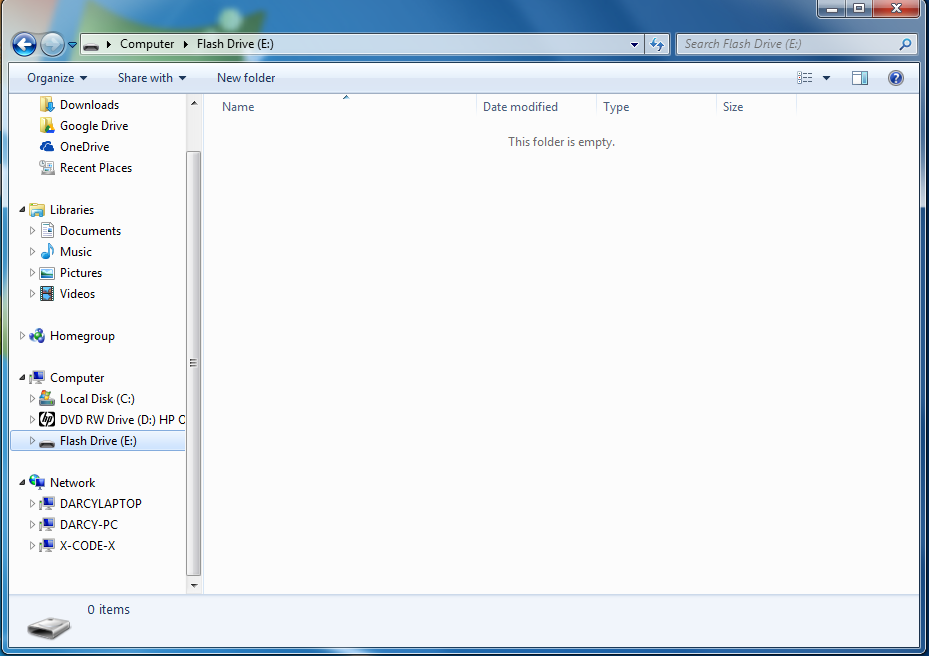
- Double click on flash drive to open up it up.
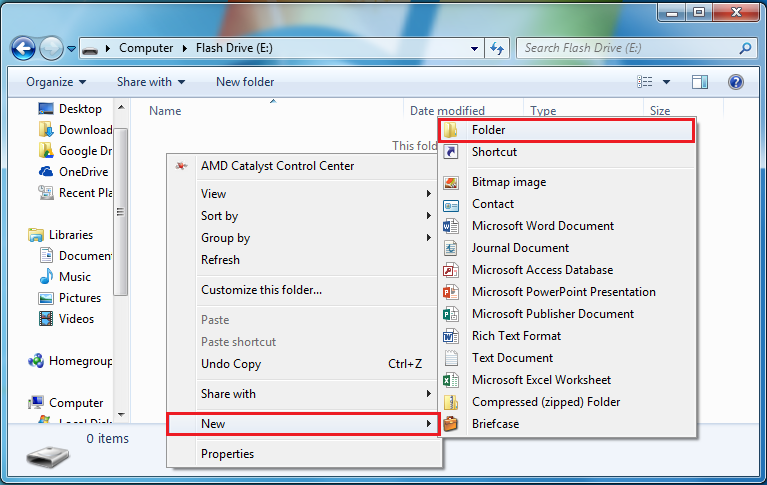
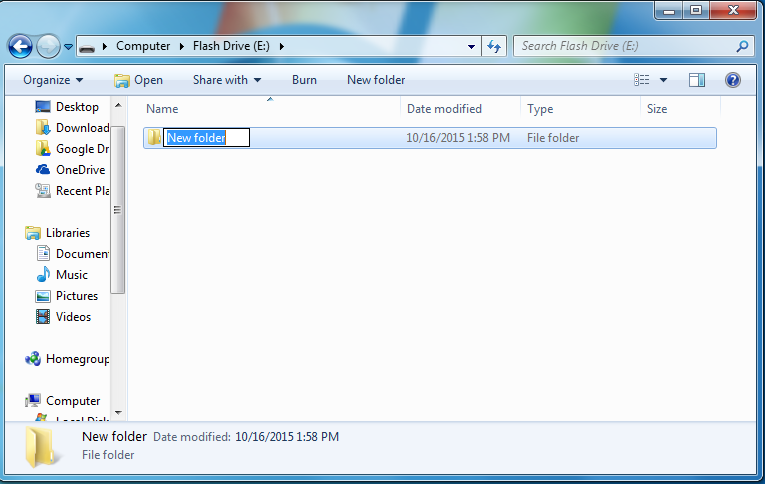
- Right Click on any empty space in the Flash Drive to create a new folder. Name the file and press the Enter key.
- Double click the newly made folder.
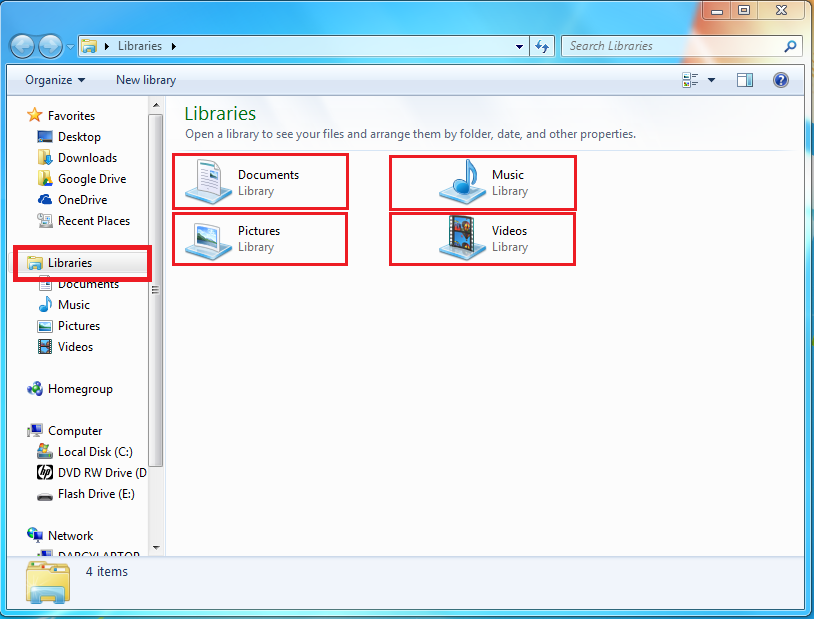
- Navigate to the desired library you want to back up.
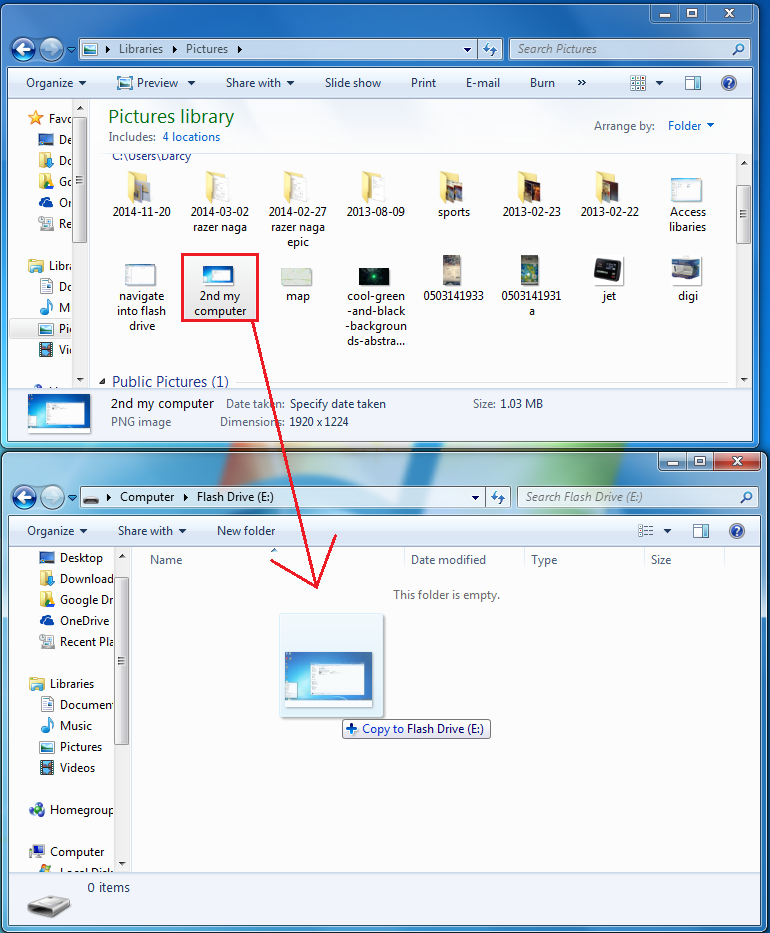
-
Put your USB drive and your library window side by side.
- Using your mouse, click and drag the files and/or folders you wish to back up from your library into your USB drive.
Note: Large files may take a while. You will see a progress bar for the duration of the process.
- Repeat this process for all your library folders you wish to backup.
- When you are done, close your USB drive window.
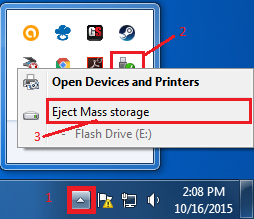
- Eject the Flash Drive Safely from your computer by right clicking on the safely eject hardware button located in the bottom right corner of the screen.
B) Backing Up Files to DVD
- Insert a blank DVD into the CD drive.
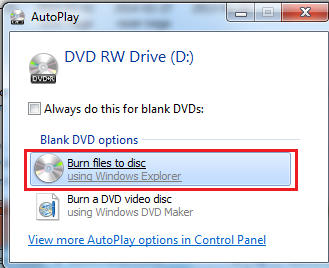
- Select burn files to disc.
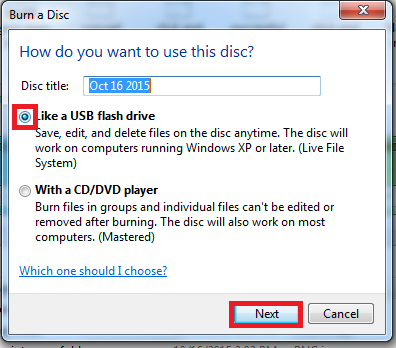
- Name the disk, select the "Like a USB flash drive" option, and then click next.
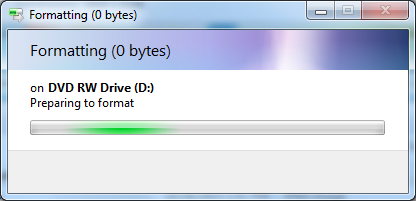
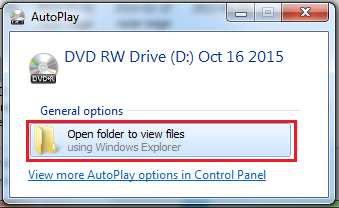
- Wait until Windows is done formatting the disk and getting ready.
- Select "Open folder to view files"
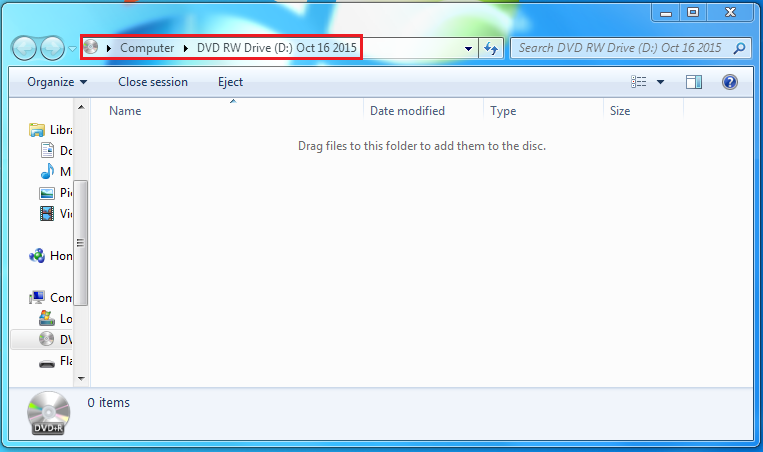
- You will then be taken to an Empty window. Keep it open.
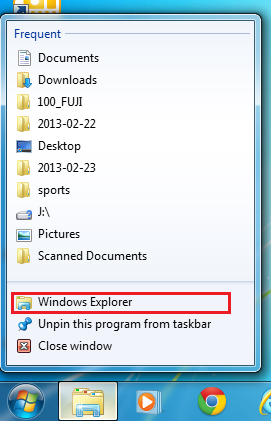
- Open up a secondary window by right clicking the folder icon and then left click on windows explorer.
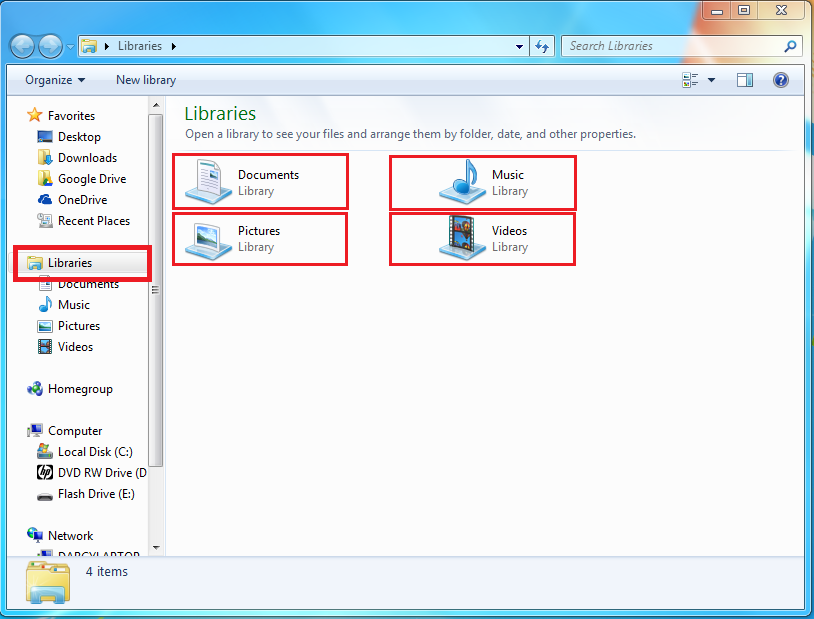
- Click "Libraries" on the left.
- Select the desired library you wish to back up by double clicking the folder.
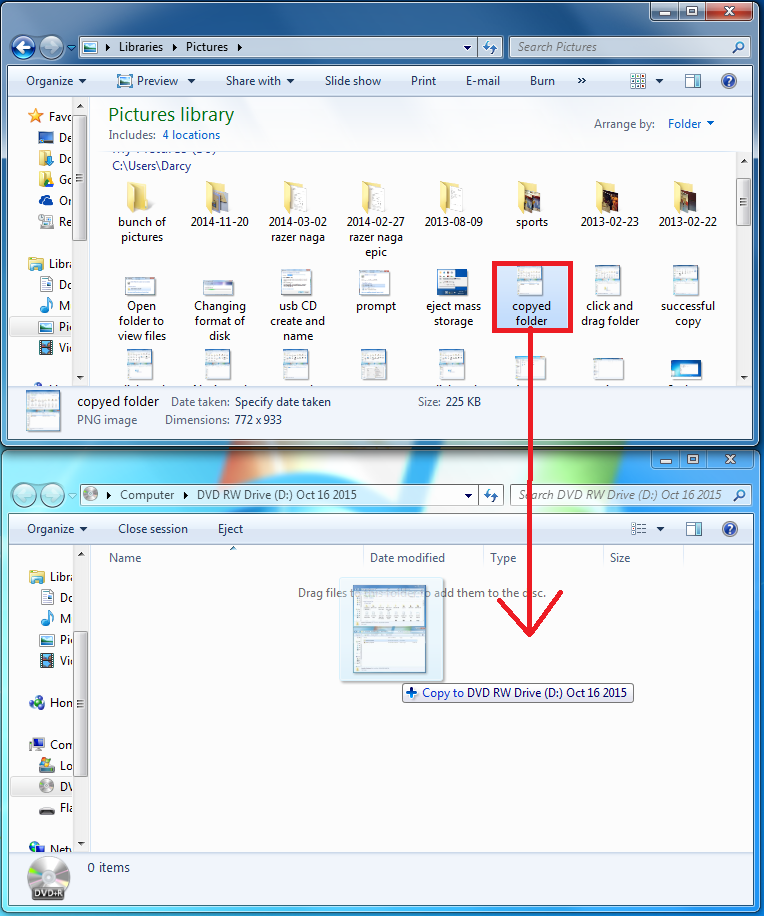
- Put your CD/DVD drive and your library window side by side.
- Using your mouse, click and drag the files and/or folders you wish to back up from your library into your CD/DVD drive.
Note: Large files may take a while. You will see a progress bar for the duration of the process.
- Repeat this process for all your library folders you wish to backup.
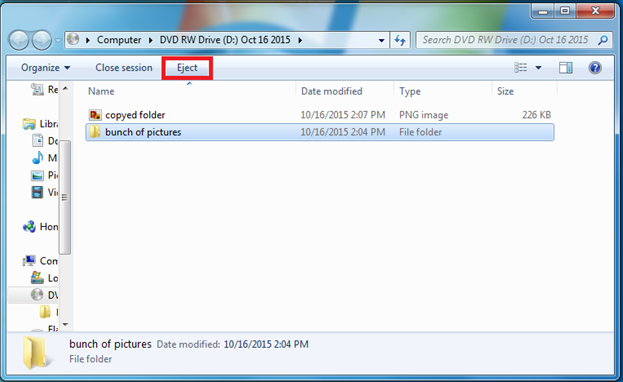
- Eject the disc
Note: The disk should come out after 10-30 seconds. It will varie on different computers.
C) Backing Up Files Online
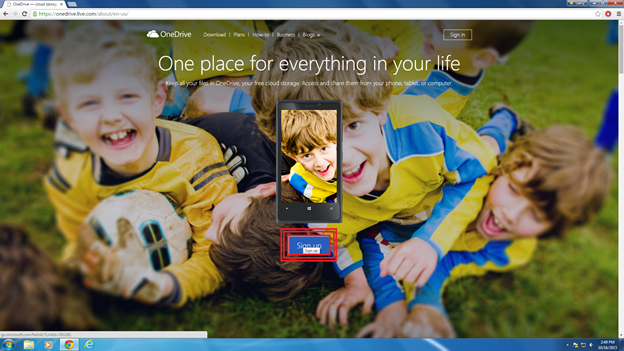
- Open up your favorite web browser.
- Navigate to: http://onedrive.live.com
- Create a new account by clicking on sign up.
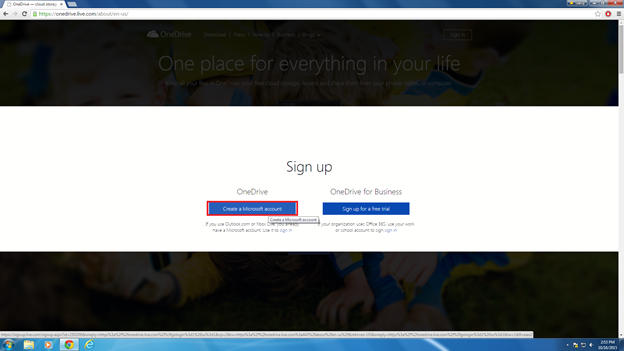
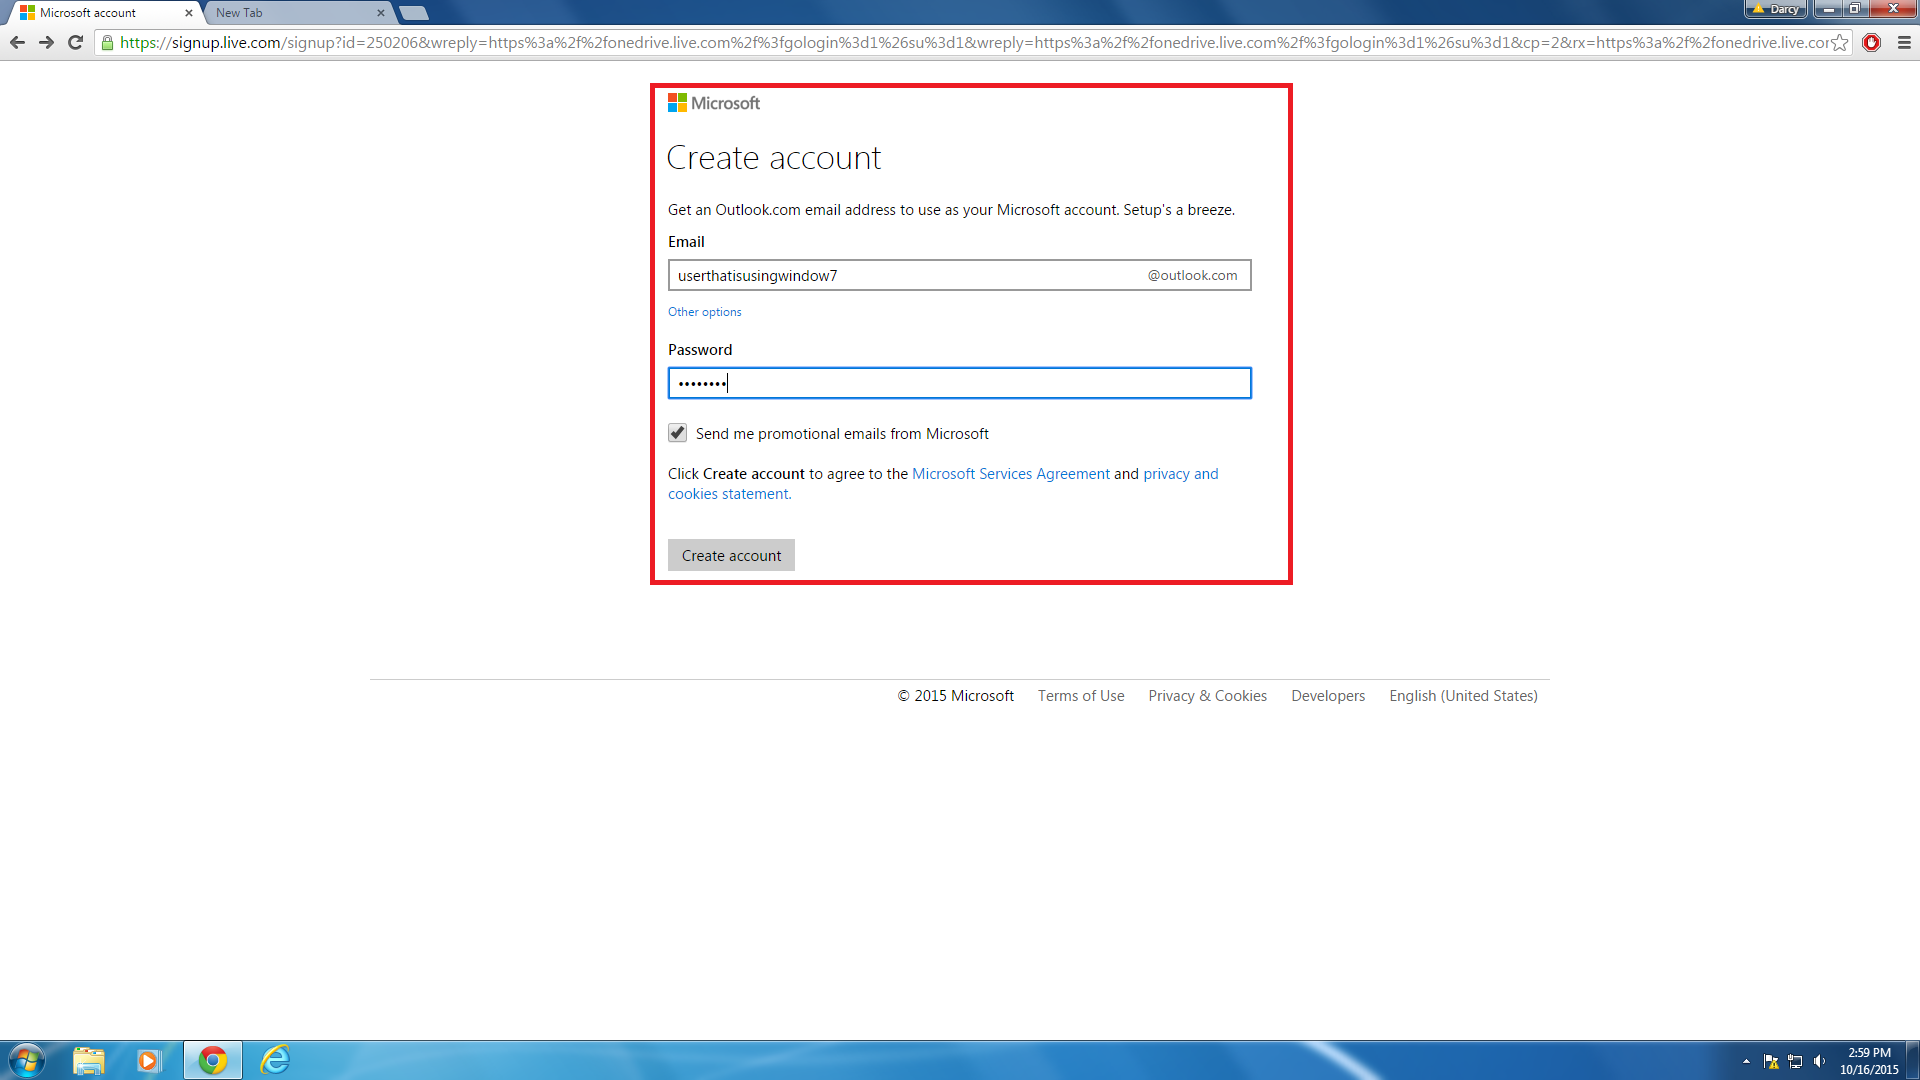
- Click on "Create a Microsoft account".
- Create your new email with a someone@outlook.com extension.
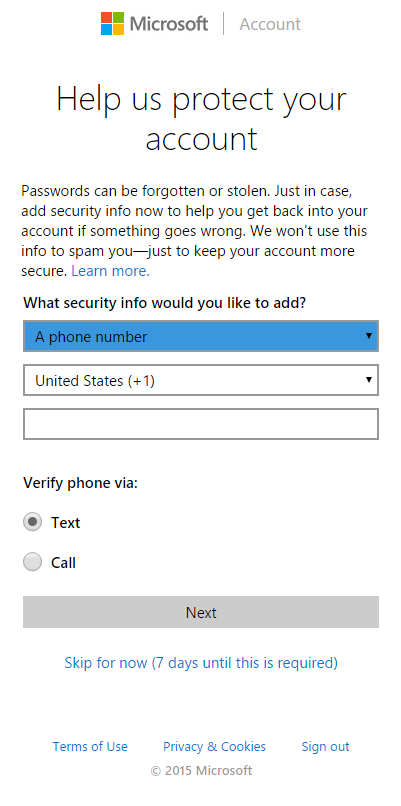
- Enter a phone number for extra profile protection. You can skip but you need to add a number 7 days after creating the email.
- Once you are done with the sign-up process, you will be taken to the Onedrive's main page.
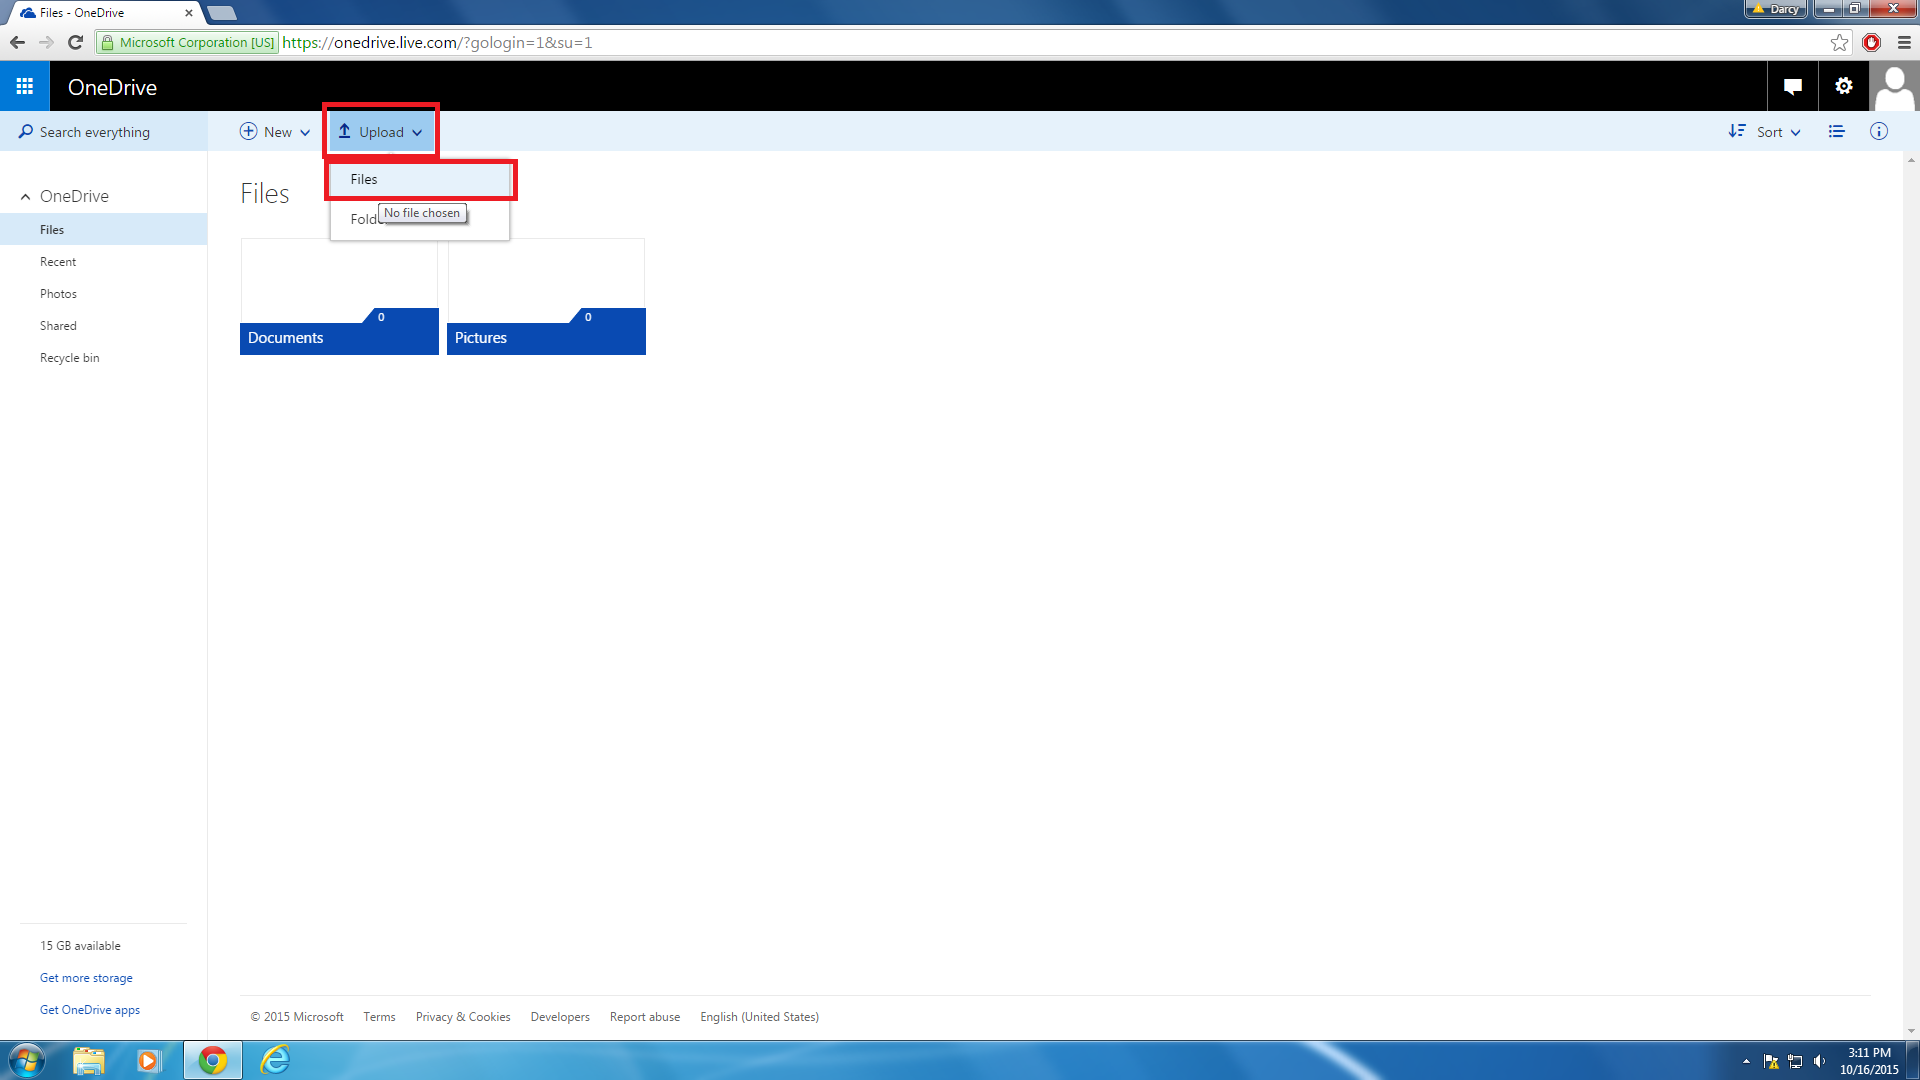
- If you wish to select a file, click the upload button and select "Files".
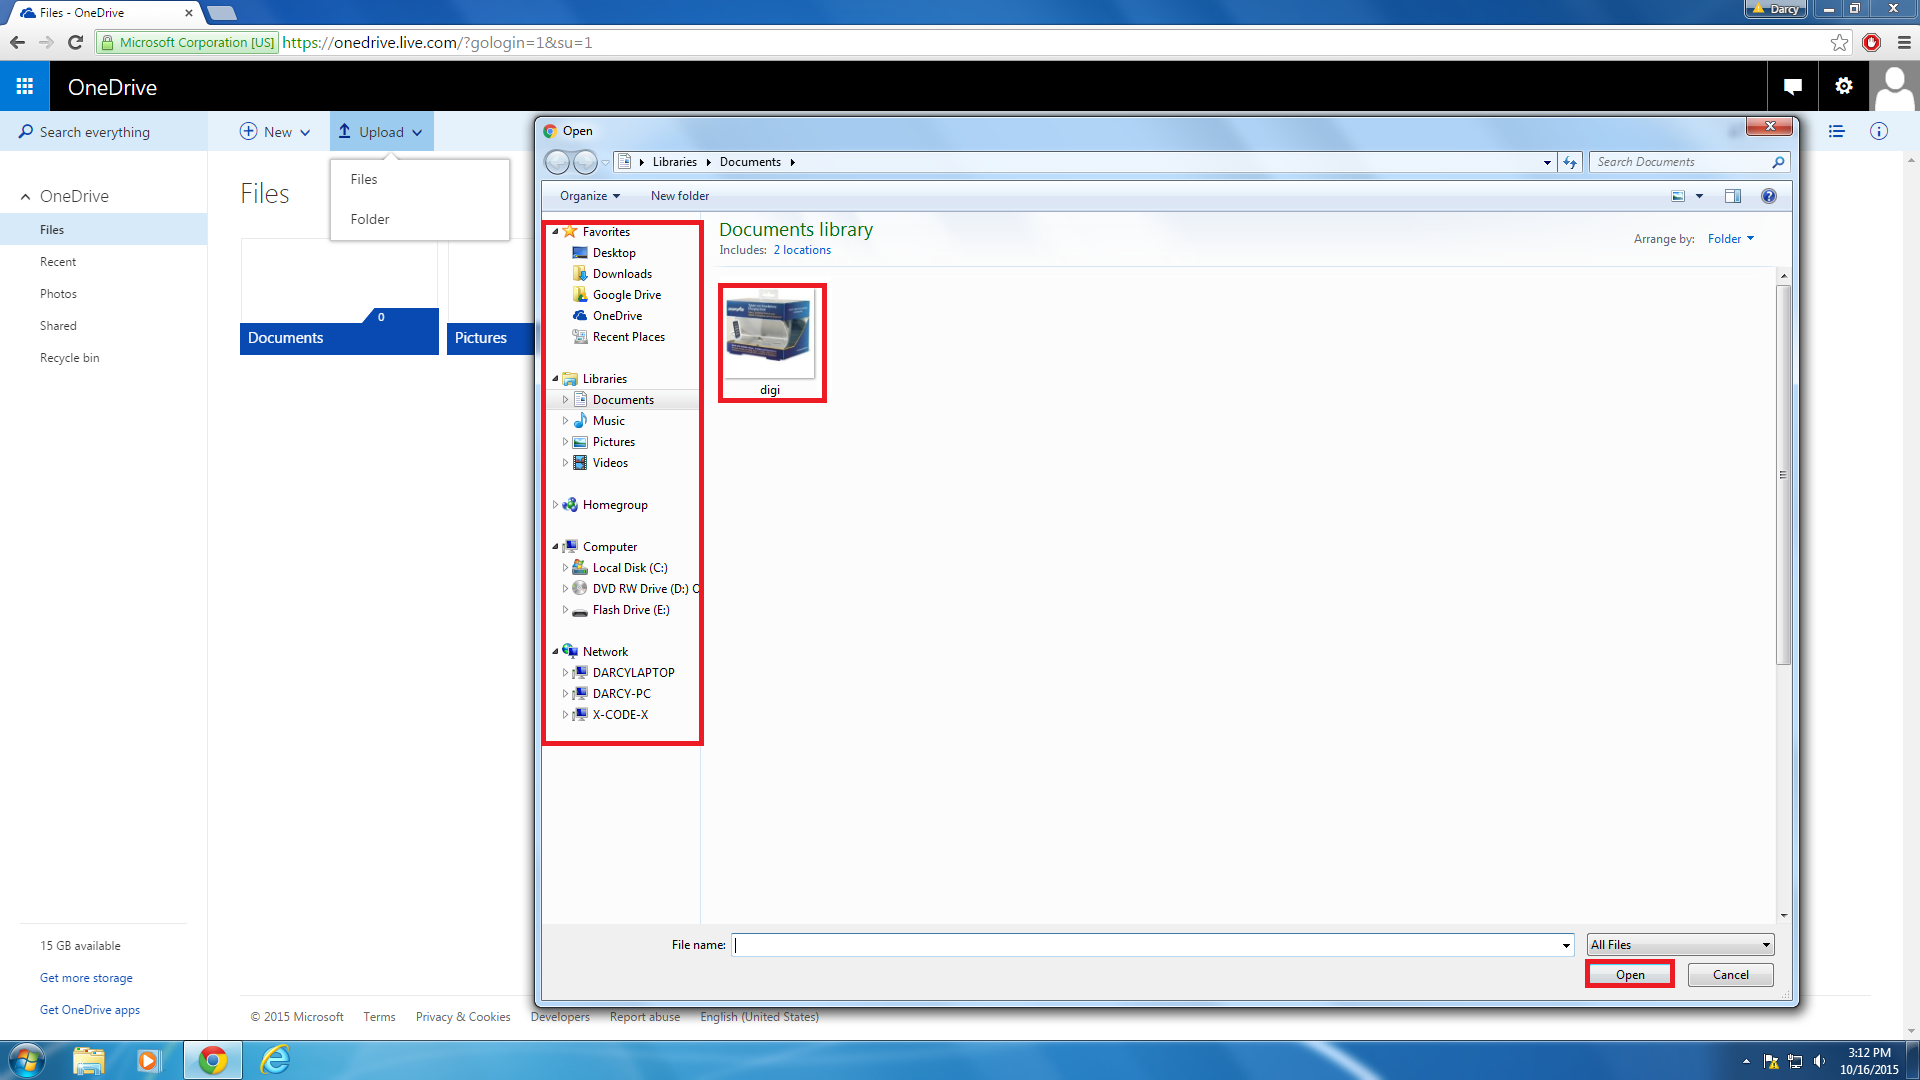
- Navigate using the side. Click on the desired file or click on item then click on open.
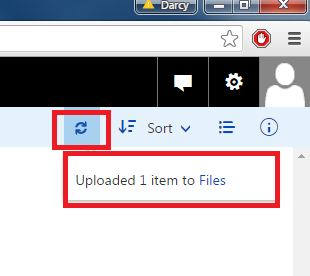
- On the top left of the page, you will notice the file being uploaded.
- Once it's done, it will appear on the Onedrive page.
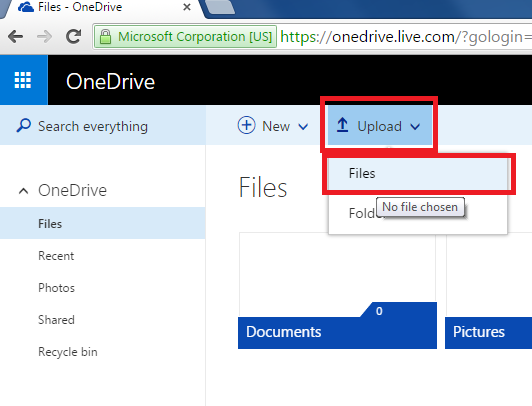
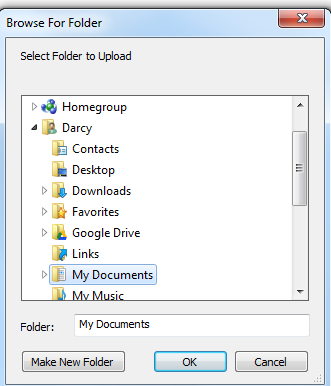
If you wish to select an entire folder instead
- Click upload
- Click folder
- Select the folder you wish to upload
Once it's done, it'll appear on Onedrive's window
Image Burning (if Needed)
Before you start:
Make sure you have:
● Your Windows product key (xxxxx-xxxxx-xxxxx-xxxxx-xxxxx)
● Sufficient data storage available on a computer, USB or external drive for the download (at least 4GB).
● A blank DVD
- Go to: https://www.microsoft.com/en-us/software-download...
- Enter your Windows Product Key
- Download the appropriate version of Windows (This download time will depend on your internet connection.)
Note: If unsure, download the X86 (32-bit) version. This version will work on any computer. NOTE: Please save the file in a location you can easily access and remember. This will make the burning process quicker, and more convenient.
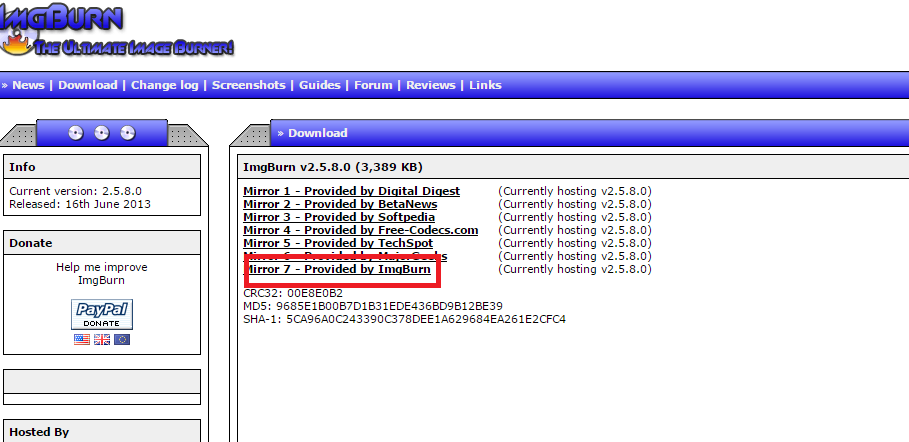
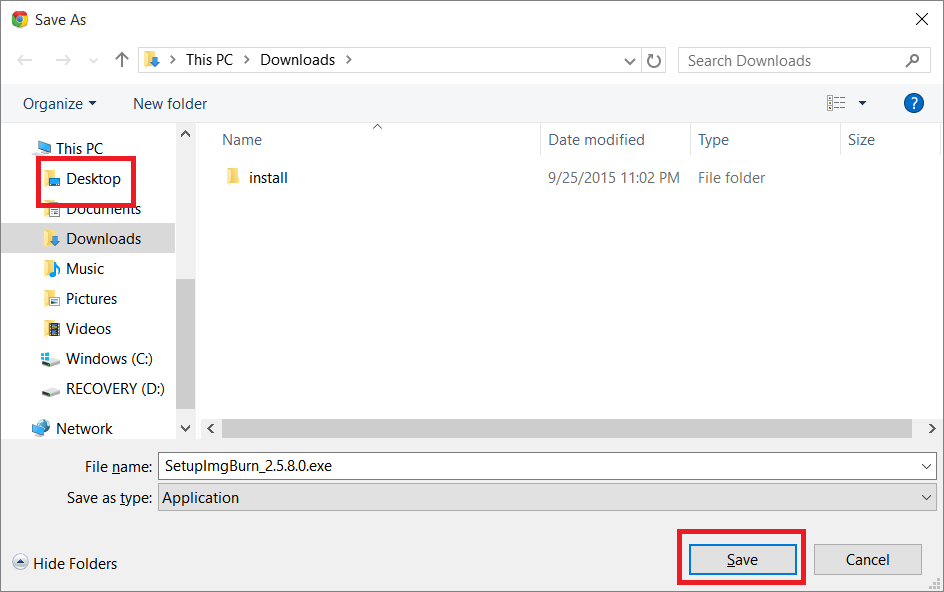
- Go to: http://imgburn.com/index.php?act=download
- Click the link highlighted in red.
- Save the installer in a convenient place. Here we chose the desktop for convenience and ease of access.
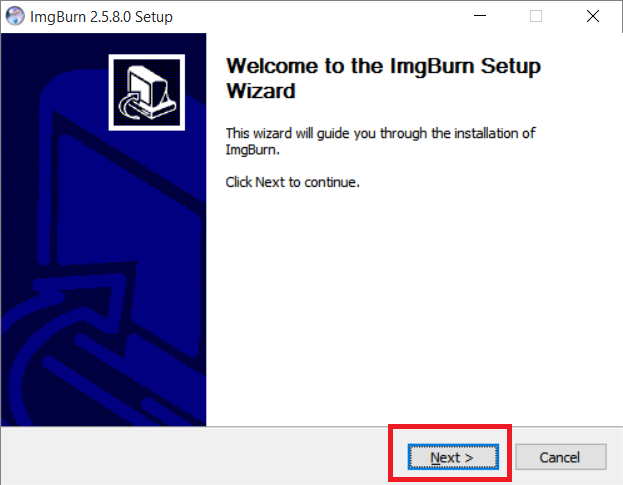
- Double click the installer file you just downloaded (shown above)
- Click "Next"
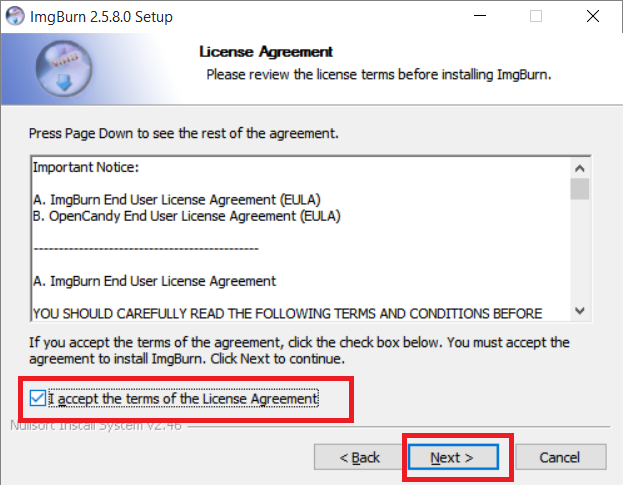
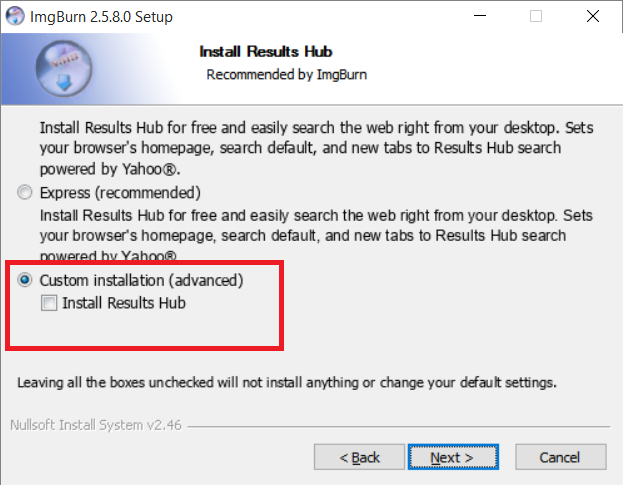
- Select “Custom Installation (Advanced)" and uncheck the box under it.
- Click "Next"
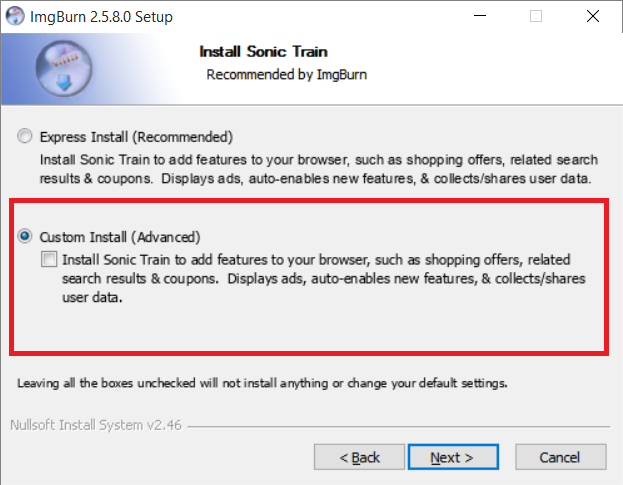
- Select “Custom Install (Advanced)” again, and uncheck the box under it.
- Click "Next"
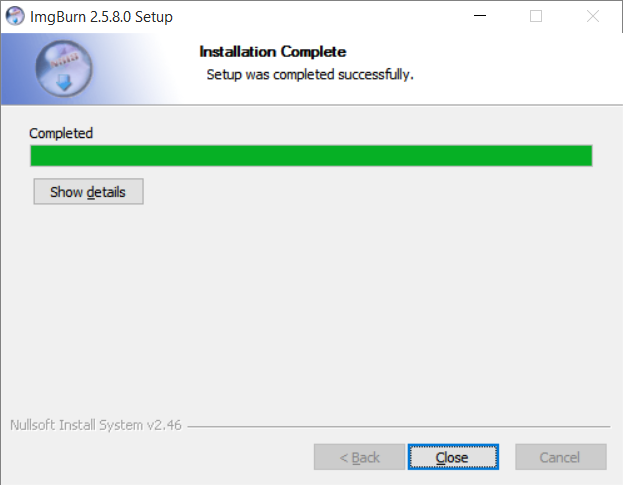
- Installation will begin. Once it’s done you’ll see the following image.
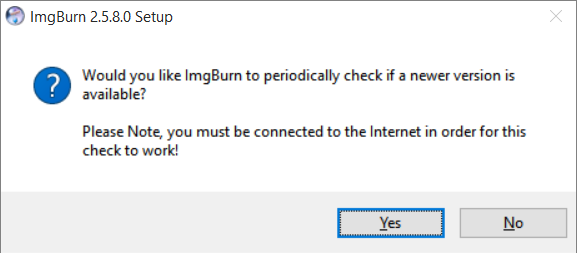
- It doesn't matter if you click "Yes" or "No", once you click one
- click "Close" on the next window
- Locate the ‘ImgBurn” icon on your desktop.
- Double click it
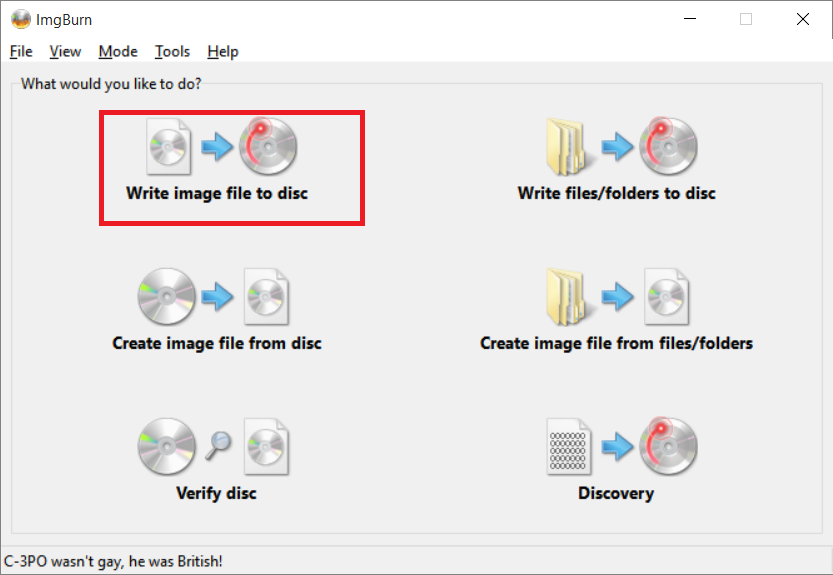
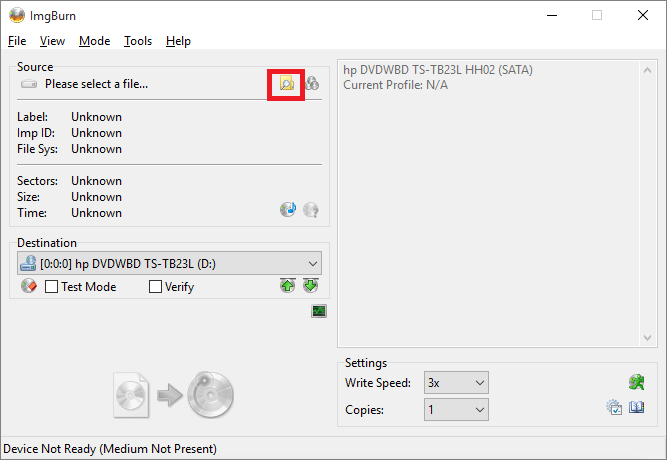
- Click "Write image file to disc"
- Click the small folder with the magnifying glass
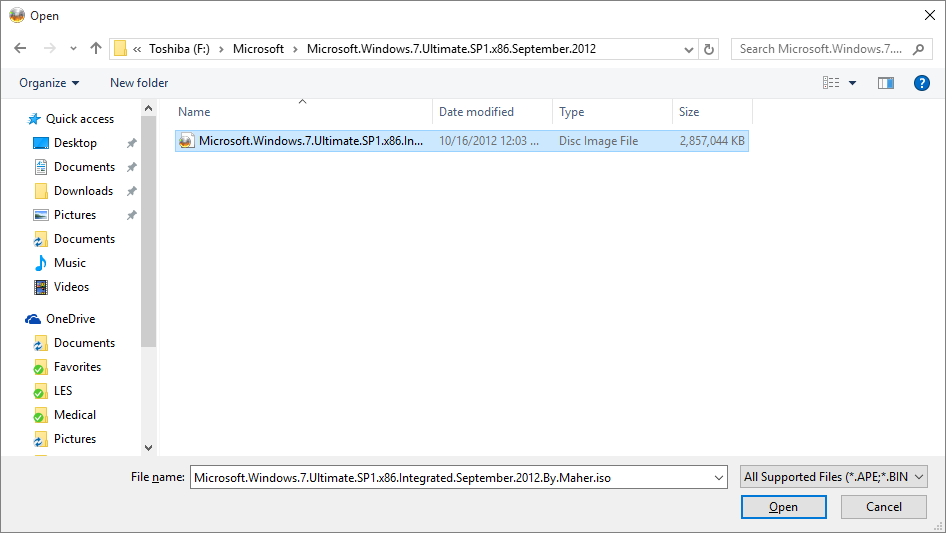
- Navigate in the left panel to locate the Windows file you downloaded previously.
- Once you find it, highlight it and click open.
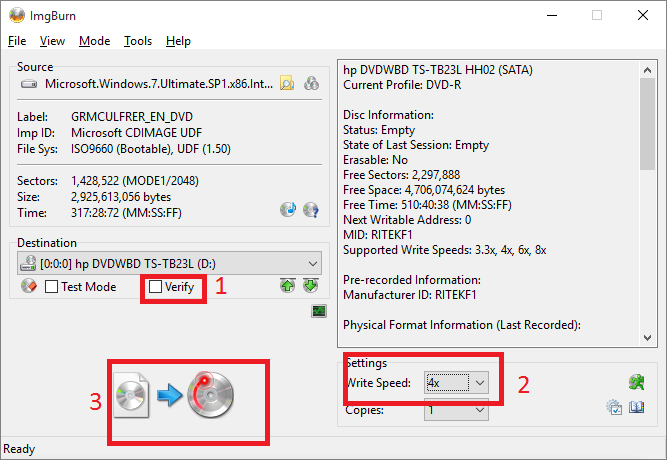
- Uncheck “Verify”
- Select a “Writing Speed” of “4x”
- Click the start burning process icon

- Once finished you will hear a jingle sound
- Click “Ok”
- Close “ImgBurn” program
Windows Installation
- Insert your Windows DVD into the CD drive
- If your computer is off, turn it on.
- If your computer is on, restart.
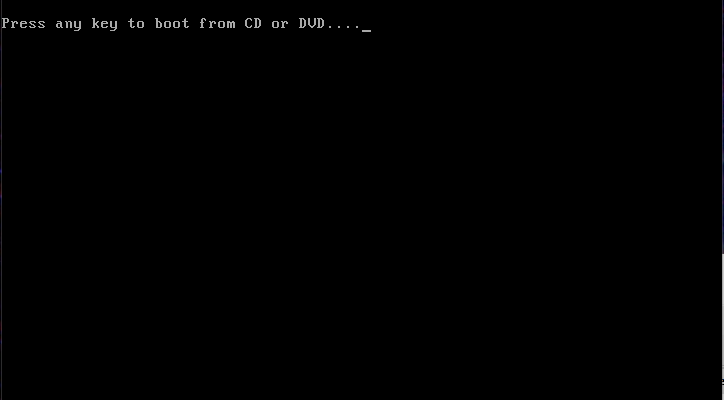
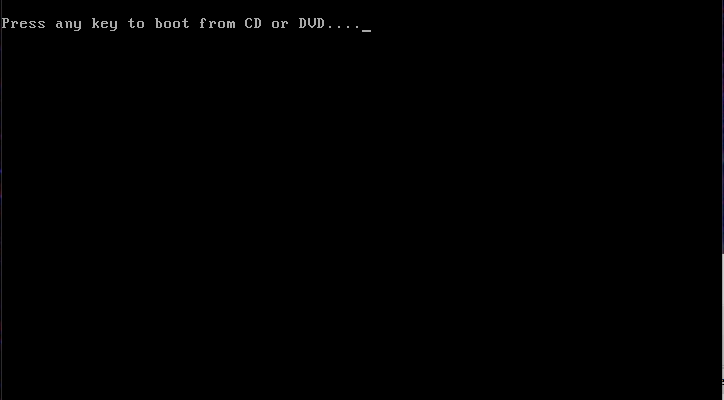
- Once you turn on/restart your PC, you'll see the screen above.
- Press any key to continue
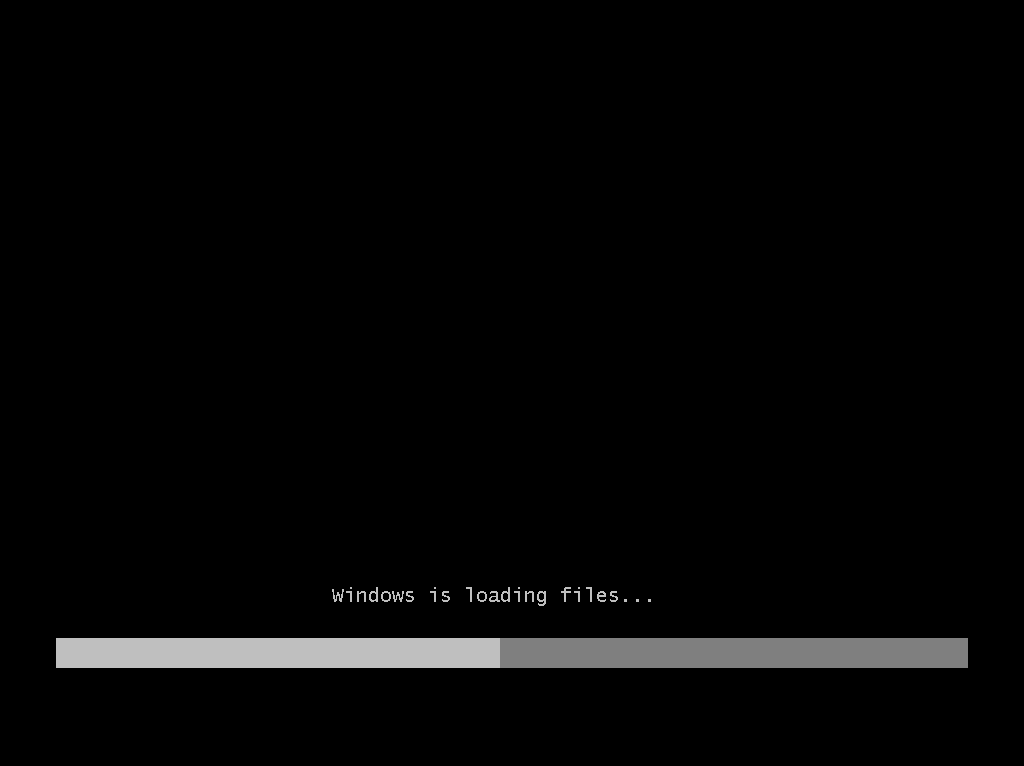
- Once you press a key, you'll see a screen with a loading bar
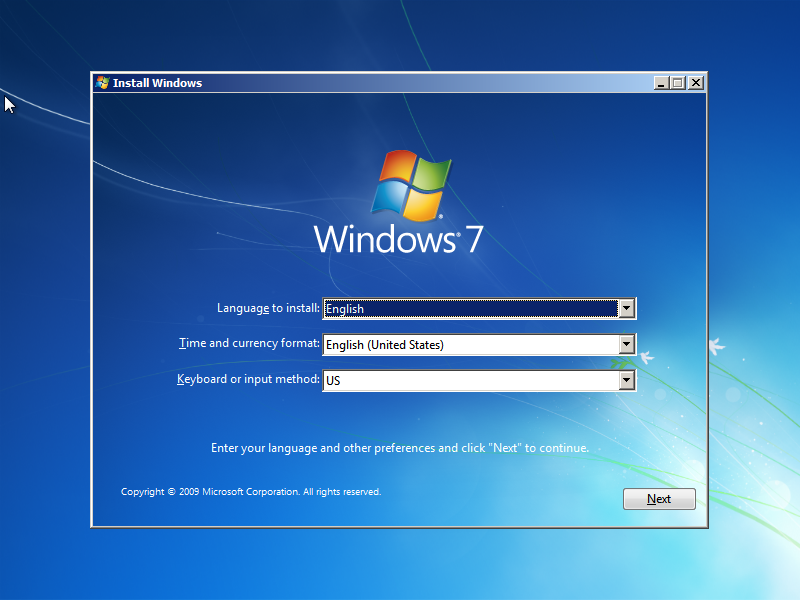
- Select language, time, currency format, and Keyboard method
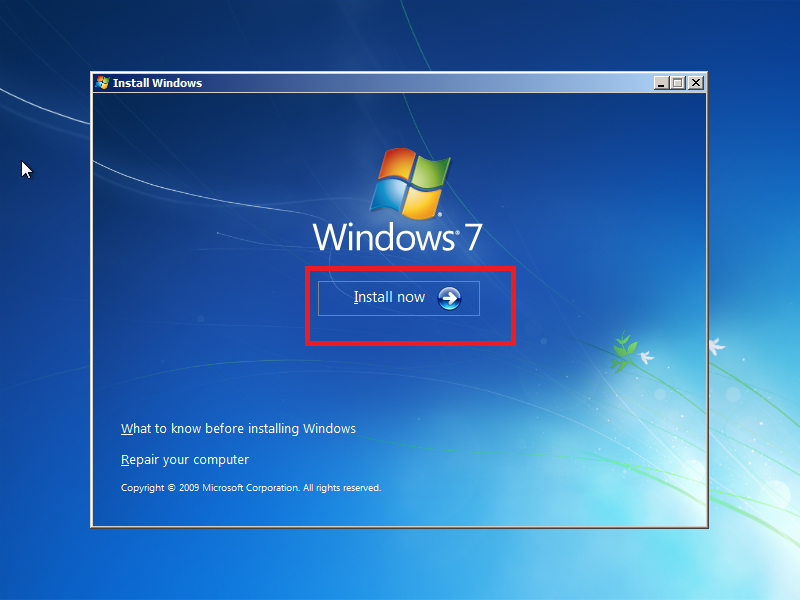
- Click "Install now"
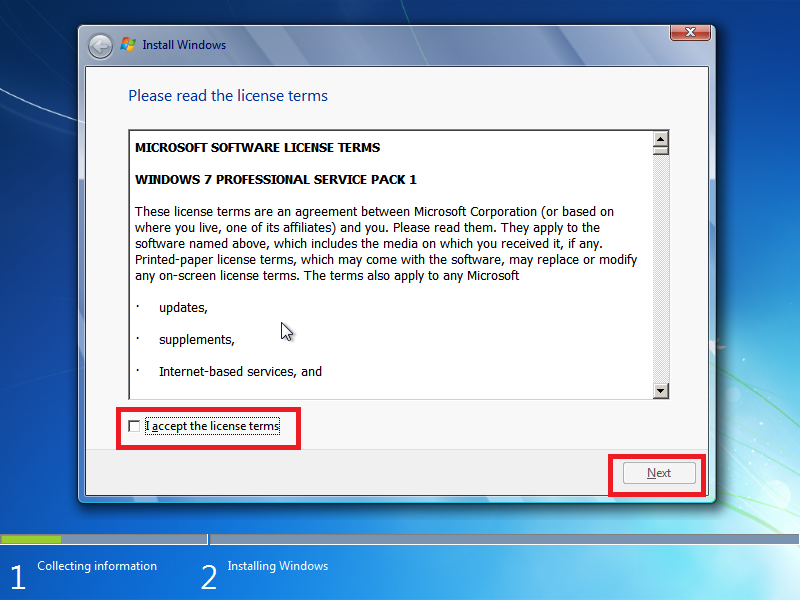
- Accept the license terms then click next
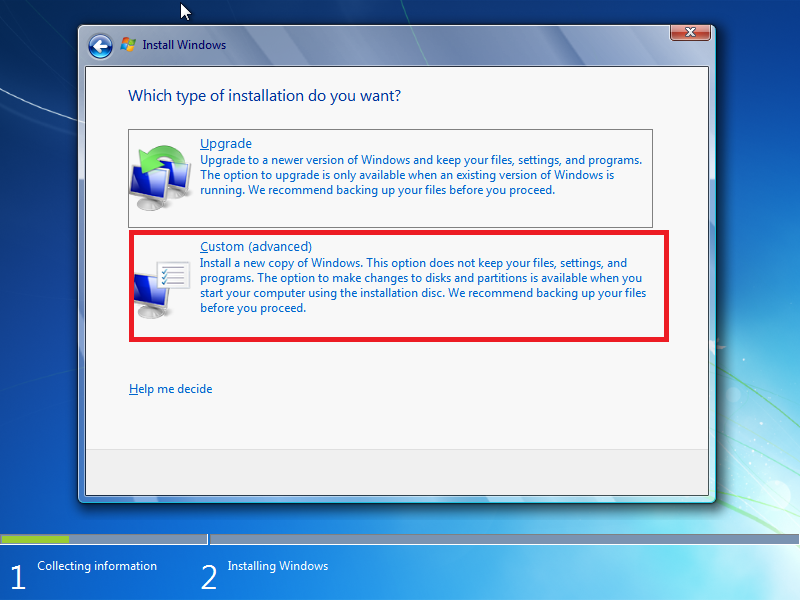
- Click custom (advanced)
WARNING
BEFORE CONTINUING, MAKE SURE ALL YOUR DATA IS BACKED UP. ONCE YOU DO THE FOLLOWING STEPS, YOU CAN'T STOP THE PROCESS UNTIL YOU ARE DONE.
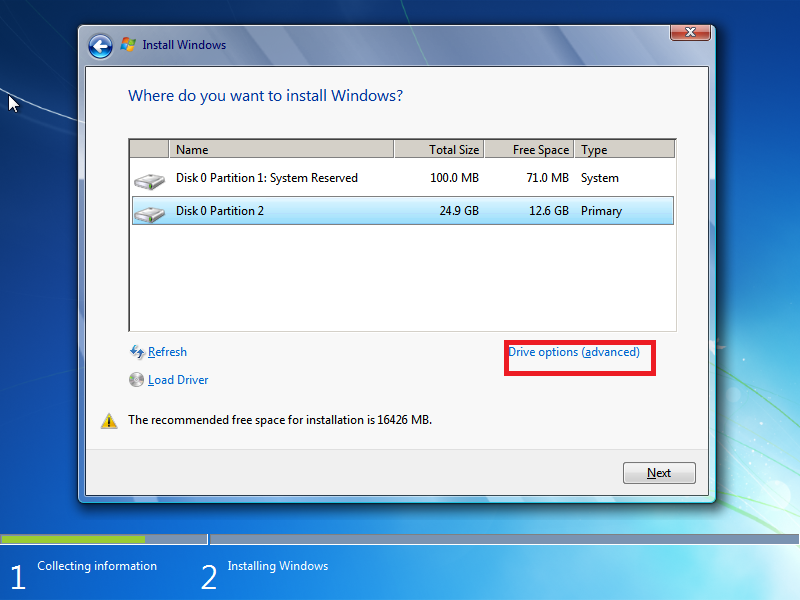
- Click drive options (advanced)
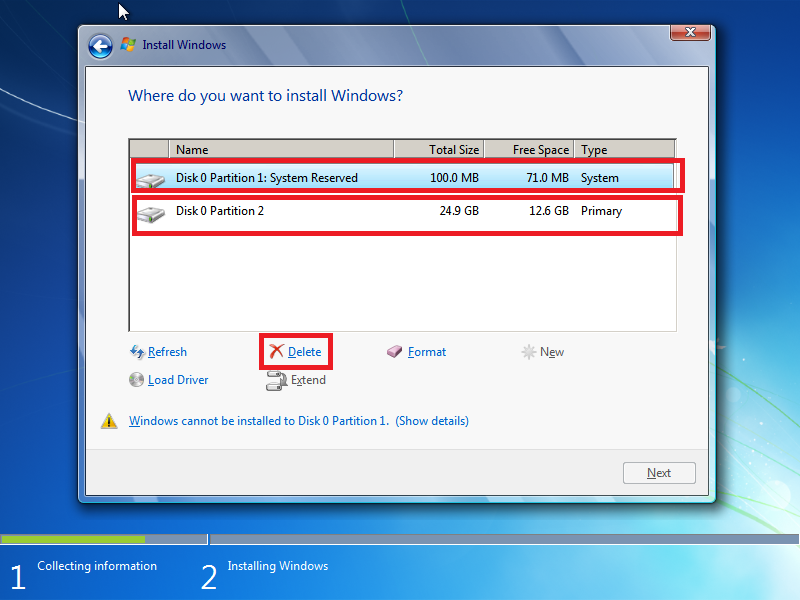
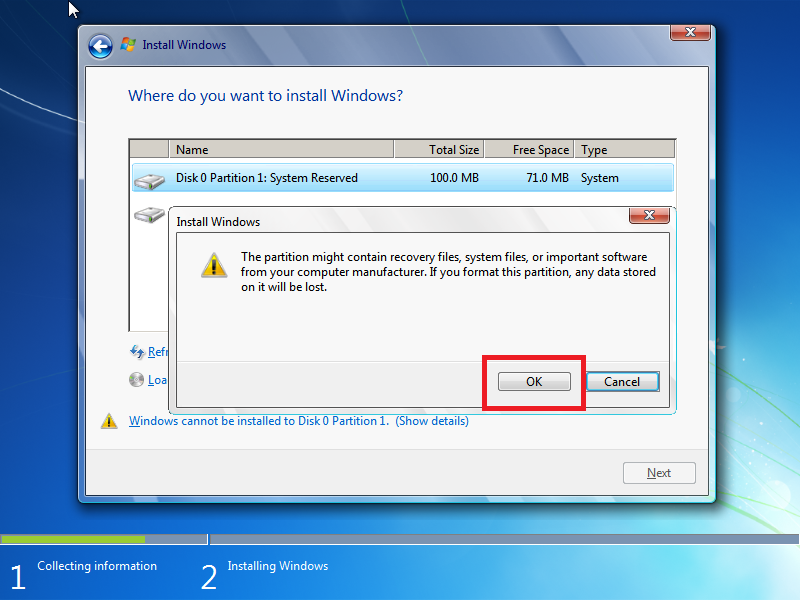
- Select System Reserved and click delete.
- Once you click delete, you will receive a caution, click OK.
- Repeat this process for the other partition
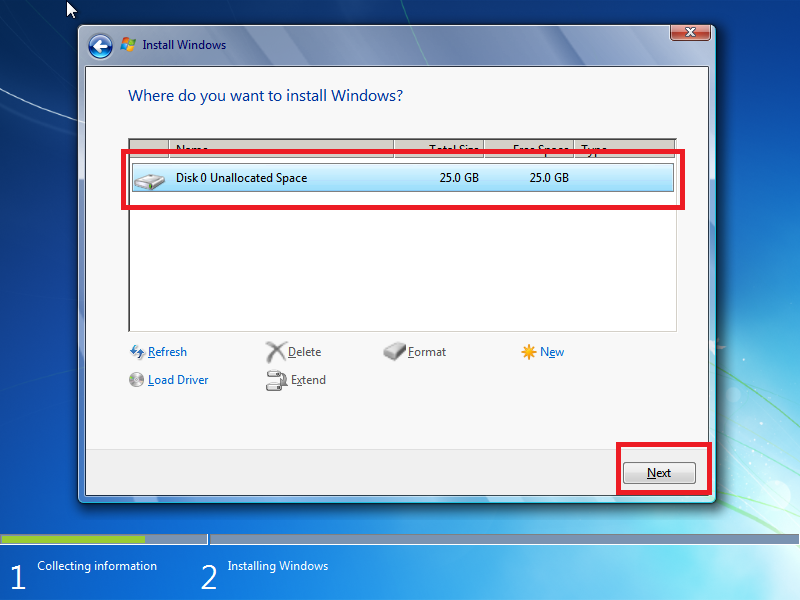
- Once you successfully delete all your partitions, you should see the same thing as in the image above.
- Click next to begin the installation
Note: Your computer will start installing Windows. This can take a long time (30-40 minutes). Please be patient.
Note: Your computer may restart a couple times this is windows configuring and completing the installation process. This is normal.
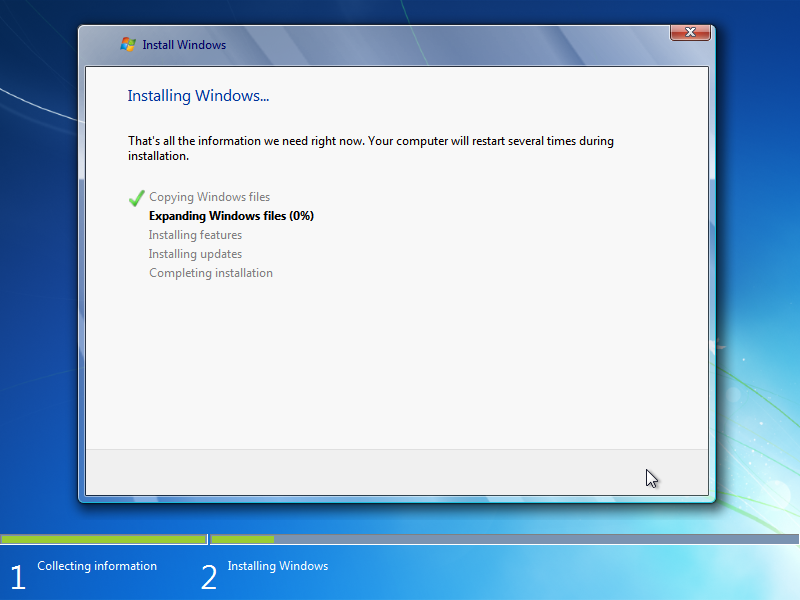
- The image above shows you what you will see when waiting for the installation process to finish.
CAUTION
Once the installation process has started, ignore the "press any key to continue" message when the computer restarts. The installation process will restart the computer multiple times during the installation of windows. This is normal.
When the installer finishes, you will see the following image:
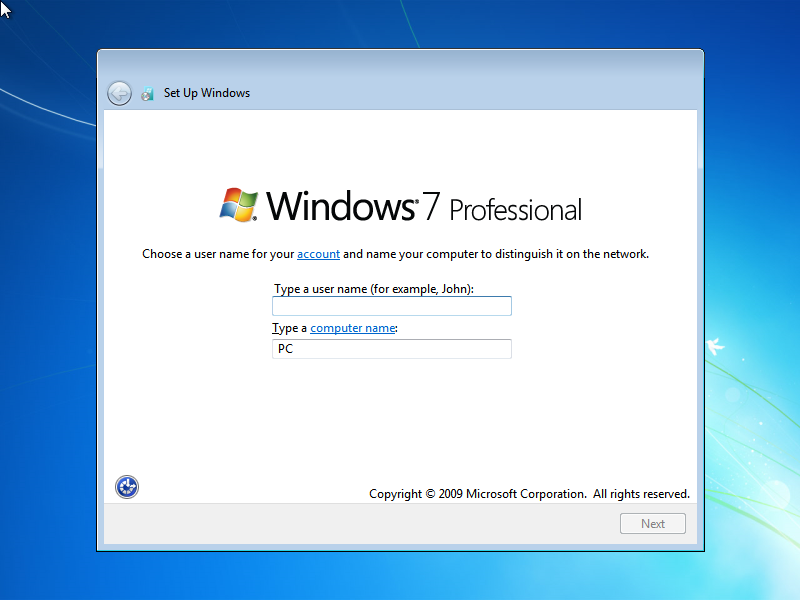
- Enter your desired user name and click next.
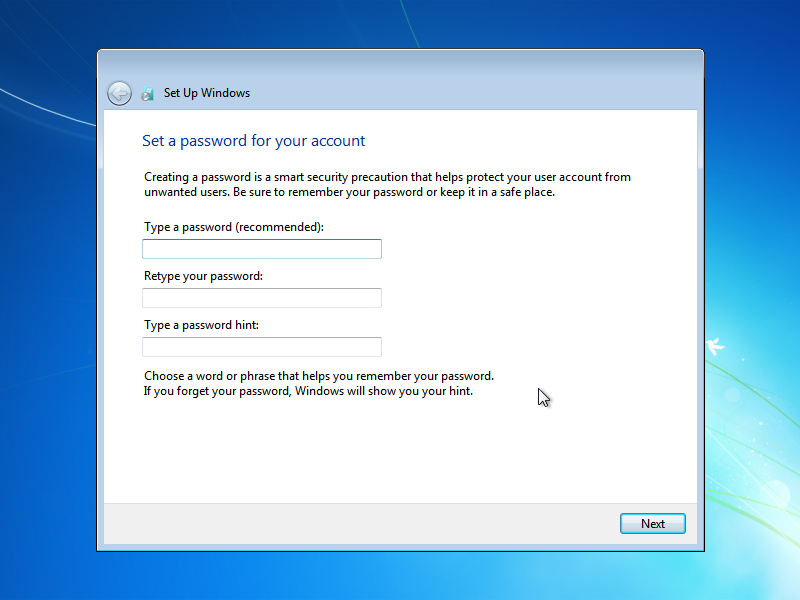
- Create a password and a password hint.
- Click next.
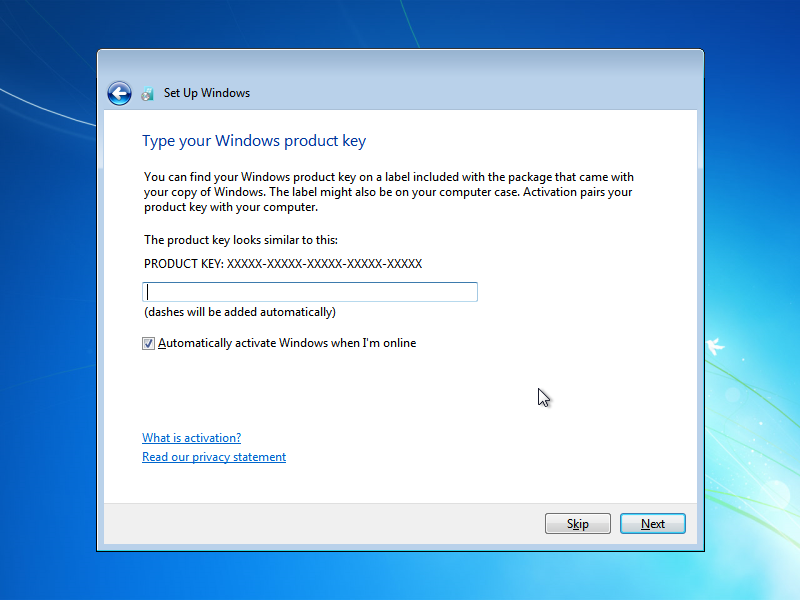
- Enter your Windows' Product Key
- Click next
Note: If the computer is connected to the internet, this might be done automatically by the installation. In other words, if you don't see this, don't worry. Proceed as normal.
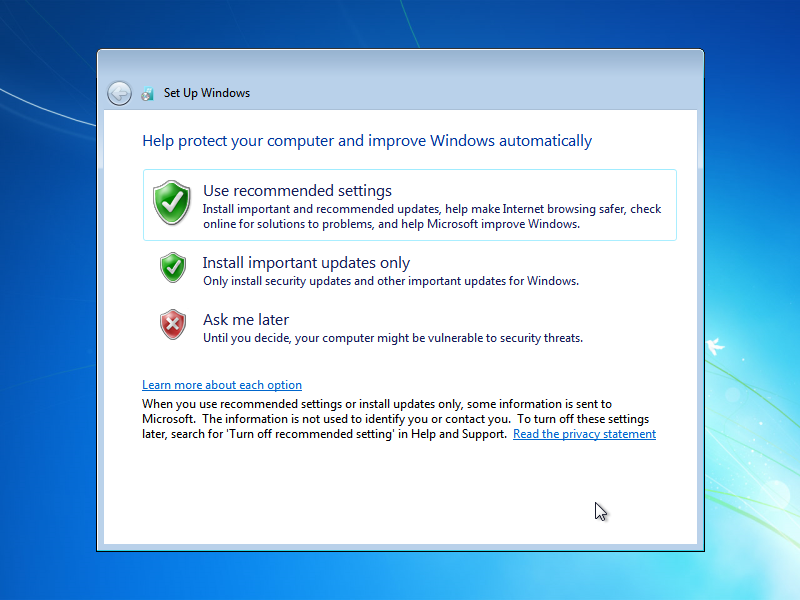
- Click "Recommended settings"
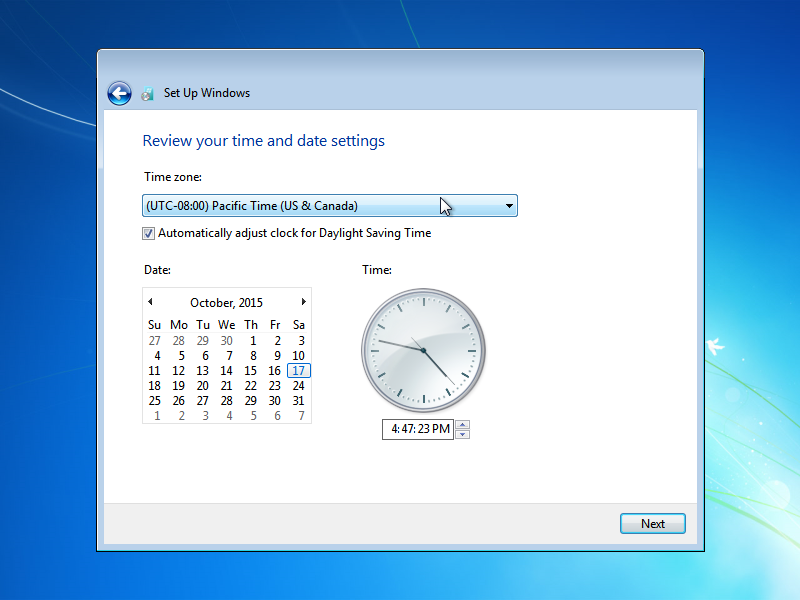
- Select the appropriate time zone, date, and time.
- Click next.
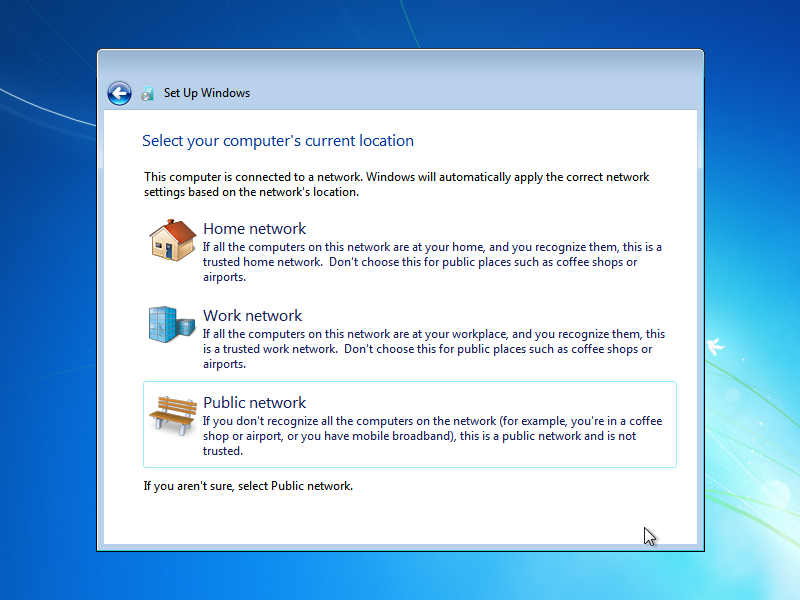
Note: The window above will only appear when the computer is connected to the Internet.
- Click the appropriate place this computer is connected to.
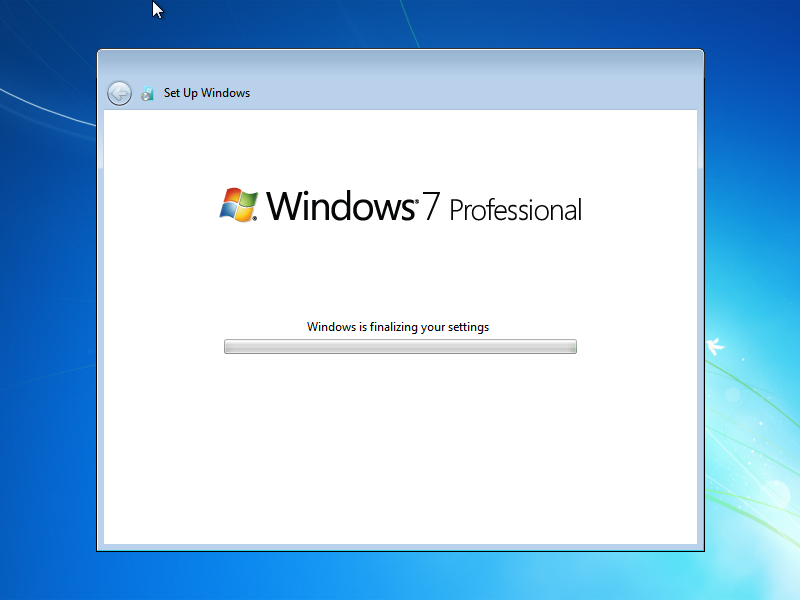
- The image above is the finalizing screen. Windows is applying the last touches to the installation.
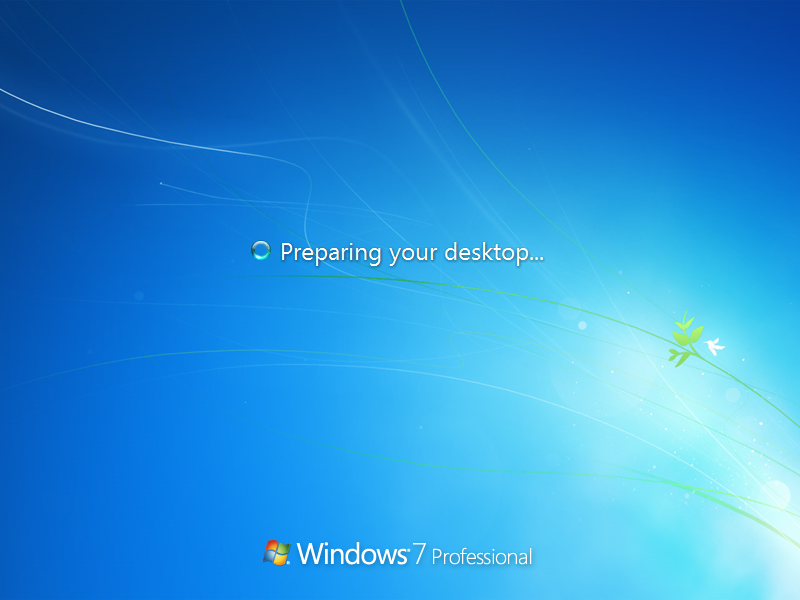
- You will see the image above. That's windows starting up.
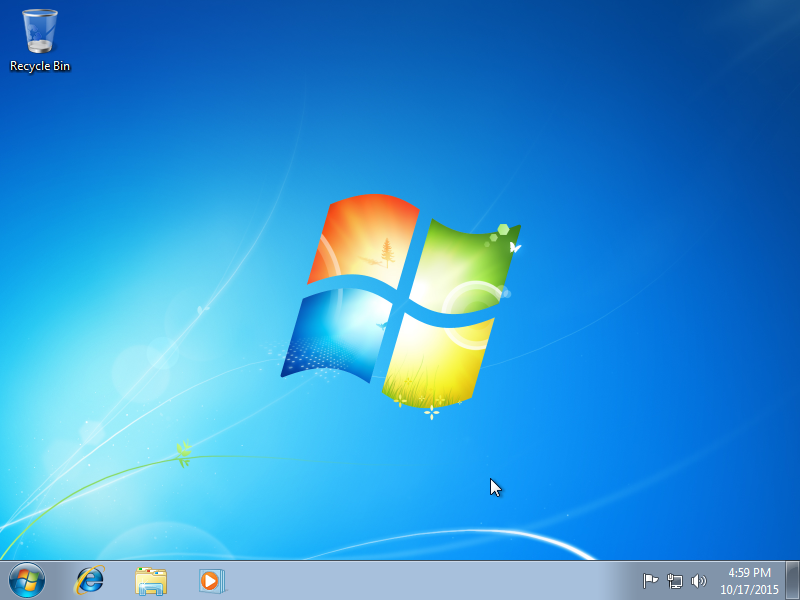
Congratulations! Enjoy your freshly installed Windows 7 Operating System
Installing Antivirus
Now that you have your fresh new computer it’s time to protect it. There are many websites with malicious content meant to harm or to take sensitive information. This is where software called antiviruses come in. These applications will not only stop these malicious files before they reach your computer but also remove any that are currently on it. There are plenty of options to choose from but this tutorial will go over AVG. AVG stands for Anti virus Guard and is a free Antivirus that anyone can download on any machine.
Download AVG
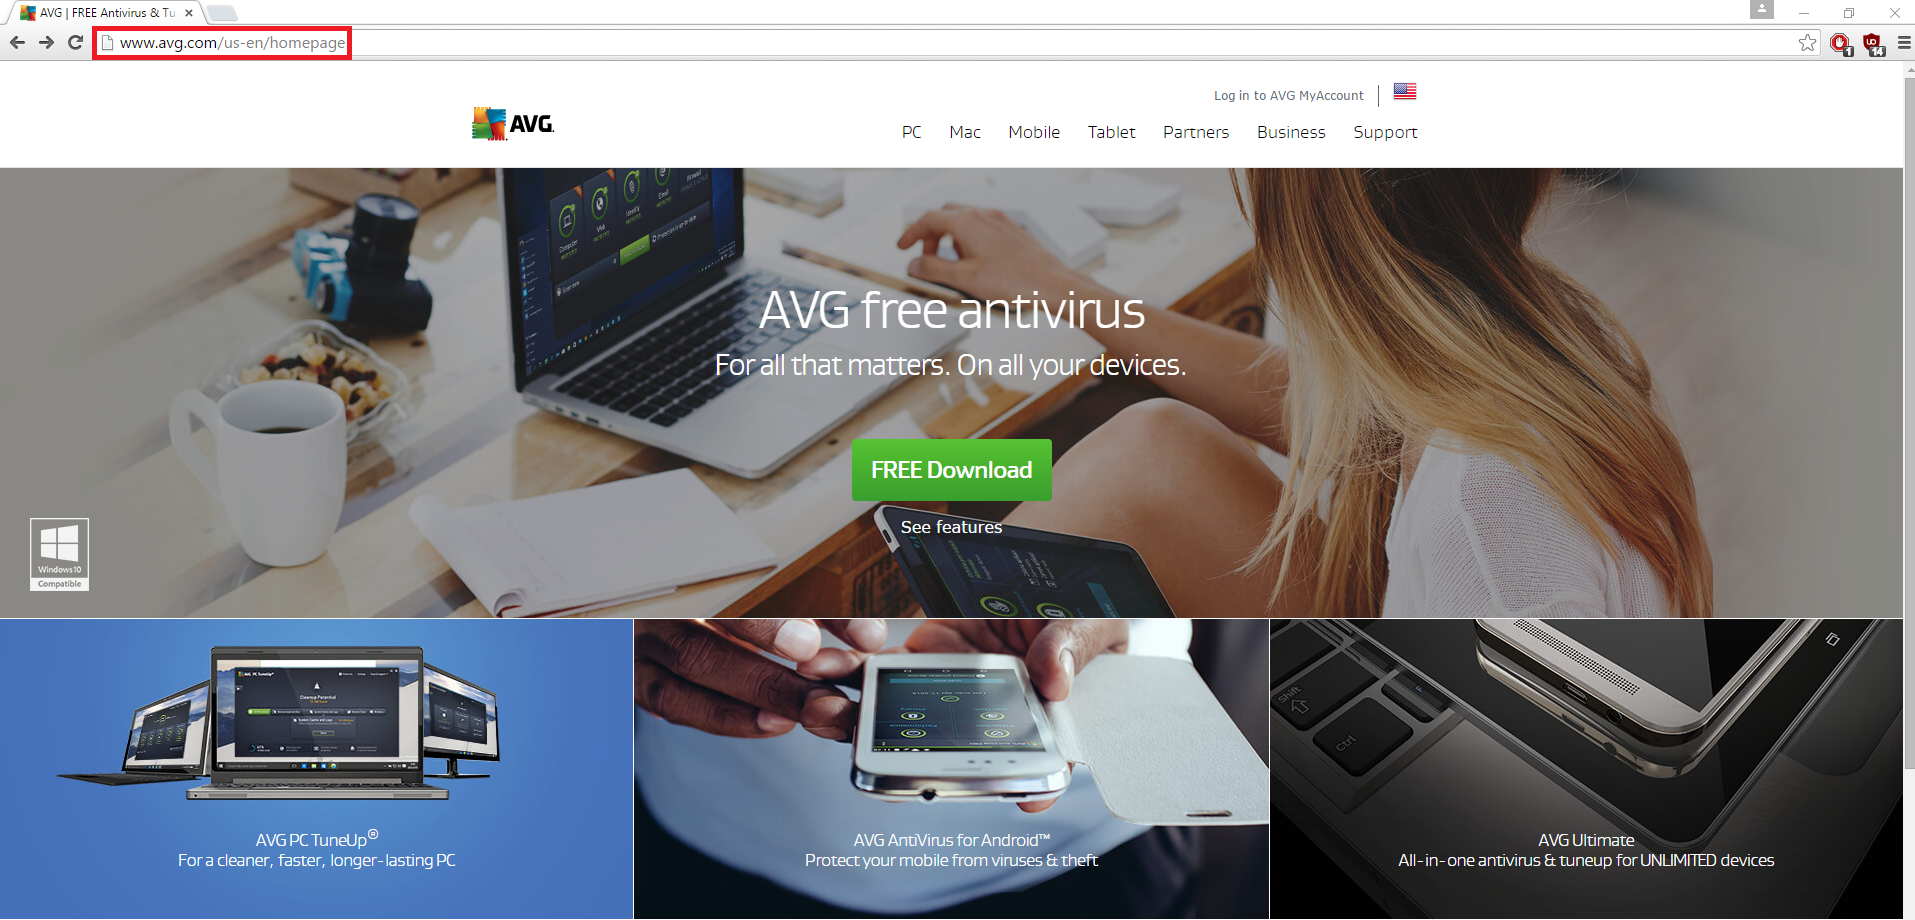
- First open up your default web browser and go to www.avg.com. It should take you to this homepage.

- Click on the “Free Download” button on the homepage.
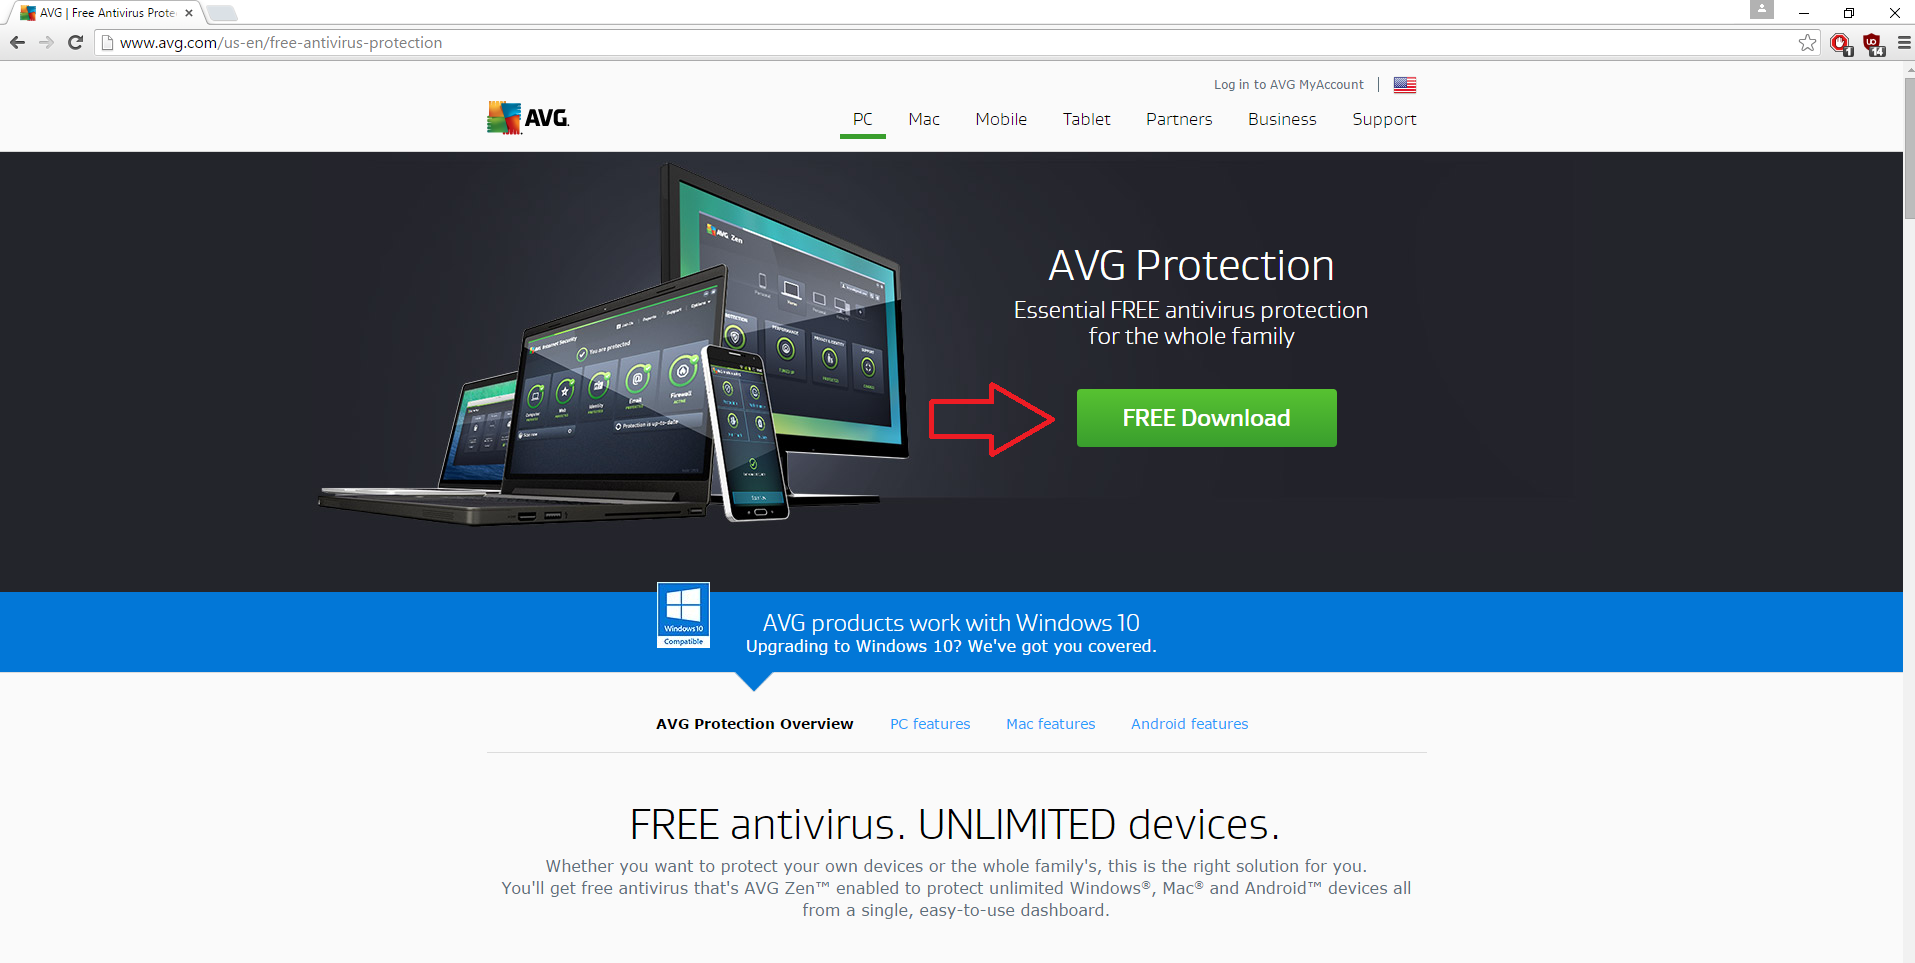
- The link will take you to this page. From here click the "Free Download" link again.
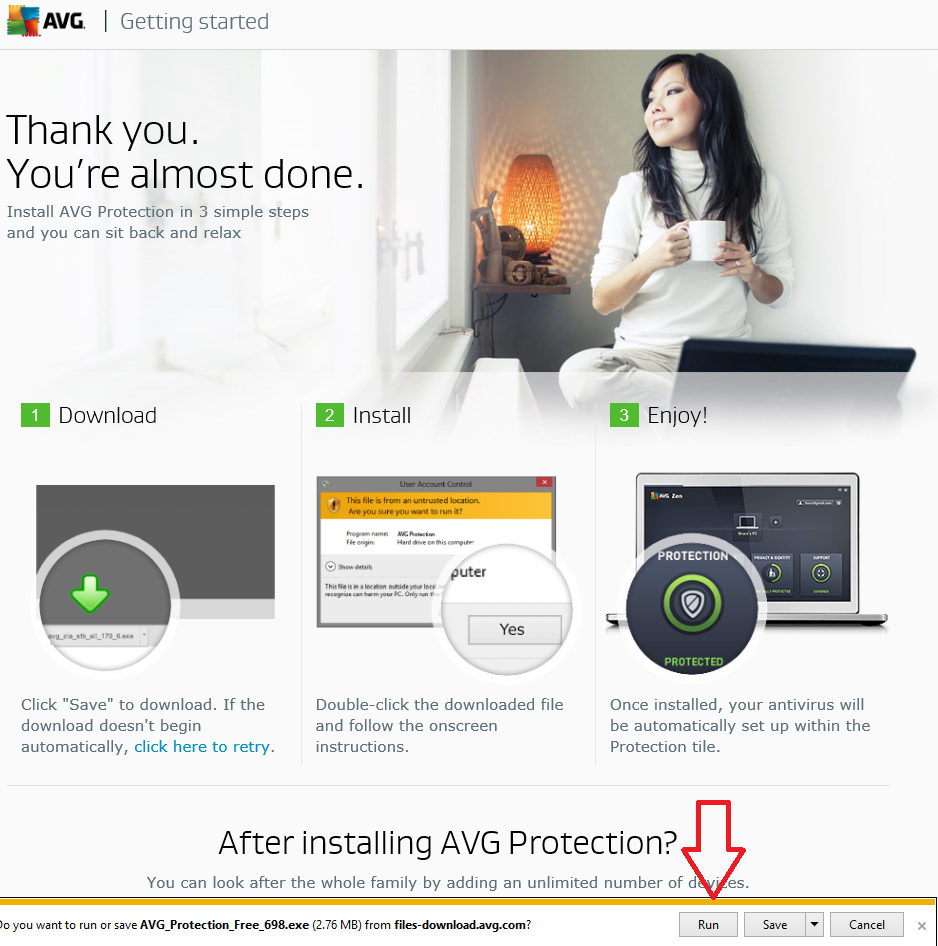
- This will download the files to your computer. Now you need to actually run it.
- Click on the “Run” button for the file link at the bottom of your browser to start it. If you’re on Google chrome it will be on the bottom left of your browser.
Install AVG
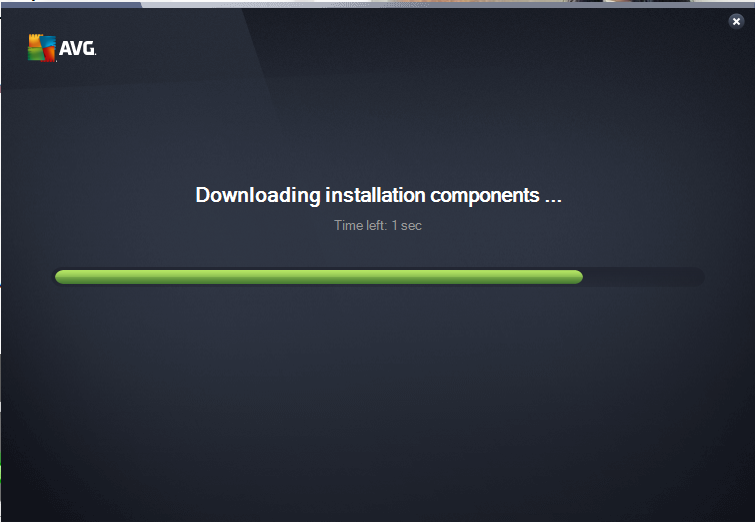
- Once the installation starts the application will pop up and start downloading the required components.
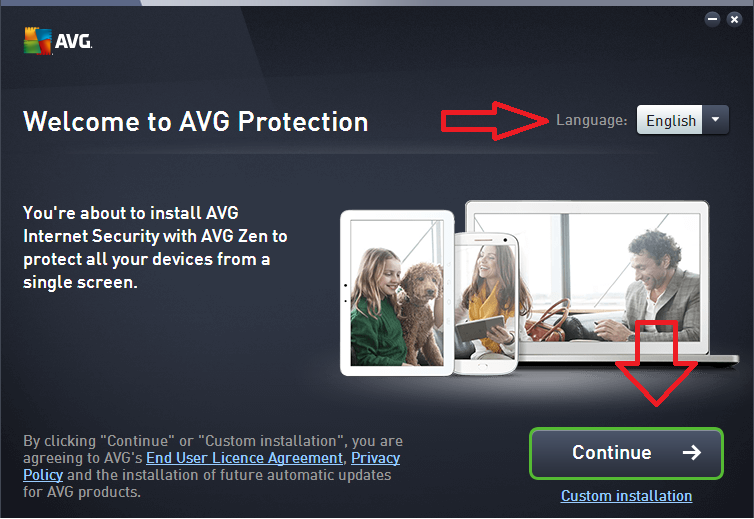
- After your download is complete be sure to select your preferred language at the top right if it is not English. Afterwards click "Continue" to accept the Terms and Agreements.
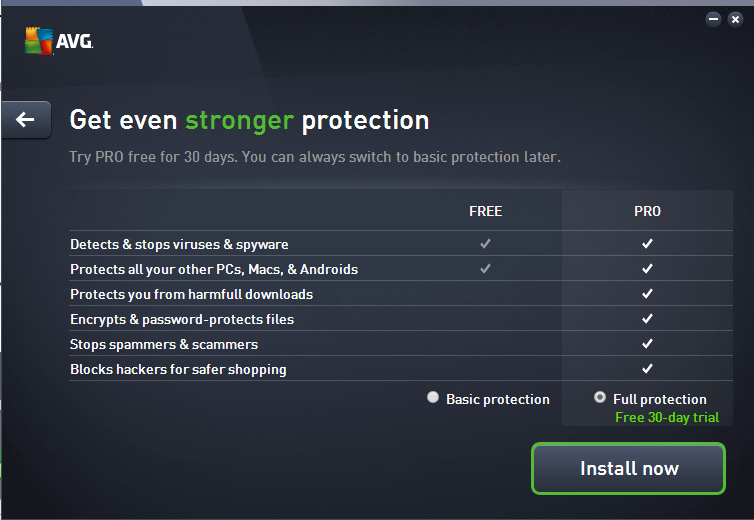
- I suggest trying out the 30 day free trial. There is no downside to it and as it states you just switch to the free trial afterwards.
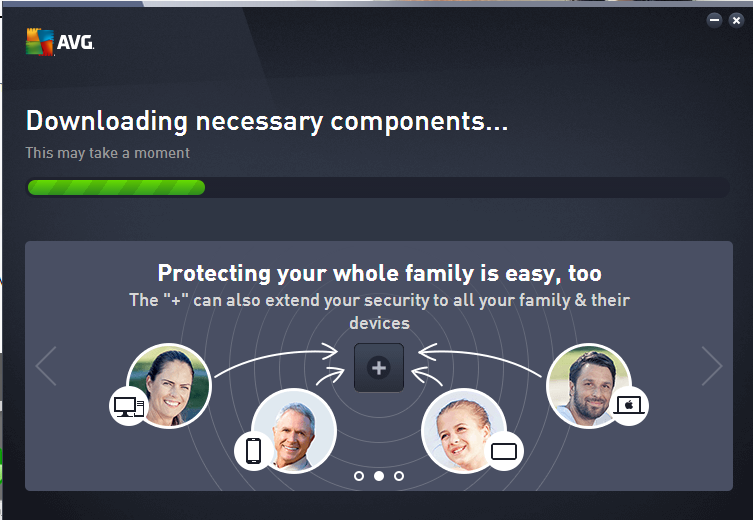
- Finally the application will download the virus protection data banks onto your computer. This will take a few minutes to complete so just be patient and let the bar fill.
Set Up AVG
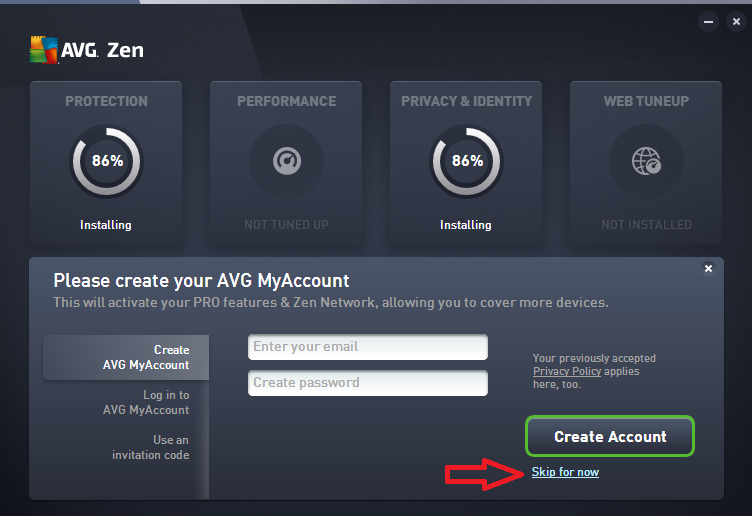
- AVG will ask for you to create an account afterwards but I suggest just skipping it for now. Since this is a free trial of the application an account won’t benefit you much.
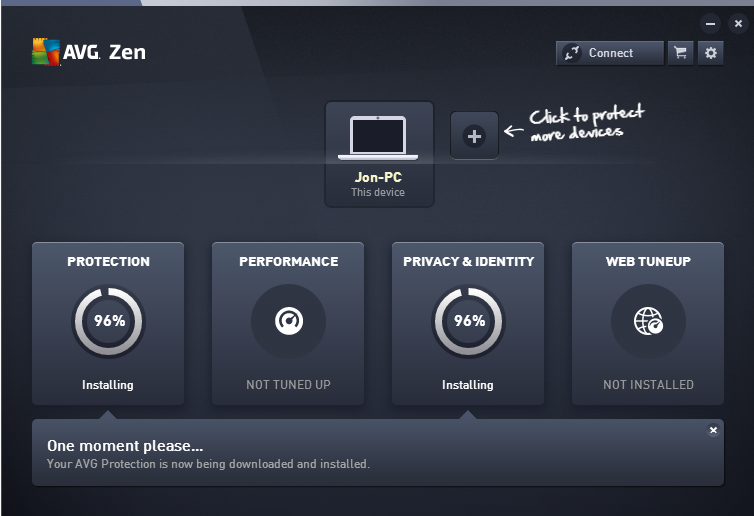
- This will take you to the finalizing stage of the installation process.
- Another downloading screen but you are almost done!
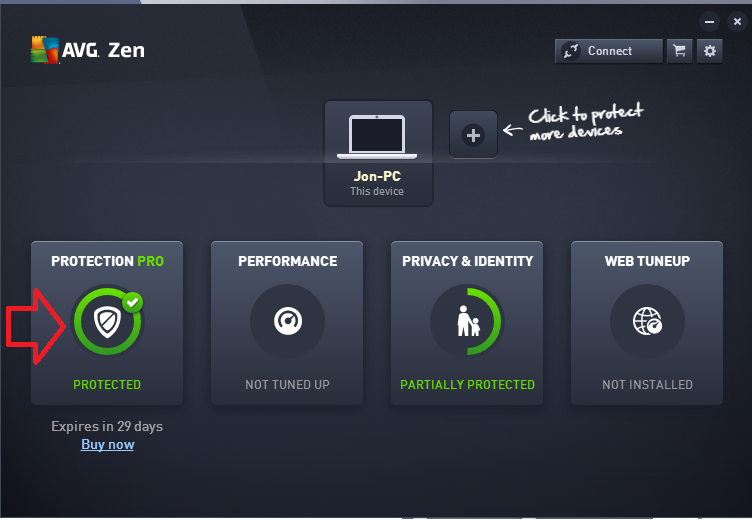
- A installation and update later and you will finally get to this screen showing a full green circle for the "Protection" tab. This indicates that it is finally complete.
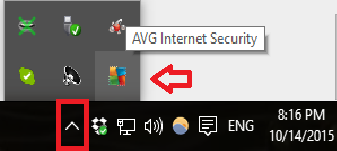
- An icon should now pop up in your windows taskbar at the bottom right. I had to select the upwards arrow to find mine but yours should be right next to your clock. Just look for that yellow, blue, green, and red square icon and click it to open the program.
First Scan!!
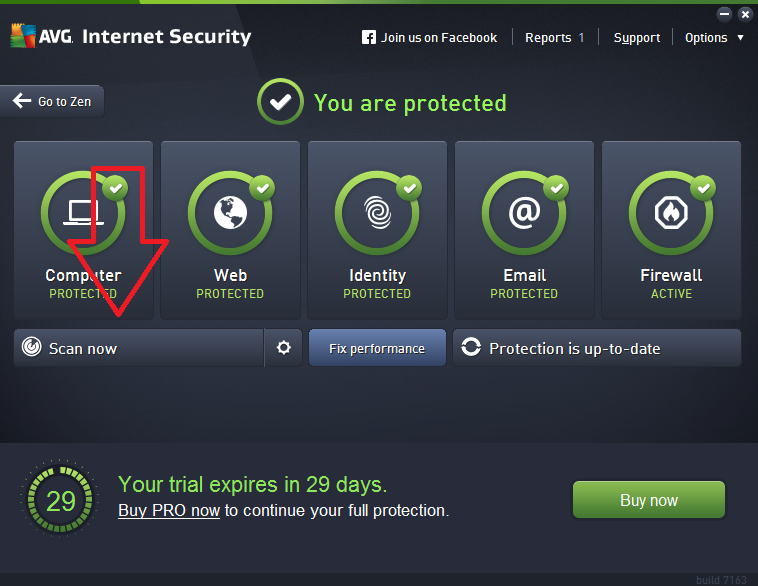
- Click scan now to run your first scan of your computer. This will look for any malicious files that could harm it in any way.
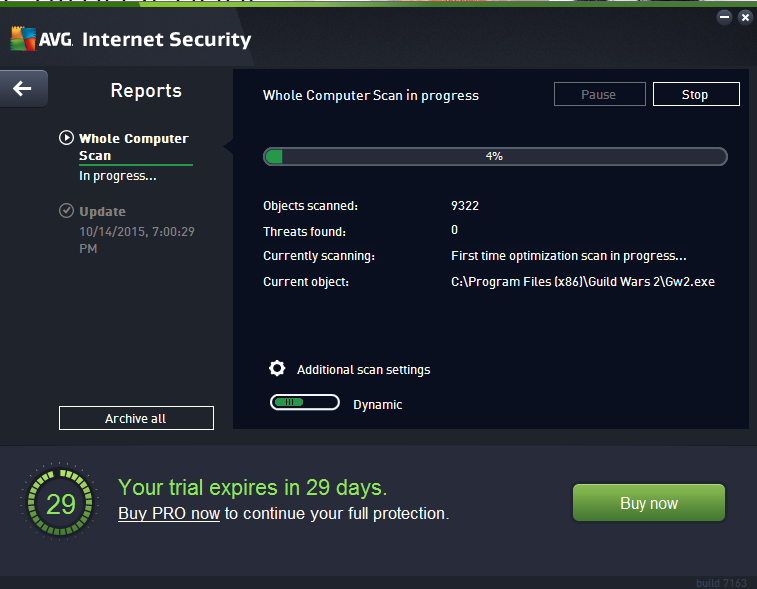
- This is the screen it will send you to. Just be patient and wait for the scan to complete
Disable Popups
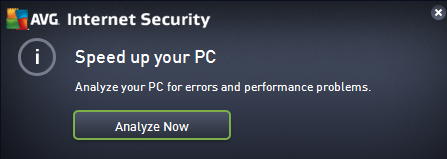
- Now the downside of having a free antivirus are popups. Ignore any pop ups that don’t have anything to do with updates or a scan you initiated. So for this speed up your PC just click the "X" at the top right to close it.
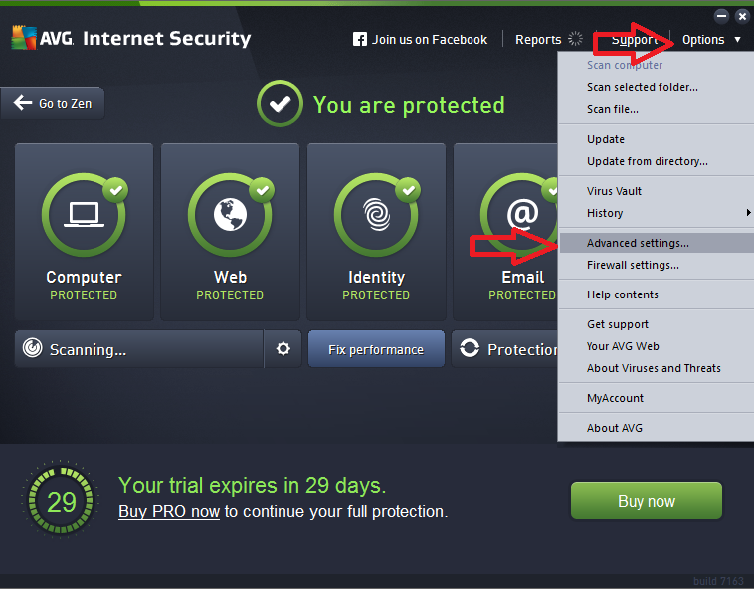
- Now I will show you how to get rid of those pesky popups that you don’t need. Click the options in the top left of your AVG program. Then click on “Advanced Settings”.
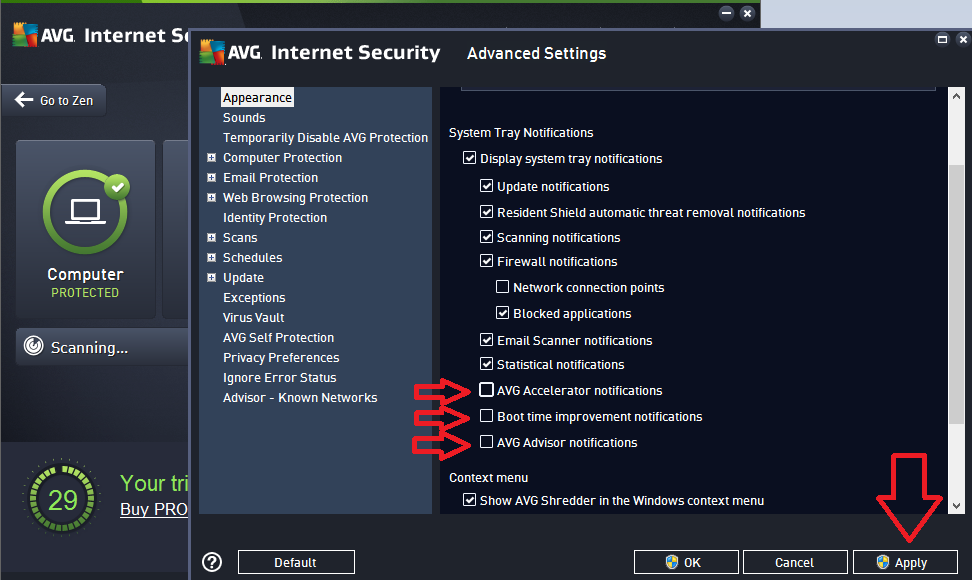
Following the previous instructions will take you to this screen. Notice the three unchecked boxes I have with the red arrows pointing to them? Click on each of those boxes to uncheck them and make them similar to the picture shown here. Then click the “Apply” button on the bottom right.
This will disable only the unwanted popups that you don’t need while keeping the important ones.
Summary of Antivirus
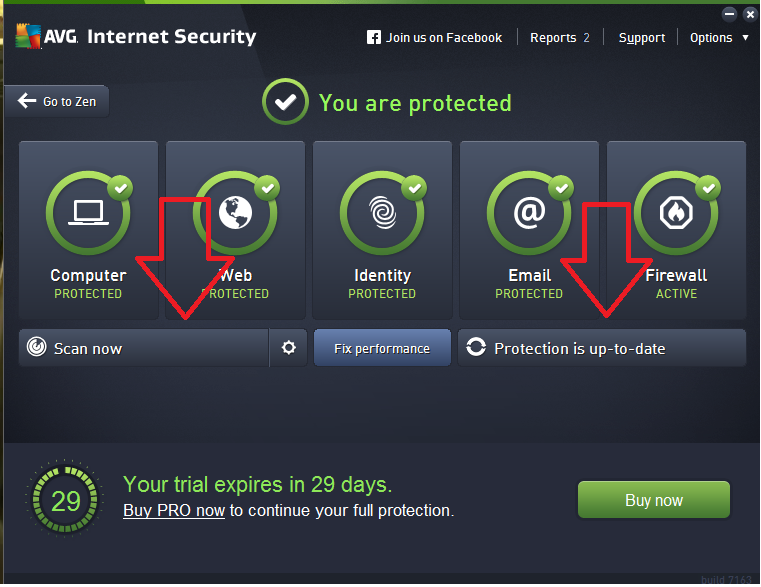
That is the end of this antivirus tutorial. You now have a fully updated and running free antivirus to protect you and your computer. These two red arrows point to the only two buttons you will ever need to use. Make sure your antivirus is always up to date with the right button and run scans every so often with the left.
A) Extracting Files From a Usb Drive
- Insert same usb you used on your computer before the installation of windows 7
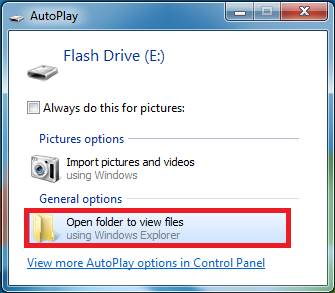
- After you plug it in, you will see this in the picture above
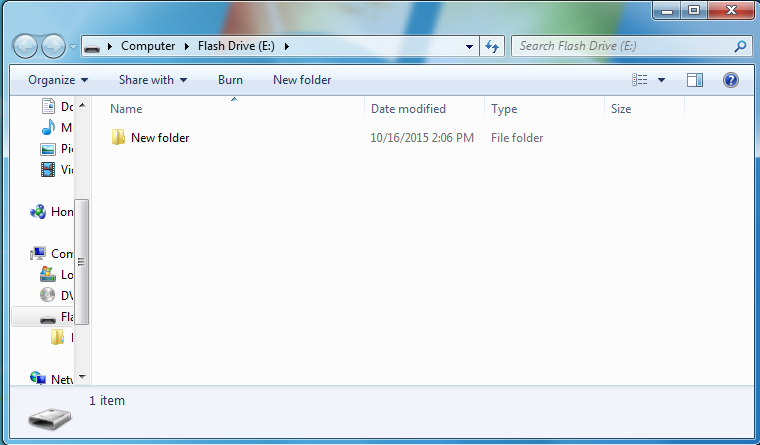
- Once you click “open folder to view files” a new windows with the content will appear
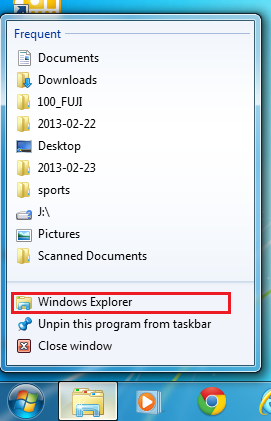
- Right click this folder next to the start menu. Click Windows Explorer
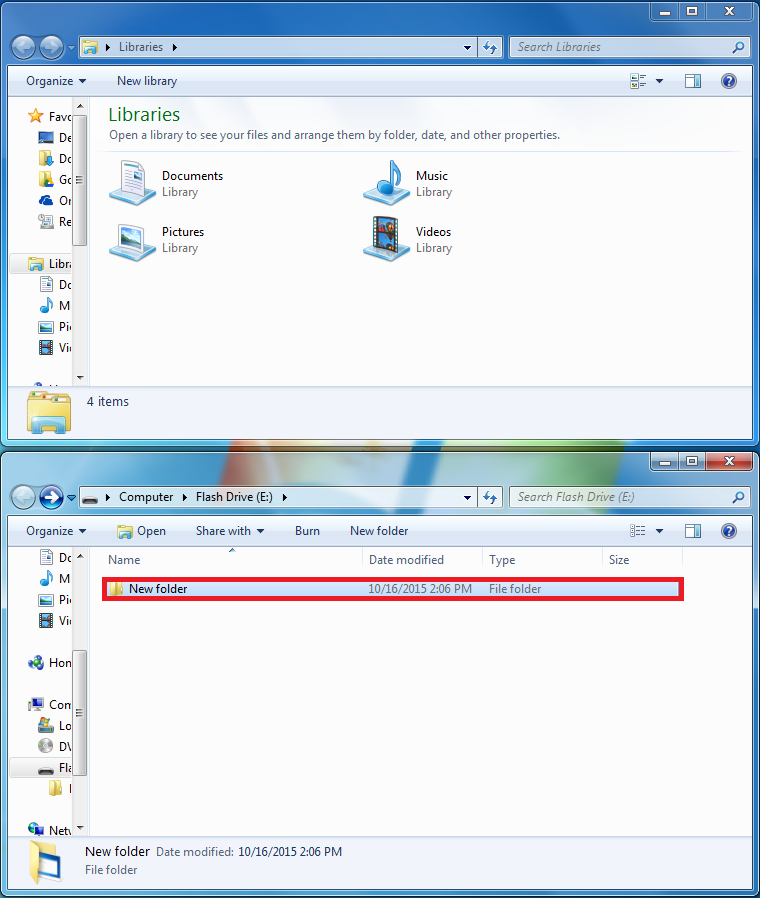
- Double click your backup folder to see the content (we named ours new folder)
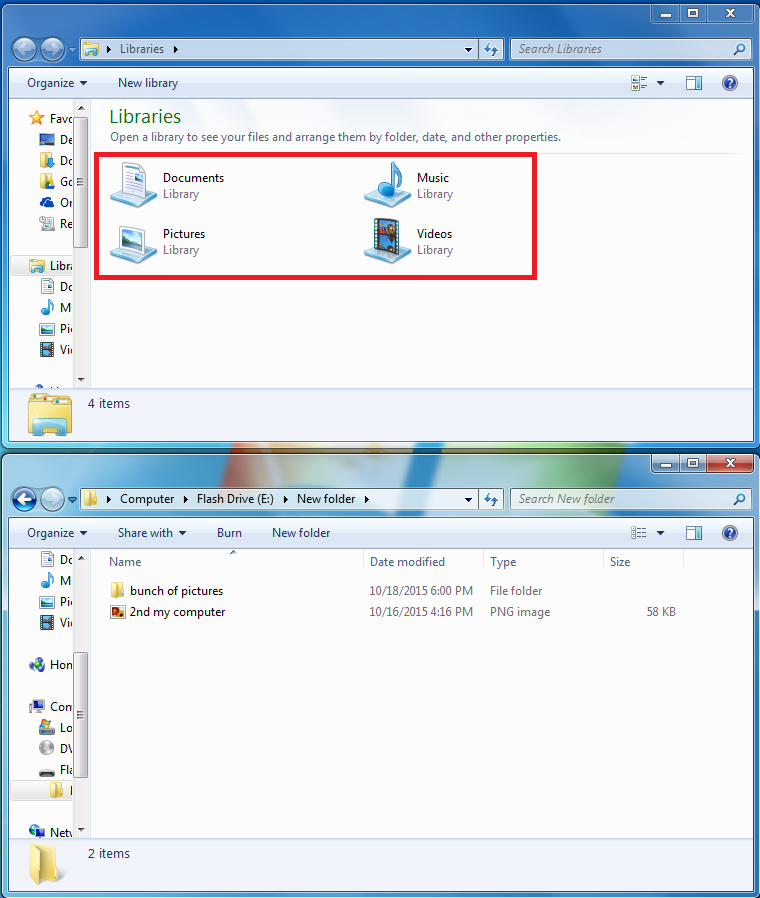
- Double click the library that will contain the type of content you will restore to the PC
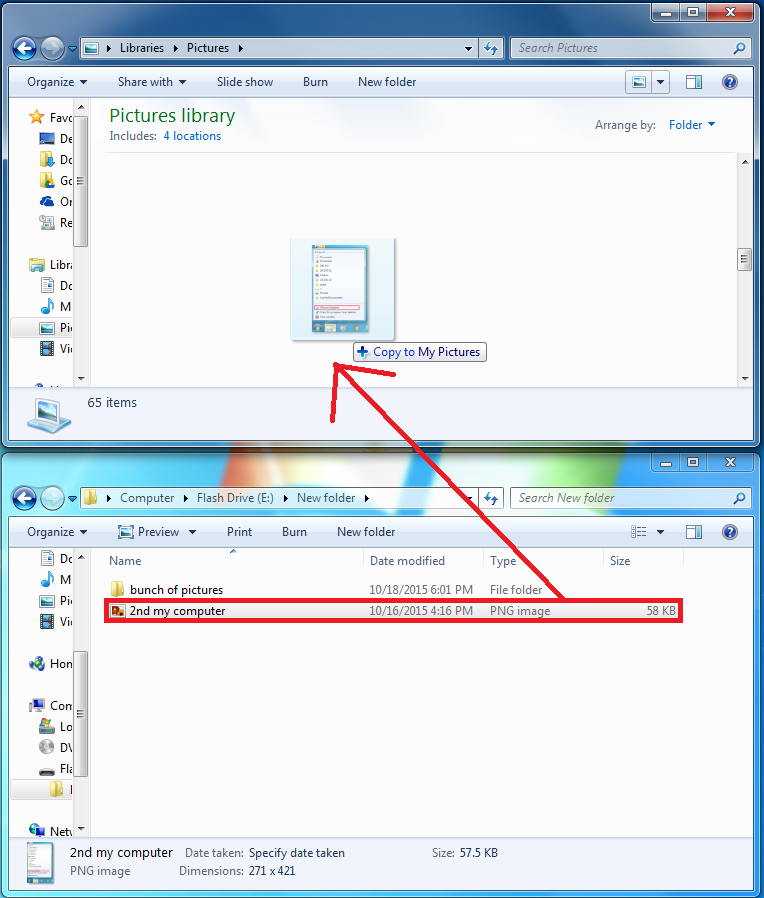
- Once you open the library, drag the content from the USB folder to the library
- Using your mouse, click and drag the files and/or folders you wish to extract from the USB drive
Note: Large files may take a while. You will see a progress bar for the duration of the process.
- Repeat this process for all your library folders you wish to backup.
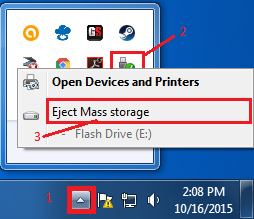
- click arrow on the bottom right of the screen, click safely remove device, and eject mass storage
B) Extract Files and Folders From CD/DVD
- Insert disk that was used to back up files and folders
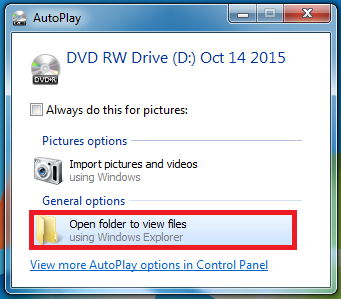
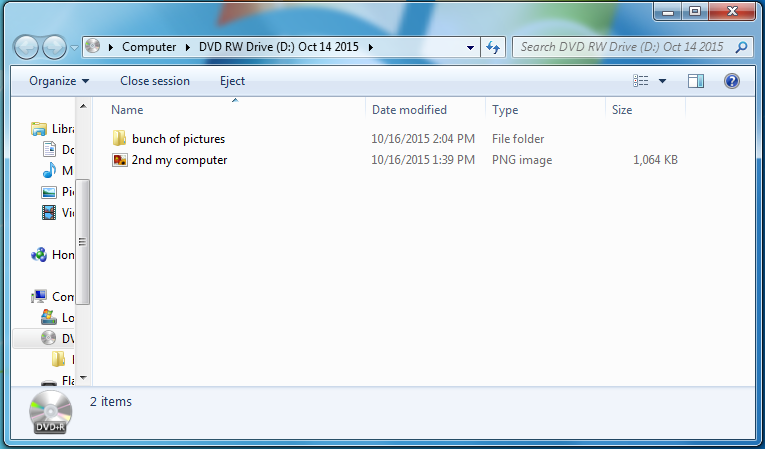
After you put the CD/DVD in, you will see this:
- Click “Open folder to view files”
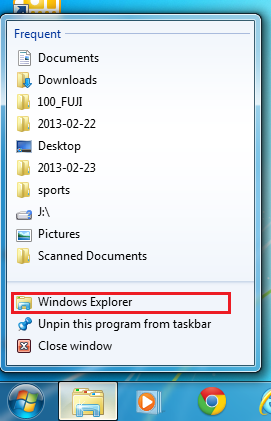
- Right click this folder next to the start menu. Click Windows Explorer
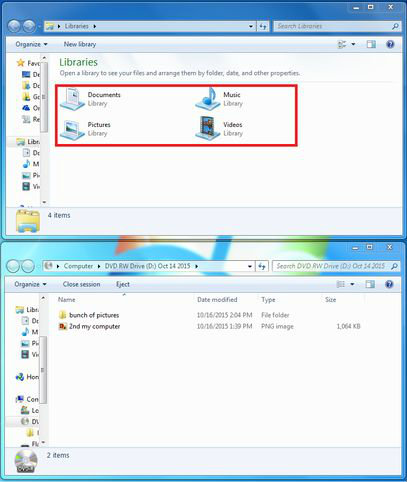
- Double click the library that will contain the type of content you will restore to the PC
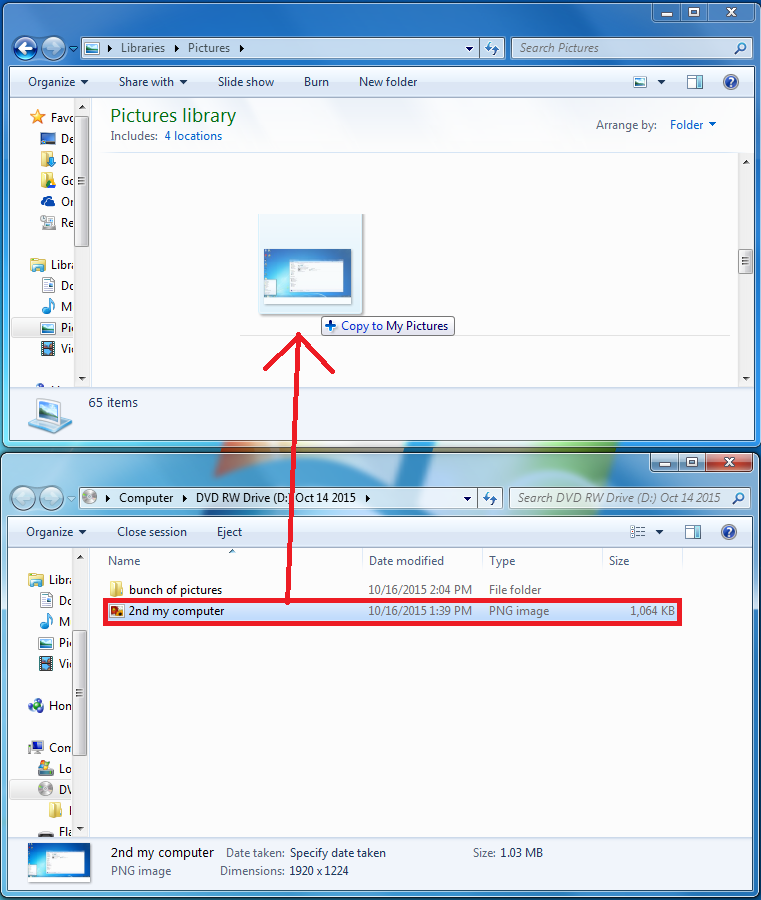
- Click and drag to your desired destination
- Using your mouse, click and drag the files and/or folders you wish to extract
Note: Large files may take a while. You will see a progress bar for the duration of the process.
- Repeat this process for all your library folders you wish to extract.
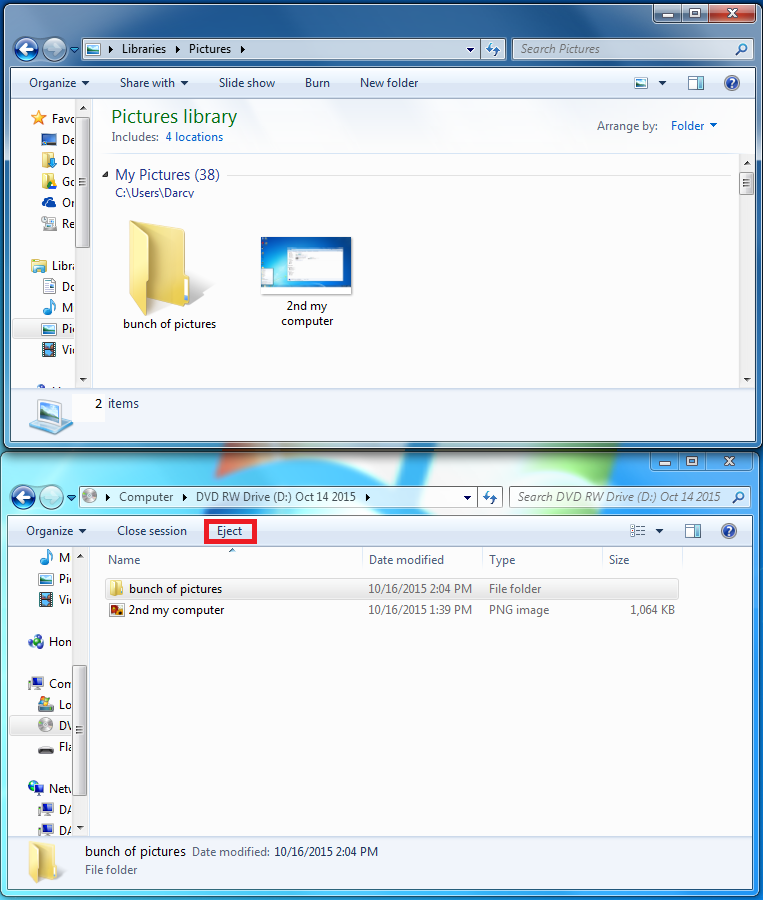
- Eject the CD/DVD and wait for it to come out of the computer
C) Extract Files and Folder From Website

- Open up a browser
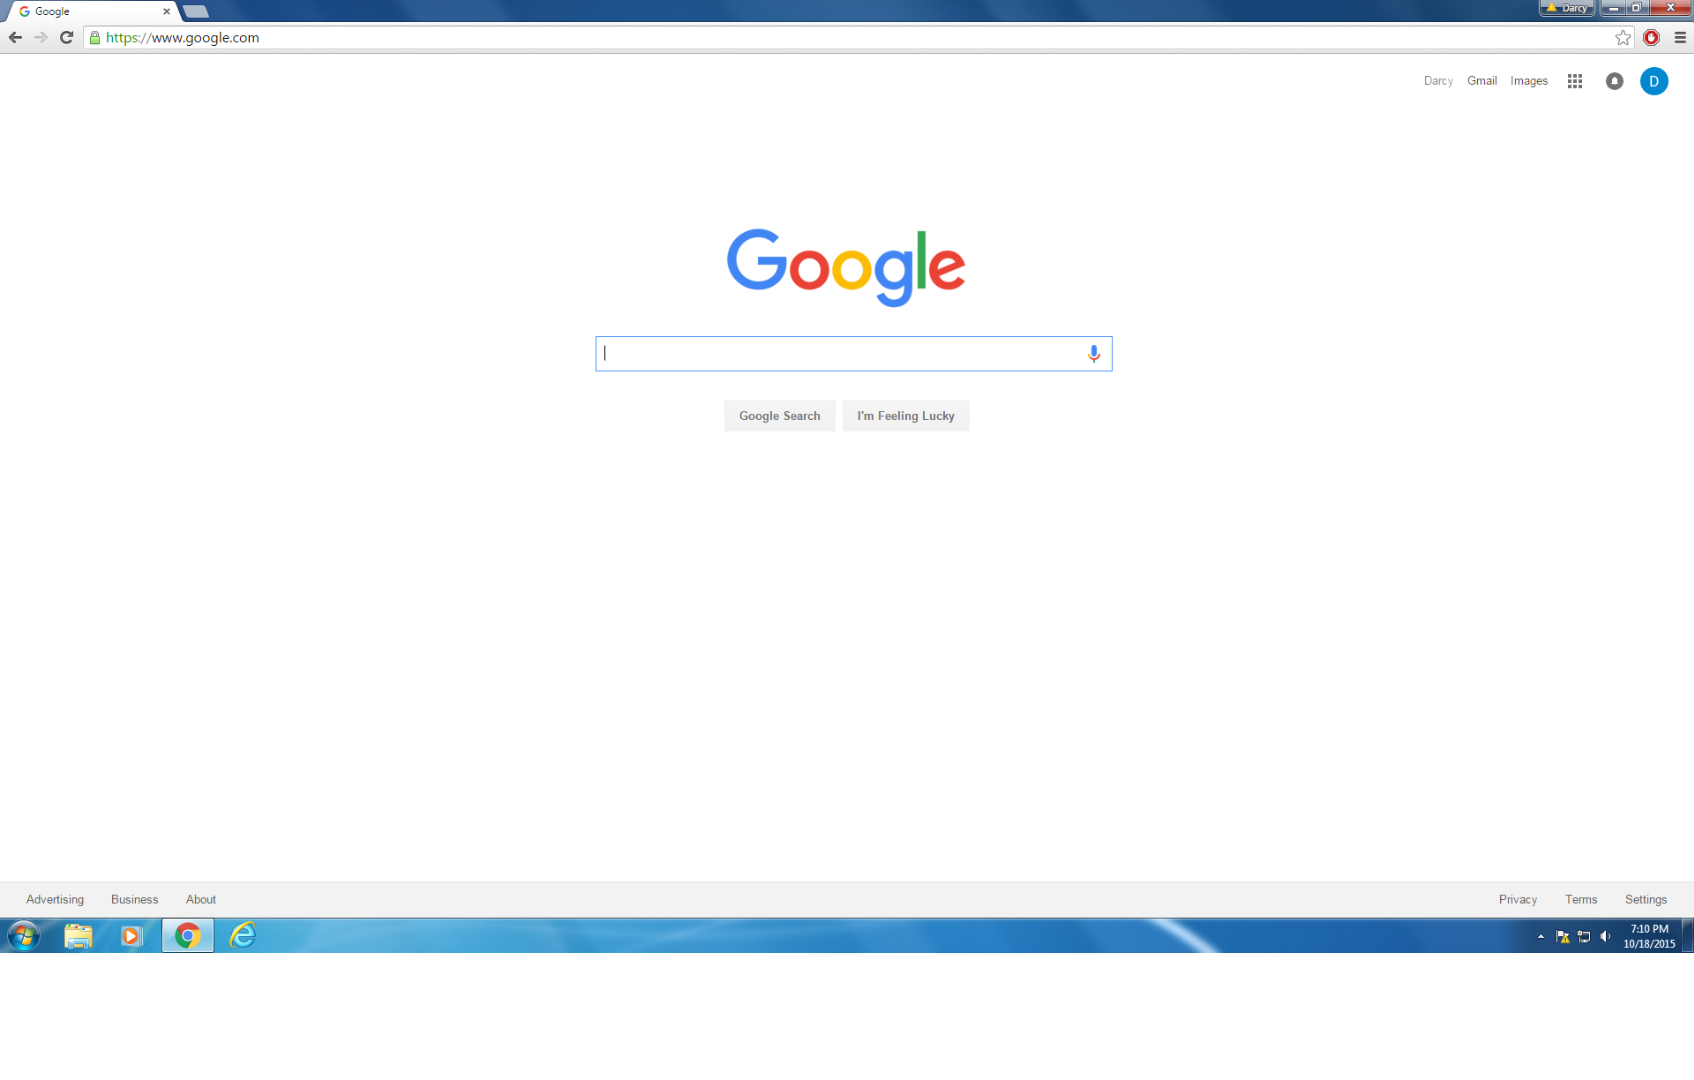
- Go to www.google.com
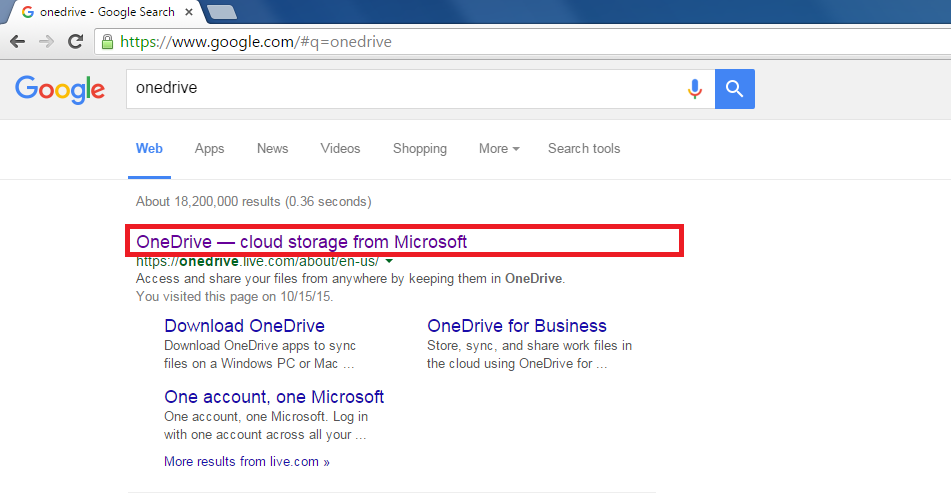
- Search for “OneDrive”
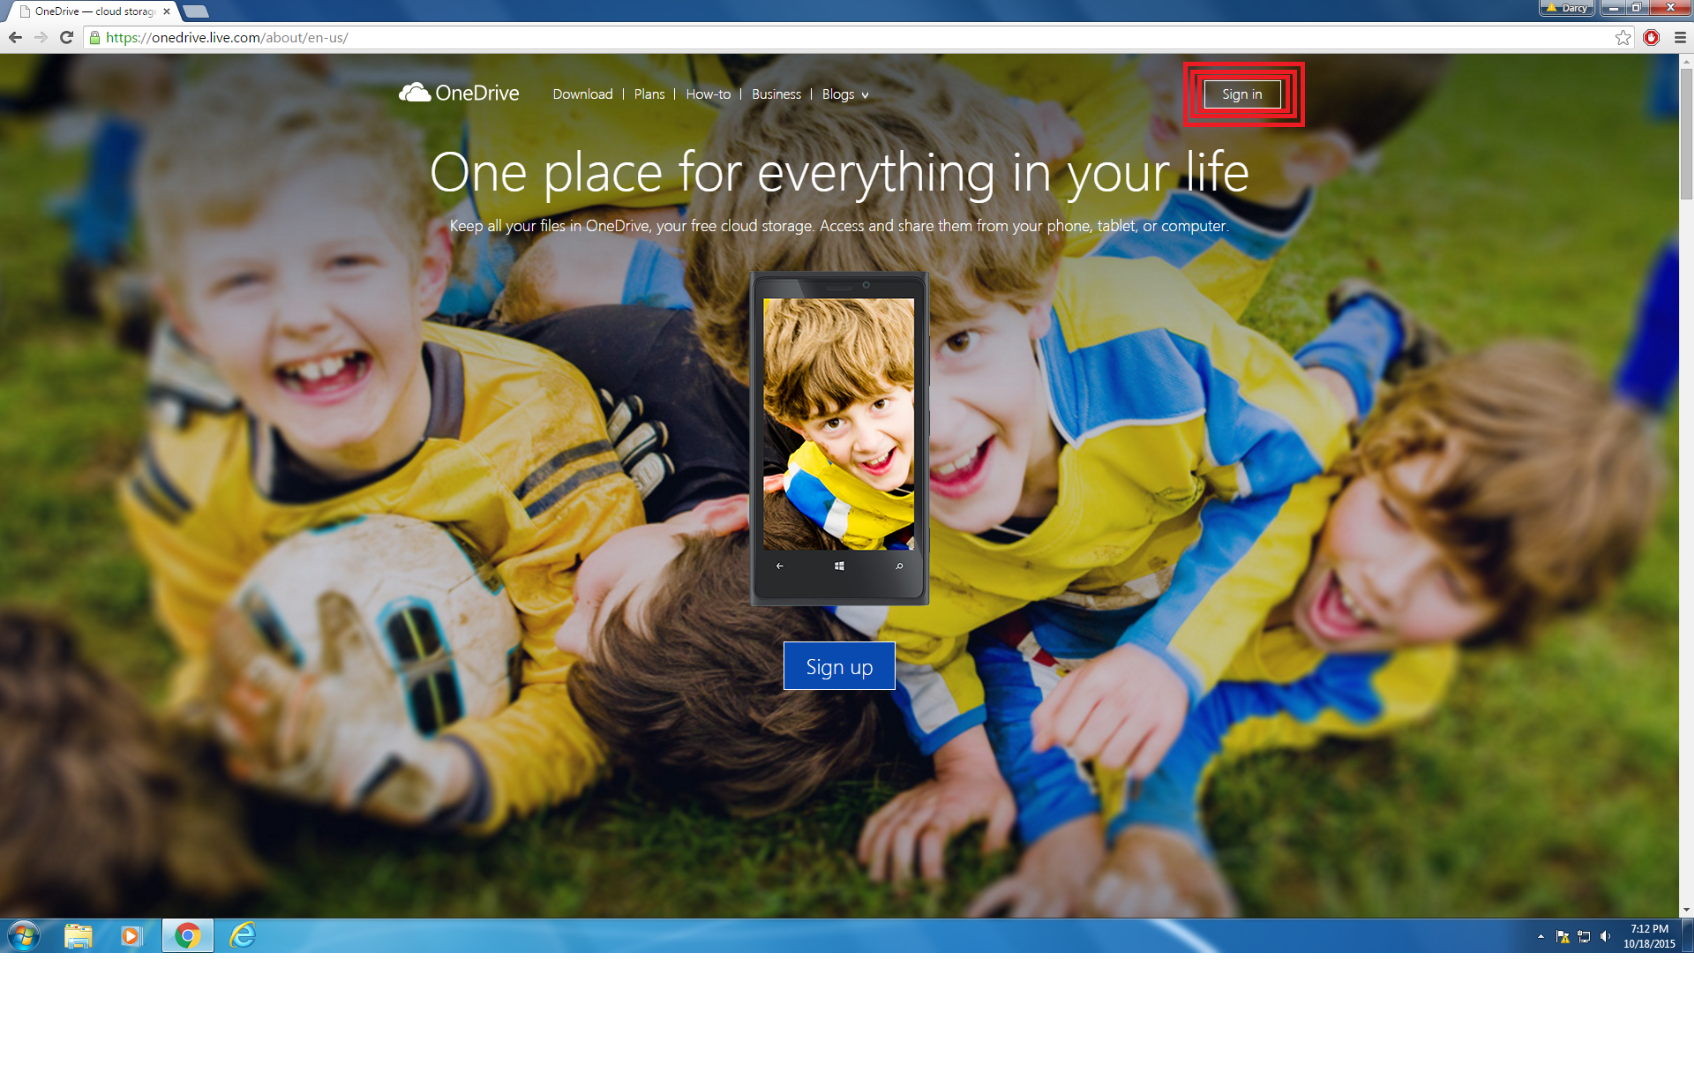
- Once on the webpage, click sign-in
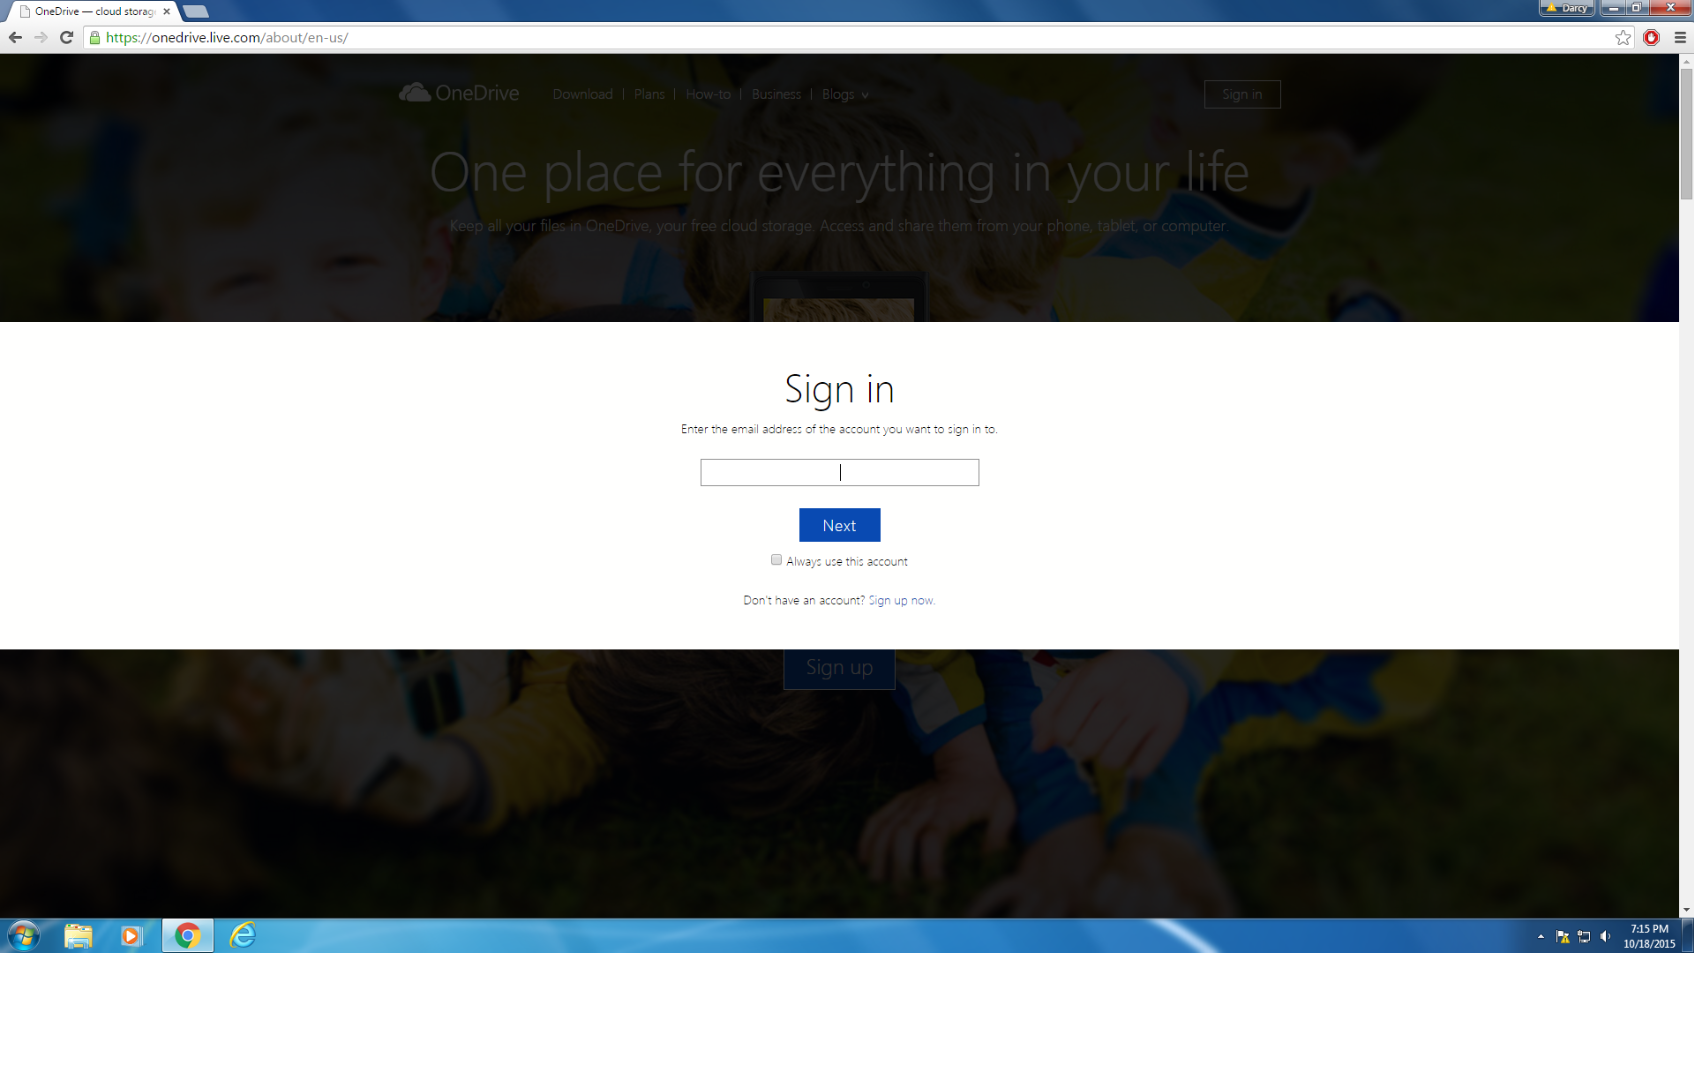
- Sign into OneDrive using the account you created in the back up instructions
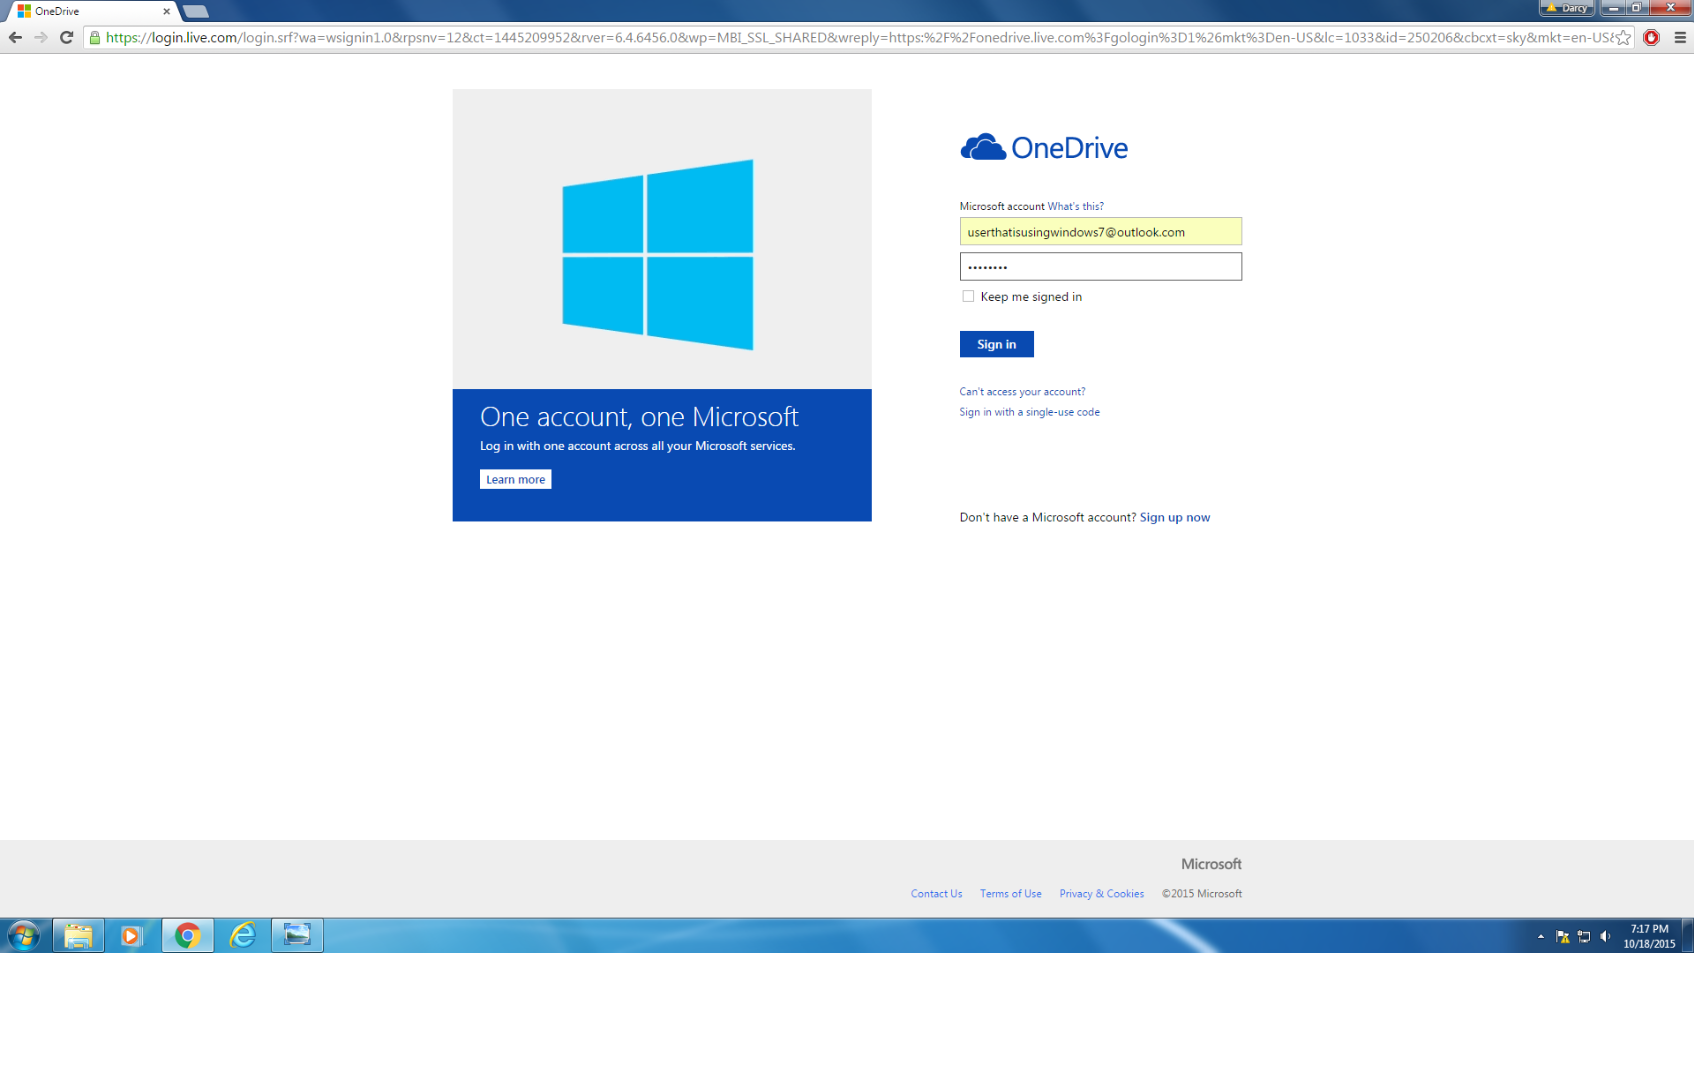
- Enter your login information. (E-mail and password)
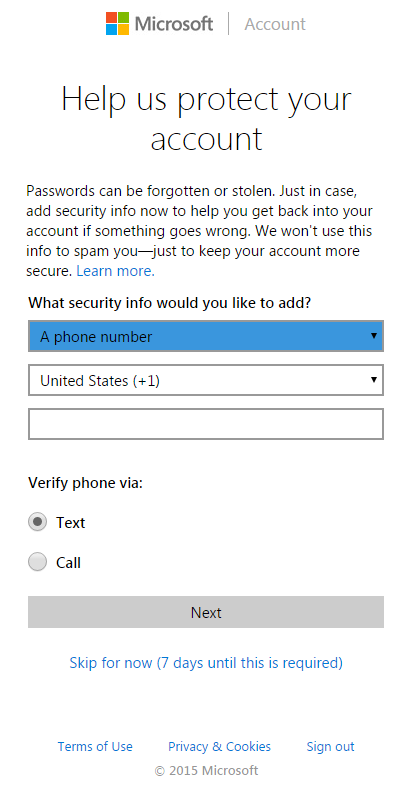
- This will pop up if you haven’t added a protection to your account
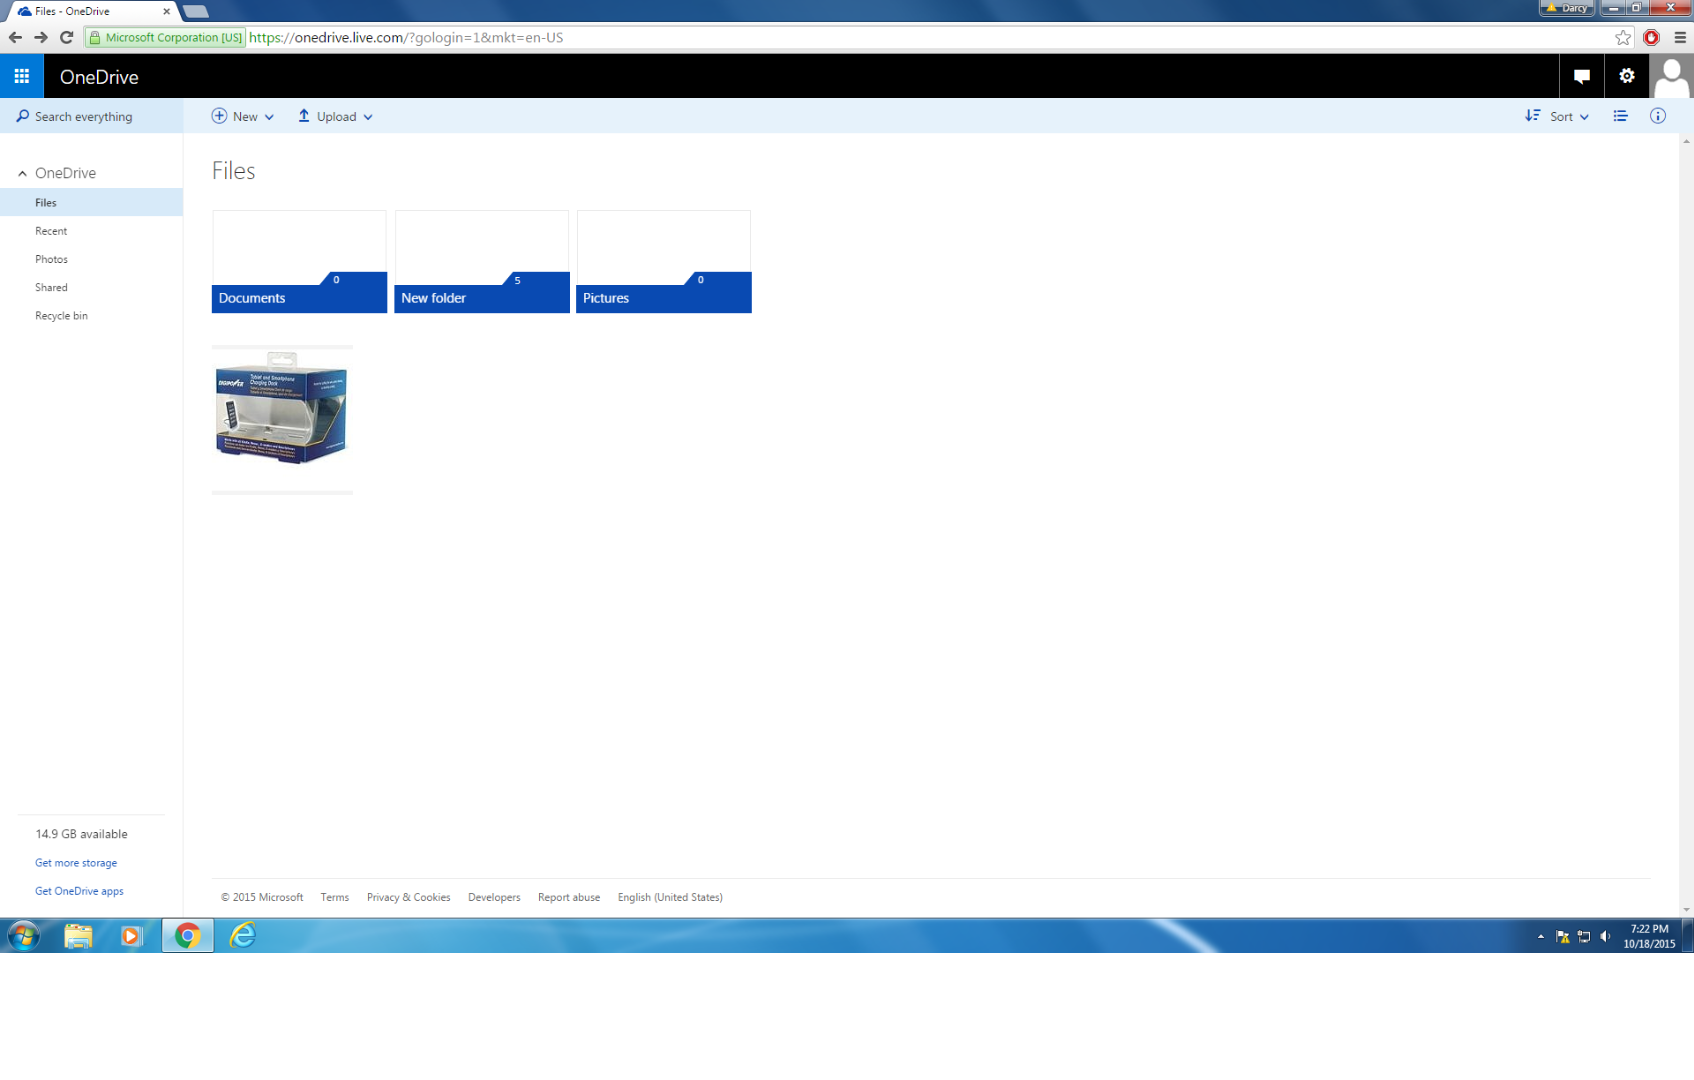
- This is the main window. Here you will see the content you previously backed up
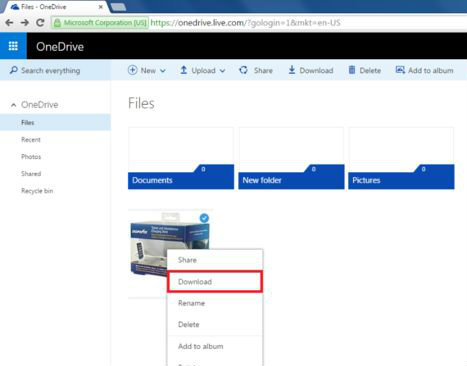
- Right click the file you wish to download, and click download.
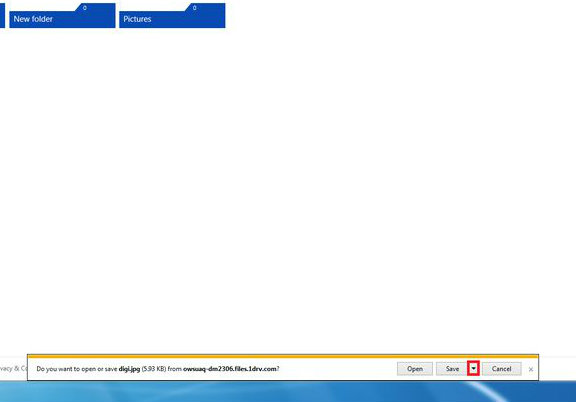
- Choose a download location and click Save arrow
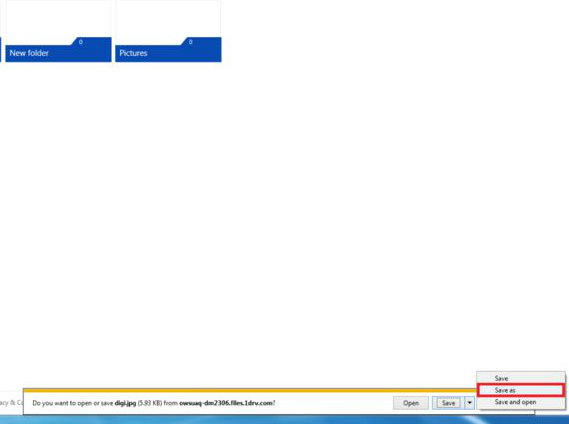
- Click Save as (in red)
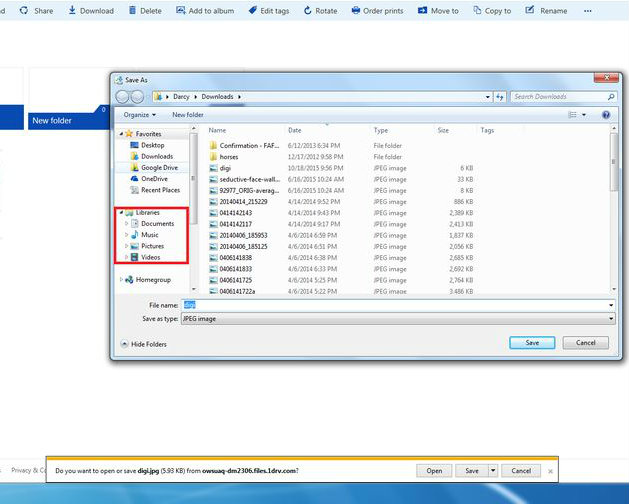
- Navigate using to the location you wish to put the file (the red box)
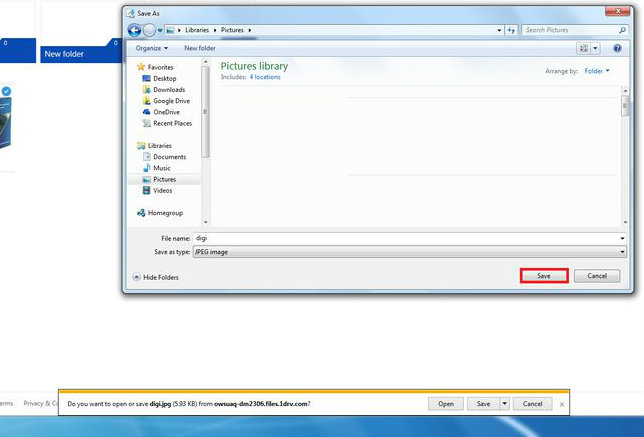
- Click save to save to desired location
Note: You can do the same thing with a folder
Conclusion
We hope you found these set of instructions easy to follow and understand. If in the beginning you thought the process was going to be challenging, we hope to have changed that. Right now, you should be enjoying your computer the way it was meant to be enjoyed: quick, responsive, and free of frustration. Now that your computer is behaving correctly, it’s a good idea to practice smart usage to keep it this way as long as possible. Try to run windows update and install any available updates. Also, make sure to only download software from trustworthy sources, also don’t open email attachments from people you don’t know, and finally don’t let any website install addon software on your computer unless you are completely sure of what you’re installing. It is now up to you to maintain your new restored computer. If you stay vigilant and follow these simple tips, it will stay fresh for a long time.