Wifi-Controlled Robot Using ESP8266 NodeMCU and Mobile Browser
by kirancps in Circuits > Microcontrollers
793 Views, 4 Favorites, 0 Comments
Wifi-Controlled Robot Using ESP8266 NodeMCU and Mobile Browser
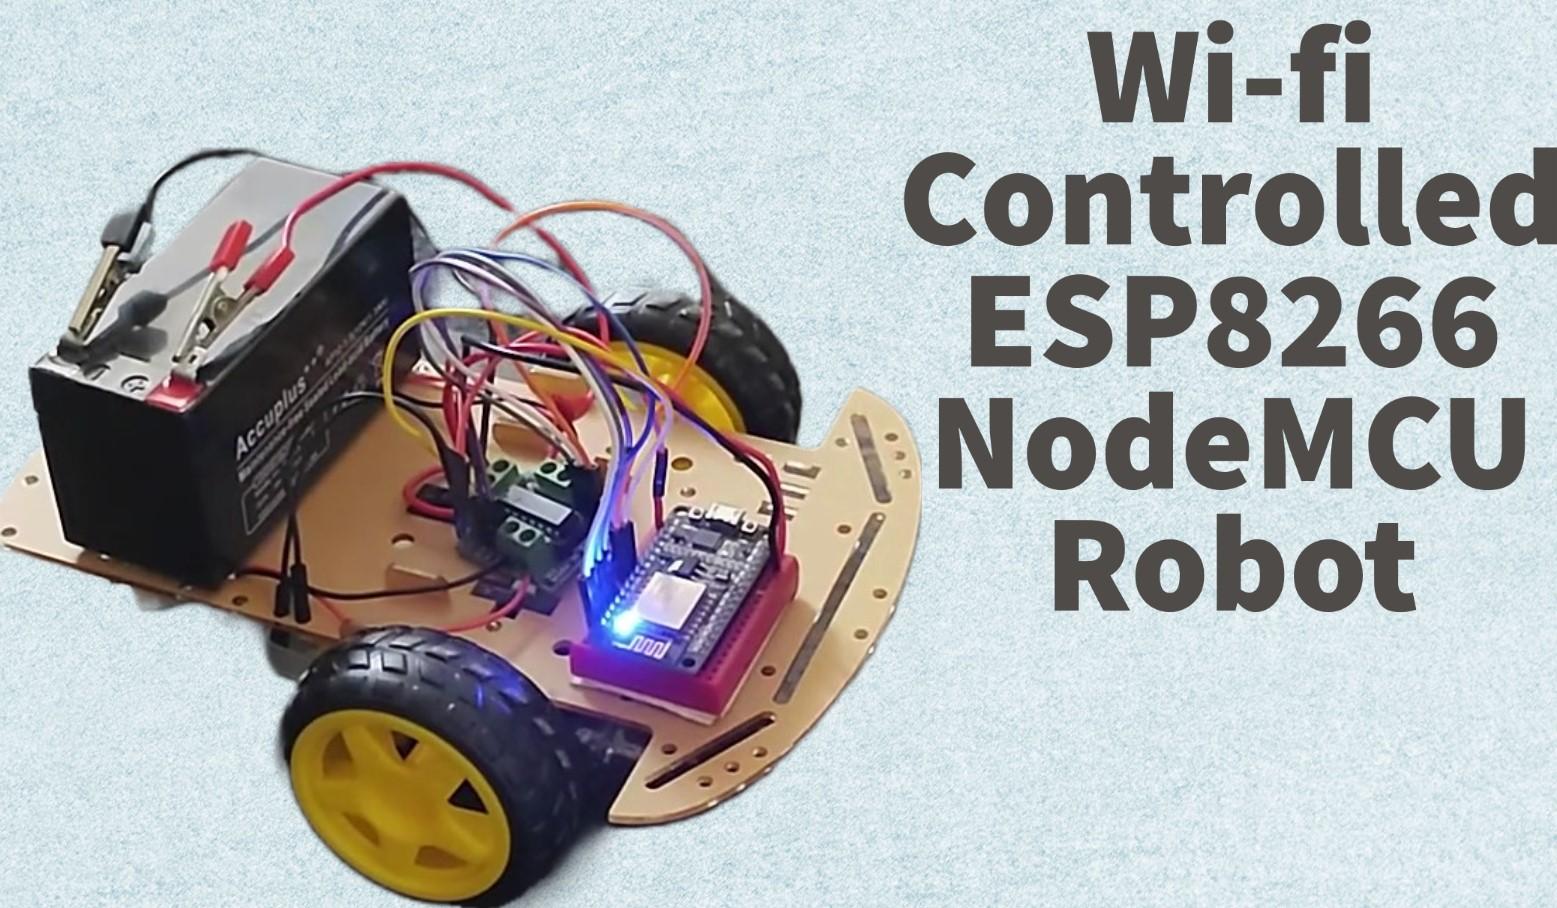
If you're interested in robotics, you might want to try building a Wifi-controlled robot using the ESP8266 NodeMCU microcontroller. With this project, you can remotely control your robot from your smartphone or computer, and even stream live video from a camera mounted on the robot. Here's how to build your own Wifi-controlled robot using ESP8266 NodeMCU.
Supplies
Gather Your Materials
To get started, you'll need the following materials:
- ESP8266 NodeMCU
- Motor Controller (L293D / L298D)
- Motor, wheels and Chassis
- Jumper wires and breadboard
- Battery (12V recommended)
Assemble Your Robot
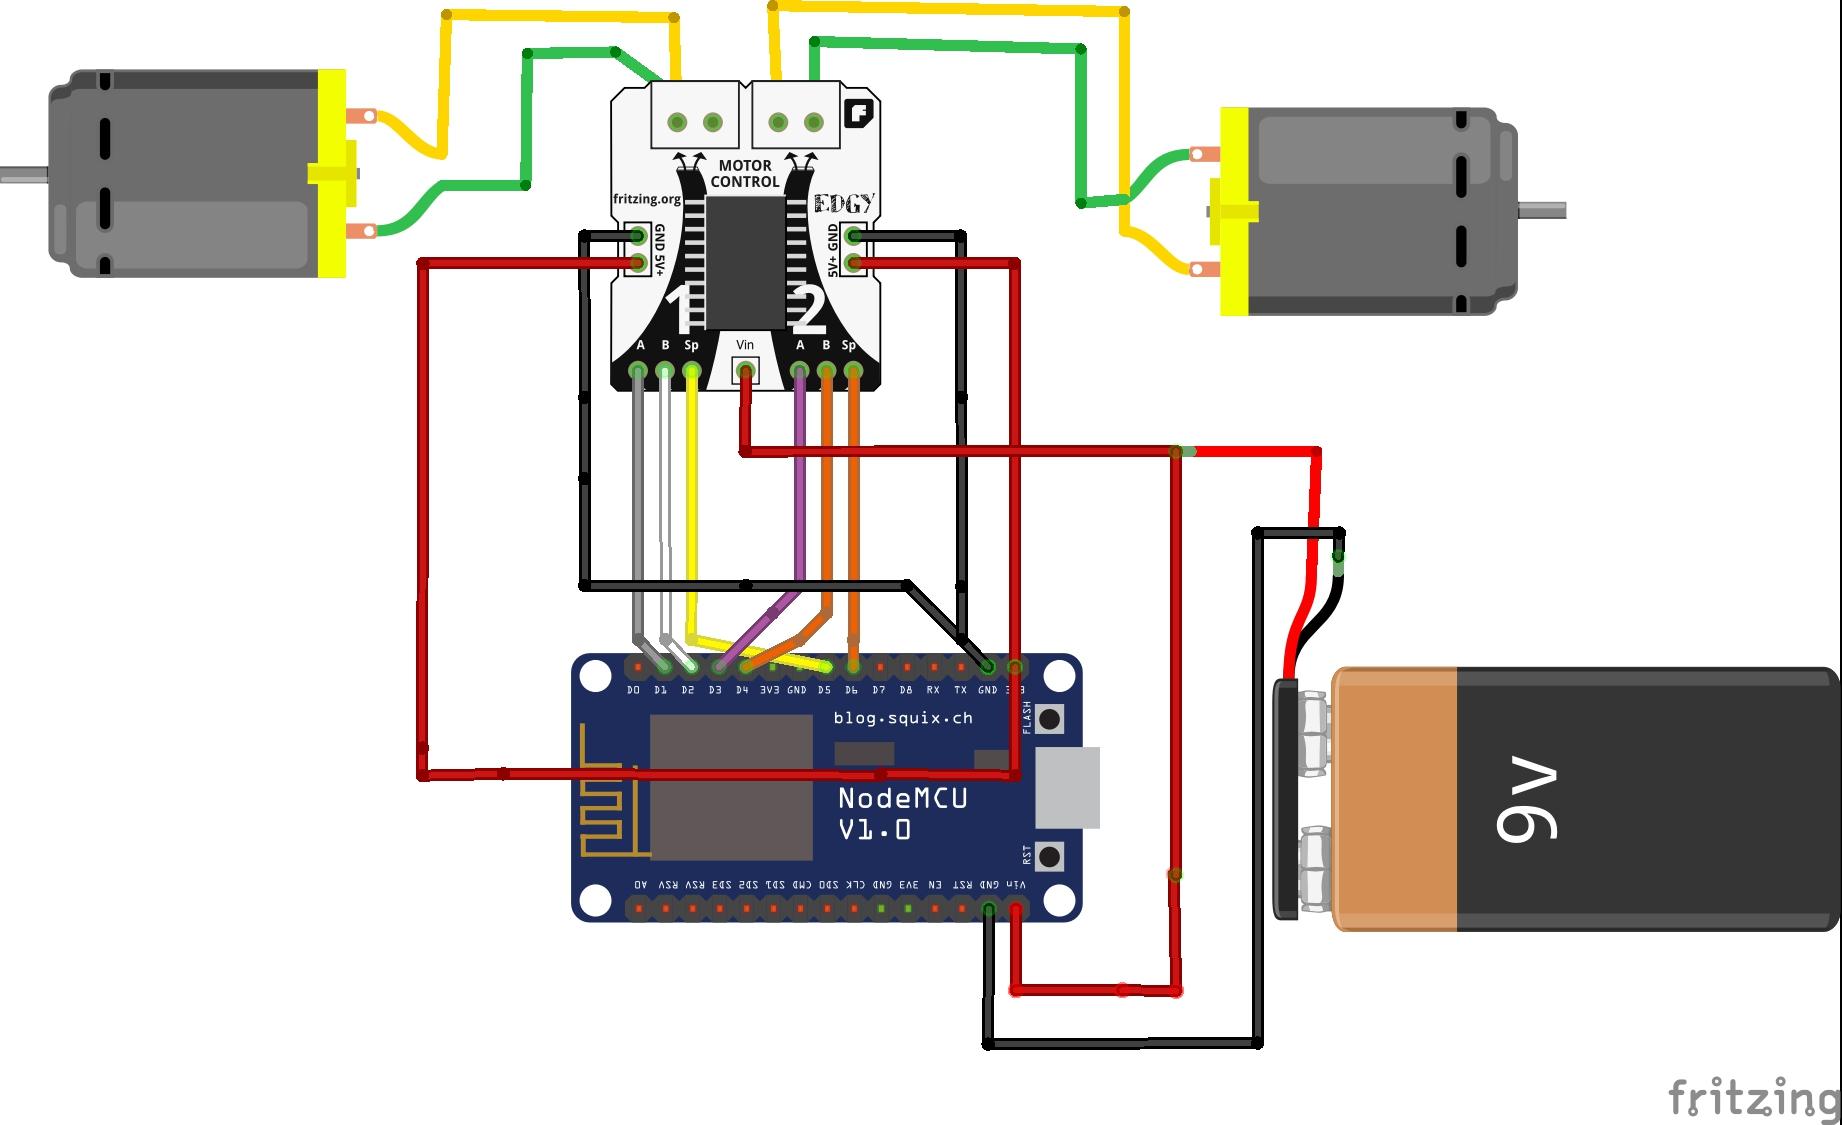
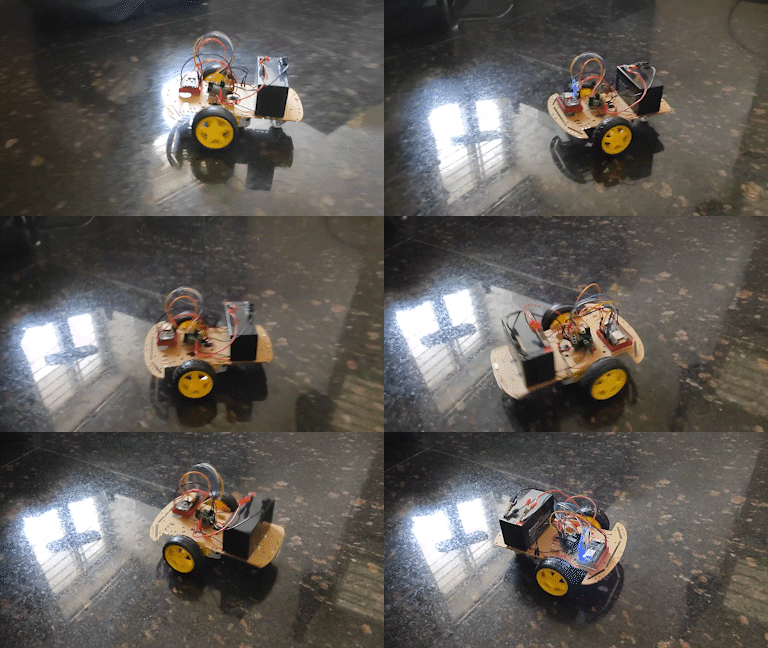
Once you have your materials, it's time to assemble your robot. You can use any type of chassis, such as a 3D-printed one or the one shown above, as long as it fits your motors and battery pack. Connect the motors to the motor controller, and connect the motor controller to the ESP8266 using jumper wires as shown in the circuit diagram. Then, connect the battery pack to the motor controller and the ESP8266. Finally, mount the ESP8266 NodeMCU on the chassis.
The ESP8266 NodeMCU can take 12V input from the battery directly. It also gives 5V output which can be used for motor driver. Make sure that all the ground connections are connected to the battery ground terminal.
Write the Code
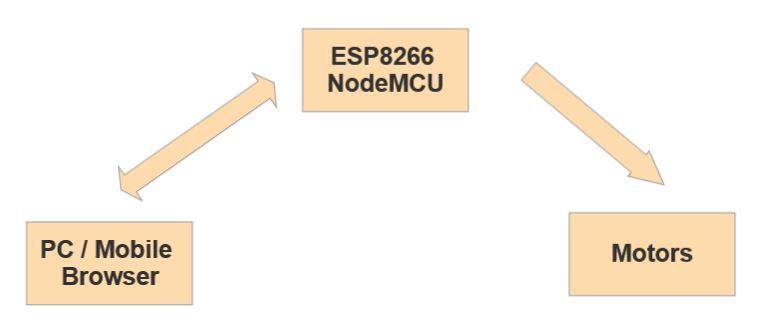
To control your robot, you'll need to write code for the ESP8266 NodeMCU microcontroller. You can use the Arduino IDE or any other programming environment that supports ESP8266. Above shows the architecture of the software. The ESP8266 NodeMCU acts as server and renders a HTML page which has control buttons to control the movement of the robot. Make sure that ESP8266 and PC/Mobile is connected to the same WiFi router.
Arduino IDE
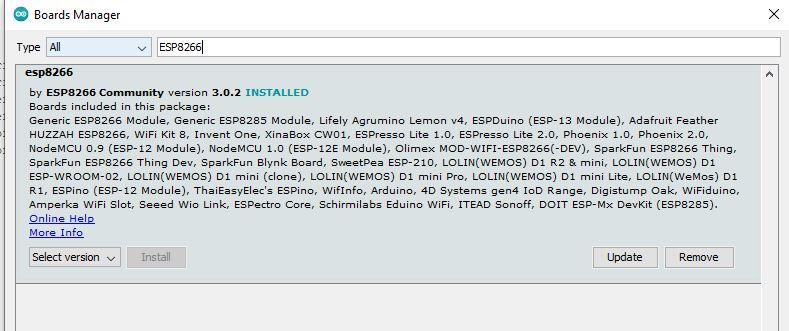
Install Arduino IDE from the official Arduino website and follow the instructions. Open the Arduino IDE and install the board package for ESP8266. To install, Go to Tools --> Boards -->Board Manager and type ESP8266 and install the board package.
Once board is selected, select the COM port on which ESP8266 is connected, and write the following code.
#include <ESP8266WiFi.h>

const char* ssid = "Your WiFi Name";
const char* password = "Your Wifi Password";

int right_a = 0;                 // D3 right motor_a
int right_b = 2;                 // D4 right motor_b
int left_b = 4;                 // D2 left motor_b
int left_a = 5;                 // D1 left motor_a
int ENA = 12;                 // Pin 1 of L293D IC, D6 Pin of NodeMCU
int ENB = 14;                 // Pin 9 of L293D IC, D5 Pin of NodeMCU
int duty_a = 70;              //Speed of right motor range(0-255)
int duty_b = 70;              //Speed of left motor range(0-255)
WiFiServer server(80);

void setup()
{
  Serial.begin(115200);
  pinMode(right_a, OUTPUT);
  pinMode(right_b, OUTPUT);
  pinMode(left_a, OUTPUT);
  pinMode(left_b, OUTPUT);
  pinMode(ENA, OUTPUT);
  pinMode(ENB, OUTPUT);
  digitalWrite(left_b, LOW);
  digitalWrite(left_a, LOW);
  digitalWrite(right_b, LOW);
  digitalWrite(right_a, LOW);
  analogWrite(ENA,0);
  analogWrite(ENB,0);


  Serial.print("Connecting to Internet ");
  WiFi.begin(ssid, password);
  while (WiFi.status() != WL_CONNECTED)
  {
    delay(500);
    Serial.print(".");
  }
  Serial.println("WiFi connected");

 /*-------- server started---------*/
  server.begin();
  Serial.println("Server started");

  /*------printing ip address--------*/
  Serial.print("IP Address of network: ");
  Serial.println(WiFi.localIP());
  Serial.print("Copy and paste the following URL: https://");
  Serial.print(WiFi.localIP());
  Serial.println("/");
}

void loop()
  {
    WiFiClient client = server.available();
    if (!client)
    {
      return;
    }
  Serial.println("Waiting for new client");
  while(!client.available())
  {
    delay(1);
  }

  String request = client.readStringUntil('\r');
  Serial.println(request);
  client.flush();


  char* value = "stop";
  if (request.indexOf("/foward") != -1)
  {
    //digitalWrite(LED, HIGH);
    forward();
    value = "forward";
  }
  if (request.indexOf("/stop") != -1)
  {
    //digitalWrite(LED, LOW);
    halt();
    value ="stop" ;
  }

   if (request.indexOf("/right") != -1)
  {
    //digitalWrite(LED, LOW);
    right();
    value ="right" ;
  }
   if (request.indexOf("/left") != -1)
  {
    //digitalWrite(LED, LOW);
    left();
    value ="left" ;
  }
   if (request.indexOf("/reverse") != -1)
  {
    //digitalWrite(LED, LOW);
    reverse();
    value ="reverse" ;
  }

/*------------------Creating html page---------------------*/

  client.println("HTTP/1.1 200 OK");
  client.println("Content-Type: text/html");
  client.println("");
  client.println("<!DOCTYPE HTML>");
  client.println("<html>");
  client.println("<head>");
 client.println(" <meta charset=\"utf-8\"> ");
 client.println("<meta name=\"viewport\" content=\"width=device-width, initial-scale=1\">");
  client.println("<title>");
  client.println("ROBOT CONTROL");
  client.println("</title>");
   client.println("<link href=\"https://cdn.jsdelivr.net/npm/bootstrap@5.3.0-alpha1/dist/css/bootstrap.min.css\" rel=\"stylesheet\" integrity=\"sha384-GLhlTQ8iRABdZLl6O3oVMWSktQOp6b7In1Zl3/Jr59b6EGGoI1aFkw7cmDA6j6gD\" crossorigin=\"anonymous\">");


  client.println("</head>");
  client.println("<body>");
  client.println(" <script src=\"https://cdn.jsdelivr.net/npm/bootstrap@5.3.0-alpha1/dist/js/bootstrap.bundle.min.js\" integrity=\"sha384-w76AqPfDkMBDXo30jS1Sgez6pr3x5MlQ1ZAGC+nuZB+EYdgRZgiwxhTBTkF7CXvN\" crossorigin=\"anonymous\">  </script>");
 client.println("");
 client.println("<div class=\"d-flex justify-content-center\">");
 client.println("<div style=\"margin-top:5px\">");
  client.print("<h1>ROBOT IS MOVING: ");
   client.print(value);
   client.print("</h1>");
   client.println("<br><br><br><br></div>");
   client.println("</div>");

  client.println("<div class=\"d-flex justify-content-center\">");
  client.println("<br><br>");
  client.println("<table>");
  client.println("<tr><th></th>");
  client.println("<th class=\"text-center\"> <a href=\"/foward\"><button class=\"btn btn-primary\" type=\"button\">FORWARD</button></a></th>");
  client.println("<th></th></tr><tr></tr><tr>");
  client.println("<th class=\"text-center\"><a href=\"/left\"><button class=\"btn btn-primary\" type=\"button\">LEFT</button></a></th>");
  client.println("<th class=\"text-center\"><a href=\"/stop\"><button class=\"btn btn-primary\" type=\"button\">STOP</button></a></th>");
  client.println("<th class=\"text-center\"><a href=\"/right\"><button class=\"btn btn-primary\" type=\"button\">RIGHT</button></a></th></tr>");
   client.println("<tr><th></th>");
  client.println("<th class=\"text-center\"><a href=\"/reverse\"><button class=\"btn btn-primary\" type=\"button\">REVERSE</button></a></th>");
  client.println("<th></th></tr><tr></tr></table>");
  client.println("</div>");
  client.println("</body>");
  client.println("</html>");

  delay(1);
  Serial.println("Client disonnected");
  Serial.println("");


}


void forward(void){
  analogWrite(ENA,duty_a);
  analogWrite(ENB,duty_b);
  digitalWrite(left_b, LOW);
  digitalWrite(left_a, HIGH);
  digitalWrite(right_b, LOW);
  digitalWrite(right_a, HIGH);

}

void reverse(void){
  analogWrite(ENA,duty_a);
  analogWrite(ENB,duty_b);
  digitalWrite(left_a, LOW);
  digitalWrite(left_b, HIGH);
  digitalWrite(right_a, LOW);
  digitalWrite(right_b, HIGH);

}

void right(void){
  analogWrite(ENA,duty_a);
  analogWrite(ENB,duty_b);
  digitalWrite(left_b, LOW);
  digitalWrite(left_a, HIGH);
  digitalWrite(right_b, HIGH);
  digitalWrite(right_a, LOW);

}
void left (void){
  analogWrite(ENA,duty_a);
  analogWrite(ENB,duty_b);
  digitalWrite(left_b, HIGH);
  digitalWrite(left_a, LOW);
  digitalWrite(right_b, LOW);
  digitalWrite(right_a, HIGH);

}
void halt (void){
  analogWrite(ENA,0);
  analogWrite(ENB,0);
  digitalWrite(left_b, LOW);
  digitalWrite(left_a, LOW);
  digitalWrite(right_b,LOW);
  digitalWrite(right_a, LOW);

}
Connect to the Robot
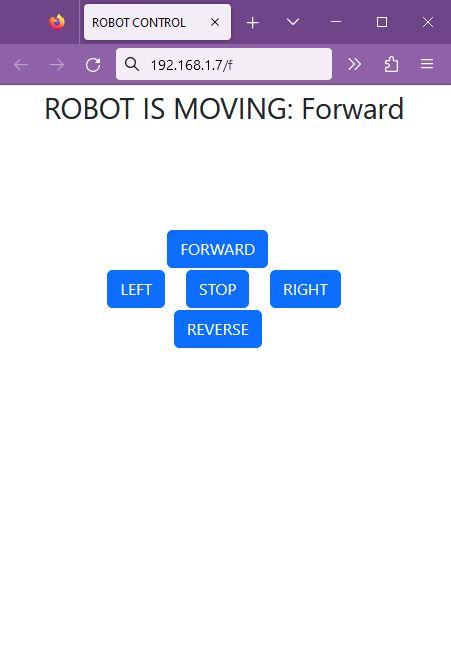
Once you program the microcntroller, open the serial monitor and set the baud rate to 115200. You will see the connection progress and displays the ip address to which it is connected. Enter the ip address in your PC browser / Mobile Browser. Make sure you are connected to same wifi as ESP8266 MCU. I have used Bootstrap to make the webpage little attractive.
If the connection is successful you will see a webpage with control buttons. Click on the buttons to see the robot in action.
PS: Some times the controls might be off or may not match with the logic of the button on webpage. Just swap the motor channels on motor driver or change on the MCU.
You can change the speed of the robot by changing the duty cycle parameter in the code, range of the value is between 0-255.
If you built this proect support this page ;)


