IOT WiFi Flower Moisture Sensor (battery Powered)
by sylwekbala in Circuits > Sensors
3485 Views, 24 Favorites, 0 Comments
IOT WiFi Flower Moisture Sensor (battery Powered)
In this instructable we present how to build WiFi moisture/water sensor with a battery level monitor in less than 30 minutes. The device monitors a moisture level and sends data to a smartphone over the internet (MQTT) with a chosen time interval. Use any MQTT mobile app to receive and visualise the data. The device is powered on a 2xAAA batteries (or a single AAA), if configured properly can last for years. It connects to the internet over Wi-Fi network by using Things On Edge Cricket Wi-Fi module, so you do not require any extra IoT HUB.
Supplies
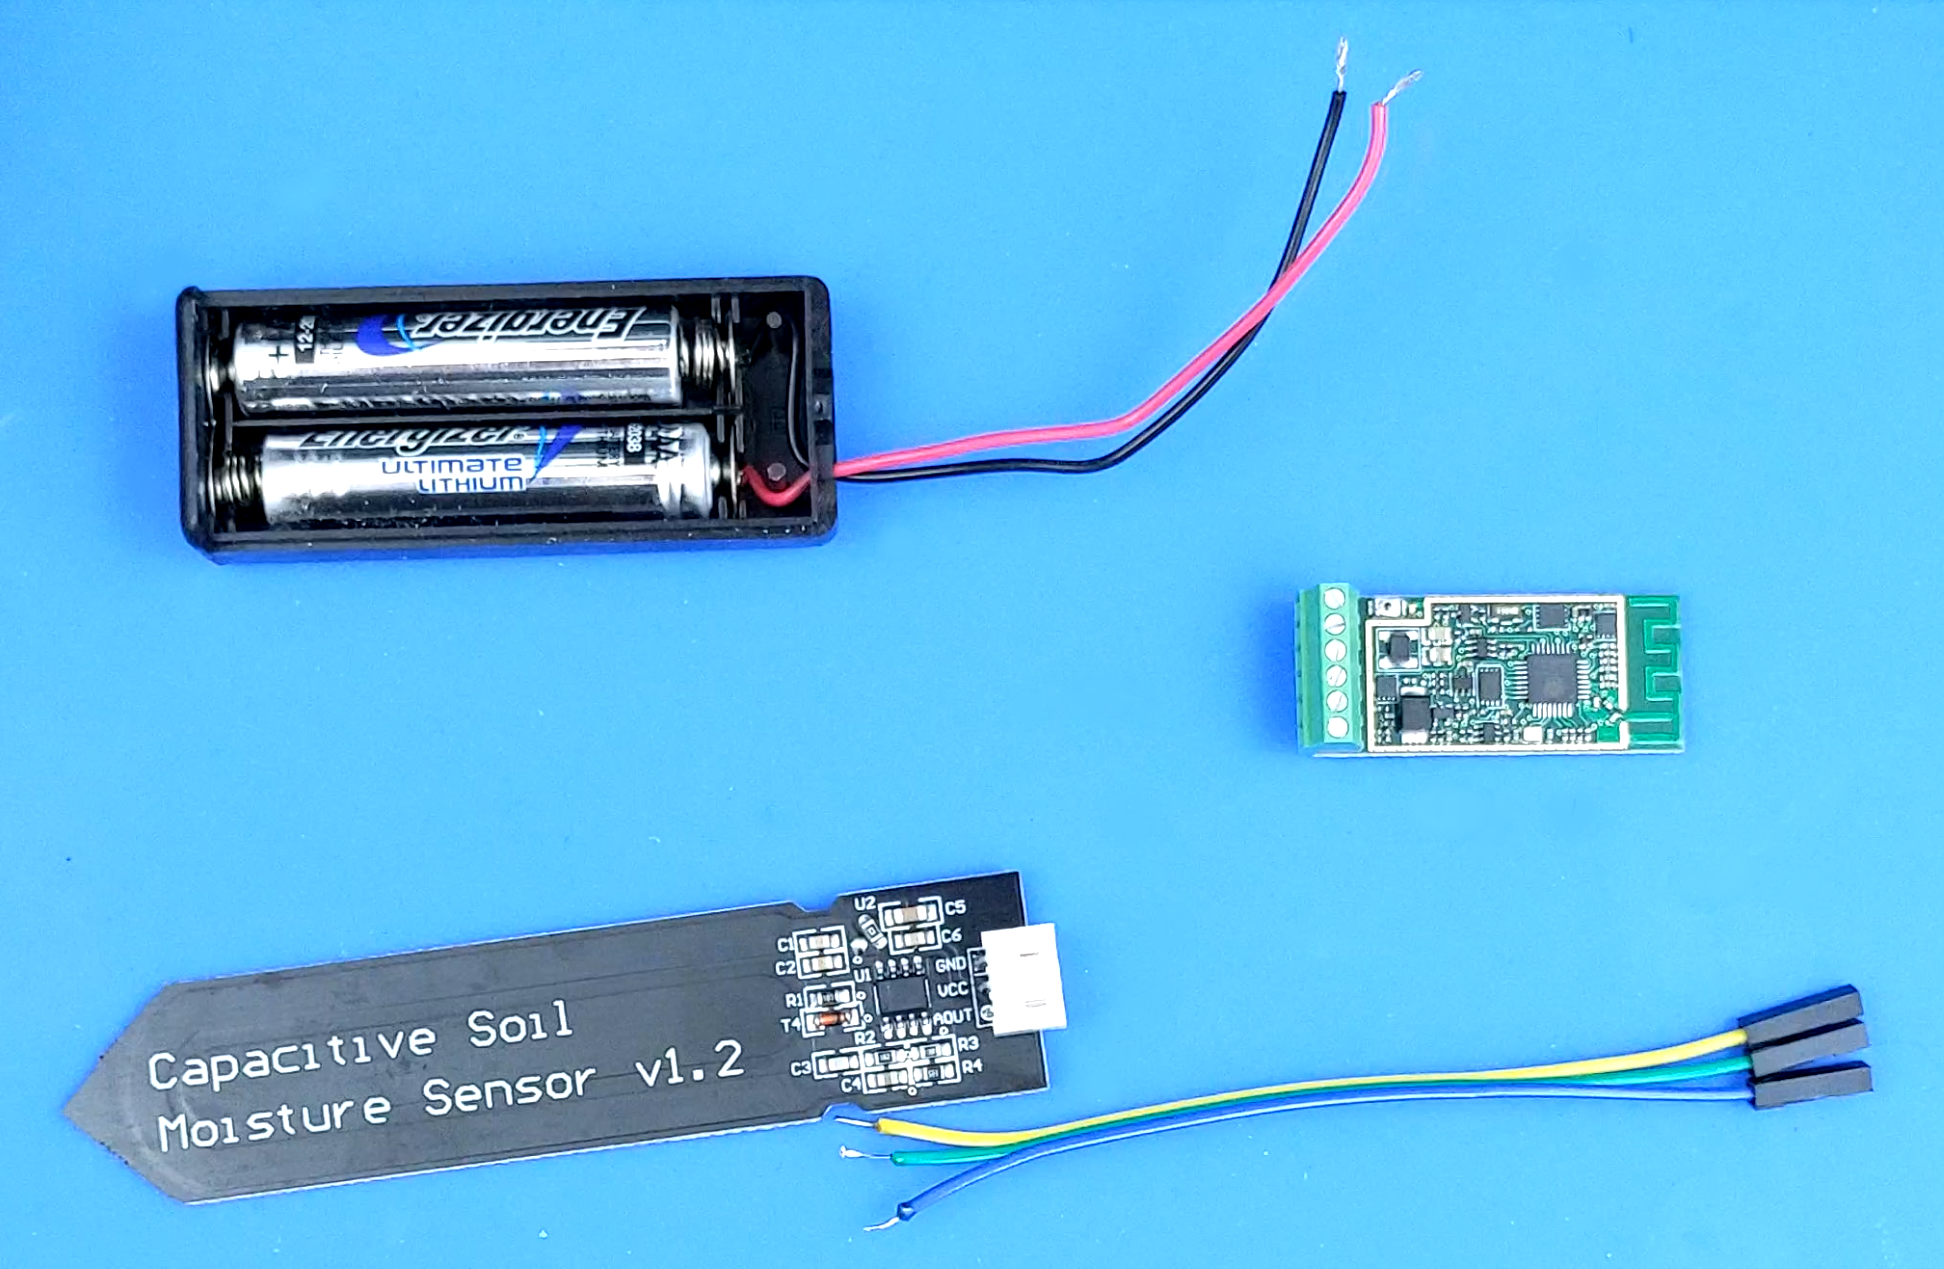
Before you start, please make sure you have the following components:
- Cricket Wi-Fi module (https://www.thingsonedge.com)
- Soil Moisture Sensor
- 6-Way Terminal Block
- 2xAAA batteries (either AAA or AA)
- AAA batteries pack (either AAA or AA)
- 3x Female/Female Jumper Wires
If you are ready let's get started!
Assembly
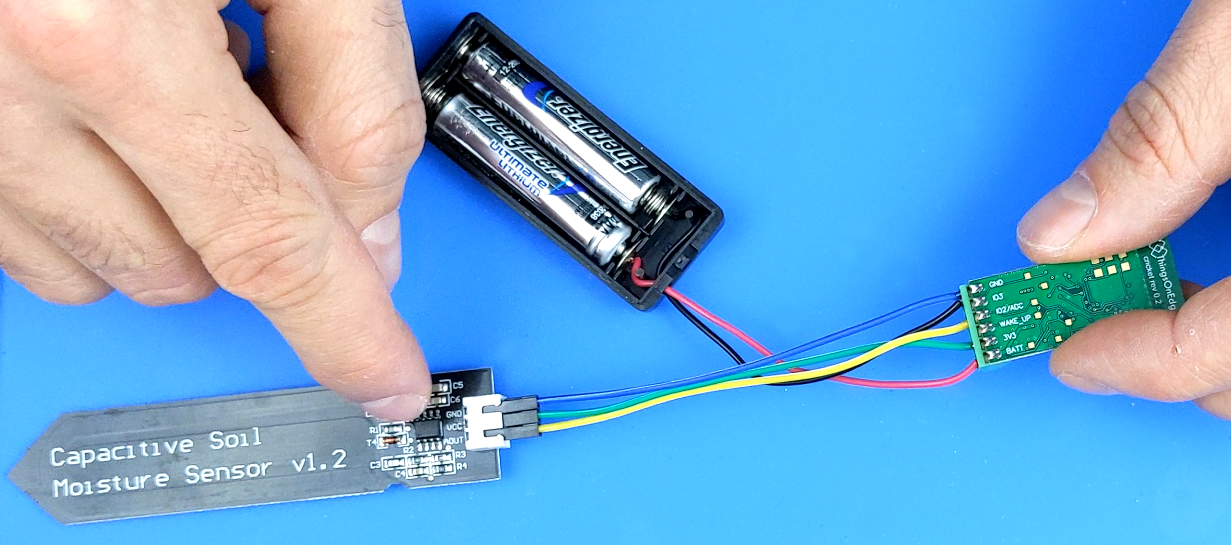
Now you need to connect batteries and the moisture sensor to the Cricket module with the following steps:
- Connect battery VCC / + (red cable) to Cricket's BATT port
NOTE: The Cricket module can be powered either on AA or AAA batteries - Connect the sensor VCC / + (green cable) to Cricket's 3V3 port
NOTE: 3.3V port supplies stable 3.3V regardless of a battery voltage level - Connect the sensor AOUT analog signal (yellow cable) to Cricket's IO2 port
NOTE: This port can be configured as an analogue signal. The data will be reported to your smartphone - Connect the sensor GND / (-) (blue cable) to Cricket's GND port
- Connect the battery GND / (-) (black cable) to the same Cricket GND port
Well done you have successfully assembled the device!
Before you start using the device it needs to be configured in Developer Portal. Please go to the next section.
Configure Your Device in Developer Portal
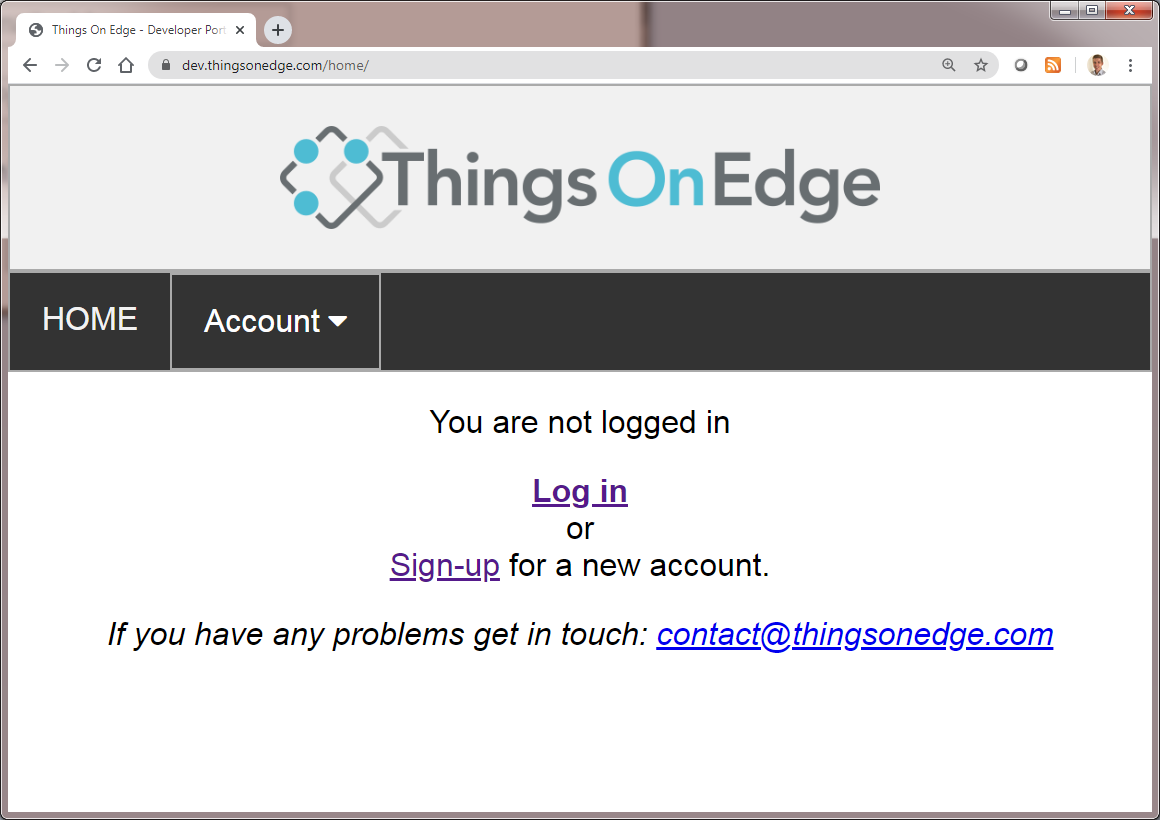
You configure the device entirely OTA (Over The Air) on Things On Edge - Developer Portal (https://dev.thingsonedge.com). The configuration is retrieved by Cricket via the internet when connected to your Wi-Fi (see the next section).
Now let's configure it first. For the moisture sensor it is recommended to set the following configuration:
- Set IO2 as an analog input
- Report moisture level every 2 hours - it will make your device running on 2xAAA alkaline batteries for more than 2 years.
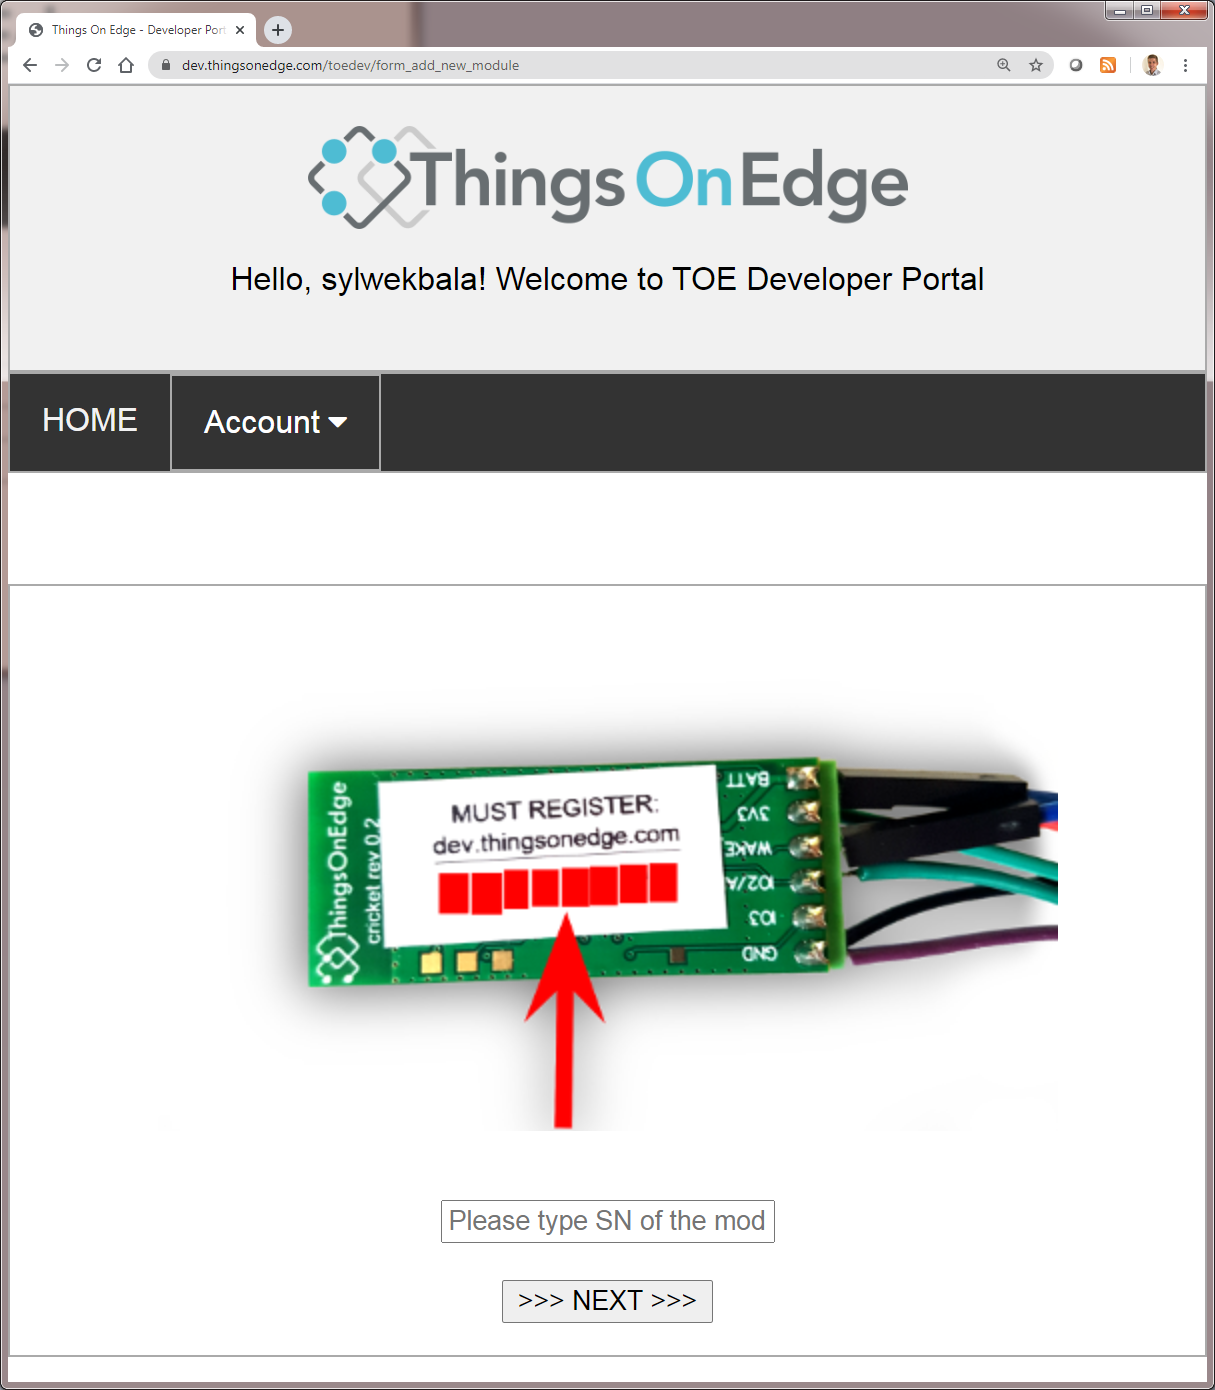
- Open TOE Developer Portal (https://dev.thingsonedge.com) from any browser either from PC or mobile. You must register/login to Developer Portal to activate and configure the device in your account. Otherwise the device won't work.
- After successful login / registration you need to click "Add new" device to activate your device in the system. You need to use the unique serial number printed on a label stick on the back of Cricket.
WARNING: You must keep the serial number for yourself only. Do not share it with anyone else. The serial number is a private MQTT communication account between your device and a smartphone or any other internet service. In other words keep it as secret as a PIN to a credit card.
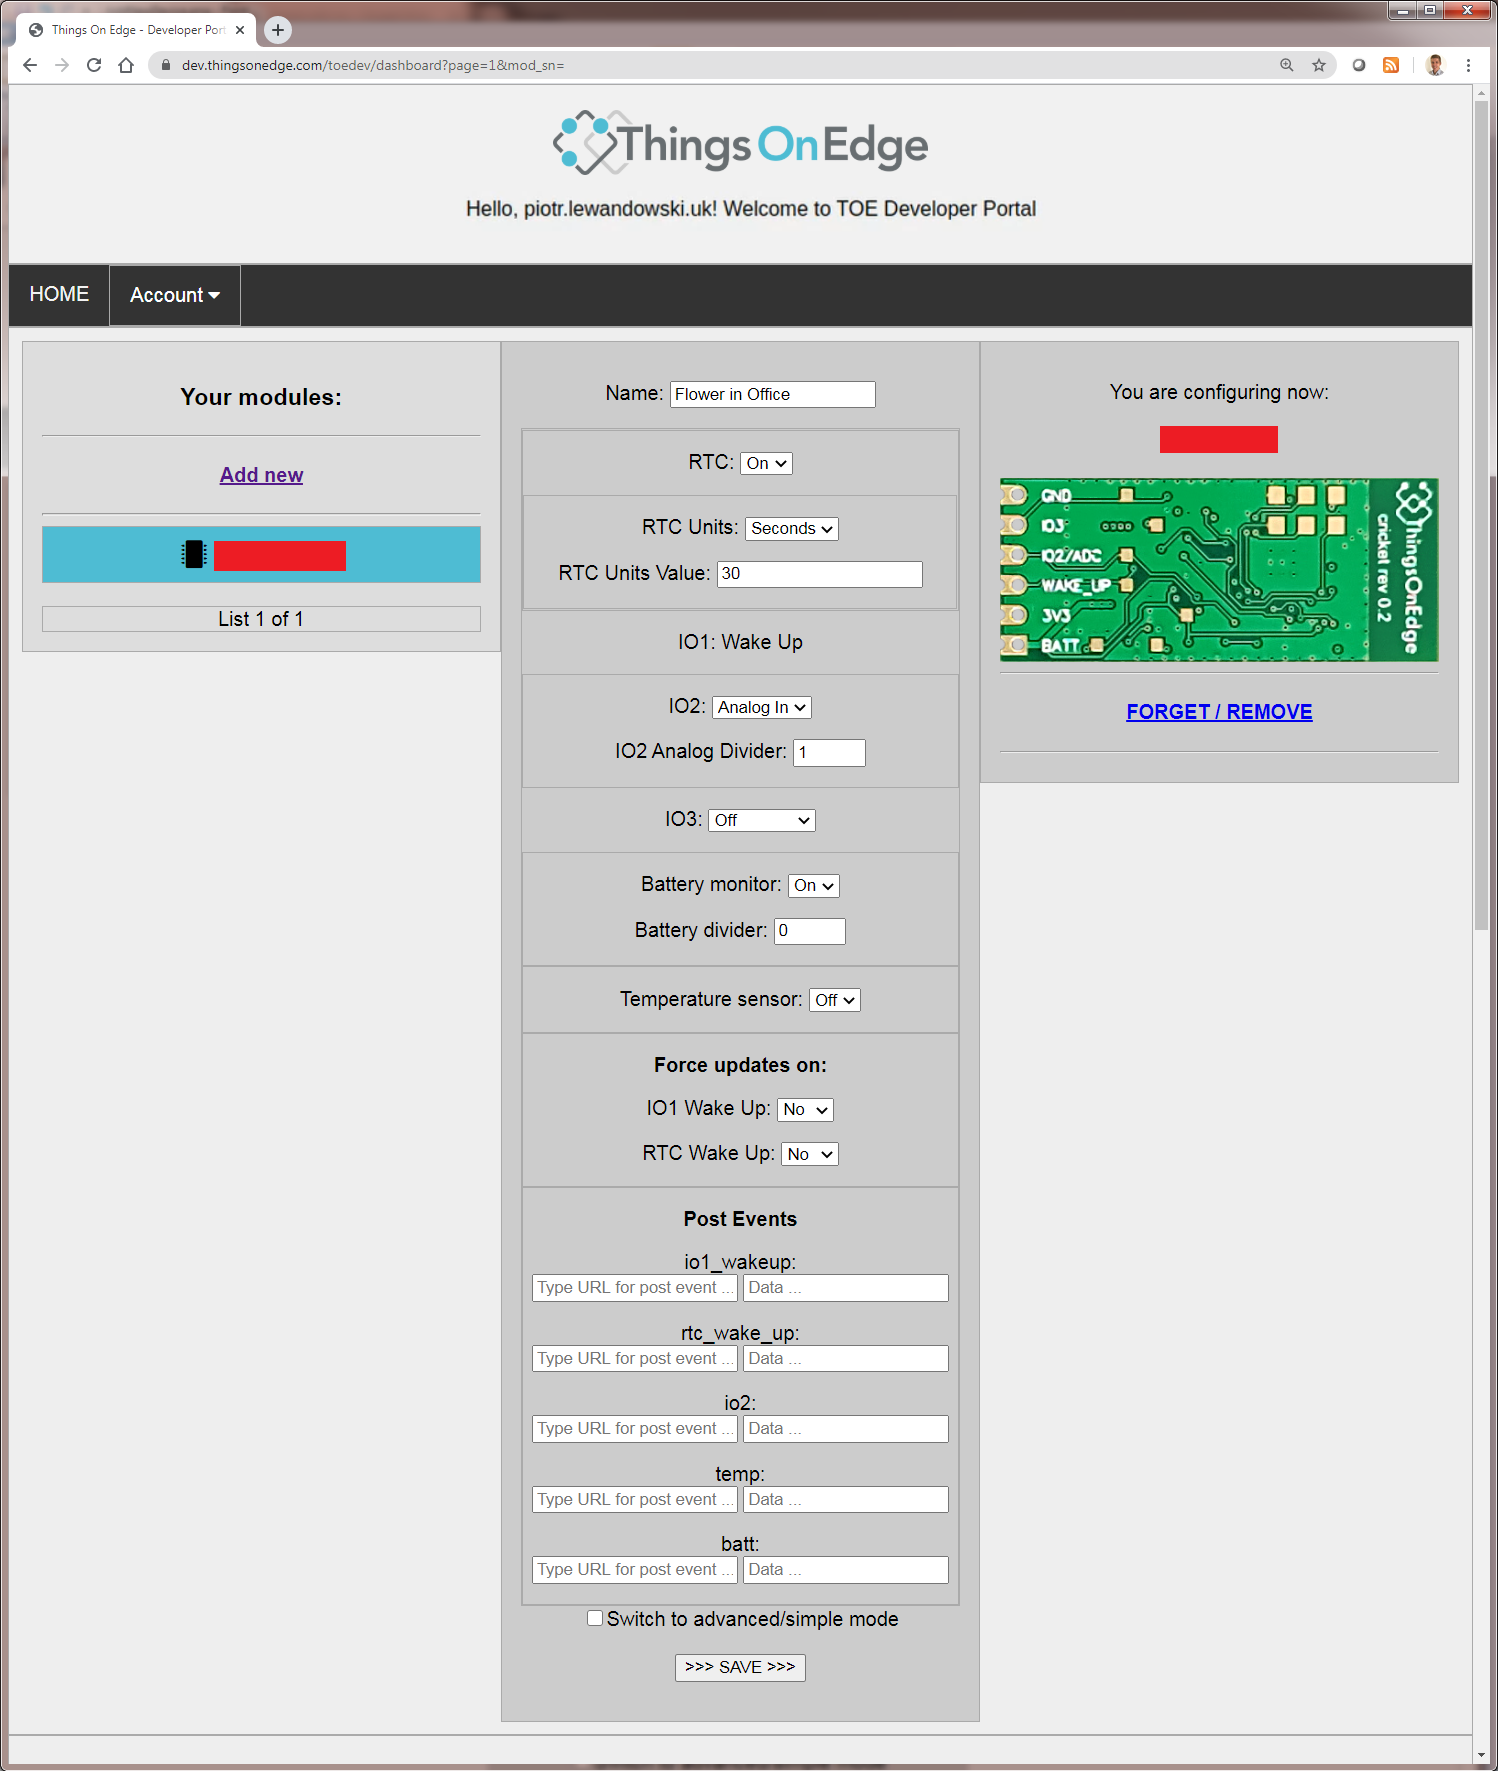
Now you can configure your device.
-
Set the following configuration:
RTC: ONRTC Units: Seconds (to be changed later)
RTC Units Value: 30 (to be changed later)
IO2: Analog In
IO3: Off
Battery monitor: On
Battery divider: 0
Temperature sensor: Off
Force updates on - IO1 Wake Up: On (to be changed later)
Force updates on - RTC Wake Up: On (to be changed later)
Post Events: leave all empty
-
Once you set your configuration hit the Save button.
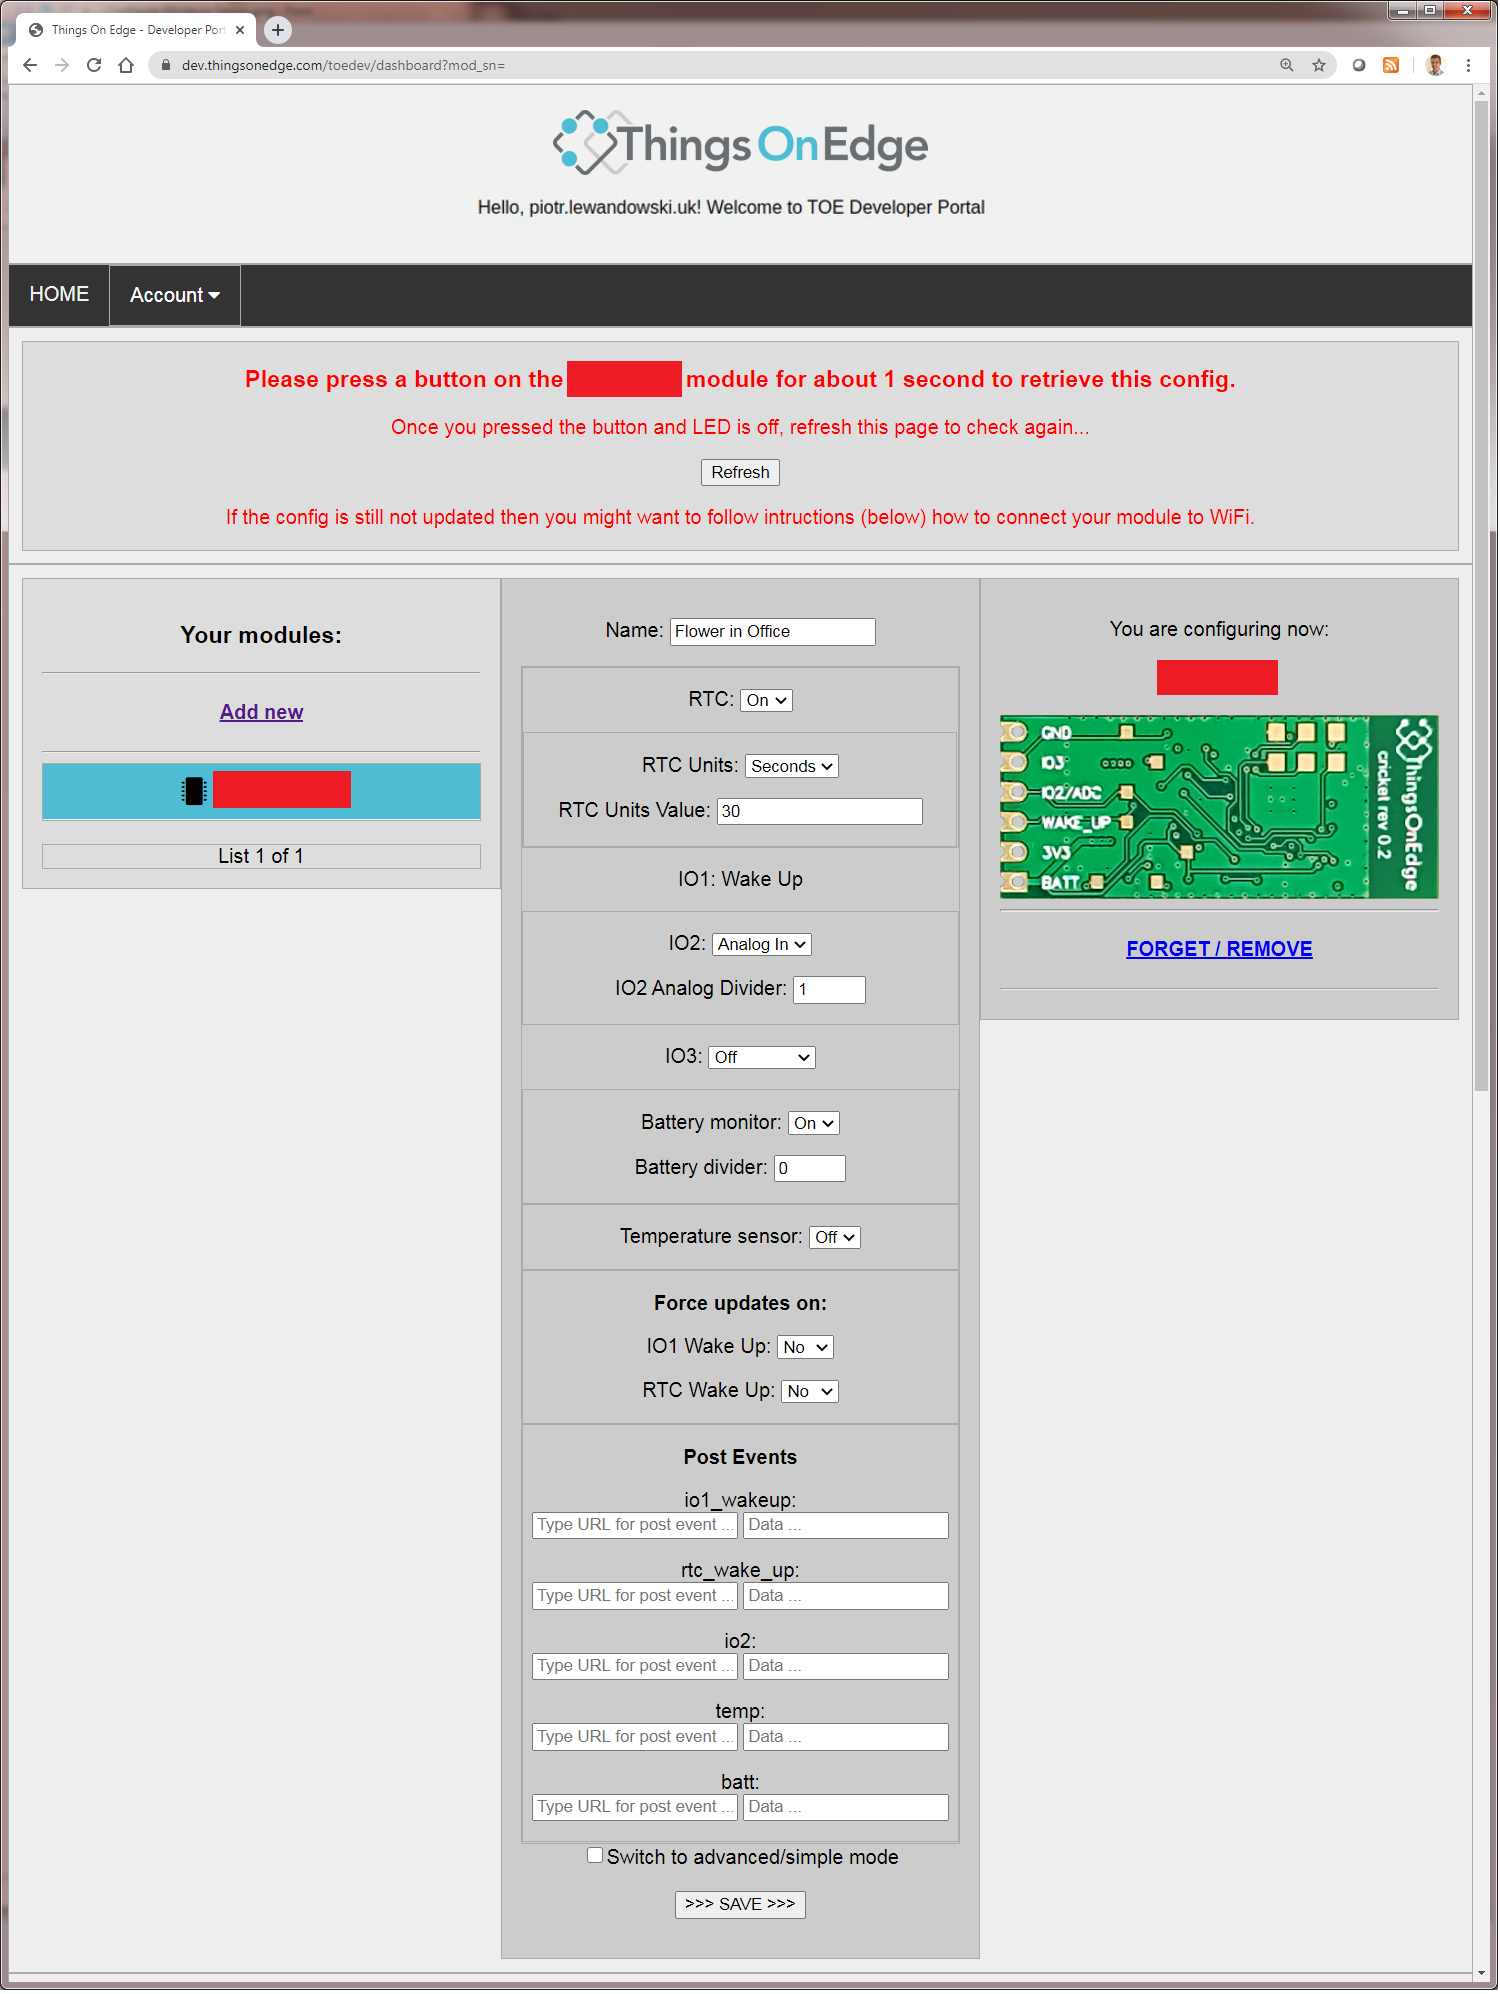
Well done! You are almost there! Now you just need to connect your device to the internet over your Wi-Fi network. Please follow the next section how to do it.
Connect to Wi-Fi Network (internet)

In a few steps you will connect your device to the internet over your Wi-Fi network. All you need to do is to activate Cricket's private Wi-Fi hotspot and then open a private web page to pass your Wi-Fi network credentials. Please follow the steps below:
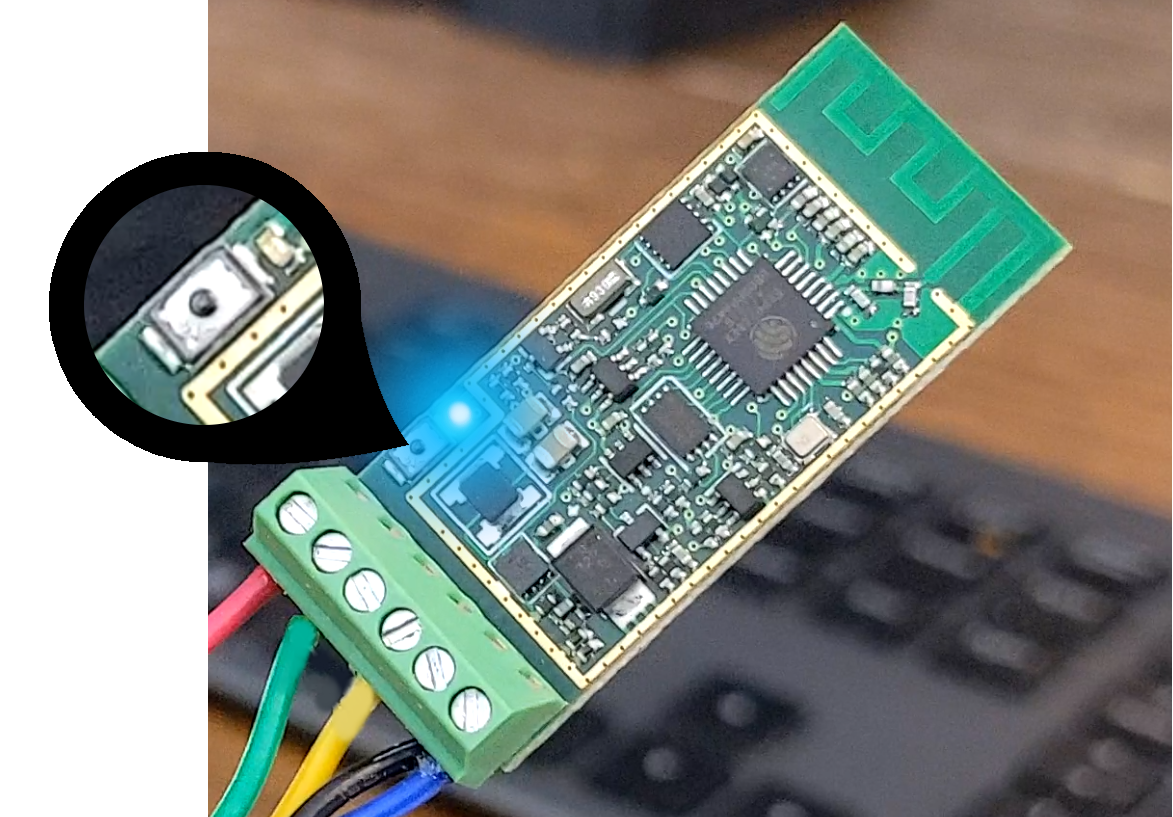
- Press and hold a button on the module for 5 seconds until the LED is constantly lit.
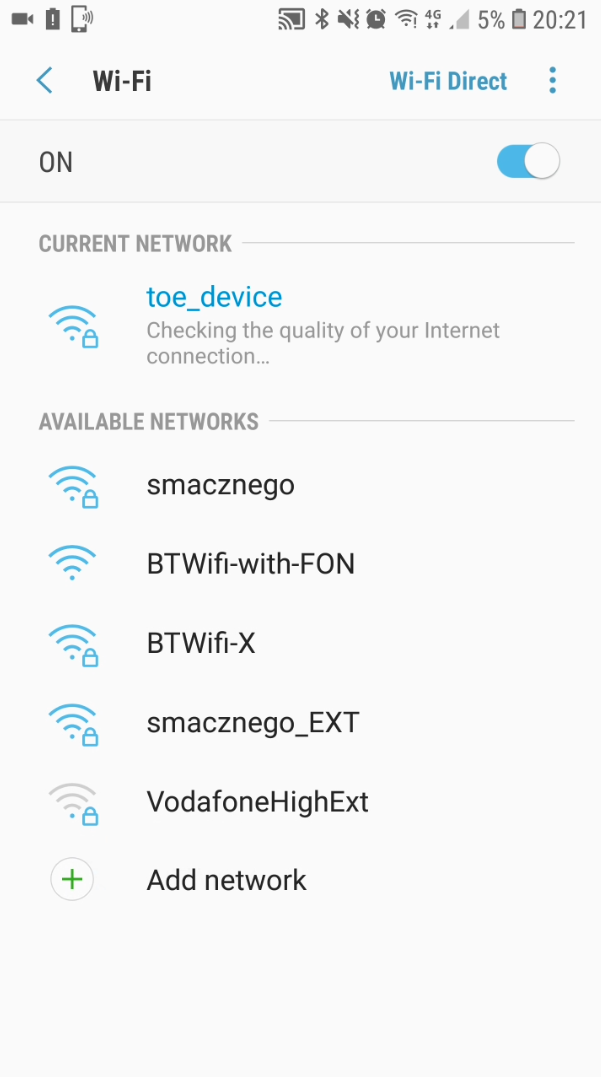
- Once the LED is constantly lit Cricket opened a private Wi-Fi hot spot. Connect from either a laptop or smartphone to the hot spot with the following credentials:SSID: toe_deviceNo password is required
- Once connected, open a private web page: http://192.168.4.1/index.html
NOTICE: make sure LED is still ON! If is OFF repeat the steps from the beginning - Now you can pass your Wi-Fi network credentials and click CONNECT. If you passed correct SSID and Password then after few seconds the device should report it is online and the LED will be OFF.
Congratulations! Now your device is live and connected to the internet! You can start reading the data from the sensor on your smartphone or any other internet services. Please see the next section as an example.
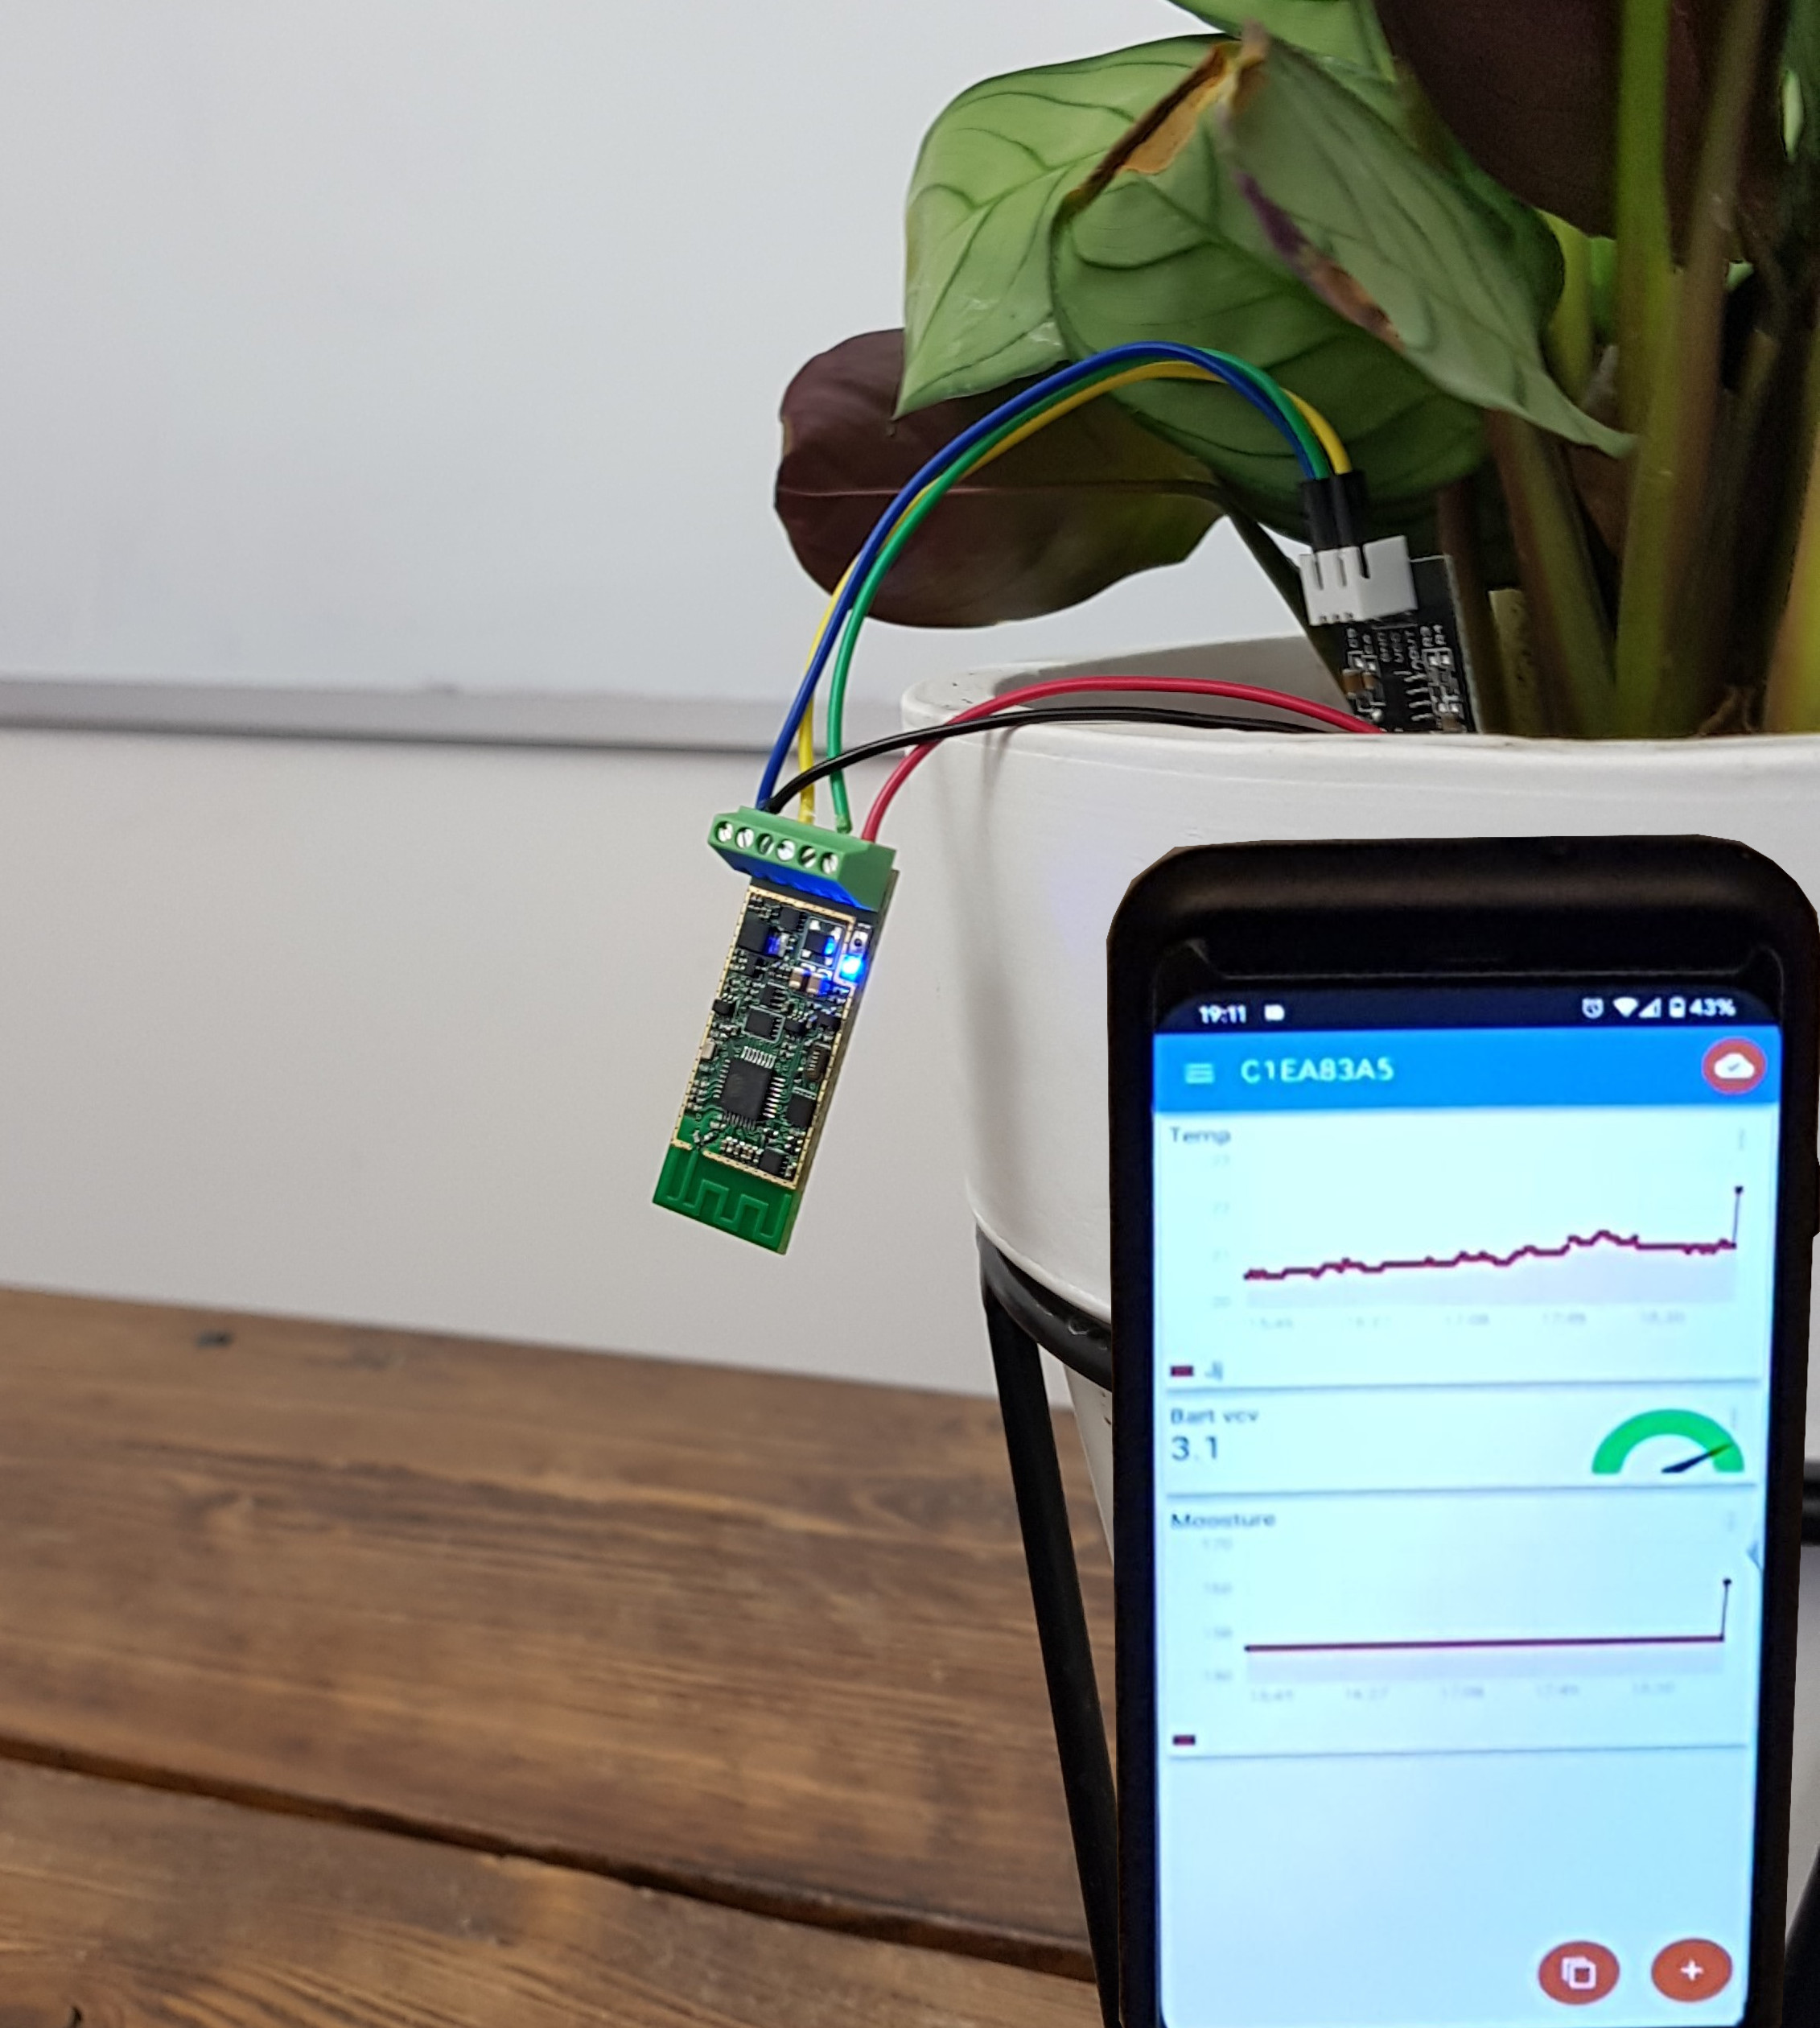
Using MQTT Client on Mobile
You can use any preferred MQTT client. However for the completeness for this project let's use IoT MQTT Panel application to receive and visualise data. The Cricket module connects through low-latency Things On Edge MQTT broker (mqtt.thingsonedge.com). You just need to do the following steps:
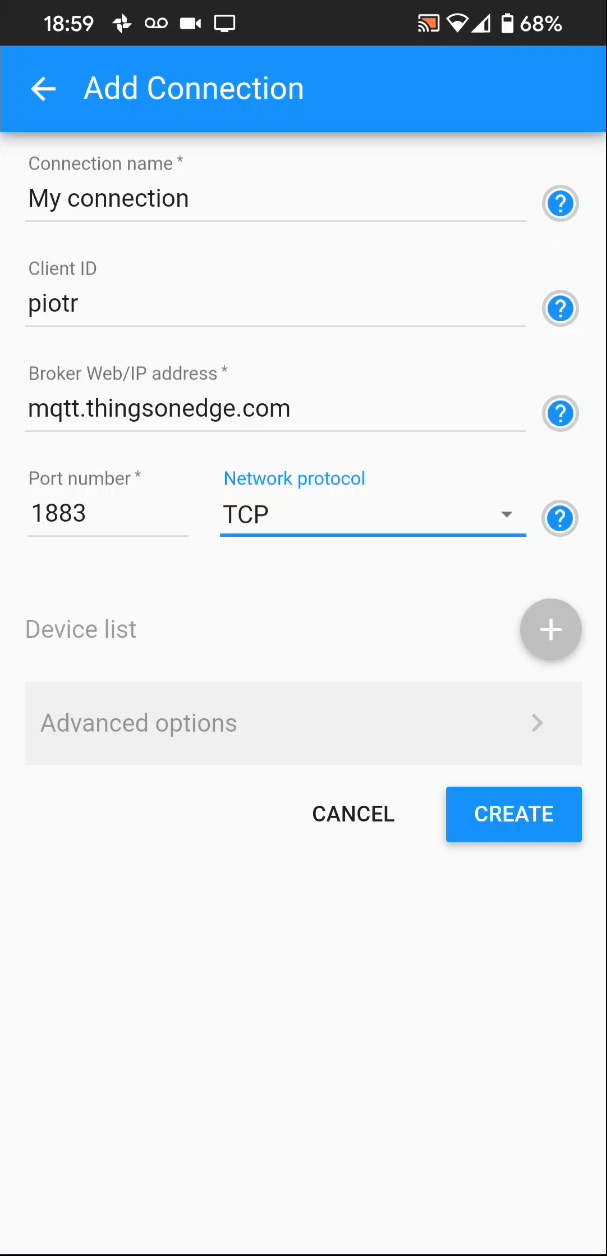
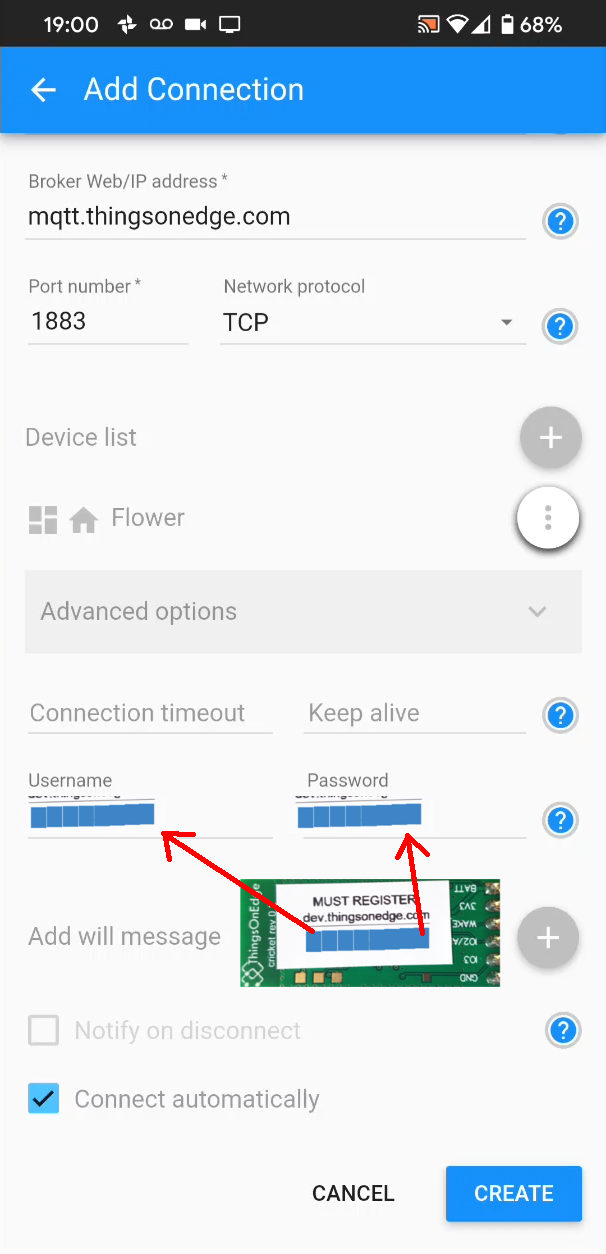
- Configure a server connection with the following details:
Server / Broker IP address: mqtt.thingsonedge.com
Port number: 1883
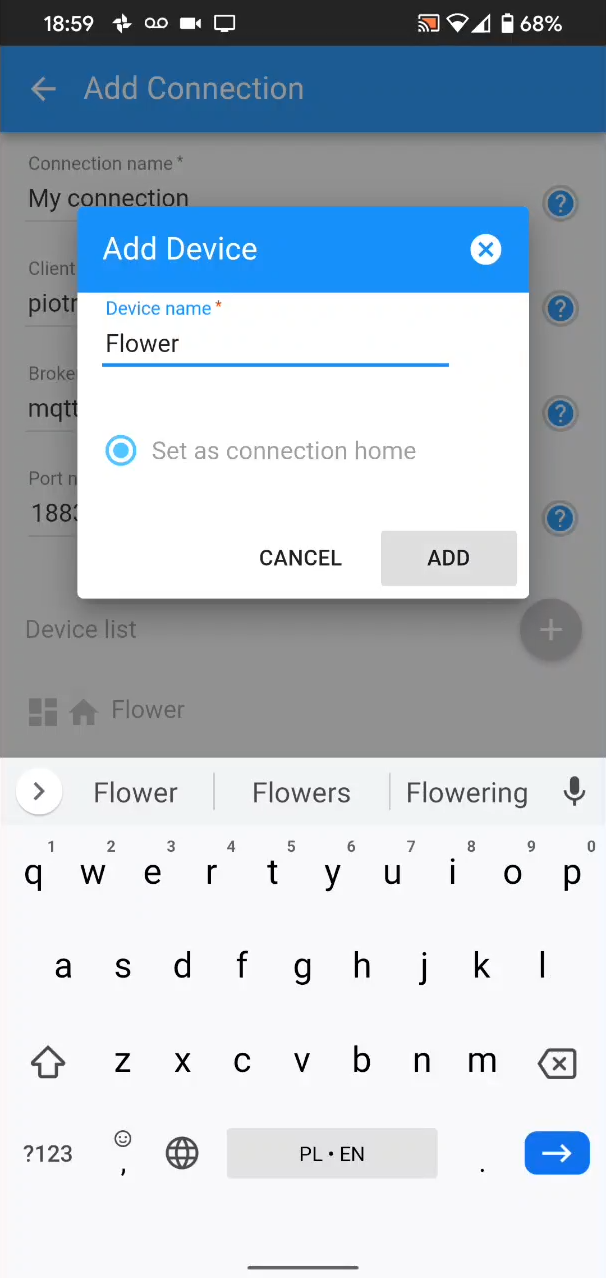
Network protocol: TCP - Add device e.g. "Moisture Sensor"
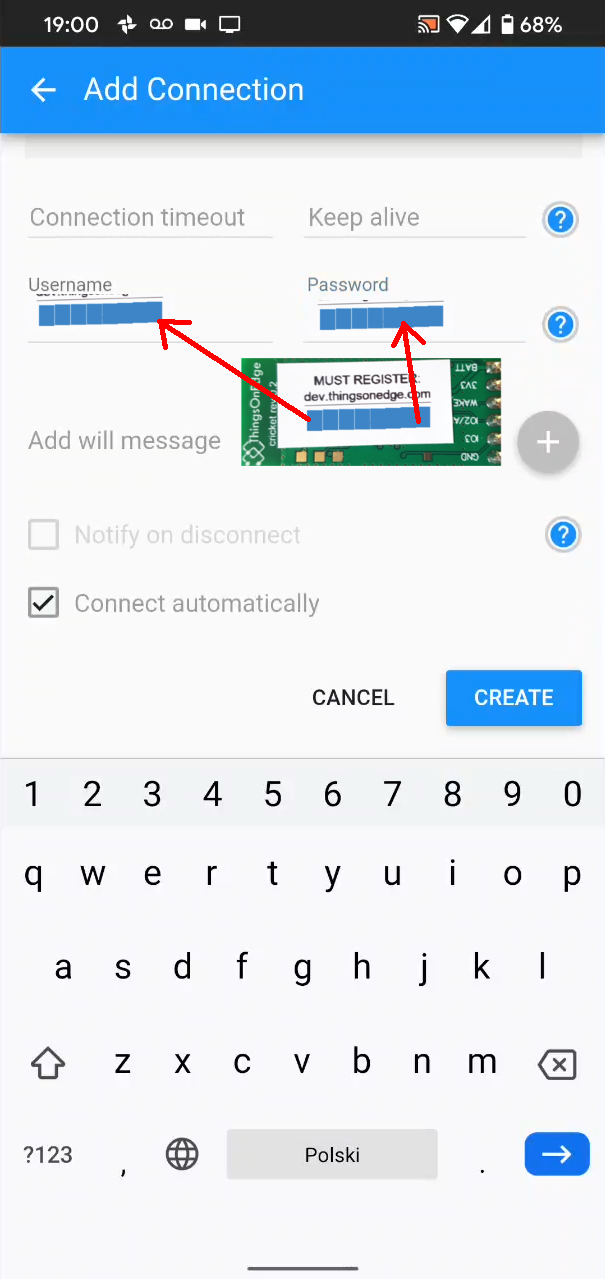
- Goto advanced options:
Username: your_cricket_serial_number
Password: your_cricket_serial_number
Connect automatically: YES - Press the Create button
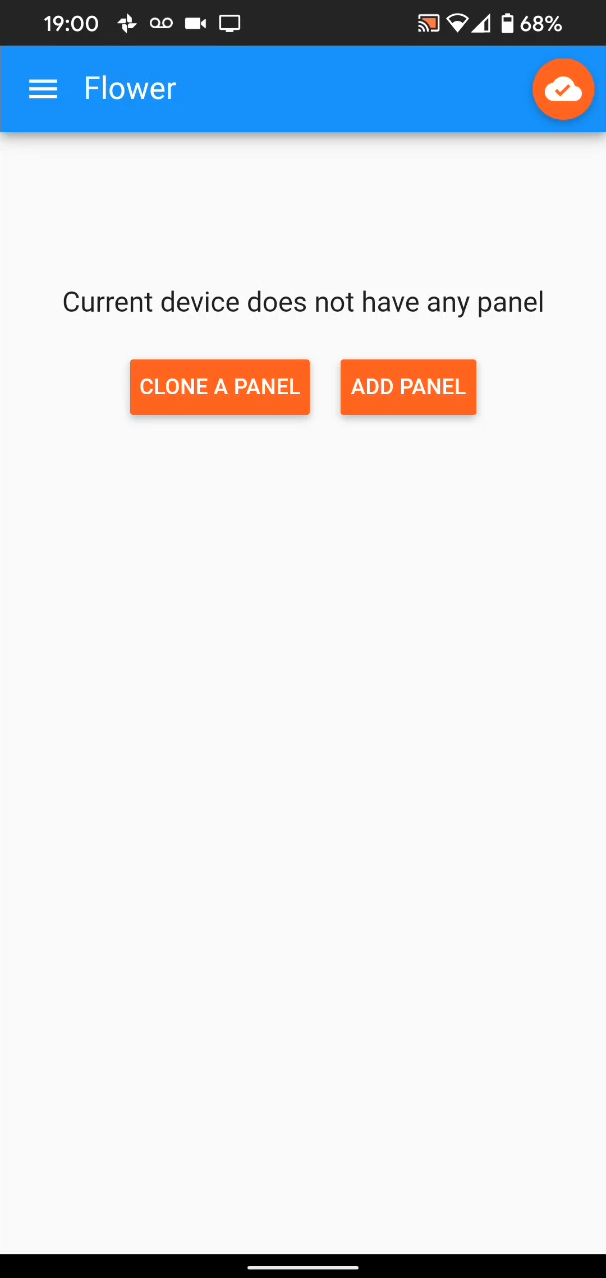
- Press ADD PANEL
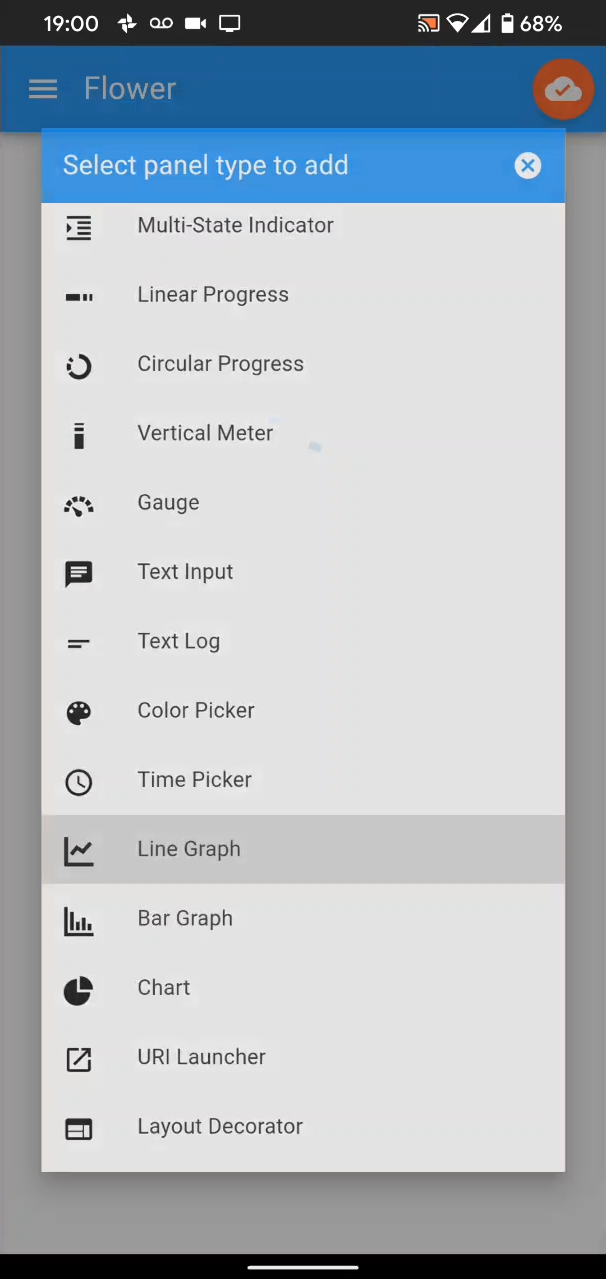
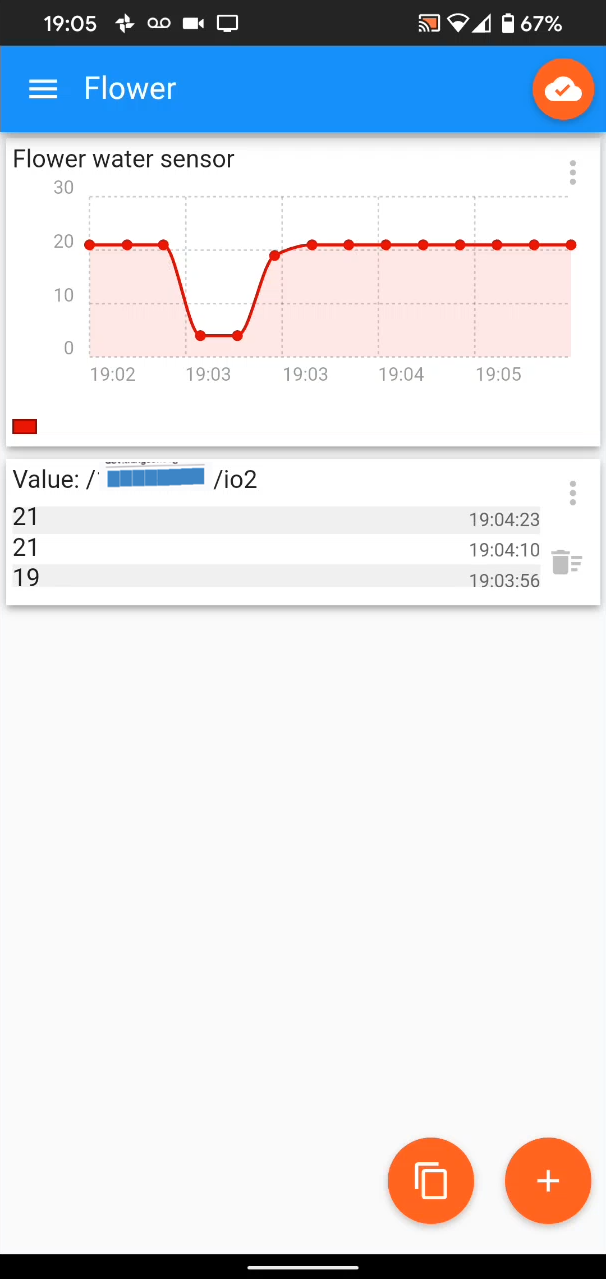
- Select: Line Graph
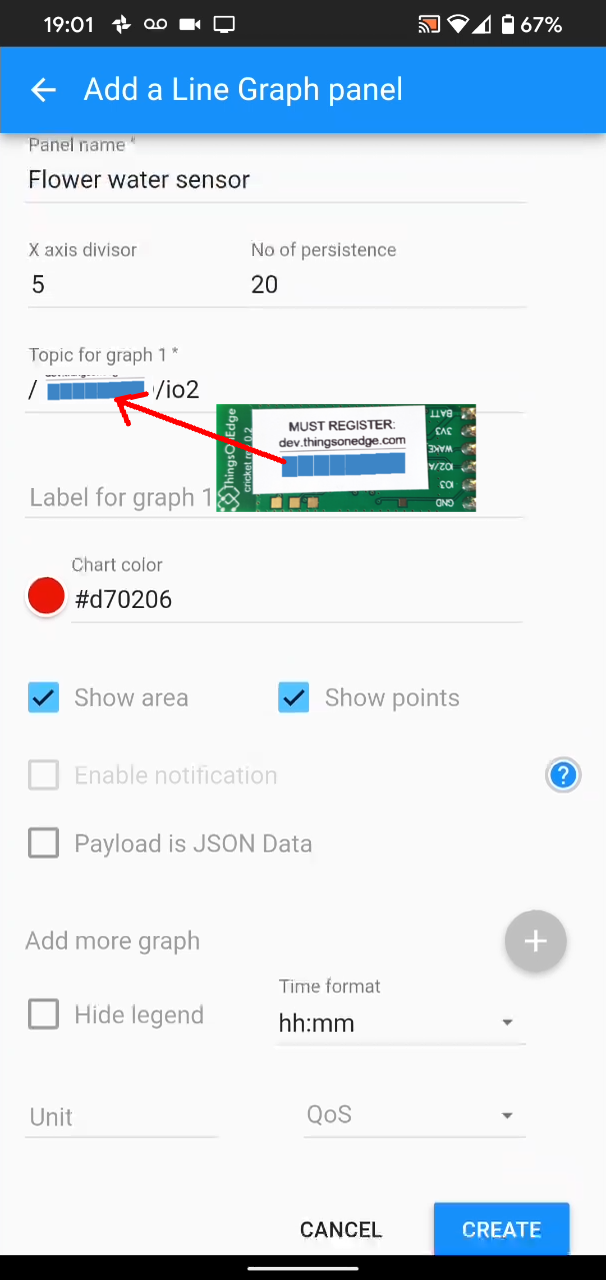
- Set the details for graph 1 to read data from sensor (from the Cricket IO2 port)
Panel name: e.g. Moisture sensor
Topic for graph 1: /your_cricket_serial_number/io2
Show area: YES
Show points: YES
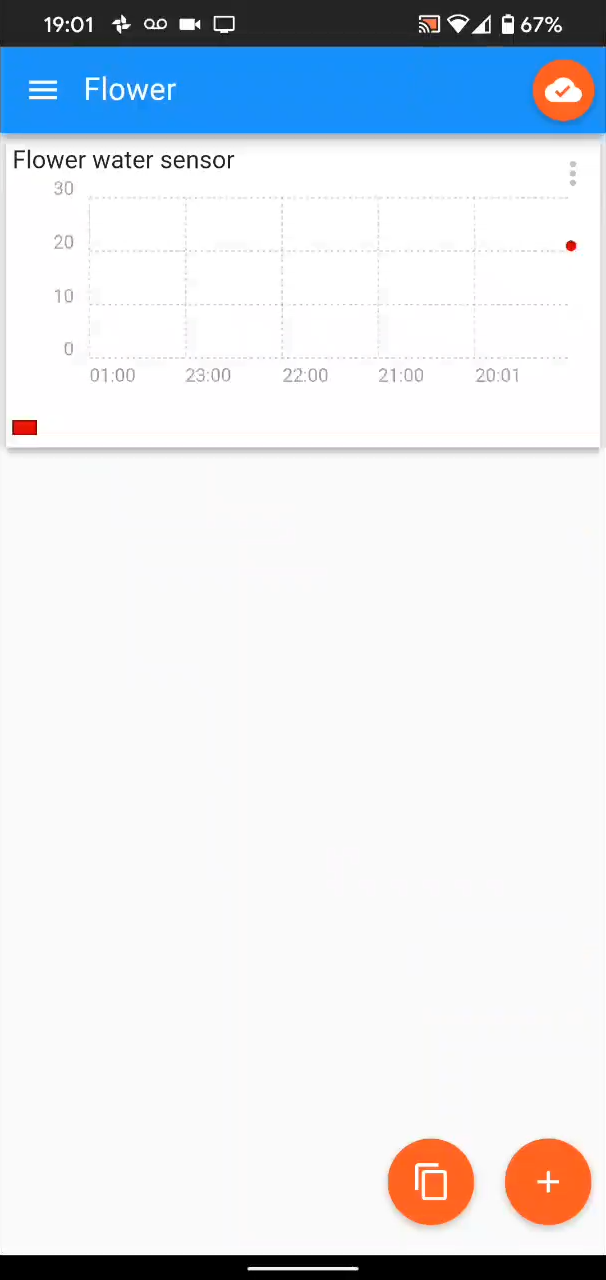
For more information please refer to the attached screenshots from IoT MQTT Panel.
Congratulations!
Your moisture sensor is already working and sending data over the internet to your smartphone. The battery level can be monitored via MQTT using dedicated topic /your_cricket_serial_number/batt
Optimise Your Device to Run for Years on Batteries
You can make your device to run for years on these batteries. You just need to make the following changes:
- wake up every couple of hours e.g. 2 hours
- send data to the internet only when the sensor's value changes
Open the TOE Developer Portal (https://dev.thingsonedge.com) and set the following configuration:
- RTC: ON
- RTC Units: Hours (send data only when changed)
- RTC Units Value: 2
- IO2: Analog In
- IO2 Analog Divider: 3
- IO3: Off
- Battery monitor: On
- Battery divider: 3
- Temperature sensor: Off
- Force updates on - IO1 Wake Up: Off (send data only when changed)
- Force updates on - RTC Wake Up: Off (send data only when changed)
- Post Events: leave all empty
Monitor a Battery Level
In principle the less module communicates to the cloud, the better power saving. The Cricket module requires energy for either sending an update to the cloud or evaluating values of attached sensors only. It is true 0A when is in OFF state.
In practice it can send 10k messages to the cloud using 2xAAA alkaline batteries and more than 15k when used lithium batteries. In this case the battery monitor configuration is also set to update cloud service when the battery level value changes only. Additionally battery consumption can be reduced by lowering resolution of measuring an analog signal.
The battery value can be calculated as follow:
Vbatt = val * (3.5/256) * 2^
Battery divider where val is reported battery level from MQTT service.
In this case 1.4V indicates low level of the alkaline battery and suggests replacing it, the value reported via MQTT is 13 Vbatt (V) = 13*3.5/256 * 8 = 1.42V
Minimum value for the Cricket is 1.1V.
IO2 analog input configuration:
- IO2: Analog In
- IO2 Analog Divider: 3
These values reduce resolution of the analog signal and significantly reduce battery consumption, module will reduce time sending new updated values to the Cloud.
Likewise, the analog value can be calculated using the following formula: IO2 (V) = io2_val*3.5/256 * 2^IO2 Analog Divider
Analog divider of 3 provides resolution approx. 0.1V
Receive Even More Data ...
There is much more you can play with your current device such as reading built-in temperature sensor, read the battery level, and more. Please checkout more information on Things On Edge GitHUB (https://github.com/thingsonedge/cricket).
Feedback
Thank you for taking your time! If you enjoyed building this moisture sensor I would really appreciate if you could spread the word among your peers. If you have any feedback or suggestions how to improve it and make easier for other folks, I would be more than happy to do it. I'm opened for your suggestions.
Many thanks & Enjoy!