Whack-a-moLED!!


This is a LED version of the classic Whack-a-Mole Game.
Basically a random LED out of 4 LEDs light up instead of a mole looking out of a hole and the player turns off the LED using a joystick instead of whacking the mole!
Supplies
Arduino Uno/Nano or any variant board
4 LEDs and corresponding current limiting resistors.
Joystick module with X,Y outputs
Active Buzzer (optional)
Jumper wires.. enough to debug!
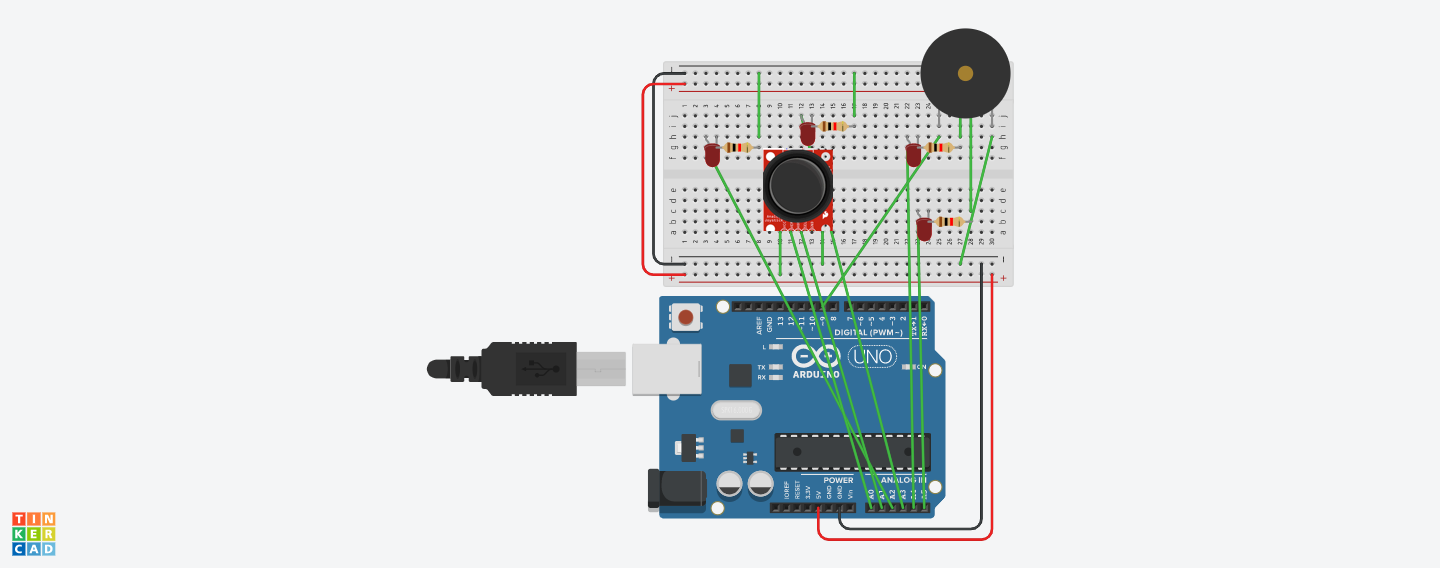
Hook Up the Circuit
.png)
Hook up the Arduino Uno board to joystick module, connecting 2 analog Input pins to the X Y outputs of the joystick.
4 LEDs to be connected using resistors to 4 Digital or Analog output pins pins.
Active Buzzer to be connected to a digital output pin
Code for Setup of Pins
int xVal = 0, yVal = 0, butVal = 0, xPin = A0, yPin = A1, joyPin = 13, butPin = 7, speakerPin = 9;
int leftLED = A2, rightLED = A3, topLED = A4, bottomLED = A5;
int selectedLED = 0; // Can be one of A2,A3,A4 or A5
void setup() {
pinMode(xPin, INPUT);
pinMode(yPin, INPUT);
pinMode(leftLED, OUTPUT);
pinMode(rightLED, OUTPUT);
pinMode(topLED, OUTPUT);
pinMode(bottomLED, OUTPUT);
pinMode(joyPin, OUTPUT);
pinMode(buzzerPin, OUTPUT);
}
Code for Joystick Sensing
void joystickSenseRoutine()
{
xVal = analogRead(xPin); yVal = analogRead(yPin); butVal = digitalRead(butPin);
joyPin = mapXYtoPin(xVal, yVal, butVal);
analogWrite(selectedLED, 1024);
if (selectedLED != leftLED) { analogWrite(leftLED, 0); }
if (selectedLED != rightLED) { analogWrite(rightLED, 0); }
if (selectedLED != topLED) { analogWrite(topLED, 0); }
if (selectedLED != bottomLED) { analogWrite(bottomLED, 0); }
if (joyPin == selectedLED) // Mole Whacked
{
analogWrite(selectedLED, 0);
//
// Add code to play music/tone for whacking moLED!!
//
}
}
int mapXYtoPin(int xVal, int yVal, int butVal) {
if ((xVal < 100) and (yVal < 600) and (yVal > 400)) { return bottomLED; }
else if ((xVal > 900) and (yVal < 600) and (yVal > 400)) { return topLED; }
else if ((xVal < 600) and (xVal > 400) and (yVal < 100)) { return leftLED; }
else if ((xVal < 600) and (xVal > 400) and (yVal > 900)) { return rightLED; }
else { return -1; }
}
Main Loop Routine Code
void loop() {
for (int i = 0; i < length; i++)
{
if (random(0, 100) > 90) { selectedLED = anaPinMap(random(2, 6));}
// Add code for game music here
// *** *** ***
//
}
int anaPinMap(int randNum) {
if (randNum == 2) { return A2; }
else if (randNum == 3) { return A3; }
else if (randNum == 4) { return A4; }
else if (randNum == 5) { return A5; }
}
Ready to Try Out!

Arduino Nano Implementation for Prototype

Same implementation made with Arduino nano in breadboard, custom made board with LEDs, resistors and buzzer, and X-Y joystick switch.
Final Packaged Whack-a-MoLED Prototype to Present Your Loved One!


.jpg)
Supplies for prototype:
Simple cardboard box(Minimum 4cmX6cmX3cm), extra cardboard pieces fro support.
Decorative paper for covering chassis(optional)
Multipurpose adhesive/glue
Mini breadboard(optional)
Arduino nano
Small Universal PCB
9V battery for powering Arduino nano(connect to Vin pin).
SPDT switch
Rest of the supplies(LEDs, resistors, joystick,buzzer, wires) as described in the step 1 above.