Weighing Plants
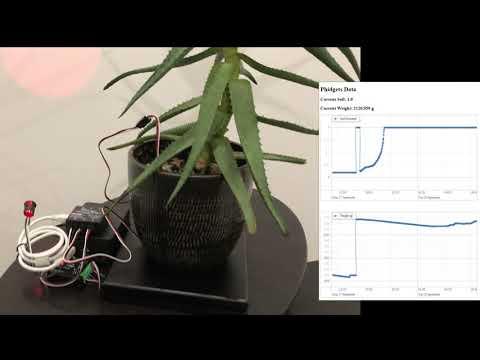
It's quite difficult to determine when you should be watering your house plants. In this project, you will learn how to do the following:
- Monitor the weight and moisture level of a plant
- Display the data on a website hosted on your raspberry pi
With the moisture data AND weight data all easily viewable from a webpage, determining when to water your plants should be much easier!
Supplies
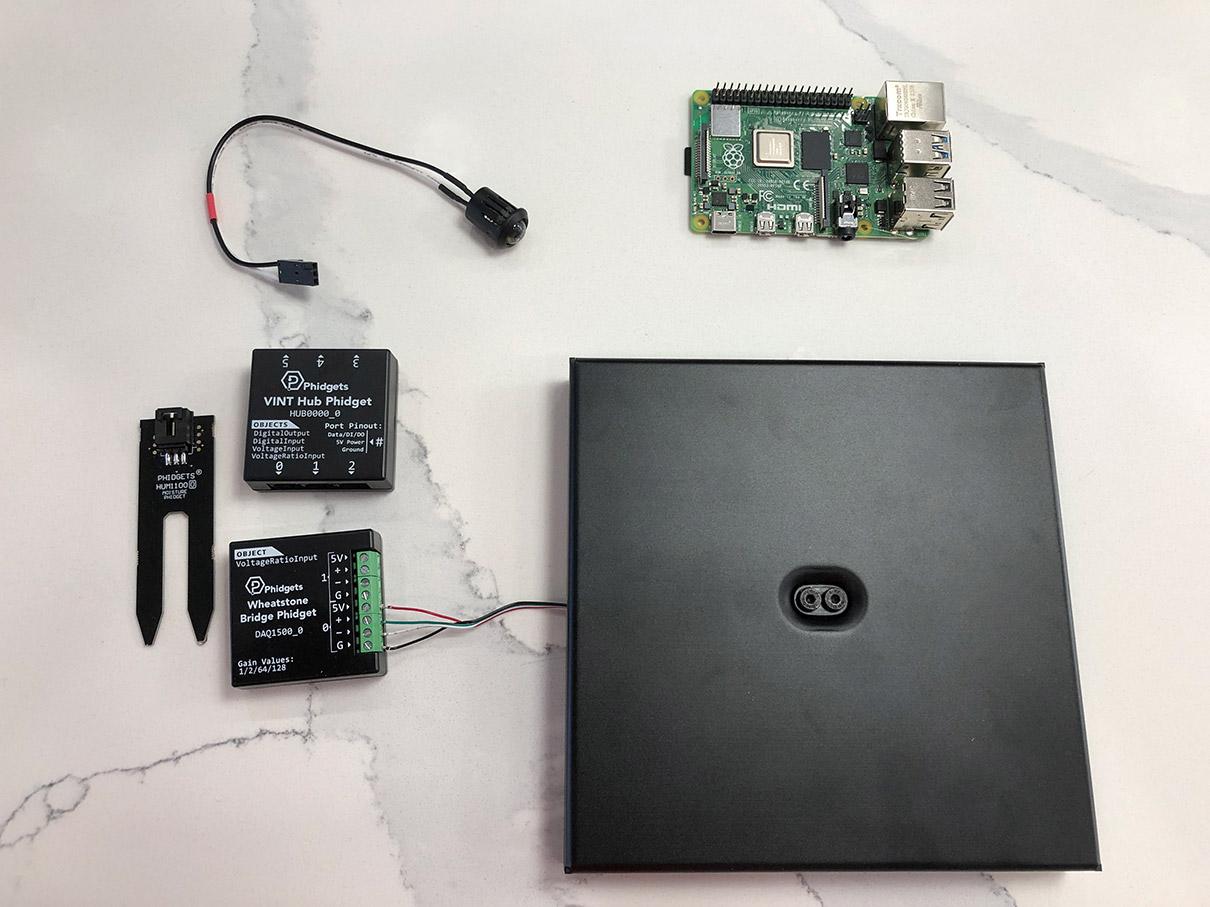
- Raspberry Pi
- VINT Hub Phidget
- Wheatstone Bridge Phidget
- Moisture Phidget
- Red LED
- Scale Assembly
If you are a student or educator, the components can be found in the Phidgets Plant Kit and the Phidgets Scale Kit ($30 and $40 respectively). Otherwise, all the parts are available at phidgets.com.
Hardware Overview
Notes about the hardware:
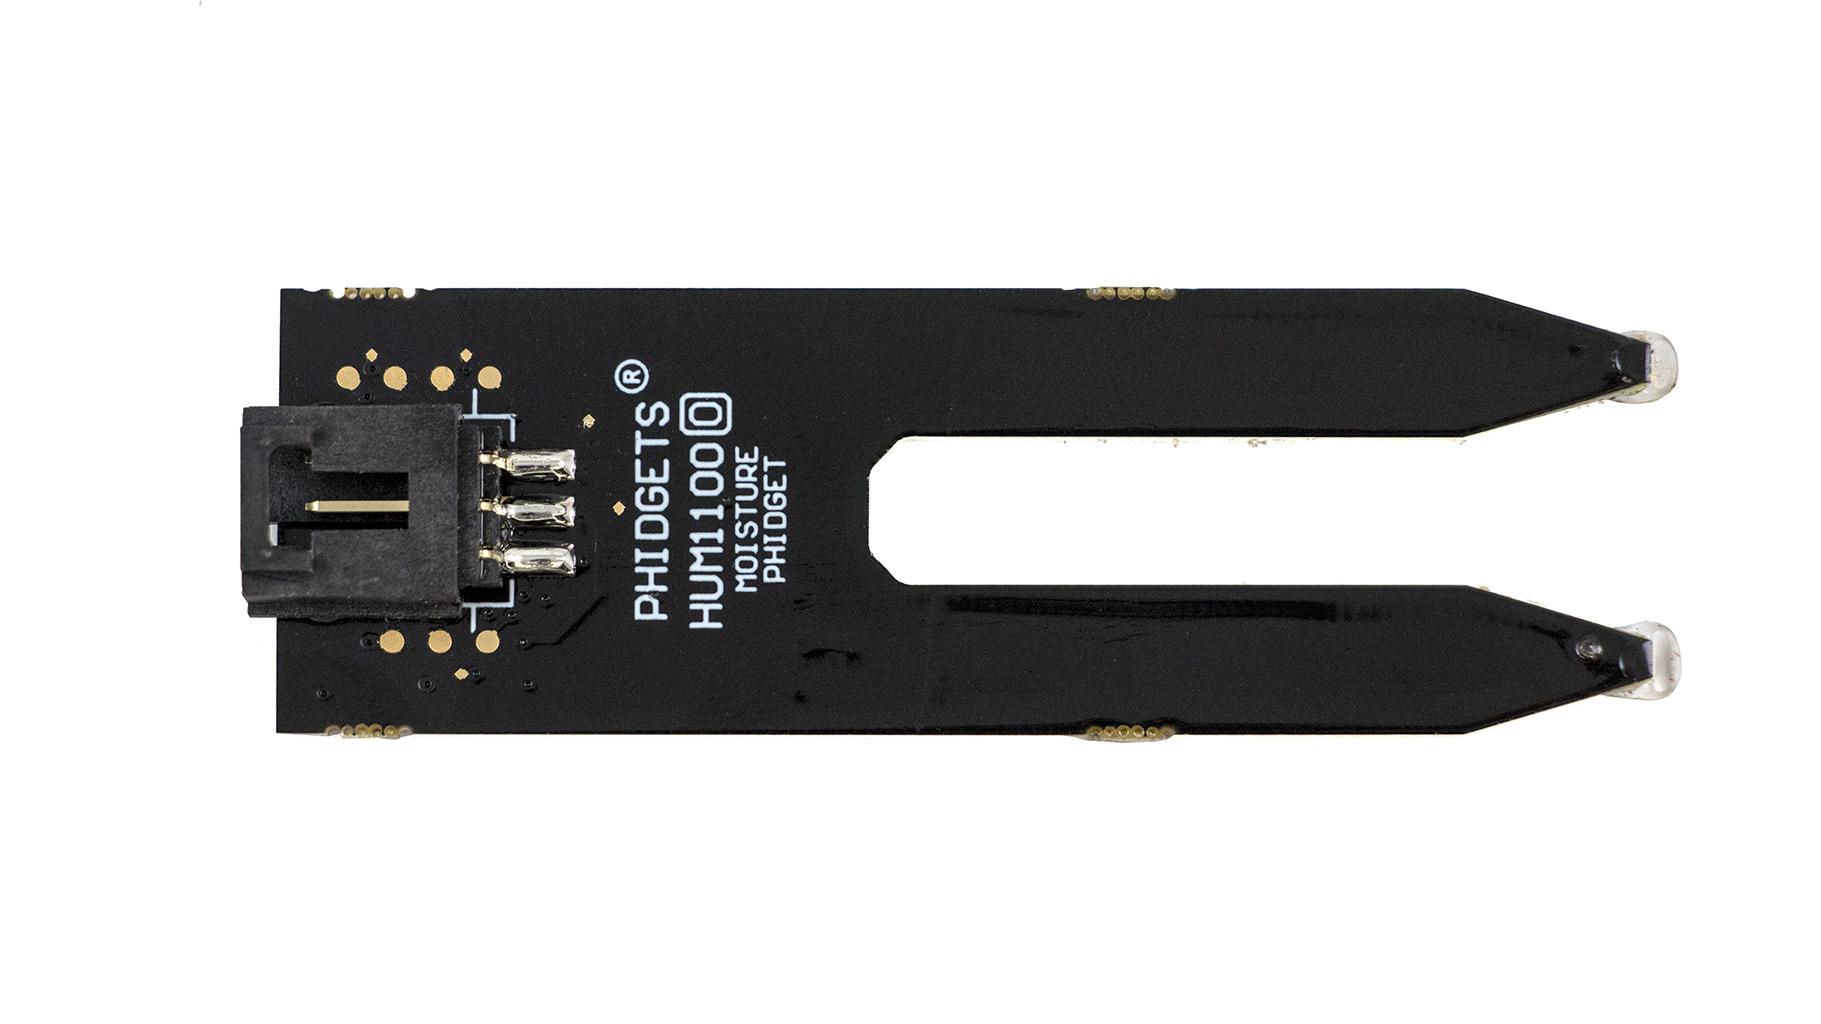
Moisture Phidget
- Capacitive sensor (will survive in the soil for much longer than a voltage-based sensor, example)
- Returns a value between 0 and 1 depending on the amount of moisture. Closer to 0 is no moisture and closer to 1 is submerged in water.
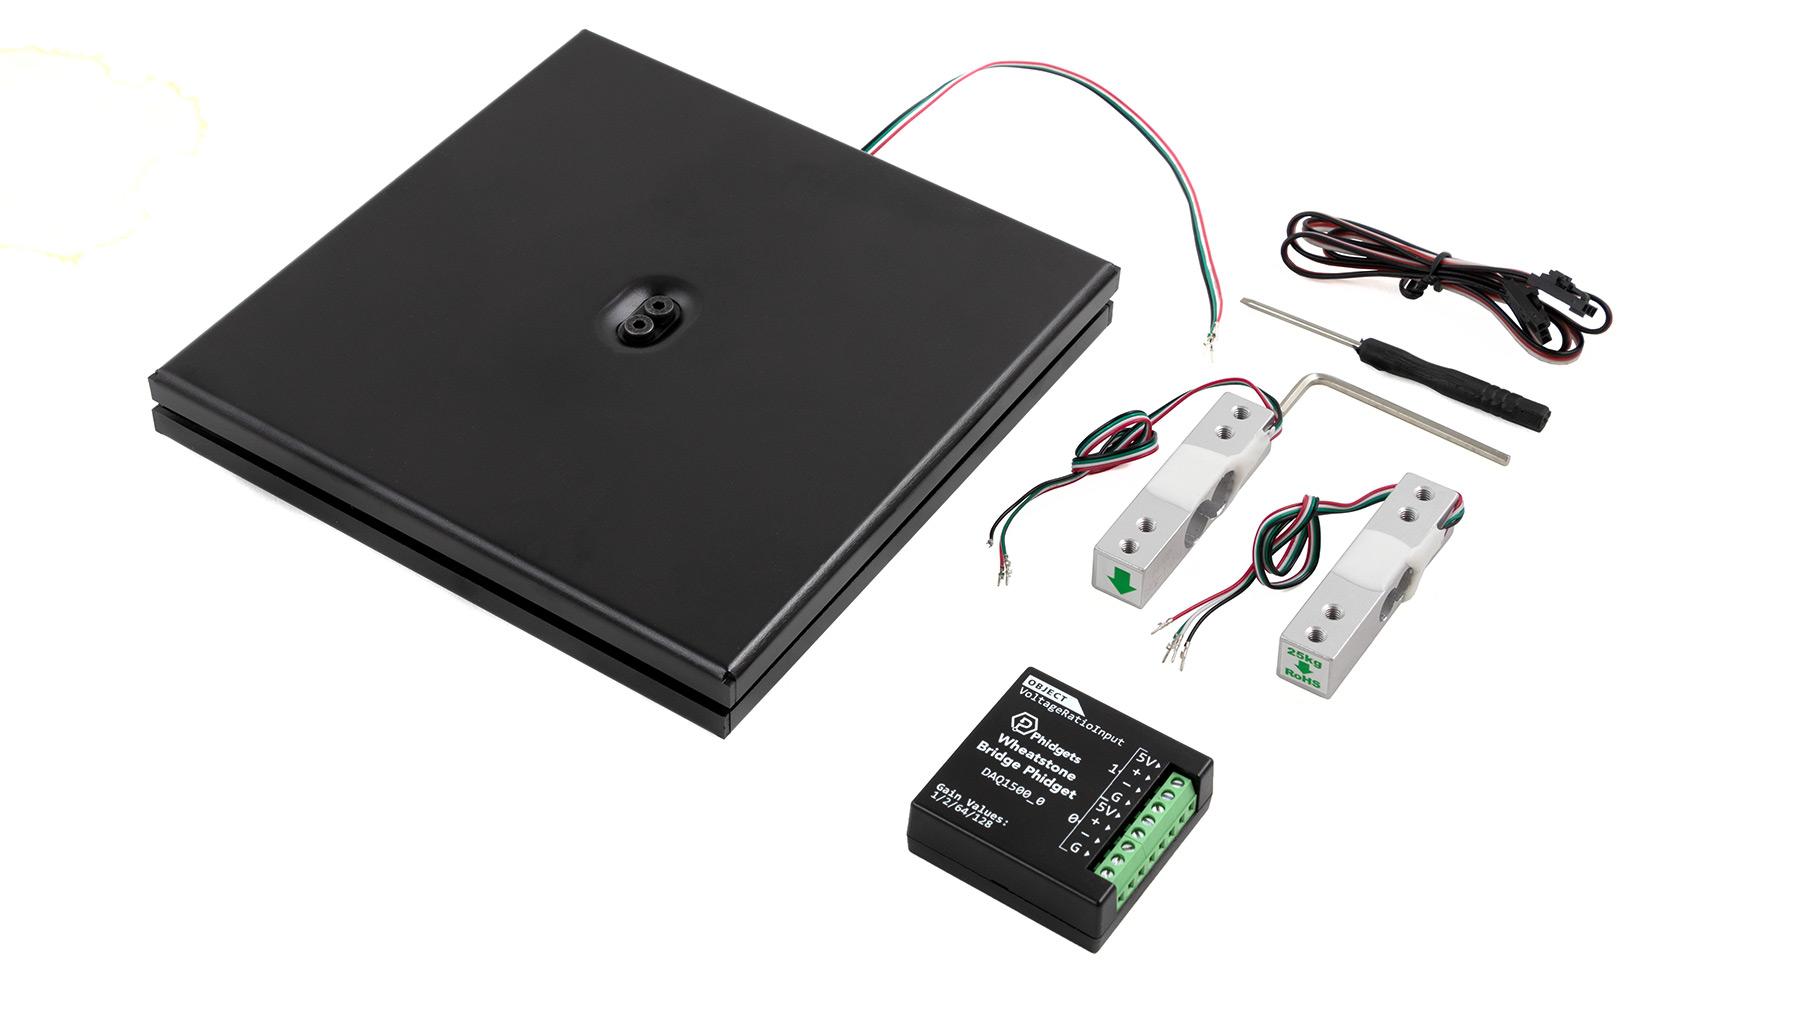
Scale Assembly:
- This scale can measure from 0 - 25kg.
- This project talks about how to use the scale.
Software Setup
Install the Phidget libraries on your Raspberry Pi. This tutorial shows how to do that.
Set up an Apache Web Server on your Raspberry Pi. Documentation.
Software Overview
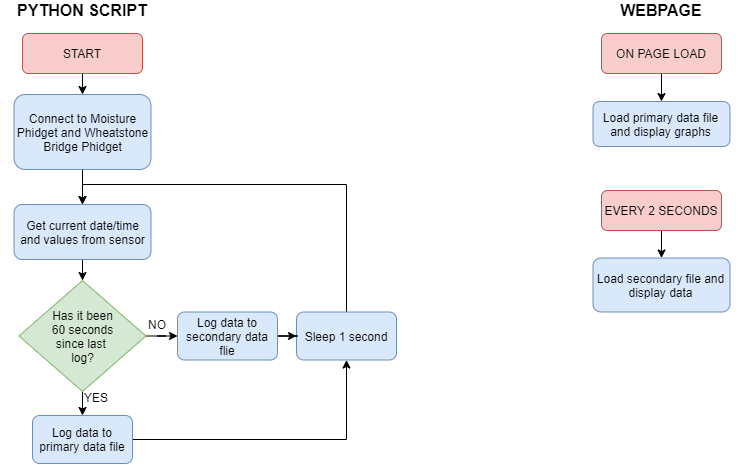
As shown above, there are two main parts to this project:
- Python script
- Webpage
Let's start by taking a look at the Python script.
Python Script
The Python script has to do a few things:
- Connect to the sensors and configure them
- Log sensor data at a particular interval
The code below is used to achieve these goals:
# Add Phidgets library
from Phidget22.Phidget import *
from Phidget22.Devices.VoltageRatioInput import *
from Phidget22.Devices.DigitalOutput import *
from Phidget22.Devices.Log import *
# Used to get current time
from datetime import datetime
# Required for sleep statement
import time
# Check file status
import os

#Enable Phidget logging
#The libraries will automatically log any errors/information about the sensors. Check this log periodically to see how things are going.
Log.enable(LogLevel.PHIDGET_LOG_INFO, "plant_log.log")

#Use this to zero out scale when the program starts
def zeroScale():
    statusLED.setState(True) #turn on LED while zeroing
    count = 0
    avg = 0
    while(count < 64):
        avg += scale.getVoltageRatio()
        count += 1
        time.sleep(scale.getDataInterval()/1000.0) #sleep until new data is ready
    scale.offsetVal = avg/count
    print("Offset val: " + str(scale.offsetVal)) #In python you can just add onto an existing class
    statusLED.setState(False)

#Create
soil = VoltageRatioInput()
scale = VoltageRatioInput()
statusLED = DigitalOutput()

#Address
statusLED.setHubPort(0)
statusLED.setIsHubPortDevice(True)
soil.setHubPort(1) #Both soil and scale use the same object, so we must address them
scale.setHubPort(2)

#Open
soil.openWaitForAttachment(1000)
scale.openWaitForAttachment(1000)
statusLED.openWaitForAttachment(1000)

#Zero scale
zeroScale()

# Write Headers if file doesn't exist
if (not os.path.isfile('/var/www/html/data.csv')):
    with open('/var/www/html/data.csv', 'a') as datafile:
        datafile.write("Date,Soil Level,Weight(g)\n")

# Use your Phidgets
while(True): #if an error occurs, just retry for now, if you are getting multiple errors (check your log file), do this in a better way
    try:
        count = 0 #keep track of time
        while (True):
            weightval = 24168000 * (scale.getVoltageRatio() - scale.offsetVal)
            if(weightval < 0):
                weightval = 0
            soilStr = str(soil.getVoltageRatio())
            scaleStr = str(round(weightval, 3))
            now = datetime.now()
            timeStr = now.strftime("%Y-%m-%dT%H:%M:%SZ")

            #Format data for csv
            fileStr = timeStr + "," + soilStr + "," + scaleStr + "\n"

            #Only update main file every minute, should probably cut back even more
            if(count == 60):
                count = 0
                # Write data to file in CSV format
                with open('/var/www/html/data.csv', 'a') as datafile:
                    datafile.write(fileStr)

            # Update incase someone is looking at webpage
            with open('/var/www/html/latest.csv', 'w') as datafile:
                datafile.write(fileStr)
            # Blink LED
            statusLED.setState(not statusLED.getState())
            # Sleep, modify this based on your needs
            time.sleep(1.0)
            #increment count
            count += 1
    except:
        Log.log(LogLevel.PHIDGET_LOG_INFO, "Error in main loop")
Python Script Review
Here is a quick review of the code above:
#Add Phidgets library
Import the Phidgets module and any other modules that are needed (e.g. time, datetime, os).
#Enable Phidget logging
The Phidgets library has a prebuilt logging system. If you enable it, it will log all Phidget errors/warnings. This can be useful if you want your program to operate over days/weeks/years without crashing. Usually things will go wrong in the first few minutes/days, so this will help you track down what is happening.
zeroScale
This is used to zero out the scale to start the program. You will want to make sure the scale is empty at this point. For more information, visit the scale project that was mentioned above.
#Create/Address/Open
Configuring the sensors is done here. One thing to note is that both the sensors used in this project (Moisture Phidget and Wheatstone Bridge Phidget) use the VoltageRatioInput API. This means you have to address them by setting the hubport, or else you won't know which software object has opened which sensor.
#Use your Phidget
This section has a main while loop that samples the sensors, converts the scale reading to weight, and writes data to files. The main while loop is embedded in a second while loop that has a try-except block. This is because there may be an error every once in a while if this runs 24/7 (e.g. communication with a sensor may fail, writing to the file may error, etc.) and instead of the program going down, we want to just keep polling. You could limit the number of times the try-except while loop executes, e.g. if there are 100 errors, just end the program, but for now, this is working well enough.
Now that the data is being gathered and logged to a file, the next step is to take the data and display it via a website.
Webpage Review
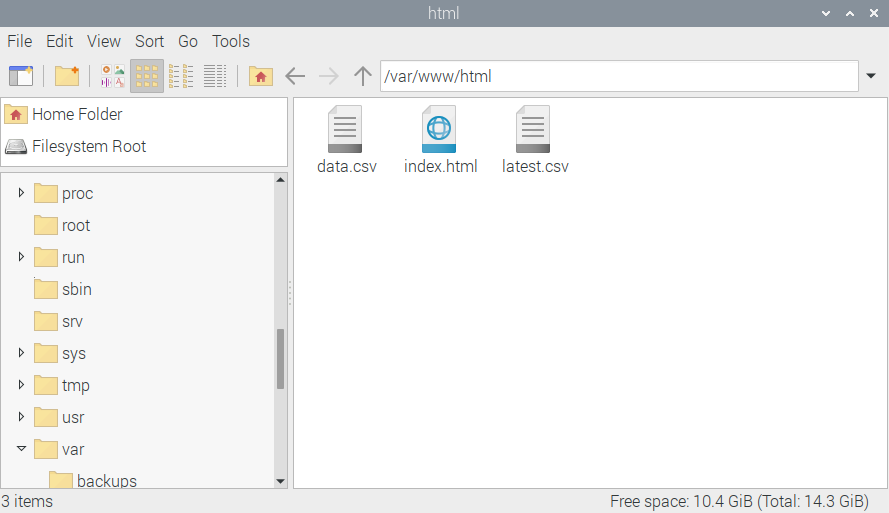
Previously, we mentioned using the Raspberry Pi documentation to set up an Apache webserver. This information is also covered in this project.
It may sound complicated, but there are only two commands to run:
- sudo apt update
- sudo apt install apache2 -y
After running the commands in your terminal, you are ready to view/edit your webpage. There will be a folder under /var/www/html that holds all of your web files. In this next step, we will be editing the index.html file to create graphs and labels that display the Phidgets data.
Note: /var/www/html is also where your Python script is now logging data. This is so that it can be served by the webserver and used by the website.
Webpage
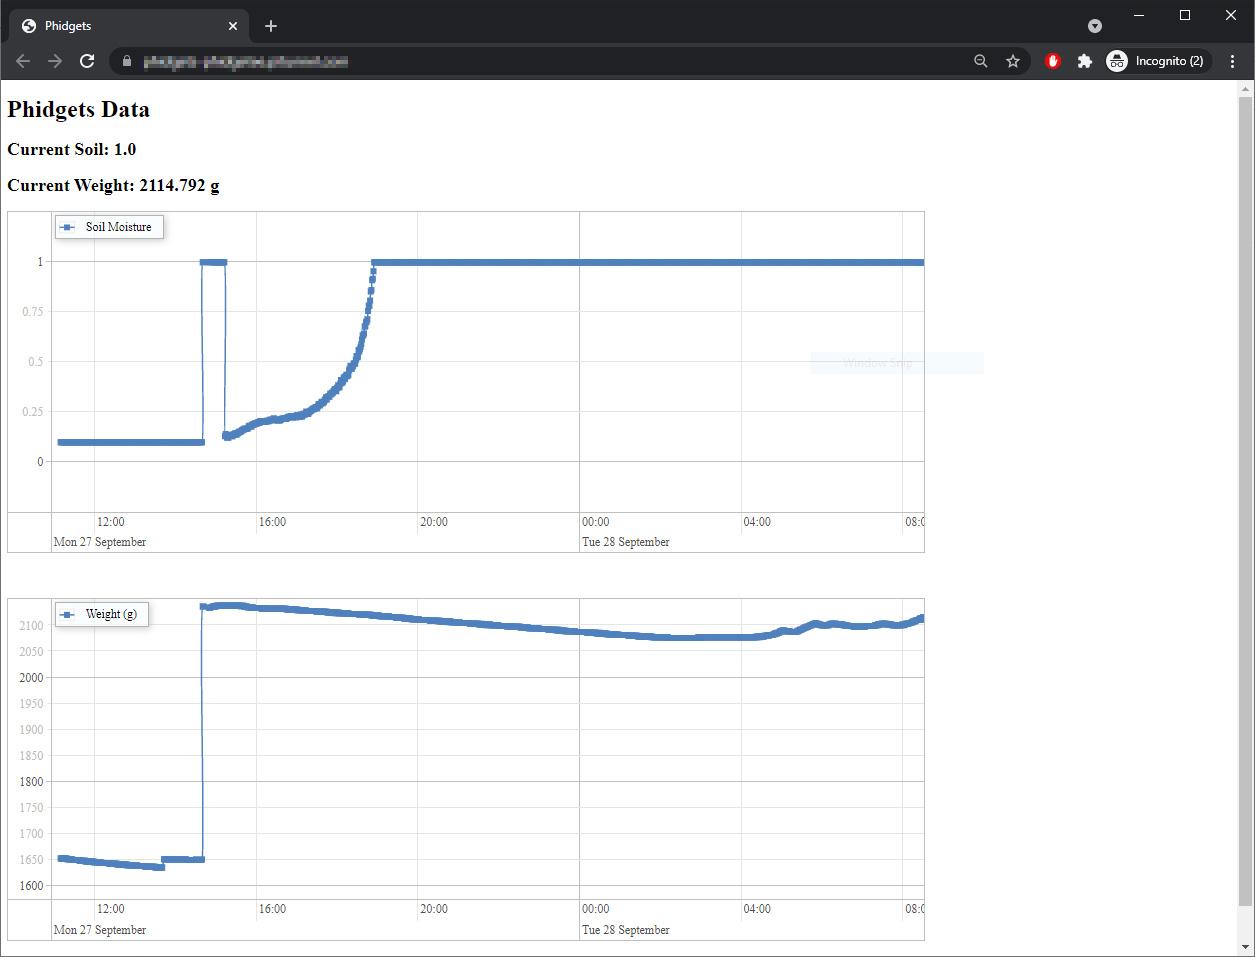
The webpage has a few things to do:
- Display the primary data file on a graph
- Display the secondary data file on labels
The code below is used to achieve these goals. Replace the index.html file with the following:
<!doctype html>
<html lang="en">
<head>
    <meta http-equiv="Cache-Control" content="no-cache, no-store, must-revalidate" />
    <meta http-equiv="Pragma" content="no-cache" />
    <meta http-equiv="Expires" content="0" />
    <meta charset="utf-8">
	<script src="https://cdnjs.cloudflare.com/ajax/libs/vis/4.21.0/vis.min.js"></script>
	<link href="https://cdnjs.cloudflare.com/ajax/libs/vis/4.21.0/vis.min.css" rel="stylesheet" type="text/css">
    <title>Phidgets</title>
</head>
<script>
    var soilgraph;
    var soilwdata = [];
    var soilDataset;

    var weightgraph;
    var weightwdata = [];
    var weightDataset;

    setInterval(function() {
        fetch('latest.csv')
        .then(response => response.text())
        .then(text => {
            let newData = text.split(",");
            let date = new Date(newData[0]);
            document.getElementById("soilLabel").innerHTML = "Current Soil: " + newData[1]
            document.getElementById("weightLabel").innerHTML = "Current Weight: " + newData[2] + " g"

            //Soil update
            soilwdata.push({ x: date, y: parseFloat(newData[1]), group: 0});
            soilDataset.update(soilwdata);
            soilgraph.setWindow(null,date);
            soilgraph.redraw()

            //Weight update
            weightwdata.push({ x: date, y: parseFloat(newData[2]), group: 1});
            weightDataset.update(weightwdata);
            weightgraph.setWindow(null,date);
            weightgraph.redraw()
        })
    }, 2000);

    function connectPhidgets(){
        fetch('data.csv')
        .then(response => response.text())
        .then(text => {

            let data = text.split("\n");

            let options = {
				legend: true,
				width: '75%'
			};

            let groups = new vis.DataSet();
				groups.add({
					id:0,
					content: "Soil Moisture"
				});
                groups.add({
					id:1,
					content: "Weight (g)"
				});

                //Soil
				let soilContainer = document.getElementById('soilgraph');
				for (let i = 1; i < data.length -1 ; i++) { //first data point is headers, last is new line, so avoid those
                    realData = data[i].split(",");
                    let date = new Date(realData[0]);
					soilwdata.push({ x: date, y: parseFloat(realData[1]), group: 0});
				}
				soilDataset = new vis.DataSet();
				soilDataset.add(soilwdata);
				soilgraph = new vis.Graph2d(soilContainer, soilDataset, groups, options);

                //Weight
                let weightContainer = document.getElementById('weightgraph');
				for (let i = 1; i < data.length -1 ; i++) { //first data point is headers, last is new line, so avoid those
                    realData = data[i].split(",")
                    let date = new Date(realData[0]);
					weightwdata.push({ x: date, y: parseFloat(realData[2]), group: 1});
				}
				weightDataset = new vis.DataSet();
				weightDataset.add(weightwdata);
				weightgraph = new vis.Graph2d(weightContainer, weightDataset, groups, options);
        })
    }

</script>
    <body onload="connectPhidgets()">
        <div>
            <h1>Phidgets Data</h1>
            <h2 id="soilLabel"></h2>
            <h2 id="weightLabel"></h2>
            <div id="soilgraph"></div><br><br><br>
            <div id="weightgraph"></div><br><br><br>
        </div>
    </body>
</html>
Webpage Review
Note: the website code can be vastly improved. This is an extremely basic website that displays data on graphs.
We will review the following sections:
- Main flow
- Graphing
- Updating Graphs
- Caching
Main Flow
The website has two main parts:
- Webpage load: when the webpage loads the main data file (data.csv) is loaded and the contents of the file are displayed on graphs
- Every 2 seconds: there is a function that runs every 2 seconds (you can change this frequency) that grabs the small data file (latest.csv) and displays the latest data on the webpage AND updates the graphs.
Graphing
Graphing is accomplished using the vis.js graphing library. When the webpage loads, we fetch the data.csv file, extract the data, and graph it. If you need more information about how this is done, leave a comment below.
Updating Graphs
In order to update the graphs and the labels on the website, we fetch the much smaller latest.csv file, extract the data, update the labels and add the data points to our graphs.
Caching
Caching may need to be looked into more closely on this project. Depending on your browser, it may want to pull old versions of data.csv and latest.csv. There are multiple ways around this, and if you are getting strange results when running the code above, look there first.
Run on Boot
Now that all of your software is running, you will want to make your Python script runs every time your Pi boots. You will want to do this because your Pi will be running "headless" (i.e. without a monitor), so you won't be able to manually run the program.
Follow the instructions on this project for more information.
Install and Run
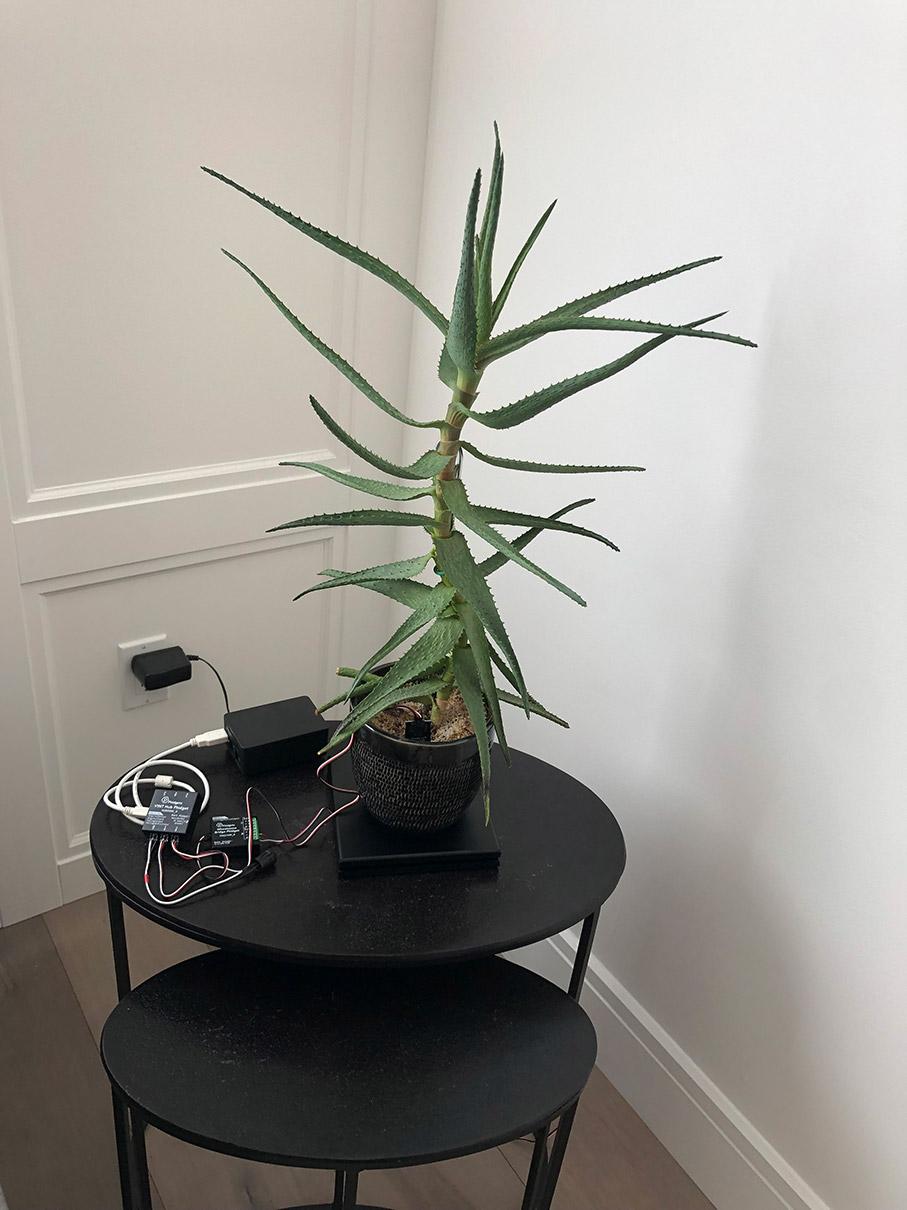
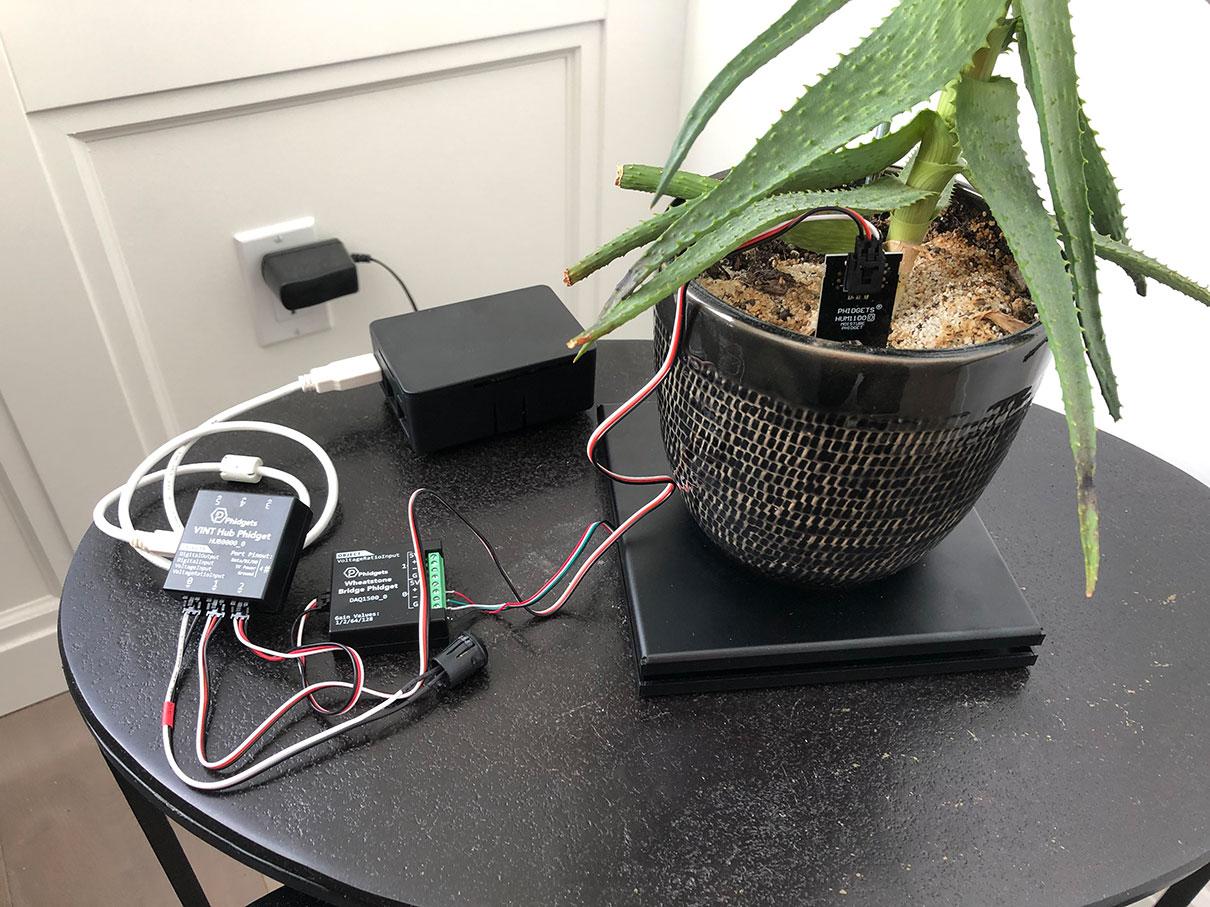
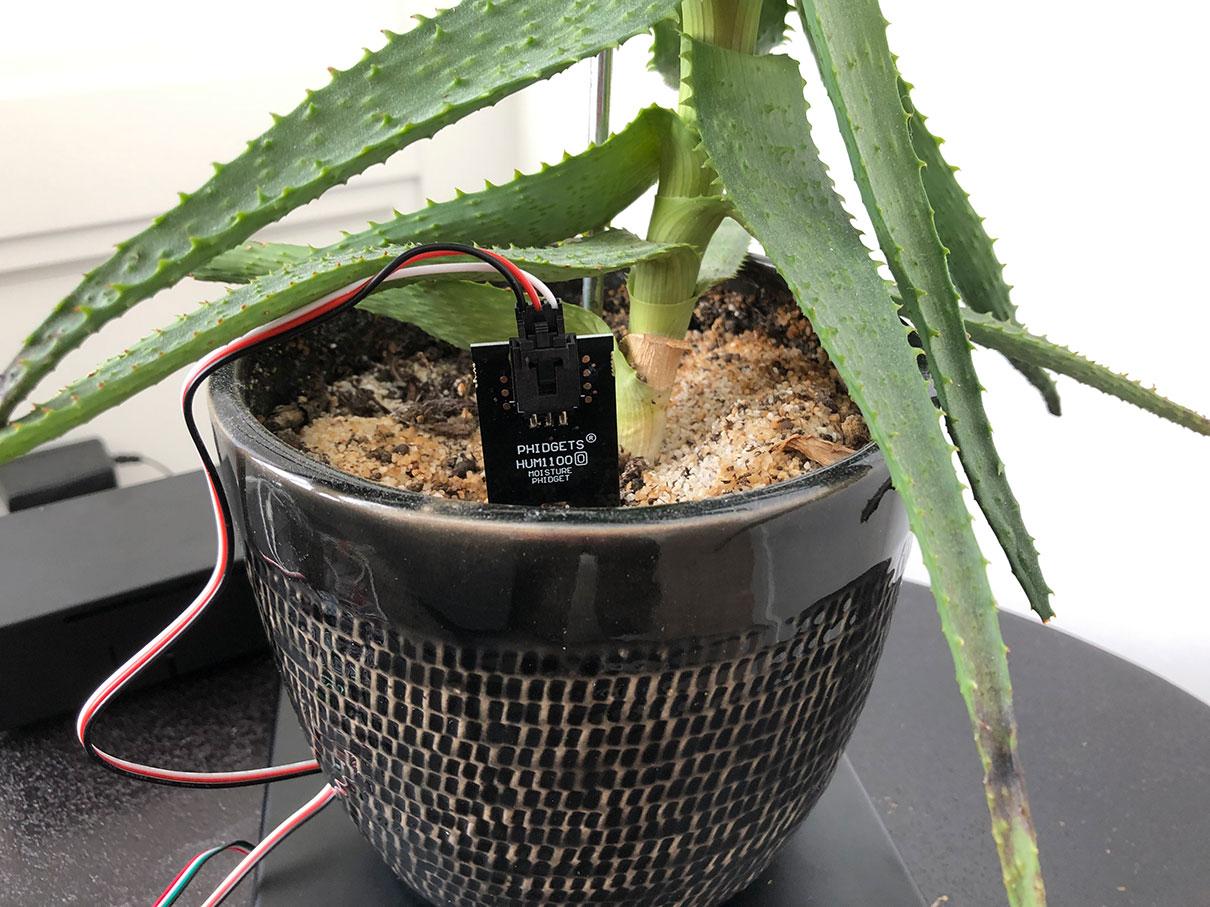
The last step is to install your project and run it. You will likely have to do some debugging to get it running solidly, but if you do, you will have some awesome data to review.
Going Forward Points
Here are some things you can do to improve on the project:
- Make your website viewable from the outside world. Right now, your project runs on your local network. Try using PiTunnel to make it accessible from anywhere. This project has some good points.
- Add some filters to your graphs. Allow users to filter by day, month, year, etc.
- Think about your data. Right now you have a file that is constantly being written to and is getting larger and larger. Maybe you want to make a backup? Maybe you want to create files based on the month/year instead of just one large file, etc etc.
- Make your website look better. There are many website templates available online that you can simply import and use.
Some other notes:
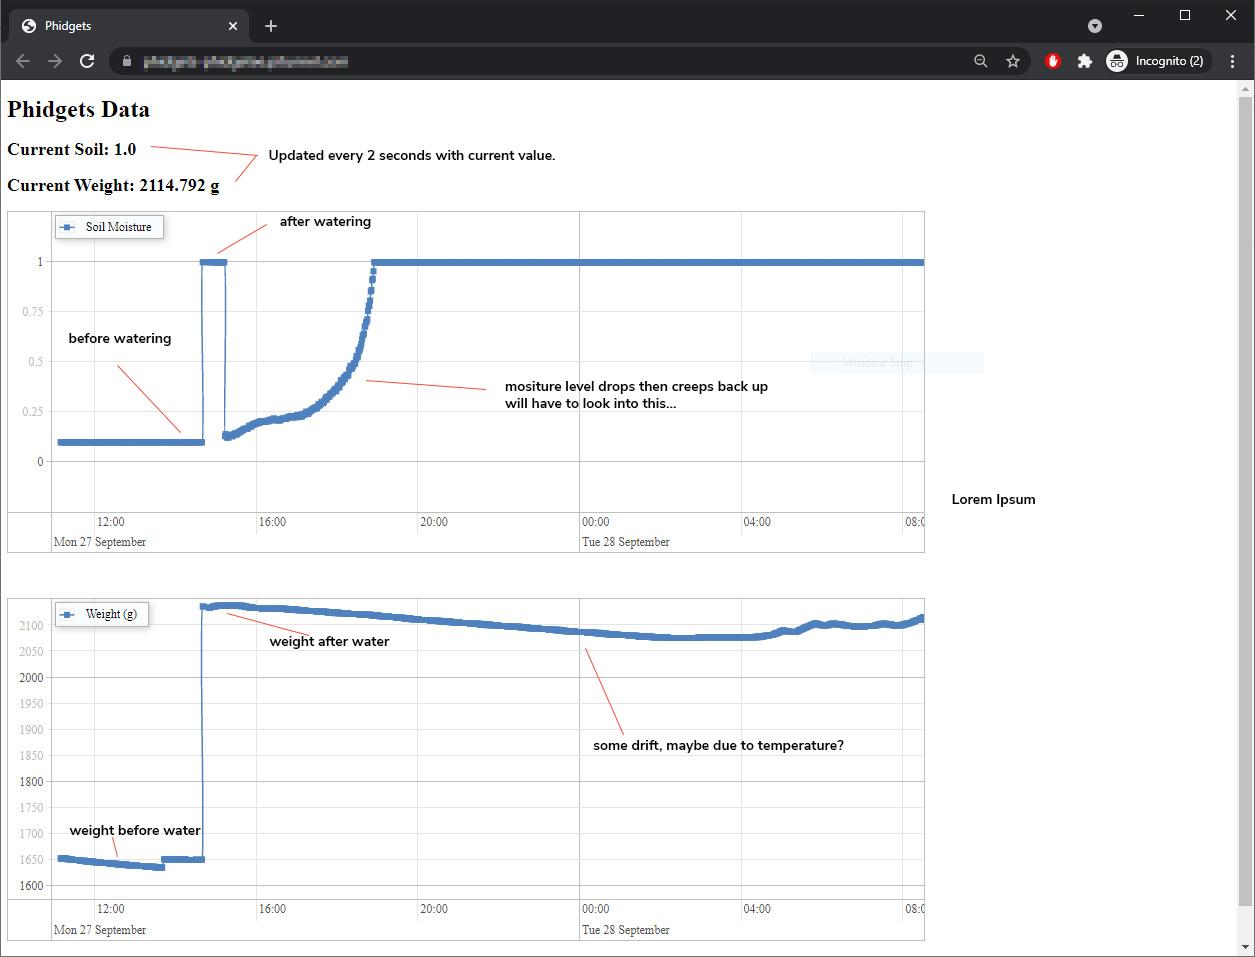
- Load cells can be impacted by temperature which can cause a drift. More data will be collected and this project will be updated with our findings.
- Load cells can also be permanently deformed if a constant load is applied. More data will be collected to update our findings here as well.
- The soil moisture sensor shot up from around 0 to around 1 right after watering (the water pooled around the sensor before draining into the soil). The moisture reading then dropped, and slowly crept back up to 1. More watering will give us some insight on this behavior.
If you have any questions, leave a comment below.
Update Oct 11/2021
Part 2 of the project is now available here: https://www.instructables.com/Weighing-Plants-Part-2/