Webcam Document Camera Mirror
by tapasquini in Living > Education
641 Views, 1 Favorites, 0 Comments
Webcam Document Camera Mirror

Online school hit me hard this fall. My school is fortunate that all students have strong internet connections, so Zoom has helped me continue teaching even as the city went into movement control and school buildings were closed. It was (relatively) easy to instruct students.
But, I teach physics, and not being able to see my students drawings, free-body diagrams and equations took away the main tool in my toolbox for making sure my students were "getting it".
I'd seen this hack-a-day article about turning a built-in laptop webcam into a document camera, and I'd even thought about 3D printing one. But, now I was stranded at home away from my usual tools. I needed to improvise.
This article shares a version of the webcam document camera that uses a paperclip and hot glue to attach a mirror to your laptop screen. The mirror reflects the field of view of the webcam downward to they keyboard so that students can set their notebooks on the keyboard and you can see their writing (instead of their kitchens).
The cost and construction times are minimal.
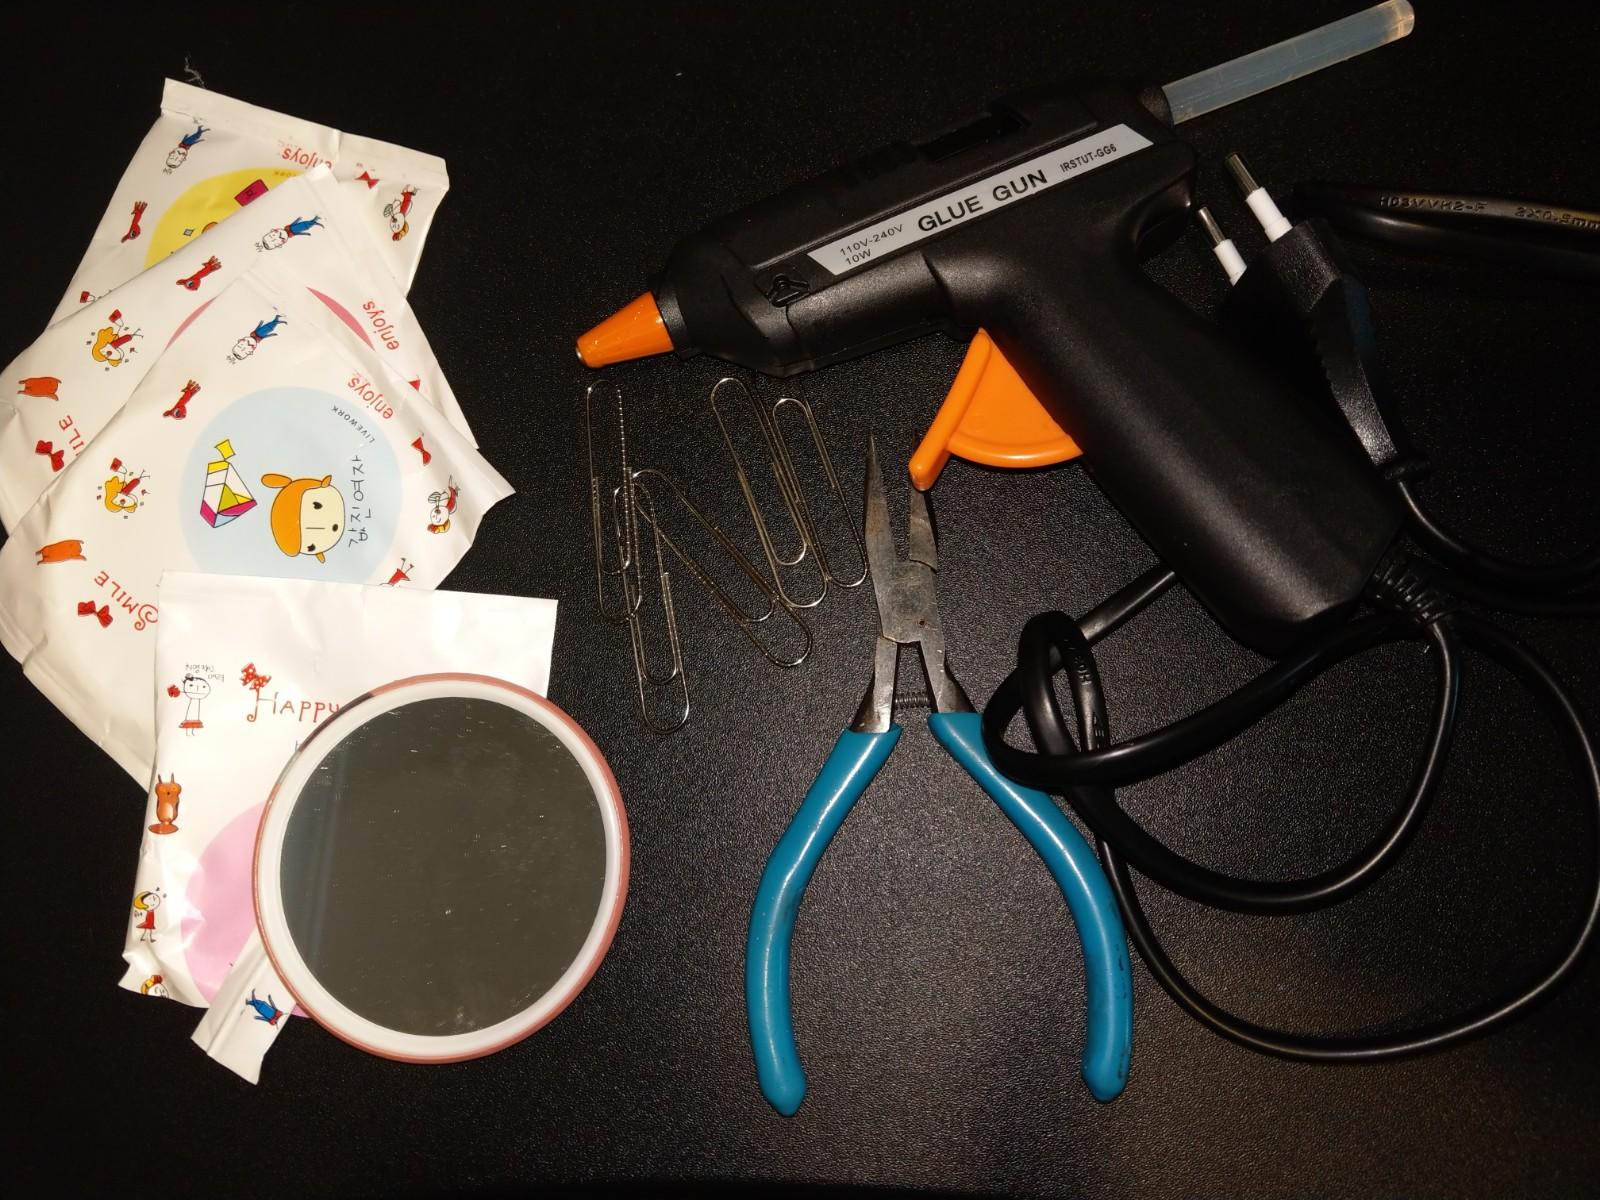
Supplies
Materials
- Mirrored surface. I found a local supplier of cosmetic mirrors and could source them at about $0.10 each. Amazon has them for a bit more.
- Jumbo Gem paperclip (the 5cm long ones)
Tools:
- Hot glue gun
- Needle nose pliers
Step 1: Bending the Paperclip
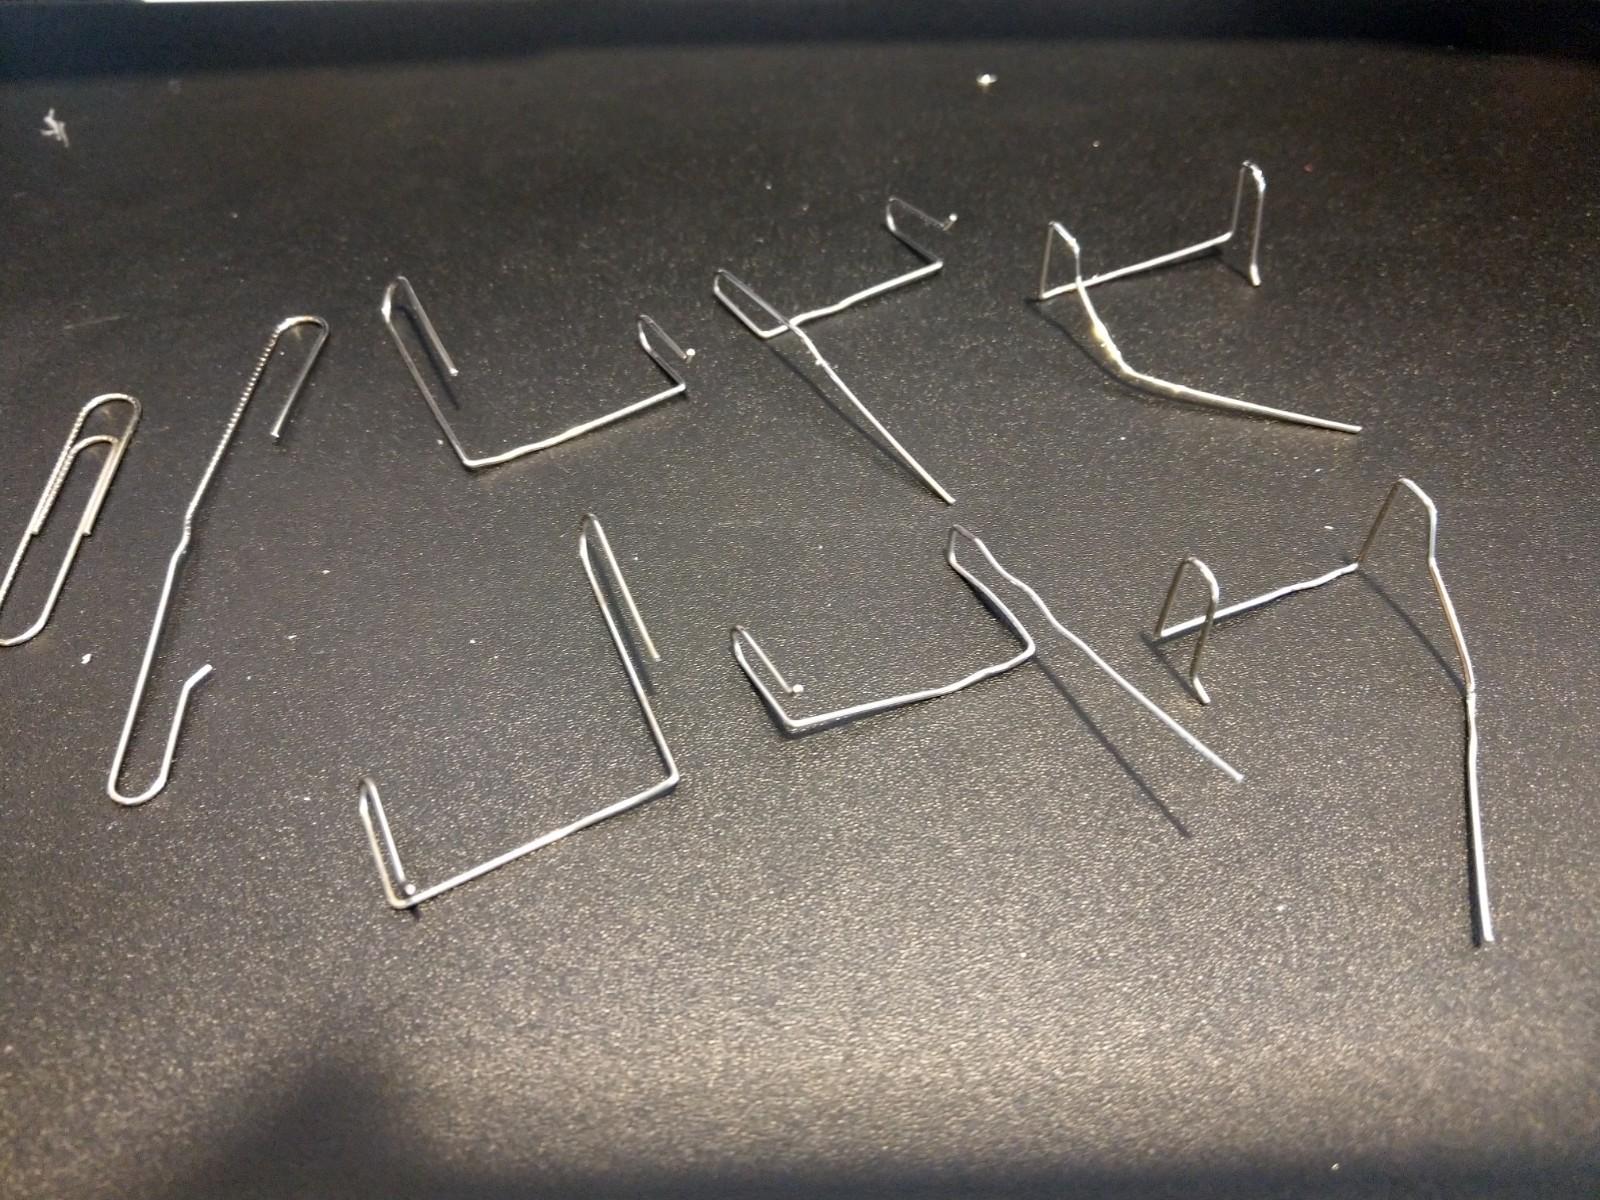
Bending the paperclip can be done in four steps. The photos show the progress from left to right.
- Straighten the main bend of the paperclip. This will leave you with a straight piece of wire with a large and small U-bend at either end. Put a small outward bend on the small U-bend end of the paperclip. This will prevent the exposed end from scratching your the top of your screen.
- Bend the two U-bends upward. The small end should bend up by about 1cm and the two bends should be spaced by 3-4cm. The large end will stick up a lot more than the small end at this stage. Depending of whether you're a left or right handed, you might end up following the top-row of images or bottom-row of images.
- Re-shape the large side so that it mirrors the small side. The two U-bends will hook onto the top of your screen, so they should be close to even.
- Add bends to the long end of the paperclip so that it stretches away from the U-bend hooks. I like making a sharp kink close to the top of the U-bend and curving the rest of the wire across and away from the U-bends.
Needlenose pliers make this easier, but they aren't necessary.
Don't worry about being too precise here; you'll adjust after the paperclip is glued to the mirror.
Be careful about fatiguing the paperclip; repeated bending could make it more likely to break later.
This particular shape was for the webcam on a macbook; your mileage may vary.
I've found that if I need to make these for a whole class, I can use the pliers to bend four of these at the same time.
Step 2: Attaching the Mirror
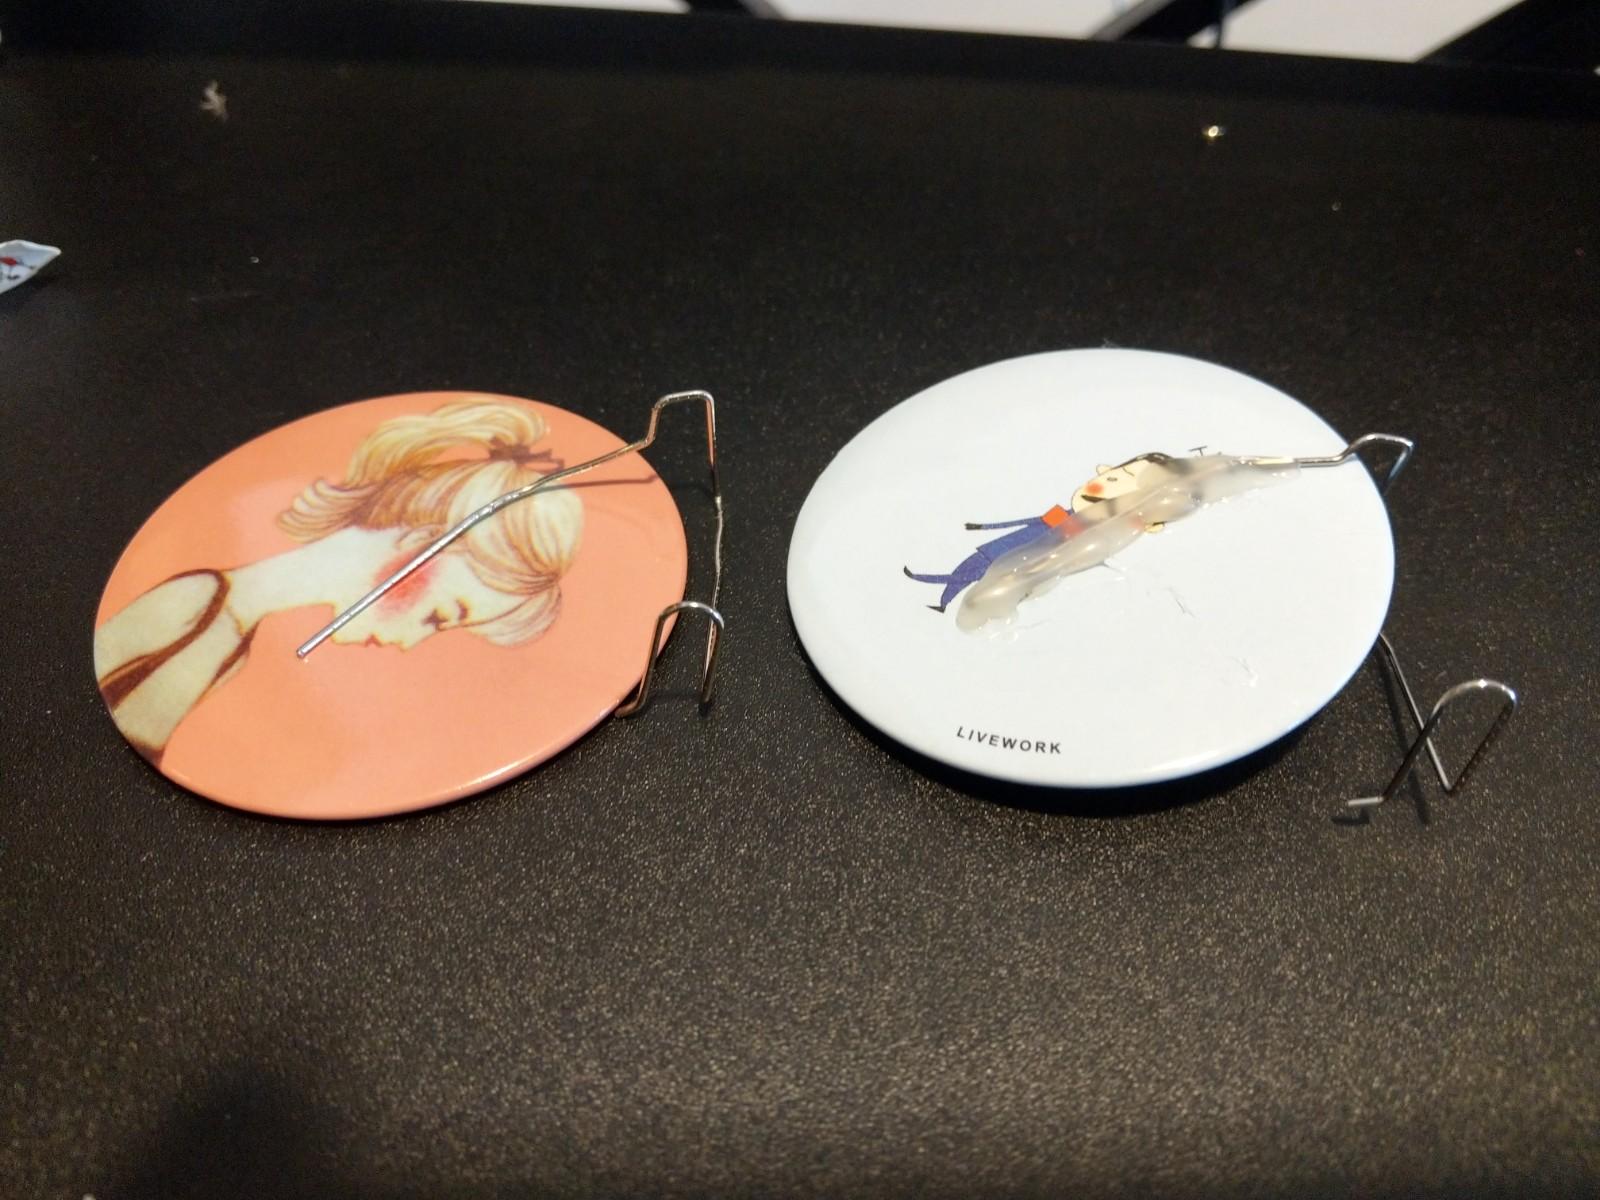
Attach the mirror to the paperclip support using hot glue.
- I've found that it is best to try to line up the top edge of the round mirror with the center of the straight wire between the two bends. If the mirror doesn't press firmly against the screen, the picture can get quite wobbly.
- If you have time, it can help to do the gluing in two steps. Tack the paperclip gently, adjust shape and position with your compute, then finish gluing the paperclip firmly in place.
Step 3: Adjust the Fit

The best part about using a paperclip is that you have a lot of freedom to adjust the device after you've built it.
Always remove the mirror from your computer before adjusting. You could squeeze hard enough to crack your screen if you try to adjust with the device attached.
Some suggestions for common issues are addressed below.
- If you are seeing your screen instead of your keyboard, tilt the mirror up. If you see your t-shirt, tilt the mirror down.
- If the picture seems tilted left-right, it is probably because the U-bends are at different heights. Take the device off and try to level these out a bit.
- If the mirror seems very wobbly, try narrowing the U-bends to be a little bit smaller. You can also decrease the distance between the straight wire behind the screen and the top curve of the mirror. This will create a triangle of contact.
- If the image is very blurry (or black), the mirror may be blocking the camera. This is tricky to fix because the mirror is too low. You will need to reshape the two U-bends significantly with your pliers to raise the mirror up.
Step 4: Zooming With Your Camera
Adding a mirror to your webcam isn't perfect. The mirror also reverses left and right so that the text that you can read easily in front of you will appear reversed to your audience.
For me, this meant that the cameras that I gave to my students to share their work show me images that are all reversed. Given that I'm used to looking at their writing upside down anyway, this wasn't so bad. Drawings and equations "read" fine reversed in many cases.
But, there are other solutions depending on how much effort you want to put into this.
- Share your screen instead of your camera. Use a program that accesses your webcam (Photos for Mac, Camera for Windows). You could have your participants do this as well.
- Suggestions from the SuperUser forums suggest calling into your own meeting from the Chrome browser with the Extension Flip This installed. Flip this allows you to reverse the display of your Zoom call. If you like to juggle windows, this would let you see anyone's camera reversed.
- If you have a second monitor, you could set it up near a mirror. This will flip what you see.
- If your second monitor was designed to act as a teleprompter, there might be an option in the hardware menus to mirror the display.
----------------------
I hope that this was helpful to you.
If you make this, I would love to know if you're a student making one for yourself or a teacher making one for your class.
Stay well!