Voting Box Using an Arduino by Liam, Luther, and Gabe
by PHS_Engineering in Circuits > Arduino
376 Views, 0 Favorites, 0 Comments
Voting Box Using an Arduino by Liam, Luther, and Gabe

This is a box that counts votes using sensors. It displays the votes on an LCD screen.
Supplies
Arduino, breadboard, wires, laptop, box, 330 ohm resistor, potentiometer, LCD screen, 2 motion ultrasonic sensors, hot glue gun.
Make the Box

Find a medium sized cardboard box. On the inner most top flap that runs horizontal, mark two slots where you will cut. Cut off the top flaps that run vertical. Save one, as you will need it in the next step.
Use One of the Top Flaps As a Divider


Remove the flaps on the floor of the box. Hot glue one of the top flaps onto the bottom of the box going vertically.
Cut Hole for the LCD Screen
Measure the size of your LCD screen, and cut a hole that size going horizontally on the other top flap.
Wire the Motion Sensors
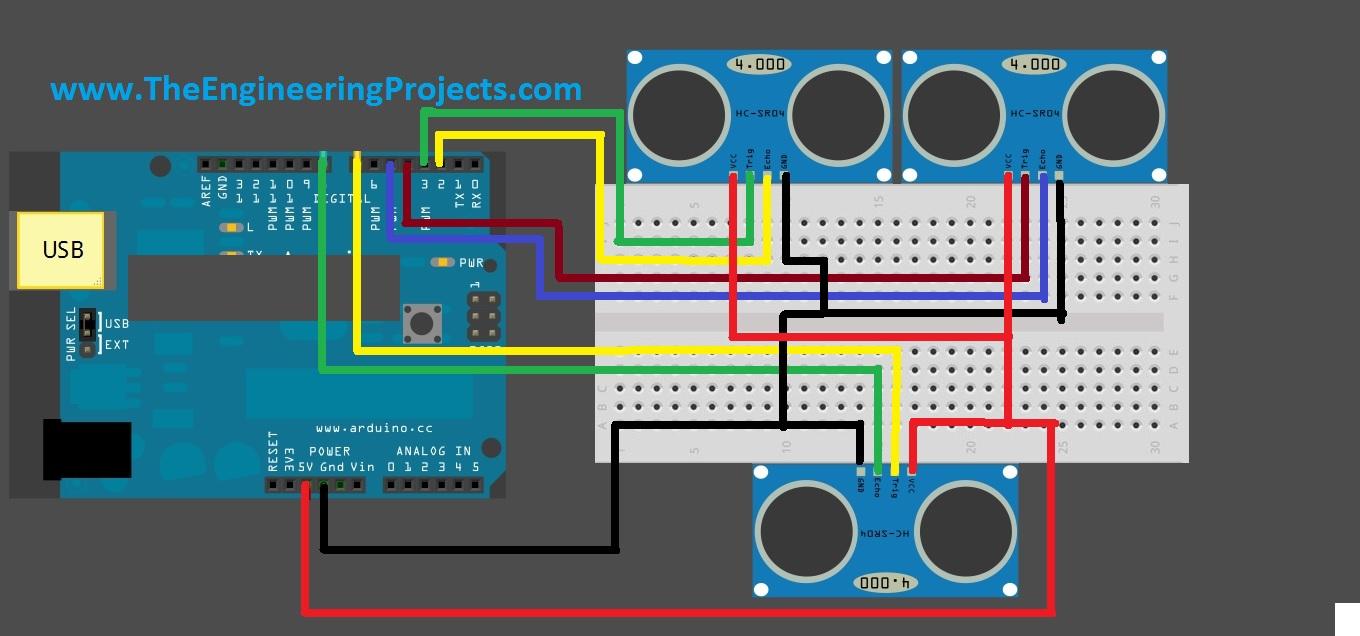
Follow the wiring diagram. The only changes you need to make are: move the 5v wire to go to the long running positive strip on the breadboard and don't include one of the motion sensors. Image from https://www.theengineeringprojects.com/wp-content/uploads/2015/02/Multiple-Ultrasonic-Sensor-With-Arduino.jpg
Wire the LCD

Follow the wiring diagram. Use the 5v from the long running positive strip that you used in the last step. If you don't have very long wires, you may need to add extensions. Image from https://docs.arduino.cc/learn/electronics/lcd-displays
Stick on the Sensors

Put the sensors on the inside of the box below the two slots you previously cut. depending on your wire length, you may need to add extensions.
Put the Breadboard and Arduino in the Box


Carefully but the breadboard and arduino into the box. Stick the LCD through the hole and tape it down. Cut a small hole for the USB cord to go through. Rewire the sensors.
Clear a Path for the Sensors

Tape all wires to the side to make sure they don't obscure the vision of the sensors.
Cut Cardboard Sqaures

Cut 1 in x 1 in cardboard squares to use as votes.
Code
Copy this code:
const int trigPin1 = 9;
const int echoPin1 = 8;
const int trigPin2 = 10;
const int echoPin2 = 11; //These constants set the pin number for the trigger and echo pins of both ultrasonic sensors.
long duration1;
int distance1;
long duration3;
int distance3;
long duration4;
int distance4;
long duration2;
int distance2; // These lines define the distance and duration variables for each sensor, duration is in microseconds, and it will be converted to distance in cm.
int x=10;
int y=10; // x and y are the distances from the ultrasonic sensors to the side of the box, used as a baseline for the ultrasonic sensor.
int count1 = -1;
int count2=0; // These variables, set equal to zero to start, are the vote counts for each sensor.
#include <LiquidCrystal.h>
const int rs = 13, en = 12, d4 = 5, d5 = 4, d6 = 3, d7 = 2;
LiquidCrystal lcd(rs, en, d4, d5, d6, d7); // These lines include the LCD library and set the pins that it is connected to.
void setup() {
// initialize serial communication:
Serial.begin(9600); // Initializes the serial moniter for printing later on.
lcd.begin(16, 2); // Defines the coordinates of the LCD.
lcd.print("Opt 2 Opt 1"); // Prints the message in quotes onto the LCD, starting in the top right corner.
pinMode(trigPin1, OUTPUT); // Sets the trigPin as an Output.
pinMode(echoPin1, INPUT); // Sets the echoPin as an Input.
pinMode(trigPin2, OUTPUT); // Sets the trigPin as an Output.
pinMode(echoPin2, INPUT); // Sets the echoPin as an Input.
}
void loop() {
digitalWrite(trigPin1, LOW); // Wipes the trigPin to start the process
delayMicroseconds(2);
digitalWrite(trigPin1, HIGH);
delayMicroseconds(10); // Turns on the trigPin for 10 microseconds
digitalWrite(trigPin1, LOW);
duration1 = pulseIn(echoPin1, HIGH); // Reads the value of the echoPin and sets the duration in microseconds equal to the duration variable.
distance1= duration1*0.034/2; // Changes the duration to distance in cm.
Serial.print(distance1); // Prints the distance to the serial monitor.
Serial.print (",");
if (distance1 < x) {
delay (20);
digitalWrite(trigPin1, LOW); // Wipes the trigPin to start the process
delayMicroseconds(2);
digitalWrite(trigPin1, HIGH);
delayMicroseconds(10); // Turns on the trigPin for 10 microseconds
digitalWrite(trigPin1, LOW);
duration3 = pulseIn(echoPin1, HIGH); // Reads the value of the echoPin and sets the duration in microseconds equal to the duration variable.
distance3 = duration3*0.034/2; // Changes the duration to distance in cm.
if (distance3 > 10){
count1++; // If the distance is over 10, the count will increase by one.
}
}
digitalWrite(trigPin2, LOW); // Repeats the same process for the second sensor.
delayMicroseconds(2);
digitalWrite(trigPin2, HIGH);
delayMicroseconds(10);
digitalWrite(trigPin2, LOW);
duration2 = pulseIn(echoPin2, HIGH);
distance2= duration2*0.034/2;
Serial.println(distance2);
if (distance2 < y) {
delay (20);
digitalWrite(trigPin2, LOW); // Wipes the trigPin to start the process
delayMicroseconds(2);
digitalWrite(trigPin2, HIGH);
delayMicroseconds(10); // Turns on the trigPin for 10 microseconds
digitalWrite(trigPin2, LOW);
duration4 = pulseIn(echoPin2, HIGH); // Reads the value of the echoPin and sets the duration in microseconds equal to the duration variable.
distance4 = duration4*0.034/2; // Changes the duration to distance in cm.
if (distance4 > 10){
count2++; // If the distance is over 10, the count will increase by one.
}
}
String myString = String(count1);
String myString1 = String(count2); // Turns the count numbers into a string.
String mySpecialString = String(myString1 + " " + myString); // Combines the strings together.
lcd.setCursor(1,4);
lcd.print (mySpecialString); // Sets LCD coordinates and prints the combined string, which appears as the two counters.
}