Graphical Programming IDE Software for Arduino, ESP32, STM32, Raspberry Pi, IoT
by RonFrtek in Circuits > Arduino
69 Views, 0 Favorites, 0 Comments
Graphical Programming IDE Software for Arduino, ESP32, STM32, Raspberry Pi, IoT


Program Arduino and Microcontrollers without writing a line of code!
Does programming in C++ seem like an obstacle to getting your Arduino projects off the ground? Would you like a more visual and intuitive way of programming microcontrollers? Then you need to get to know Visuino! This graphical programming platform turns the creation of complex electronic projects into a simple task of dragging and connecting blocks. In this article, we’ll take you through your first steps with Visuino, from installation to creating your first interactive project.
INSTALLATION
Visuino currently has two versions: Standard and Pro. We recommend downloading and installing the Pro version, as it offers more features. Even if you don’t buy a permanent license, you can use it temporarily with a trial license.
Below is a step-by-step guide to installing Visuino and activating the trial license:
Note: At the time of writing, the latest version of Visuino was 8.0.0.146. However, it is recommended that you always download the latest version available, as there will be no compatibility problems.
Installation steps:
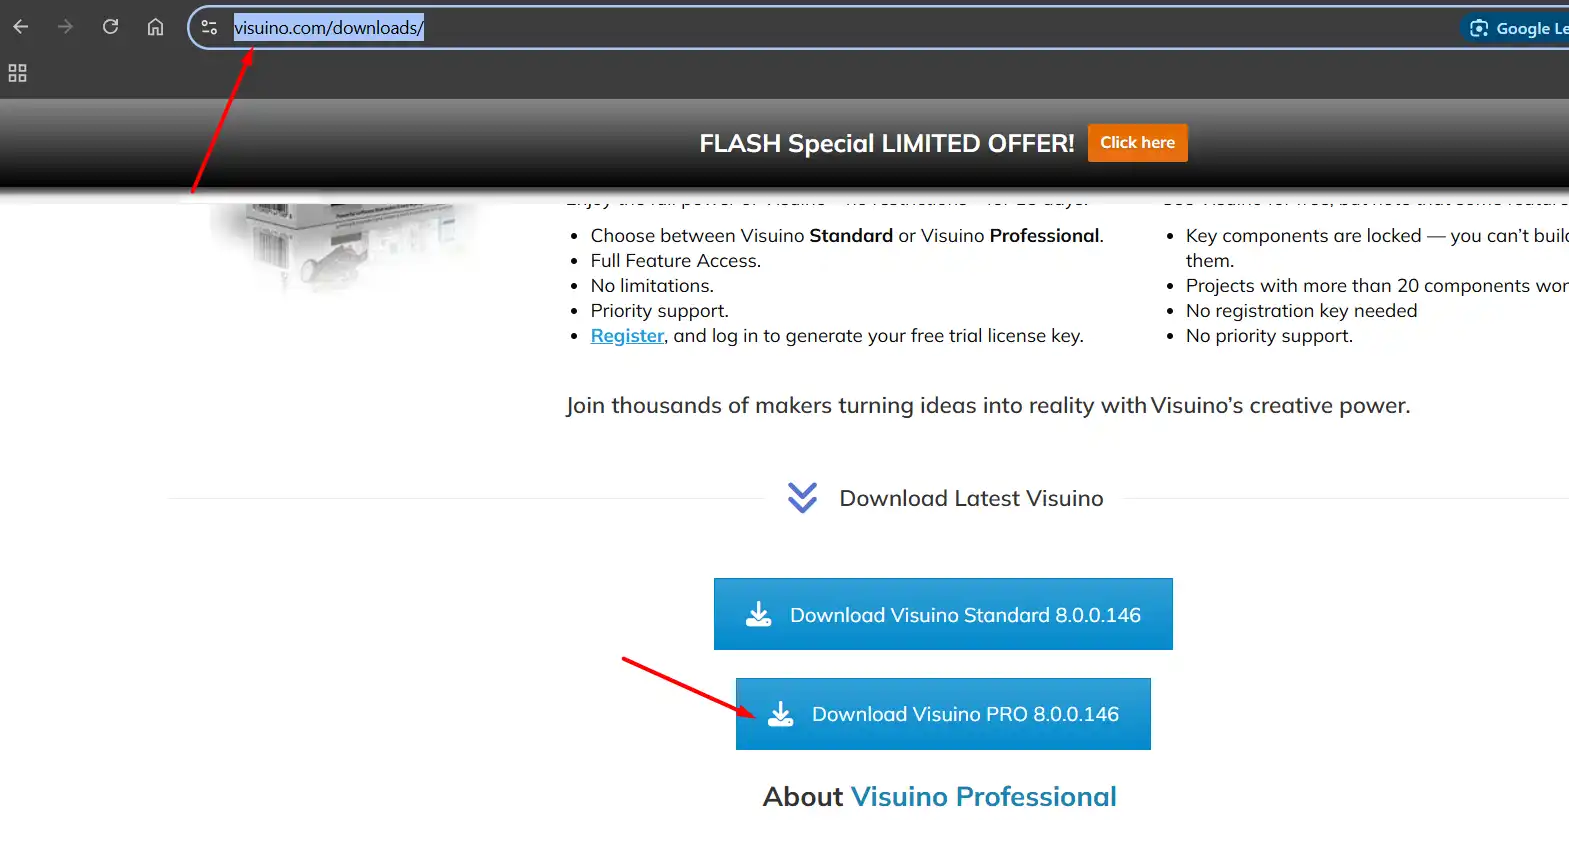
- Go to the Visuino download page: https://www.visuino.com/downloads/
- Download the latest version of Visuino.
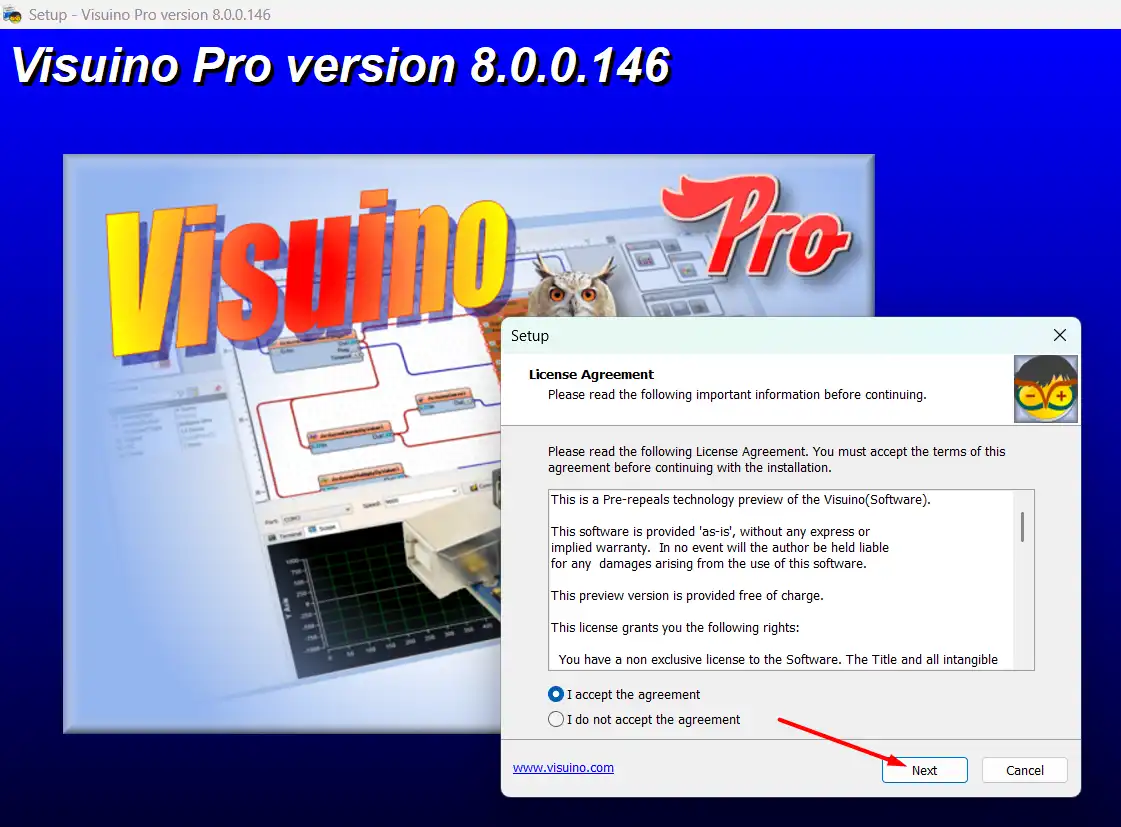
- Run the installer and follow the instructions. (No additional settings are required.)
See the step-by-step images:
After downloading, open the compressed file and start the installer, then just click Next, Next, Install.
FIRST PROJECT
After completing the installation, start Visuino.
The first time you run the program, it may take a while to load. This is because Visuino needs to compile some internal files and create a cache of the components.
But before starting the project, let’s get to know the interface and a few other details:
- Object Inspector: Displays all the settings for the selected component. This is where you adjust specific properties for each item in your project.
- Build Panel: Shows the log of the build process, useful for tracking errors or messages during the build.
- Root Component: Represents the board used in the project. By default, Visuino starts with the Arduino UNO selected.
- Mini Visualization Panel: Visually displays how the components are connected, providing an overview of the project.
- Build button: Generates the build of the current project, converting it into code to be sent to the board.
- Upload button: Sends the compiled project directly to the board connected via USB.
- Component Palette: Contains all the available components. The icons represent categories, and by clicking on each one, you can see the corresponding components.
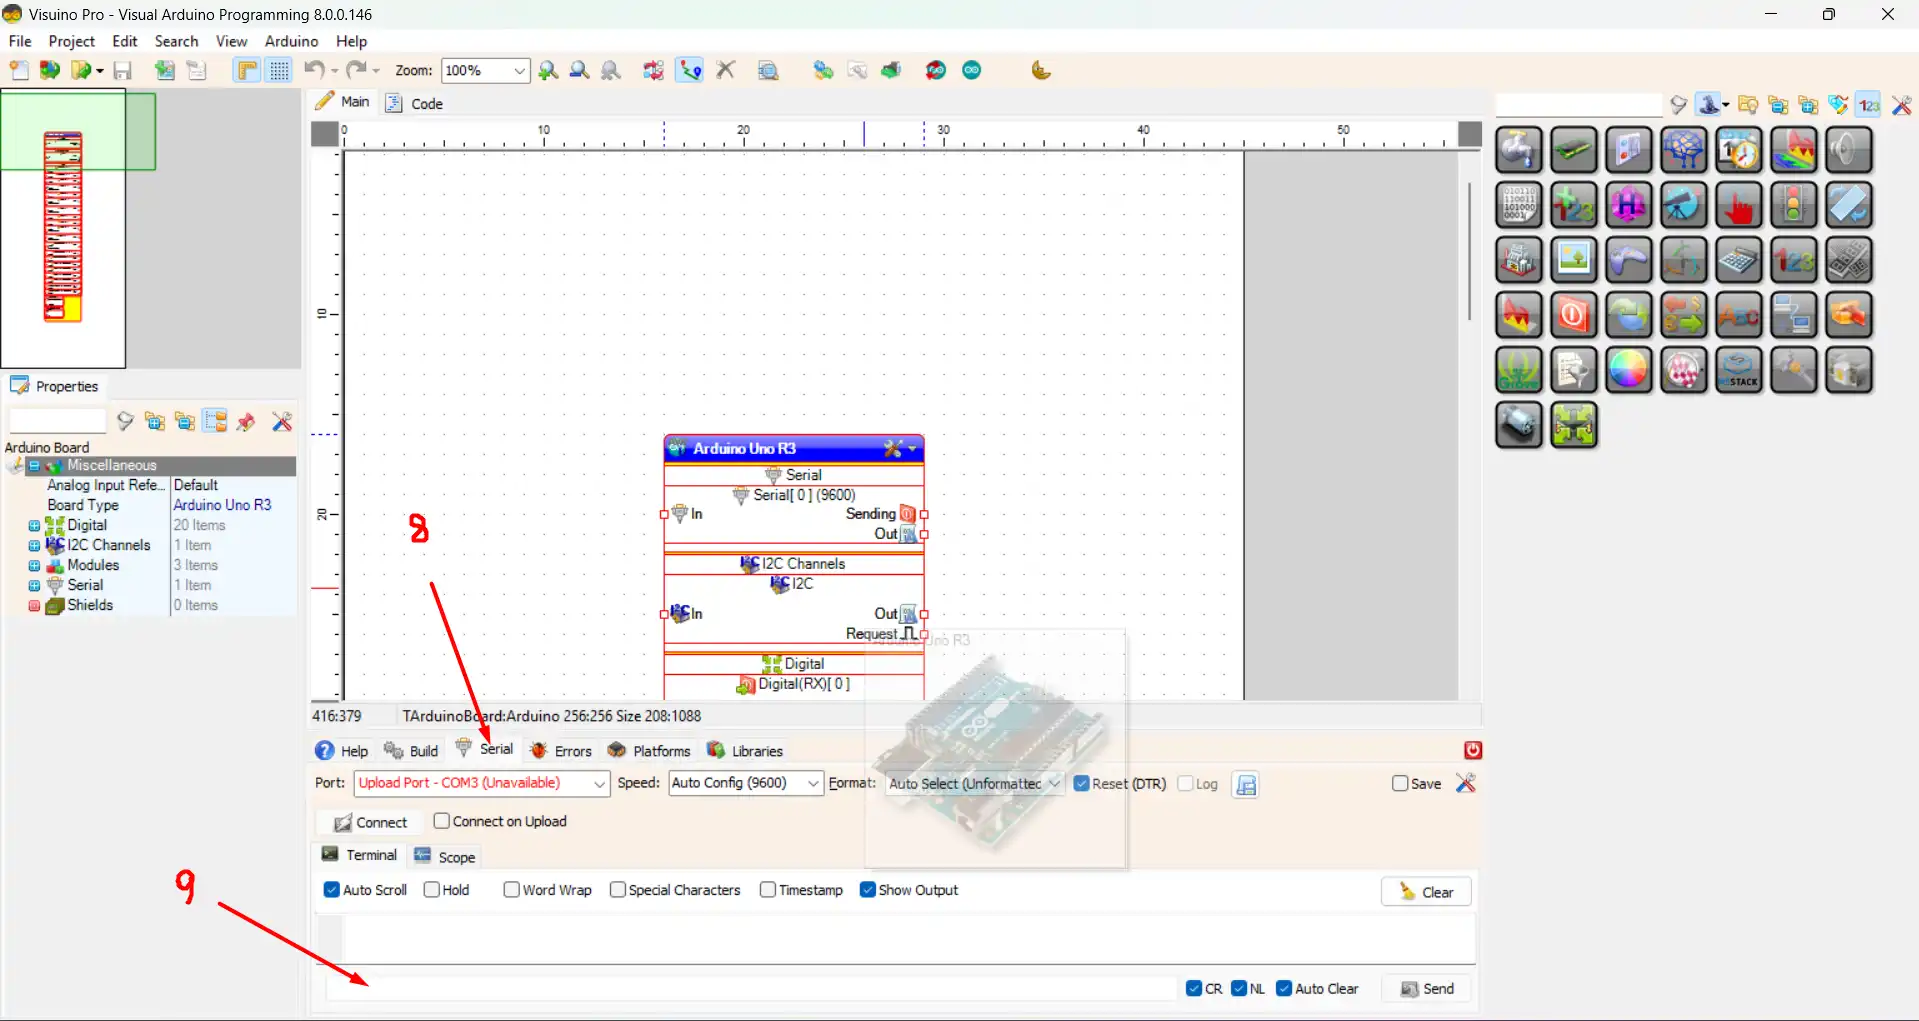
- Serial Monitor: Works in the same way as the Arduino IDE, allowing you to interact.
- Serial Monitor Input: Here you can send texts.
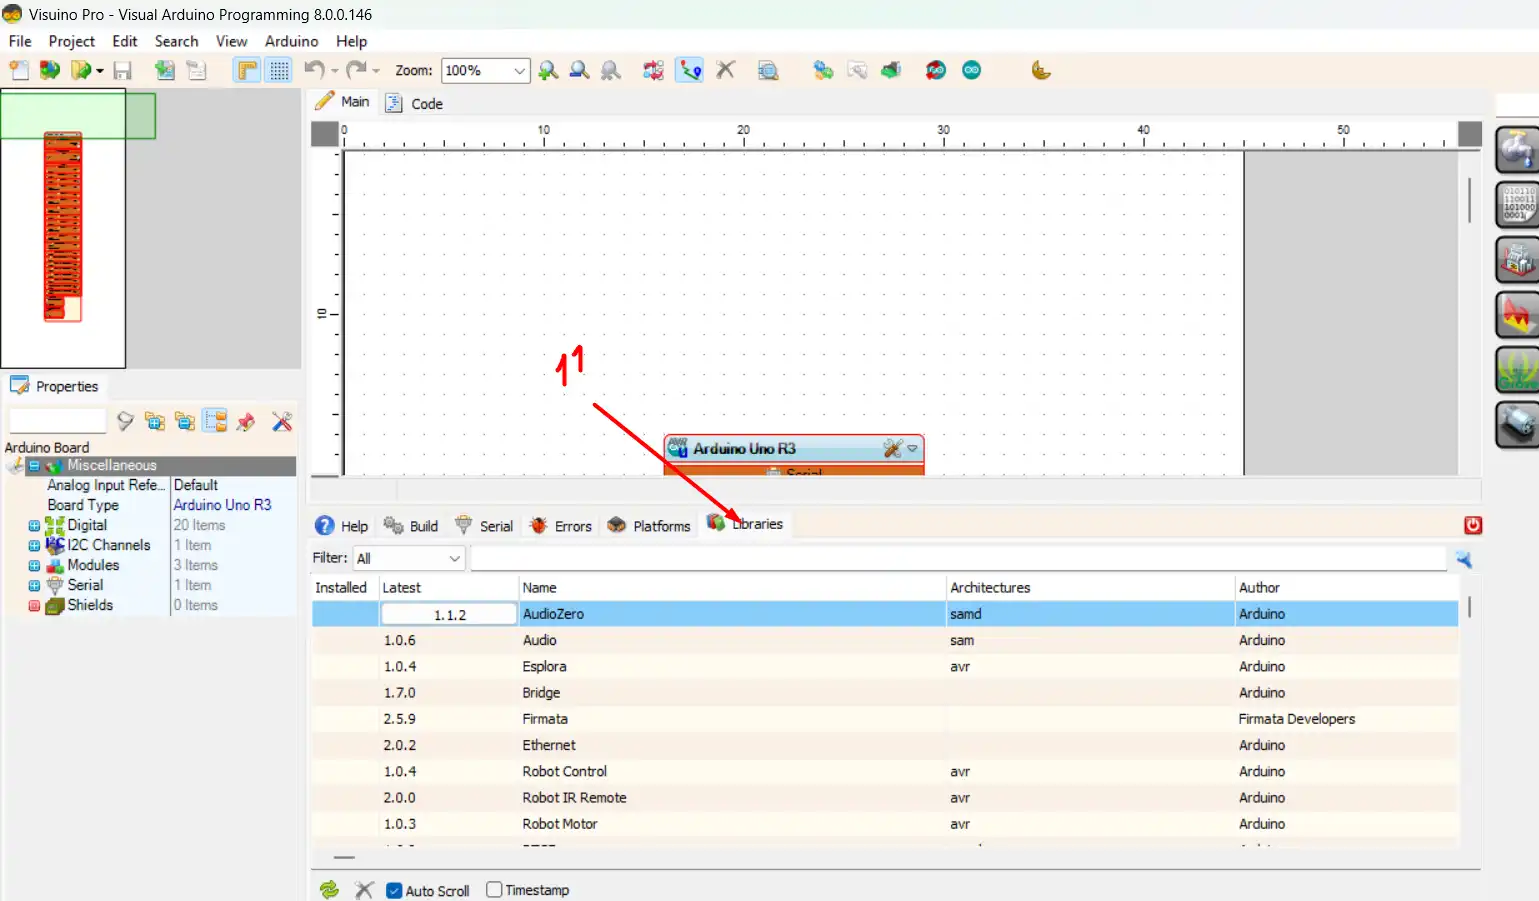
- Platform panel: Here you can install different platforms or update existing ones, but Visuino already does this automatically when necessary;
- Libraries Panel: Just like the platform panel, here you can install extra libraries. Visuino does not automatically update libraries.
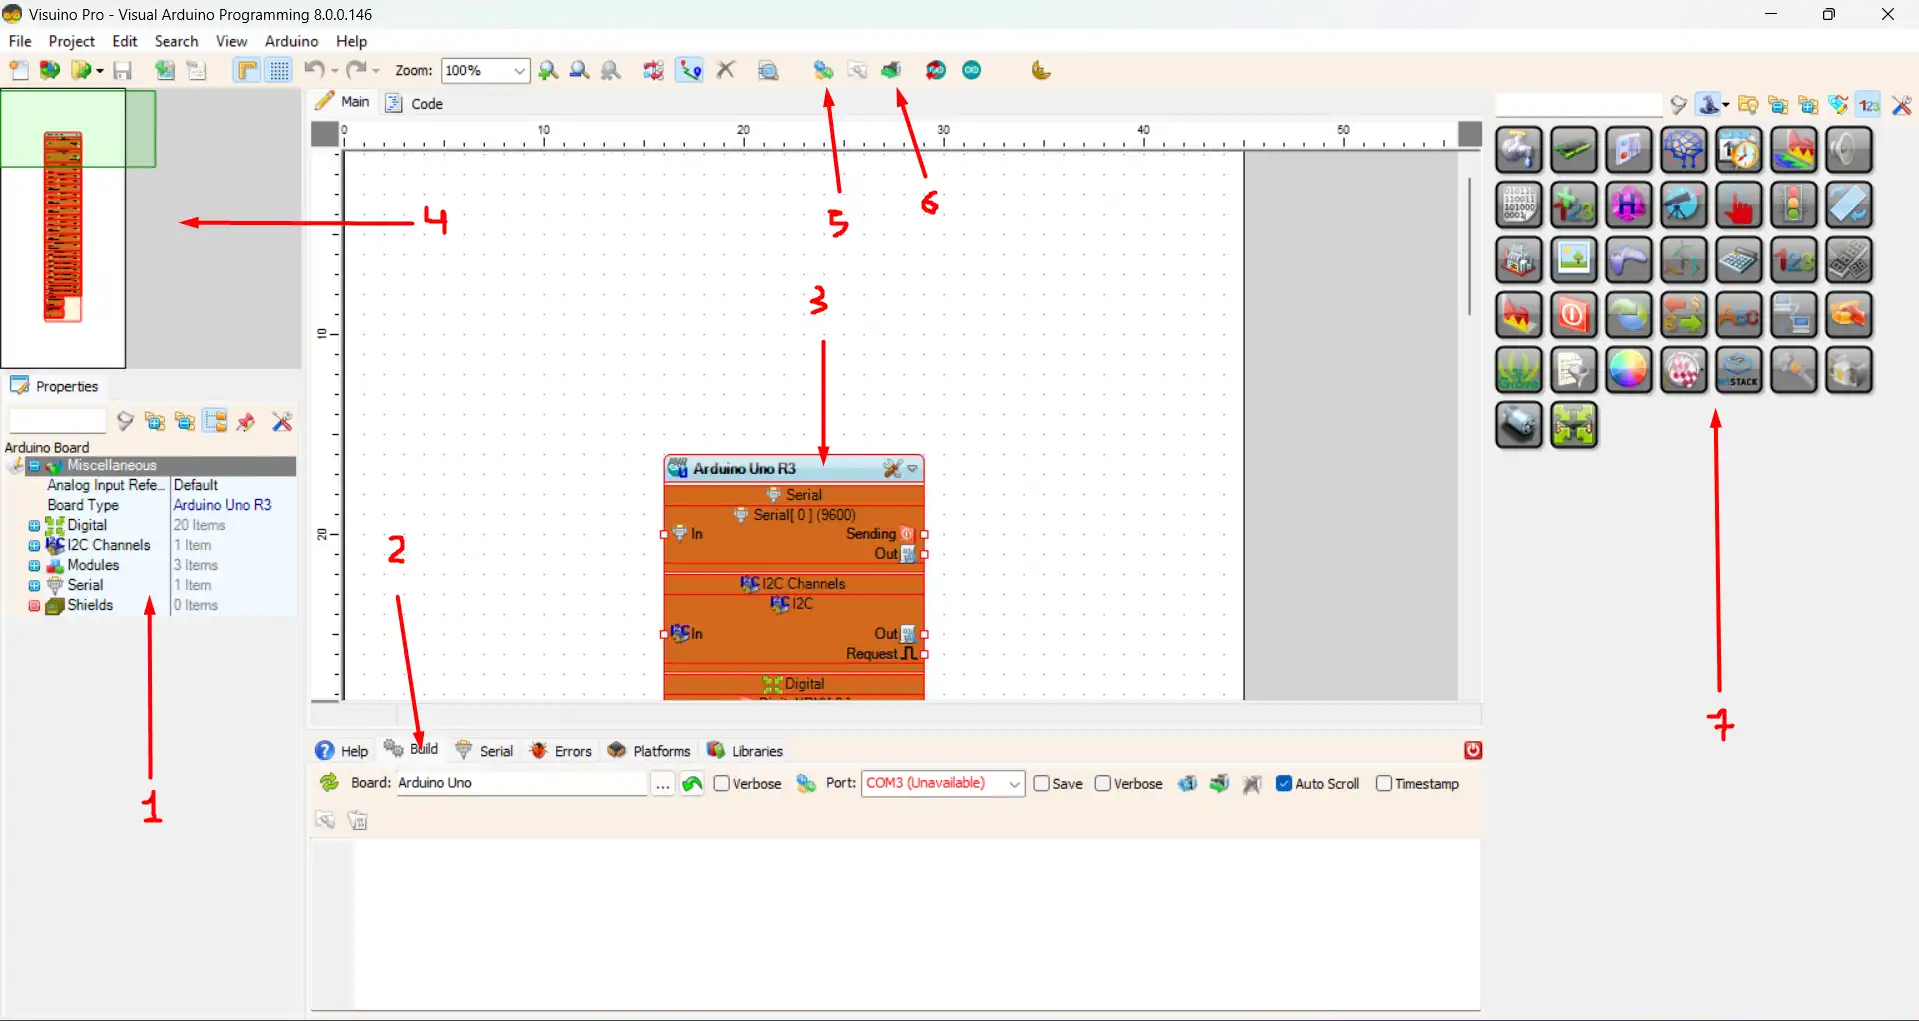

I can’t tell you all about the interface, but you’ll get to know it better as we go along.
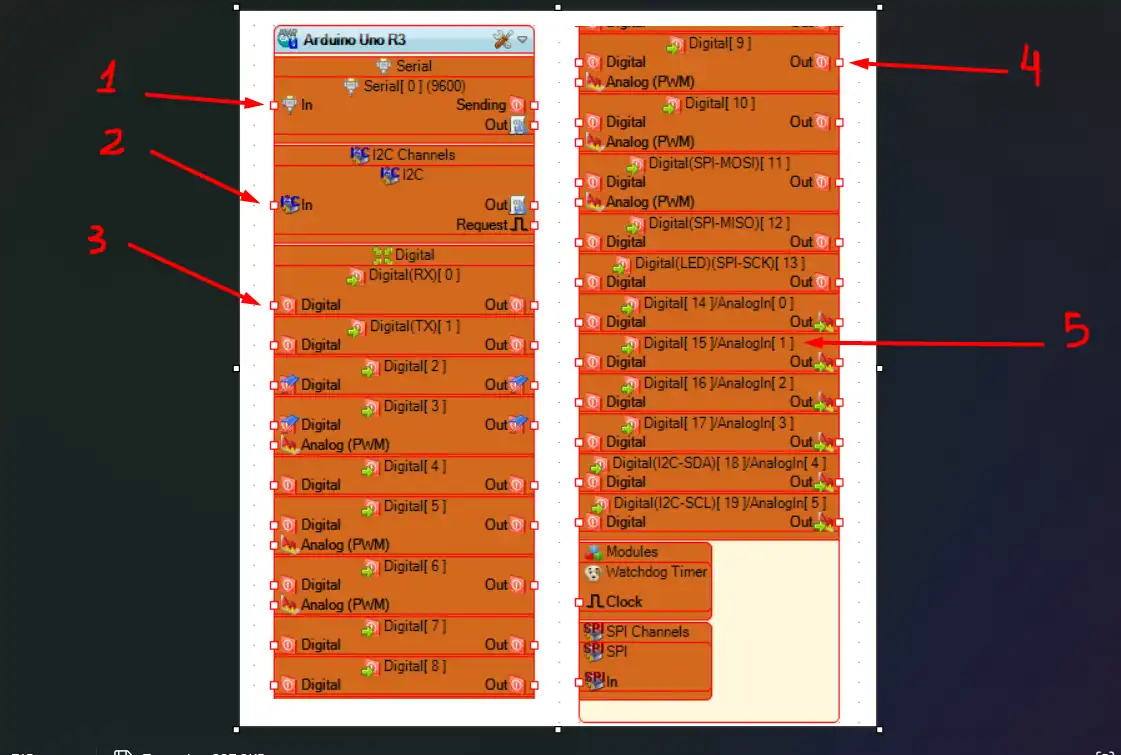
Let’s now find out a bit about the Root component, i.e. the component that represents the board.
- Standard Serial Input of the board: in the case of the Arduino UNO there is only one;
- Input for modules that support the i2c protocol;
- Pins: (Input)
- Pins: (Outputs)
- Pins: (Identification of the Pin on the Board, in addition to the number and type, there is other relevant information such as standard identification for connection, i2c, SPI, Tx)
STARTING THE PROJECT
Now that we know the basics of the interface, it’s time to get down to work and actually start our project!
Let’s create a weather station
Our goal will be to build a simple station that measures air temperature and humidity.
Components needed:
For this project, you will need the following items:
- DHT11 humidity and temperature sensor: https://www.makerhero.com/produto/sensor-de-umidade-e-temperatura-dht11/
- Arduino UNO or compatible: https://store.arduino.cc/products/arduino-uno-rev3
With the components in hand, make the connection as shown in the image below:
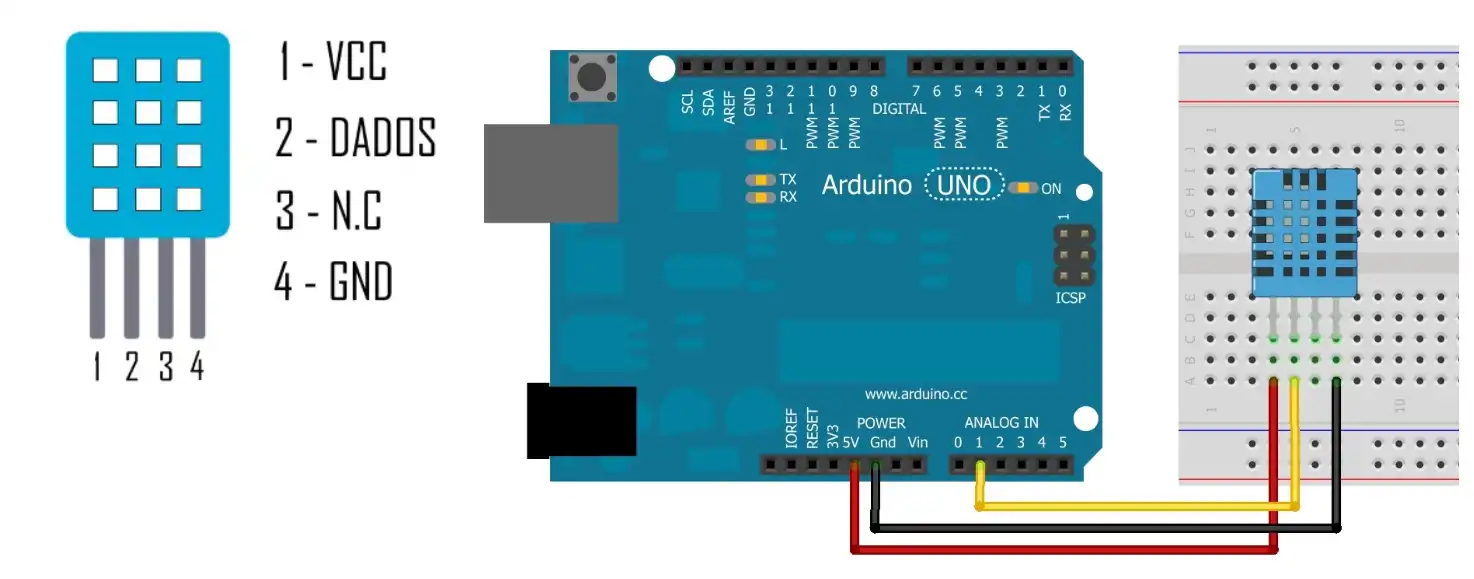
- Red wire: Connection to the board’s 5V input and to Pin 1 of the sensor
- Black wire: Connection to the board’s GND input and to Pin 4 of the sensor
- Yellow wire: Connection to the board’s Analog 1 (Digital 15) input and to Pin 2 of the sensor
With the connections made, let’s go back to Visuino and create our project.
Go to the components palette and look for the DHT11 component and drag it into the project.
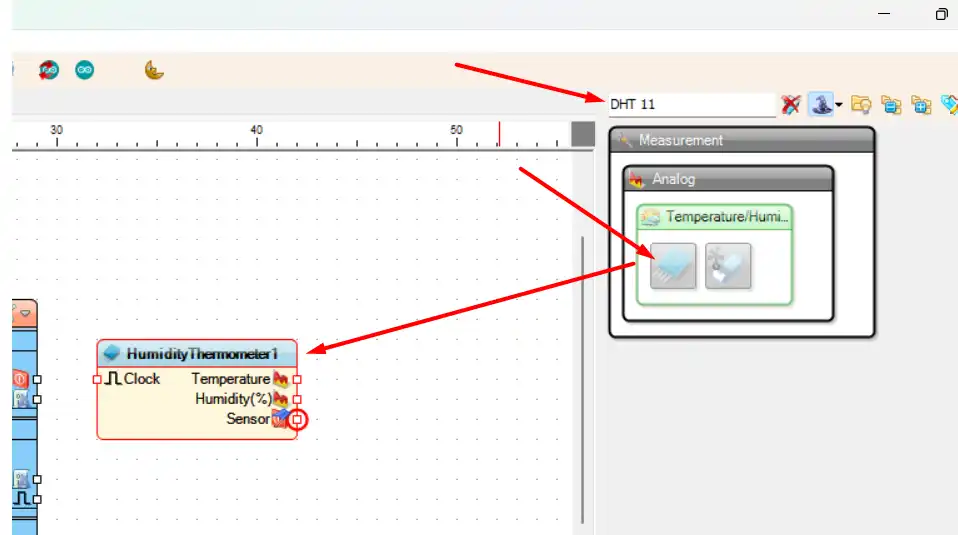
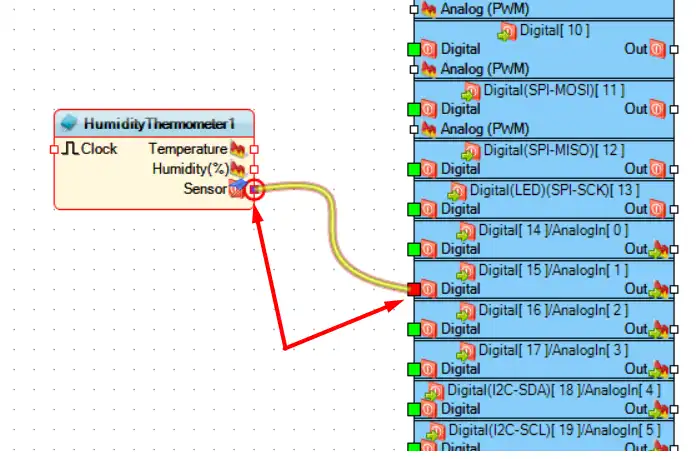
Click on the sensor output pin and connect it to the Digital [15](AnalogIn[1]) pin as shown in the image below:
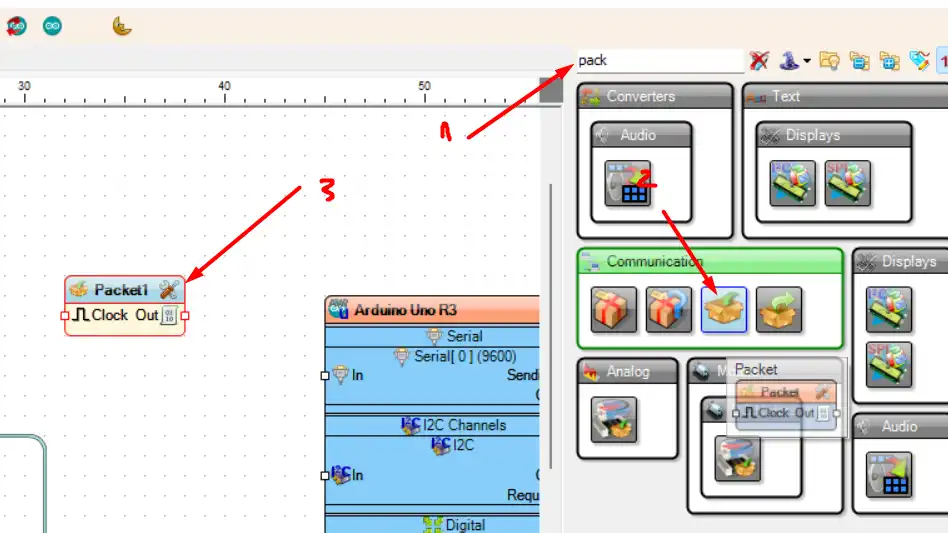
Go back to the components palette and look for Packet and add the Packet component to the project. See the image below:
Connect the Out of the Packet component to the In of the board’s Serial[0].

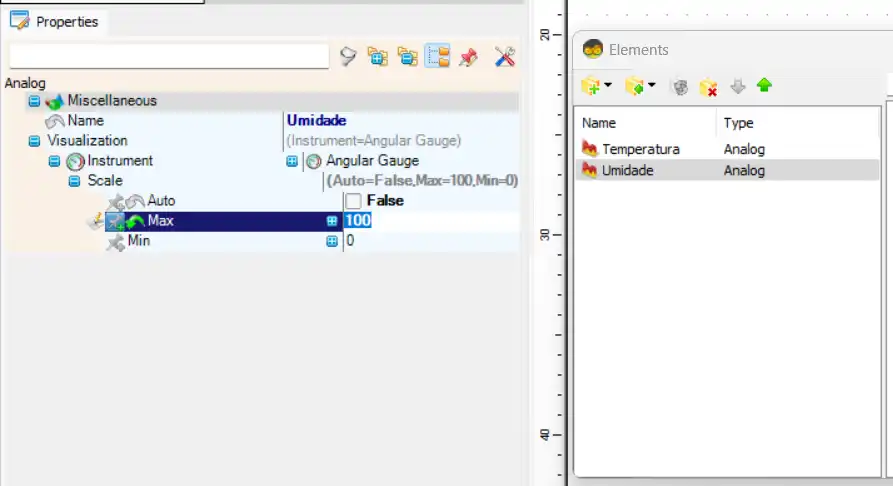
Select the Packet component and in the Object Inspector check the Only Modified option and add two elements of type Analog.
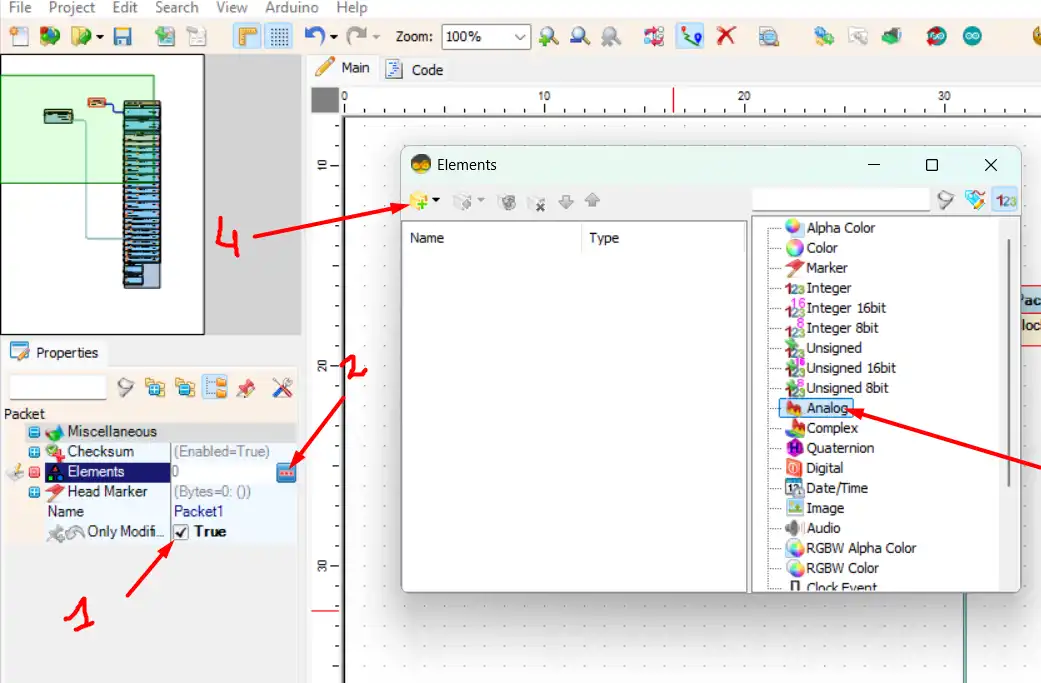
- Leave the Only Modified property as True;
- Click on the … button to open the elements window; Select the Analog element; Click on the Add button; With the two Analog elements added, let’s configure the first one. button to open the elements window;
- Select the Analog element;
- Click on the Add button;
With the two Analog elements added, let’s configure the first one, leave it as shown in the image below:
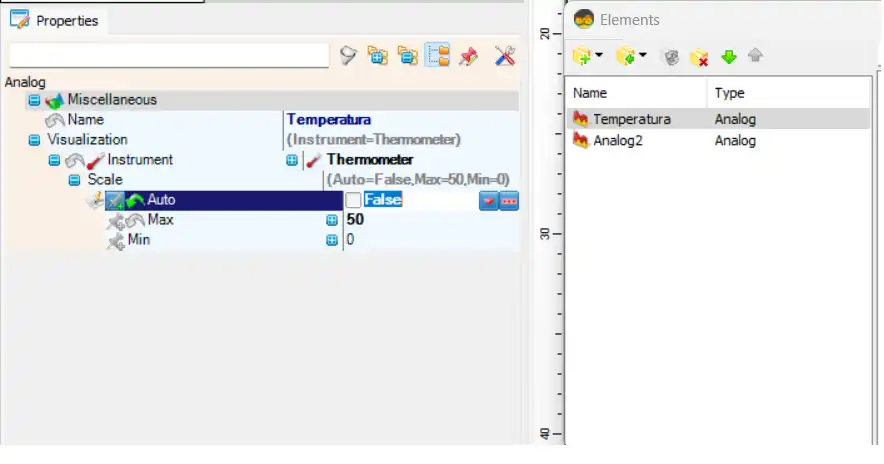
I left it between 0 and 50, because according to the sensor’s datasheet it measures between 0~50 ºC.
On the second one, leave it as shown in the image below:
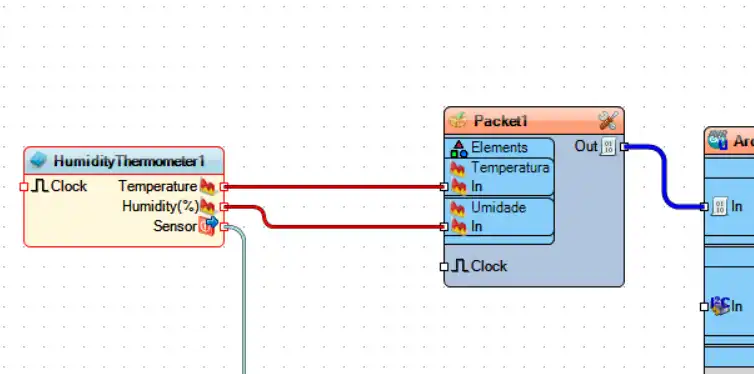
Close the Elements window, and make the connections between the DHT11 component and the Packet as in the image:
TESTING
Now let’s compile the project and upload it to the board, see the image below. If the Serial panel is not expanded, click on the button indicated by the blue arrow to expand it.
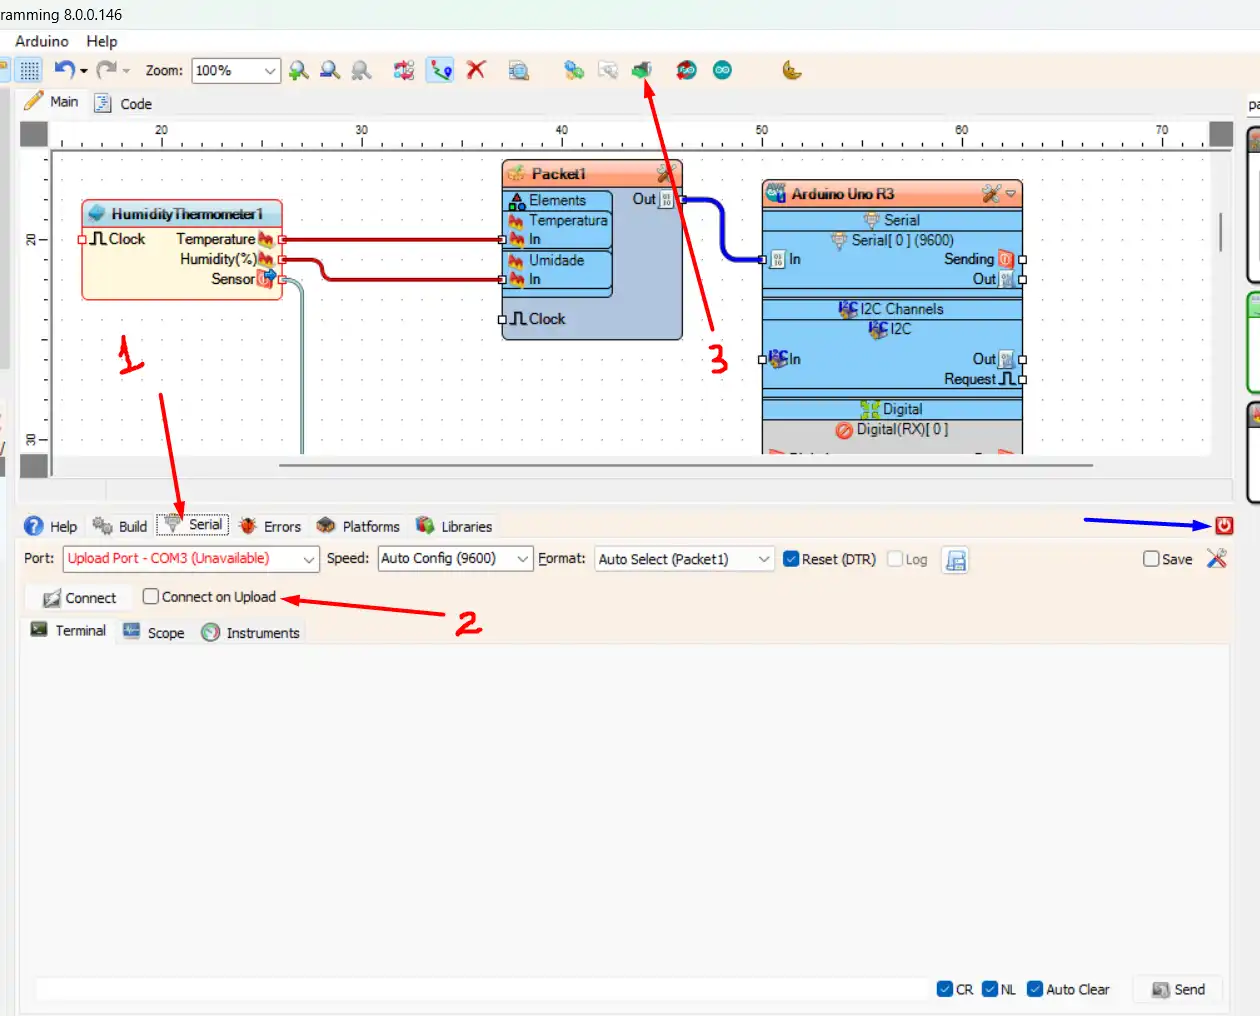
- Click on the Serial tab;
- Check the Connect on Upload box (it will connect the Serial Monitor when the upload is finished);
- Click on the button to upload;
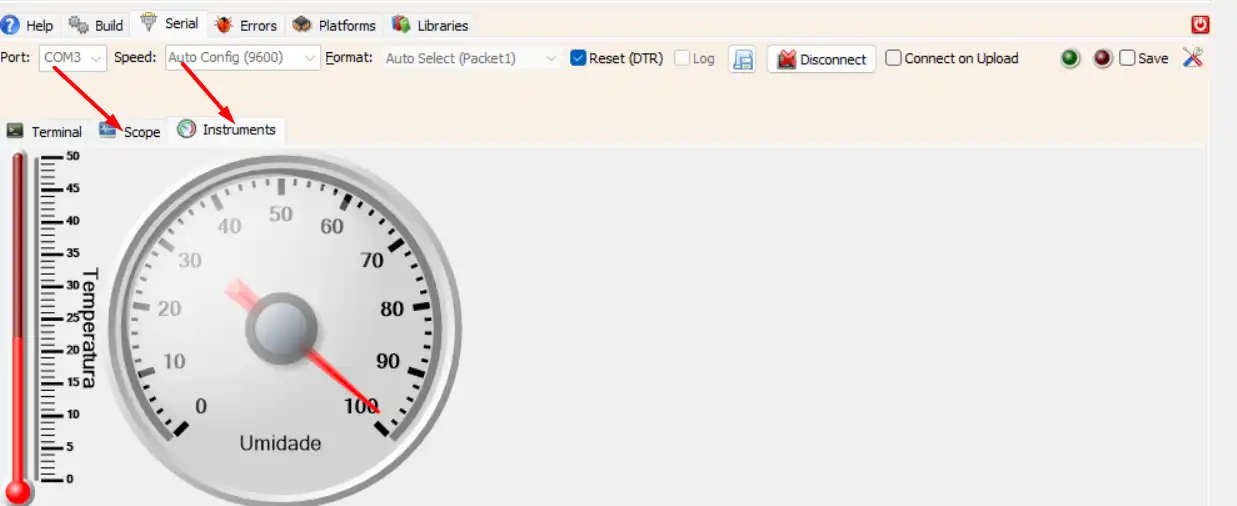
You can see the result in two ways, through Instruments or Scope:
FINAL
So that’s it!
If you’re into Arduino, IoT and embedded systems, you’ve just learned about a practical and visual way to develop your applications for these platforms.
Visuino makes the process much easier, especially for those who are just starting out or want to speed up prototyping. Now it’s up to you: explore, experiment and create your own projects!
This article was originally written in Portuguese by Visuino user Swellington Soares.
Read it here: https://www.dio.me/articles/visuino-programe-arduino-sem-escrever-uma-linha-de-codigo-e0e3ba919072