Viscous Fingering: How to Make Fluid Channels in Silicone Membranes
7979 Views, 133 Favorites, 0 Comments
Viscous Fingering: How to Make Fluid Channels in Silicone Membranes


Viscous Fingering is a fluid dynamic process where one fluid of a lesser viscosity is forced into another fluid of a greater viscosity, while constrained to ~2 Dimensions. In this Instructable, I will show you how to make all kinds of silicone membranes with embedded hollow channels. They can be used to heat or cool the body, insulate windows, as a platform for soft robotics, and hopefully lots of other great applications I haven't thought of. The process can be extremely simple, or hugely complex, depending on what you are trying to do. The one worn on my chest in red was extremely simple. The large sheet with the fine veins in it was much more difficult to execute. I will explain the differences as we move on.
The Base


The base is the bottom layer that provides support to the injection system (this is a casting process after all). It is build to be strong and consistently rigid, if you want consistent branch size in the viscous fingering (VF) fractal.
To build the base select plywood and construct a frame within. For large structures or systems where great levels of support are required, use a steel frame around the perimeter (later we will clamp to this frame).
Apply a sheet of HDPE or some similar plastic that you can machine. Fix it to the plywood by screwing from plywood side, ensuring that the HDPE surface remains unmarred. 1/2" is best.
Creating Sources and Sinks


You are going to want a source for air to enter the system. The air will tunnel its way through silicone to create the channels, so select your placement based on where you want the origin of the branches to be. They will fill the rest of the space.
Drill a full depth pilot from the HDPE side then half depth (just through the plywood) with a spade bit from the plywood side. Use a spade bit that is slightly wider than the outer diameter (OD) of the hosing that you will be using. Next drill a hole from the HDPE side with a spade bit that is slightly smaller than the diameter of the hose you will use.
Put the hose through and ram a barbed brass splice from the underside (plywood side) through the tube to create a tight barbed fitting to connect hoses to.
Cut the excess hose from the HDPE side using a sharp blade and running it nearly flush along the surface (try not to scrath the plastic!)
Sealing the Cell


The ~2D space within which VF takes place is known as a Hele Shaw cell. We are going to need to seal our cell to contain the fluids.
Lay out a perimeter in the shape you desire of your final form in double sided outdoor adhesive tape.
Miter cut the joints using a sharp blade and cutting through the overlap, then pealing out the cutoff.
Sealing the Cell


All holes need to have control valves on them. Rig a hose between the barbed connect mounted to the cell and a valve. 3-way valves are the best, because you can hard-plumb both a silicone injection source and air supply to the same port, and toggle between the two.
To continue sealing the cell, tape down the shrink film and heat shrink it. Next attach a piece of hose to the barbed connector of one of your sources/sinks and breath air in. Hold the air in the system to ensure there are no leaks. Leaks are bad.
Top Frame and Glass


For large sheets you will need a rigid frame above a sheet of rigid glass to control the height of your "2-Dimensional" cell. Rigidity gives consistency, but at a cost. It is essential that air have somewhere to go when injected. rigid systems can have pressure build up quickly. There are several solutions to this issue.
The glass should have thermal weather stripping (neoprene adhesive strips) of 1/2" on one side and 1/4" on the other following a perimeter just shy of the perimeter traced by the double sided tape. The overhang is necessary to ensure a tight seal at the boundary of the cell when clamped and under pressure.
Inject Silicone

With the glass and frame removed, inject silicone into the cell. smooth out the silicone by hand using a cloth or painters nap to press against the film and spread the silicone. Be extra careful not to damage the film.
The frame can also be clamped in place without the glass during this process to help hold the film to the double sided tape while you spread the silicone out.
Inject Air


Once the silicone has completely filled the cell, you are ready to inject air.
The width of the channels depends on two things in this situation. 1: How high is the height of the cell? This is known as the gap thickness and the channel width scales linearly with gap height. One way I like to intuit this is to imagine the cross section of one of these "finger" channels as a circle, or something there abouts. As the height of the circle increases, so does the width.
Another parameter that you have control over is the ratio of the thickness of silicone to air. This may sound unintuitive but silicone thickens up during its pot-life. This can be taken advantage of by pushing the pot-life and injecting later. The thicker the substrate that you inject air into, the finer the channels (almost like shattering a liquid).
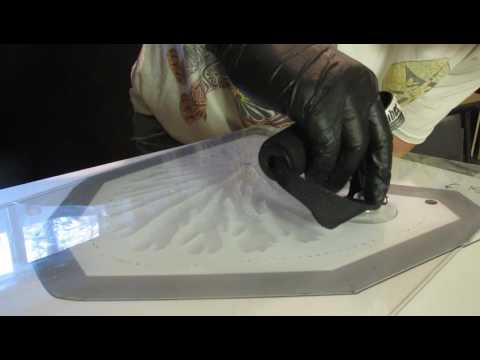
To insure that you get the appropriate flow rate of air (another factor that controls channel size) you should attach a pressure regulator to the air line, or use a large syringe to do the injection by hand, as I have in the first image where I am making my wearable (that cell is slightly different, in that it is just thin acrylic double taped to HDPE and the flexibility in the acrylic is what gives the air room to move).
One air is in, close the valves and let cure.