Vectorizing Drawings for Laser Engraving and Cutting Jewelry (Free Samples Too!) INKSCAPE Version
by robopanda in Craft > Jewelry
29251 Views, 55 Favorites, 0 Comments
Vectorizing Drawings for Laser Engraving and Cutting Jewelry (Free Samples Too!) INKSCAPE Version
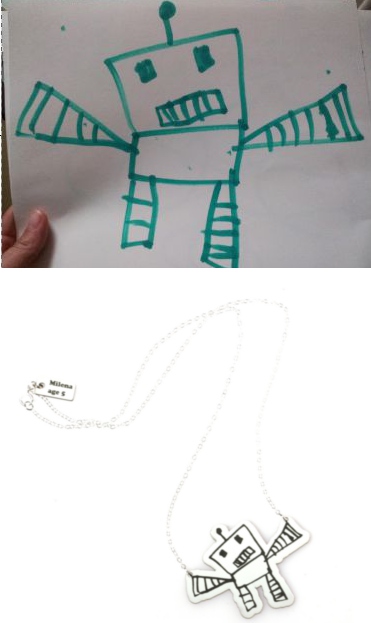
This is the Inkscape version of my previously featured Instructable on the same topic.
I used CorelDraw for the previous version and was pleasantly surprised at the positive response so I've decided to hurry up and do the Inkscape version since Inkscape is FREE & awesome (it's what got me into vector design & I now design professionally.)
Get it at Inkscape.org
A few fair warnings about Inkscape, it is open source software and there are crashing issues, etc. so save your work as often as possible. Soon you'll be Ctrl+S-ing automatically every 10 seconds. It's a good habit!
I still remember what it's like to not know how to use vector graphics editor so I try to explain every step and point out where the menus are, etc. It takes some knowledge of graphics editing and a decent eye for design. Not all drawings can be easily turned into vector graphics, though. You want something with dark ink on white (unlined if possible) paper, that is connected all the way around the drawing (A scene with stars and moon that are disconnected won't be as simple to translate)
The vector art was then submit to Outfab.com for cutting. It's a laser cutting service and you can get a free custom sample on select materials up to about 1"x3" if it's your first time without even signing up so this is a great starter project. All you'll need to buy are some jewelry findings.
So read on, and if it gets over your head feel free to message me for more tips!
Get the Picture Into Inkscape
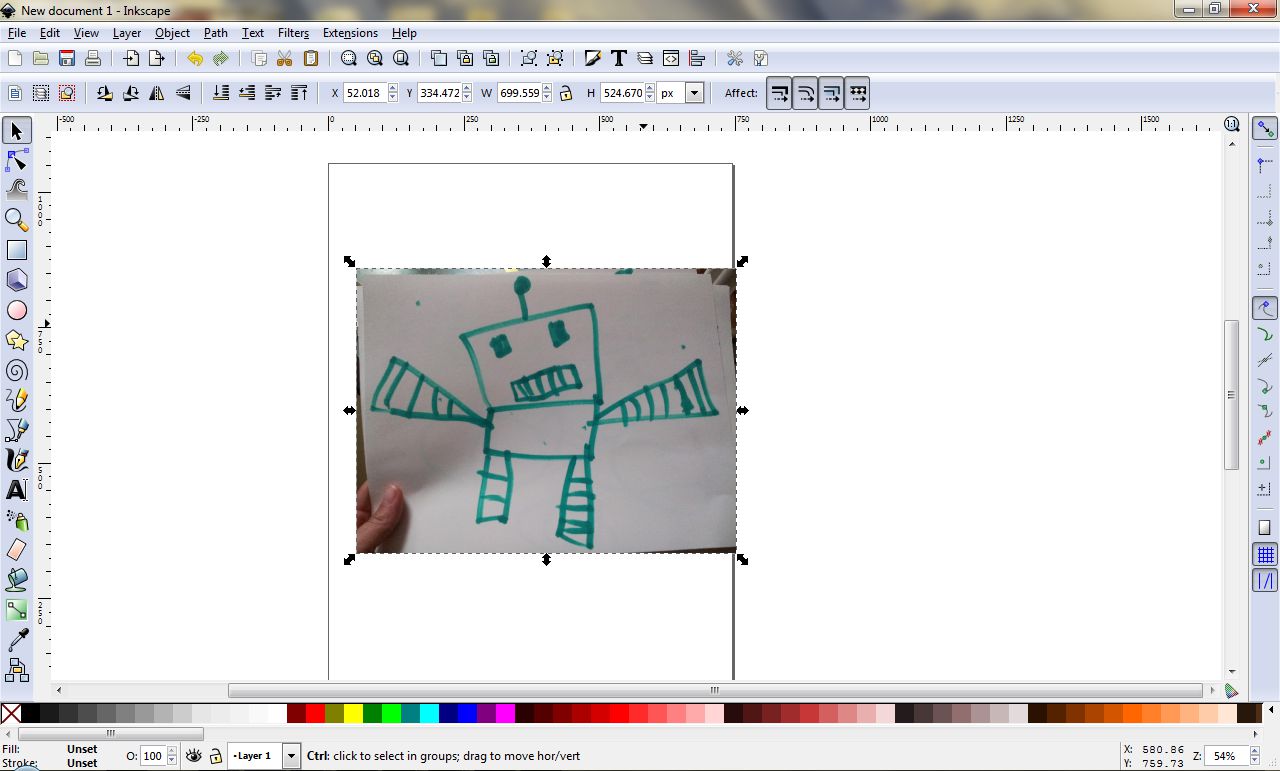
I really hate using scanners (they take up way too much deskspace!) So I just photograph things with my phone which is connected with Dropbox and...well never mind that part, just get the image to the computer one way or another.
It doesn't matter if your thumb is in the pic, you can edit it out later.
Import it into Inkscape either by dragging and dropping it into a blank page or simple opening it from wherever it is. Don't worry about the size just yet, let's focus on getting that jpg drawing into a vector!
It doesn't matter if your thumb is in the pic, you can edit it out later.
Import it into Inkscape either by dragging and dropping it into a blank page or simple opening it from wherever it is. Don't worry about the size just yet, let's focus on getting that jpg drawing into a vector!
Trace the Bitmap
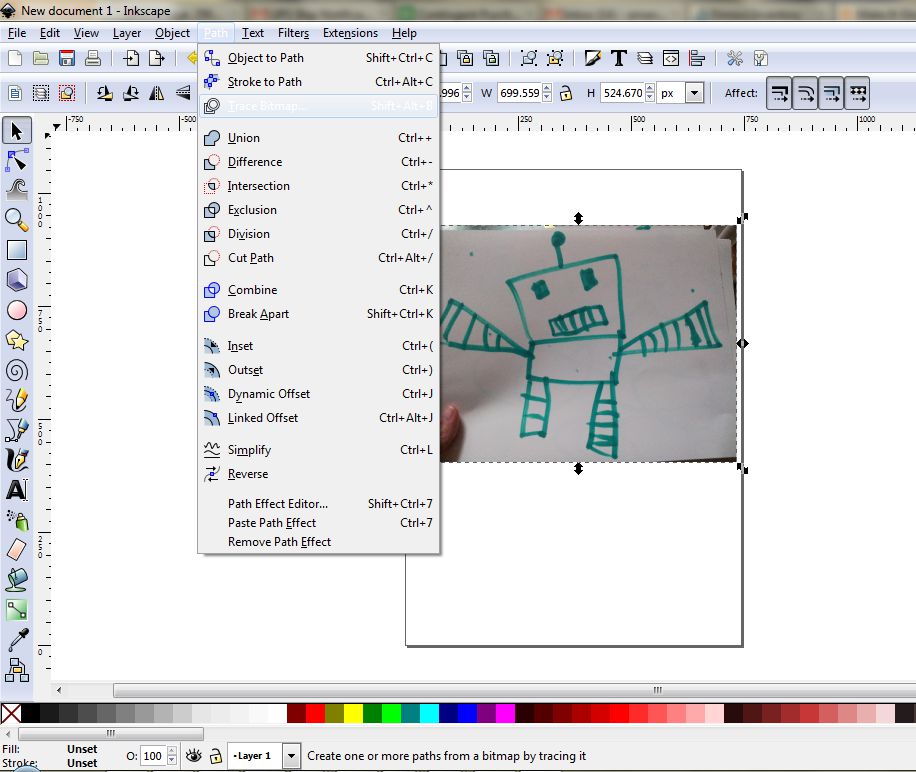
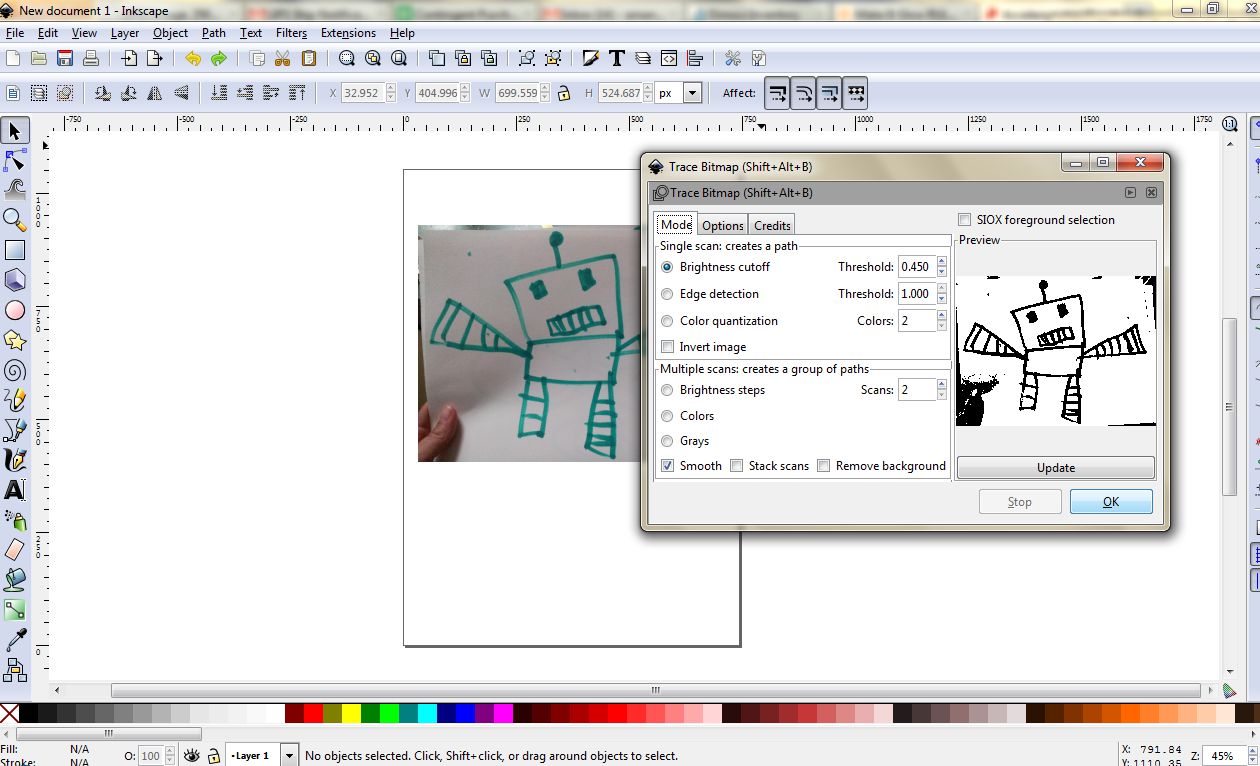
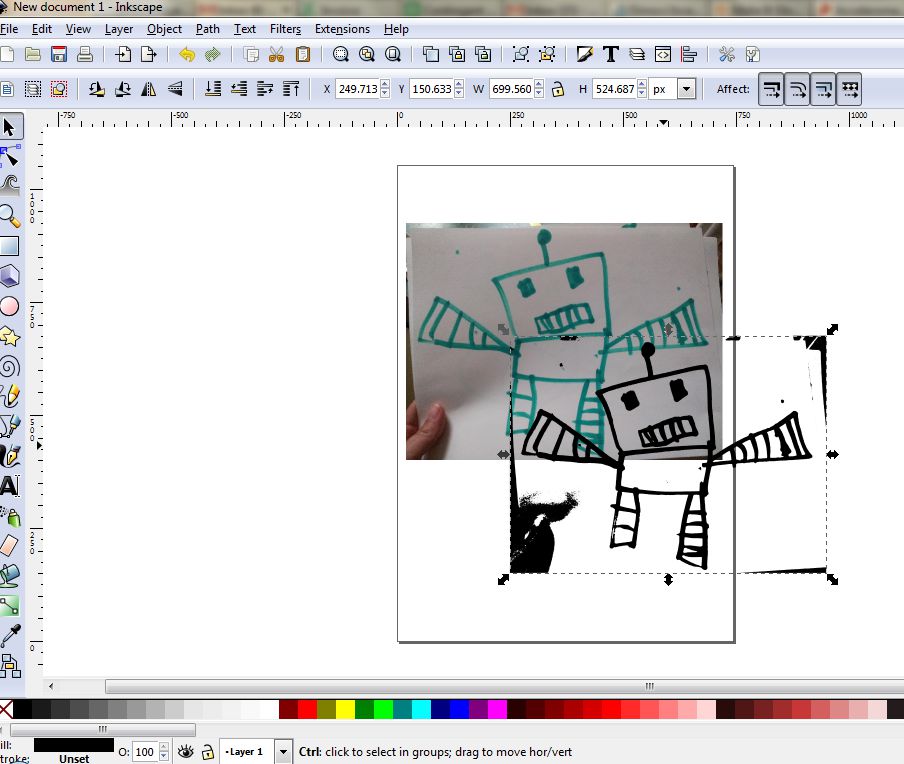
Tracing in Inkscape is pretty neat and intuitive. While your jpg is selected, go to the "path" menu and then "trace bitmap"
A window will pop up with a bunch of options but never fear, I will do my best to explain what you need to do.
Brightness cutoff (the bullet that is selected) means the function will calculate where the brightness differs in the drawing and create vector shapes in those areas.
The ink lines are dark and the background is light, so since only 2 colors are selected, the program will make all the darkest areas BLACK and all the lighter areas WHITE. You will notice the thumb area and corners look like black blodges but these can very easily be deleted later, so only focus on the look of the item of interest. You will notice if you add more colors, it will create more shades of gray.
Here's a good way to explain it. Say I told you to take two pieces of construction paper, one white, one black, and recreate this drawing.
Your scissors' path would be the vector paths created by this function.
Don't worry about the other bullets, they will not do anything as the "brightness cutoff" selection is chosen.
Click "OK" and you will see the black lines pop up on the screen, then you can hit the "X" (sometimes Inkscape doesn't close the windows)
So why do we want just black and white? I am going to etch this drawing into a piece of plastic to make a pendant and with laser cutting, you want only solid RGB black for your etched areas. Otherwise it will look all wonky or won't even etch at all!
Next we will edit out all the weird black blodges and clean up the drawing a little bit.
Edit the Newly Created Vector
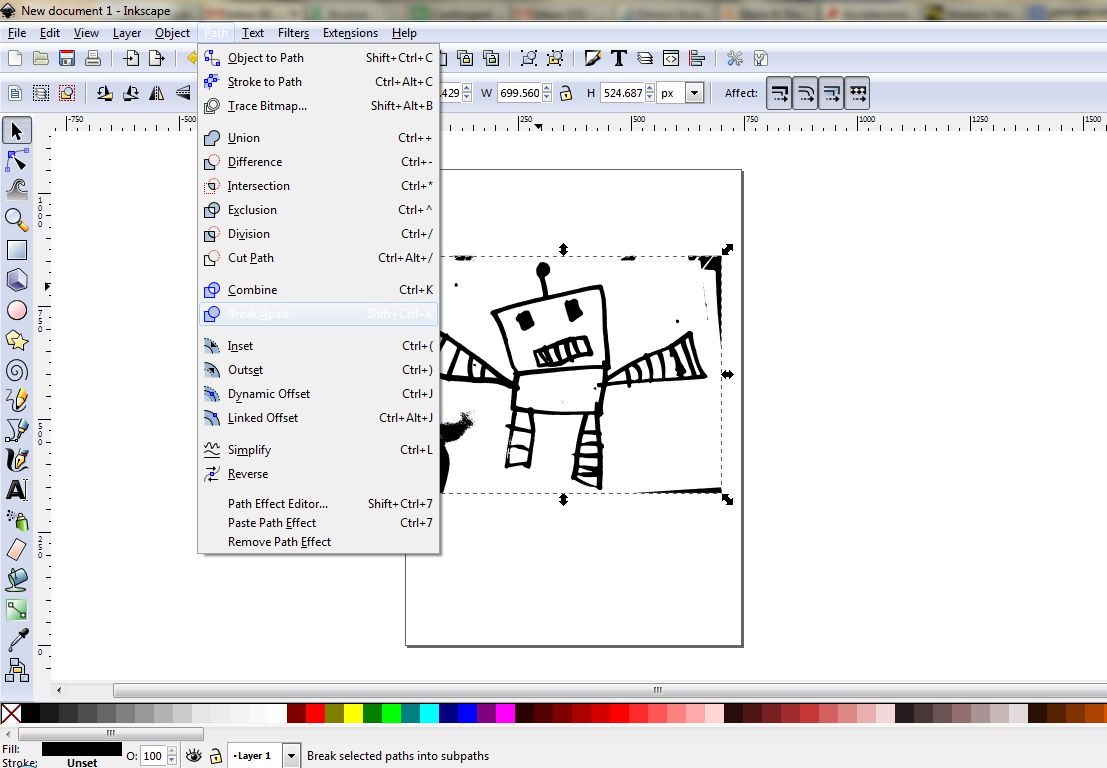
You can now delete your original photograph unless you want it around for reference.
Now you need to "break apart" the vector graphic so you can edit it. Unlike JPG graphics which are defined by rows of different colored dots called pixels, vector graphics are made up of little shapes and lines (AKA vectors, hence the name). To get back to the construction paper metaphor, vector graphics are like computerized construction paper collages in which you can move from piece to piece and edit them individually, even changing the border shape, edge color, and fill color of each shape.
You think you have a black and white drawing here, but really you have a black shape with holes cut in it that you can see the white paper through.
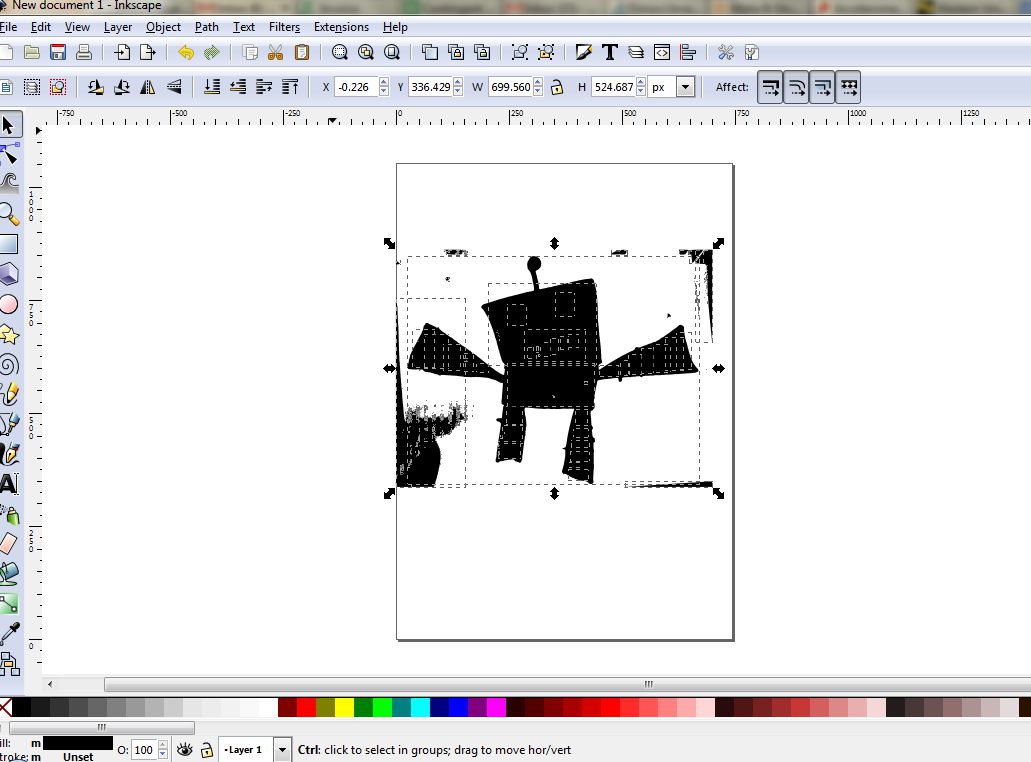
Once you "Break apart" the vector, it will change into a big black blob. This is because the parts that were once holes are now independent black shapes.
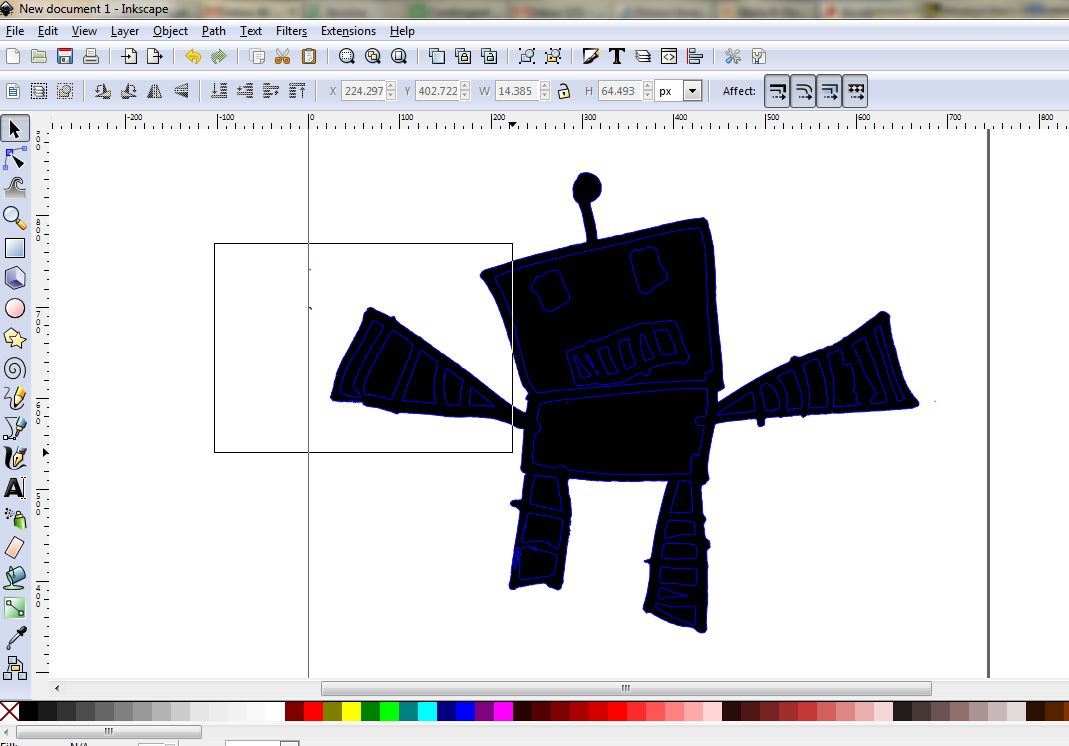
After "breaking apart", select the whole thing. You will see the little dotted outlines which describe the max size of all selected shapes. To see further detail, you can add an outline to all these shapes, then you will know which ones to delete and which ones to turn white.
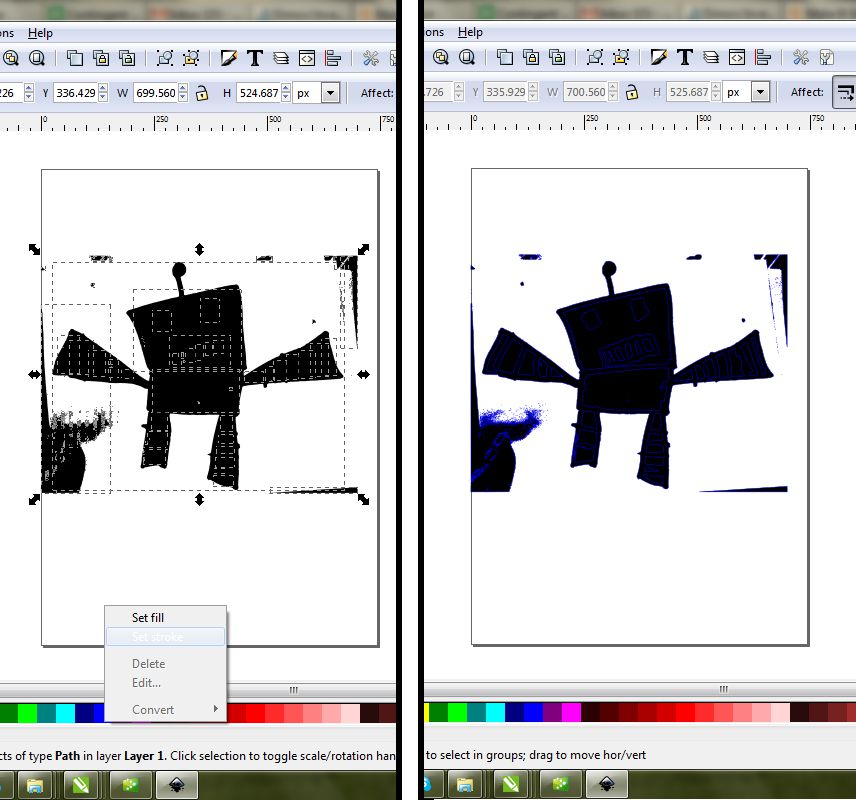
With everything still selected, go down to the color bar at the bottom of the screen and right click on a color you want for the outline (I choose blue because it's easy for me to see) you will be given the option for fill or stroke. Fill is for the inside of a shape, stroke is for the border of the shape. You want to set the stroke so you can see all the outlines.
If you want more options (like thickness, etc) you can right click while on the page with your object selected with the black arrow and select the option "fill & stroke properties..."Object menu>fill and stroke" will bring up the same menu, which can be handy to simply leave open.)
It's hard to see in this screen shot, but the eyes, stripes, and teeth are all outlined in blue.
Now finally go and delete all those blodges to isolate your object of design. Then we'll fix the stripes.
Fix the Contrast
Now we have a robot outline, not a cute growling stripey guy, so let's figure out what needs to be adjusted to make him look normal.
(Oh yea, and now would also be a good time to save)
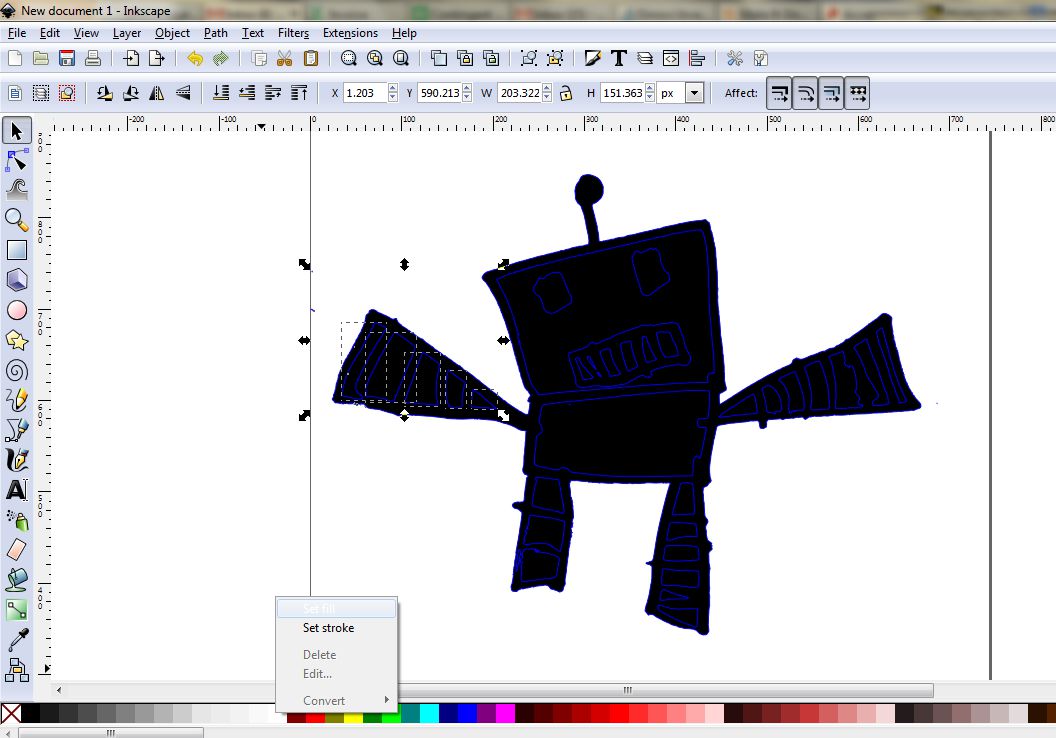
Zoom in so you can more easily see what you're doing and select the spots that should be white.
In most vector graphics software, shapes will only be selected if your selection box is entirely surrounding the shape. I like to do it slowly so I can easily undo things if I make a mistake. I select just a few shapes at a time so I can be sure I'm doing it right.
You can tell what's selected because the dotted lines show the extremities of the selected shapes. Now you want to set the fill to white by again right-clicking on the color-bar on the color you want and select "set fill" you can also just click the color to set the fill.
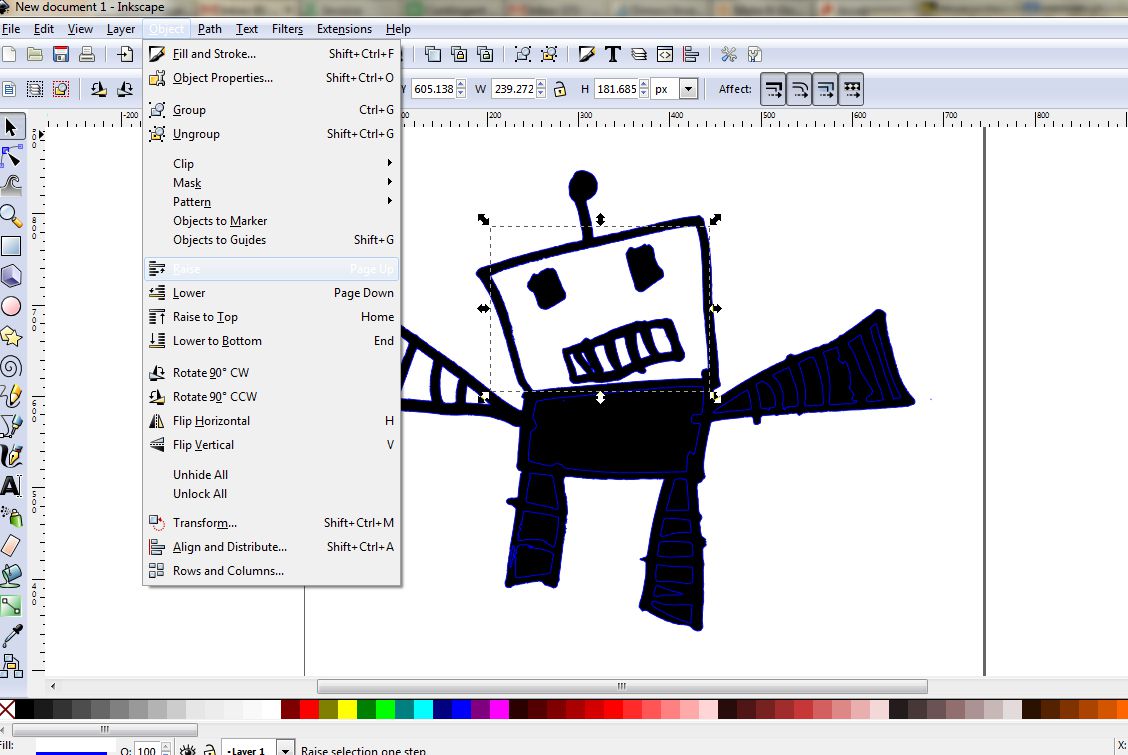
You will see it turn white. Continue on to the rest of the project. Now a little warning I should tell you is that sometimes, things stack up differently (remember the paper collage again?) sometimes, the shapes that should be white are hidden behind other shapes. You can sort the order the shapes are stacked by going to to the "Object" menu and the group of icons that read "raise,lower, raise to top, etc." These changes will apply to the shapes you have selected with the black arrow, so be careful.
In this drawing, there is a black robot background with white squares on top, then black squares for eyes and the mouth, and on the very top white squares for teeth, so I need to make sure the teeth squares are above the mouth square is above the face square, etc.
And now, on to further cleaning up the drawing! Phew!
What's a "node" Anyway?
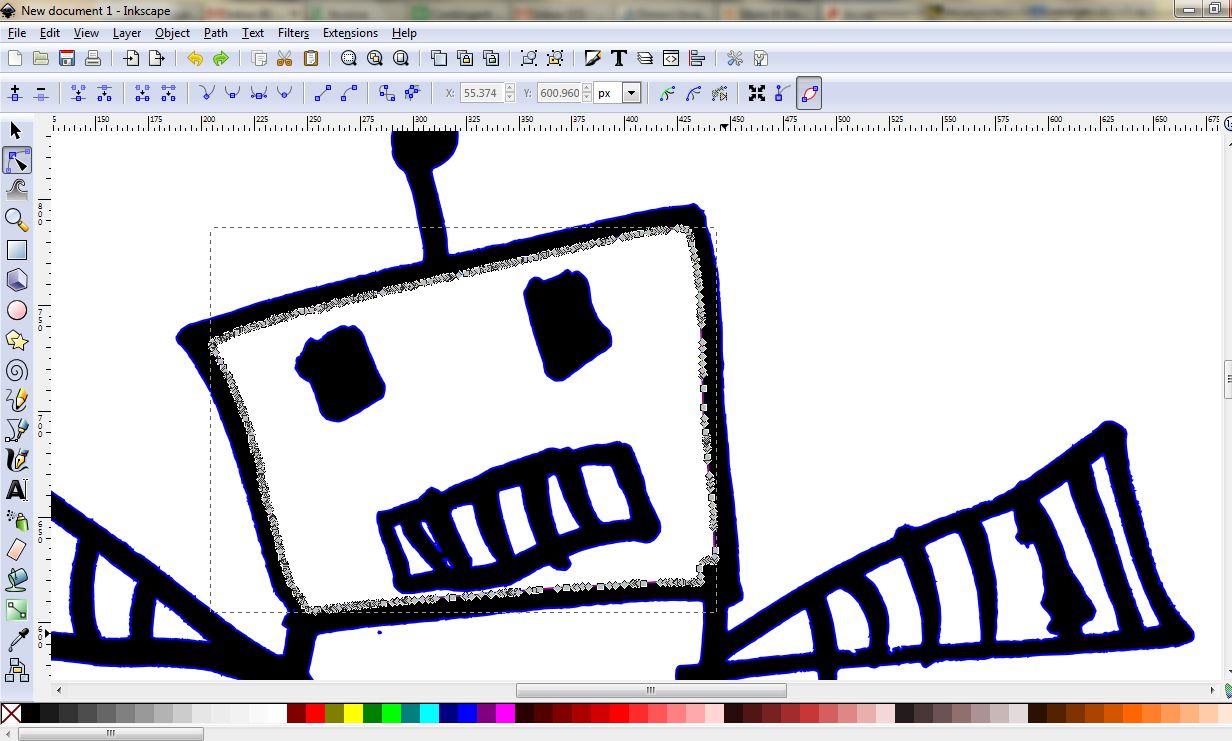
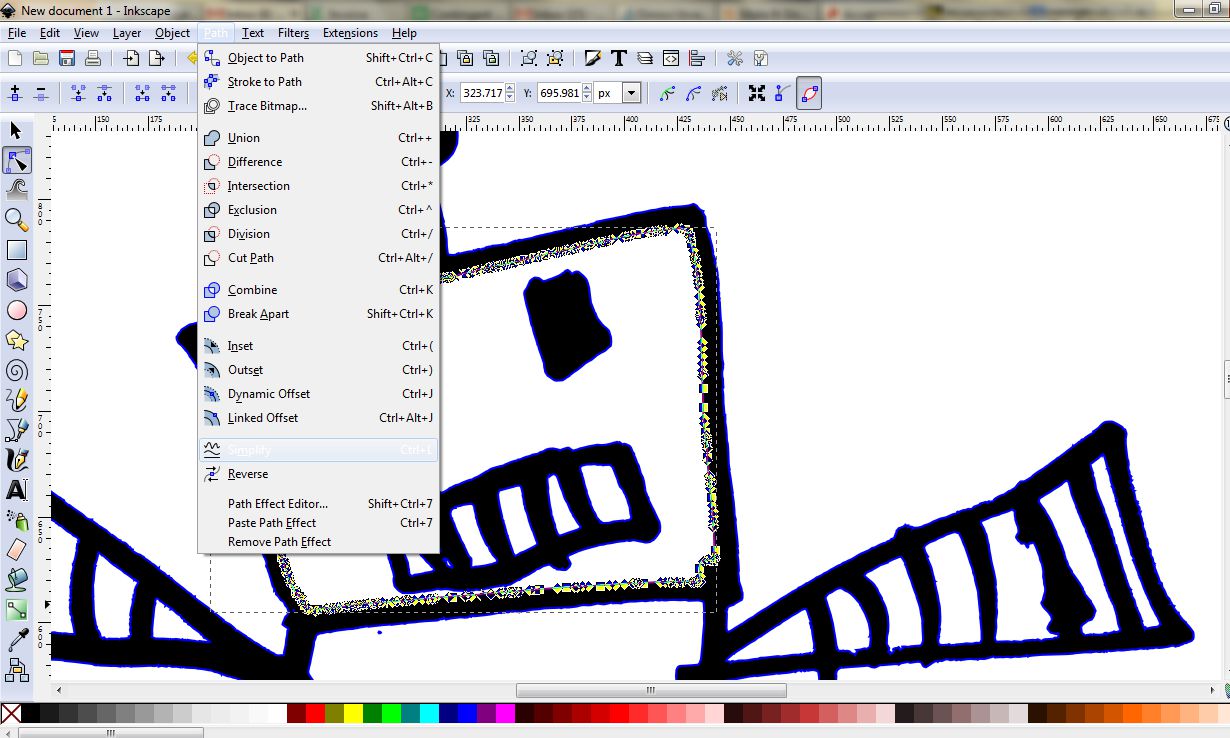
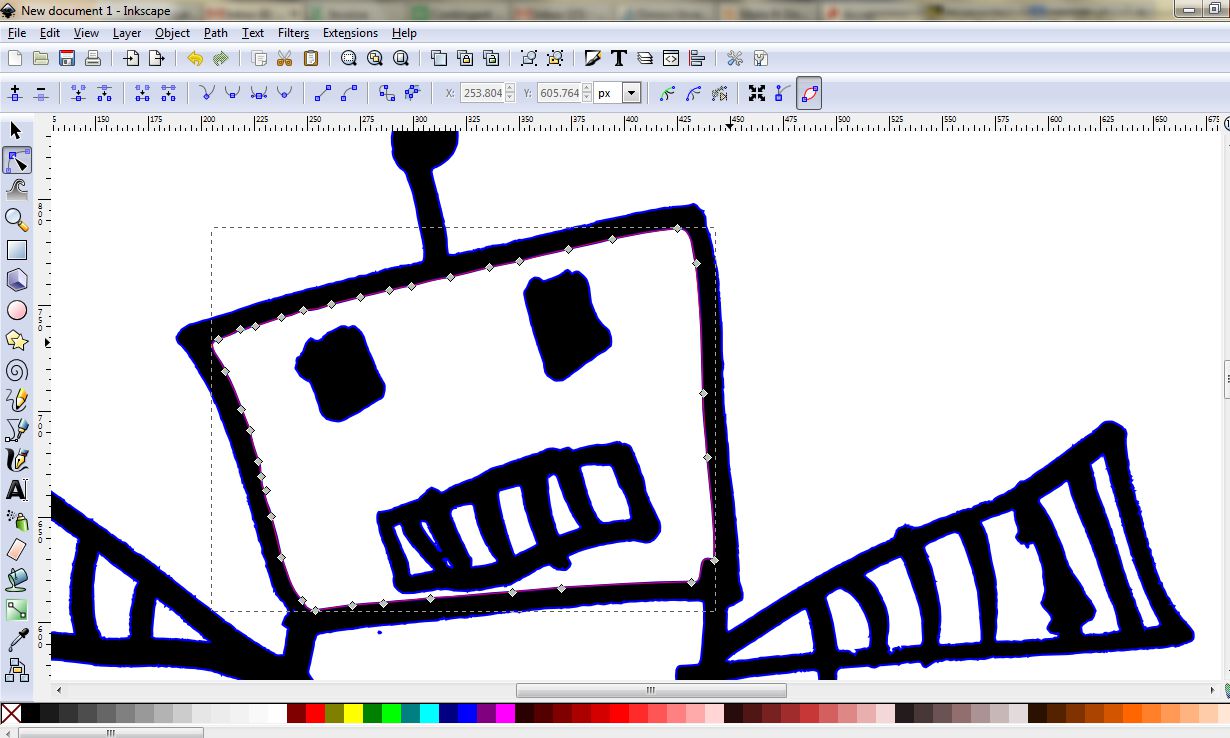
Nodes are the points on a line that define said line. You can have a bunch of nodes on a line but if it's a straight line, you only really need two points at either end. On each node, you can also define the curve of that point. If you have a circle, you'll have 4 points that have equal curves assigned to them to make a perfect circle.
Nodes add a lot of data to a file and make it more rough looking when cut. There is a very quick and easy way in inkscape to reduce the nodes on a shape, which is up to you but since I want to cut the border of this robot, I want the border to be smooth and pretty.
This is a TRADE SECRET btw, so I might be happier if you don't read this part ;P
This is a little complicated to explain if this is your first time messing with vectors, but it will make sense after you do it a few times and see the printed results, laser cut or otherwise.
First, select the shape using the narrow black "node select" arrow. You will see all these tiny squares appear. Look how many nodes there are just to make a wonky square! We could do with far less and the shape would be much more smooth.
All you have to do is go to the "path" menu and select "Simplify"
Voila! less nodes. You can repeat again if needed. The only downside is you'll have to do this to every shape, every tooth, every stripe to get it smooth and pretty.
OK, now let's remove that border and turn this into a necklace!
Removing the Border
This step is easy, simple select everything, right click on the "X" in the color bar or on your stroke settings menu you can also click the "X" you will see the borders disappear and you can move on to the next step, adding an offset to make your piece of jewelry stronger.
Adding an Offset Border
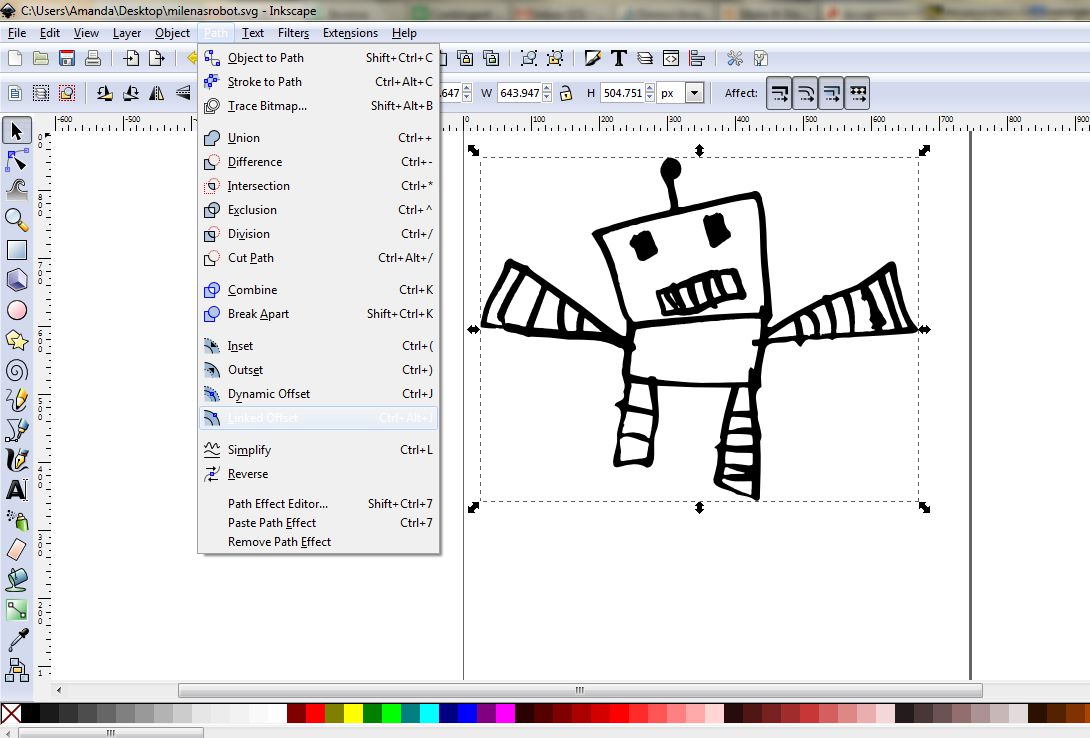
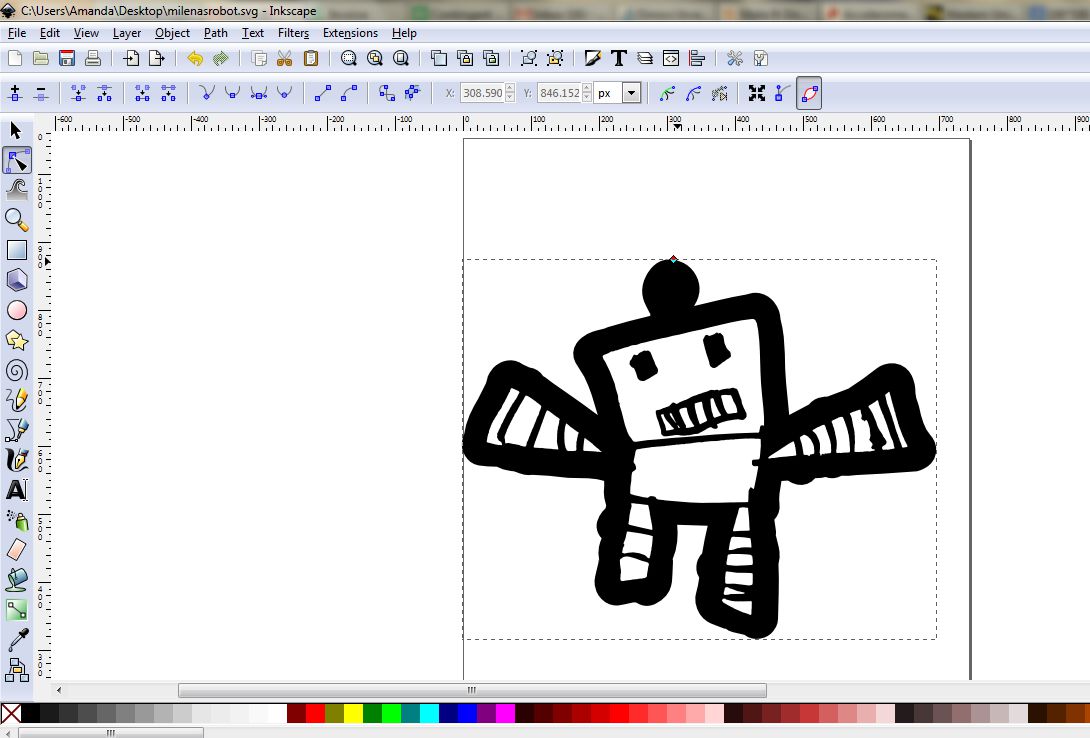
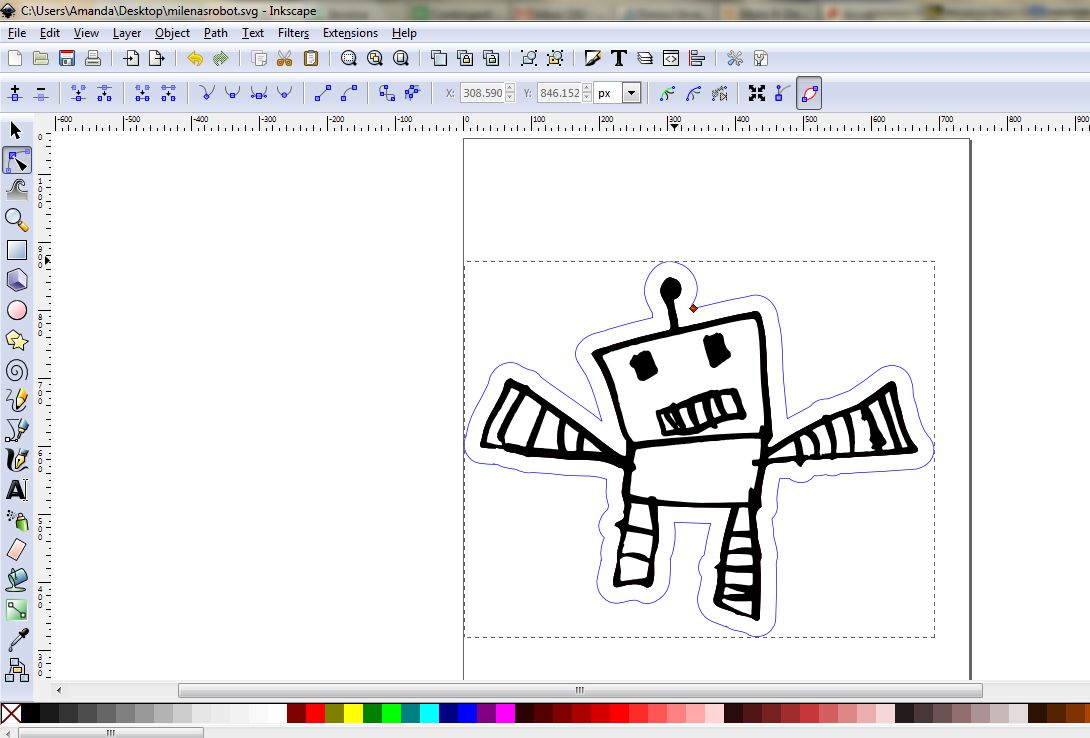
I could just draw a circle around this, poke a hole in the top, and call it done, but I want to have just the robot itself cut out. However, if it's cut out as is, the little antenna will break off and probably the arms too.
I could manually trace around the shape, which I used to do, and is a pain.
Or, I could just do another one of those "trade secret" things I mentioned earlier and am slightly hesitant to explain so freely, but ahhh, here goes!
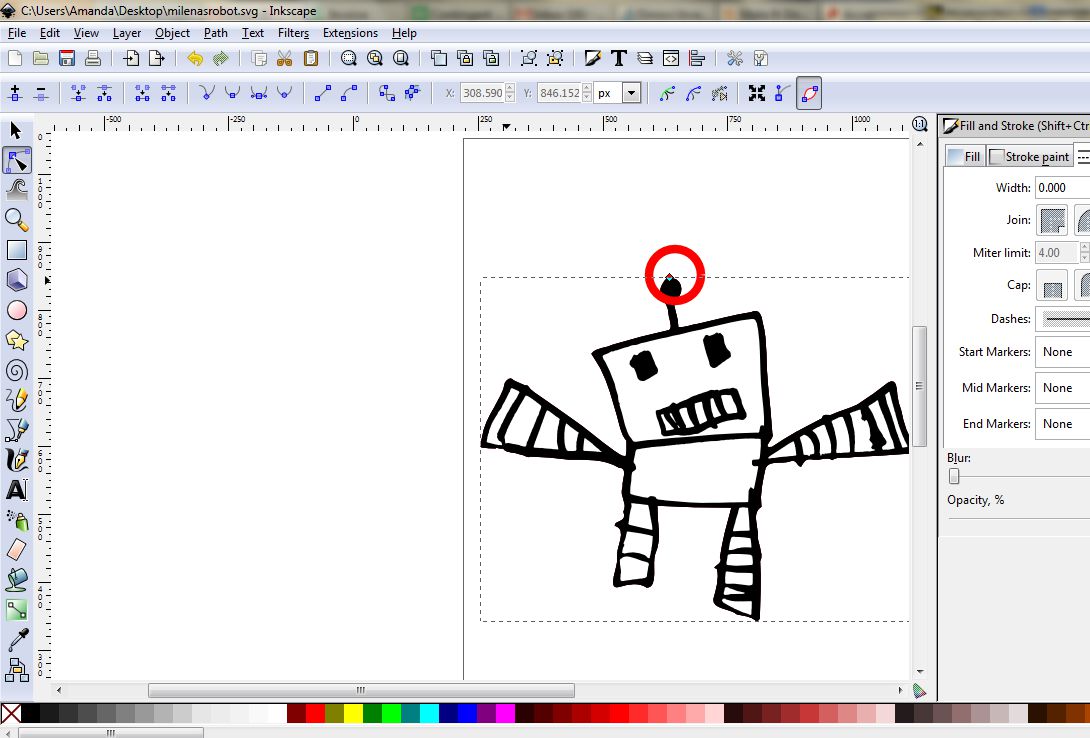
Select your "main shape" in this case, the robot's bottom most layer that is the whole body including antennae. Go to your "path" menu again and select "linked offset"
You will see a little handle pop up (see the handle within the red circle)
You can now pull on this handle to create an offset that will grow and shrink as you pull it. When you're satisfied with how it looks, stop. It will be a thick black border, but you can easily adjust this just like everything else by right-clicking and resetting the fill/stroke.
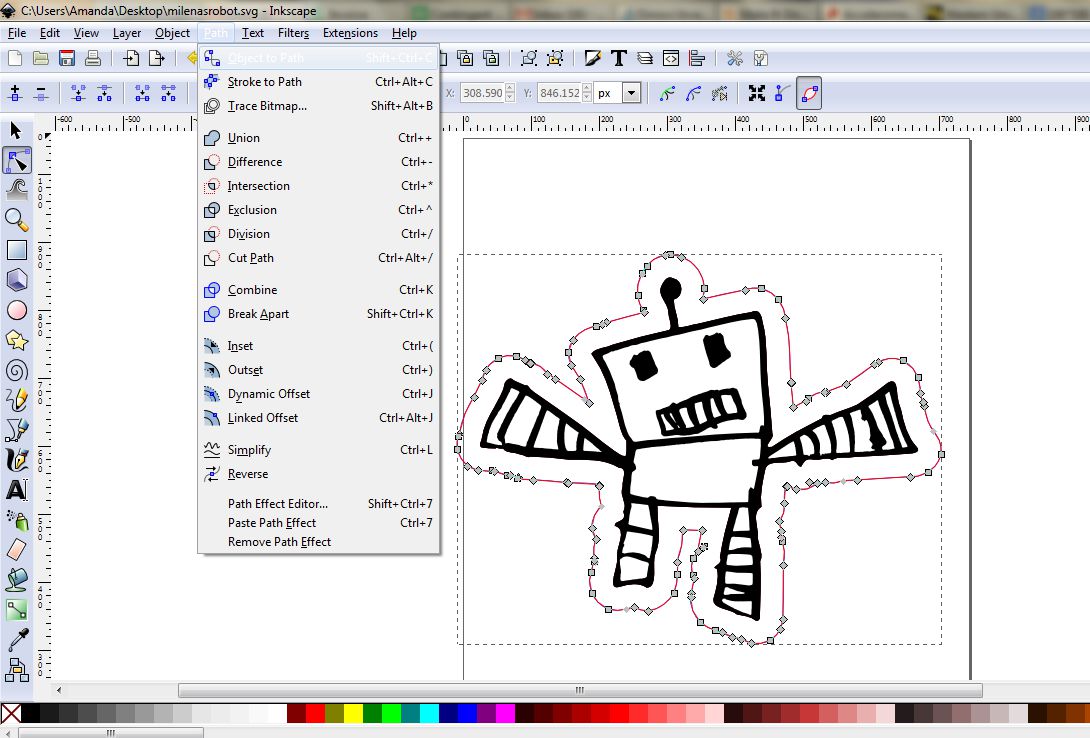
Now we need to make the border an independent shape because right now it is still linked to the robot body shape. If you leave it linked, when you try to scale the drawing, you will see the border remain the same distance from the shape, just try it and you'll see what happens.
You unlink the two do this by going to "Path" and then "Object to path". This will turn the border into an independent shape which will scale with the drawing.
Now you're ready to pick your final size and add holes for jewelry if that's what you want to do. (Save your work!)
Resize & Add Holes
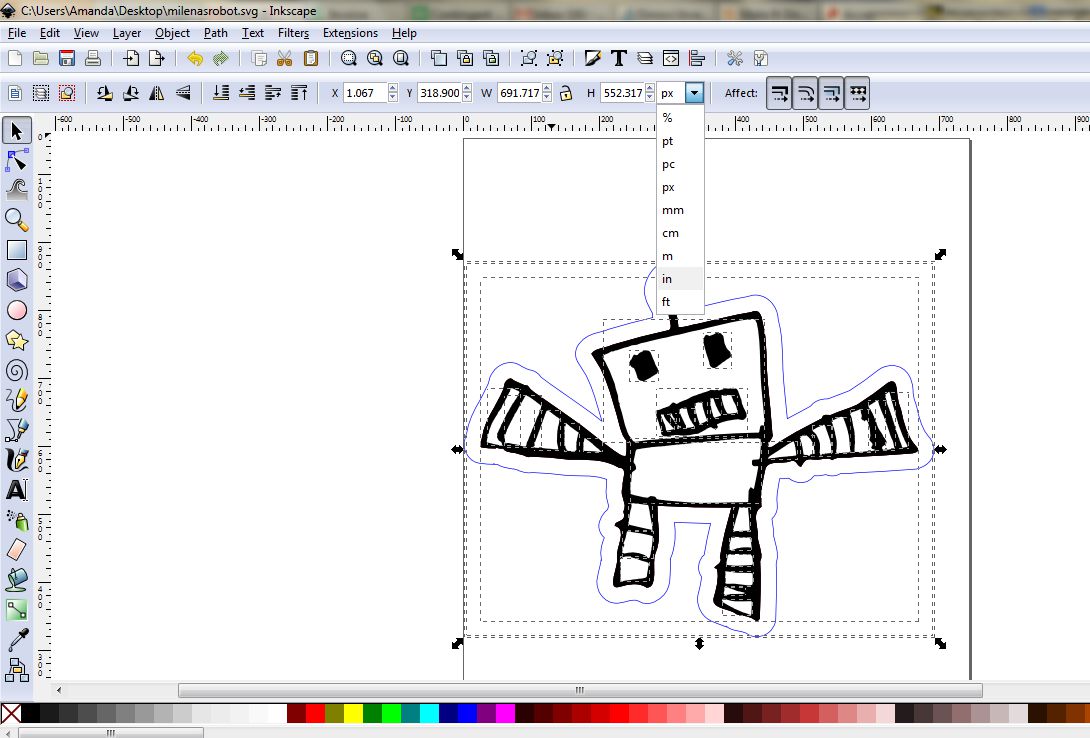
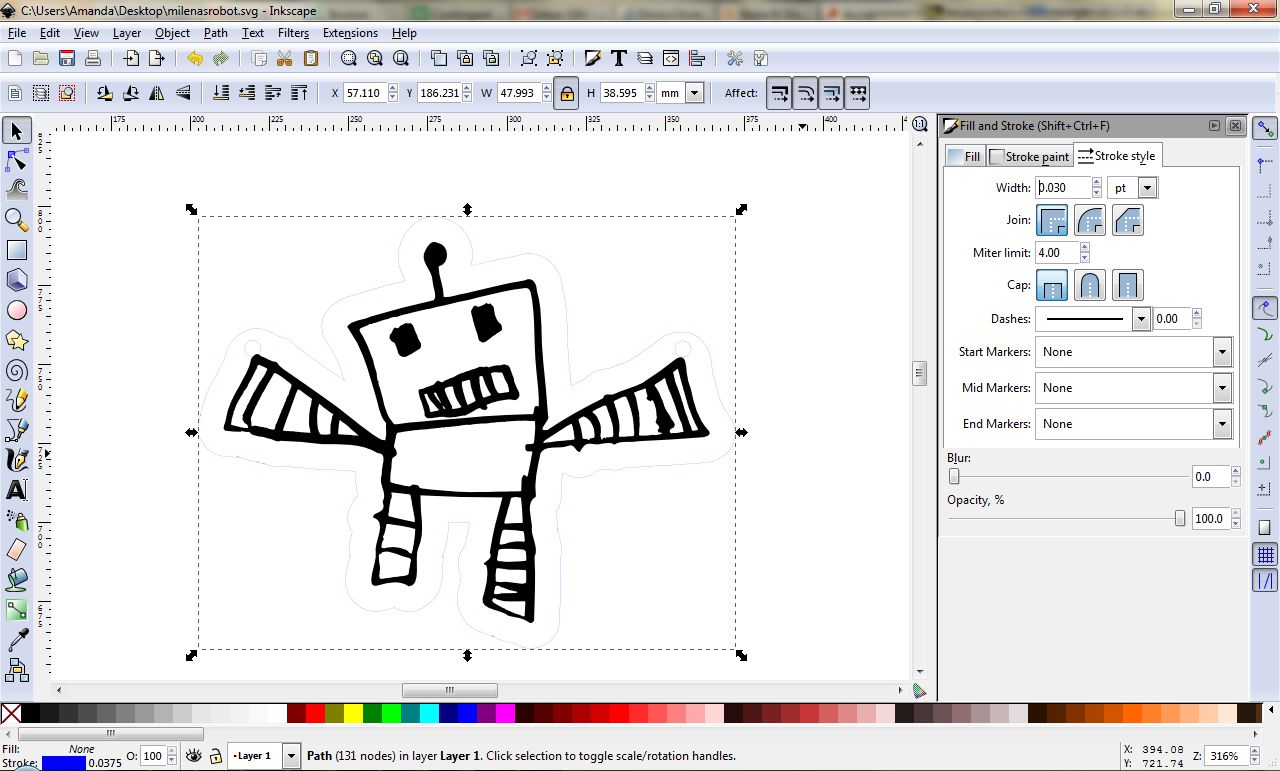
Select your whole design and resize it. There is a bar menu up top where you can change the size.
Convert the scale to something you can relate to (inches, cm, whatever) and click the little lock icon so the piece scales proportionally. Set the blue outline to less than .3PT for laser cutting, otherwise the machine won't read the line as a cutting line.
I made my piece about 2 inches, but I prefer tinier things!
You can make a big statement piece or a giant piece for wall art, even make a mirror.
If you want to make your piece into a necklace, add the holes after you pick your final size. You need the holes to be big enough to fit your jewelry findings, but you don't want them to be so big they look gaping or so small they don't fit.
A good rule of thumb is 3mm hole. Also make sure it is not too close to the edge. If it's too close, it will become fragile. Another good rule of thumb is 2mm from the edge.
Don't eyeball this, looks on the monitor are deceiving. If you're not sure, print the piece out and get a good look at it.
Measure your jumprings too. (Jumprings are the round bits of wire that connect pendants to chain for those of you who don't know)
I put two holes on either hand so the robot seems to be pulling the chain on either side.
Now comes the tough part - how are you going to turn this digital art into something real?
Fabrication Options

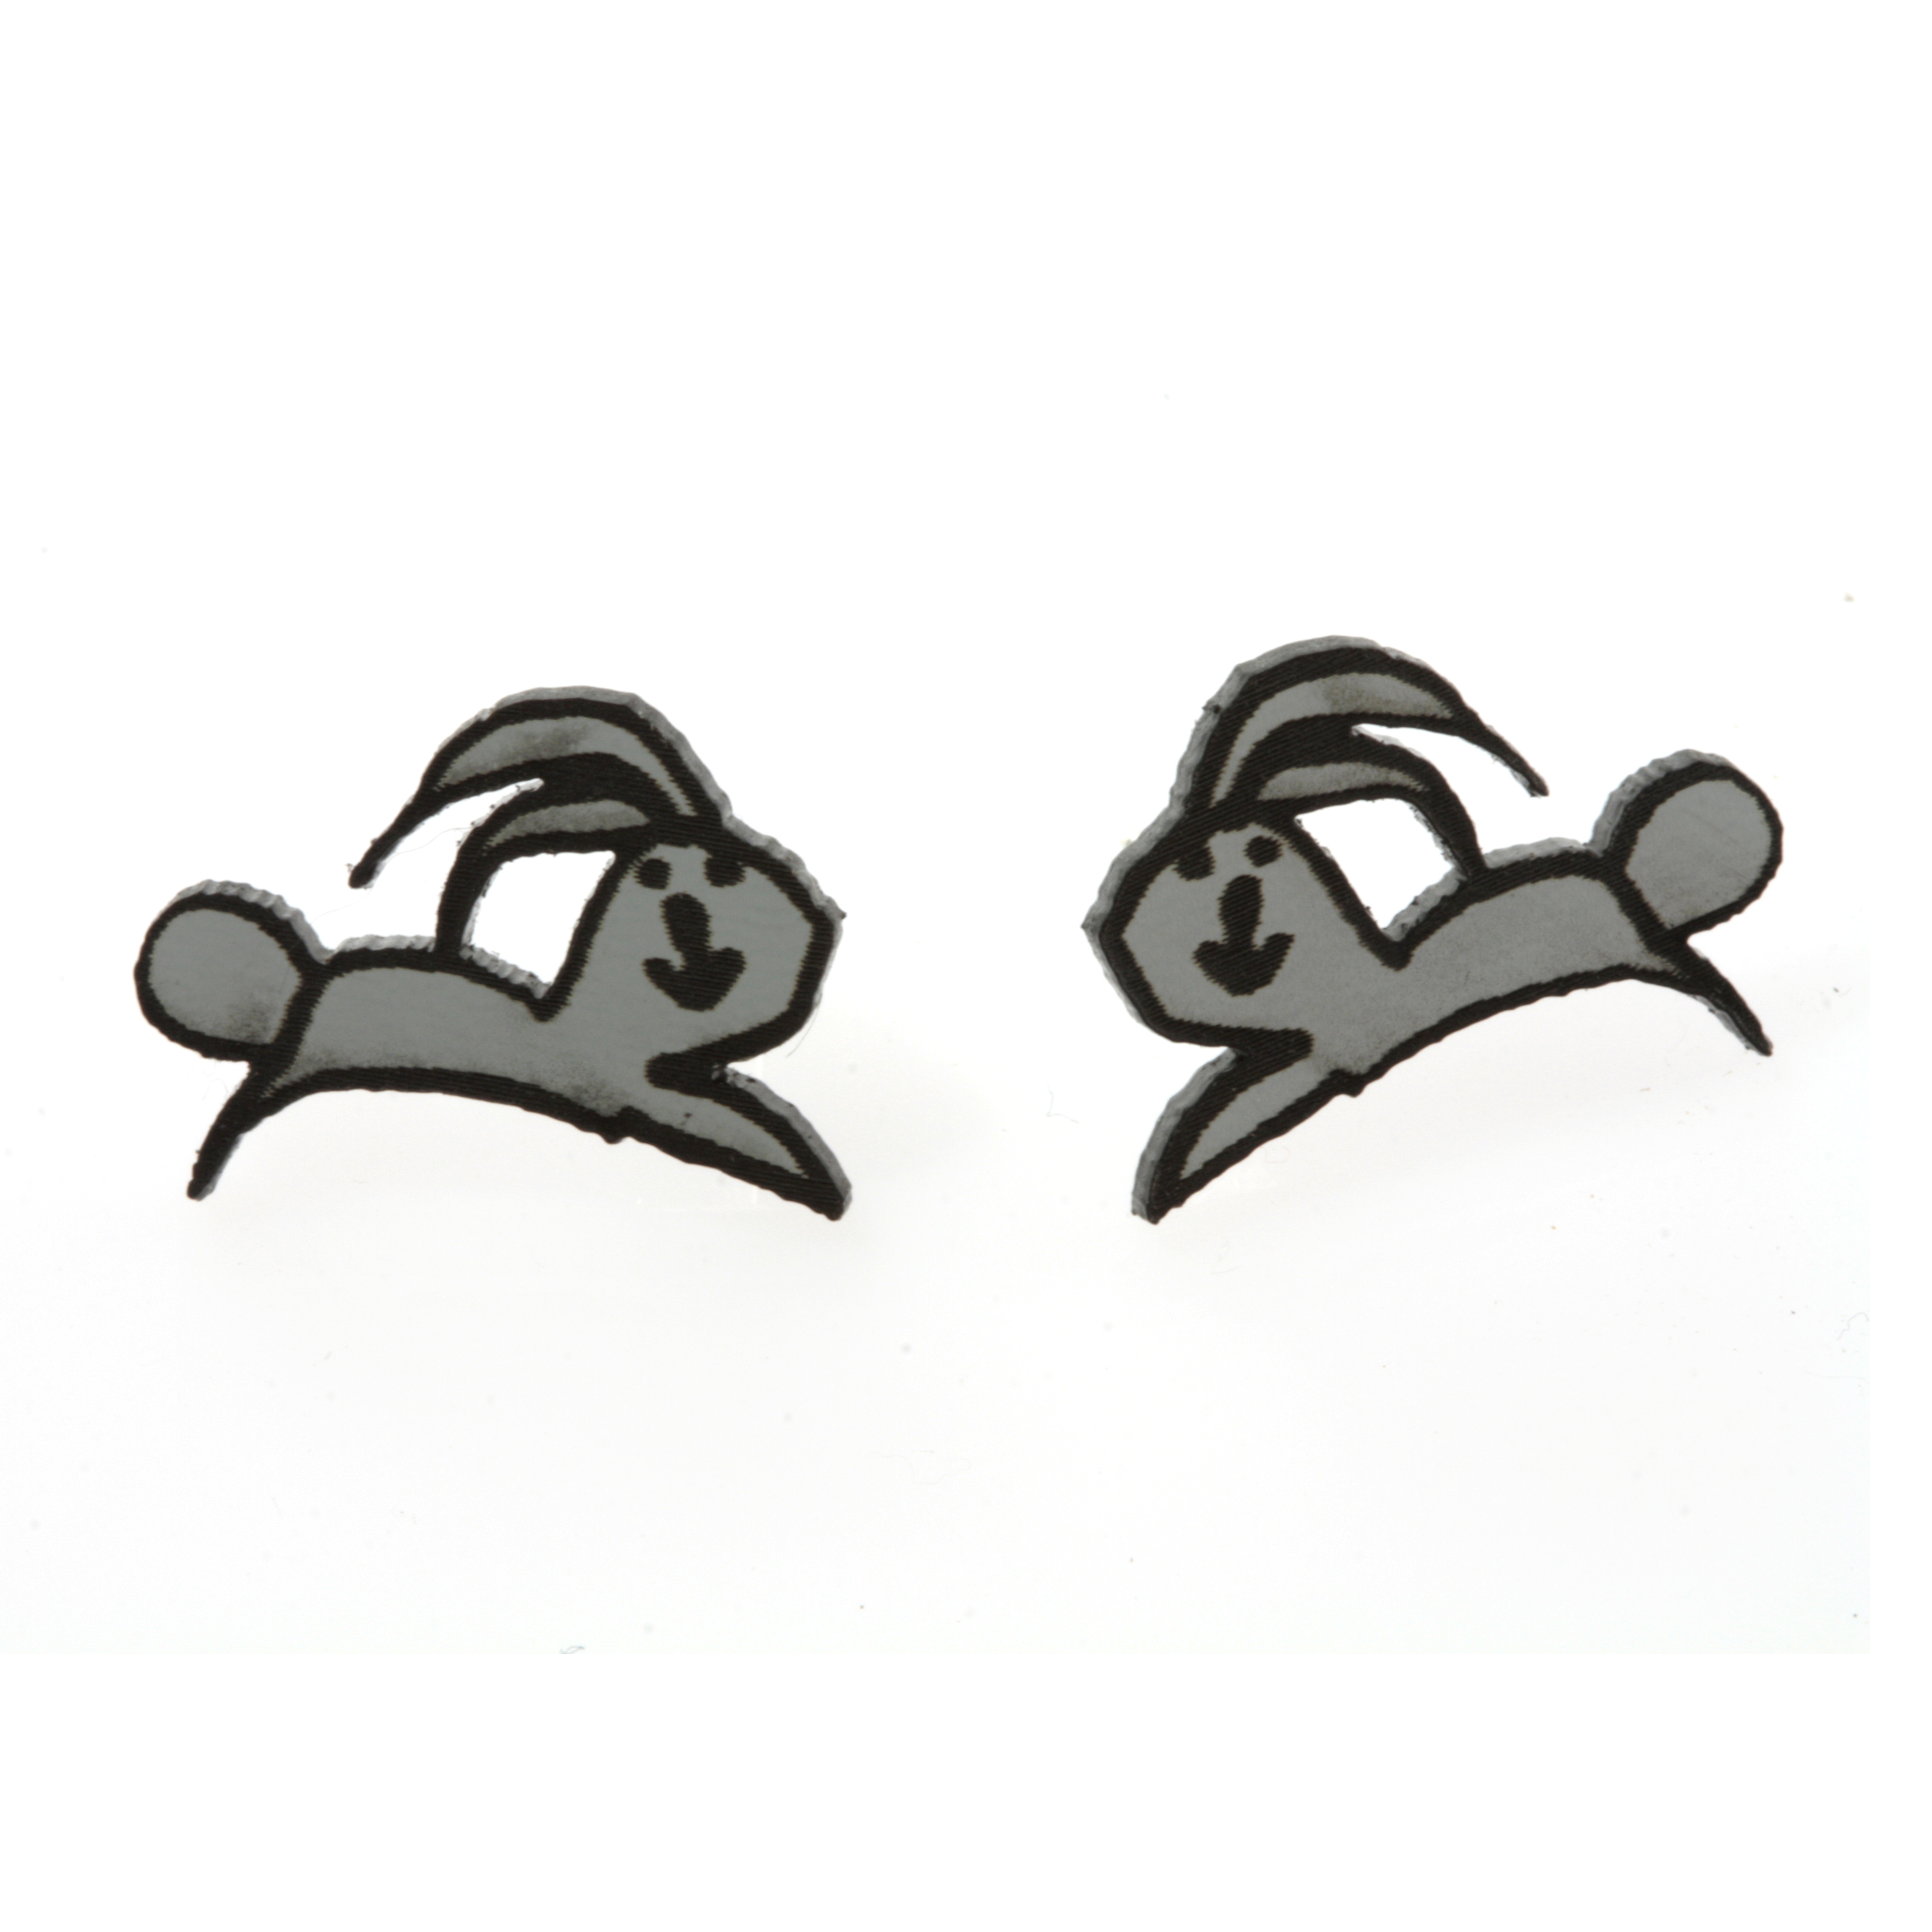
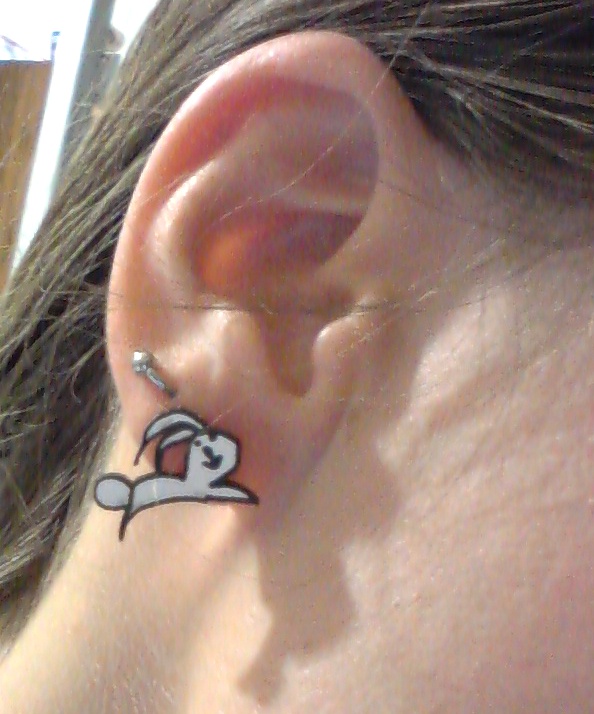
You can choose to just make an avatar with this, or make something more.
I turn kids art into jewelry and wall art for friends and family quite regularly.
This particular design was turned into a necklace using two color acrylic from Outfab.com, white on top, black on bottom. Outfab.com is a great place to get all of your parts cut cheaply without any sign up, very straightforward flat rate prices, and free shipping. With one unit of the B&W two layer stuff you can make very impressive custom jewelry for all your friends and fam this holiday for just $20
The white burns off showing the black underneath and looks just like the original drawing.
It's 1/16" thin and quite flexible, unlike regular acrylic which is brittle and snaps easily.
Also shown is a pair of bunny-drawing studs I made using the same method, only without the offset border because I didn't think it needed much more rigidity. They are just glued onto flat "pad" earstuds with good ol' E600 glue.
All the findings were sourced from Artbeads.com, a great place to get one or two of something also with free shipping (over $25) Or you can try your local bead shop. Craft stores usually have lower quality stuff so I highly recommend a real bead store where you can buy nice chain per foot.
And if you run into any troubles, feel free to msg me & I'll do my best to help you out!