VaderCam 1.0
.gif)
.gif)

.gif)
Greetings.
So here's something eye-catching, Vader Cam.
Vader Cam is an ESP32 CAM Based Device that is a live video feed streaming device, we can access the feed through a web app and see what's going on.
It's like a Nanny Cam or surveillance Device that is themed after Darth Vader.
Darth Vader is keeping his eye on things, I made this device to use it for monitoring the 3D Print Job that is being done in another room but we can use this device to monitor all sorts of stuff, from nannies to kids or even pets.
This Instructables is about the whole built Process of this Vader Cam so let's get started.
Supplies
These are the stuff used in this built-
- Custom PCBs from Seeed Studio
- ESP32 CAM
- M7 Diode SMA
- UART Programmer
- USB Micro Port
- Header Pins for ESP32 Board
- Power Source - smartphone adaptor
About ESP32 CAM

ESP32 CAM is quite a useful development board, it is equipped with a 2MP OV2640 camera module and an SD Card Reader on the bottom side of the board.
Also, It cost around 10$ which is a pretty sweet price tag for such a capable Microcontroller.
The WIFI module used in this Version is ESP-32S which has a built-in 32Mbit of Flash and 512KB Internal plus external 4M PSRAM.
It's five volts tolerant which means we can power the ESP32 Cam with a voltage less than 5V, if you provide it a voltage greater than 5V, it will get destroyed.
Installing ESP32 Boards for Arduino IDE


For Installing Third parties Dev Board on Arduino IDE, we have to copy their JSON URL which in our case is this- https://dl.espressif.com/dl/package_esp32_index.json
- copy the above URL and paste it in the additional board manager URL which is in the Preferences of Arduino IDE.
(If you already have another dev board URL in the additional board manager, you can put a comma in between two URLs)
- After putting the URL, open the board manager and search ESP32 in, and then download the ESP32 Board package.
- After doing all this, you need to Restart the Arduino IDE and the new ESP32 Board will appear in the board manager menu.
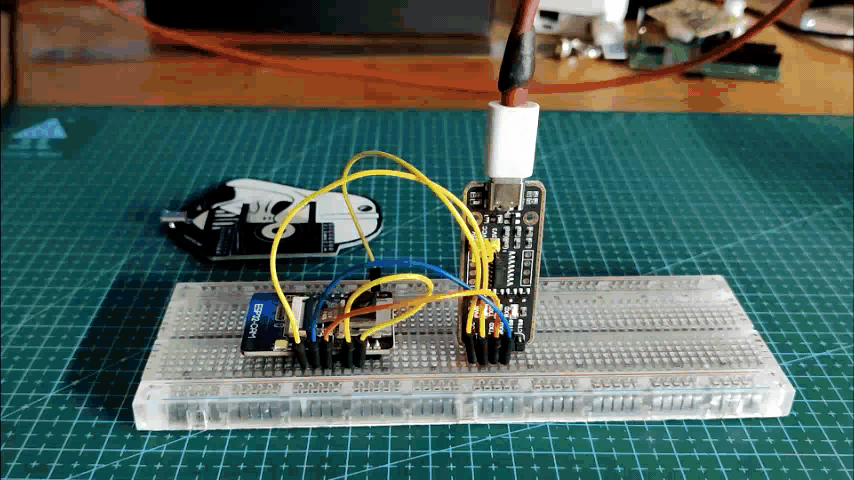
Breadboard Setup
.gif)

Before starting this project, we first prepare a breadboard setup that consists of an ESP32 Cam connected with an FTDI Board according to the attached schematic.
ESP32 CAM doesn't have an onboard programming chip which is a bummer, because of this we have to add an external USB to the Serial Programming module.
For That, I will be using this USB to Serial module. This Module is based on the FTDI FT232 chip. you can use other serial converters as well, wiring will remain the same for them as we only have to connect TX and RX with the ESP32.
- Set FTDI output to 5V
- Connect the FTDI's VCC (which is 5V) to 5V of ESP32 CAM
- GND to GND
- RX to U0T
- TX to U0R
- GPIO0 which is IO0 to GND (this will put the ESP32 CAM in Flash Mode)
Main Code
#include "esp_camera.h"
#include <WiFi.h>
#include "esp_timer.h"
#include "img_converters.h"
#include "Arduino.h"
#include "fb_gfx.h"
#include "soc/soc.h" //disable brownout problems
#include "soc/rtc_cntl_reg.h"  //disable brownout problems
#include "esp_http_server.h"

//Replace with your network credentials
const char *ssid = "JioFiber-nCDgC";
const char *password = "jiexaifieXai5chu";

#define PART_BOUNDARY "123456789000000000000987654321"

// This project was tested with the AI Thinker Model, M5STACK PSRAM Model and M5STACK WITHOUT PSRAM
#define CAMERA_MODEL_AI_THINKER
//#define CAMERA_MODEL_M5STACK_PSRAM
//#define CAMERA_MODEL_M5STACK_WITHOUT_PSRAM

// Not tested with this model
//#define CAMERA_MODEL_WROVER_KIT

#if defined(CAMERA_MODEL_WROVER_KIT)
  #define PWDN_GPIO_NUM    -1
  #define RESET_GPIO_NUM   -1
  #define XCLK_GPIO_NUM    21
  #define SIOD_GPIO_NUM    26
  #define SIOC_GPIO_NUM    27

  #define Y9_GPIO_NUM      35
  #define Y8_GPIO_NUM      34
  #define Y7_GPIO_NUM      39
  #define Y6_GPIO_NUM      36
  #define Y5_GPIO_NUM      19
  #define Y4_GPIO_NUM      18
  #define Y3_GPIO_NUM       5
  #define Y2_GPIO_NUM       4
  #define VSYNC_GPIO_NUM   25
  #define HREF_GPIO_NUM    23
  #define PCLK_GPIO_NUM    22

#elif defined(CAMERA_MODEL_M5STACK_PSRAM)
  #define PWDN_GPIO_NUM     -1
  #define RESET_GPIO_NUM    15
  #define XCLK_GPIO_NUM     27
  #define SIOD_GPIO_NUM     25
  #define SIOC_GPIO_NUM     23

  #define Y9_GPIO_NUM       19
  #define Y8_GPIO_NUM       36
  #define Y7_GPIO_NUM       18
  #define Y6_GPIO_NUM       39
  #define Y5_GPIO_NUM        5
  #define Y4_GPIO_NUM       34
  #define Y3_GPIO_NUM       35
  #define Y2_GPIO_NUM       32
  #define VSYNC_GPIO_NUM    22
  #define HREF_GPIO_NUM     26
  #define PCLK_GPIO_NUM     21

#elif defined(CAMERA_MODEL_M5STACK_WITHOUT_PSRAM)
  #define PWDN_GPIO_NUM     -1
  #define RESET_GPIO_NUM    15
  #define XCLK_GPIO_NUM     27
  #define SIOD_GPIO_NUM     25
  #define SIOC_GPIO_NUM     23

  #define Y9_GPIO_NUM       19
  #define Y8_GPIO_NUM       36
  #define Y7_GPIO_NUM       18
  #define Y6_GPIO_NUM       39
  #define Y5_GPIO_NUM        5
  #define Y4_GPIO_NUM       34
  #define Y3_GPIO_NUM       35
  #define Y2_GPIO_NUM       17
  #define VSYNC_GPIO_NUM    22
  #define HREF_GPIO_NUM     26
  #define PCLK_GPIO_NUM     21

#elif defined(CAMERA_MODEL_AI_THINKER)
  #define PWDN_GPIO_NUM     32
  #define RESET_GPIO_NUM    -1
  #define XCLK_GPIO_NUM      0
  #define SIOD_GPIO_NUM     26
  #define SIOC_GPIO_NUM     27

  #define Y9_GPIO_NUM       35
  #define Y8_GPIO_NUM       34
  #define Y7_GPIO_NUM       39
  #define Y6_GPIO_NUM       36
  #define Y5_GPIO_NUM       21
  #define Y4_GPIO_NUM       19
  #define Y3_GPIO_NUM       18
  #define Y2_GPIO_NUM        5
  #define VSYNC_GPIO_NUM    25
  #define HREF_GPIO_NUM     23
  #define PCLK_GPIO_NUM     22
#else
  #error "Camera model not selected"
#endif

static const char* _STREAM_CONTENT_TYPE = "multipart/x-mixed-replace;boundary=" PART_BOUNDARY;
static const char* _STREAM_BOUNDARY = "\r\n--" PART_BOUNDARY "\r\n";
static const char* _STREAM_PART = "Content-Type: image/jpeg\r\nContent-Length: %u\r\n\r\n";

httpd_handle_t stream_httpd = NULL;

static esp_err_t stream_handler(httpd_req_t *req){
  camera_fb_t * fb = NULL;
  esp_err_t res = ESP_OK;
  size_t _jpg_buf_len = 0;
  uint8_t * _jpg_buf = NULL;
  char * part_buf[64];

  res = httpd_resp_set_type(req, _STREAM_CONTENT_TYPE);
  if(res != ESP_OK){
    return res;
  }

  while(true){
    fb = esp_camera_fb_get();
    if (!fb) {
      Serial.println("Camera capture failed");
      res = ESP_FAIL;
    } else {
      if(fb->width > 400){
        if(fb->format != PIXFORMAT_JPEG){
          bool jpeg_converted = frame2jpg(fb, 80, &_jpg_buf, &_jpg_buf_len);
          esp_camera_fb_return(fb);
          fb = NULL;
          if(!jpeg_converted){
            Serial.println("JPEG compression failed");
            res = ESP_FAIL;
          }
        } else {
          _jpg_buf_len = fb->len;
          _jpg_buf = fb->buf;
        }
      }
    }
    if(res == ESP_OK){
      size_t hlen = snprintf((char *)part_buf, 64, _STREAM_PART, _jpg_buf_len);
      res = httpd_resp_send_chunk(req, (const char *)part_buf, hlen);
    }
    if(res == ESP_OK){
      res = httpd_resp_send_chunk(req, (const char *)_jpg_buf, _jpg_buf_len);
    }
    if(res == ESP_OK){
      res = httpd_resp_send_chunk(req, _STREAM_BOUNDARY, strlen(_STREAM_BOUNDARY));
    }
    if(fb){
      esp_camera_fb_return(fb);
      fb = NULL;
      _jpg_buf = NULL;
    } else if(_jpg_buf){
      free(_jpg_buf);
      _jpg_buf = NULL;
    }
    if(res != ESP_OK){
      break;
    }
    //Serial.printf("MJPG: %uB\n",(uint32_t)(_jpg_buf_len));
  }
  return res;
}

void startCameraServer(){
  httpd_config_t config = HTTPD_DEFAULT_CONFIG();
  config.server_port = 80;

  httpd_uri_t index_uri = {
    .uri       = "/",
    .method    = HTTP_GET,
    .handler   = stream_handler,
    .user_ctx  = NULL
  };

  //Serial.printf("Starting web server on port: '%d'\n", config.server_port);
  if (httpd_start(&stream_httpd, &config) == ESP_OK) {
    httpd_register_uri_handler(stream_httpd, &index_uri);
  }
}

void setup() {
  WRITE_PERI_REG(RTC_CNTL_BROWN_OUT_REG, 0); //disable brownout detector

  Serial.begin(115200);
  Serial.setDebugOutput(false);

  camera_config_t config;
  config.ledc_channel = LEDC_CHANNEL_0;
  config.ledc_timer = LEDC_TIMER_0;
  config.pin_d0 = Y2_GPIO_NUM;
  config.pin_d1 = Y3_GPIO_NUM;
  config.pin_d2 = Y4_GPIO_NUM;
  config.pin_d3 = Y5_GPIO_NUM;
  config.pin_d4 = Y6_GPIO_NUM;
  config.pin_d5 = Y7_GPIO_NUM;
  config.pin_d6 = Y8_GPIO_NUM;
  config.pin_d7 = Y9_GPIO_NUM;
  config.pin_xclk = XCLK_GPIO_NUM;
  config.pin_pclk = PCLK_GPIO_NUM;
  config.pin_vsync = VSYNC_GPIO_NUM;
  config.pin_href = HREF_GPIO_NUM;
  config.pin_sscb_sda = SIOD_GPIO_NUM;
  config.pin_sscb_scl = SIOC_GPIO_NUM;
  config.pin_pwdn = PWDN_GPIO_NUM;
  config.pin_reset = RESET_GPIO_NUM;
  config.xclk_freq_hz = 20000000;
  config.pixel_format = PIXFORMAT_JPEG;

  if(psramFound()){
    config.frame_size = FRAMESIZE_UXGA;
    config.jpeg_quality = 10;
    config.fb_count = 2;
  } else {
    config.frame_size = FRAMESIZE_SVGA;
    config.jpeg_quality = 12;
    config.fb_count = 1;
  }

  // Camera init
  esp_err_t err = esp_camera_init(&config);
  if (err != ESP_OK) {
    Serial.printf("Camera init failed with error 0x%x", err);
    return;
  }
  // Wi-Fi connection
  WiFi.begin(ssid, password);
  while (WiFi.status() != WL_CONNECTED) {
    delay(500);
    Serial.print(".");
  }
  Serial.println("");
  Serial.println("WiFi connected");

  Serial.print("Camera Stream Ready! Go to: http://");
  Serial.print(WiFi.localIP());

  // Start streaming web server
  startCameraServer();
}

void loop() {
  delay(1);
}
Flashing the Board Steps
.gif)
.gif)
Before Flashing Process, you need to change a few things in the example sketch.
- Go to Example> ESP32> Camera and open the CameraWebServer sketch
- Input your SSID and password
- Change the camera module from#define CAMERA_MODEL_WROVER_KITto #define CAMERA_MODEL_AI_THINKER
- Now, Go to Tools and select the right board which is in our case AI-Thinker ESP32-CAM.
- Select the right port and hit upload.
- Now, when the ESP32 Starts its uploading process you will see the connecting message with dots and dashes. press the reset button on the bottom side of the board which dots and dashes start.
If you have encountered an error during this setup that says unable to connect, this means your timing was not good, try again and when the first dot appears in the debugging menu, long-press the reset button for at least 1 second.
After a few seconds, your sketch will be uploaded.
- now plug out the USB from FTDI Module and remove the jumper between GPIO0 and GND.
- Plug in the USB and open up the serial monitor.
- ESP32 will get connected with WIFI (which would take 1min) and you will see the IP address of the ESP32 CAM.
RESULT SO FAR...
.gif)
We copy the IP Address of ESP32 Cam and open it in the web browser and it will display the live feed of ESP32 Cam. Next, we start preparing the PCB for this setup.
PCB Design


After finalizing the Breadboard setup, we prepare a simple PCB Design that consists of a USB Micro Port connected with a diode for powering the ESP32 Cam.
As for making this board more aesthetic and cool, I downloaded a Black and white Darth Vader Image and convert it into BMP Image so I could add it to the PCB Design.
I placed the ESP32 Cam on one side of Darth Vader's face so it would look like Vader is looking at us through ESP32 Cam.
Getting PCBs From Seeed Fusion
.gif)
.gif)
After finalizing the PCB and generating its Gerber data, I send it to SEEED STUDIO for samples.
Ordered PCBs in RED Soldermask with white silkscreen.
I received PCBs in a week and their quality was super good considering the rate which was also pretty low.
Seeed Fusion PCB Service offers one-stop prototyping for PCB manufacture and PCB assembly and as a result, they produce superior quality PCBs and Fast Turnkey PCBA within 7 working days.
Seeed Studio Fusion PCB Assembly Service takes care of the entire fabrication process from PCB manufacturing, parts sourcing, assembly, and testing services, so you can be sure that they are getting a quality product.
After gauging market interest and verifying a working prototype, Seeed Propagate Service can help you bring the product to market with professional guidance and a strong network of connections.
PCB Assembly
PCB Assembly consists of two steps,
- Adding solderpaste and Diode
- Adding header pin and USB Port
Solderpaste and Adding a Diode
.gif)
We start first by adding Solderpaste to each component pad on the bottom side of the board and then placing the Diode on its location.
Hotplate
.gif)
.gif)
Next, we carefully lifted the whole PCB and place it on the hotplate. I’m using my good old DIY hotplate which I made a while back.
Hotplate Heats the surface up to the solder paste melting temp and it slowly melts. after a few mins when the solder paste completely melts, we remove the PCB and let it cool down for a moment.
THT Components
.gif)
.gif)
.gif)
Here's the final setup, we place the two header pin connector by using a soldering iron.
RESULT
.gif)
.gif)
.gif)
.gif)


We put the ESP32 on the VaderCam Board and plug in a 5V Charger.
After waiting for a few seconds, we open the web app in the browser and we can see the live feed from the esp32 cam.
This is it for today folks, leave a comment if you need any help regarding this project.
If you want to know more about the ESP32 Cam and how to get started with it, do check out my previous articles about it.
https://www.instructables.com/ESP32-CAM-WEB-Server-and-Getting-Started-Guide/
https://www.instructables.com/Dumb-But-Great-Point-and-Shoot-Camera-With-ESP32-C/
Thanks, Seeed Studio for supporting this project, you can check them out for getting all sorts of services or materials from their site.
Peace out!