Using Online 'Making' Services to Turn an Altoid Tin Into a Battery Storage System
3400 Views, 15 Favorites, 0 Comments
Using Online 'Making' Services to Turn an Altoid Tin Into a Battery Storage System
Who is this for?
This Instructable is for those curious about 2D and 3D making.
What is it?
An exploration into the making process using online 2D cutting, and 3D printing services.
Why 2D and 3D in one Instructable?
This Instructable is my experience and comparison of the process (and costs) involved in using 2D and 3D online services to solve the same problem. I could have broken it into two separate Instructables, but I think that the process of making these designs was interwoven, the story should include both design avenues.
What skills are required?
This tutorial assumes a general familiarity with how to use a computer. Familiarity with 2D or 3D design is helpful, but I try to talk you through the details, and I've tried to minimize the steps to get you from design to finished product, so you can get your feet wet without feeling like you're drowning.
What tools are required?
A computer, and a connection to the internet (I'm assuming you have both if you are reading this.)
A vector editor like Adobe Illustrator. (Trial version available here.)
A 3D program like Rhino. (Trial version available here.)
(Start downloading now... They're big.)
What services are you using to fabricate?
I am using Ponoko for 2D laser cutting, and Shapeways for 3D.
Note that Ponoko offers 3D printing too, as well as some cool part catalogs, but I wanted to give exposure to two different companies. Both are excellent in quality, price, and customer service.
On the last page of this Instructable, I am including a reusable template, so you (with minimal effort) can try your hand at creating a snug, custom-fit container for whatever it is that you want to store in an Altoid tin.
This Instructable will contain the details that I wish someone had showed me when I was starting out. (I feel like I'm still starting out, but hopefully I can share what I know.) There are a lot of steps in this journey, so please comment if you feel like I missed anything.
Example Goal:
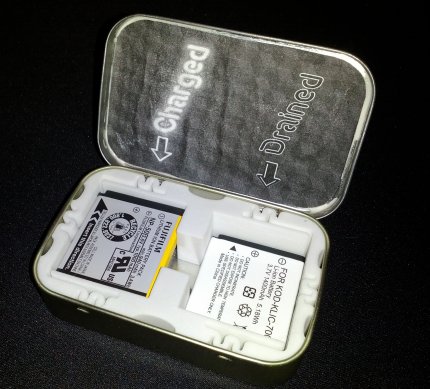
To create a nice, snug portable container for my (Fuji NP-50) digital camera batteries, with separate compartments for charged and empty batteries.
Example Use Case:
I want to be able to tell which batteries are charged, and which are drained. I carry 3 camera batteries when I travel, so at any time, two batteries are loose, and one is always in the camera. The last day before a trip, I always threw together an Altoid tin holder laboriously hand-cut from cardboard or foam. My original solution worked, but the tins didn't look very cool. Let's fix that...
2D - Setup and Software
Whenever I design something, I'll start with a vector drawing tool like Adobe Illustrator. This is the program I will be using for the tutorial, so if you want to use another tool, I'll assume you can figure out the corresponding commands on your own.
If you haven't gotten it yet, you can download a fully functional trial to follow along with this tutorial.
Some folks prefer (the cheaper) Corel-Draw. You might also try using Inkscape, a nice free cross-platform alternative, although, if you do, note that while inkscape can export .eps files, it cannot re-import them, so be sure to save your master files in a different format.
If hard-drive space is a concern, or if you don't want to (or aren't allowed to) install programs, Raven (Beta) is a free vector editing tool in the (completely web-based) Aviary design suite.
The point is, there are options out there, but start with a tool in which you feel most comfortable, because odds are, there will be many revisions before you arrive at a final design, and to change things quickly and efficiently, you want to be free from having to think about the development tools.
2D - the Design Process
Measure Twice:
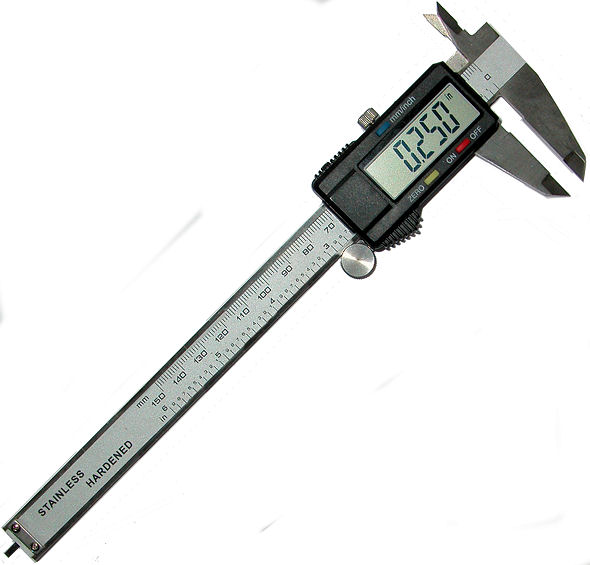
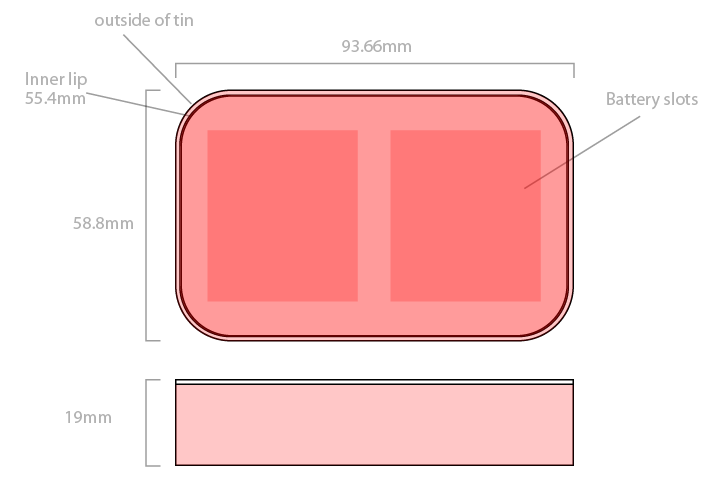
To start you'll want to get measurements for whatever you want to work with. Since this project is repurposing an Altoids tin, I pulled an empty tin from my desk drawer, and measured it's dimensions using a pair of digital calipers.
If you are at all interested in designing things for the real world, a caliper is a must-have item. A decent caliper can be purchased from various online retailers for around $20. (OK, sorry... No more sarcastic links from here forward, I promise...)
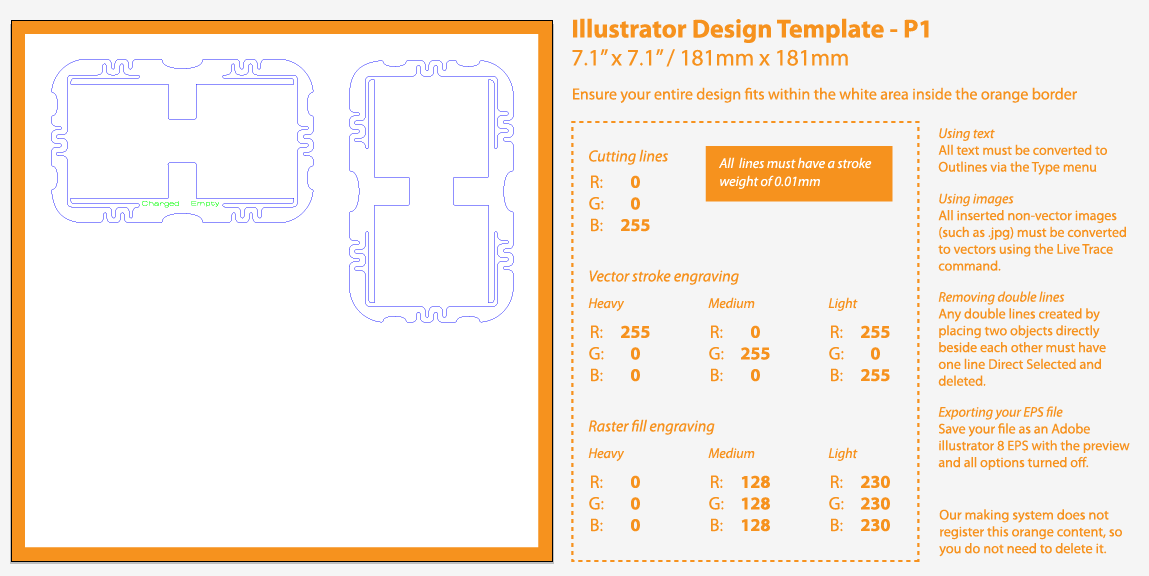
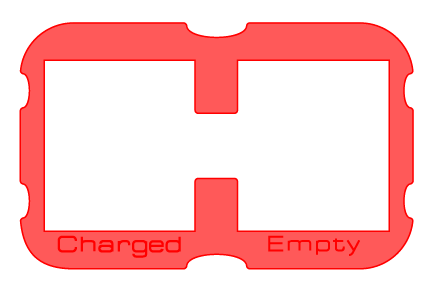
Measure the size of whatever you want your tin to hold, and then replicate it's outline in illustrator, and place the shape in the middle of the template like you see in the (mostly red/pink) illustration.
Draw:
To draw my batteries, I used illustrators rectangle tool, and resized the rectangle to the width and height I measured with the calipers.
Note: On the last page of this Instructable I talk about tolerances for your objects. I didn't add any extra wiggle-room for my batteries, and they fit a little too snug. I'd recommend adding an extra 1mm to the width and height of whatever you measured, so the holes are a hair bigger that your objects.
Note further: That when you laser cut something, the thickness of the laser beam removes a tiny bit of material, on both sides of your cut line, making your objects about .3mm inset from the exact size in your file. That amount is trivial for this project, but you should account for the beam thickness if you are making something more precision.
I duplicated (control-c / control-v) the rectangle for my second battery compartment, aligned everything to the vertical center of my template, and then connected the two compartments with a third rectangle using the pathfinder* palette. This is not necessary for holding the batteries, but I needed some extra space to get my fingers in to remove them.
*The pathfinder palette is a boolean operation tool for objects, it allows you to join object or divide them in different ways. I used the first option, called "Unite" to turn three rectangles into a solid "H" shape .
I then used the pathfinder's "Minus Front' button to subtract the battery shape from the template object to create my final shape.
Materials:
Let's take a break and talk about materials for a minute... Whatever you build, you will want to know what materials are available to work with. Different services offer different options, so you will want to explore your available materials and their sizes before you get too far in to the project.
My idea was to create a (multi-layer) frame from 2D plastic, with a springy outer frame that will press-fit into the tin. I figured plastic was a good material to start with, so I went to Ponoko's website to look at their (incredibly well documented) plastic material thickness options.
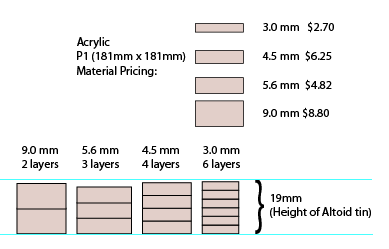
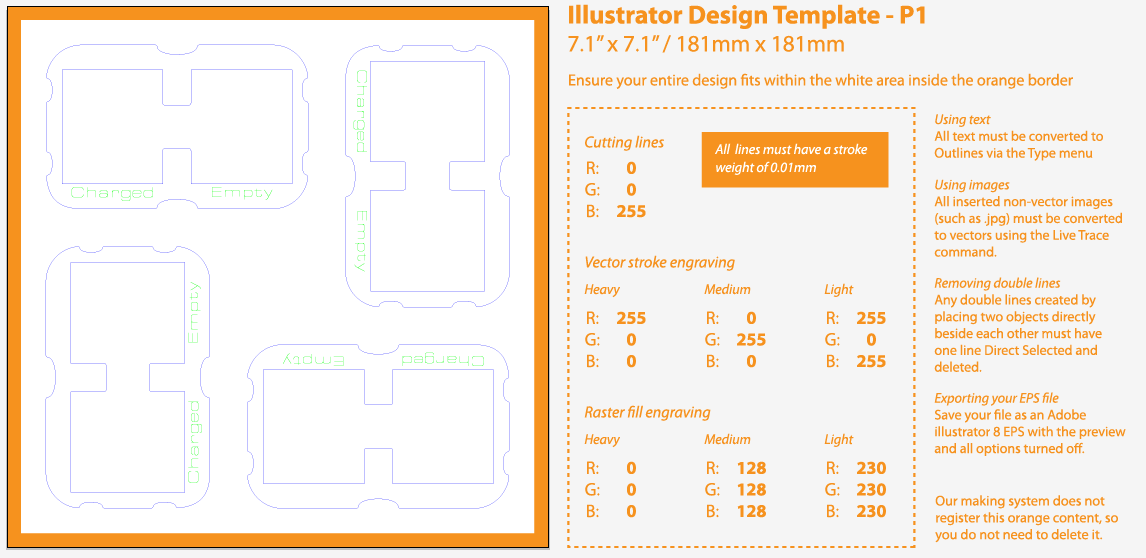
The internal height of an Altoid tin is about 19mm. In Ponoko's material pages, 3mm thick Acrylic looked like a good fit. I would need 6 layers of 3mm material to get me close to the desired height of the Altoid tin, this seemed less than optimal. I drew out some quick measurements. (See image) I noticed that I could only fit four templates on the P1 template, so I looked at the next thickness available for that type of plastic. The 4.5mm thickness was the next size up. At that thickness, I only needed 4 layers of material to get close to the 19mm height of the tin.
I also noticed that opal Acrylic was available in a 9mm thick option, in which case, I could cut 2 layers instead of 4. This is important because in the world of 2D laser cutting, the longer it takes to cut a design, the more expensive it is. In 3D, you are only charged based on the volume of the finished piece, but in 2D you want to minimize the cut time of your projects. Whoever said "time is money" must have been talking about 2D laser cutting. The final choice of the material need not be nailed down for the initial design, but I find having a rough idea of available materials allows me to better visualize options for the finished product.
The Template:
When you're happy with your design, download Ponoko's printing templates from their website. Ponoko has excellent detailed instructions on how to set up a file for cutting, but the short versions is as follows. For any laser-cut design there are a few stock sizes (width x height, NOT thickness) to choose from. I chose the small, "P1" template for my project.
Paste your design into the template. Be sure not to have any lines overlap each other. Depending on the thickness of the material you choose, you will need 2 to 4 copies of your design. You may have to rotate the design to make all the copies fit on the template.
Once everything is placed, you will need to define the behavior of your lines so the laser cutter can understand what you want done. When preparing a design for being laser cut, all objects need to be inside the orange boundaries of the print template, and their stroke thickness must be set 0.01mm. To make a shape cut all the way through your material, you will need to set it's stroke color to (0,0,255) which is pure RGB blue.
Don't worry about having to memorize anything, the downloadable templates provided by Ponoko always contain all of this in detailed instructions, displayed off to the side, in orange, which the laser cutter ignores.
Below is a quick overview of the available stroke options and their behaviors.
behavior = (RGB values)
------------------------
Vector Cut (all the way through) = 0,0,255
(Note: Ponoko has images of what each option looks like for every material on their website)
Vector Engrave:
------------------------
Light = 255,0,255
Medium = 0,255,0
Heavy = 255,0,0
Raster Engrave:
------------------------
Light = 230,230,230
Medium = 128,128,128
Heavy = 0,0,0
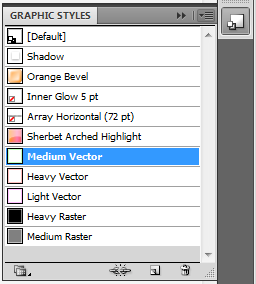
For your further convenience, I am attaching a 'graphic styles' template for Adobe Illustrator that contains all of the above styles. This can make final setup just a bit easier. Install it* if you're planning to do a lot of laser cutting projects with Ponoko. See the attached file "Ponoko Line Styles" It should work with any version of illustrator that can use graphic styles.
*To import a custom style set into Illustrator, open Illustrator's "Graphic Styles" palette (from the top menu choose Window>Graphic Styles) , and click the fly-out menu button on the top right of the palette. (see image) Choose "Open Graphic Style Library" option near the bottom, and then navigate to wherever you saved the downloaded file. The new palette should appear.
Note: To get the0.01mm LINE THICKNESS to work properly, before styling anything, you will need to select all your objects on the page, then open the transform palette and UNCHECK the option to Align to Pixel Grid. If this is checked, then the smallest stroke you can assign will be 1px, which will not print on Ponoko's laser cutters.
Exporting to .eps Format:
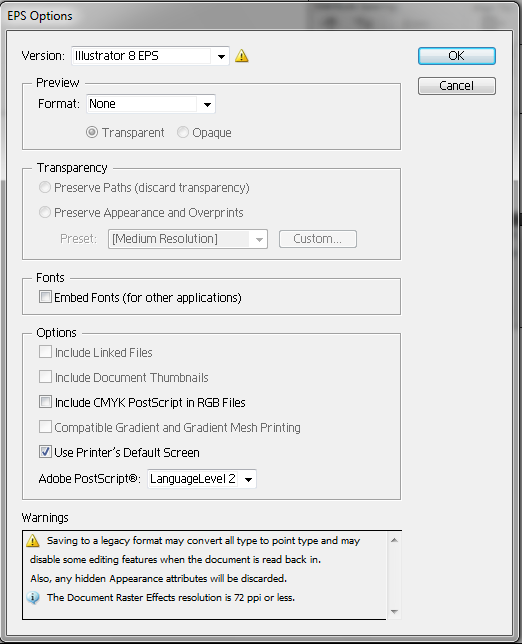
Once your design is properly styled for printing, you will need to export the file in a format that ponoko can understand. Sadly, .ai files are not natively understood, so you will need to use the Encapsulated PostScript (eps) format. This format is one of the stock export formats that illustrator can export to, but finding it can be tricky. In Illustrator, the option is found either in the "Export As" section of the "File" menu, or in the "Save As" section (Depending on which version of Illustrator you are using. For version CS5, it's in the "Save As" menu. Once selected, a 'save' dialog comes up asking about which options you want.
You will want to Save As eps version 8. Uncheck just about everything else. Use the options depicted in the attached image.
Uploading:
Once your file is saved out, it is time to opened a browser, and send your design to Ponoko. I had trouble signing in with Google Chrome, but Firefox worked flawlessly.
You'll need a Ponoko account for this next step. If you don't have a ponoko account, you can create one for free.
Once logged in, you can upload your file using the "upload a file" tool.
The auto-inspector will review to check your file is valid, and if it is, it will give you instant quotes for various combinations of materials and thicknesses.
I found that my 4-up design would cost in the range of $22.00 for 4.5mm plastic. The 2-up 9mm plastic priced in at $10 above that. ( At 9mm the material is more expensive and thicker plastic cuts slower.) Adding shipping is another $10, so I was looking at a cost of 30 to 40 dollars to ship my 2D solution. I knew that the 3D solution would be more expensive, so for 2D, I wanted to look at ways to make the project cheaper. I went back to the materials list to review my options.
2D Re-design (back to the Drawing Board)
Redesigning:
Any time you design something, you will likely go through a re-design phase to improve or fix your initial design. In this case, I just wanted to make my design cheaper to make. I could do this by selecting cheaper material, and by making a design with less detail (less cutting time.)
I looked at other materials to lower the cost, and cardboard caught my eye. I'd been meaning to try a project in cardboard for a long time and this project seemed like a perfect fit. The internal walls are protected by the Altoid tin, so they wouldn't need much strength, and my earlier prototypes were made from cardboard so I knew the material would work. Furthermore, the material cost for cardboard is ridiculously cheap, and, even better, the cutting cost is cheaper because the laser moves much faster while cutting softer materials.
I could now simplified my design, since the original frame shape was created with a more rigid material in mind, and the extra "coolness" of a springy outer structure is not necessary for a flexible material like cardboard.
I went back to illustrator, and removed about 90% of the frame complexity and re-uploaded for cutting with cardboard. This brought the making cost below $10. This was an acceptable price for my first prototype, so I clicked the "buy" button and called it an evening.
Going 3D

Adding a Dimension:
Now that might have been the end of my project, but I also wanted to try printing my original design in 3D.
For this project, I am using Rhino for my 3D program. Rhino is a bit pricey if you're just a hobbyist, but you can download a fully functional demo (limit 25 saves) to do this project.
Alternatively, Autodesk 123D is a great free set of programs with some insanely cool features, like an app for turning a photo into a 3D model, or an app for turning your 3D model into a series of slices for laser cutting. 123D has some intro videos here. Check them out, 123D looks to be a pretty slick one-stop-shop for designing, extruding and even making.
TinkerCAD is another free, web-based alternative recommended for beginners by Ponoko.
Let me begin by saying I kinda suck at 3D, so my goal was to do as much prep work as possible in Illustrator.
I learned everything I needed to know about Rhino from spending an afternoon watching Dave Schultze's excellent Lynda.com tutorial: Rhino 4.0 Essential Training. By searching Youtube, you can find many free Rhino tutorials. Rhino also has an incredible built-in searchable 'help' system via it's 'help' dropdown menu.
The goal of a cost-effective 3D print is to minimize an objects volume, because, unlike 2D, price is based on an objects volume, not by it's complexity. This meant that I don't want to just extrude my outline as a solid block, I wanted to hollow it out, (or hull) it.
Premaking a Hollow in Illustrator:
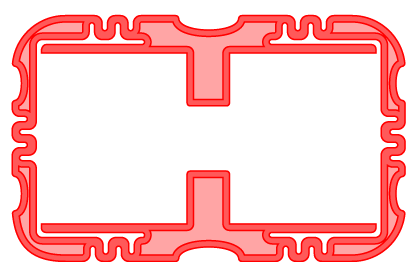
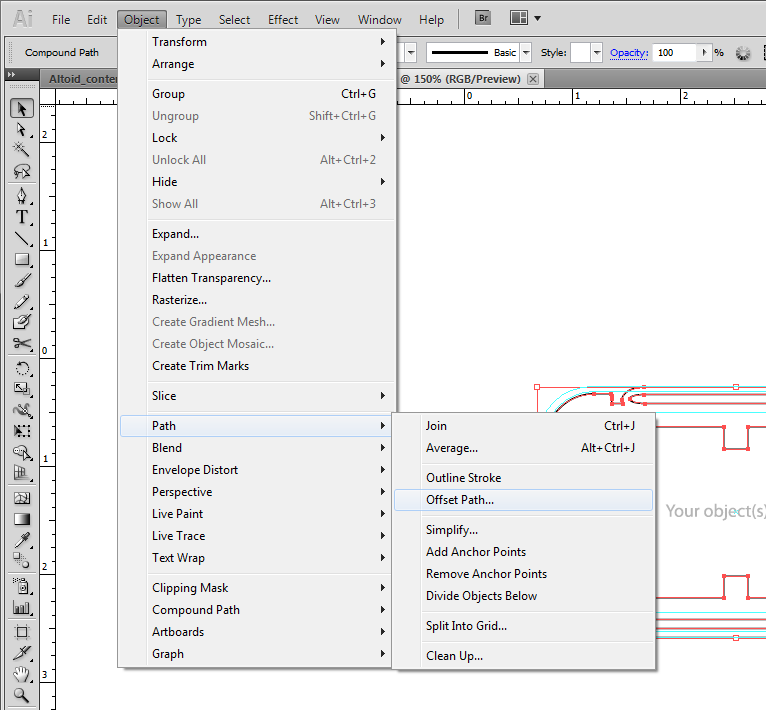
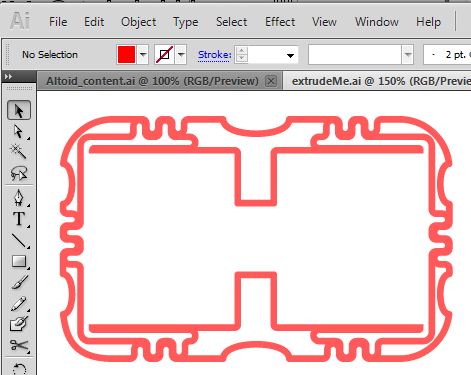
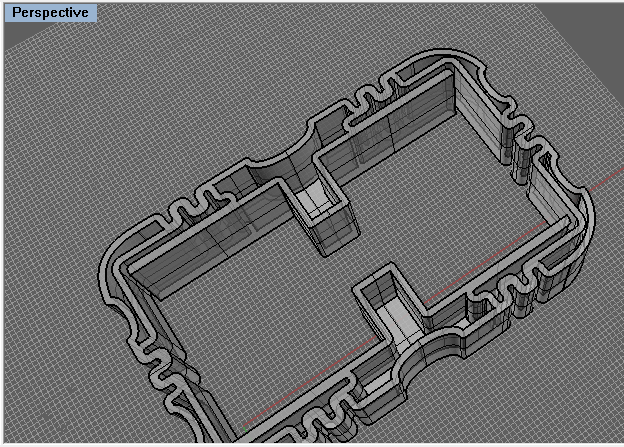
Hulling complex objects can be extremely complicated in 3D programs, so I pre-created the 'hollow' geometry in illustrator by performing a negative 1.5mm offset on my compound path shape. The "Offset" command is found in the "Object>Path>Offset" drop-down in Illustrator. Once I had an offset that didn't overlap itself or anything else, I merged my object into a single compound path (using the "Minus Front" button on the Pathfinder palette), and save my file as Illustrator8.
I also set a fill color on my object, and removed stroke. If an object is stroked when it get imported into Rhino, the stroke itself becomes geometry, and we don't want that. (see third image for illustration of the compound object.)
Rhino 3D:
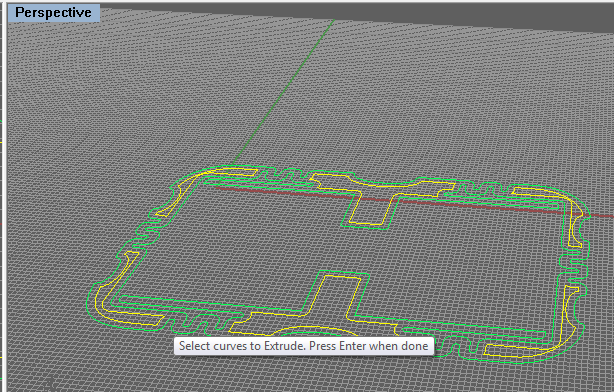
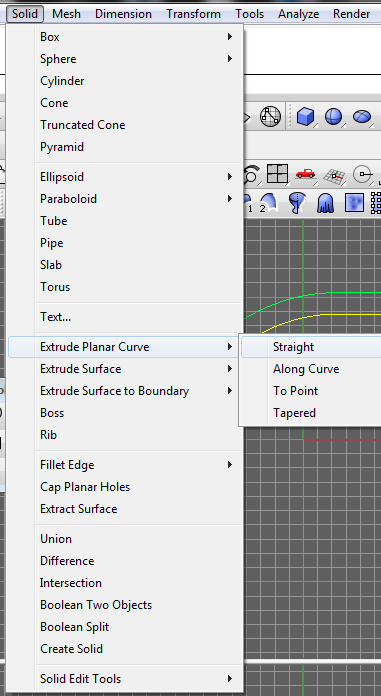
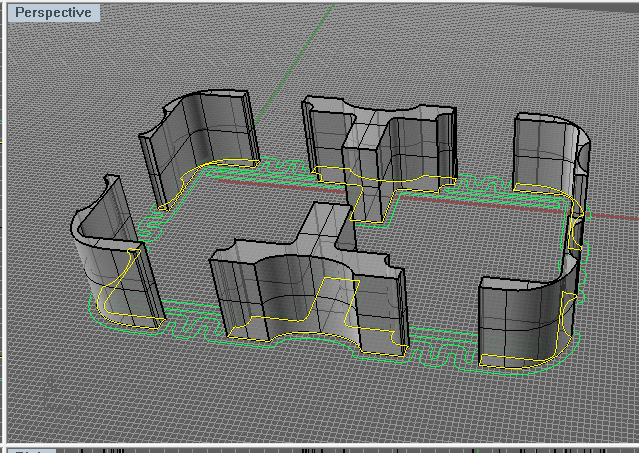
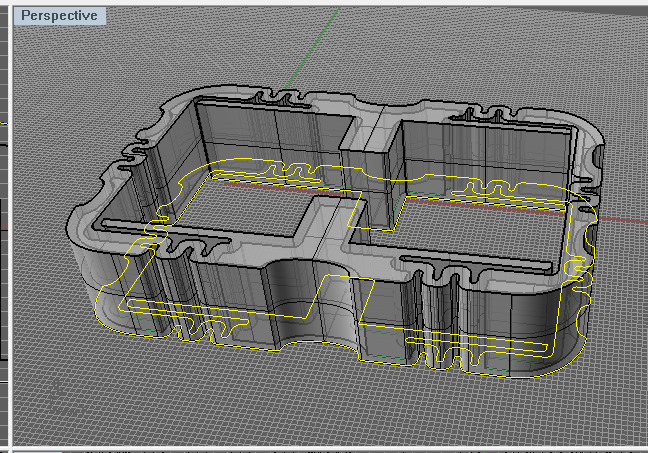
With my objects created, I opened Rhino, and imported the ai file on to the construction plane. Now, in Rhino, I only need to perform two steps. I need to extrude the shapes to the correct height, and then perform a boolean subtraction to remove the offset center geometry, and my model should be complete.
Building:
The 3D build is better explained with images. (Follow the heavily annotated images for the 3D construction process.)
Exporting:
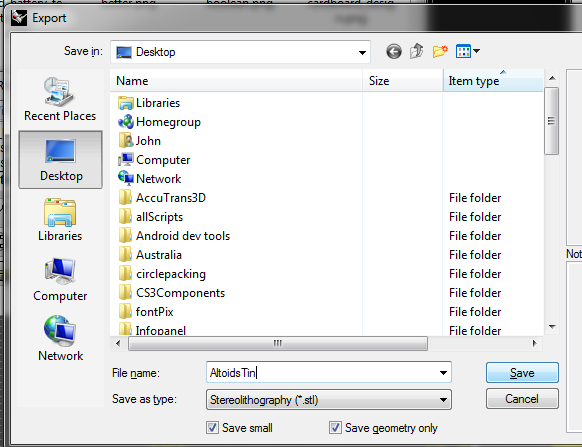
After your 3D model is created, you need to export it in a format that a 3D printer can read. I chose stl (Stereolithography format), which is an industry standard. For a model as simple as this, I used the following options:
I selected the shape, and then, chose the "Export selected" option from the "File" menu. This ensures that ONLY the model geometry is in the stl file. This is important, because you don't want to have any geometry that will mess up the print, or prevent it from printing altogether.
I checked the boxes for "Save Small", and "Save Geometry Only"
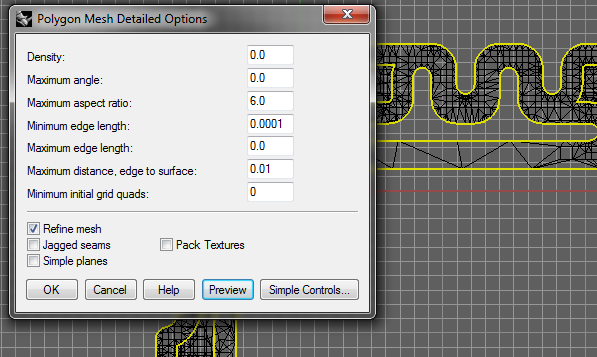
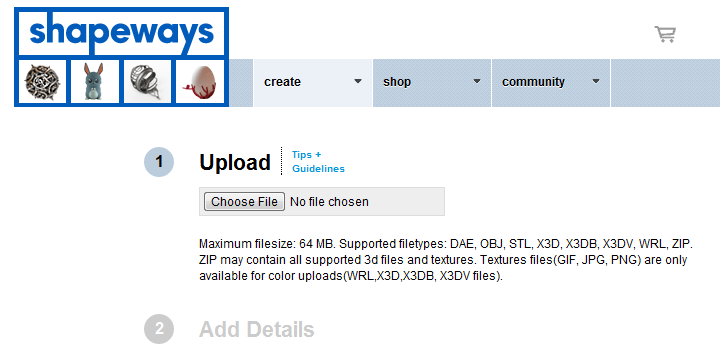
I opened the "detailed controls" dialog and unselected "pack textures", I checked "Refine mesh", then I hit preview. This showed me the model superimposed in triangles. Note: If the model looks solid black, you might want to dial down the detail until you see triangles. In this case, it looked fine, so I hit OK. In the following dialog, I chose Binary format. I was now ready to upload my exported STL file to the shapeways website.
Uploading:
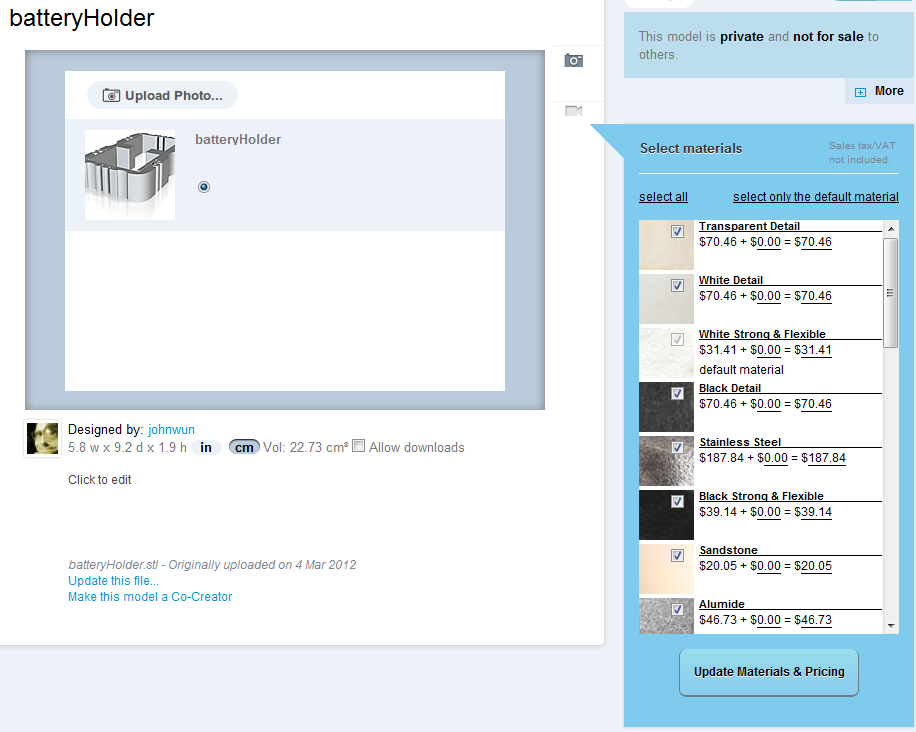
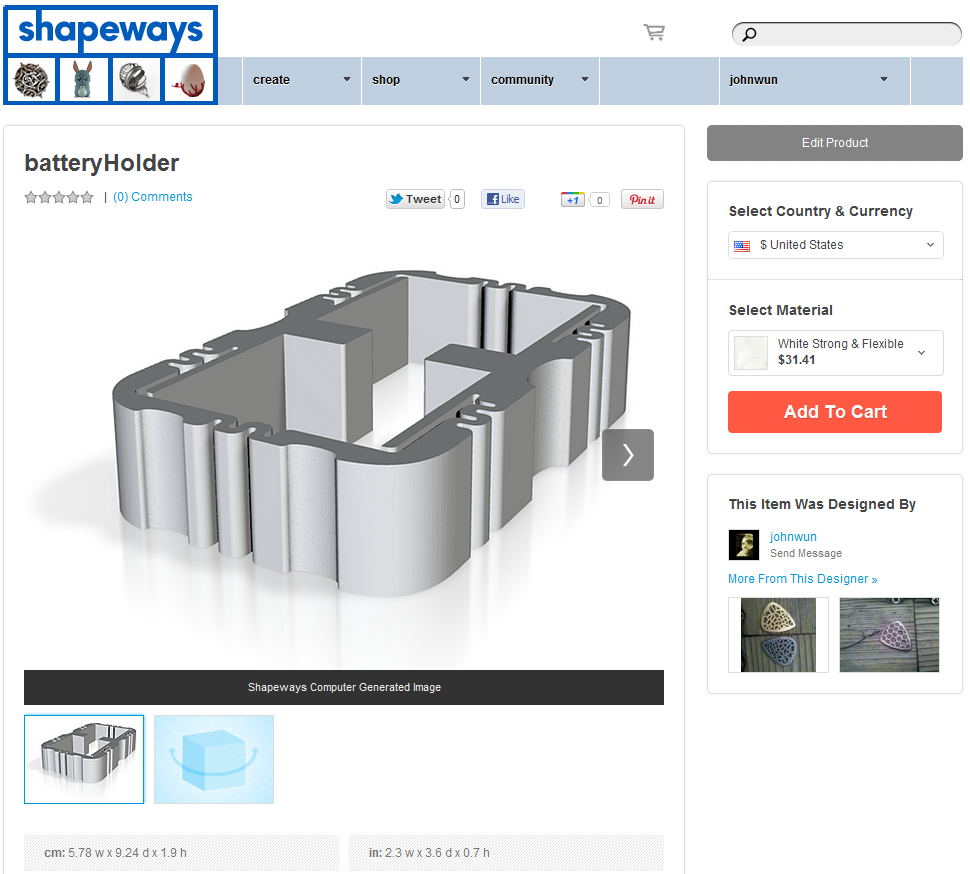
I used the web-based uploader on shapeways.com to check my file. After 3 minutes or so, I got an automated email telling me that there were no problems with my file, and that it was good to go. I returned to the "my models" section on shapeways.com and found that there was indeed a nice 3D rendered picture of my finished model, along with a very reasonable ~$30.00 price tag (with Shapeways, the minimum order is $25.00, but shipping is free) I purchased the model, and received confirmation that the order was approved.
Product Arrival and Review
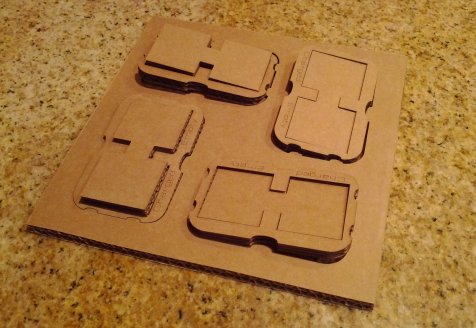


About two weeks later, I got the packages from both companies about a day apart.
2D Cardboard - Product Assembly and Thoughts:
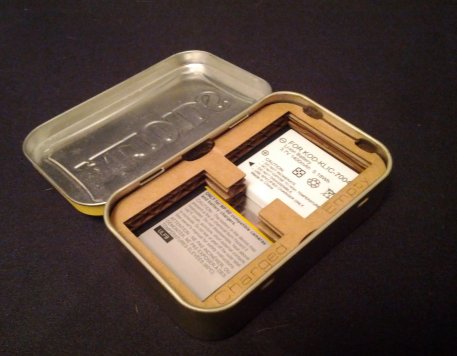
I opened the box, and the cardboard design easily popped out of it's stencil frame, The forms slipped easily into the Altoid tin. Three layers turned out to be a bit more than 19mm, but I found that two layers is fine, so now I have backups, in case I want to radically experiment with the first pair.) I will probably glue them together, and since I have a little extra vertical space, I might line the bottom with felt. The compartment labeling came out crisp (see image) on the cardboard, and the batteries slide smoothly in and out of the container.
Analysis:
Mission accomplished. This is exactly what I was wanting; cheap, professional, light and easy to use.
3D printed Plastic - Product Assembly and Thoughts:
3D is by far the coolest option. Opening the package I saw something that only existed previously in my imagination. Sadly, the 'hard, strong and flexible' plastic that I chose was not as flexible as I had assumed, so stuffing it in to the Altoid tin was a bit of a challenge. True to it's name thought, it did pop in snugly after a bit of huffing and puffing. The plastic is stiffer and heavier than I thought, even with the hulling, so,perhaps obviously, it adds slightly more weight compared to the cardboard solution.
The batteries also fit snugly; a little too snugly . This was easily remedied with a bit of sanding, but should have been addressed in my original design. When you make your thingy holder, remember to add an extra 1mm or so tolerance for your item compartments so your items have a bit of wiggle room.
Since the 3D print didn't have much space for labels, I didn't add them to the model. To keep the compartments straight, I did an "after-market mod", and whipped up a label in illustrator, printed it on my inkjet, and glued it on the inner lid. (See photo)
Analysis:
Mission (mostly) accomplished. This works, but I feel like I could improve the "spring" design to be lighter and more flexible, and can somehow incorporate labeling on the model itself.
Comparison:
In the course of this project, I've made a 2D laser-cut cardboard stencil via ponoko.com, and a plastic 3D printed object via shapeways.com. As you've seen, the mediums, materials and costs heavily influenced the final designs. My original assumption was that 2D was the best option. I believe that assumption was correct, for this round, but I think if I refine the 3D design a bit more, I could design something stronger, lighter and cheaper. My final analysis is that both routes are winners. Both are relatively cheap, effective, functional and really fun to build. The 2D route was faster to set up for me because I knew the tools, but after an initial learning curve, I was happily surprised at how quickly I was able to extrude a useful shape in Rhino. I'm hooked on both processes.
Soapbox:
Online making services are nothing short of a revolution for getting personalized stuff to your door. Never before in the history of mankind has it been so easy to make something so personalized for so cheap. I expect personal printers may soon invade the common household like computers did in the 80's, but regardless of the if's and when's, online services like ponoko and shapeways are making affordable one-off prototyping accessible everyone.
In the course of making this Instructable, I learned about 123D, and it looks like their production pipeline is nicely integrated from sketch to print. I will try their service as well. My production pipeline has been a hacking together of the tools that I am most comfortable designing in, but as the 'making' design space gains momentum, these tools are becoming cheaper, and easier to use. I guess the takeaway is that this is a really fun space to play in, and there really isn't a bad option in the playing field right now.
Parting Thoughts:
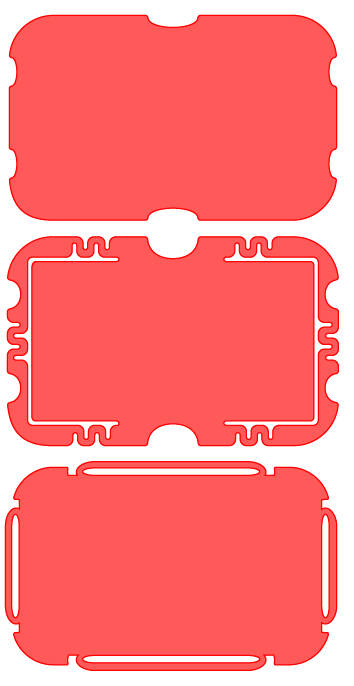
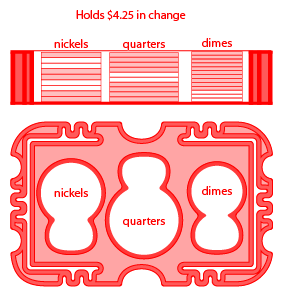
I am including an .ai file here for the Altoid form-factor, so you will only need to make the center part for whatever you want it to hold.
The file includes 3 different designs, each gauged at materials of different densities (see annotated image for details.)
I've inset the center design, so it should be a slightly better fit if 3D printed in shapeways' 'hard,strong,flexible' plastic material.
If you use these templates for something other than camera batteries, I'd love to read your idea in the comments.
If you happen to have a camera that uses the NP-50 style battery and you want to print the 3D model, I have uploaded it here: