Use Cricut to Draw Embroidery Designs on Fabric
by lizthelen in Craft > Embroidery
8099 Views, 36 Favorites, 0 Comments
Use Cricut to Draw Embroidery Designs on Fabric
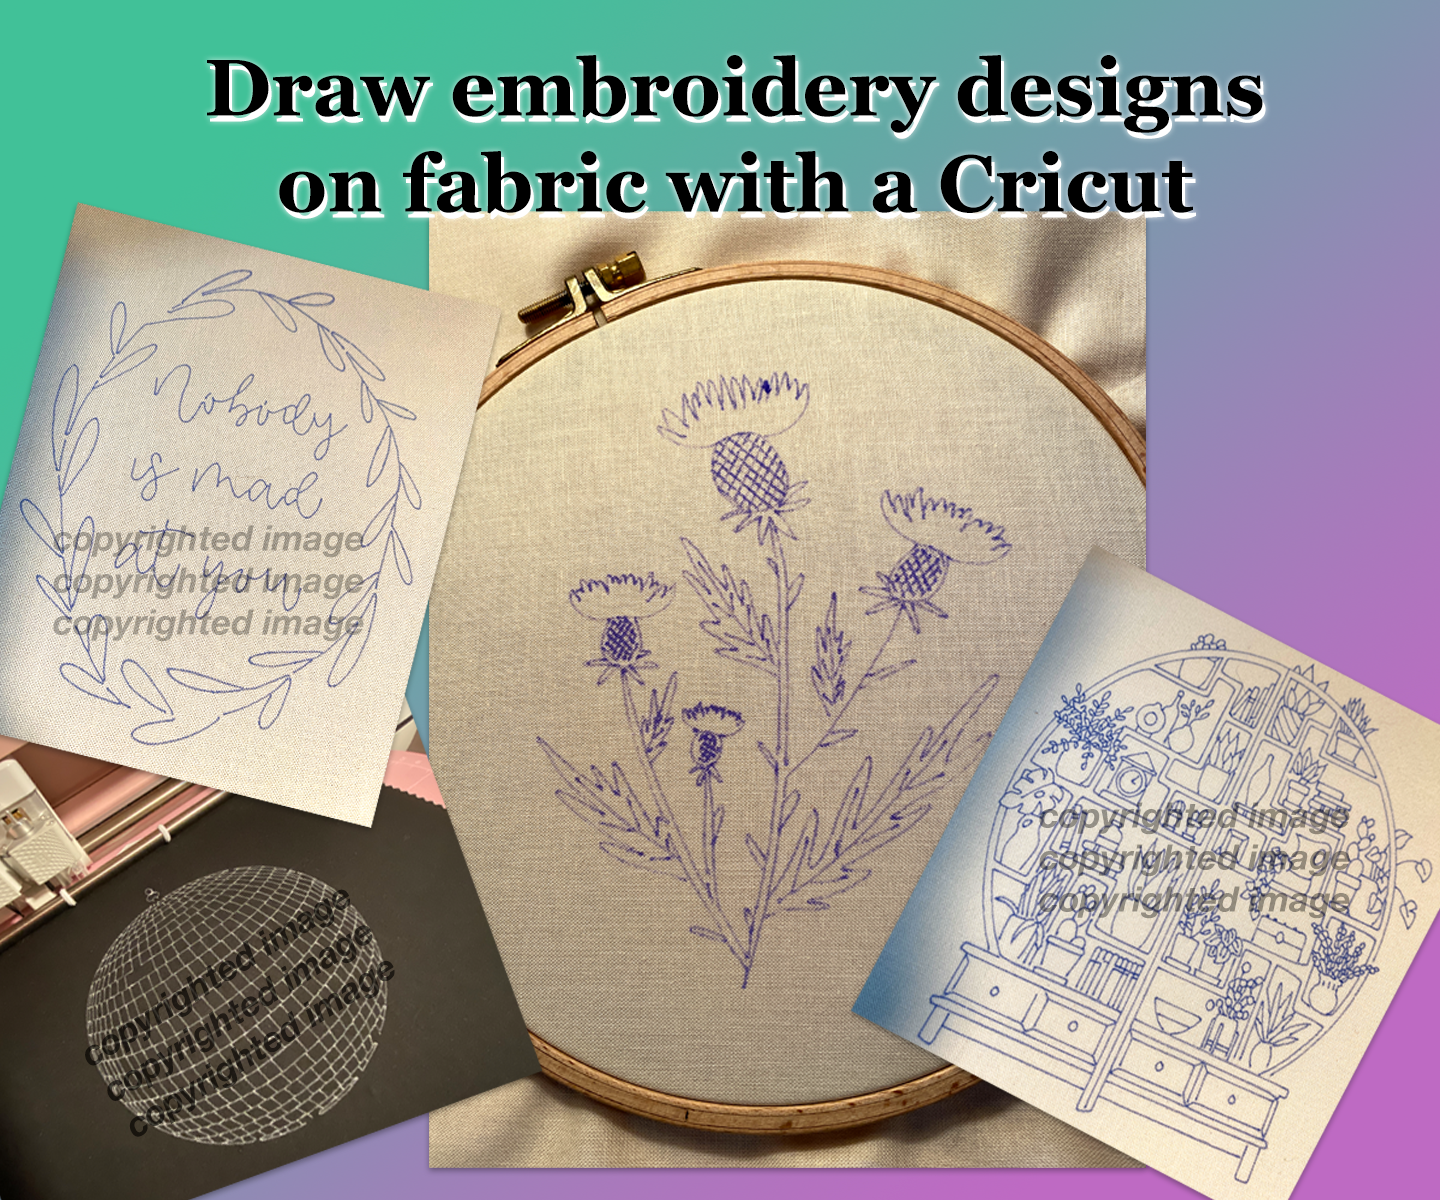
I do a lot of hand embroidery. Typically I purchase a design/pattern as a PDF, then I have to transfer the design to my fabric so I can stitch it. You can find lots of embroidery artists and teachers offering lots of tutorials for tracing and transferring designs. Some even print directly on fabric. But there's another way.
I want to share how I use my Cricut to draw embroidery designs on fabric.
This method is particularly useful for complicated designs that would be very tedious and difficult to trace by hand (such as the disco ball and bookshelf in the photo). I also use it for lettering that I want to get just right, because my tracing is not always perfect (such as the "Nobody is mad at you" design pictured).
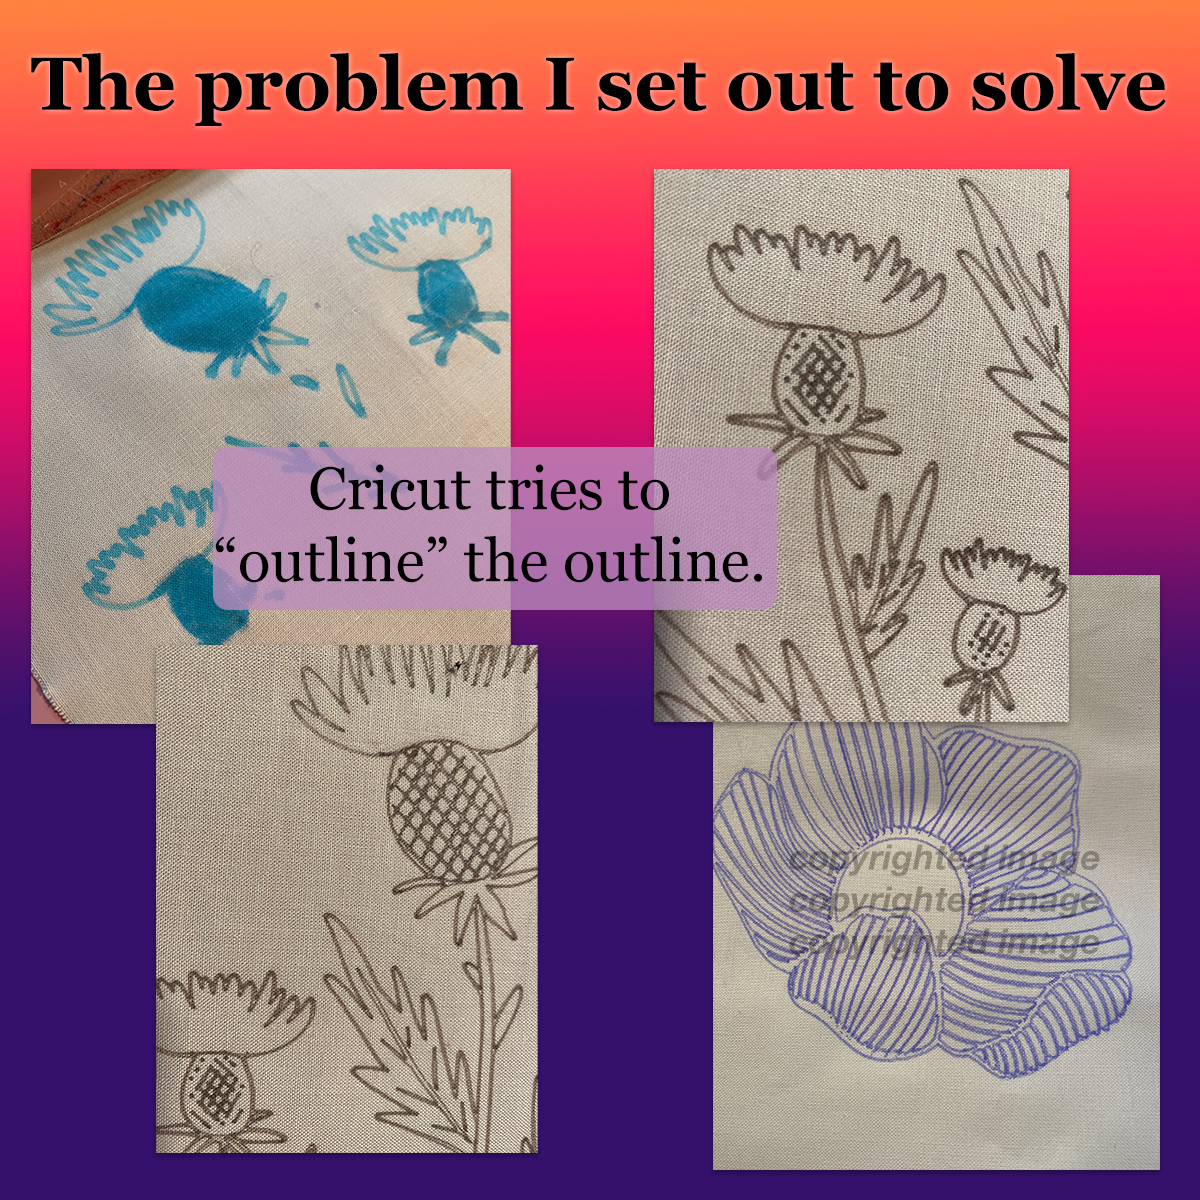
It’s actually very easy to import an image into Cricut Design Space and set it up to draw. But instead of drawing the image the way you expect, it outlines the outline. You can see this in the second picture.
It took me two years to figure out how to get it to draw the design correctly. My solution involves some specialized software and hardware, and it's not easy or obvious. But I figured it out after a really long time, and I wanted to share, in case it helps anyone else out there.
The key steps in this are performed in Adobe Illustrator. I don't know how to do it using other software.
There may be other ways to accomplish the same end result. If there are, please let me know. This is what works for me most of the time (bad news: for some designs, it just doesn’t work).
Note: This tutorial doesn't include any information about stitching embroidery. This is specific to the task of transferring a design to fabric. There are lots of great embroidery resources all over the internet if you want to learn.
Design credits:
- Thistle: DMC free pattern (this is the design I use throughout this tutorial)
- Disco ball: "Party!" by Cristin Morgan
- "Nobody is mad at you" by Stay at Home Artist
- Bookshelf: "Chinese Plant Cabinet" by Penny Dowdell
- Flower: "Flower Power" by Petras Wonderland
Supplies
Software and hardware
Adobe Photoshop (or another image editing software)
Adobe Illustrator (this is the key to the whole thing)
Cricut Design Space
I use an Apple MacBook Air laptop (Retina, 2020) running MacOS Monterey (v. 12.4). I assume this works on Windows too.
Cricut equipment and accessories
Cricut Maker (I assume this also works with Cricut Explore)
Cricut FabricGrip machine mat (12 x 12 inches)
Brayer: I use a brayer intended for linocut, but Cricut also makes one. This helps get the fabric well-stuck to the mat. It eliminates wrinkles, bubbles, and creases.
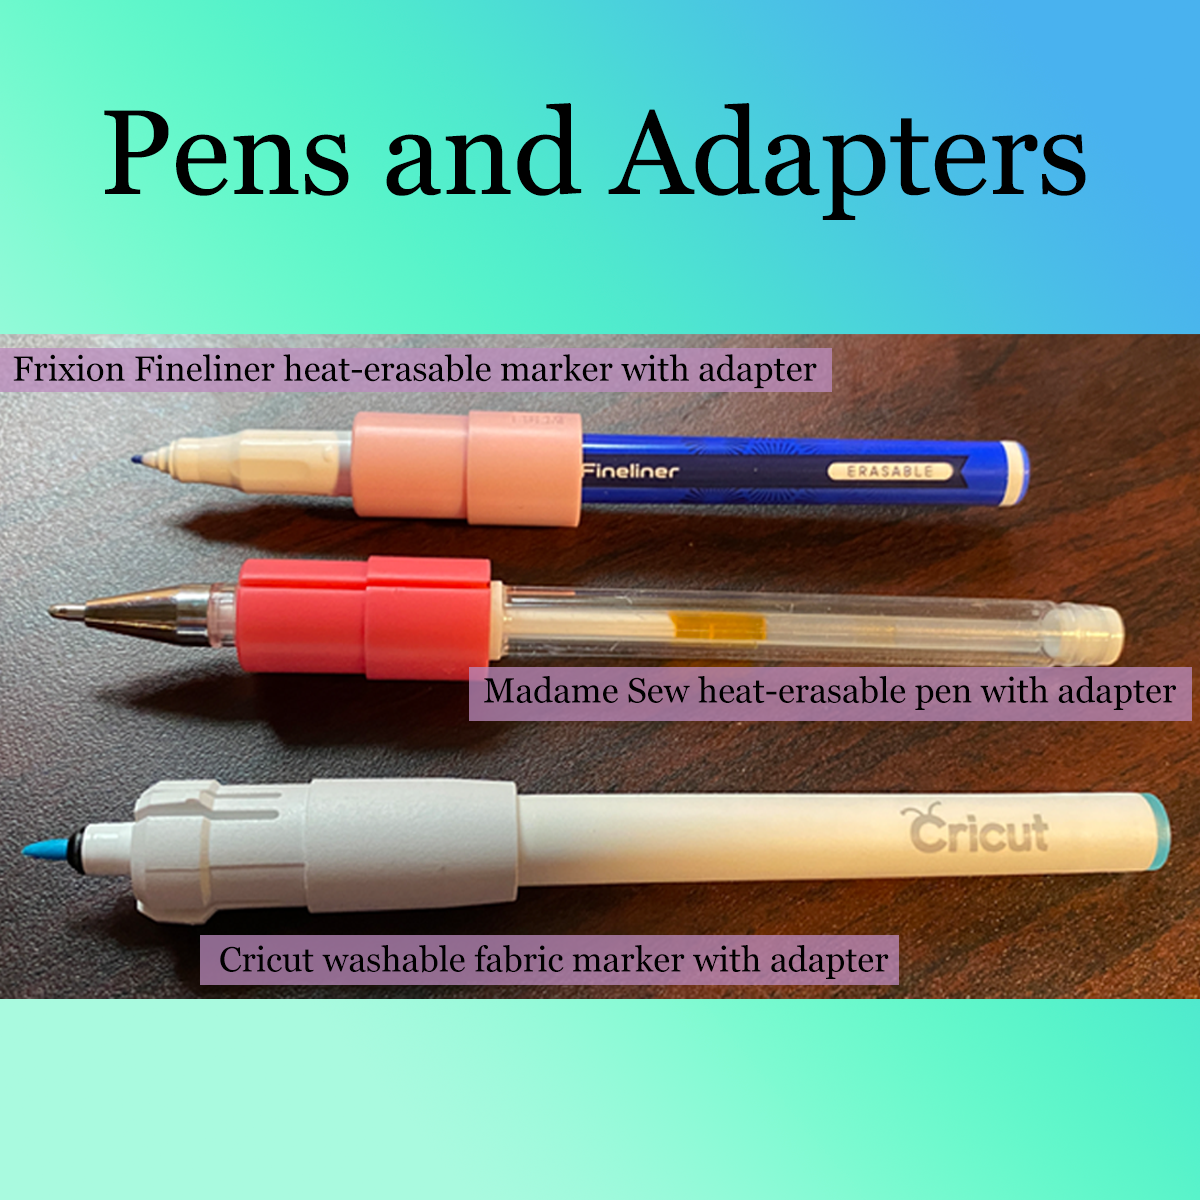
Pen converters that fit the pens I use: With the right adapters, you can use any pen or marker you want in the Cricut. The adapter is a little tube, open on both ends, which allows you to securely position the pen in the Cricut tool housing. I purchased a set of adapters from Amazon with 20 different sizes for all different kinds of pens, and experimented to find the right fit.
Note: If you use a Cricut brand pen or marker, you can use the adapter that came with the Cricut.
Markers and pens
Use whatever pens and markers you like best. Here are my favorites.
Pilot Frixion Heat Erasable Fineliner Markers: I believe these markers work better with the Cricut than other Frixion pens (e.g., gel). I usually use green, blue, brown, purple, or black. The marks erase with heat.
Madame Sew Heat Erasable Gel Pen in white: This is what I use on dark-colored fabric. This pen is amazingly effective, and it erases with heat.
Cricut washable fabric pen: It works great, but I prefer heat-erasable so I don’t have to get my project wet. You can also use regular (non-erasable) Cricut markers, but be sure to stitch over all the lines. (If you use a Cricut marker, you don’t have to buy pen adapters.)
Fabric
This method works best with cotton (I usually use Kona cotton). It works on dark or light colors.
I recommend always ironing your fabric before you trace or draw the design.
I use a 12 inch square mat, so that’s the maximum size of fabric I can use. Normally for a 7-inch hoop, I start with a square of fabric anywhere between 9 and 11 inches.
With thicker or looser fabric such as linen, the marker/pen can get caught in the texture and drag your fabric around instead of drawing on it. You may be able to work that out by setting the marker/pen a little higher, but I often use the lightbox method with these fabrics (see Step 5, Alternative Method).
Before We Start
One-time setup ("calibrate" your Cricut)
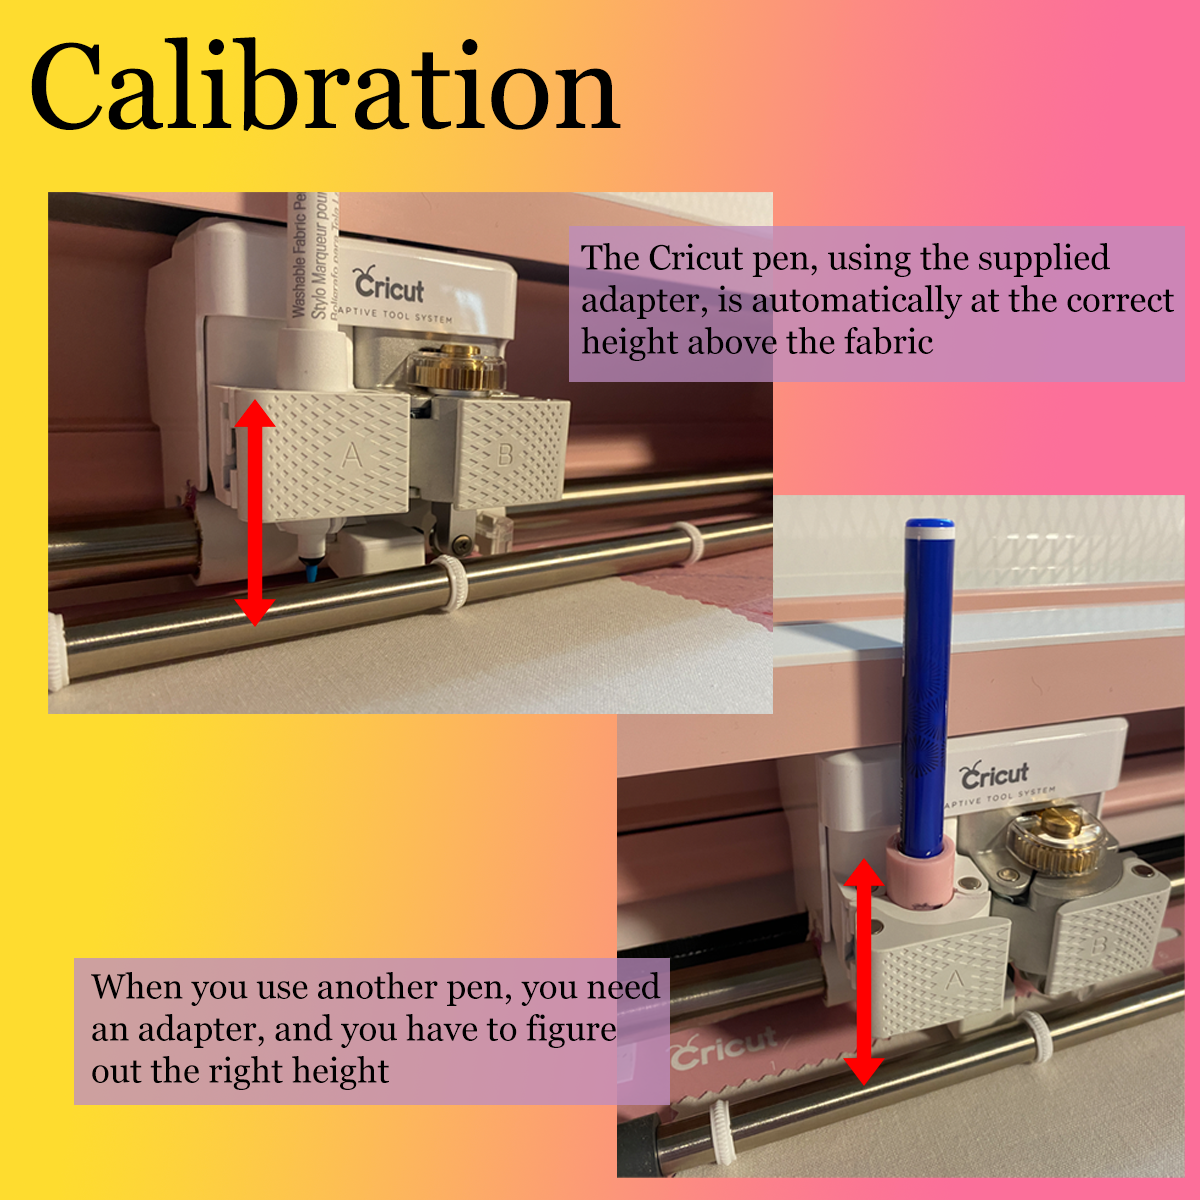
Note: This is not necessary if you are using a Cricut brand pen.
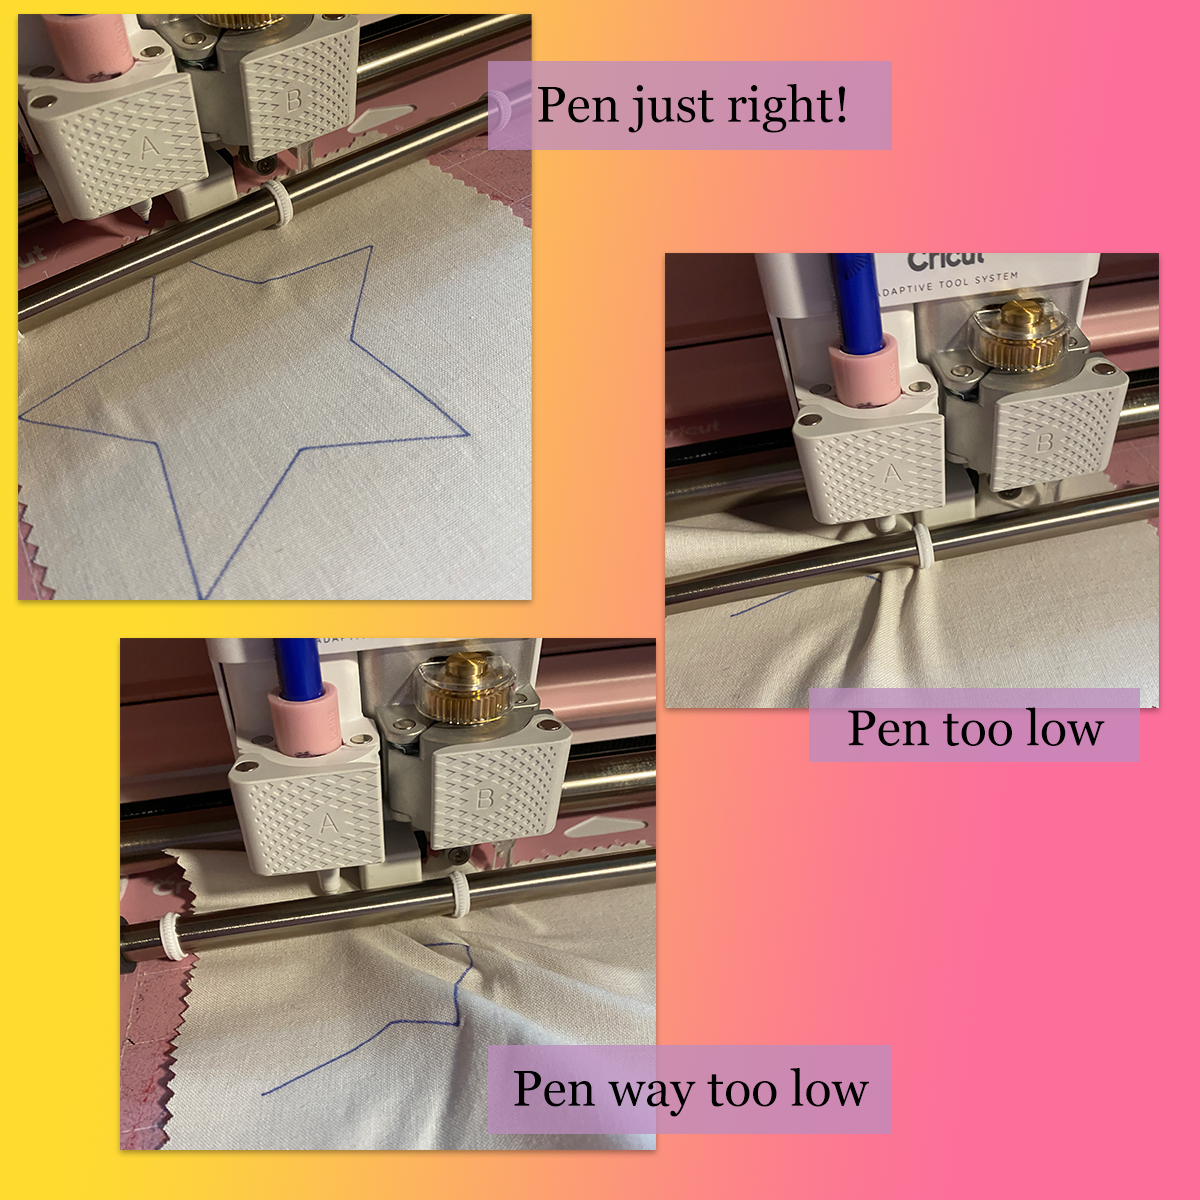
Before you print your first design you’ll have to “calibrate” your marker/pen and adapter. See, there’s no easy way to know exactly how high/low to position the pen and converter in the Cricut housing. So you have to use trial and error to get it to the right height the first time.
1. Slide your pen or marker into the adapter.
2. Put the adapter into the Cricut tool housing.
To get an approximate starting point, I put a Cricut brand pen in the tool housing first and looked at how close to the surface the tip was. Then I put in my pen/adapter combo and tried to get the tip to about the same distance from the surface. This is not very scientific.
3. Take a scrap piece of cotton fabric. Place it on a FabricGrip mat, aligned to the top left corner. Use the brayer to get it nice and flat. (Use painter's tape around the edges if your mat isn't sticky enough.)
4. Open Cricut Design Space and draw a shape that will fit on your fabric shape. Go to the “Operation” menu and change it from Cut to Draw (Pen). You don't have to specify what kind of pen you are using.
5. Click “Make It,” then “Continue.” Choose the material (Fabric / Cotton).
6. Load the mat.
7. When it begins to flash, press the Go button on the Cricut. Carefully watch what happens.
If the pen is too high, it won’t draw anything on the fabric. Press the pause button on the Cricut. Take the pen and adapter out and slide the pen down a little bit. (You can either change the position of the pen inside the adapter, move the adapter down lower in the Cricut tool housing, or both). Press the Go button to continue.
If the pen is way too low, it will drag your fabric around instead of writing on the surface. If it’s a little too low, it will create “skipped” areas in the drawing, instead of smooth, complete lines. If you see either of these things happening, press the pause button on the Cricut. Raise the pen up a little bit. Press the Go button to continue.
8. Repeat the steps above until you get it just right.
9. Use a permanent marker to make a line on the adapter where it sits in the Cricut tool housing AND make a line on the marker/pen at the top of the adapter. That way, next time you use this combination of tools, you will just have to align your marks and it will be positioned correctly. You shouldn't have to recalibrate.
Sizing the design
I usually want the image the same size as it is in the PDF. Meaning, if I printed the PDF and the design is 6 inches square, I want my Cricut to draw it that same size. Conveniently, if you follow these steps, the design will be drawn on the fabric at the same size as the PDF.
If you want to stitch the project at a different size, I recommend changing the scale at the very end, in Cricut Design Space. Don’t change the size in Photoshop or Illustrator.
Caution: There's a size limit to this method. I use a 12x12-inch mat, so I can only draw on a 12x12-inch piece of fabric. So this method works great for designs that are about 8 inches or less. If you draw right up to the edges of your fabric, you won't have enough border around the edges to put it into a hoop. I haven't tried a larger mat or folding edges under . . . but feel free to experiment!
Crop and Convert the Image
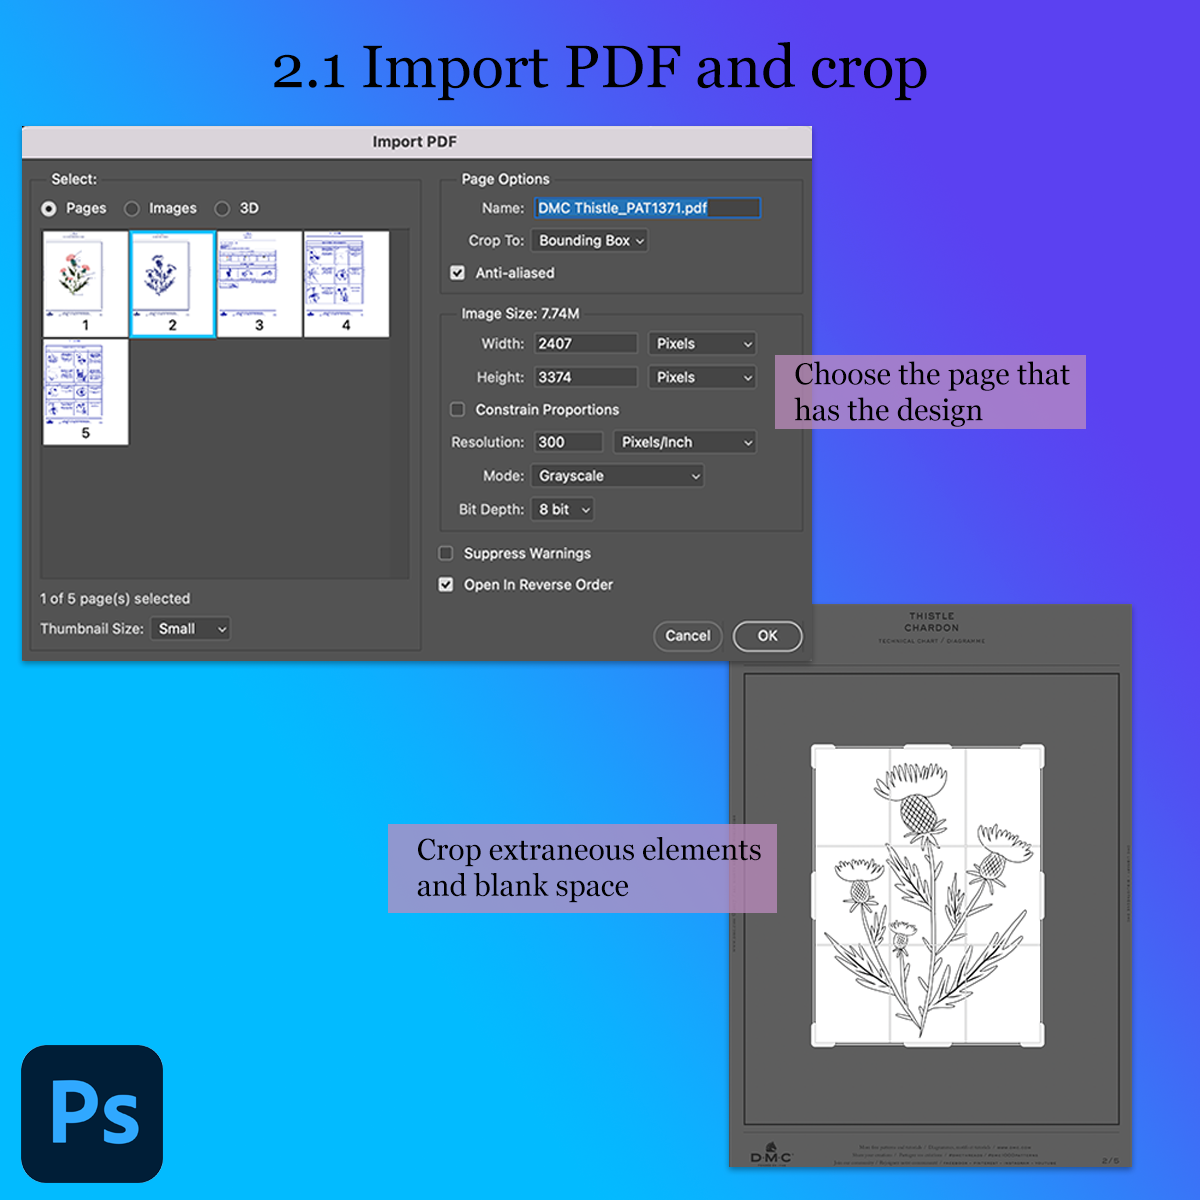
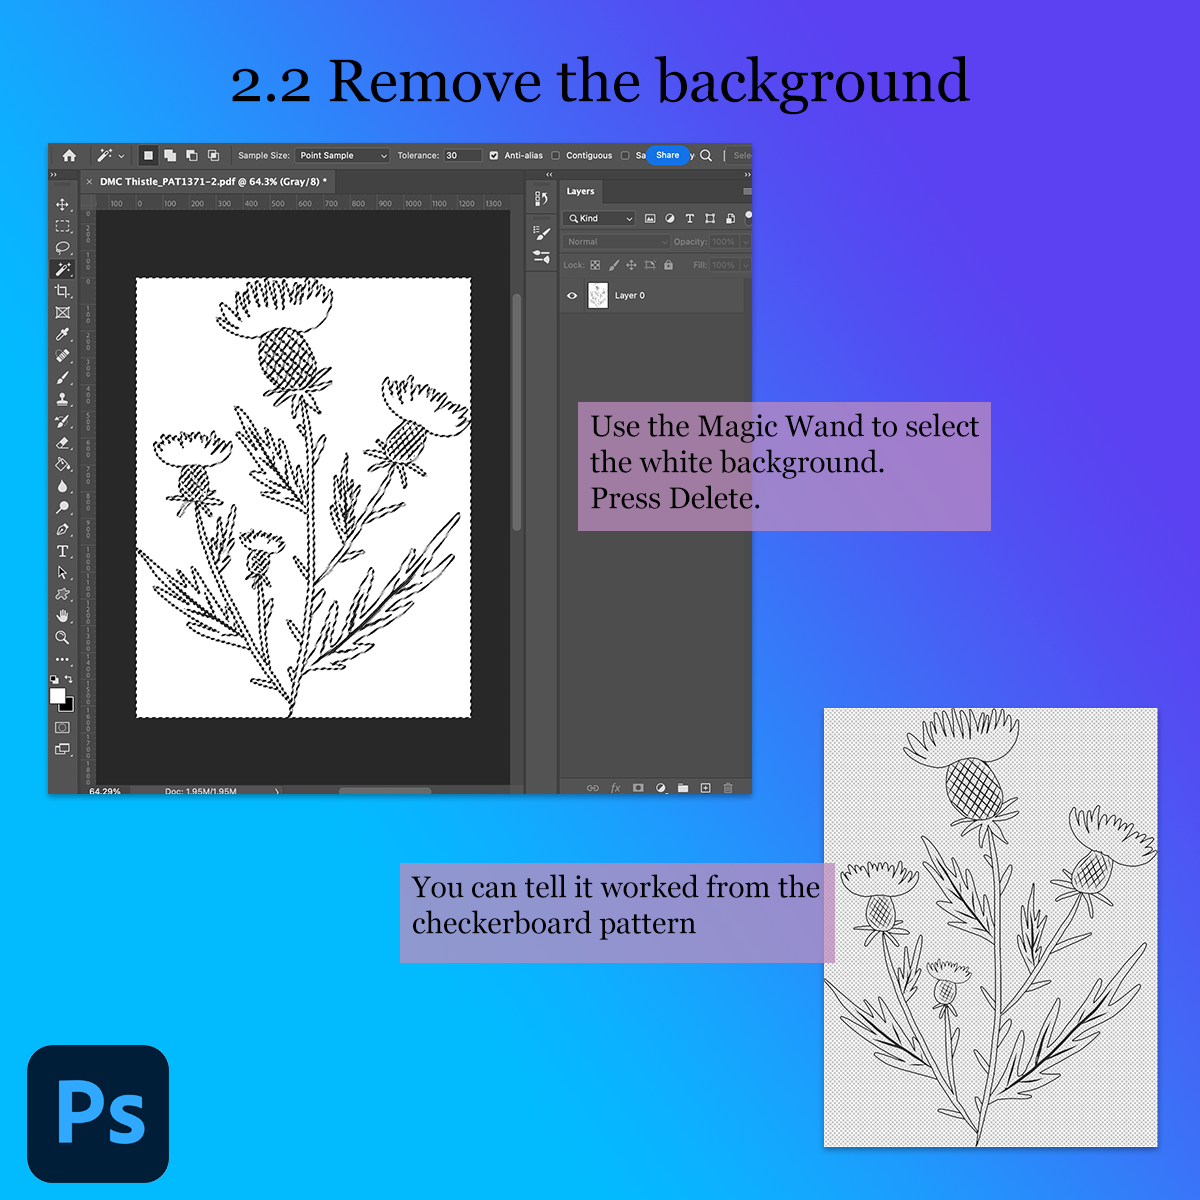
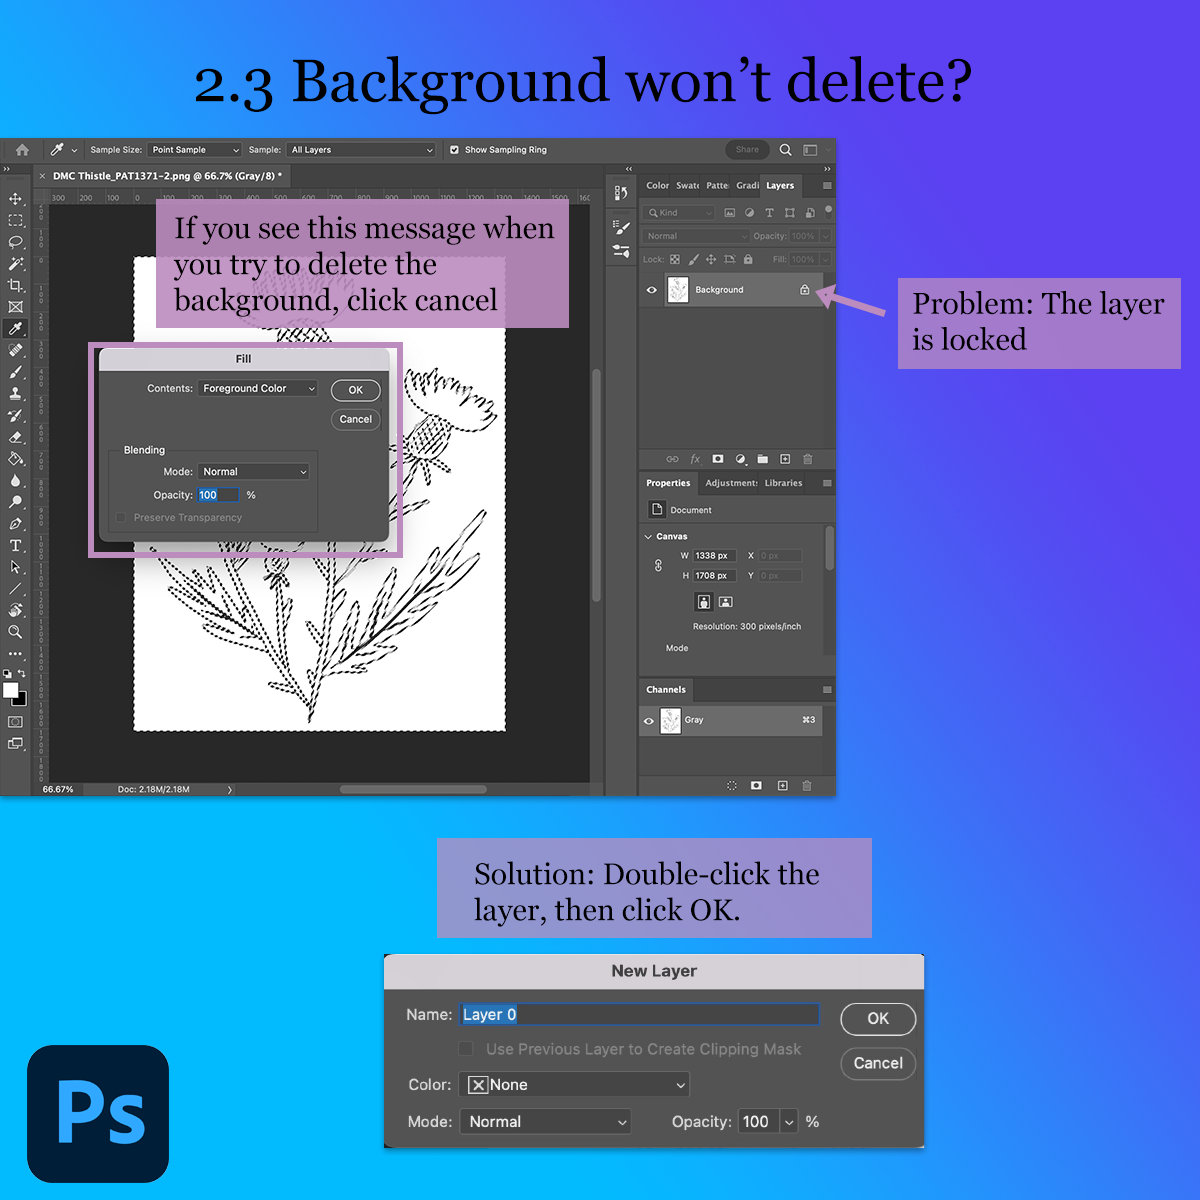
I do everything in step 2 in Photoshop, but these are pretty standard tasks that can be done in other image editing software (including free programs).
Works with Adobe Photoshop 2023 (24.0.1)
Open the file
Launch Photoshop.
Go to the File menu, choose Open, and navigate to the PDF you just downloaded.
It will ask you which page you want to import. Choose the page with the line drawing pattern (in this example, it’s page 2).
Leave all of the other settings (Page Options, Image Size) on the defaults, and click OK.
Crop the page to only include the image you need
This example has a rectangle, some text, and a bunch of blank space around the design. We want to get rid of all extraneous elements and blank space so that we’re left with only the design to be drawn.
Click the Crop tool (or hit “c” on the keyboard).
Drag the corners in towards your image to remove extraneous elements/blank space.
Click Enter on the keyboard.
Hot Photoshop tip! To get the tightest crop possible, go to the Image menu and select Trim. Click on “Top Left Pixel Color” and click OK. That will remove any additional space around your image. All four sides will be cropped right up against the edge of the image.
Remove the background
Click the Magic Wand tool (or hit “w” on the keyboard). In the toolbar/tool properties, make sure “Contiguous” is not checked.
Click on any part of the image that is white. This will select all the white pixels. The lines/edges will look like “marching ants” while it's selected.
Hit the Delete key on the keyboard, and the white background will be removed. The background will look like a gray and white checkerboard (this means that it’s empty).
Note: If you hit Delete and a “Fill” message appears, it means the layer is locked. Press Cancel. Go to the Window menu and choose Layers. Double-click the layer (it will have a lock next to it). A "New Layer" message will appear. Click OK. Now the lock is gone. Try again: use the magic wand to select the white background and hit Delete.
To unselect the background (get rid of the marching ants), go to the Select menu and click Deselect (or hit Command-D).
Export as PNG
You can either use export or save a copy. The end result is the same.
From the File menu, go to Export, and click "Quick Export as PNG." Type a name for your file and save it wherever you want (remember where you saved it).
From the File menu, choose Save a Copy. Give it a name and click “On your computer.” Save it wherever you want (remember where you saved it).
That's it for Photoshop
Close the PDF. Do not save changes. Exit Photoshop.
Magical Image Trace
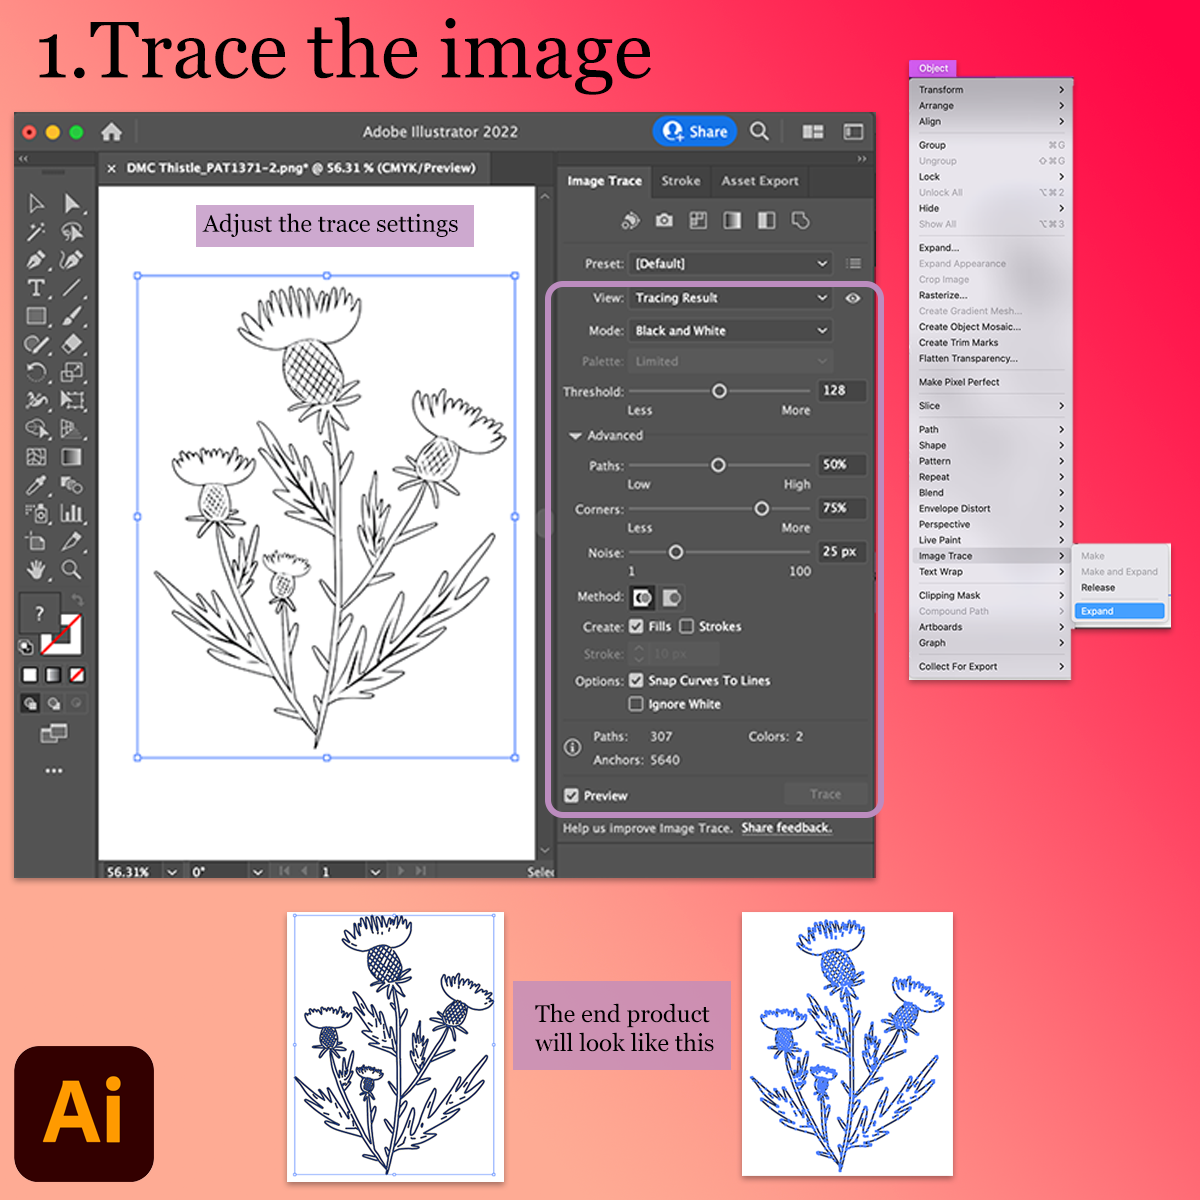
Illustrator is where the magic happens. In this step, you’re turning the drawing into lines that Cricut Design Space can draw properly (not outline). Adobe offers Illustrator for $21/month or $240/year. I'm not aware of a free utility that can do the same thing Illustrator does in this process.
Works with Adobe Illustrator 2022 (26.5.2)
Reality check: If you don't want to pay for Illustrator, at this point you can import your PNG file directly into Cricut Design Space. It works, but it just isn't ideal. Depending on your design, it might not be an issue, or it might be a disaster.
Open the file
Launch Illustrator. Go to the File menu, choose Open, and navigate to the PNG you just saved. Click OK.
If the image is not selected, click on it. (You should see a blue box around the image, with handles in each corner and on each side.)
Image Trace
Go to the Window menu, and choose Image Trace. In the Image Trace window:
Make sure View is set to Tracing Result.
Make sure Mode is set to Black and White.
Click the arrow next to Advanced to show the additional options.
Next to Create, un-check Fills. Check Strokes.
Check Preview.
Wait a minute and see what happens. If it looks right, go to the next step (export SVG). If it doesn’t look right (if the screen goes blank and/or most of the image disappears), try the options listed below. After you try each thing, wait for the preview to update. When it looks right, stop fiddling and go to the next step. Some designs never look right, and I haven’t found a way to solve that. Luckily it only happens a small percentage of the time, usually when a design has a mixture of very thick and very fine lines.
- Change Stroke to 1 px
- Change Stroke to 90 px
- Change Threshold to 10
- Change Threshold to 200
- Check Ignore White and un-check Snap Curves to Lines
Under the Object menu, go to Image Trace, and choose Expand.
The design might look funky because now all the paths are selected. That’s ok. Leave them selected.
Export Asset as SVG
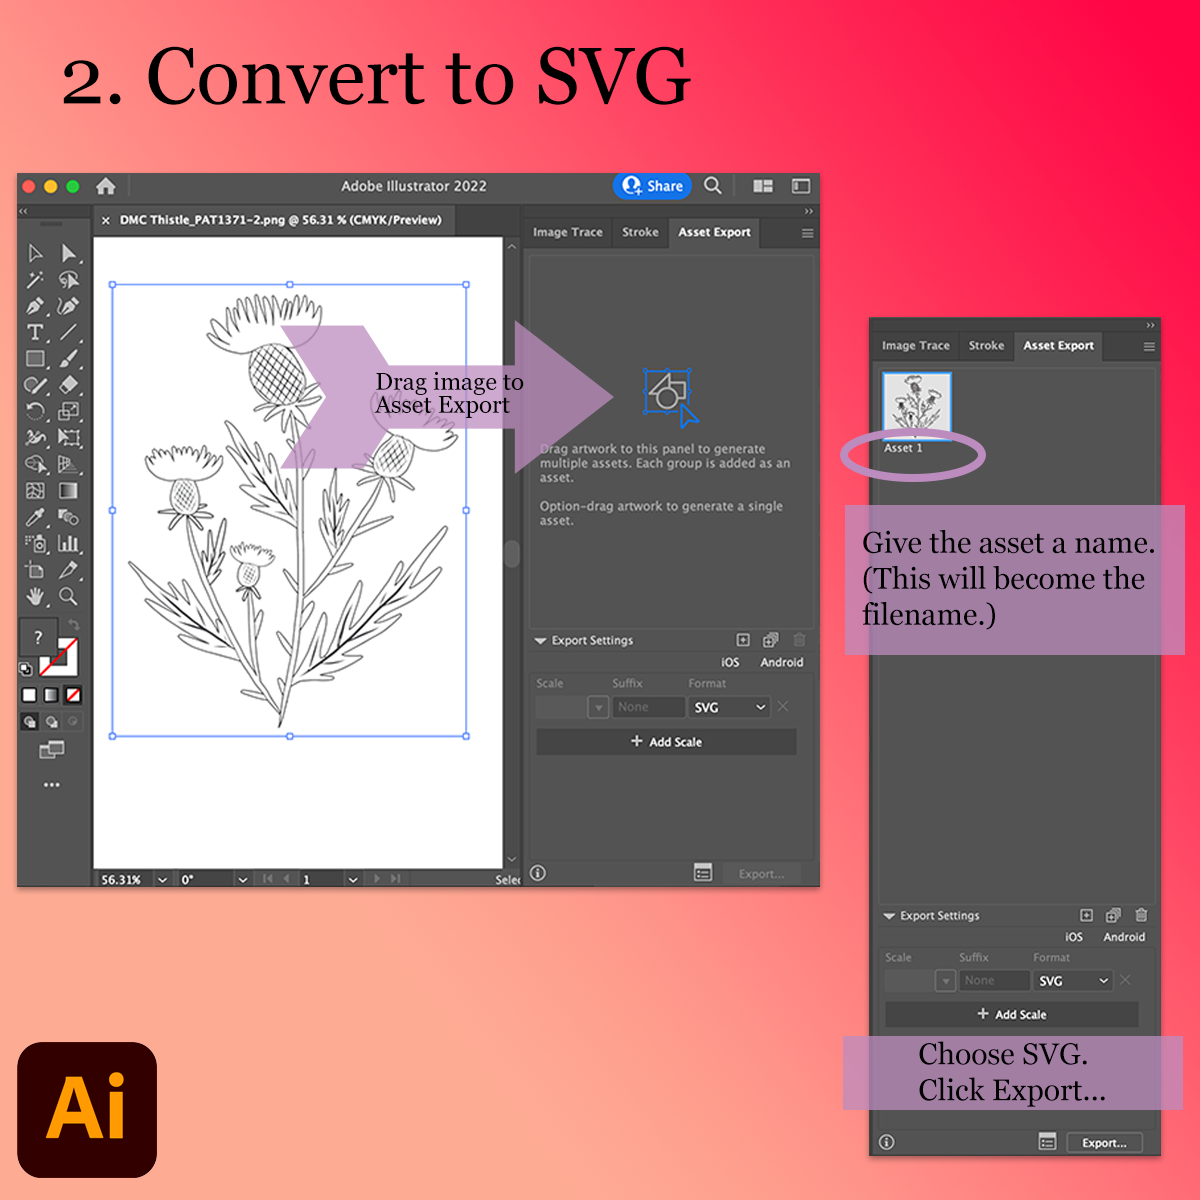
Go to the Window menu and choose Asset Export. In the Asset Export window:
Click on the image and drag it to the top part of the Asset Export window. It will appear as a thumbnail in the top left corner of the Asset Export window, labeled Asset 1.
To change the name of the file, double click “Asset 1” and type a name.
Click the arrow next to Export Settings to show additional options.
Under Format, choose SVG.
Click Export…. If that button is greyed out, click once on the thumbnail (asset) to select it.
A file navigator window will open. Click “Choose.”
Illustrator will create a new folder called SVG and will save your file in that folder.
That's it for Illustrator
Close the PNG file. Do not save changes. Exit Illustrator.
Draw the Image in Cricut Design Space
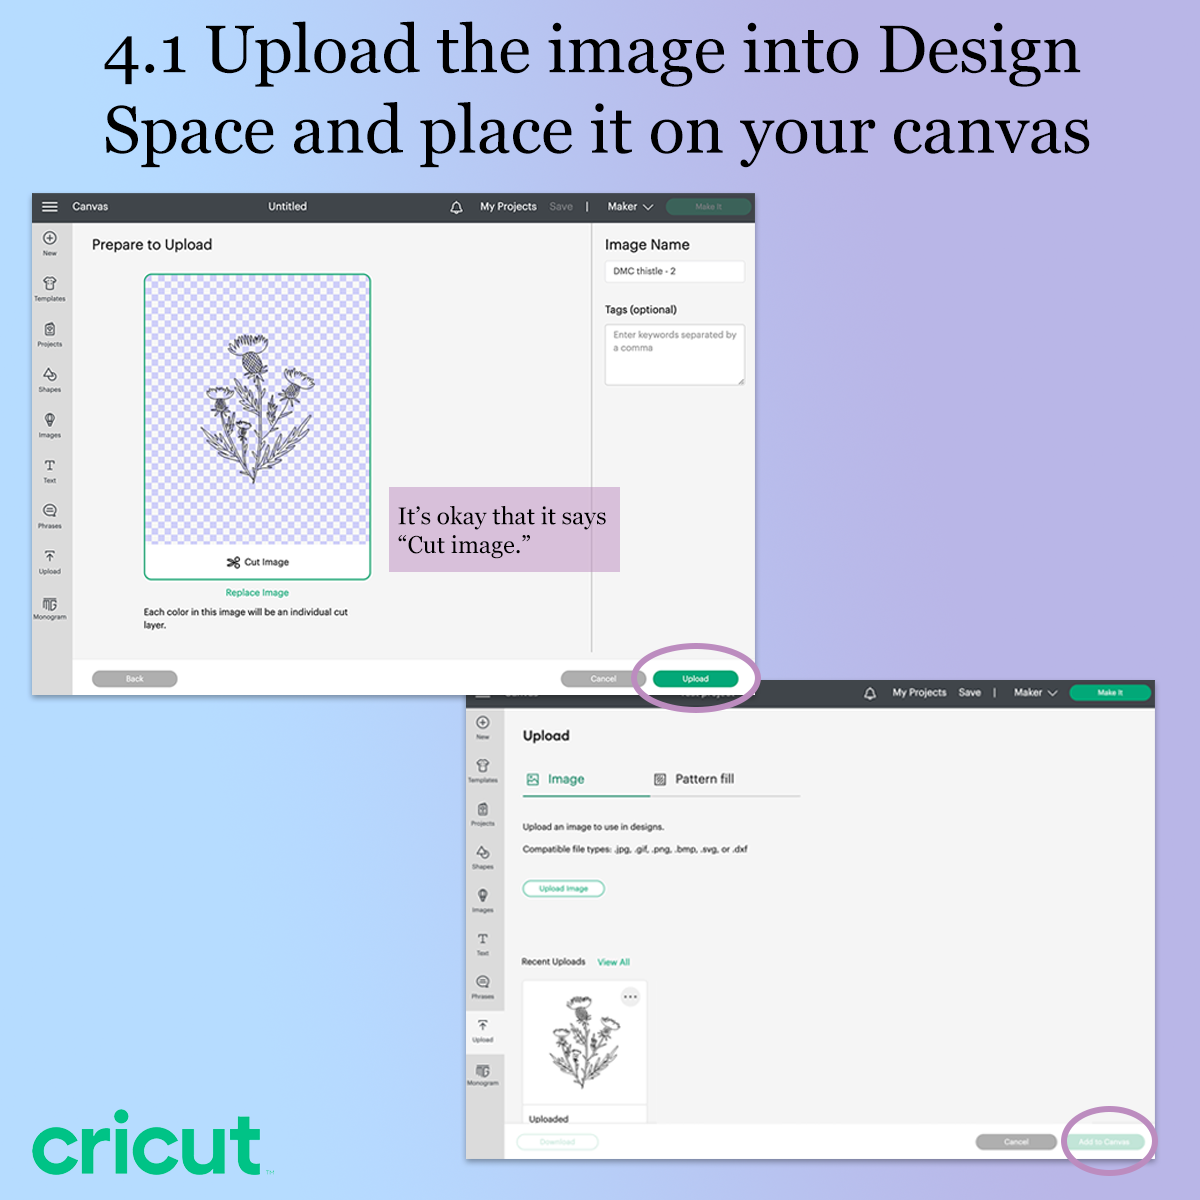
Updated 1/3/23 for Cricut Design Space 7.23.160 (Mac)
Upload the image and set it to draw
Open Cricut Design Space.
Click on New Project.
On the left side, choose Upload. Click the button labeled Upload Image.
Click Browse and navigate to the SVG you just saved. Click Open. Click Upload.
Click the thumbnail of the file you just uploaded, and click “Add to Canvas.”
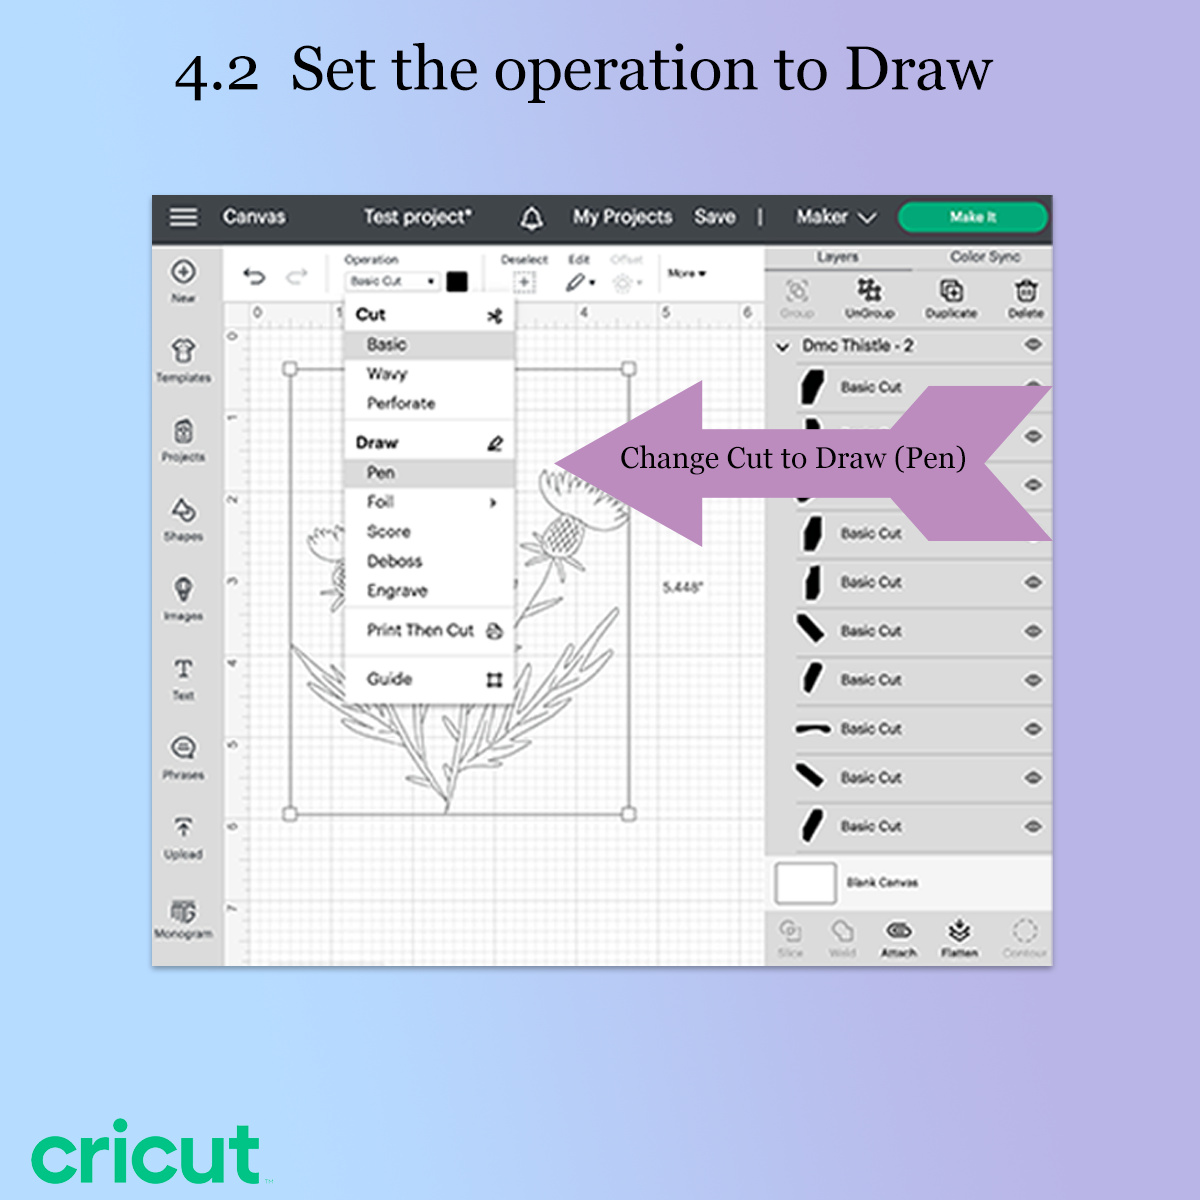
You’ll see the image on your canvas, but it will be configured to cut rather than draw. With the whole image selected, go to the Operation menu and change it from Basic Cut to Draw (Pen).
Group the parts of the image together
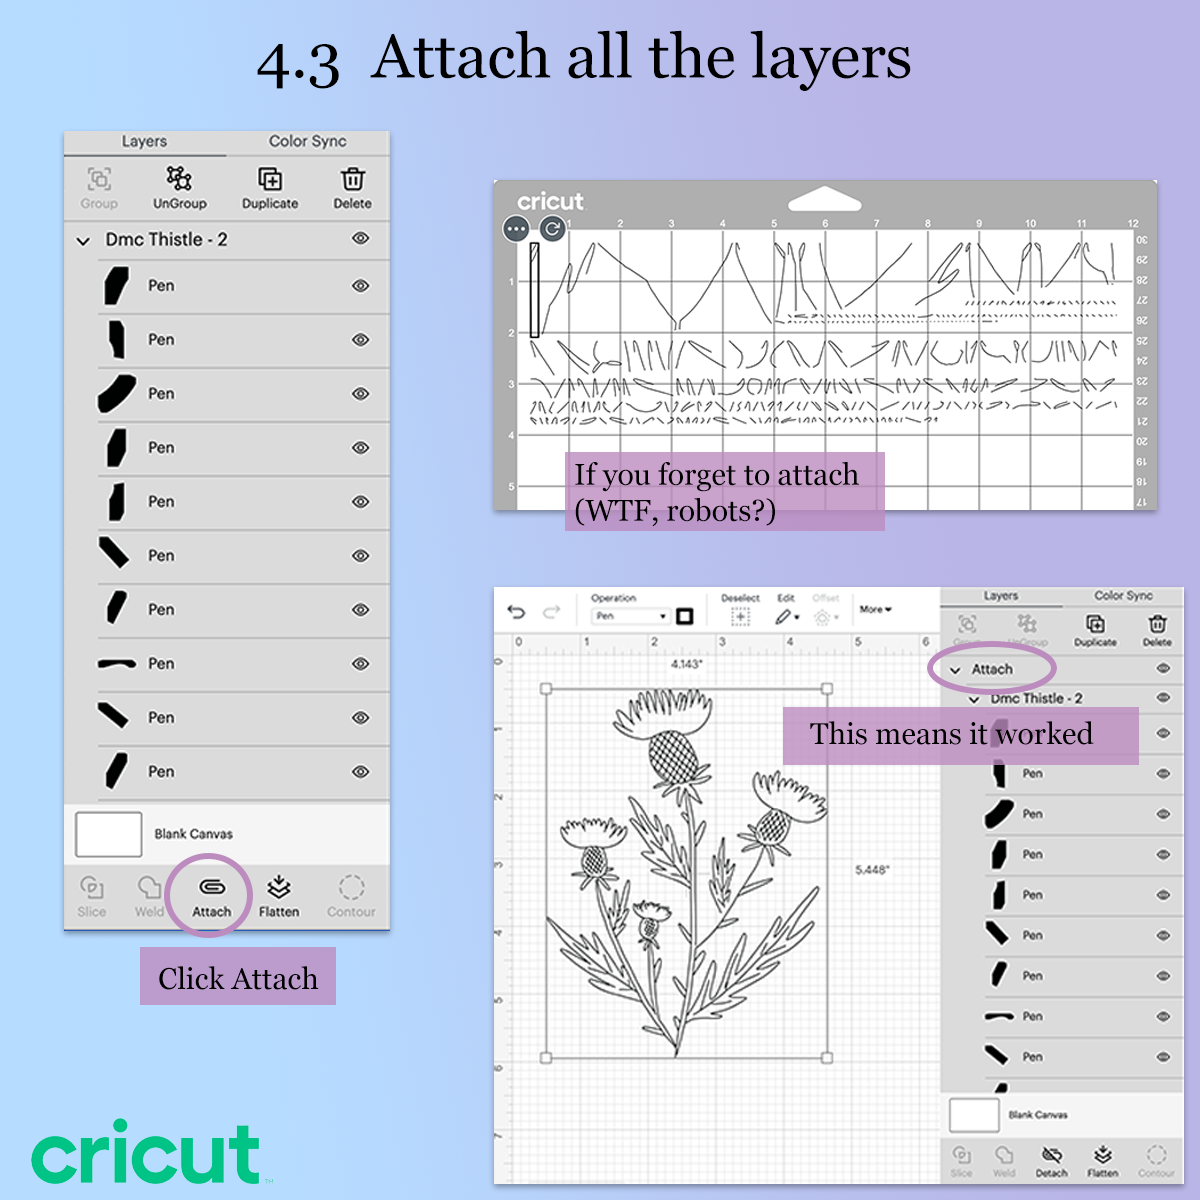
If you've used your Cricut at all, you're probably familiar with this scenario. You go to cut or draw, and see a weird arrangement of all the pieces. Cricut is planning to draw all the parts of your design, but it doesn't know you want those parts in any particular arrangement. (Robots, am I right?) Here's the remedy.
Very important step: In the Layers menu, click the layer with your drawing (e.g., Dmc Thistle - 2). This will select every part/layer that makes up the image. At the bottom of the Layers window, click Attach.
You'll see a new heading in the Layers window called "Attach."
Resize the drawing (if you want)
This is where you should resize the drawing, if you want it to be larger or smaller than the PDF. If you leave it as is, it will draw the same size as the printed PDF.
To resize, click once on the drawing to select it, and drag the handle in the bottom-right corner to make it larger or smaller. (Or type the desired measurements in the toolbar.)
Position the drawing in the center of the fabric
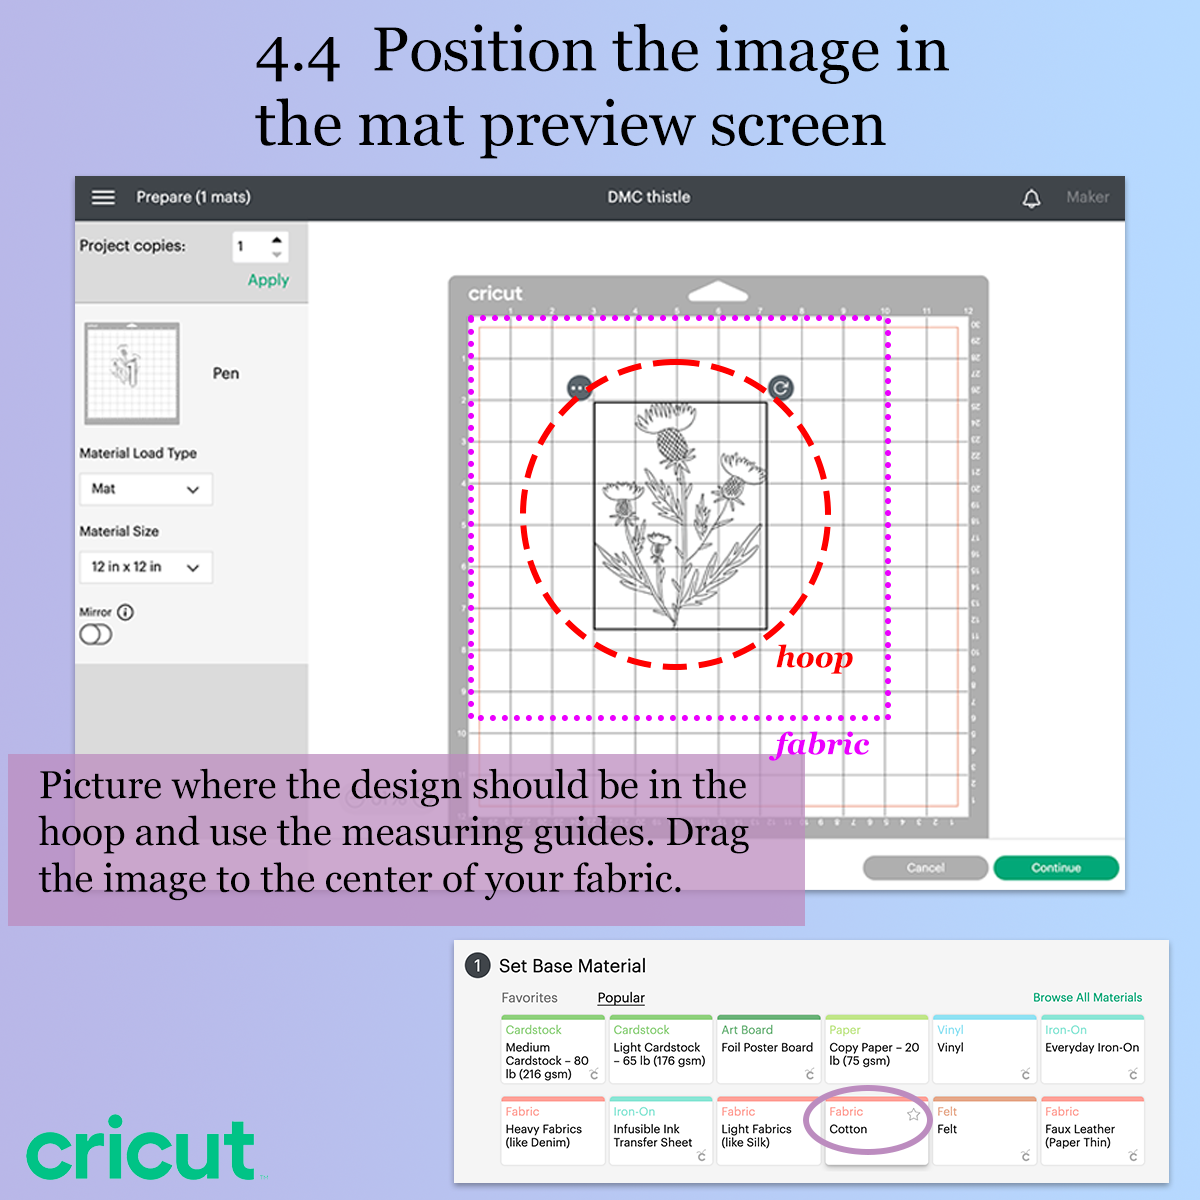
If you're planning to put the design in a hoop and stitch it, you don't want it drawn in the top left corner. You will want it to be centered on your fabric square.
Cut your fabric to the size you need (this will depend on the size of your design and the size of your hoop). Place it on a FabricGrip mat, aligned to the top left corner. Use the brayer to get it nice and flat. (Use painter's tape around the edges if your mat isn't sticky enough.)
Click “Make It.” You should see a preview of one mat, with your design positioned in the top left corner. In the preview screen, drag your design to the correct position on the mat. It's pretty easy to use the inch markings on the mat and the preview to figure out the right spot.
Note: Be sure you reposition your image when you're in the preview screen. If you reposition it on the canvas, and then click "Make It," the Cricut will move your image back to the top left. (If you prefer to lock the position on the canvas, you can create a tiny shape in the top left corner and anchor it to your drawing. There are dozens of tutorials on YouTube for doing this.)
Go time!
Click Continue.
Choose the material (Fabric / Cotton).
Load the mat. When it begins to flash, press the Go button on the Cricut.
That's it for Design Space
Unload the mat. Press Done. Save your project if you wish.
Remove the fabric from the mat.
Don’t forget to remove your marker/pen from the Cricut and place the cap on it, so it doesn’t dry out!
Now you can put the fabric in your hoop and start stitching!
Alternative Method
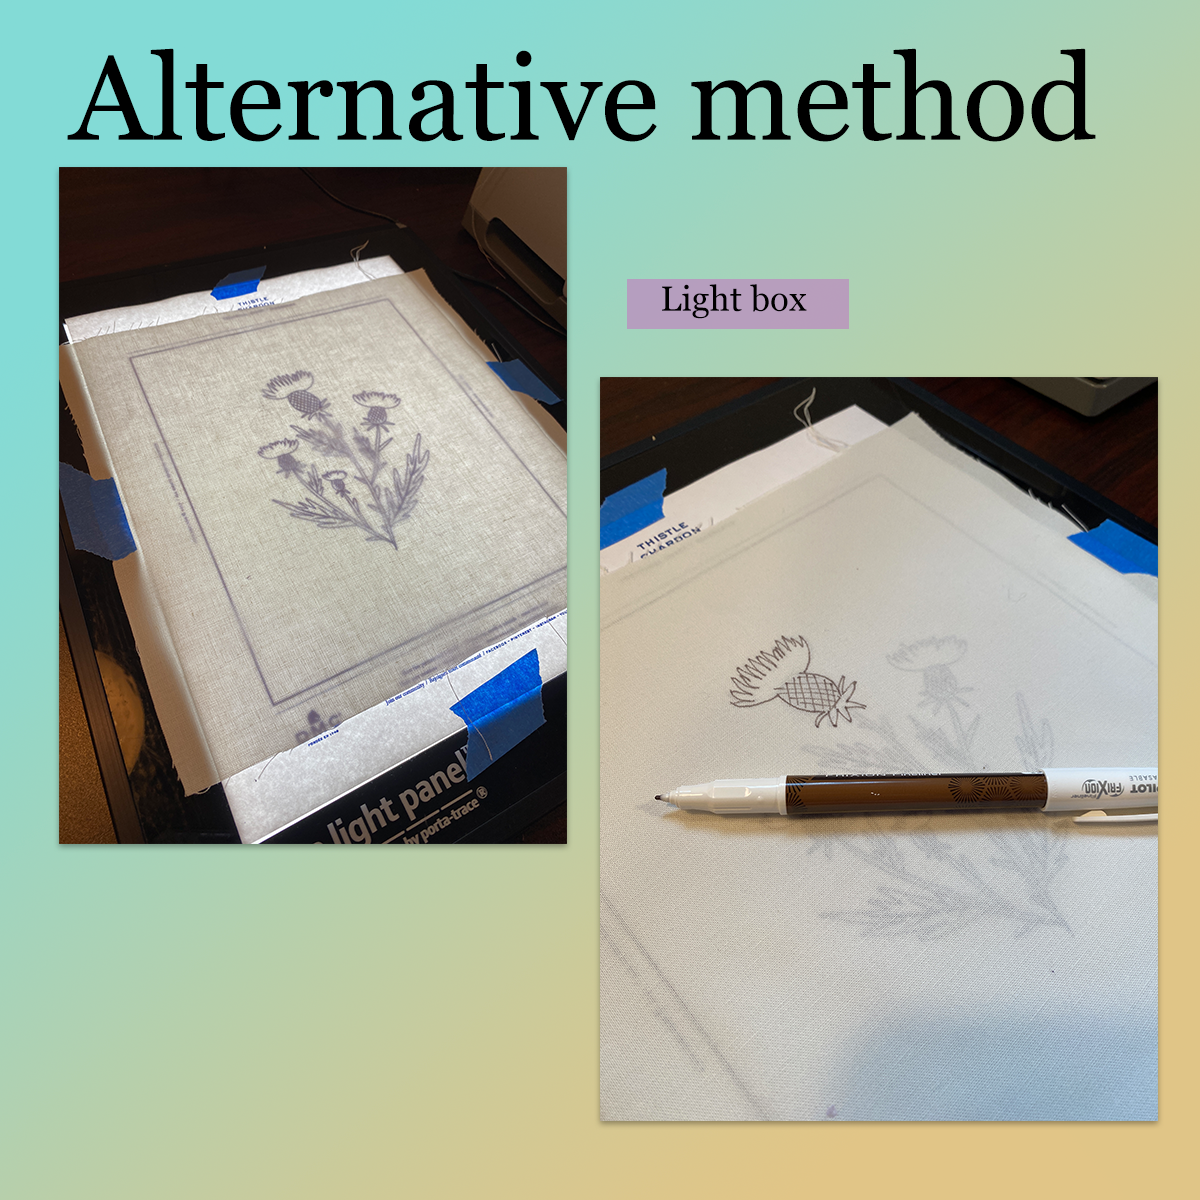
For very simple designs, uncooperative fabric, larger sizes, and when I can’t get this method to work, I use a lightbox and trace onto my fabric with a heat-erasable marker or pen. I do this before I put the fabric in the hoop. To keep It from shifting around, I tape the paper design and fabric to the light box using blue painters’ tape.
It takes a long time but I find it almost as relaxing as stitching, so I don’t mind.