Untethered Jailbreak Instructable for IPhone/iPod
by jallen810 in Circuits > Apple
4526 Views, 8 Favorites, 0 Comments
Untethered Jailbreak Instructable for IPhone/iPod
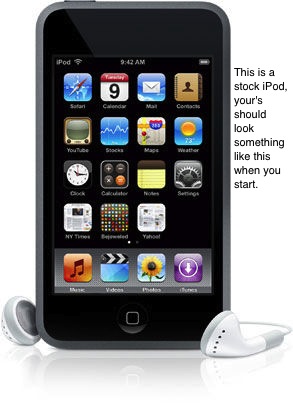
The purpose of this Instructable is to explain to Apple iDevice enthusiasts the process of jailbreaking an iPod Touch 3rd Generation. It is good to keep in mind that different generations of iPods require a different jailbreak process than covered below. Essentially, if you are not jailbreaking a 3rd generation iPod touch this will not work exactly for you. Another note to keep in mind, I am presenting this jailbreak with a MacBook Pro running Mountain Lion. Windows users may choose to look elsewhere if you are unfamiliar with Mac operating systems.
I will be operating under the assumption that users of this Instructable are comfortable with iTunes, iPhone/iPod and the syncing and transfer of data to and from an iPhone/iPod to a computer.
Jailbreaking is a fun hobby for those that are familiar with these products. However, it can be a headache when something does not work properly the first time. Please do not get discouraged if this does not work properly the first time you try it. I would like to mention if you have a "main" iPod or iPhone that you use on a regular basis and do not want to lose any information on that device, please try this on another device so that you do not lose your information. Once you are comfortable with the jailbreaking methods out there, then perhaps you may do this to your main device.
NOTE: This may/will erase all of the data on your iDevice. Make sure all of your music; apps, photos, etc are on your computer before beginning. You will/may need to add them back to your device after jailbreaking.
Gathering the Needed Materials
You will need to gather the following items to successfully jailbreak your iPhone/iPod
• Your computer (make note whether you have a Mac or Windows computer)
• Your iPhone/iPod running any operating system previous to iOS 6
• An iPhone/iPod cable
• The latest version of iTunes installed on your computer
• Jailbreak Software (details on where & what explained in later step)
• Your computer (make note whether you have a Mac or Windows computer)
• Your iPhone/iPod running any operating system previous to iOS 6
• An iPhone/iPod cable
• The latest version of iTunes installed on your computer
• Jailbreak Software (details on where & what explained in later step)
Back Up Your IDevice & DO NOT Upgrade Your IDevice's OS!!
Open & boot your computer. Open iTunes. Plug your iPhone cable into your computer and your iDevice. Next, locate your iDevice on the left-hand column under the “Devices” section in iTunes. Once, you have located your iDevice, right-click on it and select the “backup” option in the drop down menu Your device should then begin backing up your device to your computer. To verify this look at the top status box in iTunes (this is where the current music would normally show up). Pictures above will show the “Devices” & “Current Music Window in iTunes”
Download Jailbreak Software
In this step you are going to download the appropriate software to jailbreak your iDevice. The information you need to know before downloading is:
• What generation iPhone/iPod you are trying to jailbreak (iPod 3G, iPhone 3G,3GS,4)
• What version operating system you have on said iDevice (I.e. iOS 4.1, 5.1.1, etc.. this can be found by navigating to your iDevices “Settings” app then locating the “General” option in the settings app. Once you are in the “General” folder, look for the “About” option and navigate there. Now look for the “Version” and you will find your current version, this is what you need to know).
• What operating system your computer is currently running, if you do not know this you should probably not be jailbreaking your iDevice.
• (Only if you are running a Version before iOS 5) Download the operating system for the current generation of iPhone/iPod. Found here: http://www.redmondpie.com/unlock-4.3.1-iphone-4-04.10.01-baseband-with-gevey-sim/
Once, you have located this information you are ready to download your jailbreak software. Do a simple Google search for “untethered jailbreak Ipod/iphone insert your generation insert your version” and you will find the appropriate software. For this example I will be using the PwnageTool for iOS 4.1 on a Mac for an iPod touch located here: http://repairmyiphonenyc.com/vl/PwnageTool_4.3.dmg
Click and save the file to your “Desktop” folder.
Opening PwnageTool
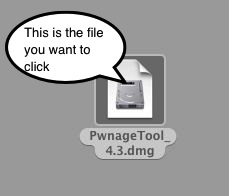
Find & Run the PwnageTool application you just downloaded, it should look like the screen shot above
Locating Your IDevice for Jailbreak
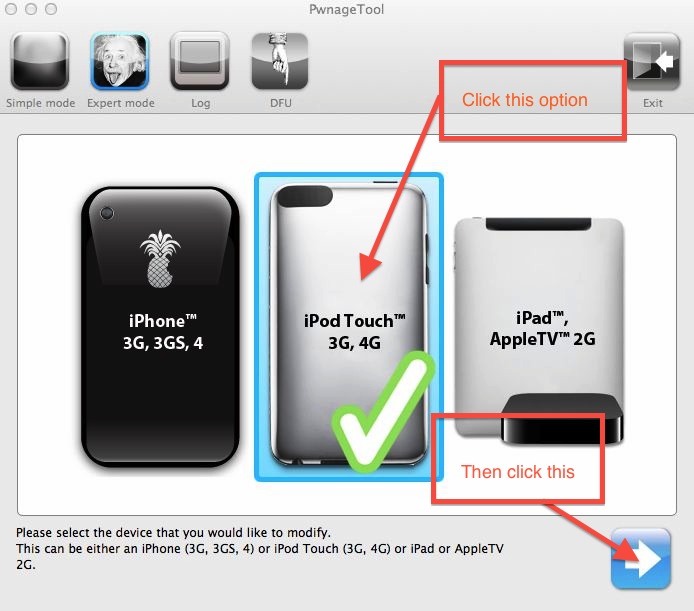
When prompted, select “Expert Mode”. Choose your device when it shows up
Locating Your IPSW Software (the IOS Software You Downloaded)
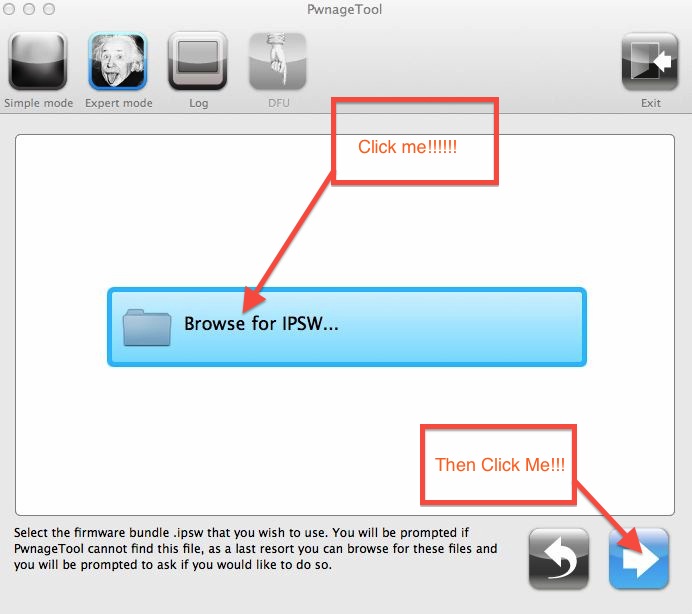
Click the blue next button, a screen will appear and ask you to brows for your iOS firmware. Browse to your “Desktop” and locate your IPSW then select it. Above are screen shots of the PwnageTool button and a picture of the file in your Finder.
Downloads
Building the Jailbreak
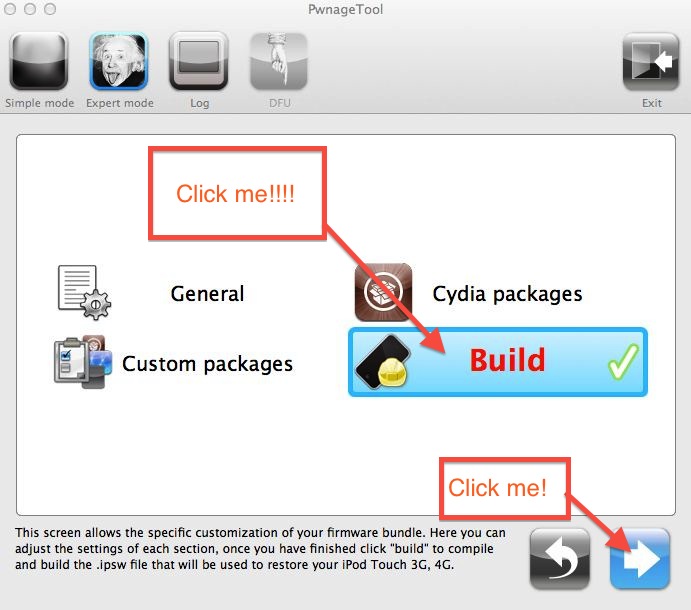
The next screen you will see is one that will have 4 options. Click the “Build” option and hit next.
Wait for PwnageTool to Work Its Magic
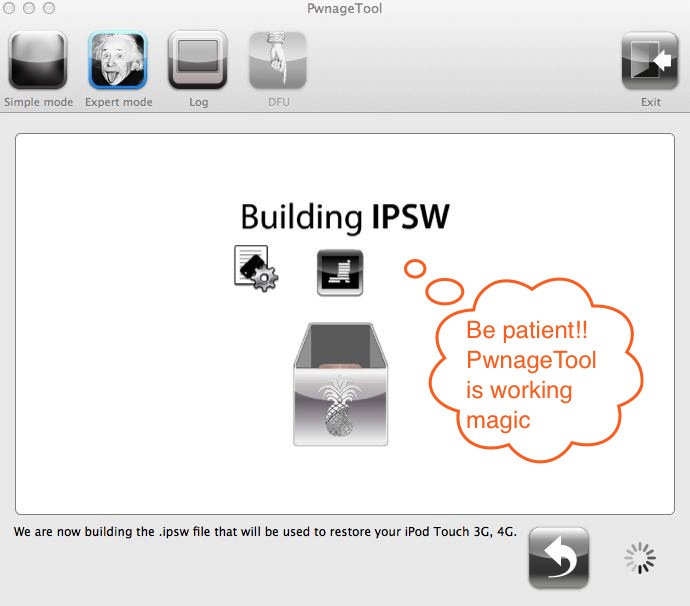
PwnageTool is now creating the jailbreak for your Version of iOS. Just wait for it. You should be looking at this screen (See above)
Enter DFU Mode Enable the Jailbreak
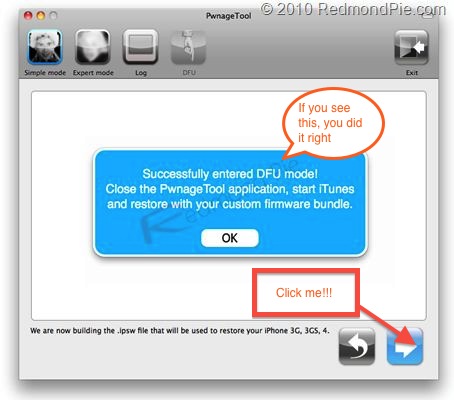
After the compiled iOS is done, you will hear PwnageTool beeping. It is prompting you to put your device in DFU mode. It will instruct you how to do this. However, the steps are written below.
1. Press and hold the “Power” & “Home” simultaneously for 10 seconds
2. Now release the “Power” button but do not release to the “Home” button and wait 10 more seconds.
If you completed this correctly, you will see the screen shot above. If you fail, a prompt box will pop up and allow you to retry the DFU.
Restoring Your Custom Firmware to IDevice

You finally are ready to install the custom firmware to you iDevice. Open iTunes and click on the connected iDevice you want to jailbreak. Now press and hold the “Alt” key and then click on the “Restore” button seen in the picture below. You will be prompted to find the .IPSW file to install. Navigate back to the IPSW file you saved earlier and select that file.
Wait for Restore & Enjoy the Glossary of Terms!!!
Run the Cydia app on your device and load your personal data back to your iDevice and you are now ready to begin using your jailbroken iDevice
NOTE: if you ever want to unjailbreak your iDevice. Simply select the Backup you complete in Step 2 and you will be back to a stock Apple iDevice.
Thanks for reading! And thanks to RemondPie for the use of their links
Below is a glossary of jargon terms you may want to know:
GLOSSARY:
-IPSW: Is an Apple Software Update file. For example, iOS-4.3.2.IPSW
-Firmware: Is the hardware of the iDevice you are using.
-Software: Is the programming used to make your iDevice work as neat and pretty as you expect it to.
-Jailbreak: It is a method used to “unlock” more features of the iDevice that Apple does not include in the standard operating system.
-Cydia: The jailbreak, app store
-DFU Mode: Allows the user to access the iDevice’s firmware to install new firmware.