'Twister' Blast Gate

DUST!
It gets everywhere. In my home workshop (the garage) I run a bandsaw, crosscut saw, pillar drill, router and the general power tools- like the sander. Although I have a dust vacuum the filter gets clogged fast and I need to keep moving the extraction tube to different tools.
So to remedy this I looked to improve the set up and hopefully improve the air quality!
This 'Instructable' is about the blast gate system and pipework only - not the collector modifications.
Stuff You May Need...
- Dremel (or equivalent) - this is still one of my most used tools, very versatile. Sanding bit required to shape the tube
- Drill
- Hole cutter
- Saw - for pipe cutting
- Epoxy glue
Standard drain pipe - 68mm diameter. If pre-used then wash it all to give better sealing between parts.
40mm plastic plumbing pipe (or similar)
Flexi pipe (like your home vacuum tube) - this fits into your 40mm tube
Pipe Choice


Most woodwork machinery has dust extraction ports that are 100mm dia. which probably works really well connected up to a decent (and expensive) dust extractor vacuum. But the majority of us tinker away with our basic setups and slowly improve our equipment.
Research showed me that 100mm tube is available as ground pipework and the connectors weren't too expensive. Flexible tube, if semi rigid, was OK but the construction creates drag. Cheap plastic flexi duct work tube is a definite 'no' as it wouldn't last. There's also various warnings about static electricity build up and fires - there's plenty on the internet about this so, if concerned, research it more.
As my extractor is a basic metal can, paper filter, fan and motor with a 100mm inlet I did look at how to stay with the 100mm but I decided to use drain pipe size - 68mm - as it won't take up so much space and I already had various pipes, connectors and wall brackets I could use. Also as I don't have a planer/thicknesser which can give out a lot of shavings, I'm not worried it will block easily.
'Twister' Blast Gate

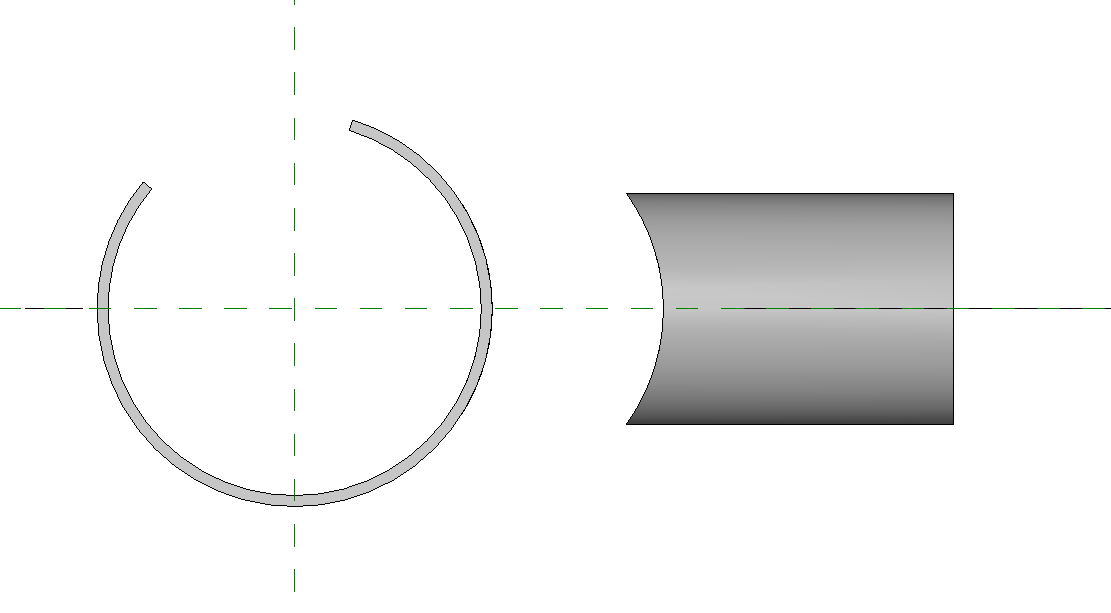

Basically you have a long tube (68mm) connected to your vacuum. Off this you need tube 'ports' (40mm) leading off to your different tools. But they need closing off when not in use - therefore you need a blast gate.
The concept is basically using a section of the 68mm tube with a length ways cut in it and a hole, then fixing a smaller tube to it at a 90 deg.angle. The spring in this section allows you to slip it over a longer section of 68mm tube. The longer section also has a hole in it, therefor when you have the 'gate' hole aligned with this it allows air flow. Twist the 'gate' around and it then seals the hole. Due to the suction, seals aren't really needed.
Small Tube Profile


The small tube (approx. 80mm long) needs to intersect the larger section, therefor a profile needs to be cut into one end. There are various methods and CAD software to do this so look it up on the net. I drew it up in AutoCad and printed out on A4 paper. This template I then cut out and wrapped it around the tube (in this case the outer dia.42mm). I used a band saw to cut the basic profile and finished it using a Dremel with a sanding bit. It just means you can get a really close fit when you come to glue it to the larger tube.
Downloads
Large 'gate' Tube


Cut approx. a 150mm length of 68mm tube. Try and cut it as square as possible. Clamp this so you can cut a hole in the side. As the smaller tube is 42mm dia. and is 2mm thick I was looking to cut a 38mm dia. hole. I tried a few methods:
- Using a hole saw and cutting a 38mm hole. Not the cleanest so I inserted a block of wood inside the tube to stabilise the hole saw.
- A flat bit - 38mm. Not a good cut at all.
- A hole saw to cut a 32mm hole. This hole can then be expanded to suit once glued to the small tube. This is what I went with in the end.
Once the hole is cut place a length ways cut about 30mm away from the hole edge. Now if this tube is to slide over your main pipe then just the one cut. If you are planning to 'snap' fit these over your main pipe you'll need a wider section taken out or you'll break the tube trying to stretch it over. I still cut a 20mm piece out even though I planned to slide fit them.
Glue Up


Secure a piece of spare 68mm tube. Slide the gate tube onto this. It will self grip. Find an elastic band and place this over the tube - this will be your 'clamp'. Place the small tube on top so it covers your 32mm hole and find the best position. Mark it with a pen so when you remove it you know exactly where it goes. Mix up some epoxy 2 part glue (or whatever method your using) and place it on your profiled edge and then place it back on your gate tube where marked. Pull the elastic band over the small tube so it applies pressure down to hold the 2 pieces together and leave to cure.
Once dry, to maximise the suction hole I used the Dremel again to just enlarge the hole. It meant I could clean up any glue and smooth the inside edges.
As an after thought I cut a small piece of acrylic plastic and secured it to the side as a 'fin'. This adds a little more stability and can be used as your turning handle.
Main Extractor Pipe


I only require a short set up (approx. 2m) so I cut a length to suit and laid out what angled pieces I required to get it back near my extractor. Although you could use silicone sealant around the joins I'm not sure if my layout is finalised so for now I have used 30mm wide sections of motorbike inner tube and 1.5mm neoprene to help seal gaps with no glue.
My main pipe ends with a connector piece which takes the diameter to 100mm to allow me to connect my (occasionally used) table saw up. This has got a plywood plug in it for now but could also be adapted to some other size.
I used wall brackets to secure the pipe to the wall and it gives a nice firm fix.
'Port' Holes


Holes now need to be cut into your main pipe so once you've decided the best placement and marked the pipe accordingly cut them out. In my case they needed to be spaced about 500mm apart facing out - not up. I used a 38mm hole saw - it doesn't matter if the hole is a little too big as the 'gate' section will cover it. Be careful doing this as the hole saw can 'grab' the tube a little and twist so be prepared for this!
I removed the pipe off the wall and slid the blast gates on and secured it back onto the wall. Small pieces of 68mm pipe were cut to act as 'stops' and these were glued onto the main pipe once the blast gates were positioned correctly. I then used a marker to show the open and closed positions. Generally if the arrows line up I know its correct and its only a 90deg. twist.
This could be done in a differently in a nice fancy way (and neatly) but I had very little time to complete this so it is what it is!
Flexi tube was then used to go between each blast gate port and the machine port. Small strips of neoprene were used to improve the seal but again silicone sealant could be used.
Conclusion...

If I had an empty workshop... and could start from scratch... I would place this along the whole length of my wall about 1200mm off the floor. I would have my electric sockets placed just below so the two would be in the same area. It would be great to have a more 'mass' produced twister blast gate that could be snapped over your main pipe wherever you required it. All then that would be required is to cut the hole. If at a later date the hole is in the wrong position you could remove the blast gate and just snap on a blanking plate. So potentially there are very few parts to this system.
I would recommend that you make a hole guide - a section of 68mm tube, lengthways cut, with a block of wood - profiled - stuck onto it . This has the correct hole size predrilled. This could be placed where required on your main pipe and using a hole saw, cut a hole using the wood jig to keep it all aligned.
On the whole it works really well but how efficient it is I have no idea, but its an improvement on what I had before.
Thanks for viewing.