Tiny DIY Game Console Based on ATtiny85
by tech_nickk in Circuits > Gadgets
2624 Views, 57 Favorites, 0 Comments
Tiny DIY Game Console Based on ATtiny85

We've all been there. You're taking a well-deserved break from work or putting down that book you've been reading, and you reach for your phone thinking you'll just play a quick game to unwind. But before you know it, you're three hours deep into TikTok videos about cats who look like celebrities, or endlessly scrolling through Instagram reels that somehow went from cooking tips to conspiracy theories about why hot dogs come in packs of 10 but buns come in packs of 8.
The modern smartphone, while incredibly powerful, has become a double-edged sword. What should be a moment of relaxation turns into an endless cycle of notifications, social media rabbit holes, and that peculiar form of digital quicksand we call "doom scrolling." Sometimes, you just want to play Tetris without your phone buzzing with work emails, news alerts, or that friend who sends memes at 2 AM.
This is where the beauty of a dedicated gaming device shines through. Remember the pure joy of firing up your Game Boy or sneaking in a quick round of Snake on your old Nokia? There was something magical about those simple, focused gaming experiences, no notifications, no social media temptations, just you and the game.
That nostalgic longing for simpler gaming, combined with the desire to escape the digital chaos of modern life, inspired me to build something special: a tiny, pocket-sized game console that brings back the essence of classic gaming while being completely disconnected from the online world.
The Vision
I wanted to create a device that would:
- Fit comfortably in your pocket and can be attached to a keyholder.
- Run classic games like Tetris, Frogger, and Snake
- Have a satisfying retro gaming experience with physical buttons
- Be completely offline and distraction-free
- Showcase the power of minimalist electronics
- Serve as a perfect conversation starter and a testament to DIY creativity

key ring style
What We're Building
This project centers around the ATtiny85 microcontroller – a tiny but capable chip that proves you don't need massive processing power to create engaging gaming experiences. Our console features:
Core Components:
- ATtiny85 microcontroller (the brain of our operation)

- SSD1306 OLED display (crisp 128x64 pixel gaming canvas)

- Three tactile push buttons (for navigation and gameplay)

- Active buzzer (for those satisfying beeps and boops)
- Small battery pack (for portable gaming sessions)
- Custom 3D-printed case (designed in Autodesk Fusion 360)
Technical Specifications:
- Display: 0.96" OLED (128x64 resolution)
- Power: 3.7V Li-Po battery
- Dimensions: Approximately 45mm x 35mm x 20mm (pocket-friendly!)
- Games: Tetris, Snake, Frogger, and more classics
- Battery Life: 4-6 days of continuous gameplay
Why This Matters
In our hyperconnected world, there's something profoundly satisfying about creating and using a device that does exactly one thing well: entertaining you without distractions. This isn't just about building a game console; it's about:
- Digital Minimalism in Action: Proving that sometimes less is more
- Rekindling Childhood Wonder: Bringing back the pure joy of simple games
- Learning Through Making: Understanding electronics and programming through hands-on creation
- Sustainable Gaming: A device that will work for years without software updates or planned obsolescence
- Conversation Starter: Nothing beats pulling out a device you built yourself

The Journey Ahead
In this article, we'll walk through every step of the build process, from selecting components and writing the code to designing the case and assembling everything into a polished, professional-looking device. Whether you're a beginner looking to learn about microcontrollers or an experienced maker wanting to try something new, this project offers the perfect balance of challenge and reward.
We'll cover:
- Hardware Setup: Wiring diagrams and component selection
- Programming: Writing games for the ATtiny85 using Arduino IDE (with free downloadable game pack)
- 3D Design: Creating a custom case in Autodesk Fusion
- Assembly: Putting it all together
- Troubleshooting: Common issues and solutions
- Future Upgrades: Ideas for expanding your console
By the end of this build, you'll have not just a functioning game console, but a deeper understanding of embedded systems, game programming, and 3D design. More importantly, you'll have created something that brings genuine joy, both in the making and the using.
So let's dive in and build something that proves the best gaming experiences don't always come from the biggest screens or the most powerful processors. Sometimes, they come from the satisfaction of creating something awesome with your own hands.
Ready to escape the doom scroll? Let's start building!
Supplies


Components List
Before we begin, let's gather all the components you'll need for this build:
Essential Components:
- 1x ATtiny85 microcontroller (DigiSpark compatible board recommended)
- 1x SSD1306 OLED Display (0.96", 128x64, I2C)
- 3x Tactile Push Buttons (6mm x 6mm)
- 1x Passive Buzzer (5V compatible)
- 1x 3.7V Li-Po Battery (500-1000mAh) or 3xAAA Battery Holder
- 1x Slide Switch (for power)
- Jumper wires and breadboard for prototyping
- Perfboard or custom PCB for final assembly
- 3D printer filament (PLA recommended)
Tools Required:
- Soldering iron and solder
- Wire strippers
- 3D printer
- Computer with Arduino IDE installed
- USB cable for programming
Wiring
.png)
The beauty of this project lies in its simplicity. The ATtiny85 has just 5 I/O pins, so we need to be strategic about our connections
Console Schematic
Pin Assignments:
- Pin 0 (PB0): Button 1 (Left/Rotate)
- Pin 1 (PB1): Buzzer
- Pin 2 (PB2): Button 2 (Right/Drop)
- Pin 3 (PB3): SDA (I2C Data for OLED)
- Pin 4 (PB4): SCL (I2C Clock for OLED)
- Pin 5 (PB5): Button 3 (Select/Pause)
Connection Details:
- OLED Display: Connect VCC to 3.3V, GND to ground, SDA to PB3, SCL to PB4
- Buttons: Each button connects between its assigned pin and ground (with external pull-down resistors )
- Buzzer: Positive terminal to PB2, negative to ground
- Power: Battery positive to VCC, negative to ground through the power switch
Power Management
The ATtiny85 is incredibly power-efficient, making it perfect for battery-powered projects. With proper sleep modes implemented in the code, you can achieve 4-6 hours of active gameplay or several days on standby.
Programming the Games
Setting Up Arduino IDE
First, you'll need to set up your Arduino IDE to work with the ATtiny85:
- Install the ATtiny board package via the Board Manager
- Select "ATtiny25/45/85" from the Tools menu
- Choose your programmer (USB ASP or Arduino as ISP)
- Set the clock to 8MHz (internal)
IMPORTANT NOTE🚨: Follow this Instructable to learn How to program ATTINY85 using Arduino Uno

Game Architecture
WARNING🚨:Do NOT upload this code, It is just a snippet and is only for demo , to upload the games to your Console, Download and extract this ATTINY GAMES Zip File and upload the game you are interested in.
This Code and all the available games were brought to life by the original creator Andy Jackson, Credits to him for making this possible and now we can build on top of it and bring amazing creations to life.
Each game follows a similar structure optimized for the ATtiny85's limited memory:
Available Games
The console comes with several classic games, each optimized for the small screen and limited controls:
1. Tetris: The classic block-stacking game with simplified controls
- Left Button: Move left/rotate
- Right Button: Move right/drop
- Select Button: Pause/restart
2. Snake: Guide your snake to eat food and grow
- Directional controls using two buttons
- Simple but addictive gameplay
3. Frogger: Cross the road and avoid obstacles
- Left/Right movement
- Timing-based challenges
4. Pong: Classic paddle game
- Single-player mode against AI
- Simple but satisfying
5. Space Invaders: Defend against alien invasion
- Minimalist shooter gameplay
- Progressive difficulty
Free Game Download
All the games mentioned above are included in a downloadable ZIP file attached to this project. Simply extract the files, open the .ino file for your desired game in Arduino IDE, and upload it to your ATtiny85. Each game is fully commented and ready to customize!
3D Design and Case Creation
Designing in Fusion 360
The case design balances aesthetics, functionality, and printability. Key design considerations include:
Ergonomics:
- Rounded edges for comfortable grip
- Button placement optimized for thumb access
- Slim profile that fits in your pocket
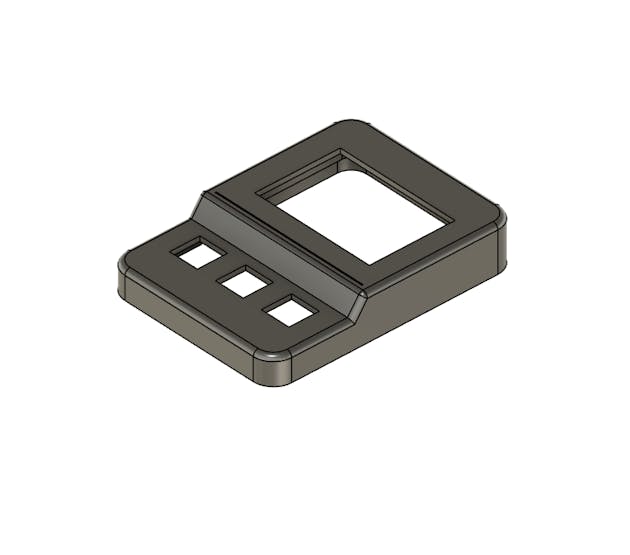
TOP SHELL
Functionality:
- Slots for the 3 buttons
- Clear window for OLED display
- An attachment to act as a keyring

BOTTOM SHELL
Download the STL Files for Printing here
Design Process
- Measurement Phase: Carefully measure all components
- Sketch Creation: Start with 2D sketches of front and side profiles
- 3D Modeling: Extrude and modify to create the basic shell
- Component Placement: Create precise cutouts and mounting points
- Testing: Print prototypes to test fit and feel
- Refinement: Iterate based on physical testing

EXPLODED VIEW
The case consists of two main parts: the front shell and the back shell (housing the battery and electronics).

ASSEMBLY
Professional 3D Printing with JUSTWAY
While designing the case in Fusion 360 is exciting, not everyone has access to a 3D printer. That's where professional 3D printing services become invaluable. For this project, I used JUSTWAY for high-quality 3D printing services – they've been my go-to solution for turning digital designs into physical reality.

Why Professional 3D Printing?
- Material Quality: Access to premium filaments and finishing options
- Precision: Industrial-grade printers ensure perfect fitment
- Convenience: No need to invest in expensive equipment
- Reliability: Consistent results without failed prints or calibration issues
Summer Cashback Opportunity - Great news for makers! JUSTWAY is currently running a Summer Cashback Event (June 1 - August 31, 2025) offering 15% cashback on all orders. This is perfect timing if you're planning to print your console case or any other project components.
Learn more about the cashback event here
This cashback offer covers all their services including CNC machining, 3D printing, sheet metal work, injection molding, and urethane casting – making it an excellent opportunity to get

Assembly Process
Step 1: Electronics Assembly
- Solder components to perfboard following the wiring diagram
- Test all connections with a multimeter


Step 2: Final Assembly


Now Let's See the Console in Action
Troubleshooting Common Issues
Display Not Working:
- Check I2C connections (SDA/SCL)
- Verify display address (usually 0x3C)
- Ensure adequate power supply
Buttons Not Responding:
- Confirm pull-up resistors are enabled in code
- Check solder connections
- Test button continuity
No Sound from Buzzer:
- Verify buzzer polarity
- Check PWM pin assignment
- Test with simple tone code
Short Battery Life:
- Implement sleep modes in code
- Check for excessive current draw
- Consider larger battery capacity
Future Upgrades and Modifications
The beauty of this design is its expandability. Consider these upgrades:
- Color Display: Upgrade to a color OLED for enhanced visuals
- More Buttons: Add directional pad for better game control
- Sound Upgrade: Replace buzzer with small speaker
- Wireless: Add Bluetooth for multiplayer games
- Charging Circuit: Integrate USB-C charging
- Game Cartridges: Design removable memory modules
Conclusion
Building this tiny game console has been an incredible journey that combines nostalgia, creativity, and technical skill. In a world dominated by smartphones and endless notifications, there's something deeply satisfying about creating a device that does one thing perfectly: providing pure, distraction-free gaming joy.
What's Next?
I'm passionate about exploring the world of tiny gaming consoles and pushing the boundaries of what's possible with minimalist hardware. This ATtiny85 console is just the beginning, I'm currently working on a custom PCB design that will make assembly even easier and open up new possibilities for features and form factors.
If you're interested in collaborating on future tiny gaming console projects, whether you're a hardware designer, programmer, 3D modeler, or just someone with great ideas, I'd love to hear from you! Reach out through the comments or contact me directly. Together, we can create even more amazing pocket-sized gaming experiences.
Looking Forward
The next iteration is already in development, featuring a custom PCB that will allow for more games, better battery life, and even more compact form factor. The goal is to create a series of tiny consoles, each optimized for different types of games and experiences.
Whether you build this exact version or use it as inspiration for your own creation, remember that the best technology is often the simplest. Sometimes, the most powerful gaming experience comes not from the latest graphics card or the biggest screen, but from the satisfaction of creating something awesome with your own hands.
Happy building, and may your games be glitch-free and your batteries long-lasting ;)
Download the complete game pack and build files from the attachments section. Don't forget to share your build in the comments – I'd love to see how you customize your console!