The Third Eye

.gif)
.gif)


Greetings!
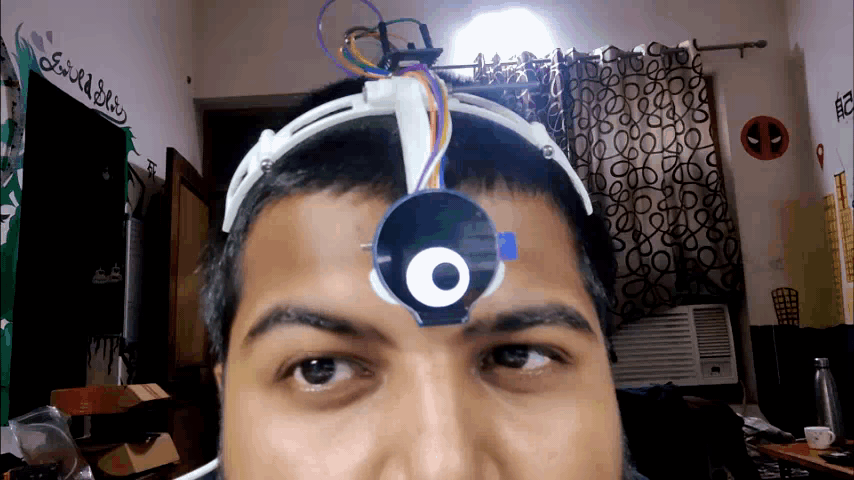
So here's something super weird but totally Awesome, THE THIRD EYE head attachment system.
It's a super simple wearable device with a Round LCD placed in front of the forehead, ESP32 is being used to drive the Round Display and run Adafruit's Uncanny Eye Sketch.
The goal here for doing this project was to make a third eye just like Tien Shinhan from Dragon Ball.
Tien Shinhan is a fictional character from the dragon ball series. He's a cyclops-like guy with a third big eye on his forehead.
This Instructables is about the whole built process of the third eye setup, so let's get started.
Supplies
Following are the materials used in this project-
- Round LCD GC9A01 Module
- ESP32 Board
- 3D Printed head frame parts
- 5V Power Source (power bank)
Third Eye Concept

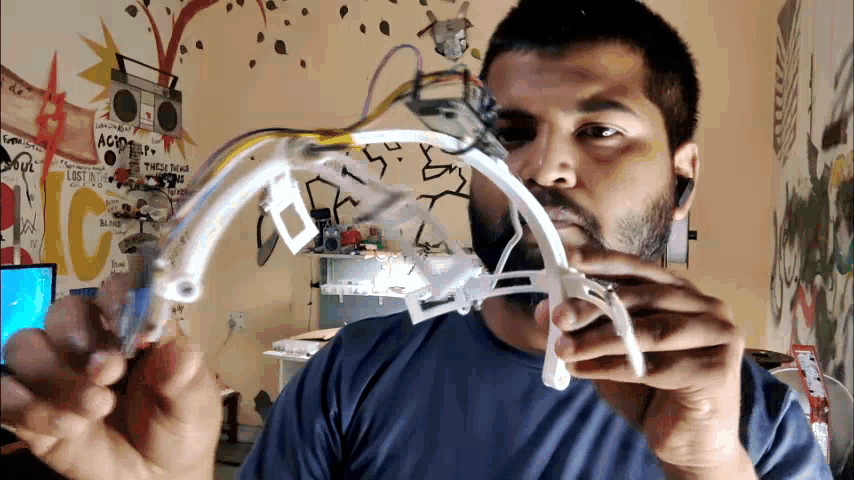
For making this project, we needed some kind of frame that will be used to hold the Display in front and also houses ESP32 in the middle somewhere, this frame has to be made in such a way that it firmly holds the head and keep itself lock in its position without adding any elastic string or cord.
As for the eye animation, Adafruit's infamous Uncanny Eye Sketch will be used by modifying the existing TFT_eSPI Library for driving the GC9A01 Display.
Design
.gif)
.gif)
Frame or "highly edited headband" consists of the main arc shape that has four holding levers for supporting and gripping the front top part and back part of the head.
Each Lever is made from two parts connected, Lever itself and the supporting part.
These levers can easily rotate so if the user's head is a little bit large, he can adjust the fitment by rotating the lever according to his or her head.
In the front, there's an LCD Holding part that is designed to hold the round LCD by using its two screw mounts.
PS- This structure is designed by using a normal-size head file.
3D Files and Print Details
.gif)
After completing the design, we 3D Printed the arc along with four levers and their supporting part with white PLA at 20% infill through a 0.8mm Nozzle.
Any material can be used to print these, I would recommend using PLA with a lower nozzle size like 0.5mm or 0.3mm for finer print.
Head Frame Assembly
.gif)
.gif)
.gif)
.gif)
.gif)
- We start the assembly by first connecting the lever with its support part by using an M3 Nut and bolt, we prepare three more lever-support setup so we can assemble them with the main arc.
- Next, we connect the lever-support setup with the main arc structure by using slightly longer M3 nuts and bolts.
- The frame is now ready.
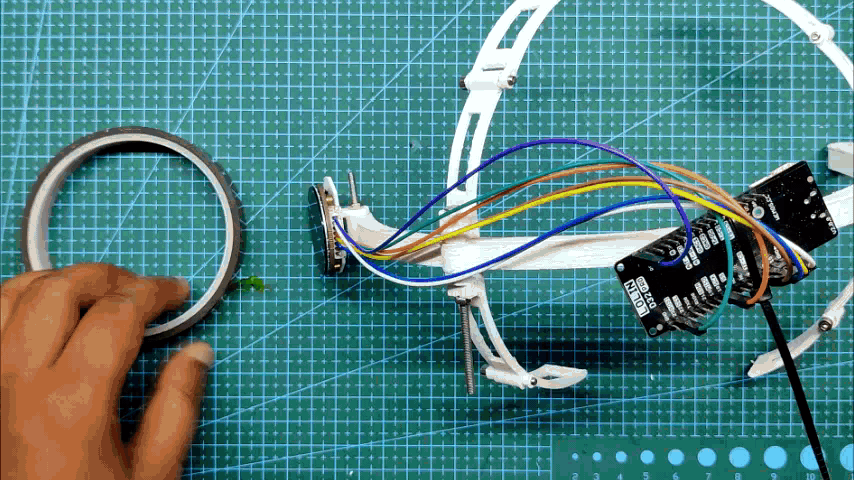
Round Display and ESP32 Setup

.gif)
.gif)
Next, we prepare the ESP32 and LCD Setup by connecting both with the provided wiring diagram. I also added the LCD Holder to Round LCD before the main assembly even started (just to save time).
Main Assembly
.gif)
.gif)
.gif)
- We first start by connecting the LCD Holder with the front side of the frame
- Next, we add ESP32 in the middle by using a zip tie
- After that, we add Kapton tape to neatly bind the wires to the frame body, zip tie can also be used here just make sure not to squeeze wires tightly or they will get damaged and lose their continuity.
- Third Eye setup is ready, next we add code into the ESP32.
Code
As for the sketch, I'm using the famous Uncanny Eyes which was made by adafruit.
The code contains hex files and CPP files that are all attached.
// Load TFT driver library
#include <SPI.h>
#include <TFT_eSPI.h>
TFT_eSPI tft;           // A single instance is used for 1 or 2 displays

// A pixel buffer is used during eye rendering
#define BUFFER_SIZE 1024 // 128 to 1024 seems optimum

#ifdef USE_DMA
  #define BUFFERS 2      // 2 toggle buffers with DMA
#else
  #define BUFFERS 1      // 1 buffer for no DMA
#endif

uint16_t pbuffer[BUFFERS][BUFFER_SIZE]; // Pixel rendering buffer
bool     dmaBuf   = 0;                  // DMA buffer selection

// This struct is populated in config.h
typedef struct {        // Struct is defined before including config.h --
  int8_t  select;       // pin numbers for each eye's screen select line
  int8_t  wink;         // and wink button (or -1 if none) specified there,
  uint8_t rotation;     // also display rotation and the x offset
  int16_t xposition;    // position of eye on the screen
} eyeInfo_t;

#include "config.h"     // ****** CONFIGURATION IS DONE IN HERE ******

extern void user_setup(void); // Functions in the user*.cpp files
extern void user_loop(void);

#define SCREEN_X_START 30
#define SCREEN_X_END   SCREEN_WIDTH   // Badly named, actually the "eye" width!
#define SCREEN_Y_START 150
#define SCREEN_Y_END   SCREEN_HEIGHT  // Actually "eye" height

// A simple state machine is used to control eye blinks/winks:
#define NOBLINK 0       // Not currently engaged in a blink
#define ENBLINK 1       // Eyelid is currently closing
#define DEBLINK 2       // Eyelid is currently opening
typedef struct {
  uint8_t  state;       // NOBLINK/ENBLINK/DEBLINK
  uint32_t duration;    // Duration of blink state (micros)
  uint32_t startTime;   // Time (micros) of last state change
} eyeBlink;

struct {                // One-per-eye structure
  int16_t   tft_cs;     // Chip select pin for each display
  eyeBlink  blink;      // Current blink/wink state
  int16_t   xposition;  // x position of eye image
} eye[NUM_EYES];

uint32_t startTime;  // For FPS indicator

// INITIALIZATION -- runs once at startup ----------------------------------
void setup(void) {
  Serial.begin(115200);
  //while (!Serial);
  Serial.println("Starting");

#if defined(DISPLAY_BACKLIGHT) && (DISPLAY_BACKLIGHT >= 0)
  // Enable backlight pin, initially off
  Serial.println("Backlight turned off");
  pinMode(DISPLAY_BACKLIGHT, OUTPUT);
  digitalWrite(DISPLAY_BACKLIGHT, LOW);
#endif

  // User call for additional features
  user_setup();

  // Initialiase the eye(s), this will set all chip selects low for the tft.init()
  initEyes();

  // Initialise TFT
  Serial.println("Initialising displays");
  tft.init();

#ifdef USE_DMA
  tft.initDMA();
#endif

  // Raise chip select(s) so that displays can be individually configured
  digitalWrite(eye[0].tft_cs, HIGH);
  if (NUM_EYES > 1) digitalWrite(eye[1].tft_cs, HIGH);

  for (uint8_t e = 0; e < NUM_EYES; e++) {
    digitalWrite(eye[e].tft_cs, LOW);
    tft.setRotation(eyeInfo[e].rotation);
    tft.fillScreen(TFT_BLACK);
    digitalWrite(eye[e].tft_cs, HIGH);
  }

#if defined(DISPLAY_BACKLIGHT) && (DISPLAY_BACKLIGHT >= 0)
  Serial.println("Backlight now on!");
  analogWrite(DISPLAY_BACKLIGHT, BACKLIGHT_MAX);
#endif

  startTime = millis(); // For frame-rate calculation
}

// MAIN LOOP -- runs continuously after setup() ----------------------------
void loop() {
  updateEye();
}
This sketch uses the TFT_eSPI library that you need to download and install first into the Arduino IDE. Also, if you are using ESP32 for the first time, you also need to install its core files by putting this link in the preferences option in Arduino IDE.
Result

.gif)
.gif)
.gif)
.gif)
This will be the result after adding the code to the ESP32.
As you can see, there's a different UncannyEye displaying on the LCD Screen, that's because the uncanny eye sketch contains a bunch of other eyes that we can switch by changing the below code in the config file.
However, you will need their hex file included in the sketch folder before uploading.
// Enable ONE of these #includes -- HUGE graphics tables for various eyes:
//#include "data/defaultEye.h"      // Standard human-ish hazel eye -OR-
//#include "data/dragonEye.h"     // Slit pupil fiery dragon/demon eye -OR-
//#include "data/noScleraEye.h"   // Large iris, no sclera -OR-
//#include "data/goatEye.h"       // Horizontal pupil goat/Krampus eye -OR-
//#include "data/newtEye.h"       // Eye of newt -OR-
//#include "data/terminatorEye.h" // Git to da choppah!
//#include "data/catEye.h"        // Cartoonish cat (flat "2D" colors)
//#include "data/owlEye.h"        // Minerva the owl (DISABLE TRACKING)
#include "data/naugaEye.h"      // Nauga googly eye (DISABLE TRACKING)
//#include "data/doeEye.h"        // Cartoon deer eye (DISABLE TRACKING)
Conclusion


This project works and can be used to display all sorts of stuff, the third eye is just a gimmick for now but my plan for using this setup is to make a body temperate meter by connecting a temp sensor with the esp32 to monitor user's body temp and display it on the LCD Screen.
As for Version 2, My plan is to use a proper board made from scratch by using ESP32 wrover or wroom module and increase the sturdiness of the frame a little bit more to hold even a lithium cell for making this setup completely wireless.
leave a comment if you need any help regarding this project, thanks for reading this article, and stay tuned for the next one.
Peace!