The Cat Has Left the Building - ESP8266 PIR Monitor
by rgrokett in Circuits > Arduino
6431 Views, 16 Favorites, 0 Comments
The Cat Has Left the Building - ESP8266 PIR Monitor
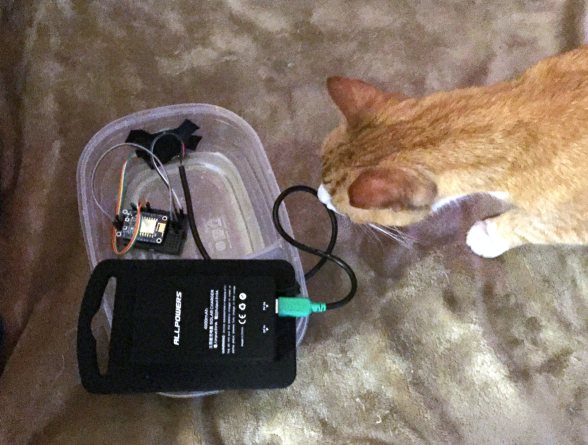
ESP8266 PIR Motion Detector to IFTTT
Or The Cat has left the Building!
UPDATED 10/2017 -Instructions for new IFTTT procedures. Corrected for changes to the IFTTT website.
Also: There is another version of this project to use ESP8266 Deep Sleep mode to significantly save battery power. BUT requires extra hardware, so more complex. See https://github.com/rgrokett/ESP8266_PIRv2
Overview
We just installed a Cat Door in our garage and I wanted to see how many times per day (actually night) our cat went in and out the door. We could tell the cat was using the door as we would find it outside sometimes and inside sometimes. For this project, I skipped the camera that other projects used and decided to try IFTTT (If This Then That) free service to send emails when detecting motion.
So, breaking out my parts box, I found a PIR motion sensor, an ESP8266 and a 5V battery.
I used the Adafruit HUZZAH ESP8266 as it has 5V regulator for powering the 3.3v ESP as well as good tutorials for initially getting it set up. I also used the Arduino IDE with the ESP8266 library, since I was already quite familiar with using it with the Huzzah ESP8266.
I decided to interface this to IFTTT (www.ifttt.com) to trigger any number of types of events. Initially, just an email each time motion was detected.
Note that IFTTT requires HTTPS SSL encryption. Thus this project includes code for that.
PARTS LIST
Parts List
- · Adafruit HUZZAH ESP8266 https://www.adafruit.com/product/2471
- · PIR Motion Detector such as https://www.adafruit.com/products/189
- · FTDI or USB console cable https://www.adafruit.com/products/954 or equiv
- · 5V power supply or 5V USB battery (for portable use)
- · Breadboard, wire, box to put everything in
- · Arduino IDE with ESP8266 extension package installed (see Initial Setup below)
- · Download the ESP8266_PIR software from GitHub: https://github.com/rgrokett/ESP8266_PIR
Important Initial Setup of ESP8266
Before beginning the project, you should become familiar with the Adafruit HUZZAH board and programming it using the Arduino IDE. The best way is to use the excellent Adafruit tutorial:
https://learn.adafruit.com/adafruit-huzzah-esp8266...
You must be able to program your ESP8266 and connect wirelessly to it via browser as described in their tutorial. Once completed, THEN continue below to next step...
IFTTT Setup
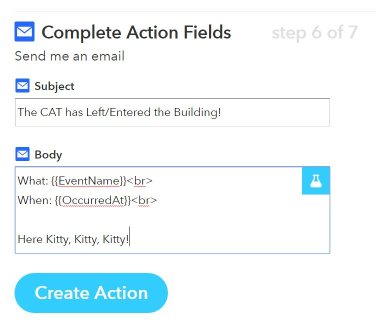

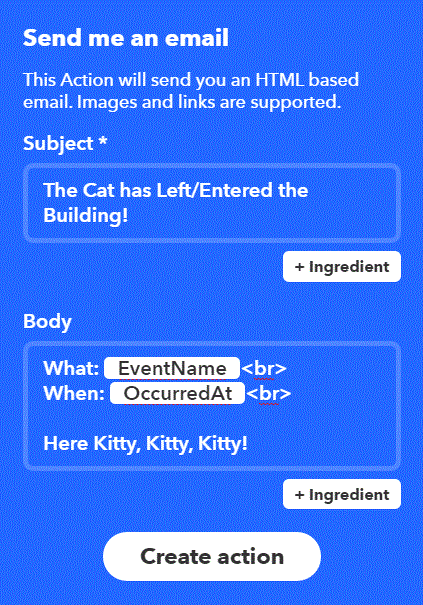
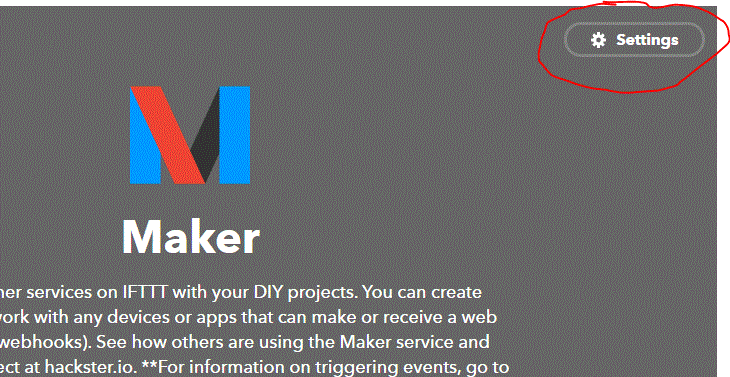
1. Go to www.ifttt.com
2. Log in. If you don’t have an account, you can sign up. It’s free.
3. Once logged in, click on My Applets
4. Click on New Applet
5. Click the “this” of ifthisthenthat…
6. Type “Webhooks” into the Search services box
7. Click on the Webhooks icon
8. For Choose a Trigger, there is only one big gray box with “Receive a web Request”. Click it
9. For Complete Trigger Fields, enter “pirtrigger” and click Create. This is the event name used in the ESP8266 .ino software. They must match.
10. Click the “that” of ifthisthenthat…
11. Type “email” into the Search Channels box. You could change this to do other things, like send SMS messages, etc. But let’s stick to email. You can always edit later.
14. For Choose an Action, click the big gray box with “Send me an email”.
15. Click the big blue box with “Send me an email”.
16. You can edit the text or just leave it as is. Some of the fields aren’t used, but they just show up blank in your email.
17. Click Create Action. You will see a screen that just describes what this recipe will do. You can edit the Recipe Title, or just leave as is. Click FINISH.
18. NOTE that it uses the email address you entered when you signed up for IFTTT.
19. You now have an IFTTT Recipe.
Any IFTTT Recipe that uses Maker channel can be used, as long as it is called “pirtrigger”. (You can change the trigger name in the ESP8266_PIR.ino program below, if desired.)
IFTTT Maker URL
You will need Maker URL assigned by IFTTT in order to send from ESP8266 to IFTTT.
1. Click on your name in the upper right corner of the screen and select Services.
2. Again, click on the Webhooks icon.
3. Click on Settings button.
4. On the Maker Settings screen, you need to copy the api key portion of the “URL:” field.
Example: https://maker.ifttt.com/use/aBc1fakekey2ab3cBA
It is needed for the .ino program later on.
Software
You should program and test the ESP8266 before adding its hardware wiring.
1. STOP! Be sure you have already completed the Adafruit tutorial software setup of the Arduino IDE and tested the ESP8266 with your WiFi network as described in the Initial Setup section above!
2. Ok, download the ESP8266_PIR software from GitHub (https://github.com/rgrokett/ESP8266_PIR/)
3. Copy the ESP8266_PIR subdirectory into your Arduino IDE development directory.
This folder has the 3 software files needed.
<p>ESP8266_PIR.ino<br>HTTPSRedirect.h
HTTPSRedirect.cpp</p>
4. Double-click the ESP8266_PIR.ino program to load it into your Arduino IDE.
5. Using Arduino IDE, edit the ESP8266_PIR.ino and insert your WiFi SSID and PASSWORD into the appropriate places.
6. Update the API_KEY with your IFTTT API KEY copied previously. You can look on Channels -> Search Channels -> Maker in IFTTT for it, if needed.
7. You can also change a few variables, described here:
<p>const char* ssid     = "{YOUR_WIFI_SSID}"; // Your WiFi SSID<br>const char* password = "{YOUR_WIFI_PWD}";  // Your WiFi Password
const char* api_key  = "aBc1fakekey2ab3cBA";   // Your API KEY from <a href="https://ifttt.com/maker" rel="nofollow"> https://ifttt.com/maker
</a>
const char* event    = "pirtrigger";       // Your IFTTT Event Name
bool verifyCert = false; // Select true if you want SSL certificate validation
int PIRpin = 14;      // GPIO 14 (PIR Sensor)
int MOTION_DELAY = 15; // Delay in seconds between events to keep from flooding IFTTT & emails</p>
IFTTT requires HTTPS SSL and HTTPS 302 Redirection. The ESP8266 Library (installed in the Adafruit Tutorial) contains the HTTPS SSL functions and an extension of that library was developed by https://github.com/electronicsguy/ESP8266/tree/ma... to handle the HTTPS 302 Redirection.
Since this code wasn’t in the ESP8266 Library, I have included a copy or you can get the latest version from the URL above and add the .cpp and .h files to the ESP8266_PIR folder.
The IFTTT server initially returns a 302 Redirect message back, so the “HTTPSRedirect.cpp” software invisibly handles resending the request to the new host.
OPTIONAL
The “WiFiClientSecure” provides SSL encryption, so the messages are always sent encrypted, but by default the verification of IFTTT’s SSL Certificate is turned off. You can turn it on by changing verifyCert = true;
Doing this requires the SHA1 Fingerprint of the IFTTT server to be used to verify the certificate.
<p>const char* SHA1Fingerprint="A9 81 E1 35 B3 7F 81 B9 87 9D 11 DD 48 55 43 2C 8F C3 EC 87";</p>
This fingerprint is initially retrieved from the IFTTT server using the Linux command:
<p>$ openssl s_client -servername maker.ifttt.com -connect maker.ifttt.com:443 | openssl x509 -fingerprint -noout</p>
Replace colons with spaces in result and update the ESP8266_PIR.ino as needed.
NOTE: You should NOT have to change this unless IFTTT changes their SSL Certificate.
Again, you can bypass all of this check by leaving verifyCert = false; The data is still encrypted.
CONTINUE HERE
8. Compile and Upload the program using the FTDI or USB console cable just like shown in the Adafruit tutorial. Remember, you have to press the tiny GPIO0 and RESET buttons on the HUZZAH ESP8266 (aka bootload mode) to allow the upload to occur.
9. When the program finishes loading, open a Serial Monitor, set to 115,200 baud, and press the ESP8266 RESET button to restart the program running.
10. It should display the IP address in the Serial Monitor once connected to your Wifi.
Also, the onboard Red LED should blink 4 times signifying it’s successfully connected. If you don't get a connection, be sure your SSID/PASSWD in the ESP8266_PIR.ino has been updated and uploaded.
11. Time for wiring the PIR and power…
Hardware - PIR

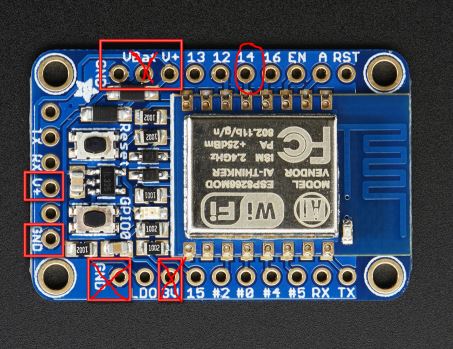
1. Temporarily unplug the FTDI/USB cable from the PC to power off the ESP8266.
2. Wire the PIR sensor as follows. Note that the PIR is powered by 5V, but its I/O line is 3.3v which makes it directly compatible with the ESP8266’s 3.3v GPIO pins.
(See Pinout diagram)
3. With the PIR now wired in, reconnect the FTDI/USB cable to the PC.
4. Again, start the Serial Monitor from the Arduino IDE.
5. Reset the ESP8266 and you should see the LED blink 4 times and the IP address displayed again.
6. If you move in front of the PIR, the Serial Monitor should register the event and send off to IFTTT. If IFTT trigger is successful, you should see a 200 OK HTTP response message and text and receive an email.
<p>< HTTP/1.1 200 OK<br>< Server: Cowboy
< Connection: keep-alive
< X-Powered-By: Sad Unicorns
< X-Top-Secrettt: VG9vIGVhc3k/IElmIHlvdSBFK3.../NlY3JldEBlIHdnQgTWFrZXJzLg==
< Content-Type: text/html; charset=utf-8
< Content-Length: 50
< Etag: W/"32-44d0098f"
< Date: Wed, 29 Jun 2016 21:25:32 GMT
< Via: 1.1 vegur
<
* Connection #0 to host maker.ifttt.com left intact
* Closing connection #0
* SSLv3, TLS alert, Client hello (1):
Congratulations! You've fired the pirtrigger event</p>
Hardware - Power

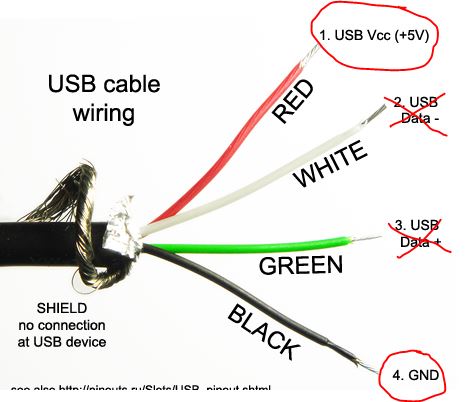
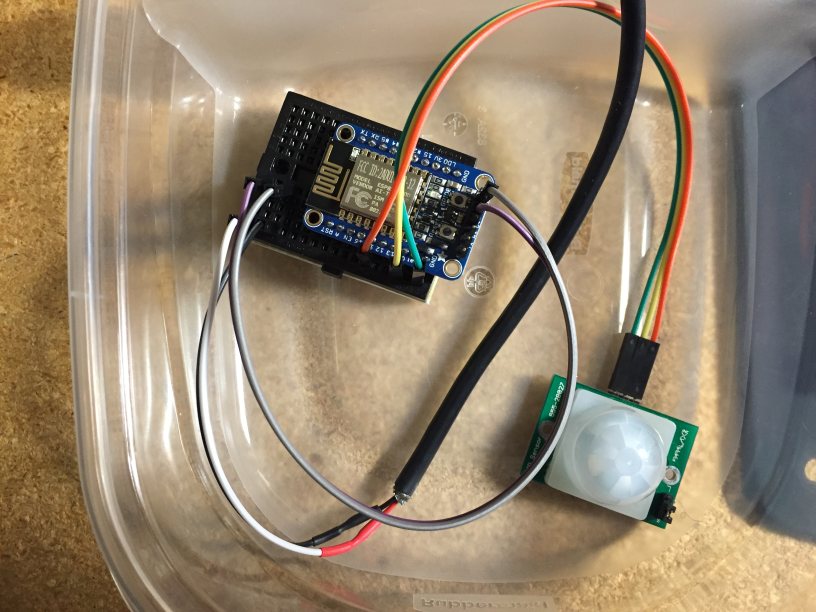
1. Since the Adafruit HUZZAH ESP8266 supports operating on 5V, a 5V USB battery or USB power supply can be used. Since we tied the PIR sensor directly to one of the V+ pins, the battery or power supply is going to have to connect to the V+ and GND that the FTDI/USB cable connected to. So if you need to reprogram the ESP8266, you will need to disconnect these.
(See Cable Pinout diagrams)
You may need to build a USB-to-ESP cable by taking an unused USB cable and cutting it as shown in the cable diagram above.
2. Once ready, plug in the USB connector to your power supply or battery.
3. After a few seconds, you should see the red LED blink four times to indicate it connected to your WiFi.
4. Do some motion and after a minute or so, an email should arrive!
Place everything into a box. The PIR sensor will work thru clear plastic, but is more sensitive if mounted outside. Put the box near the cat door (or anywhere you want to detect motion) and you are ready to go.
Have Fun!