Tacuino: a Low-cost, Modular, Arduino-compatible Educational Platform
by MakersBox in Circuits > Arduino
62749 Views, 582 Favorites, 0 Comments
Tacuino: a Low-cost, Modular, Arduino-compatible Educational Platform


For my soft-circuit classes, we have been using either a pre-programmed Attiny85 circuit (https://www.instructables.com/id/SnapNsew-An-Educational-Soft-Circuit-Platform/), or the more expensive Arduino-compatible Lilypad USB. I wanted something in between those two extremes that would be:
- Easy to build by beginners
- Low cost for large workshops
- Programmable with the Arduino IDE
- Modular so it can be installed in a soft-circuit with conductive thread or other projects using jumper wire.
- No special hardware or programmer cable.
- Fits in an empty Tic-Tac container. Because, Tic-Tacs!
After finding the Paperduino project, I learned that a bootloader could be placed on the inexpensive Attiny85 chips so that they could be programmed like a regular Arduino. This method was developed and made popular by the Digispark Kickstarter project.
The Tacuino (think Tic-Tac Arduino), is an extension of my SnapNsew project. It now includes the necessary hardware so that they project can be easily re-programmed by a student after the circuit is built.
The Tacuino is self-contained in that it includes:
- An inexpensive, commonly available CR2032 battery power source.
- Two inputs (touch and light sensors).
- Two output (sound and LEDs).
This is a just enough "umph" for a reasonable beginning project while demonstrating some of the amazing abilities of an embedded circuit!
Note: An Arduino is nearly bullet proof. This circuit is not. From the bootloader developer:
"[At]tiny85 does not offer any hardware bootloading support, and does not protect the bootloader from being accidentally overwritten by a misbehaving app."
If you are developing a circuit, it may be advisable to use an IC socket and have an extra Attiny on hand.
Gather the Parts, Tools, and Supplies


You can build this circuit with a number of various parts, but these are the ones I've used and found to work well:
PCB:
Digikey Parts:
- 1 - Baterry holder, BAT-HLD-001-THM-ND1
- 1 - Attiny microcontroller, ATTINY85-20PU-ND
- 1 - Optional 8-pin IC socket, AE9986-ND
- 1 - Photo transistor, 160-1988-ND
- 1 - Slide switch 401-2000-ND
- 1 - Piezo speaker 445-5229-1-N
- 2 - 5MM LED (red for power and one of your choice)
- 1 - 0.1 uf Capacitor, 399-9776-ND
- 1 - USB B-type socket, ED2983-ND
- 1 - 1N4001 diode, 641-1310-1-ND
- 2 - Zener diodes, 3.6V568-7951-1-ND
- 1 - 1.5k resistor, CF18JT1K50CT-ND
- 2 - 22 ohm res, CF18JT22R0CT-ND
- 1 - 10 uF capacitor, P997-ND
- 2 - 330 ohm resisotr, CF18JT330RCT-ND
- 1 - Header right-angle, 929500E-01-36-ND
Other parts you supply:
- CR2032 coin cell, Digikey P189-ND or local store.
- USB A/B cable.
- A Tic-Tac case (optional).
Tools and Supplies:
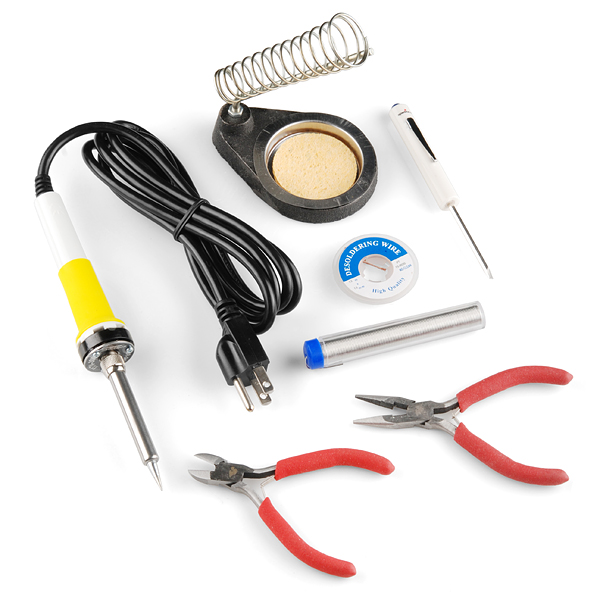
For my workshops, I use SparkFun's Beginner's ToolKit which has most of what you need:
- Soldering iron.
- Solder
- Wire nippers
- Desoldering braid (hopefully not needed, but you never know)
A kit for this project is available on Tindie.com. Purchasing the kit will save you the time and expense of ordering from several different vendors and avoid the minimum PCB order premium. You will also be helping me develop and share other projects in my workshops!
Ladies and Gentlement, Start Your Irons


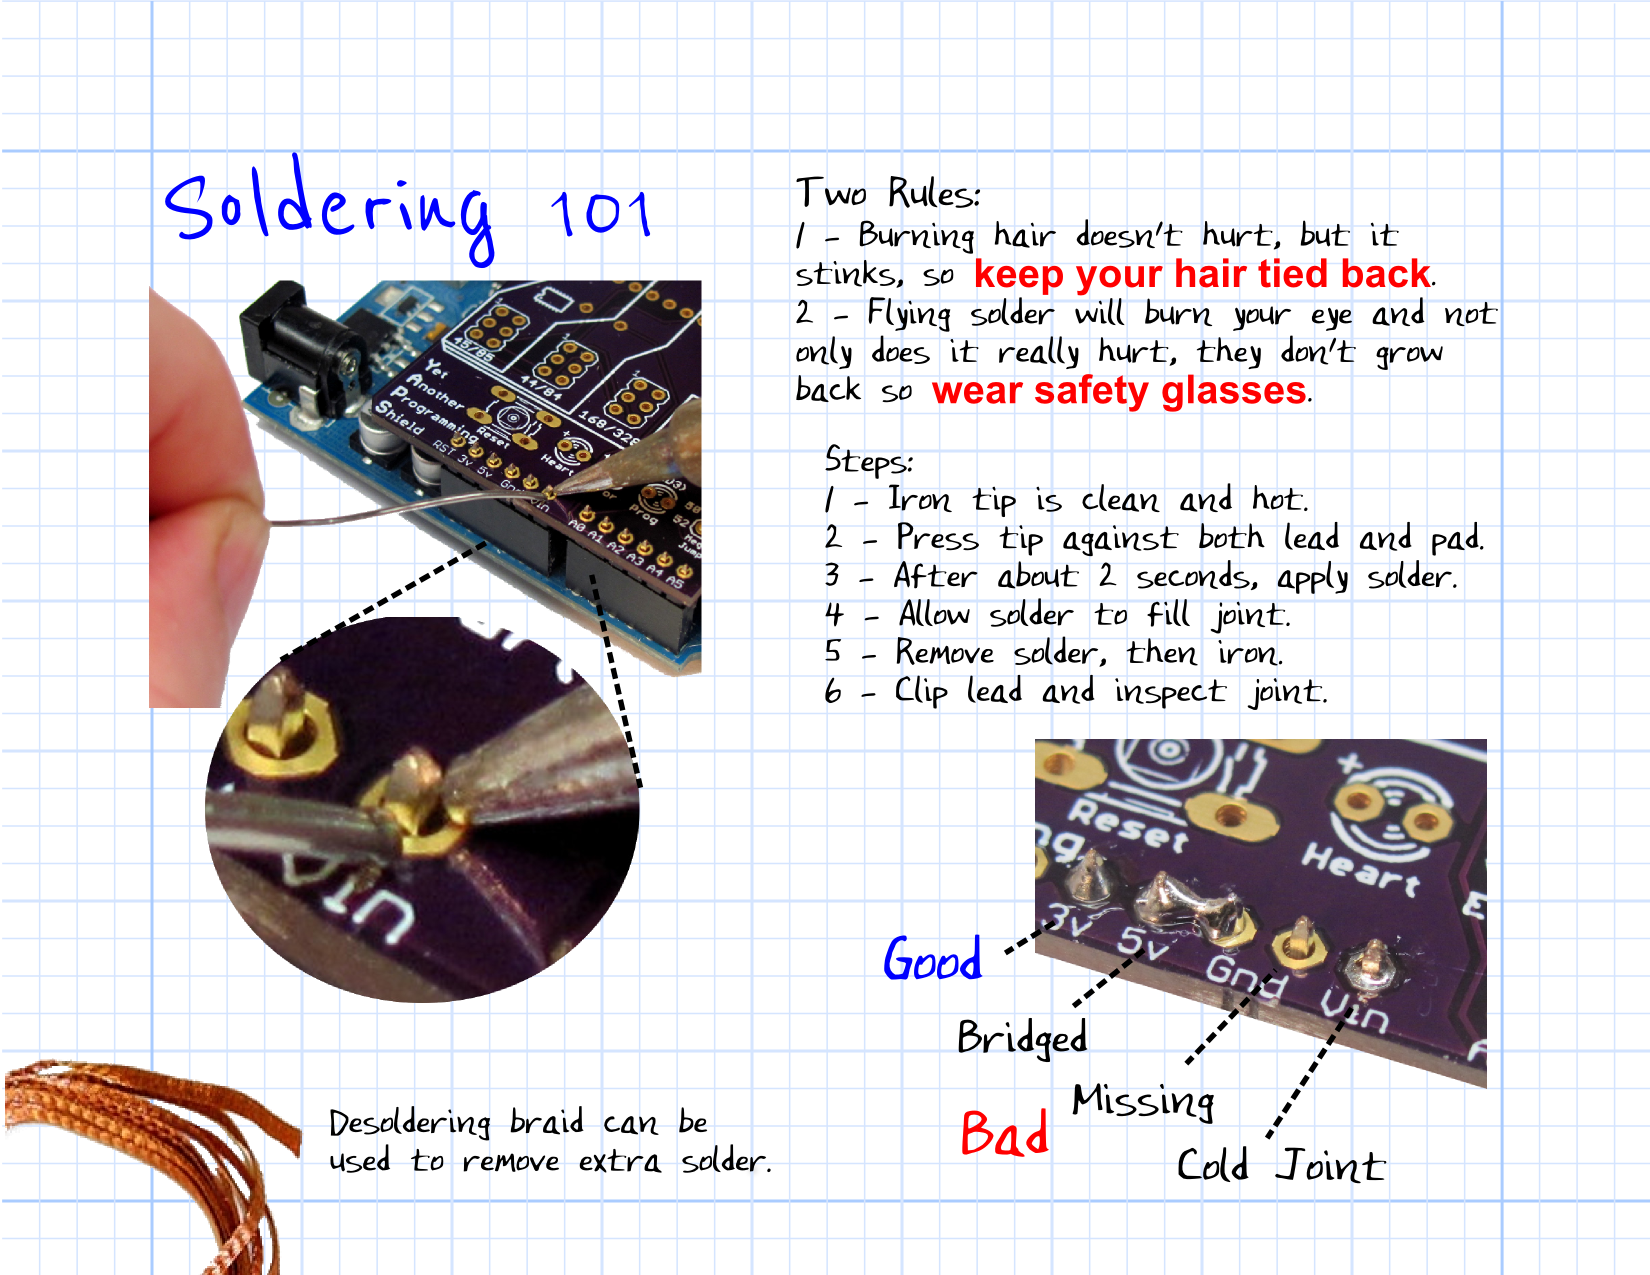
We are going to assume you have some kit-building experience. If you need some help soldering, head over to www.sparkfun.com/tutorials/213 to brush up or watch the Geek Girl explain it at http://youtu.be/P5L4Gl6Q4Xo.
The order of assembly is largely a matter of preference. If you don't have a helper or a vice, I generally go from lowest height to tallest so when the board is reversed on the table, the parts stay in place.
- Lets start with the black 1N4001 Diode on the Programmer board. The component has polarity, so ensure the marking band matches the silk screen (band to the right). This component also had thicker legs than most, so will take a little more heat when soldering. This diode protects the circuit from reverse voltages.
- Next, solder the 1.5K ohm resistor below the diode. Its color code is brown - green- red - gold. It does not have polarity.
- Solder the two 22 ohm resistors below the 1.5K ohm resistor. Their color code is red-red-black-gold.
- Finally, lets put in the two 3V6 Zener diodes. Like the first diode, they have polarity and a band marking the direction they go. This time, the band goes to the left.
Capacitors, Switch, Socket


Moving down to the Tacuino board section:
- The 0.1 uF capacitor goes in the upper left corner. Ceramic capacitors do not have polarity. It smooths the voltage levels the microcontroller receives.
- The power switch goes below the capacitor, with the actuator pointed to the left. "On" is upward toward the USB jack.
- Next is the optional IC-socket, which aligns with the notch pointing toward the battery. This will help you correctly align the IC in a latter step. The IC socket allows you to easily replace a damage chip or to remove a chip for programming.
Battery Holder, Speaker


Moving to the right, the battery board is next:
- Solder the battery holder with the arched opening toward the bottom. This component requires a little longer heating time when soldering because the metal radiates the heat away quickly.
Above the battery is the speaker board:
- Solder the piezo speaker in place. The PS1201 piezo does not have polarity. Other types may.
Photo Transistor, Touch, and Main LED.


To the right of the speaker is the photo transistor:
- Observe the polarity of the photo transistor. The longer leg is the emitter. A cadmium photo resistor will work as well.
Below the photo board is the touch board. It measure a change in resistance when touched. A 6x6mm tactile switch can be soldered in to place if desired.
Below the touch board is the main LED board. The color and size is up to you:
- Solder a 330 ohm resistor in place. Its color code is orange - orange - black - gold. It does not have polarity.
- Solder the main LED in, observing polarity. The long leg is positive, and goes in the hole marked "+" on the silk screen.


Almost done! Back to the Programmer board:
- The 4-pin right angle header is optional and used only if the boards are separated and you want to reprogram the microcontoller. Solder it with the pins extending over the speaker as shown.
- A 330 ohm resistor is mounted vertically between the capacitor and the LED. Its color code is orange-orange-brown-gold. Bend it as shown and solder it in place.
- The 10 uF capacitor goes at the bottom toward the left of the zener diodes. It is electrolytic, and has a polarity. The long leg goes in the hole marked "+" on the silk screen.
- A red 5mm LED is used for USB power indication. Observe the polarity. The long leg is positive and goes in the hole adjacent to the "+" on the silkscreen.
- And last, but certainly not least, is the USB Type B connector. Ensure the 4 smaller pins are in correct position, and then solder the two main mechanical support in place. Solder the 4 smaller pins.
Final Checks, Attiny, and Power On!


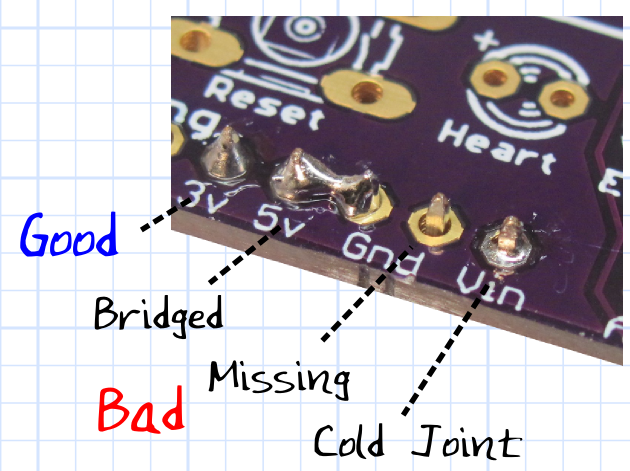
Before we insert the IC and apply power, take a minute to inspect your work. Use a good light and magnifying glass. You are looking for missing or bridges solder joints. Touch up anything that looks suspect.
If you buy a kit from me, the Attiny85 IC will already have a bootloader program installed on it and you can just insert the chip. A bootloader is a simple program that checks to see if new programs are available to upload, and if not, after 5 seconds, start the current program.
Burning a bootloader onto a chip is not trivial, and requires an Arduino, Raspberry Pi, or a Programmer. Look at http://paperduino.eu/doku.php?id=burning_bootloade... for further details. For programming chips directly, I use my own Open Source AVR Programming Shield.
All that being said, it is time to:
- Insert the Attiny85 IC with the alignment dot toward the battery. I usually add a dot of paint to make it more visible. Align the chip with the divot on the socket (or the silkscreen) and carefully press it in to place, ensuring no pins get bent over or tucked under.
- Insert the CR2032 battery with the "+" sign facing up.
- Place the slide switch in the "On" position (toward the USB port).
- The bootloader takes 5 seconds to start. During this time, it is checking to see if a program is waiting to upload, something we will show how to do in the next step.
- You should see a brief flash of light from the main LED indicating the program is running.
- Press the Touch sensor, and you hard work should be rewarded with some music and light!
- As a bonus, when you get tired of hearing the tune, you can place it in silent mode by holding the touch sensor while you turn the power off, on again, and wait for the LED to flash twice (wait the five seconds).
Troubleshooting:
If you are not getting any response from the board, do not panic! Here are some things to check:
- Remove the battery.
- Check the IC alignment. If the IC is hot to the touch, you have it in backward. Double check the alignment mark.
- Inspect the bottom side of the board for soldering problems as discussed earlier. Touch up any questionable joints.
- Verify the battery has a good voltage.
- Ask for help!
I tell my students you have to be patient, persistent, and have faith you can figure it out!
Blink

You have built your own working computer! Even more amazing, you can now write your own programs for it!
We will be using the Arduino IDE to write and upload programs, but to talk to the Attiny, we need a special version of the software developed by Digispark. Follow the instructions at http://digistump.com/wiki/digispark/tutorials/conn... to set up the software.
The primary difference in programming the Attiny verses a regular Arduino is that you start the upload before connecting the board. If you are a regular Arduinoist, this will take some getting use to. There is also a five-second delay between power-on and starting the program.
Launch the IDE and set it up as follows:
- [Tools]->[Board]->[Digistump (Default 16.5 Mhz)].
- [Tools]->[Programmer]->[Micronucleus].
Now select a program to upload. Everyone starts with "Blink":
- [File] ->[Examples]->[Basic]->[Blink].
- Replace anywhere a "13" is present (Arduino's built-in LED) with "4", which is the Tacuino main LED.
- Click the Arrow icon, or [File] ->[Upload]
- You will see the IDE compile the program, and then prompt you to plug you board in:
-
Running Digispark Uploader...<br>Plug in device now... (will timeout in 60 seconds)
- You should get a message that the sketch was successfully uploaded, and the LED begin to blink.
-
> Starting to upload ...<br>writing: 70% complete
writing: 75% complete
writing: 80% complete
> Starting the user app ...
running: 100% complete
>> Micronucleus done. Thank you!
- If you get an error message, double check the steps and try again. Remember what I said about "patience, persistence, and faith"!
Now that you have your computer doing your bidding, it is time to have fun:
- How fast can you make it blink and still see it?
- Remember, you will have to plug your board in each time after you hit "Upload" to trigger the bootloader to look for the new program.
- Keep the "on" delay and "off" delays equal.
- Once it is blinking so fast that it looks like it is always on, try moving the board back and forth quickly. Can you see it blink now?
- There is an interesting article on Wikipedia about the phenomena called "Flicker Fusion Threshold".
Touch
The analog and digital pin numbers for the Attiny are a bit confusing. I like to refer to the following diagram which comes from the "pin.h" file for the Attiny core software if you dig deep enough:
ATMEL ATTINY45/85 Pin Assignments
                   +-\/-+
  Ain0 (D 5) PB5  1|    |8  Vcc
  Ain3 (D 3) PB3  2|    |7  PB2 (D 2) Ain1
  Ain2 (D 4) PB4  3|    |6  PB1 (D 1) pwm1
             GND  4|    |5  PB0 (D 0) pwm0
The touch sensor is connected physically to the Attiny's pin 7, which in the Atmel data sheet, is designated "PB2". In Arduino software, we need to engage the pull-up resistor using the digital pin designation ("2"). Then, we need to use the analog pin designation ("1") when we use the analogRead() function. Confusing as heck, but I'm not smart enough to start re-write the Arduino libraries.
To measure touch, we need to do a little Arduino magic. By engaging an internal pull-up resistor, we can detect when the resistance across two traces changes. Without a current path (high resistance), the 10-bit value will be near the 1023 maximum because the pull-up resistor is pulling the voltage high. When skin provides a current path, the analog value will drop below 1000, and we can trigger the LED to indicate detection.
int led = 4;<br>int touchPin = 1;
int touchPullUp = 2;

void setup() {
  pinMode(led, OUTPUT);
  digitalWrite(lightPullUp, HIGH); // engage pull-up resistor
  digitalWrite(touchPullUp, HIGH); // engage pull-up resistor
}

void loop() {
  int touchVal = analogRead(touchPin);
  if (touchVal < 1000){
    digitalWrite(led, HIGH);
  }
  else {
    digitalWrite(led, LOW);
  }
}
If we had a button or switch installed instead, the value would drop to near 0 since the resistance is nearly zero.
Light
Like the Touch, we can use the internal pull-up resistor and analogRead() to determine light value being detected by the photo transistor. Looking at the previous pin assignment chart, we can see we need to use the digital designation of "5" and analog "0" to use the light sensor.
int led = 4;
int lightPin = 0;
int lightPullUp = 5;

void setup() {
  pinMode(led, OUTPUT);
  digitalWrite(lightPullUp, HIGH); // engage pull-up resistors
  digitalWrite(touchPullUp, HIGH);
}

void loop() {
  int lightVal = analogRead(lightPin);
  if (lightVal > 800){
    digitalWrite(led, HIGH);
  }
  else {
    digitalWrite(led, LOW);
  }
}
You may need to adjust the threshold value depending on the light in the room.
Sound
Coming soon!