TM4C123G LaunchPad Starter Guide
by mack7999 in Circuits > Microcontrollers
2605 Views, 1 Favorites, 0 Comments
TM4C123G LaunchPad Starter Guide

As an introduction to embedded programming, development boards such as the TM4C123G launchpad provide a simple way to set up the hardware enough to start programming. However, the process of setting up a development environment for your board can be a little tricky. This guide aims to help you get around all the kinks of getting your launchpad ready to go.
Unboxing the Hardware


When unboxing your brand new launchpad, you'll notice it comes with three things.
- TM4C123G Launchpad Board
- Small Micro USB to USB-A Cable
- Launchpad Quick Start Guide
For our purposes, we need to set the device mode to "debug" by using the dip switch on the corner of the launchpad. We can then plug in our usb cable into the debug port immediately next to the dip switch. From here, we plug in the other end to our development computer.
Downloading Drivers and Other Tools - Downloading TivaWare for C Series


Now that we have our launchpad board out of the box, we now need to install some software on our development computer. These steps vary based on your operating system, so look out for platform specific instructions.
First up is downloading the TivaWare for C Series software package.
This software package contains all the support files and headers necessary for launchpad development.
Download the SW_TM4C-ver#.exe file. You must make a TI account in order to download this file.
- On Windows
After downloading run the .exe file, I recommend extracting the files into a folder where you plan to put your development files. For this, I made a folder on my desktop named "TM4C123G Files" and within it, I made a folder named "TivaWare" where I extracted the files.
- On Mac/Linux
On Mac and Linux systems, you cannot natively run the .exe file. However, you can extract the contents just the same. After placing the .exe in a "TivaWare" folder where you plan to put your development files, run "unzip SW_TM4C-ver#.exe in the terminal and it will extract all the files into your working directory.
WARNING - Make sure you use the "cd" command to set your working directory within a dedicated folder for your TivaWare files in the terminal, or you will have an absolute mess of files and folders in an unwanted place.
(Windows) Downloading Drivers and Other Tools - Download Stellaris ICDI Drivers

The Stellaris ICDI drivers allow you to use the inline debugger attached to the launchpad board to flash and program the main chip. On Windows, it won't recognize the debugger until after you install the drivers. In order to do this, extract the driver files from the downloaded zip archive. From the driver manager, you can update the drivers by right clicking the unrecognized Stellaris debugger device and browsing to the driver files you extracted.
(Optional) Downloading Drivers and Other Tools - Download UniFlash Software Flashing Tool


UniFlash allows you to flash already compiled programs onto your launchpad.
This is most useful for seeing the provided examples found within TivaWare/examples. The installation is fairly straightforward, as they provide platform specific installers on the website. After downloading the tool, you can open it, auto-detect the Stellaris Debugger, manually select the TM4C123G module you're using, and then press the start button. From there, you can load a .bin file from the examples and flash it into memory to see the code in action.
Downloading Drivers and Other Tools - Download Code Composer Studio(CCS) Installer


Code Composer Studio is the portal by which you can compile your own assembly or C code and flash it directly onto the launchpad for debugging.
The install process for CCS is fairly simple. As usual, you choose the location on your computer to install the software first. After that though, it gives you options to install the compilers for various different microcontroller products. You'll want to select the "TM4C12X ARM" option. Then, if it's not already selected, make sure to enable the "Stellaris ICDI Debug Probe."
After completing the installation of CCS, we can configure CCS to start our first project.
CCS - Creating Our First Project


The most complicated part is within this step, but after we're finished, our development environment will be good to go! The steps will be given in order with the pictures so you can more easily follow along.
1. Select "Create a new CCS project."
2. Select the Tiva C Series board you are using, in my case, I have the TM4C123GH6PM. Be sure to select the Stellaris Debug interface.
3. Go to the new project's properties.
4/5. Create a path variable to your TivaWare folder. Under Resource -> Linked Resource, you should add a new path variable named TivaWare with the directory path pointing to your TivaWare install folder.
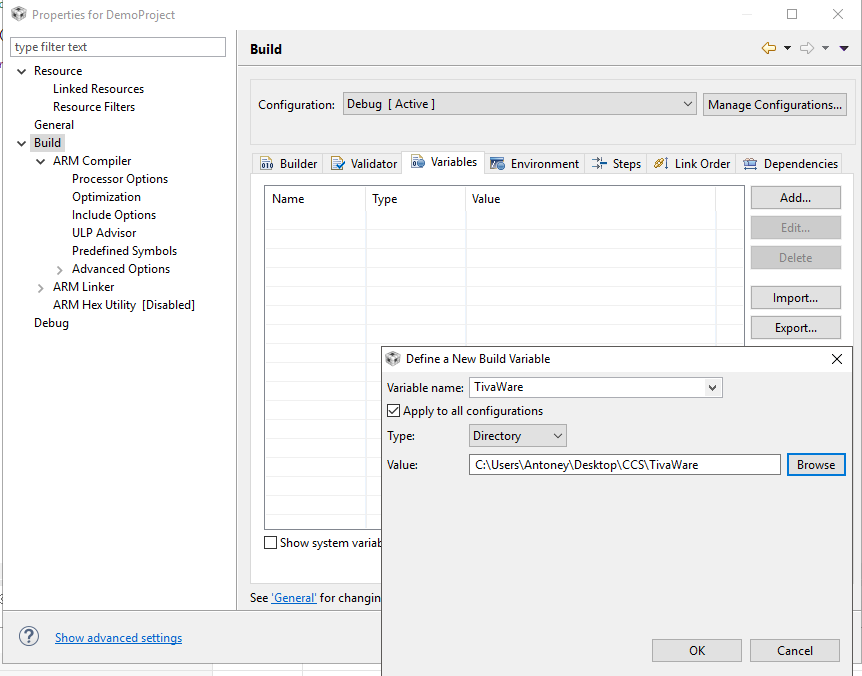
6. Create a build variable to your TivaWare folder. Under Build -> Variables, add a directory variable to your TivaWare folder as well.
Together, the path and build variables will make it easier to include the necessary files from the TivaWare installation into our project, and allow for updating the TivaWare library without having to redo our directory paths.
7. Under Build -> ARM Compiler -> Include Options, add a directory named ${TivaWare}. This will point to the path variable you defined earlier and make it so the compiler can automatically find the necessary include files.
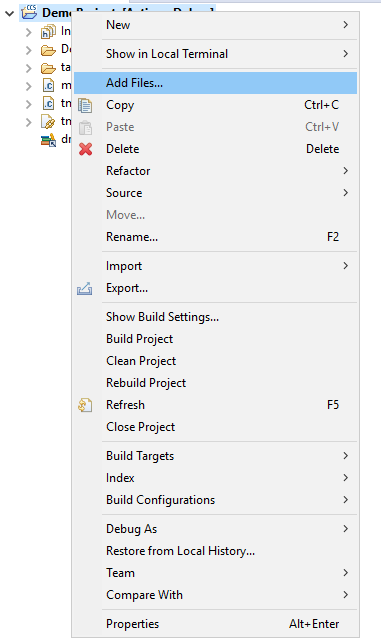
8/9/10. Last but not least, we need to add the driverlib library from the TivaWare folder to our project. This can be done by right clicking on the project and choosing "add files." Navigate to the shown directory to select the driverlib.lib file. After that, select "link to files" relative to our TivaWare directory.
If you made it this far, your environment should be completely set up!
Some Final Notes
At this point, you should have a functional development environment, as well as all the additional drivers and software packages you should need.
From here, a good way to learn about the launchpad board is to try out some of the example codes in TivaWare -> examples. You can flash the binary files that come pre-compiled onto the board directly, or import the code into your project to poke around in.
I hope this Instructable proved to be helpful, and I wish you luck in your experience with the launchpad!
Additional Resources: