Stuffed Animal or Clothing Manufacturing With CAD and CNC
by universalibrarian in Craft > Sewing
2649 Views, 14 Favorites, 0 Comments
Stuffed Animal or Clothing Manufacturing With CAD and CNC
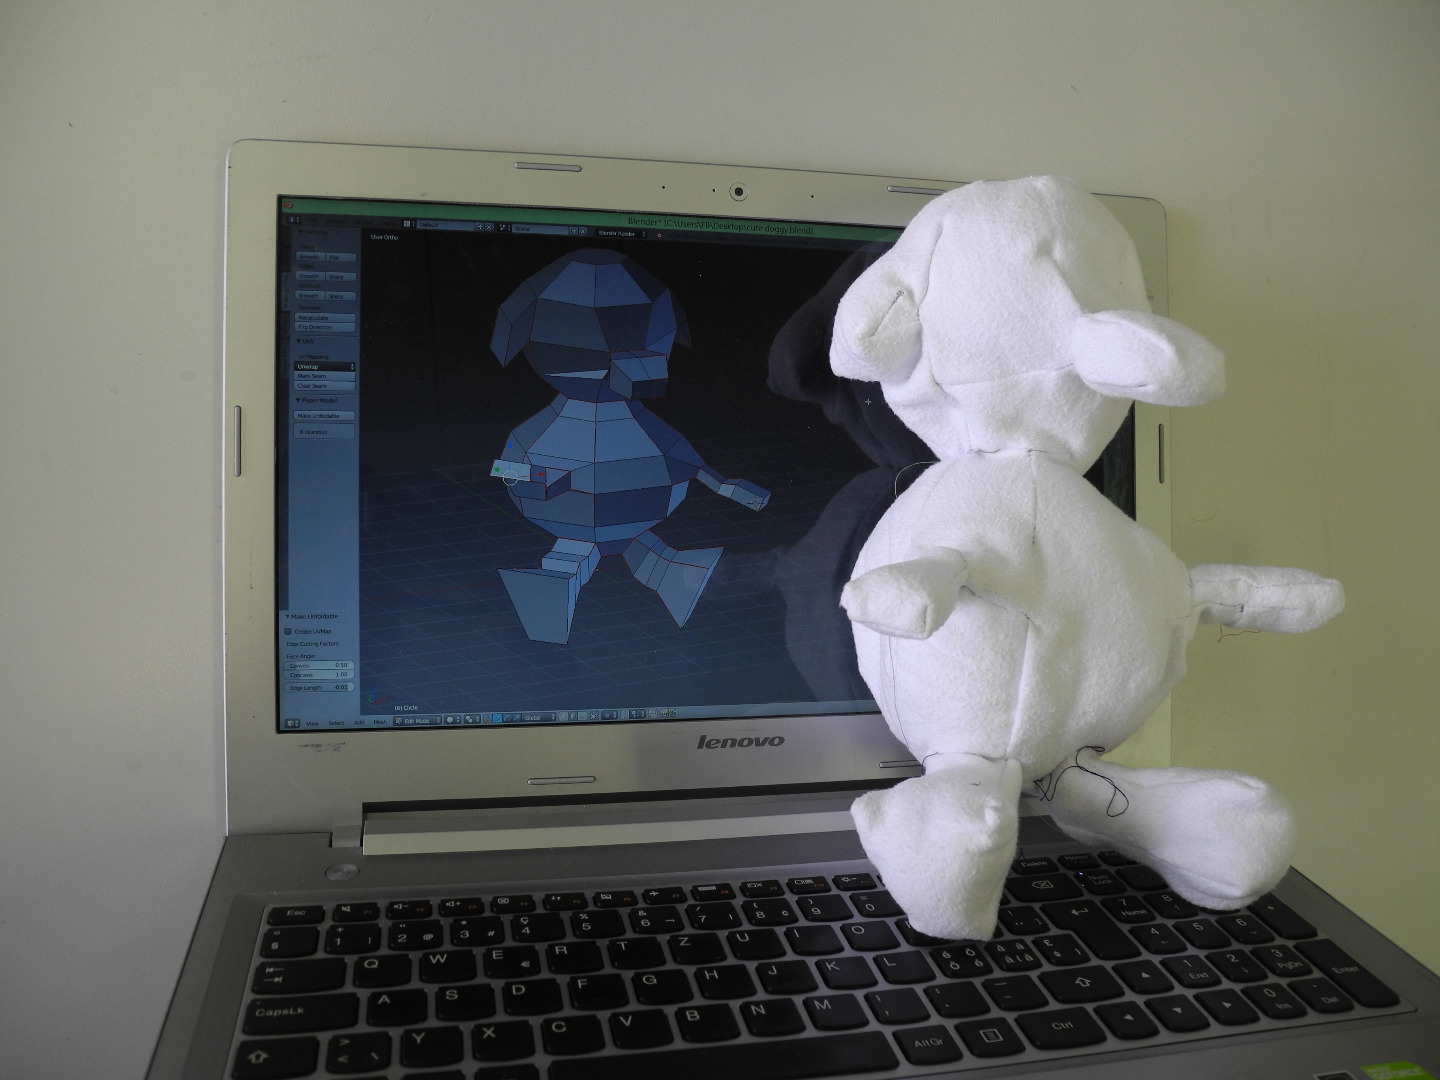
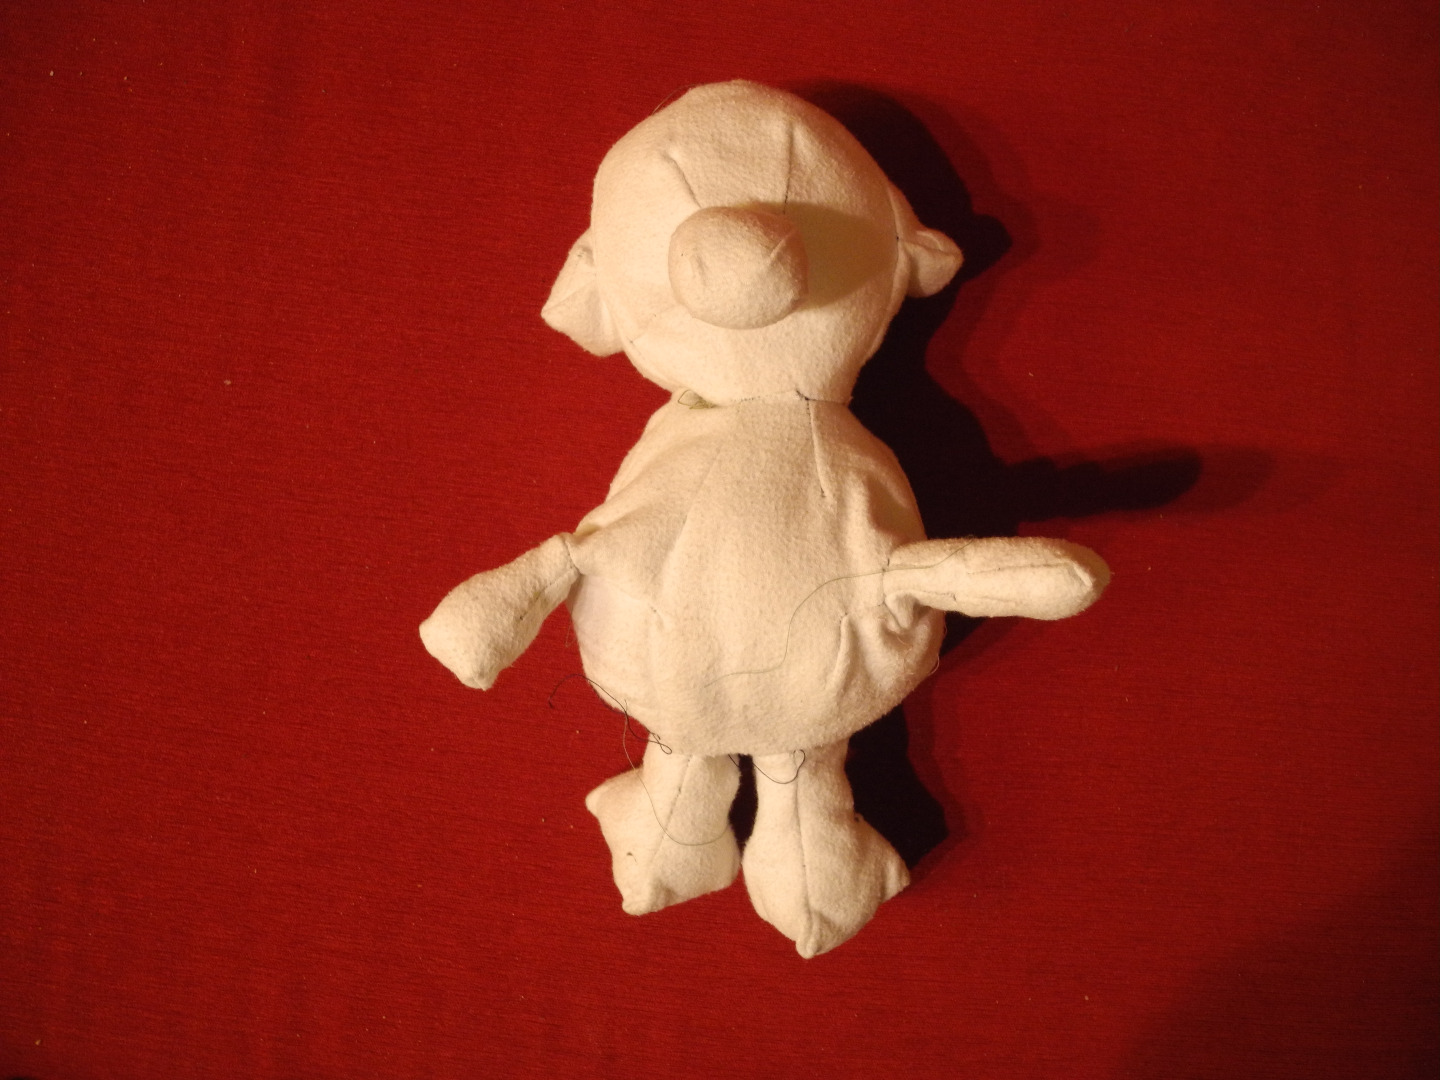
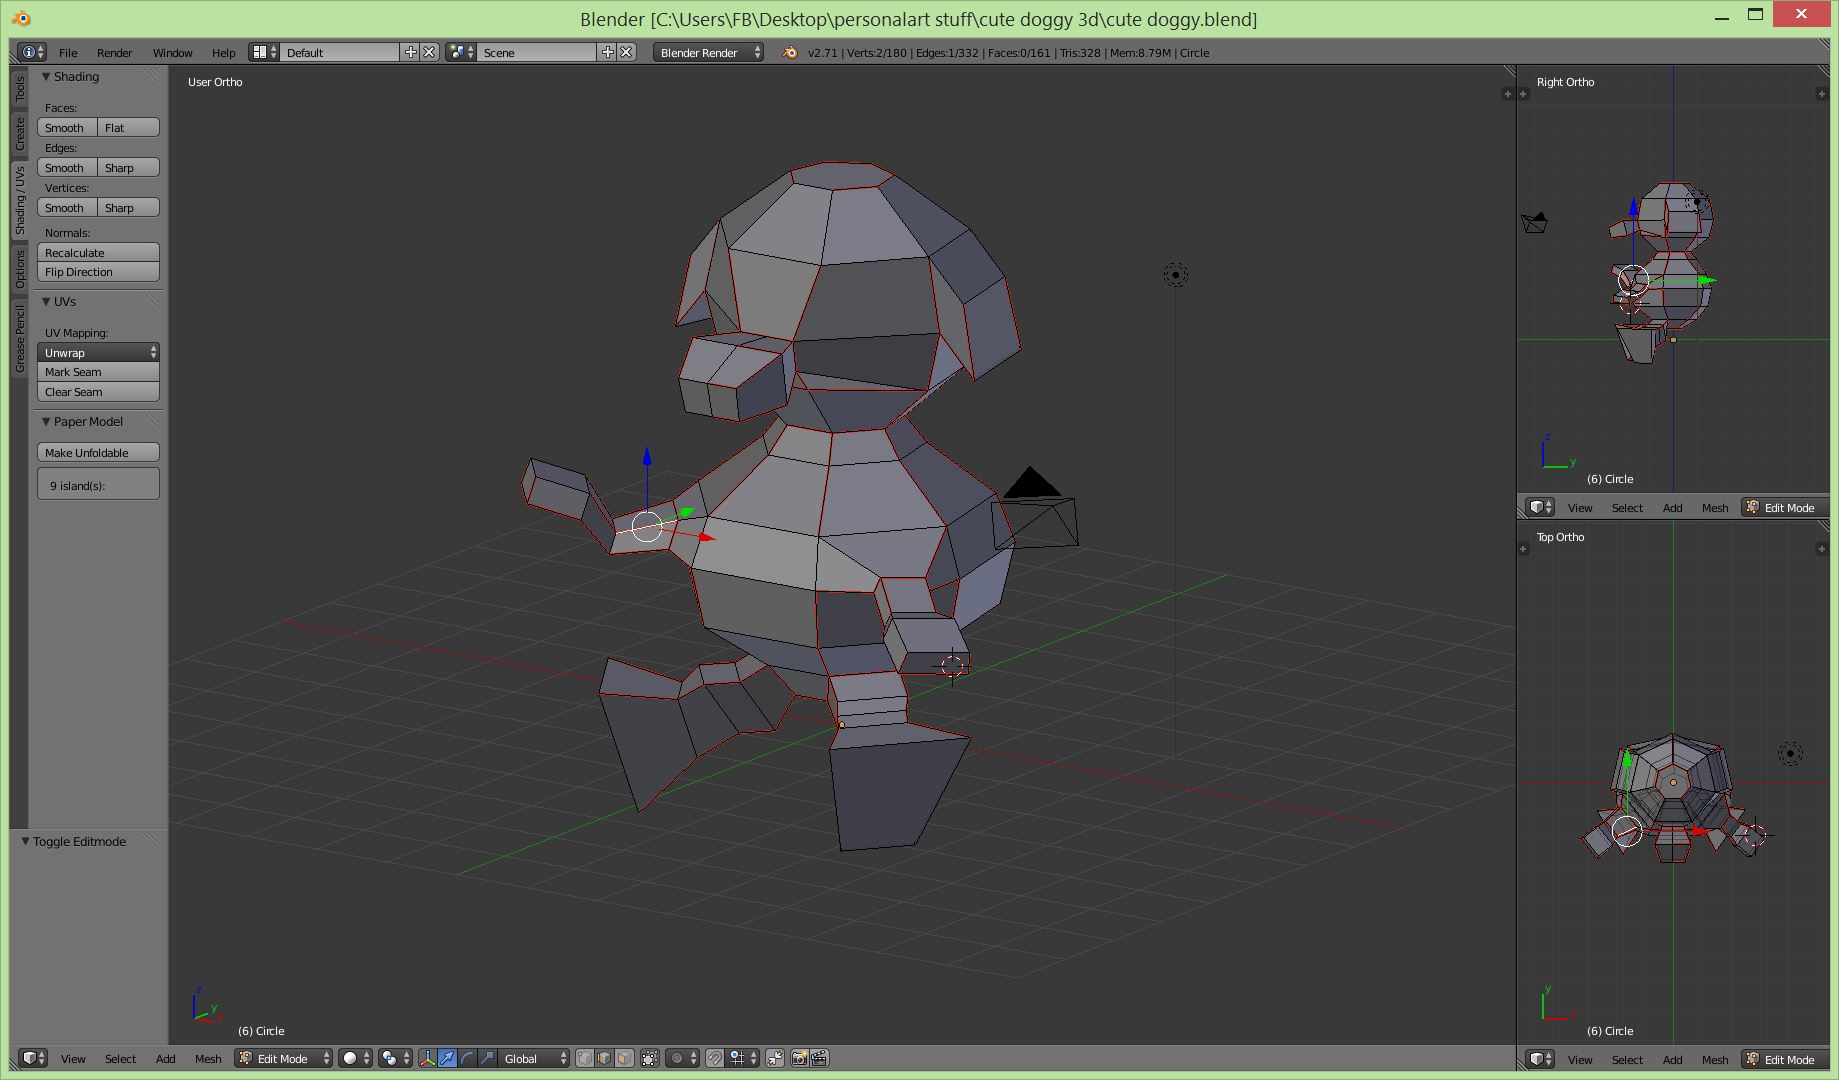
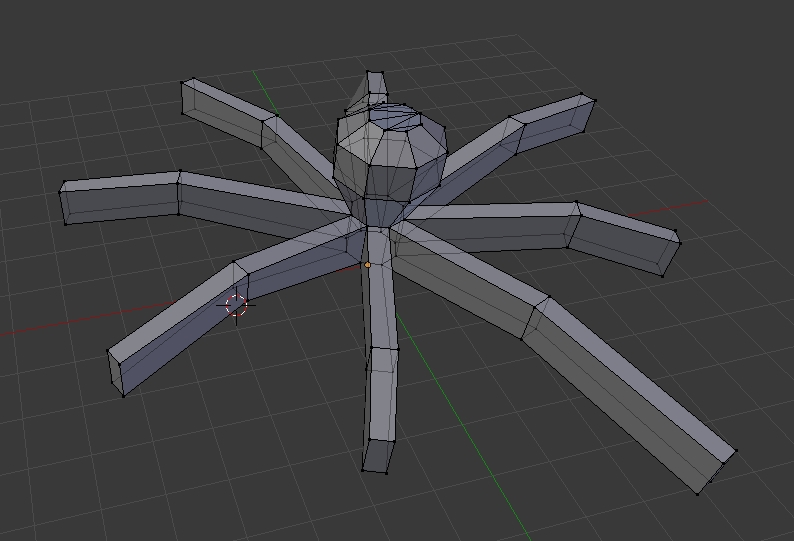
I am a high school Math, Science, Art, and Design teacher. This was successful with a small class of high school students They had already done a similar project with paper which helped. The CNC machine was a bottleneck so with larger classes it would be good to print and cut by hand. No experience needed with these programs, my instructions are just enough to get you through each step. Of course, try it by yourself first.
Instructions here. More discussion and other goodies at my blog :
http://makeandteach.blogspot.ch/
These instructions are specifically to make stuffed animals but with some smoothing of lines It would work for prototyping clothing as well. No CNC machine necessary.
Materials:
Necessities: (Free options below for all of these)
- CAD Program
- Unfolding plug in for CAD
- Vector drawing program
- Printer or projector
- Fabric, needle and thread, stuffing:
Nice to have:
- CNC paper cutting machine with fabric knife
- Sewing machine (consider getting several at thrift stores if on a tight budget) That's partly why I'm in the contest. frustrating when teaching and the aging sewing machine stops working.
Overview: Detailed breakdown in instructions.
1. Design a simple polygon mesh model
using Blender, Rhino (very nice), Sketchup, Autodesk stuff (Instructables owner so good support), or TinkerCAD.
2. Unfold Mesh
with unfold tool, (plug in in Blender), Built in in Autodesk, Plug in in Sketchup, or my favorite, not free, Pepakura Designer
3. Export unfolded mesh as a SVG file
, and open in a vector editing program, my favorite free one is Inkscape, others are Adobe Illustrator, Corel Draw, Most CAD programs have a 2D workspace that would also work.
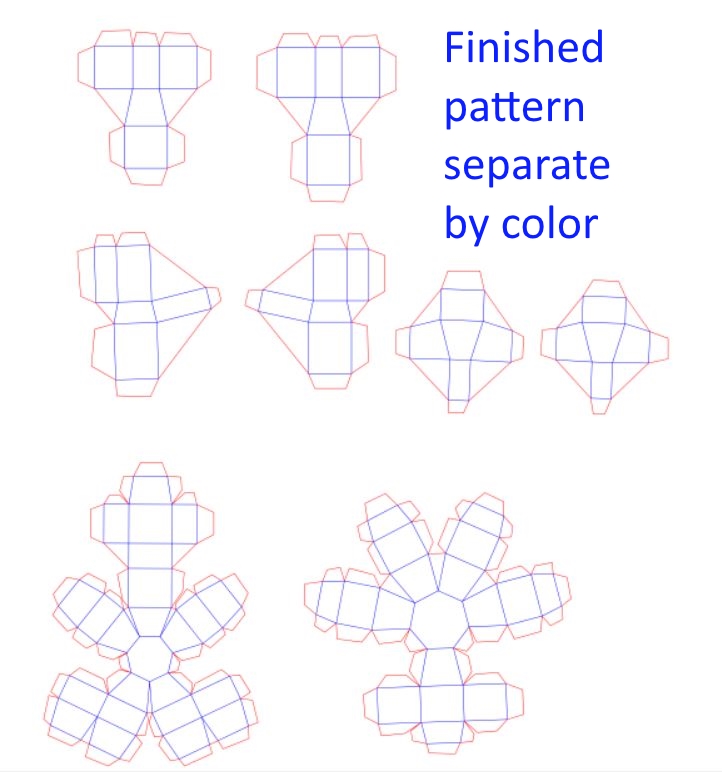
4. In Inkscape, edit the mesh using different colors for folding and cutting lines, Add useful flaps for sewing.
5. Export Sewing PATTERN from Inkscape. At this point one could print on big paper, or use a computer projector to trace onto fabric to cut and sew.
OR
6. draw the pattern directly on the fabric.
Export as a DXF and send the file to a CNC paper cutting machine, My absolute favorite, several years in the classroom is KNK Maxx. Put in a Graphite Pencil and use it as a plotter.
7. Cut out the outside of the pattern
using the fabric knife in the paper cutter.
8. Sew along drawn lines using a machine or by hand,
9. flip inside out and stuff.
10. CUDDLE or WEAR!
Design Simple 3D Mesh
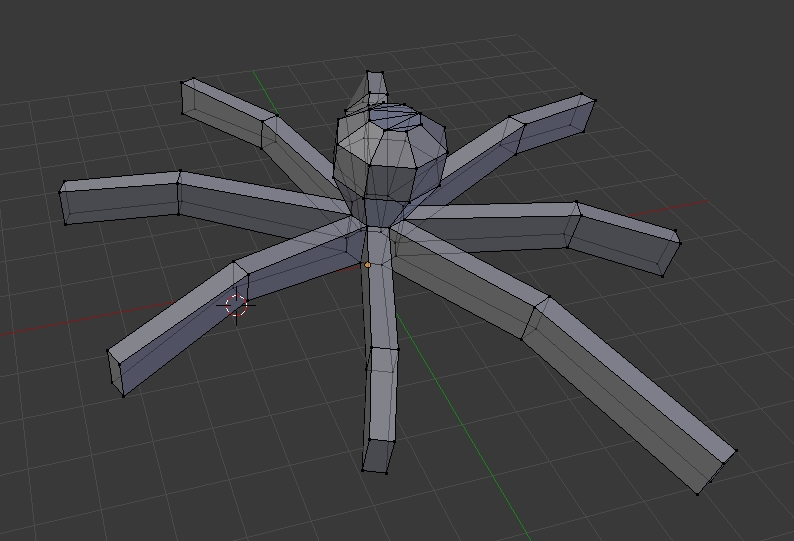
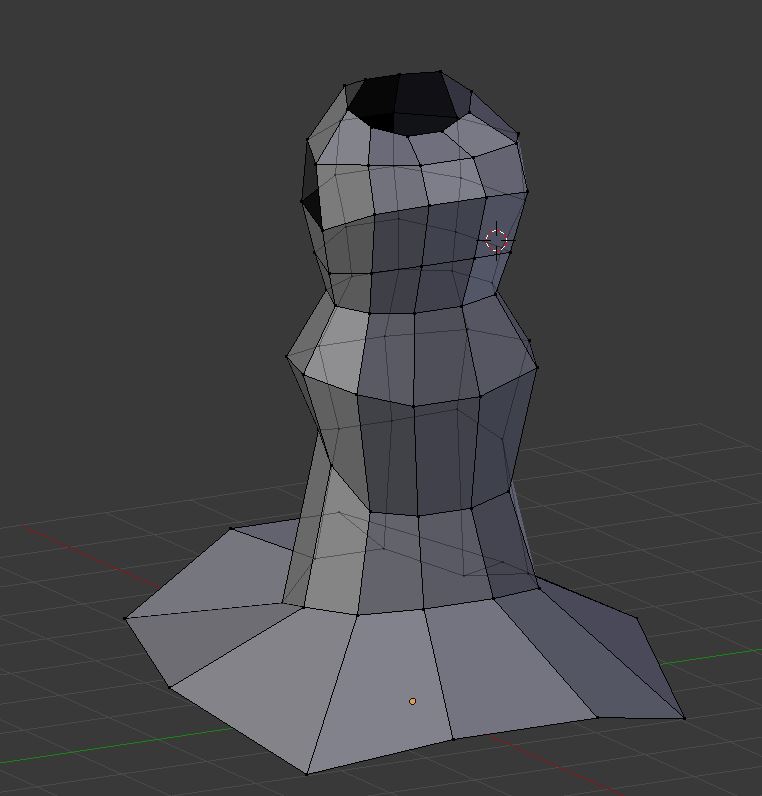
SIMPLE!!! K.I.S.S.!!!!!!
Blender and other CAD programs are HUGE and have many many features. Do not use them all. Focus on a few at a time for what you need. If working with students this is an essential point. Only use these for this project. They can experiment outside of class with others. Try this process a few times very quickly and develop fluency with these few commands. For more practice, I highly recommend Andrew Price's Blender Guru tutorials, especially this one. He has a downloadable folder with the basic commands.
Skills covered here:
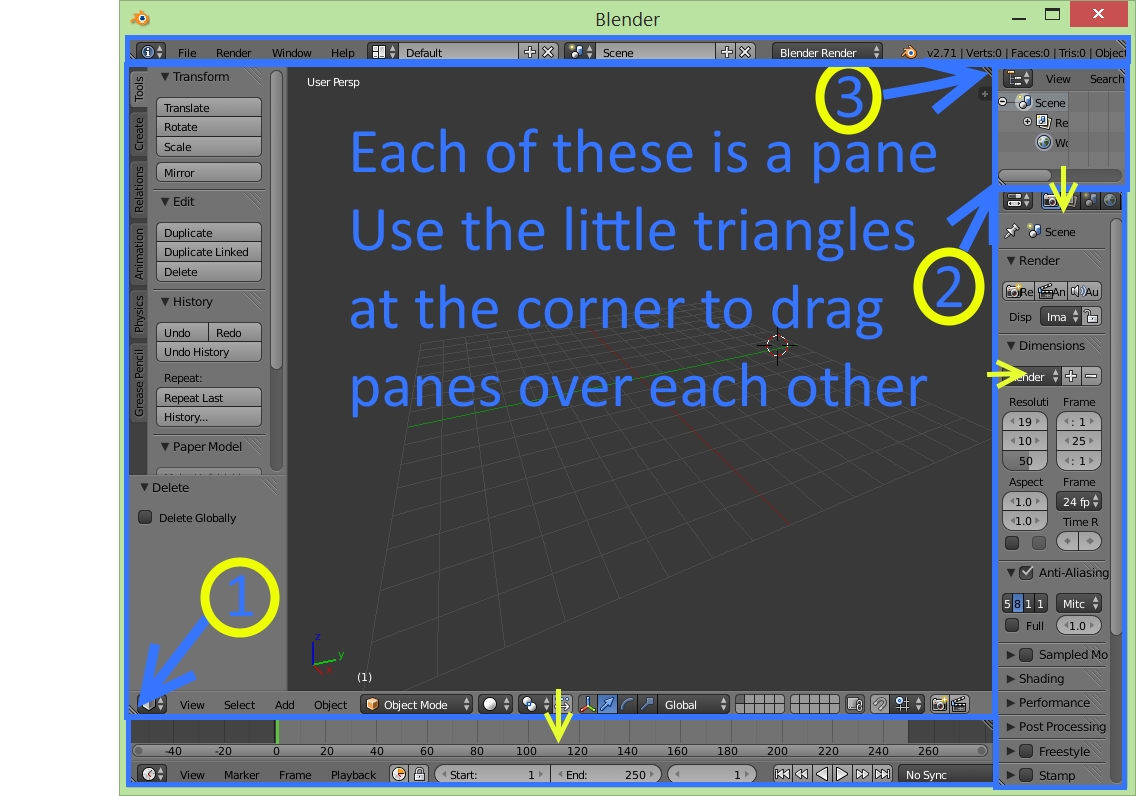
- Changing the size of Blender Panes
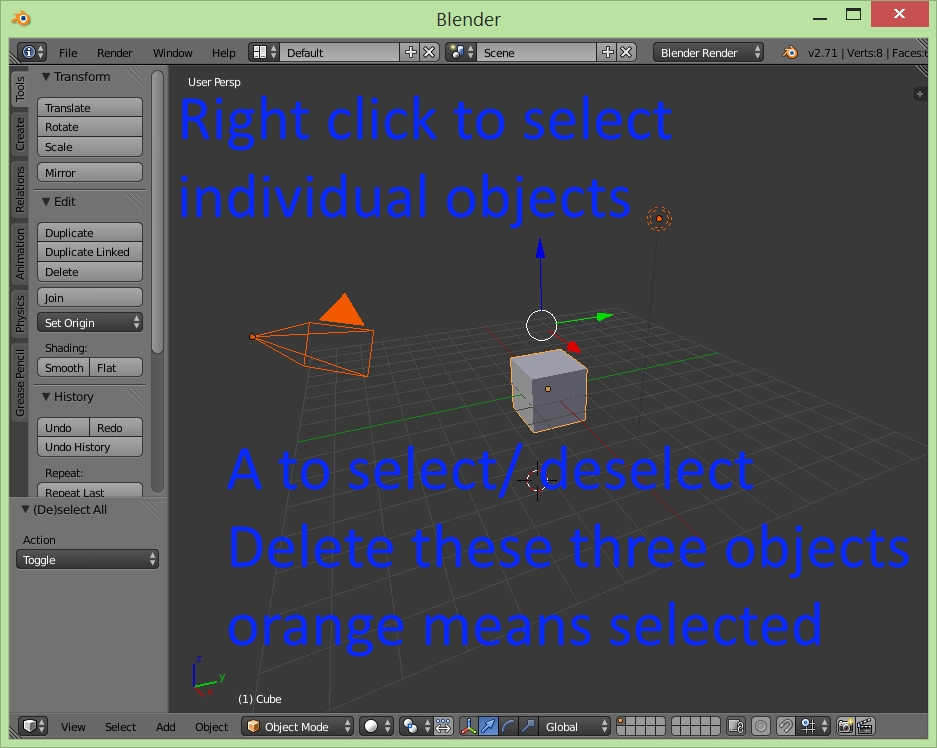
- Deleting objects
- Adding Mesh objects
- Navigation with number pad
- Toggling between edit and object modes
- Right click to select
- "a" select all or deslect
- "e" for extruding faces
- "g" for grab
- "b" for box select
- "c" and then "enter" for circle select
- "s" for scale
- Installing plugins
- Exporting an unfolded net
Instructions, follows picture order
- Download and install Blender here
- Open Blender
- Use a mouse with a scroll button if possible
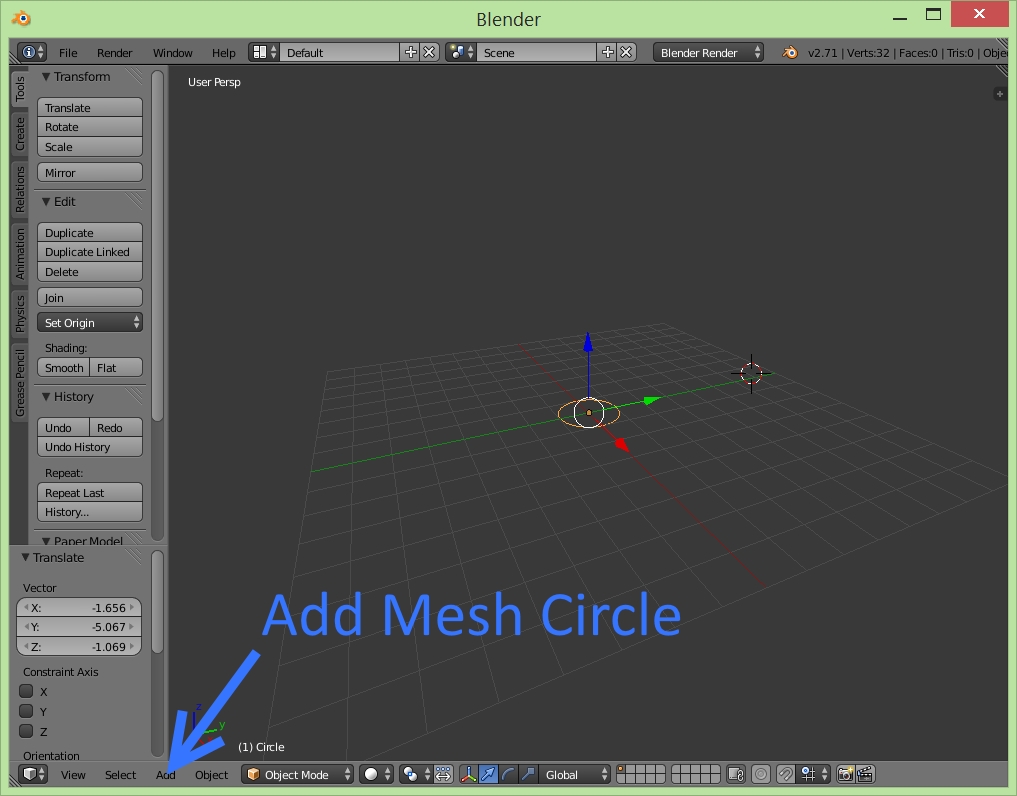
- Simplify your Blender window by pulling panes over each other using the little triangle in the corner. Fig 1
- Select all of the objects using RIGHT CLICK or by pressing "a" on the keyboard.
- Delete with the DELETE KEY then OK
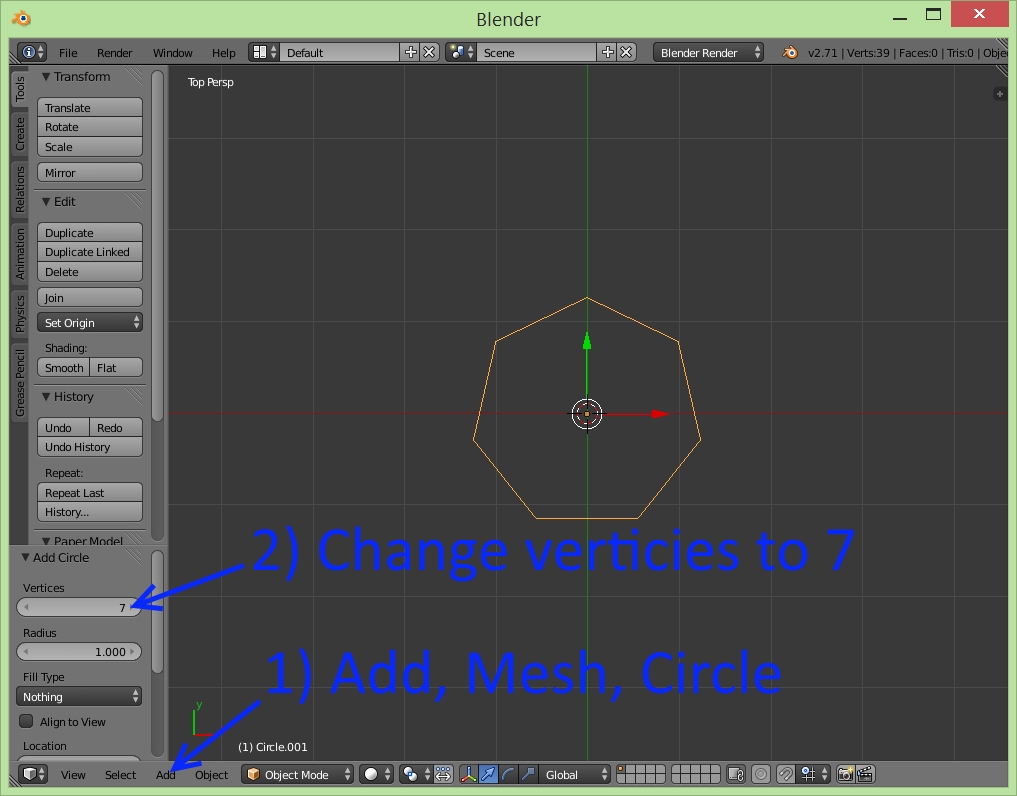
- Menu at the bottom ADD > MESH > CIRCLE
- Change the number of vertices using the input box on the left side, if you don't see it, scroll down.
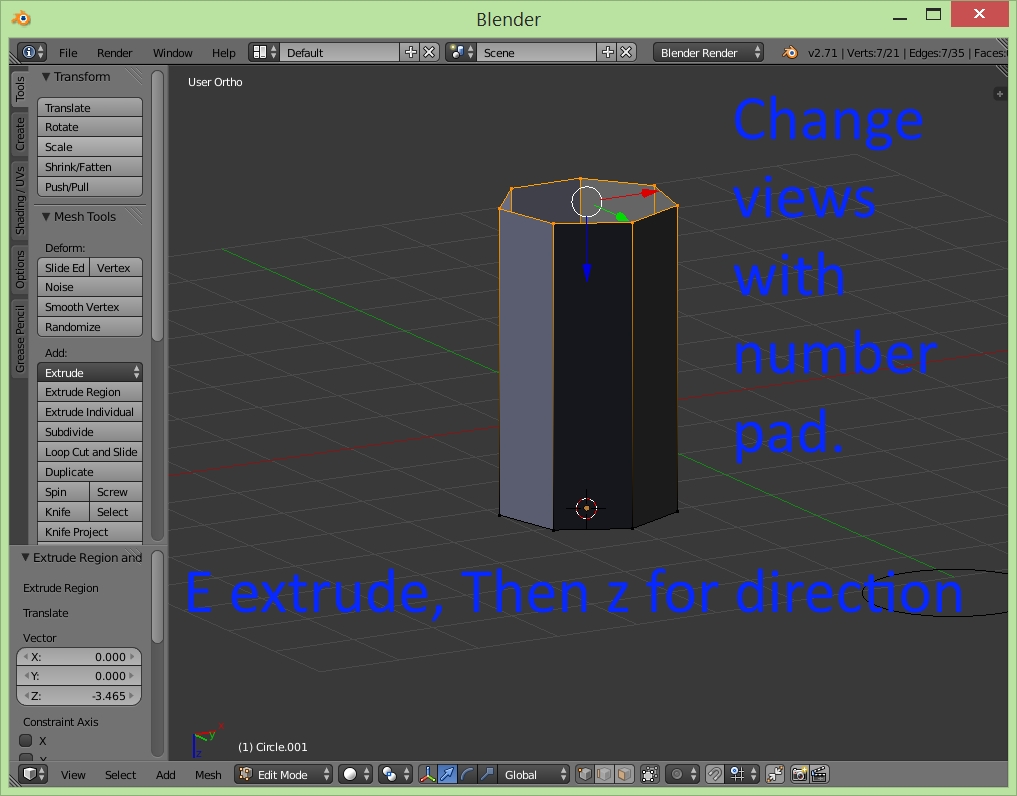
- Toggle to EDIT MODE using the little button at the bottom of the main pane.
- Click "e" to extrude and then immediately "z" to limit the extrusion to the z direction.
- Experiment with the number pad, buttons, 4,6,2,8 rotate the view, 7,1,3 set top, side, front views. 5 is important as it toggles perspective or straight (orthogonal) view. In the top left corner of the 3D pane it tells you which view you are on. Zoom in and out using the middle mouse roller or the number pad "+" and "-"
- Finish with Number Pad 5 (ortho) and 3 right view. It is important to do many of the straight movements in orthogonal flat views so that the objects don't get twisted or skewed
- Click on the button at the bottom of the 3D pane which says "limit selection to visible" Click it so that when you rotate the view, you can see wire frame through the model, now when you select, things will be selected all the way through the model.
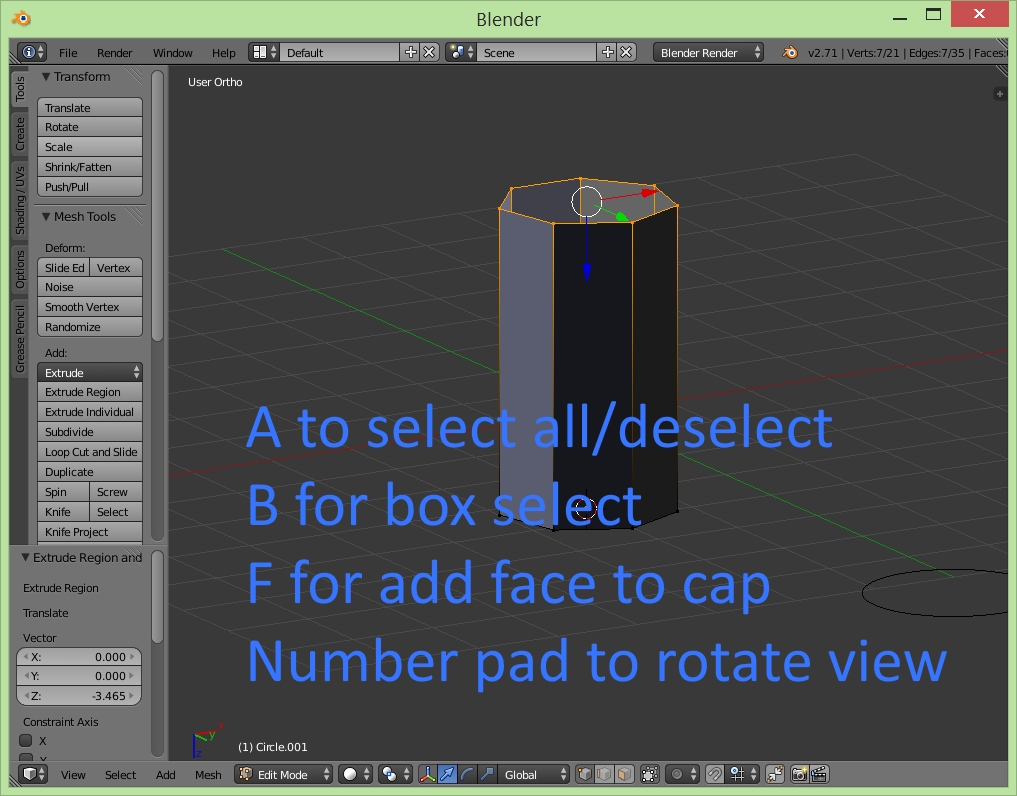
- Click "b" for box select. Select the top edge of the model.
- Menu MESH > FACES > FILL ( Alt F) not as pretty as "make face", but better results in the end.
- Click "a" to deselect
- "b" to box select and then repeat to close the bottom
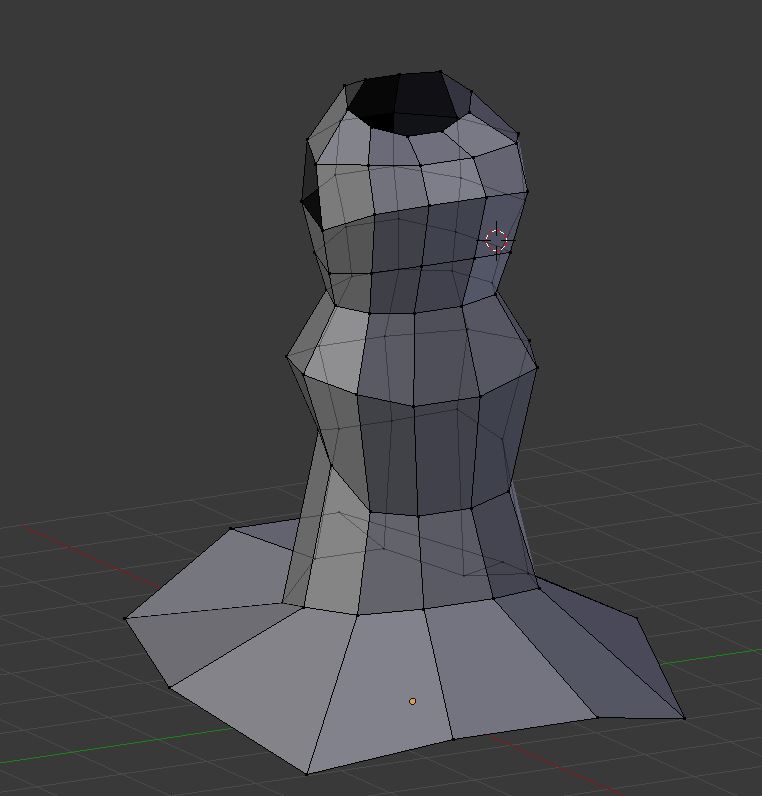
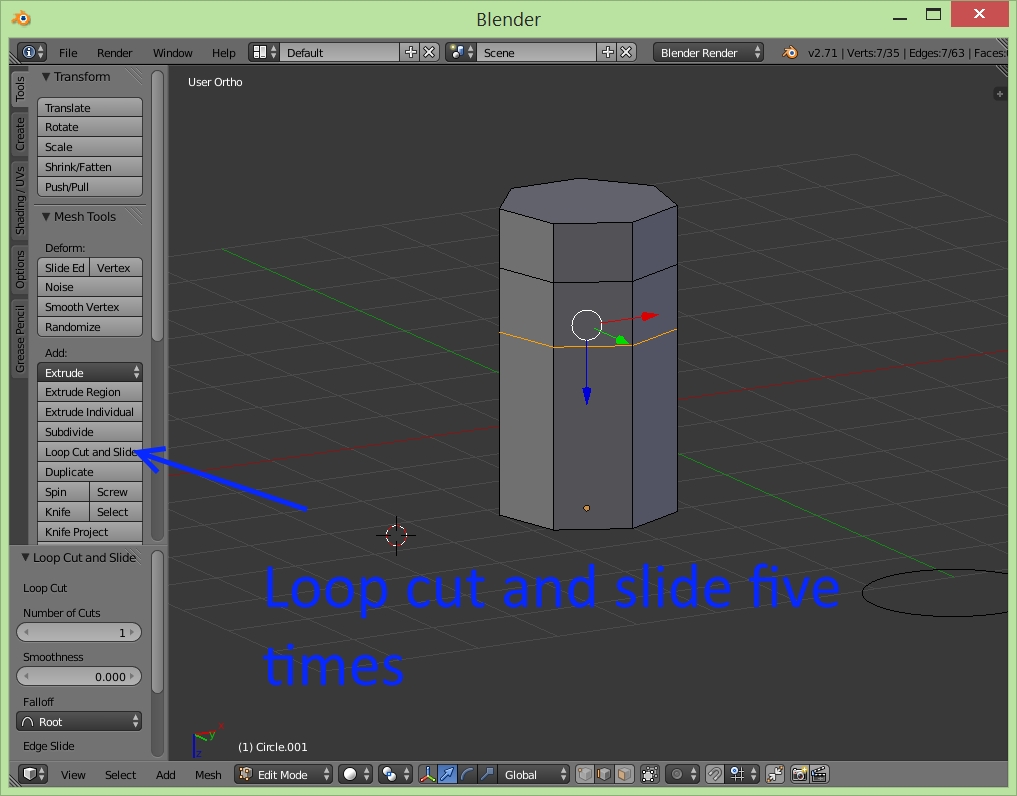
- On the LEFT panel look for "Loop cut and slide" move the mouse to the tube and add divisions. Five works well for a head and a body.
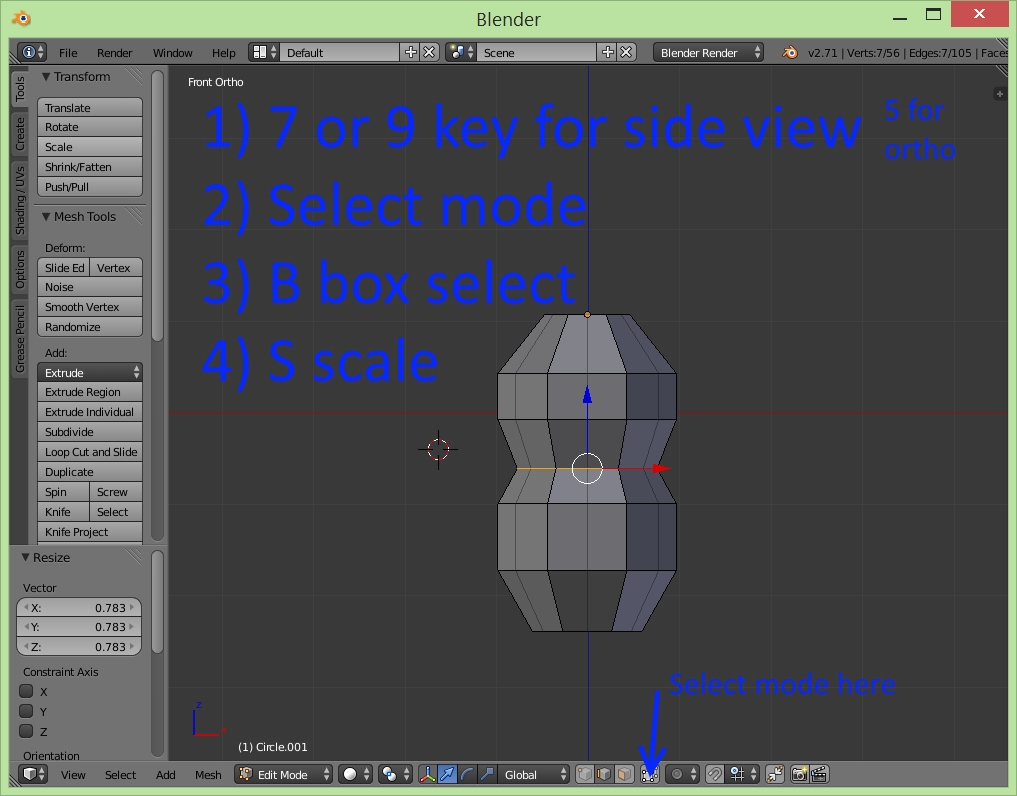
- Side view, "b" box select each layer.
- "s" to scale each ring (see pictures for suggestions)
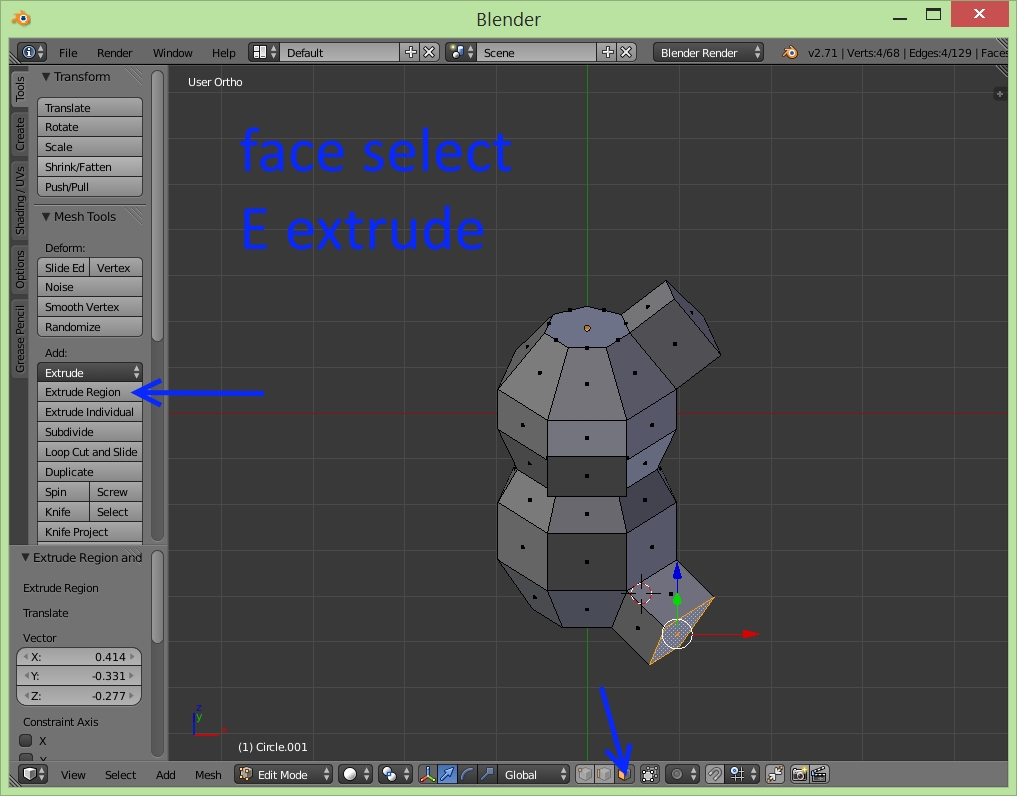
- Click on FACE SELECT from the little squares on the bottom of the 3D pane
- RIGHT CLICK to select a face
- "e" to extrude faces for limbs. Extrude the end again to make a joint like a knee or a foot.
- "a" to deselect
- "c" to select points with a circle, RETURN to finish the selection
- select a limb or a joint and "s" to scale
- "g" to grab and move a selection "x", "y", "z" to limit movement in that direction, To be precise, try to make movements only in the front, side and top views.
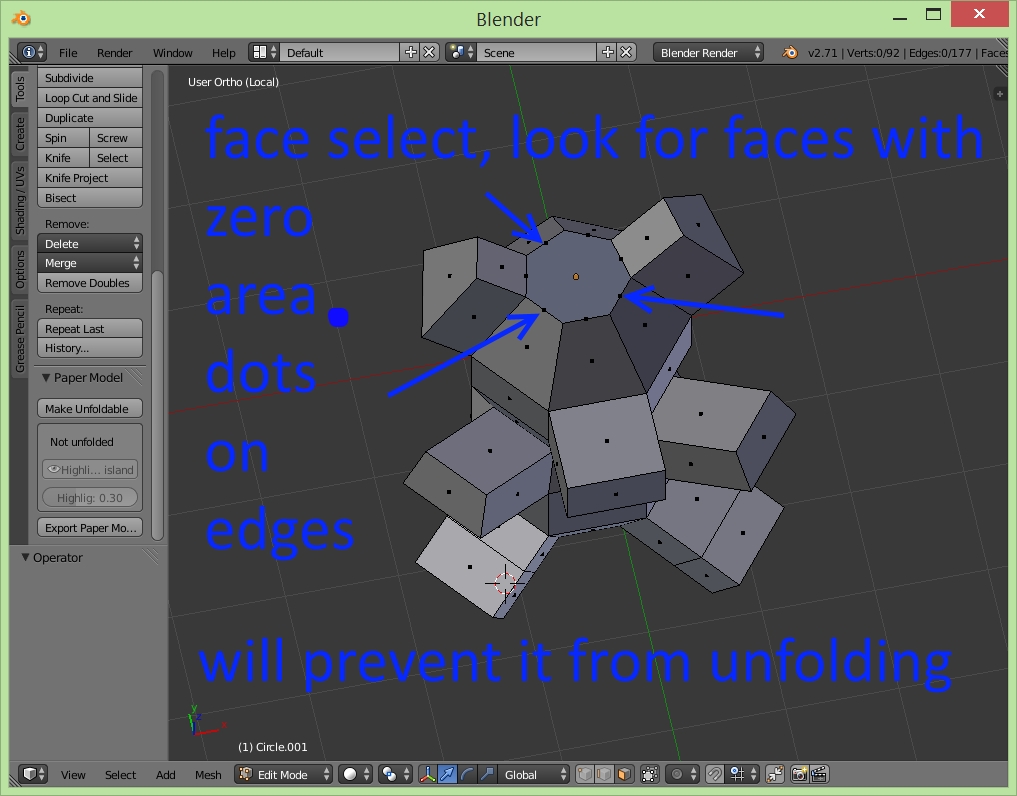
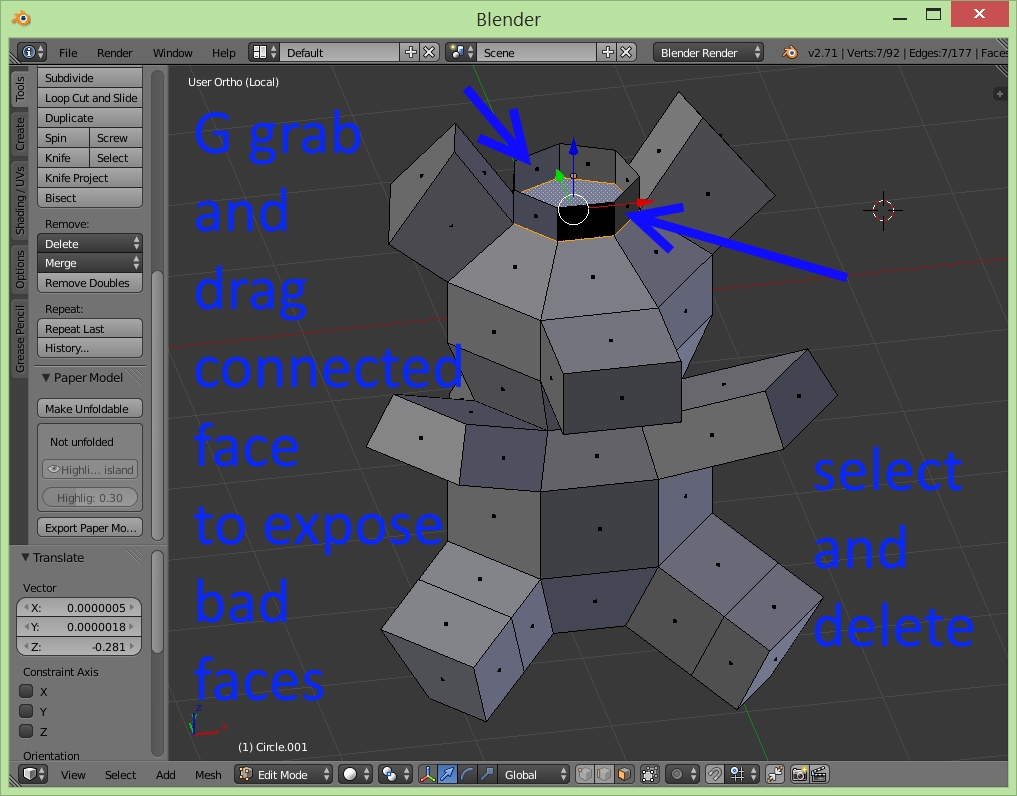
- ** protip, with the face select option on roll around the model checking for dots on the edges. If there is a dot on an edge, it means there is a face with zero area there, "g" to grab the face connected to the degenerate faces and drag it to expose and extend them. Select each and delete.
- Save early and often.
- Do this a couple of times from scratch to get good at it. It gets very fast as you gain experience.
Downloads
Unfold Mesh to a Flat Net
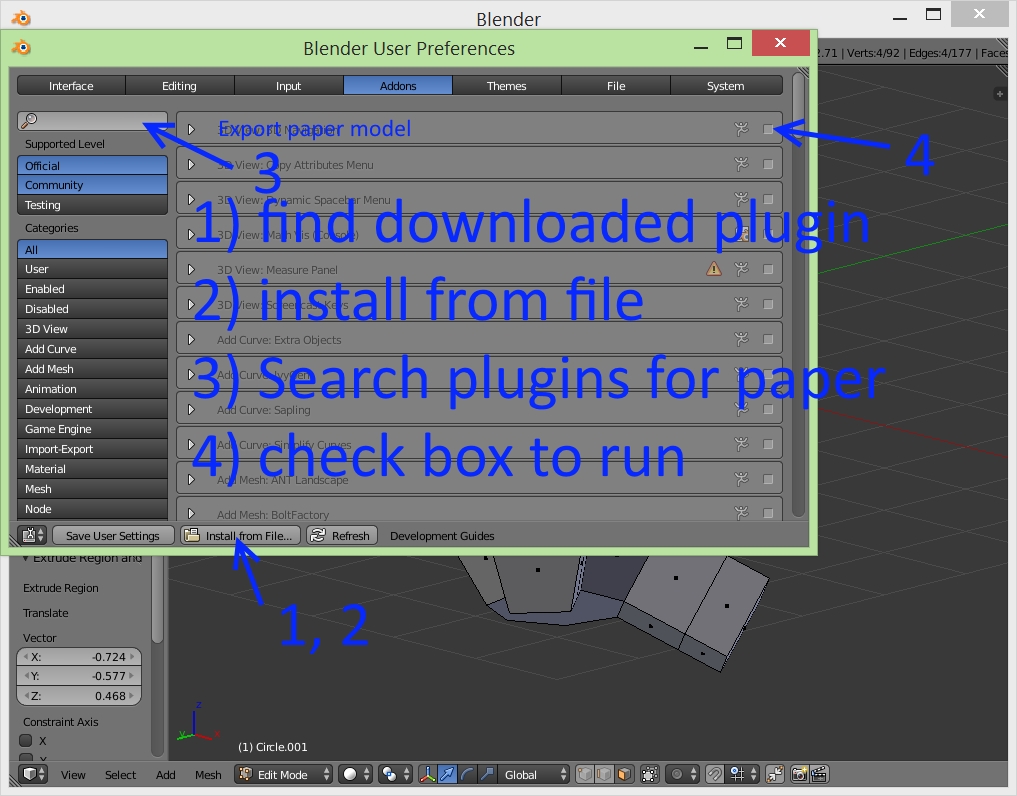
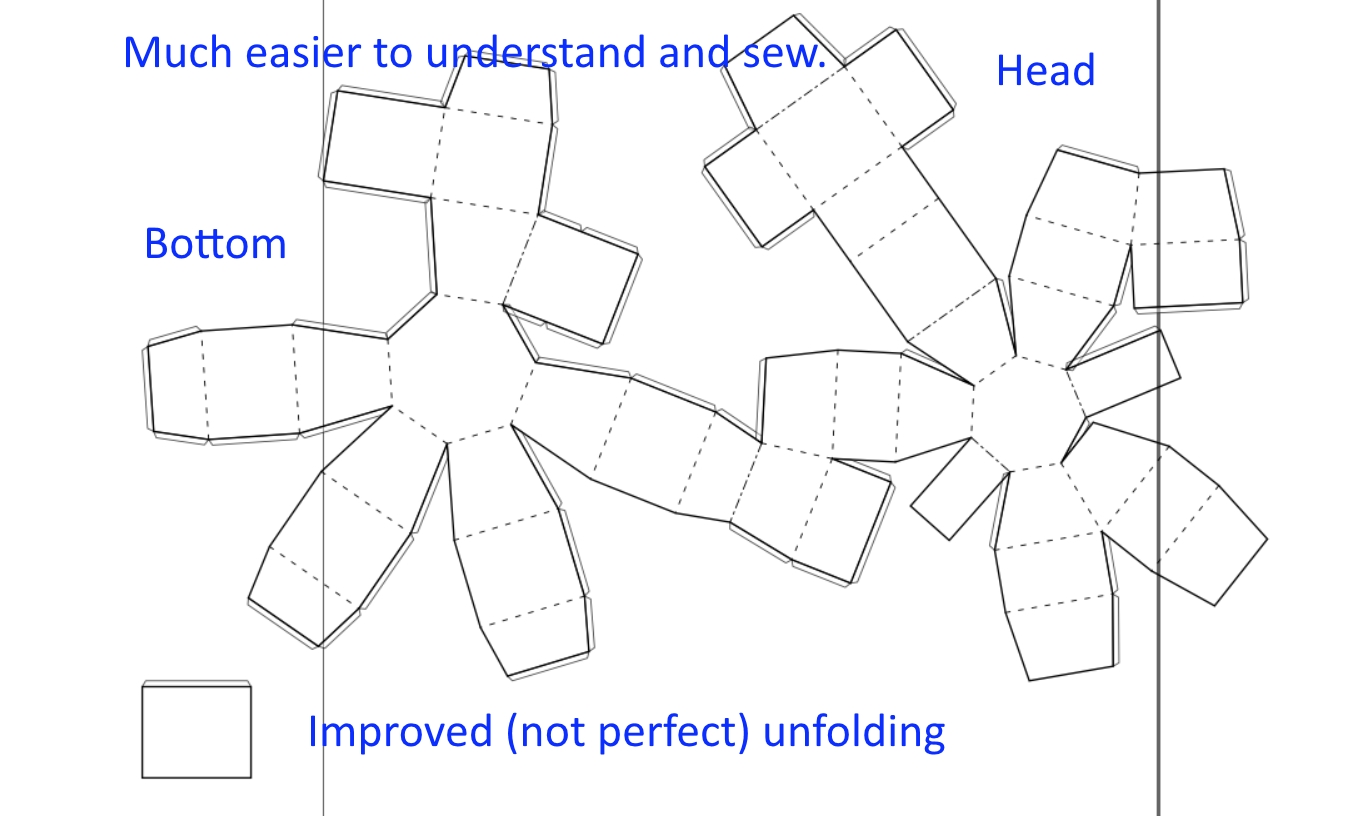
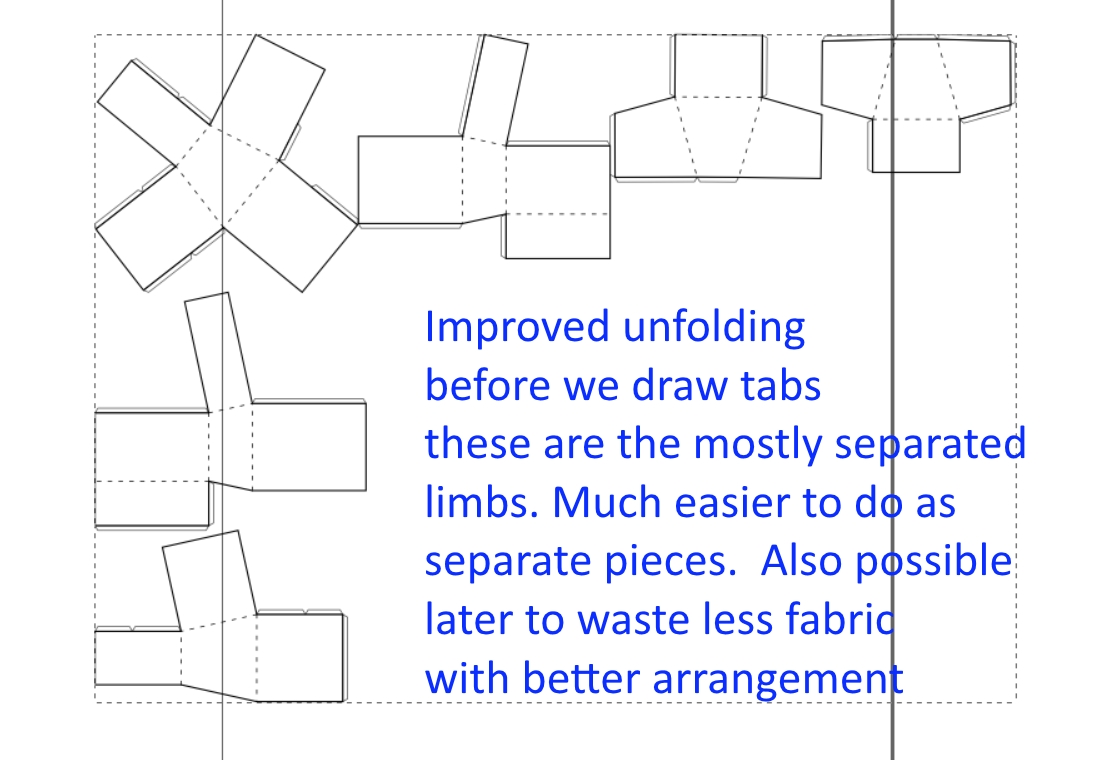
Different programs can do this in different ways. My favorite, purpose built just for this, is called Pepakura Designer. It is well worth the 30 bucks for personal work. For the classroom it is probably too expensive so free options include some of the new tools from Autodesk, and a plugin programmed by Adam Dominec (Emu) for Blender.
- Go to http://wiki.blender.org/index.php/Extensions:2.6/P...
- Download the extension, Export: Paper Model, take note of the version number to make sure your Blender is compatible.
- Open Blender
- Menu FILE> USER PREFERENCES
- Click on the ADDONS tab
- At the bottom Click on the button INSTALL FROM FILE
- Find the place where you downloaded the file. Select it and click the INSTALL FROM FILE button at the top right.
- Search in the Plugins for "paper"
- Check the box next to the running person to activate the plugin. You may need to do this every time you open blender and want to unfold things.
- When the plugin is activated, in the 3D pane there is now a new set of commands available on the left and a new option in the export menu to export a paper model.
- In EDIT MODE for your model, move to the left control panel scroll down
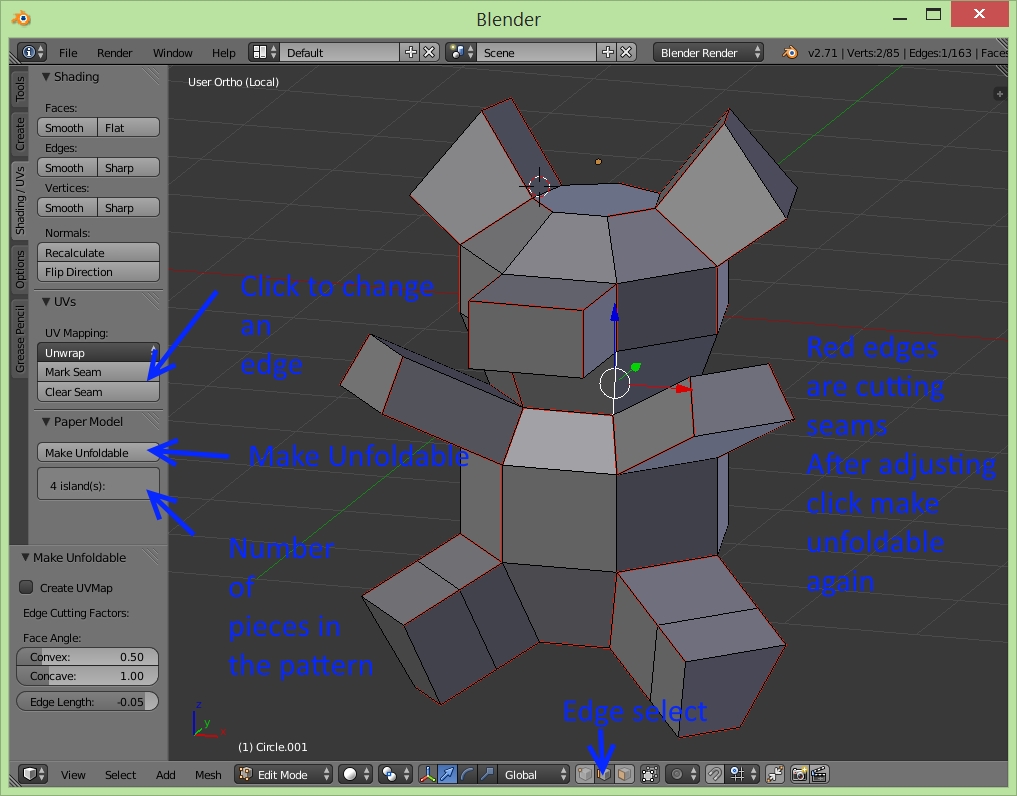
- and click on MAKE UNFOLDABLE
- If it works you will see red lines appear on your model, these are the cut seams.
- If it doesn't work you will see a cryptic error screen. What has probably happened is that there are mathematical errors in the model, the most common of these is when a face has been made with zero area along an edge. You can find these faces by clicking on FACE SELECT in the bottom edge of the 3D window and then looking for points, not in the middle of faces, but on the edges. "g" for grab, grab the faces next to these weird points and drag to extend and expose the extra faces. Delete them.
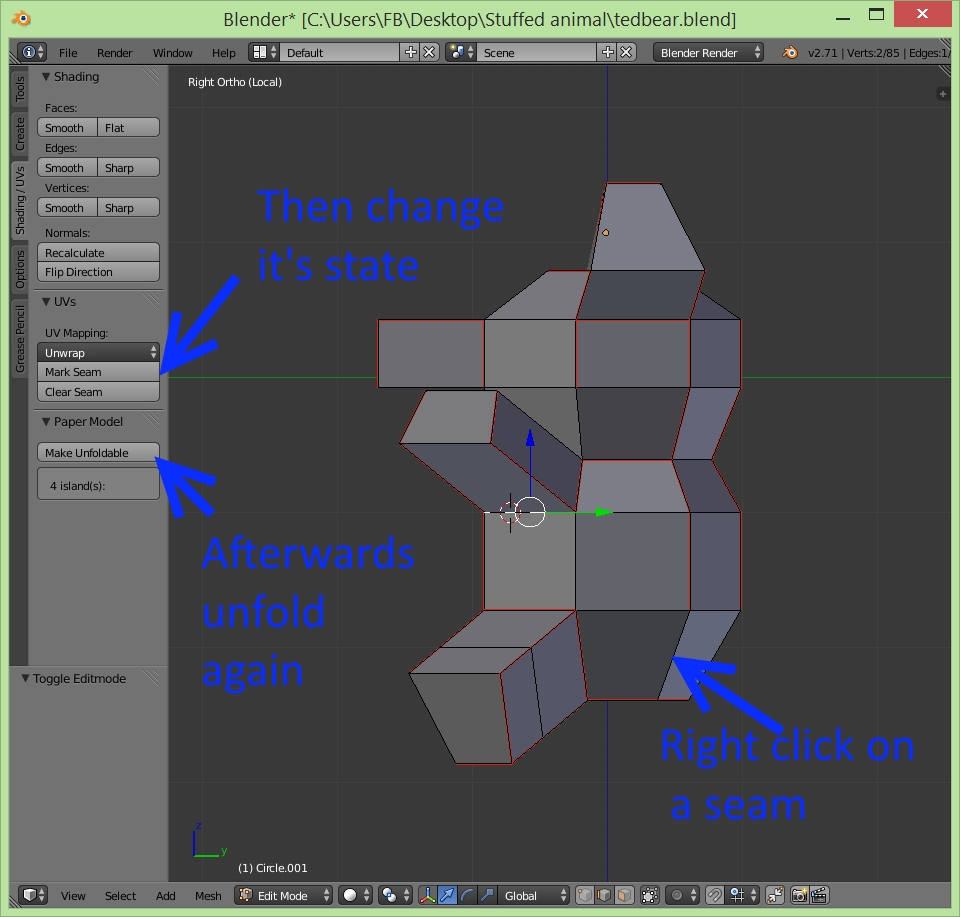
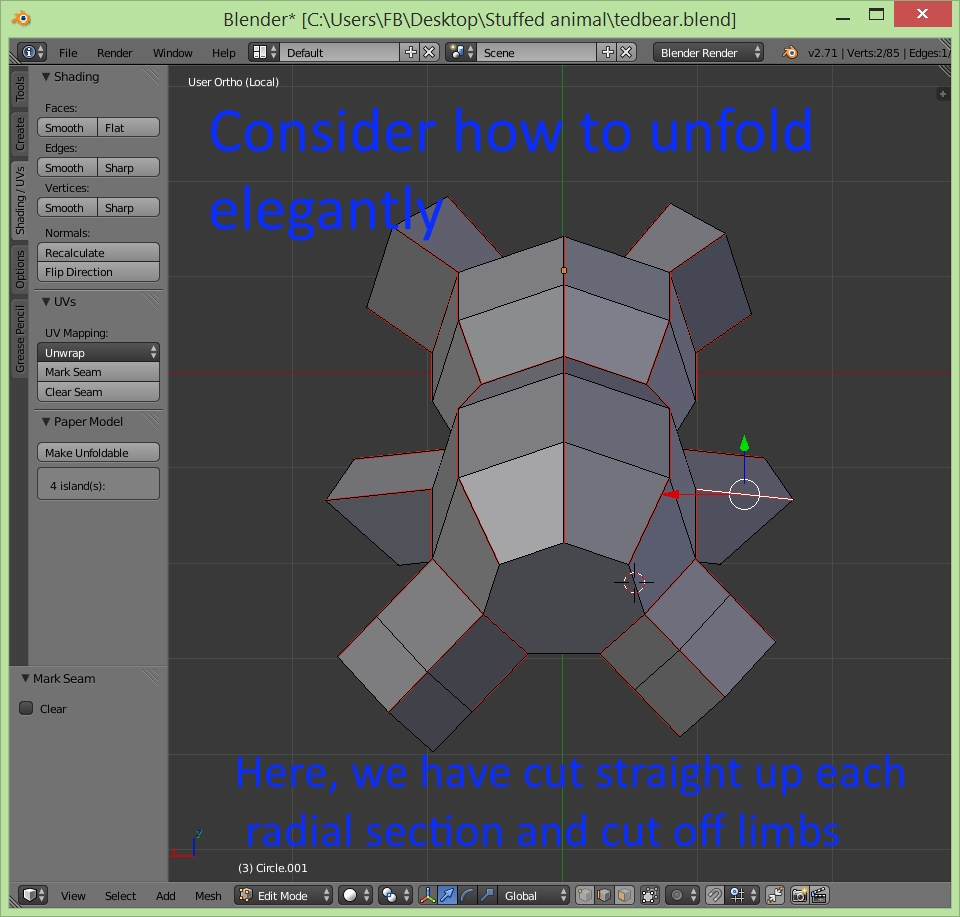
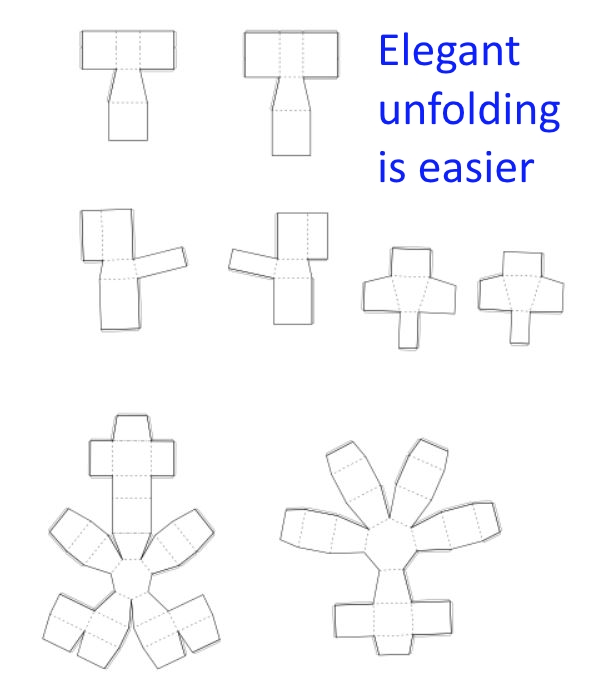
- If it works: Under the make unfoldable button there is a window that will say "4 Islands" or something like that, this is the number of pieces that the model has been cut into. Geometrically it is impossible to unfold all shapes into only one piece flat. Think about the pieces that you would like to sew together. For instance , separating limbs, or cutting down radial lines or around concentric lines are often nice.
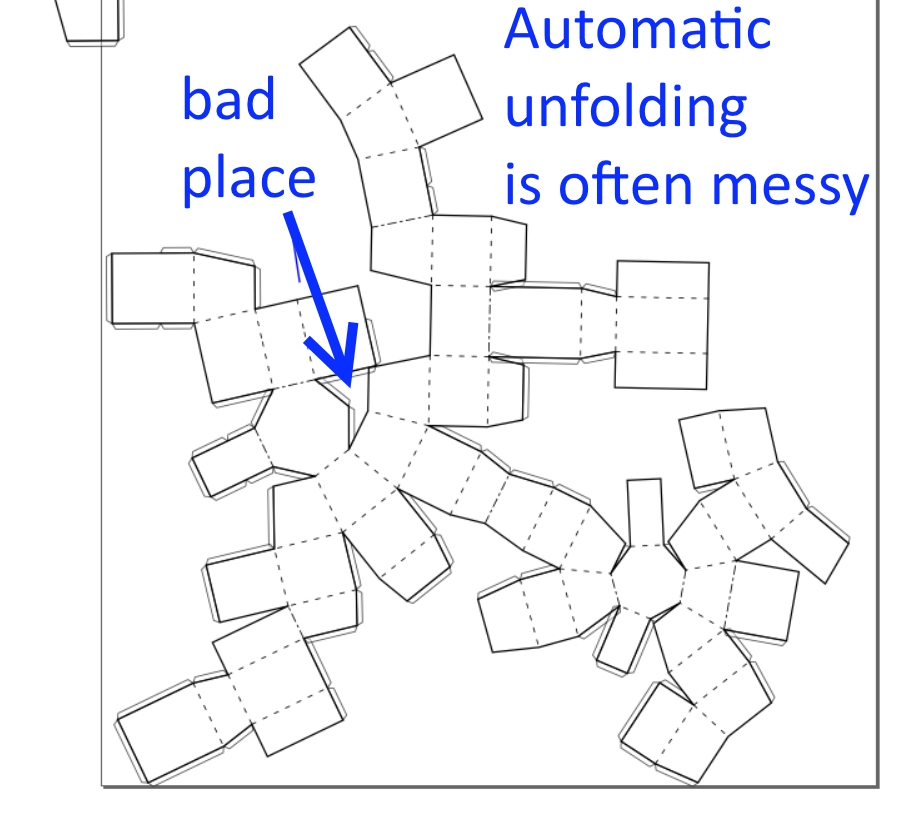
- To get an idea of what pieces the computer generated, menu FILE> EXPORT> PAPER MODEL
- Save the file and then open it in a vector graphics editing program, Like Inkscape or Adobe Illustrator, or Corel Draw, many CAD programs can do this too. More on this in the next step
- Back in Blender: To edit the cutting seams, click on EDGE SELECT at the bottom of the the 3D editing window.
- RIGHT CLICK on an edge to select it
- on the left, look for the buttons MAKE SEAM or CLEAR SEAM to change the state of an edge Look at the picture above of the bear's butt. On it I have changed the computer generated cutting lines to have a more elegant arrangement. Look at the differences in the nets before and after.
- When you have finished editing what you think will work go back and click on MAKE UNFOLDABLE The computer will start with your edits and try to make a mathematically compatible set of islands.
- Menu FILE> EXPORT >PAPER MODEL
Drawing Your Pattern
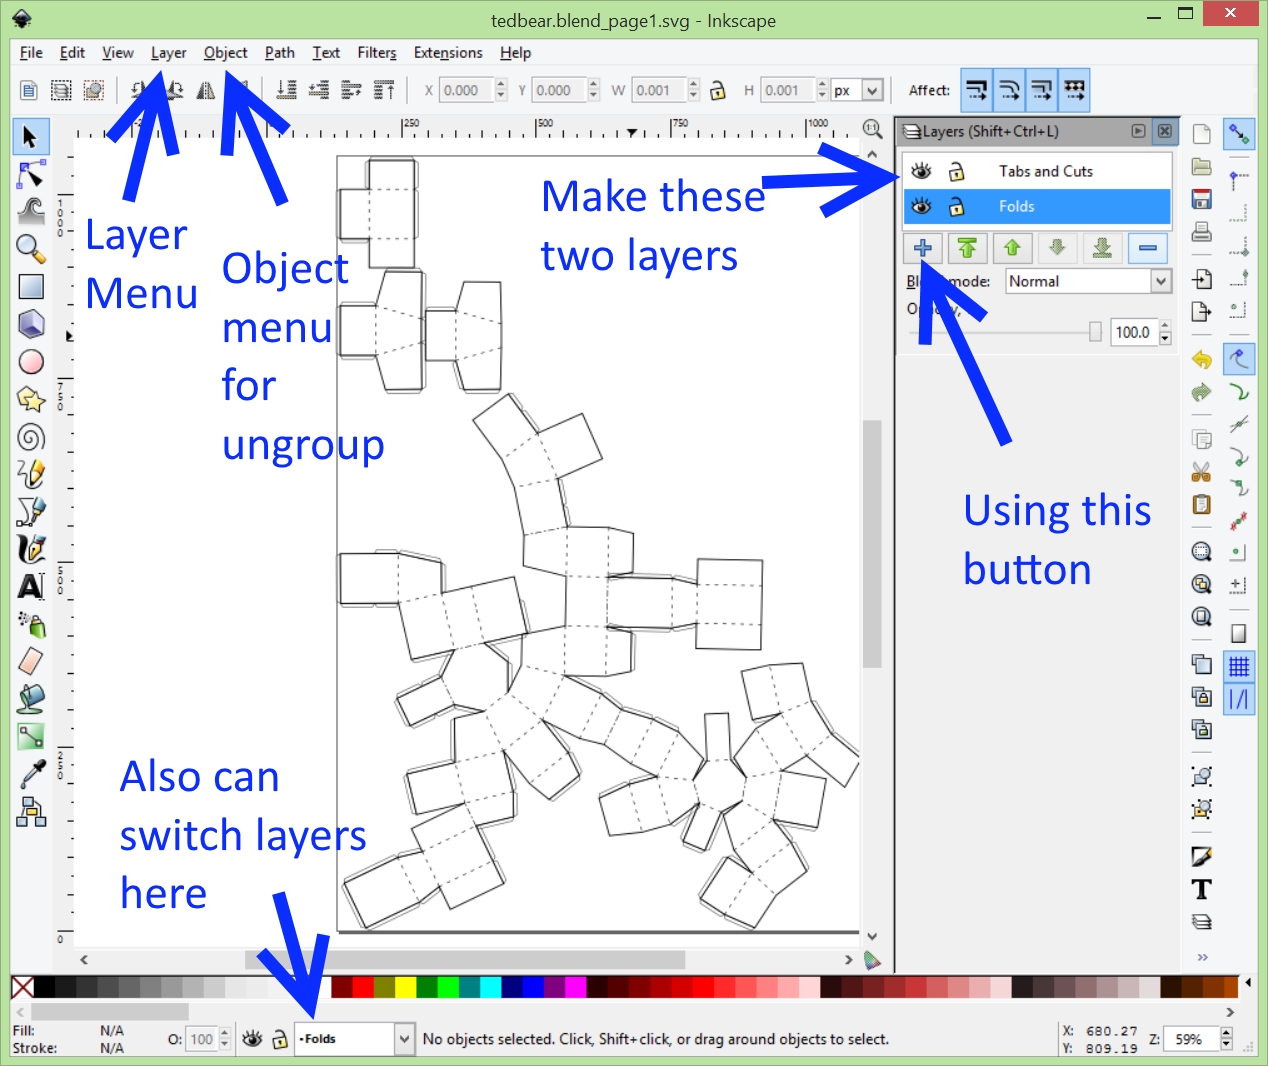
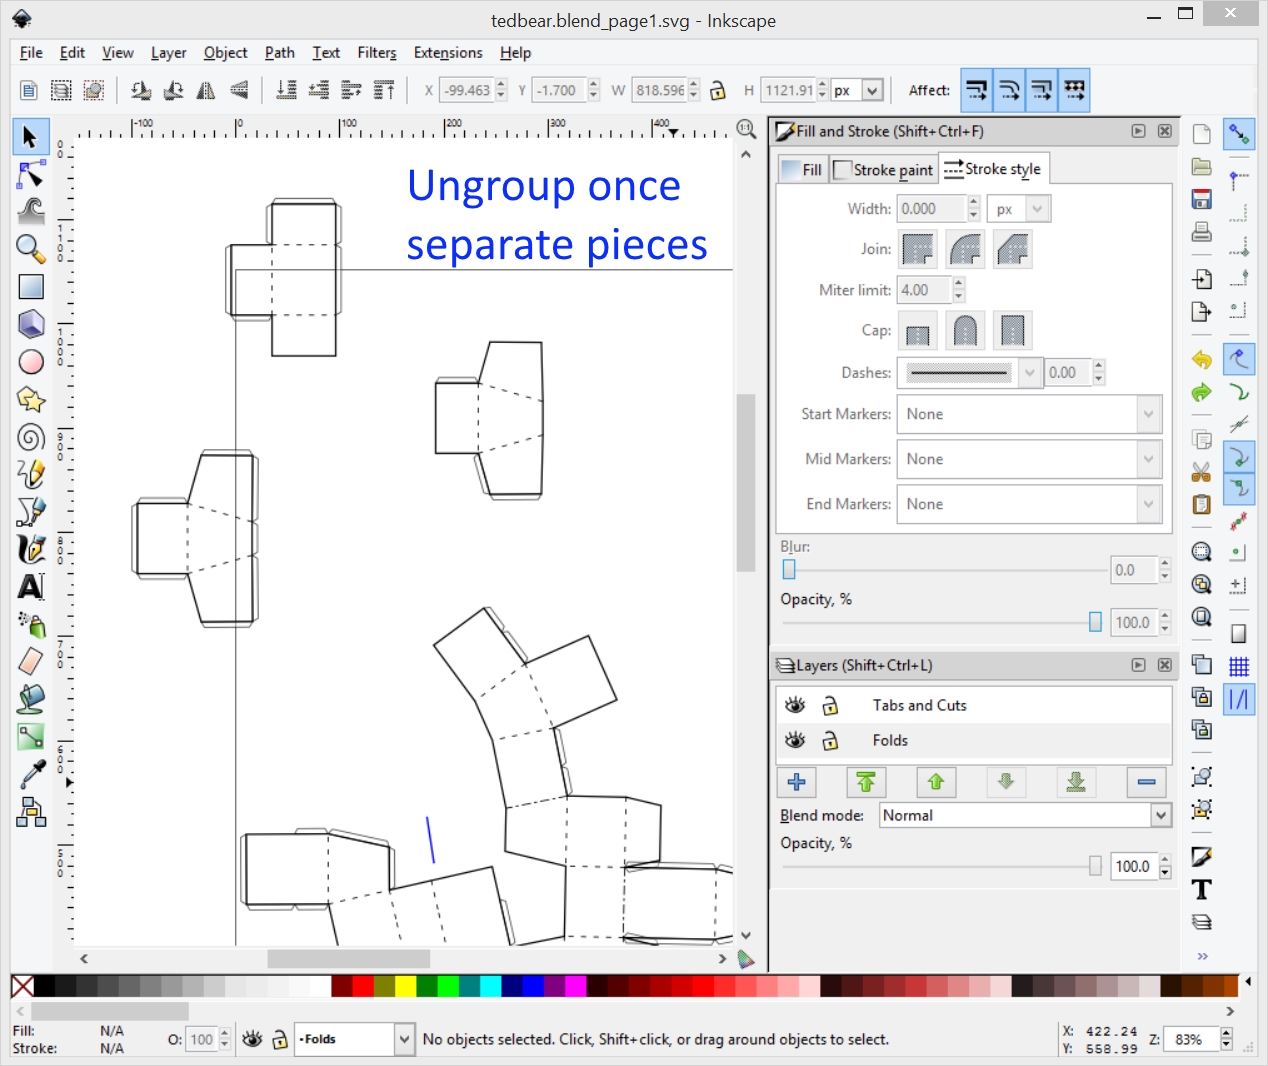
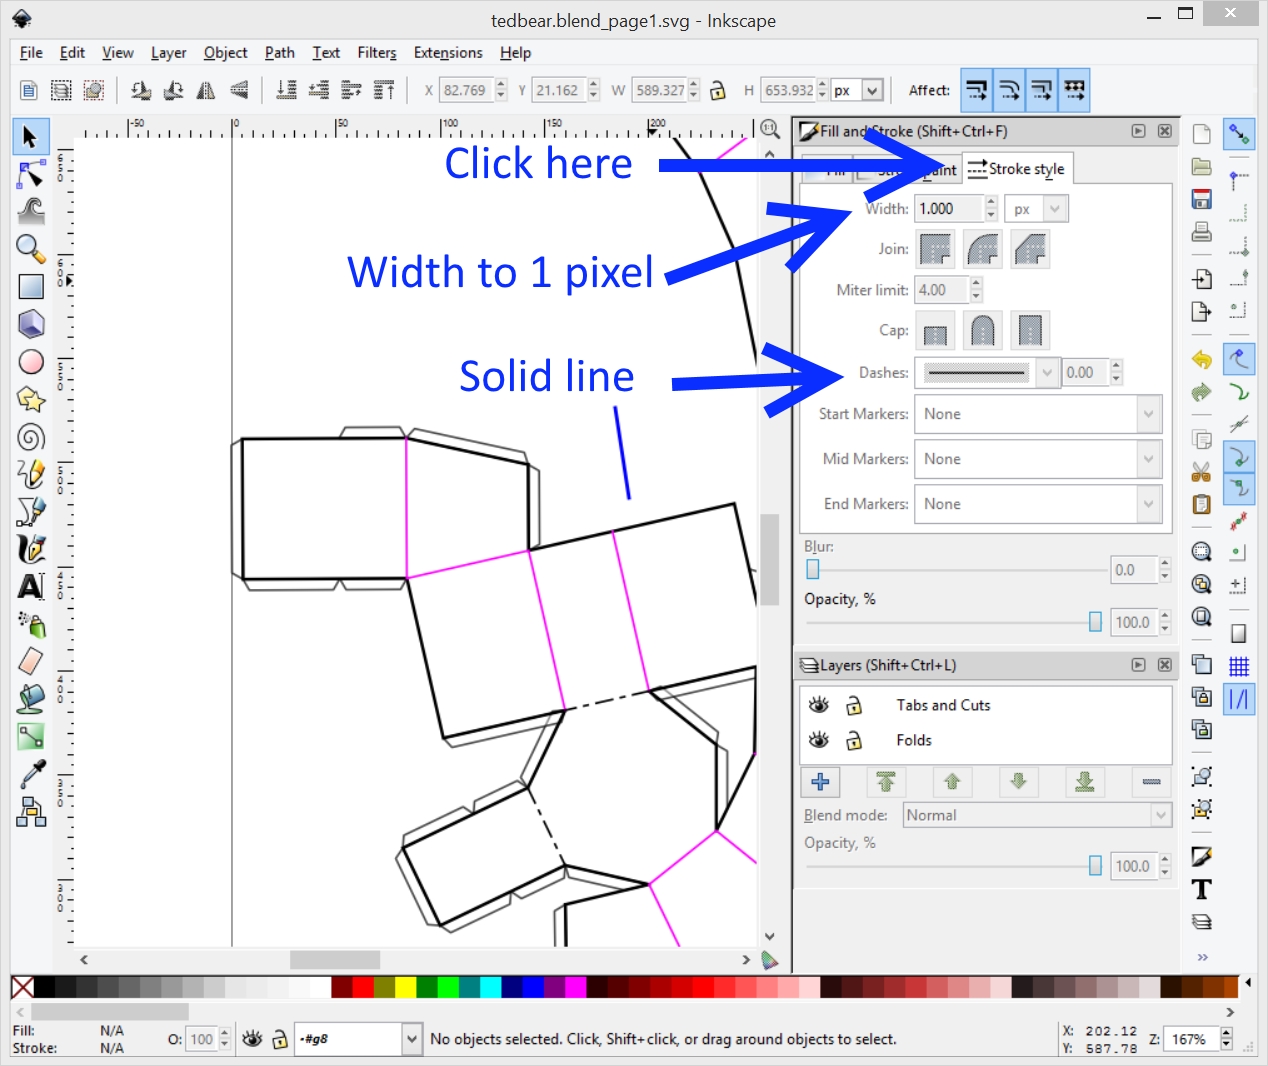
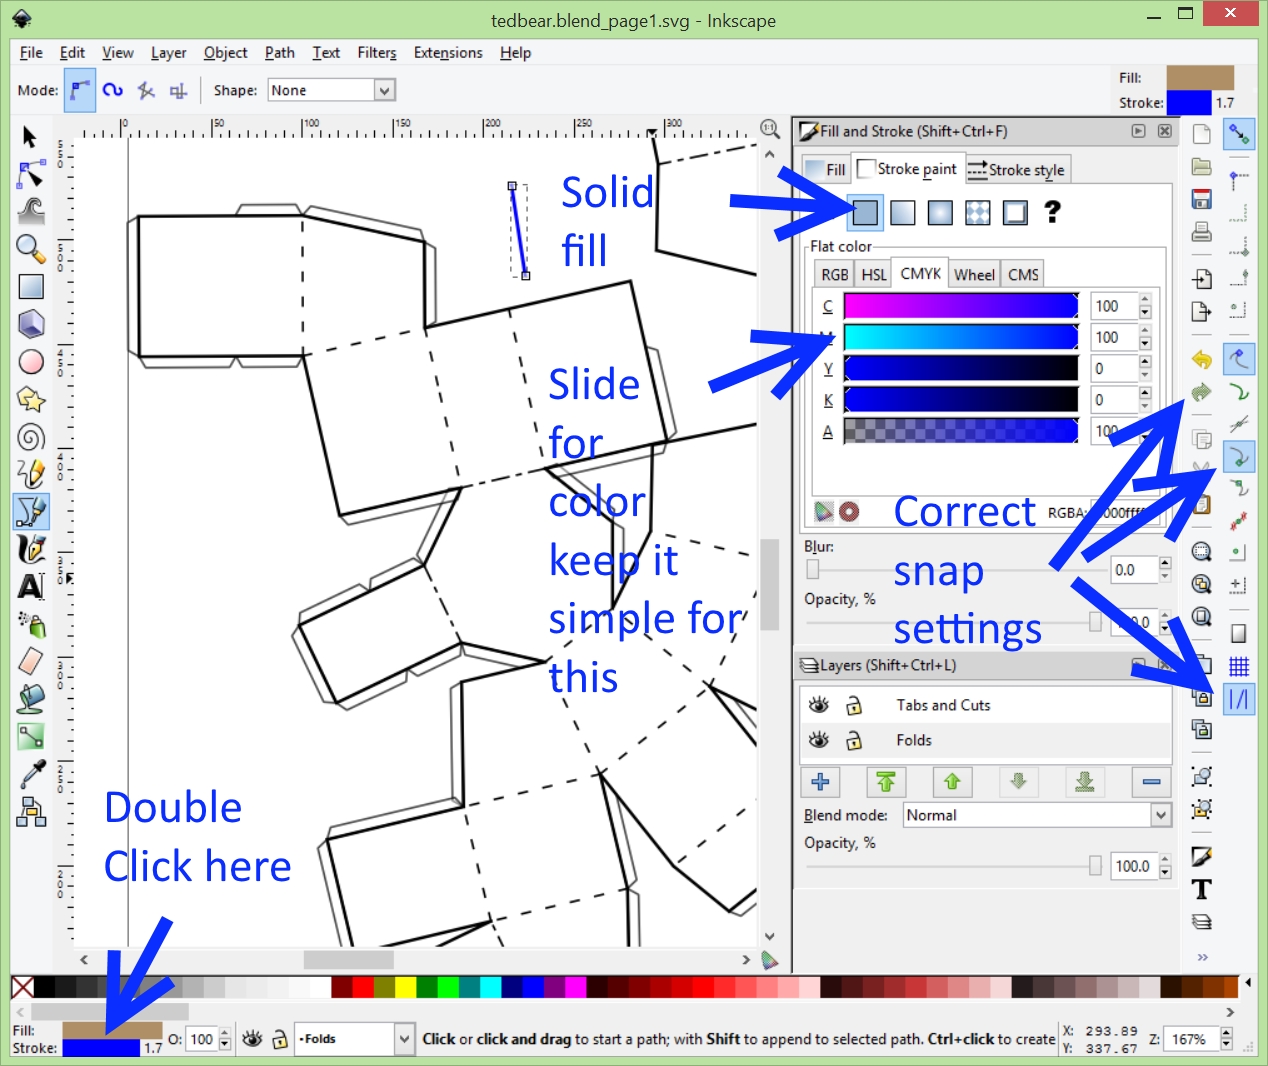

In Inkscape or another vector editing program open the SVG (scaleable vector graphics) file. The unfolding program has done it's best to add tabs for drawing and cutting out a paper model. For us, working in fabric there are several things that we need to do. We need to think about seams and hems from a sewing veiwpoint, we need larger seam allowances with more fabric to sew, we need to add tabs to ALL sides of the pattern to be sewn together and we need to separate the folding lines from the cutting lines. To do this we will make layers and trace over the computer generated pattern to make our own.
It is important that the folding lines are all solid and one color and that the cutting lines are consistent and all one color. Many cutting programs (KNK does this) can easily separate the different behaviours for different colors or select by color. Color is just a number to the computer so it is a handy thing to tag complicated parts of drawings for later separation. Some cutters are picky about the line thickness. On Epilog laser system, lines sent to be vector cut have to be "hairline" or very thin so it is good to get into the habit of being aware of line color and thickness.
- Download Inkscape here:
- Open Inkscape
- Menu FILE> OPEN find your file
- Menu FILE
- Menu LAYER > LAYERS last item in the menu, it opens a layer pallet
- Menu LAYER> ADD LAYER or plus button on the right pallet
- add a layer for folds
- add a layer for tabs and cutting lines
- move the mouse over to the buttons on the far right edge of the window. they are for snapping to points. Hover over them to find "snap to nodes" make sure it is toggled down.
- Toggle on "snap to cusp nodes" and "snap to smooth nodes"
- Toggle off "snap to grid"
- SELECT TOOL Click on the black lines of the computer generated pattern
- Menu OBJECT> UNGROUP once. This will disassociate the islands of the pattern from each other
- SELECT TOOL move the islands apart from each other
- SELECT TOOL Select each object
- Menu OBJECT > UNGROUP This will dissasociate the folding and tab and outline lines
- Menu EDIT > SELECT ALL
- Menu LAYER> MOVE SELECTION TO LAYER BELOW. Once or twice to move the objects to your fold Layer.
- In the layer pallet, toggle the eye to make it invisible and visible again to make sure the objects are on the fold layer.
- SELECT TOOL Select the dotted lines
- SELECT TOOL Double click on the space next to the word "Stroke" in the bottom left corner of the window. It will show a color or the word "unset" This will open a pallet for stroke and fill options.
- Click on the STROKE PAINT tab
- Click on the SOLID SQUARE
- Choose a color with the sliders.
- Click on the STROKE STYLE tab
- Change DASHES: selection to a SOLID LINE
- Repeat this with exactly the same color for the other dotted line pieces and for the outline piece, being careful to not move any of them
- Leave the tabs for now, we will use them to help understand the net and then delete them at the end. Each tab lines up with a flat place so it is easier to understand sometimes which things will fit together.
- Click the LOCK on the fold layer
- Click on the name of the tab layer to switch to it.
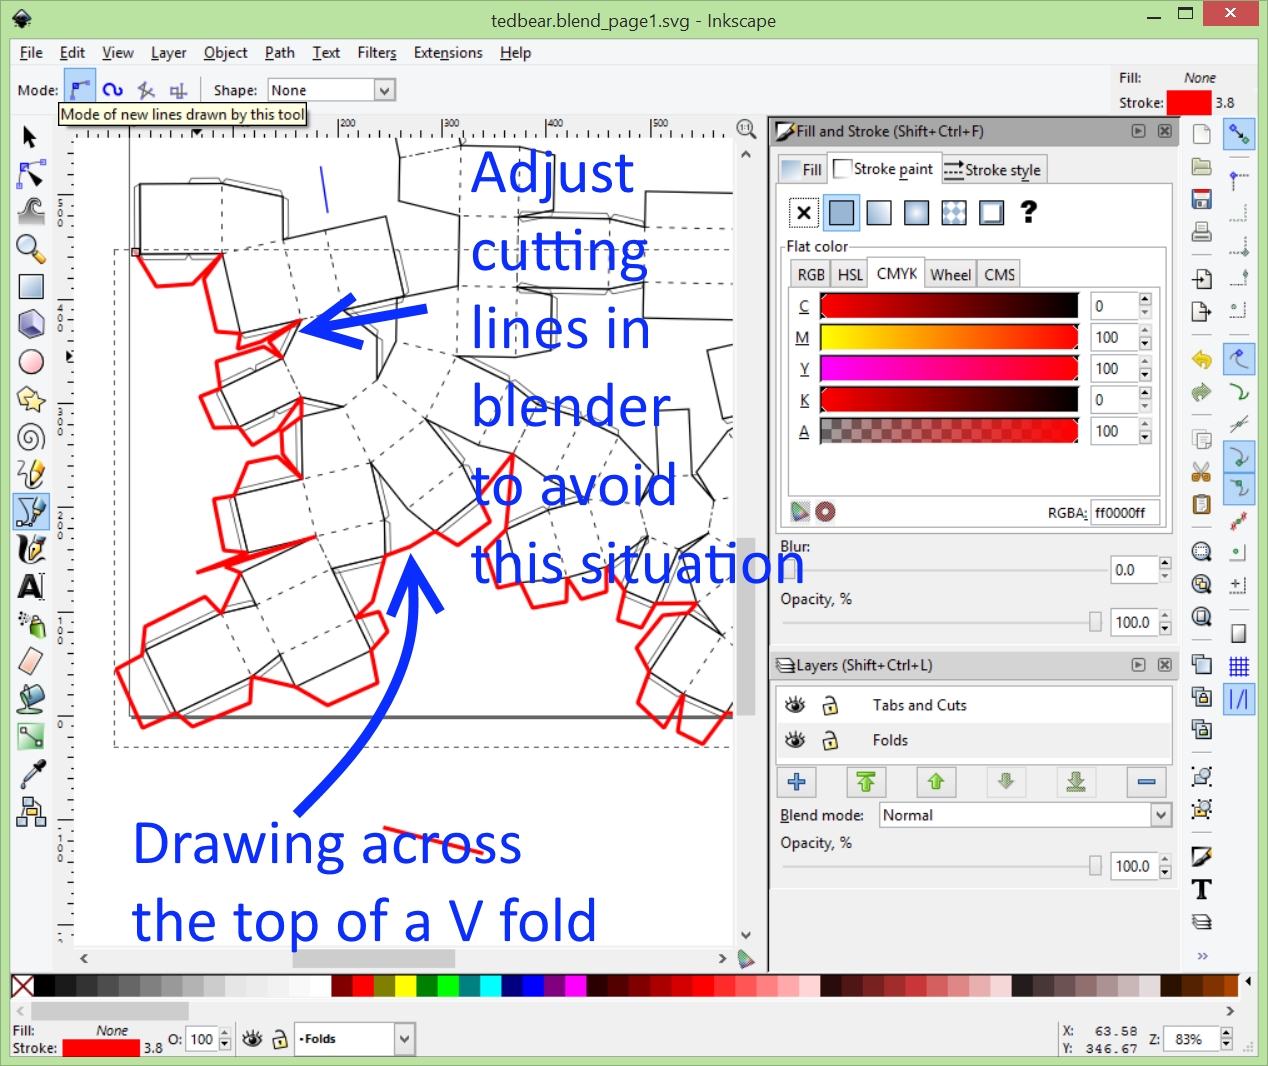
- Zoom in to a piece of your picture until you think it is the size that you will print. It does not matter what size the computer thinks it is, SCALEABLE vector graphics yay!. We are going to draw tabs about 1 cm big on every single side, both those with a tab on them and those without. There is one special thing we can do with fabric, and that is if you see a place on your model where two lines that would go together make a perfect V we will draw a line directly across the open top of the V When we sew we will just fold the arms of the V together and sew down them. no cut in the middle. Check the picture for details of this.
- On the left tool bar, hover over the tools until you find the "DRAW BEZIER CURVES" tool click it.
- we need to draw one dummy line to get started and to set the color for the tabs and cutting lines. CLICK ONCE IN OPEN SPACE and let up, don't drag to define one end point
- CLICK ONCE again in open space. don't drag to define the other end point
- ENTER or RETURN key to finish the straight segment
- Immediately go to the STROKE PAINT tab on the right and choose a different color than you did for the folds
- Click on each corner of the pattern, move over one centimeter, click, go accross, click and then end on the next corner of the pattern. Do this for EVERY side, it doesn't matter if the paper pattern computer program thought there should be a tab there or not. Check the picture for help with this part. This sounds difficult but with a little practice students get the hang of it quickly
- Menu FILE> SAVE often
- Menu FILE> SAVE AS Save a copy now with a different name
- Menu FILE> SAVE AS This one will lose structure
- Select the computer generated tabs and delete them.
- Menu EDIT> SELECT ALL
- Menu OBJECT> UNGROUP Do this lots of times. DXF files often have problems with the programming of groups and try to use the cooridnate system of the group on top of the general coordinate system. It doesn't work.
- Save as type: DXF this is the file format that CNC (computer numerical control) cutters can read, check your cutting software manual.
- Click the check box for ROBOMASTER and unclick the other box in the dialog window, other cutters might be different here.
Cutting Out the Pattern With a CNC (computer Numerical Control) Craft Cutter

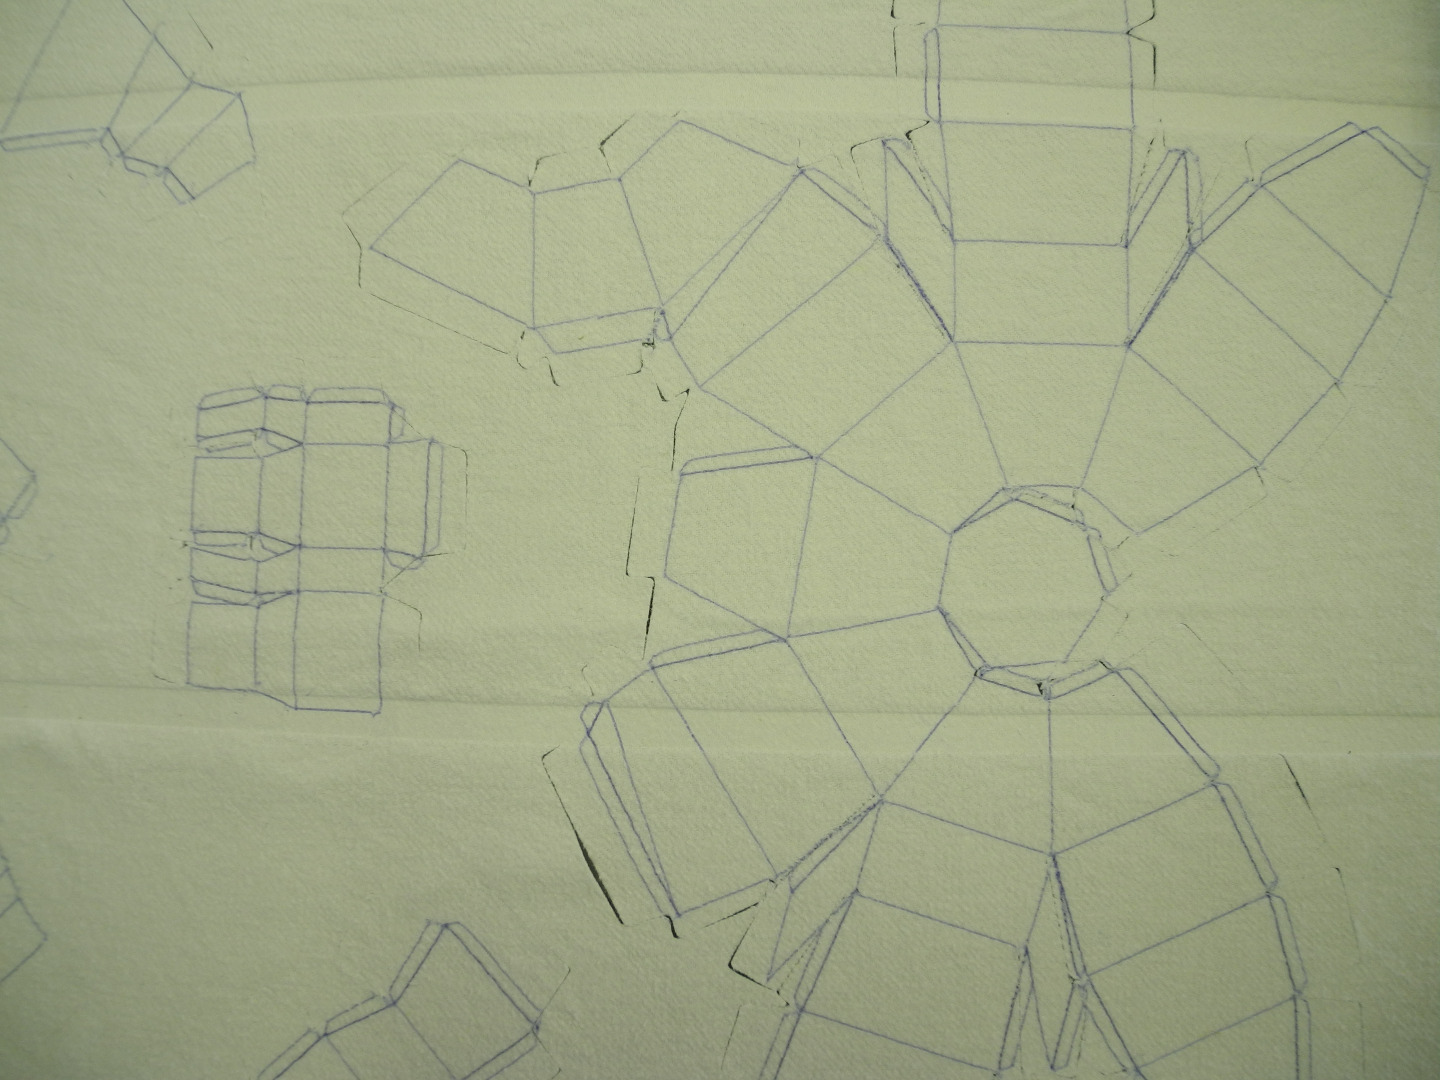
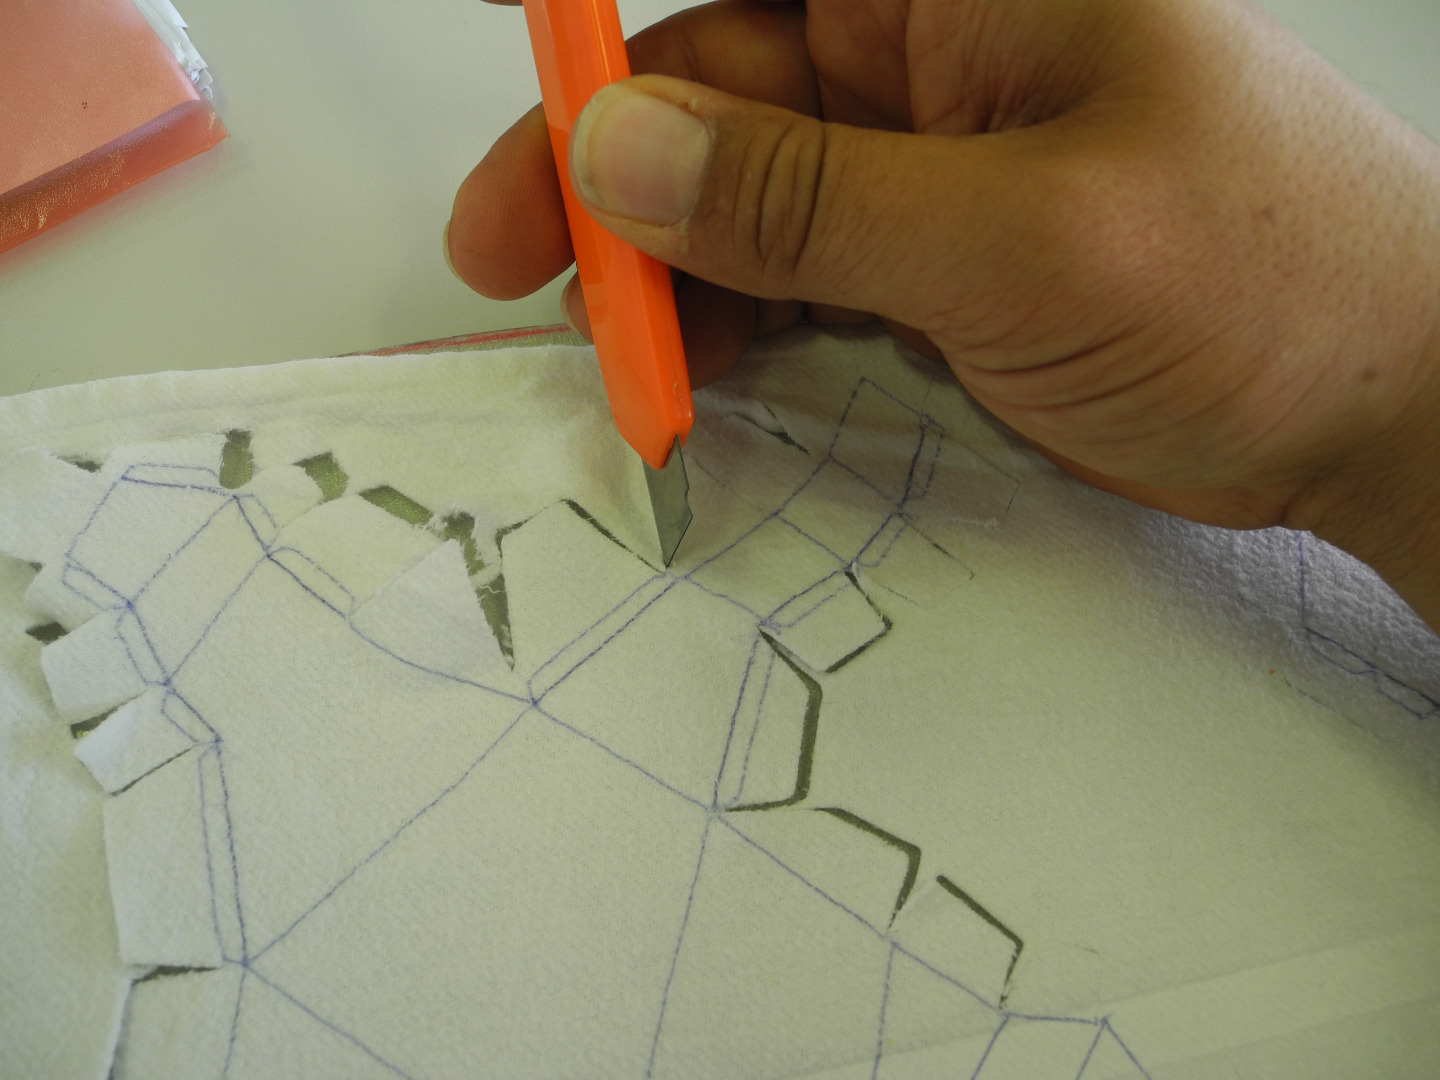
First for people without access to a knife wielding robot:
INSTRUCTIONS WITH NO CUTTER:
At this point if you do not have a CNC paper cutting machine capable of
cutting fabric you can tape a piece of fabric to the wall and use a GRAPHITE PENCIL or sewing FRENCH CHALK to trace the folding lines and cutting lines onto the fabric using a computer projector. You could also print transparencies and trace using an overhead projector. Or Just print on regular paper, tape together and use it as a paper pattern. Then lay them flat and use a circular knife rolling cutter to cut out the edges. You need the folding lines to make sense of the pattern as you work, they really help.
NOTE ON EQUIPMENT (knife wielding robot):
I have a Klick N Kut KNK Maxx cutter with it's default software. I have been really happy with this machine and have used it pretty heavily in the classroom and for my own art for 4 years with no service problems. They have just upgraded it to wireless and are working on a drill attachment that would make it the rival of a laser cutter so I would still recommend them (not paid, I am just really happy with it.) Excellent customer service when things aren't going right and the variable force, open workspace, open tool holder that can hold anything, and amazing size are all winners for me. When I bought it it was the only consumer model that would let you draw your own things rather than using overpriced control cartridges. With a fabric blade it has worked great. I had to make my own cutting surface for doing huge things by trimming a plastic office floor mat from IKEA. I haven't been able to justify buying the upgraded software but it looks nice.
The mainstream cutters are improving fast. Nothing else is this big. The one thing I wish I had was the little camera in the cutter that lets it follow the edges of a printed image.
LARGE CUTTING MAT (IKEA repurposing)
For a cutting mat big enough to do fabric I Got a new KOLON heh, from ikea and cut it down to the right width. It is good in that it is stiff but the extra mass means that the cutter can't go full speed or it stalls, so I changed the velocity to 300 or lower. It is less massive and larger than the biggest self healing cutting mat that I could find, which did not work well at all. KOLON ok. I spray the smooth side with a little repositionable adhesive (3M or Krylon). Fabric needs more adhesive and the lint means it needs to be refreshed more often. Still possible to overdo it so start light.
The cut mat is 27 by 39 inches but not all of that is usable as you have to leave room for the width of the cutting head and room for the rollers to grip the mat, so perhaps 24 by 36 is the biggest to plan for with this arrangement.
INSTRUCTIONS WITH CUTTER:
- Open Klick N Kut Studio
- Menu FILE> OPEN look for the DXF file saved from Inkscape
- Menu LAYOUT> BLANK SIZE
- CURRENT SELECTION: 2' by 3'
- OK
- Menu EDIT> SELECT ALL
- SELECT TOOL move your mouse over the lines of the pattern until it changes to an equal armed cross
- drag pattern into the outline of the sign blank (page outline)
- !!!! if you need to resize the pattern make sure that proportional scaling is locked on at the top of the window and use the percent change. Try one and then UNDO if it is not right so that you always go back to the original size. WRITE IT DOWN when you figure out the right scale percentage. If you have to cut in two parts or if you need to make a replacement piece you need the percentage so that the new piece will fit the old. Much frustration from students when they cut several pieces (especially with paper sculptures) and the pieces do not fit.
- Click with the SELECT TOOL in empty space so that nothing is selected
- Menu FILE> SAVE AS save a copy this next step is easy to mess up the pattern.
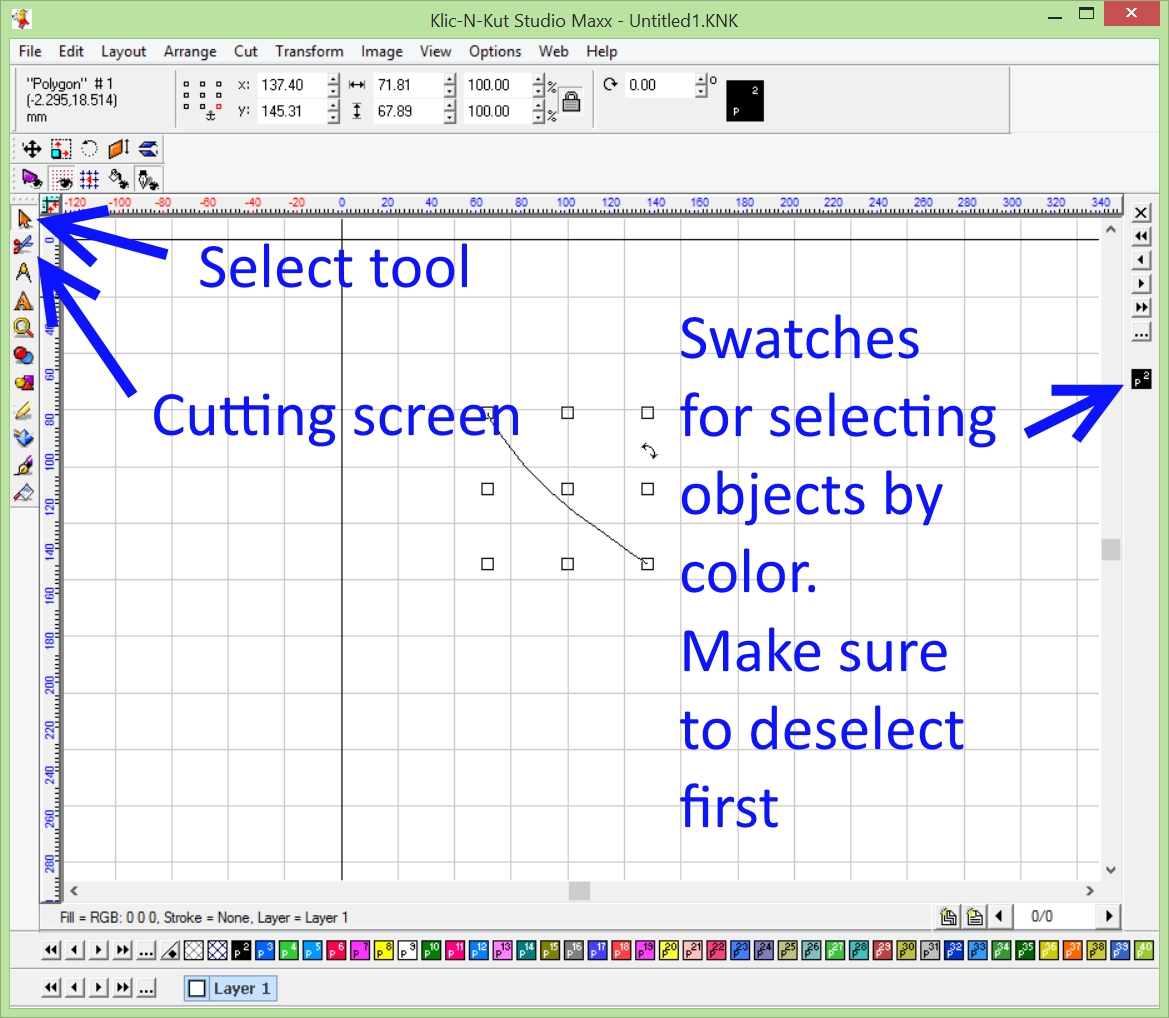
- On the right of the screen there are color swatch boxes for each of the colors in the pattern, this is why it was important to make the folding lines one color and the cutting lines another. With NOTHING SELECTED, double click on the color of the fold lines, this will select everything that is that color. If you have something else selected, it will just change the color of that piece.
- Click on the little Scissors on the left tool pallet CUT TOOL
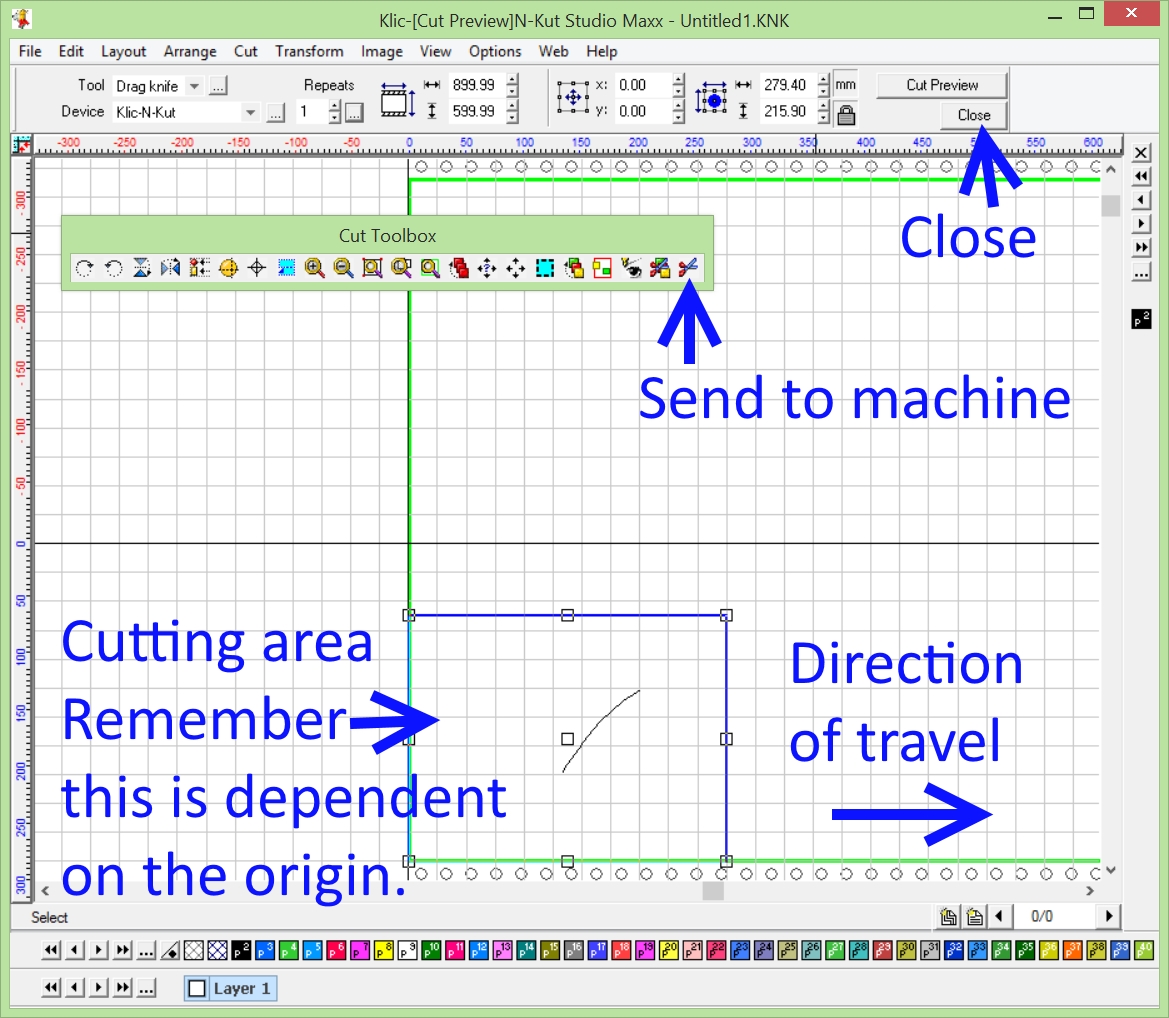
- This will open another window, with the sign blank shown in the working area of the machine with the pattern to be cut inside it. It will turn sideways, look for the track of circles on the edges ( form feed paper markings) these show the direction of travel for the machine. Be careful with large scale cuts, what you see in this screen is not necessarily where the machine will cut based on where you set the zero origin point on the machine. This picture is drawn from the origin where the machine starts in the corner.
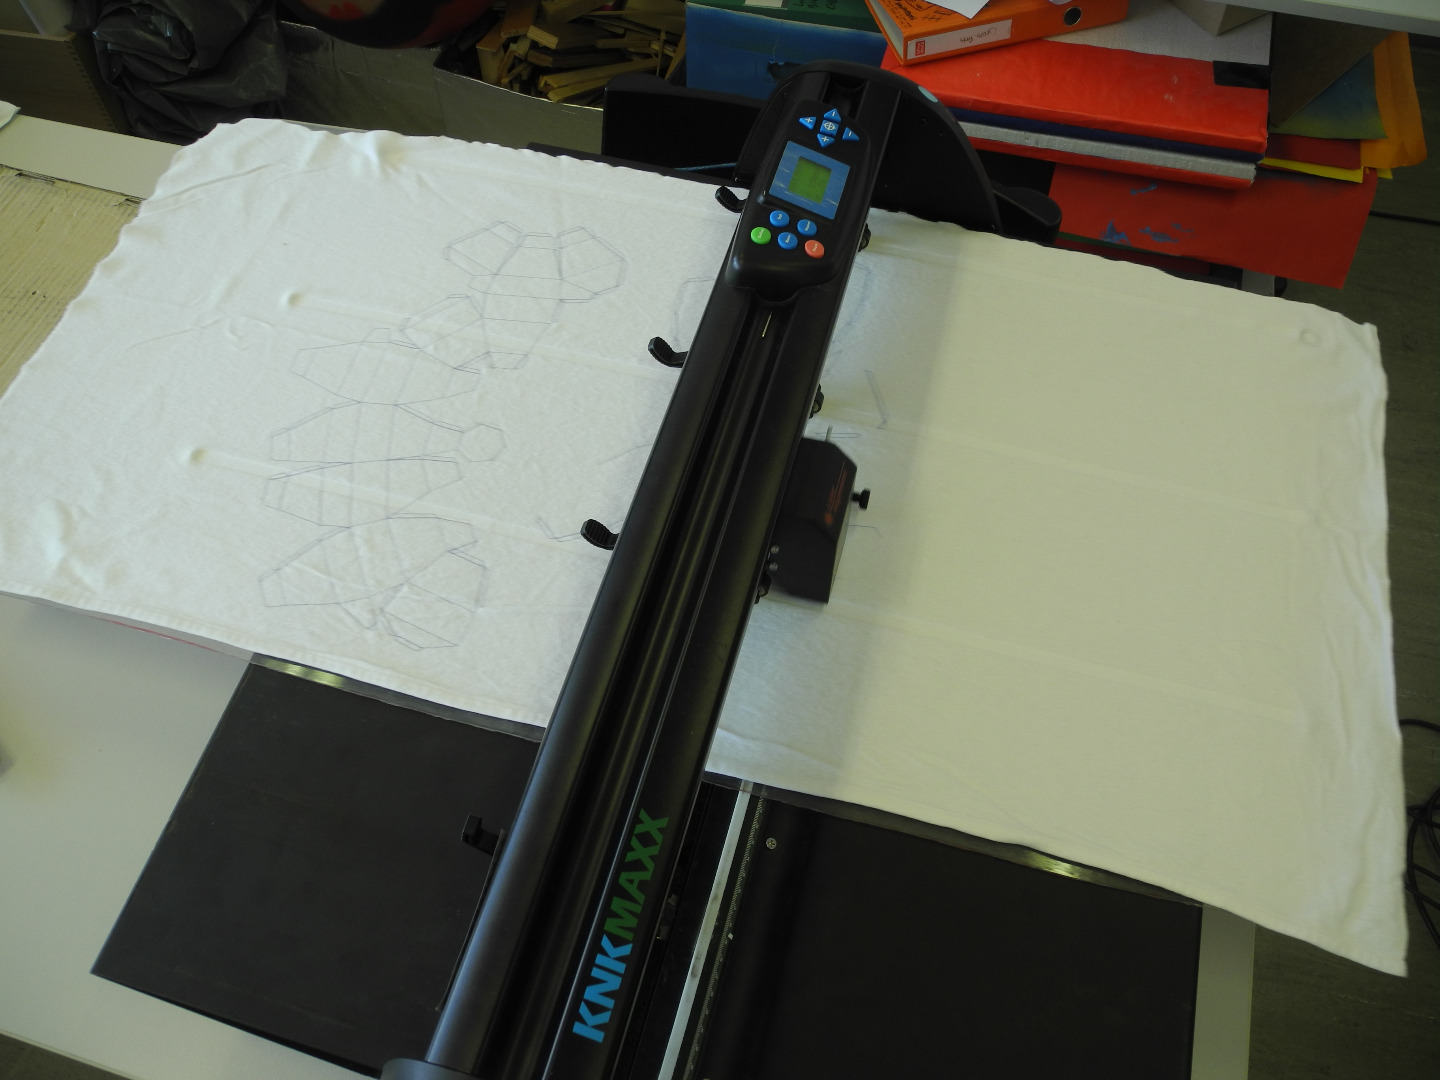
- Gently stretch and spread the fabric over the cutting mat trying to keep from distorting it but making sure that is pressed down with no wrinkles. As the knife pulls through the fabric it will stretch and wrinkle a little, so it is is important to have it well stuck down and pulled taut.
- Place the mat in the machine and drop the roller dogs. As they move they will press down the fabric but it has washed out for me. If using delicate fabric, consider planning your cut to fit between the rollers. Be sure to leave a a small space so the mat does not bump against the side.
- Place a pencil in the tool holder clamp on the machine. I bought the little collar that centers it the same as the cutting knife, you could just wrap the pencil in tape until it is the same diameter as the cutting tool.
- Connect the machine to the computer with the USB cord
- Turn on the Machine
- In the machine the little computer has two modes, online and offline, in each of these contexts the buttons do entirely different things so In the following instructions I will preface each instruction with OFFLINE or ACS (online) Toggle between these modes with the ONLINE button
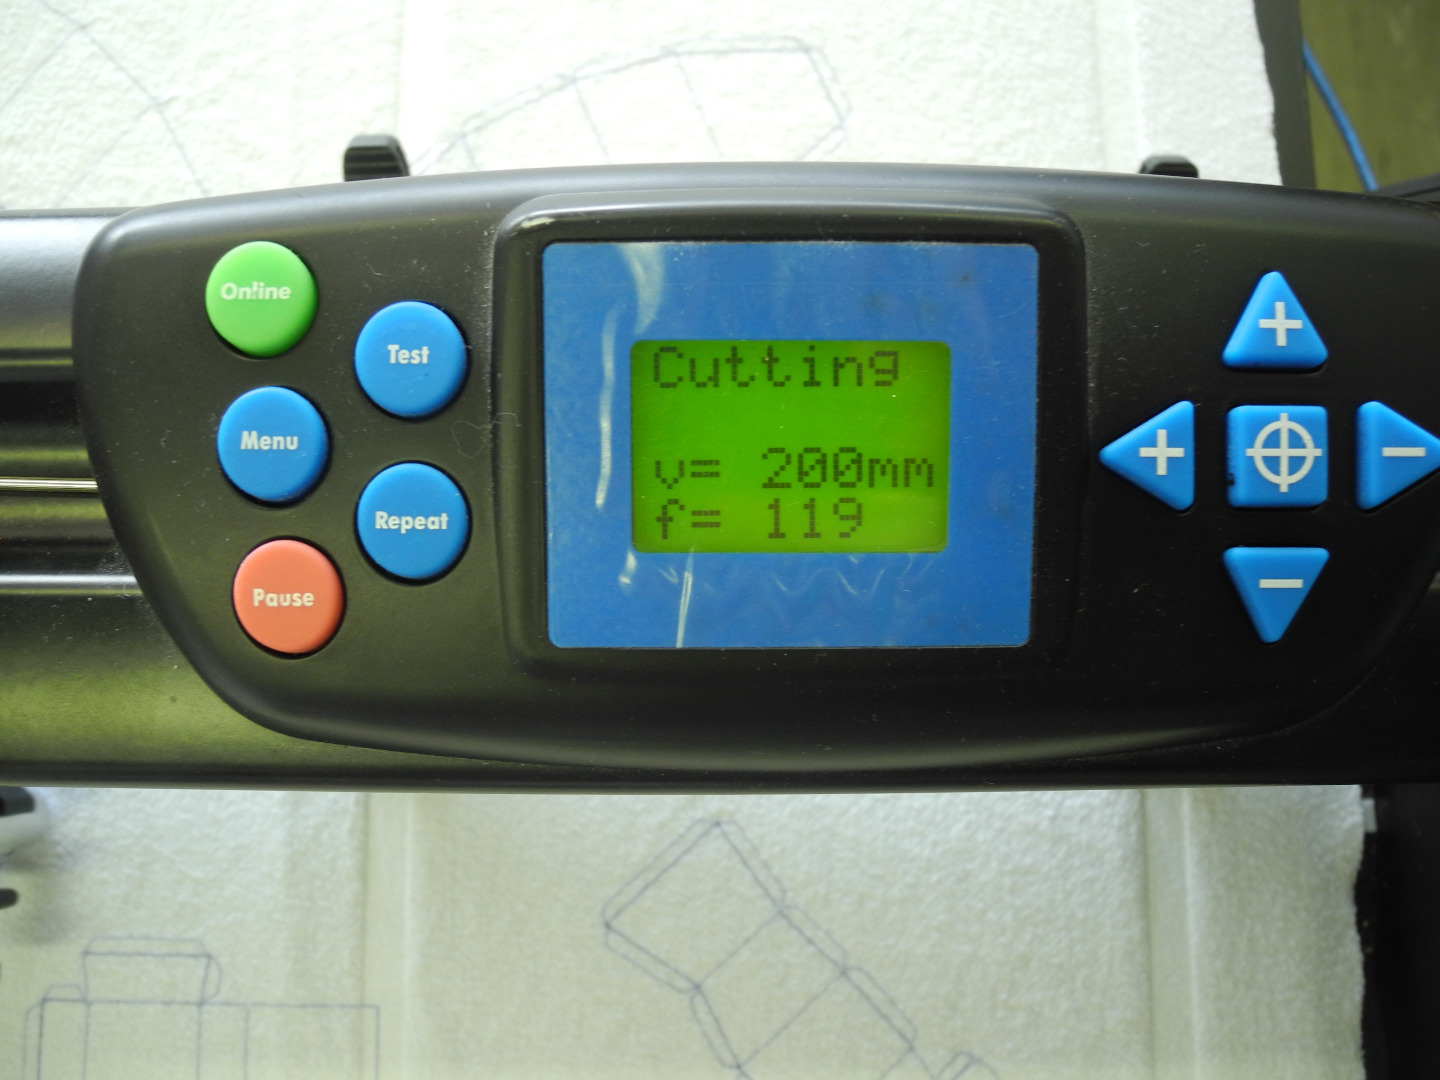
- ACS Use the UP and DOWN buttons to set the v to 200 v for velocity
- ACS Use the LEFT and RIGHT buttons to set the f to 10 (experiment with your cloth to find a force that works)
- OFFLINE Use the UP DOWN LEFT and RIGHT buttons to move the center of the knife over to the bottom most right corner of the space you want to cut. look down from above to see where it is centered
- Use a ruler to check that , FROM THAT POINT, the piece will fit on the mat and the fabric.
- CENTER BUTTON between the up and down to set the origin to 0,0 Check the screen.
- ACS ONLINE waiting for information from the computer to cut.
- Press the little SCISSORS on the far right of the tool pallet that popped up in the cutting screen on the computer to send information to the robot.
- Wait and watch as your robot minon does your bidding. This makes me very happy.
- Click CLOSE on the computer to exit cutting screen.
- Switch to the knife tool in the real world
-
DO NOT TURN ON OR OFF THE MACHINE It would lose the origin point
-
Prepare the knife, slide the normal cutting blade out of the holder and replace with a fabric blade, When placing it in the clamp make sure it is traveling completely free of the fabric, it is easy to drag a little and cut threads on the surface.
- on the machine, ACS UP and DOWN set the v to 200
- ACS LEFT and RIGHT set the f to 120 experiment with your fabric to find a force that works.
- In the virtual world deselect all by clicking in open space and then double click your cutting color
- SCISSORS ICON cutting screen opens
- SCISSORS to send
- Moar robot joy. Cut, cut my pretty.
- OFFLINE UP AND DOWN to move the fabric out from the machine, leave everything on and engaged in case you need to cut again. If you don't turn off the machine or change the origin it will cut exactly on top again.
- Gently start to peel your cut pattern from the mat. Have a scalpel ready to cut threads as you go, don't pull them just snick.
YAY!. VERY SATISFYING
Sewing
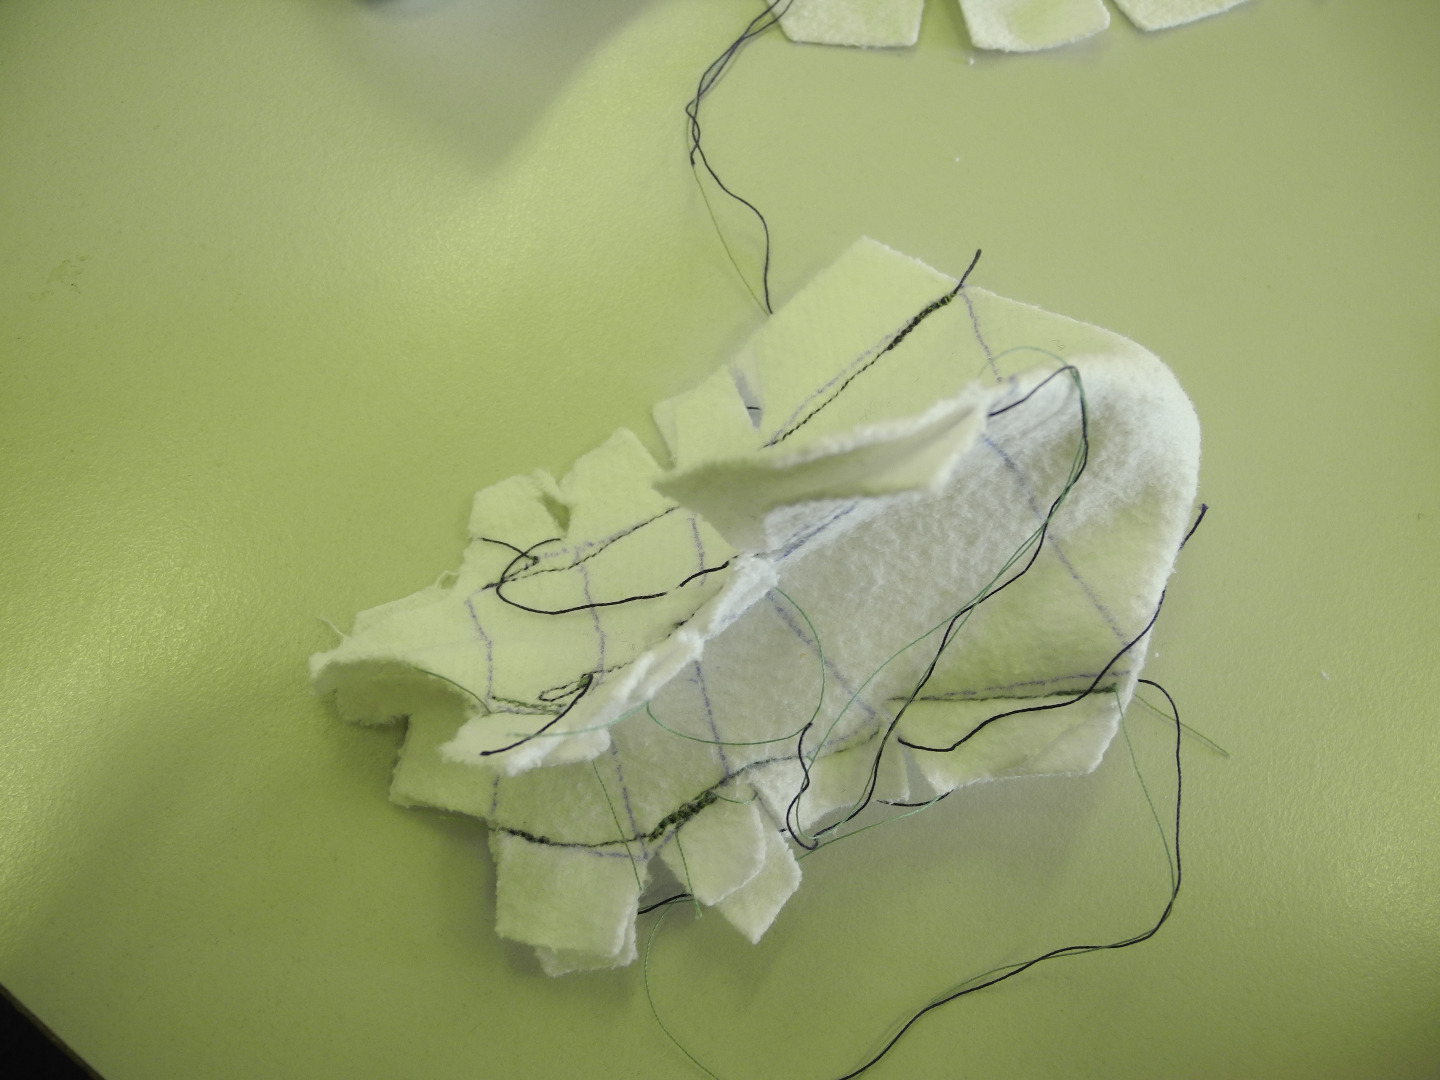
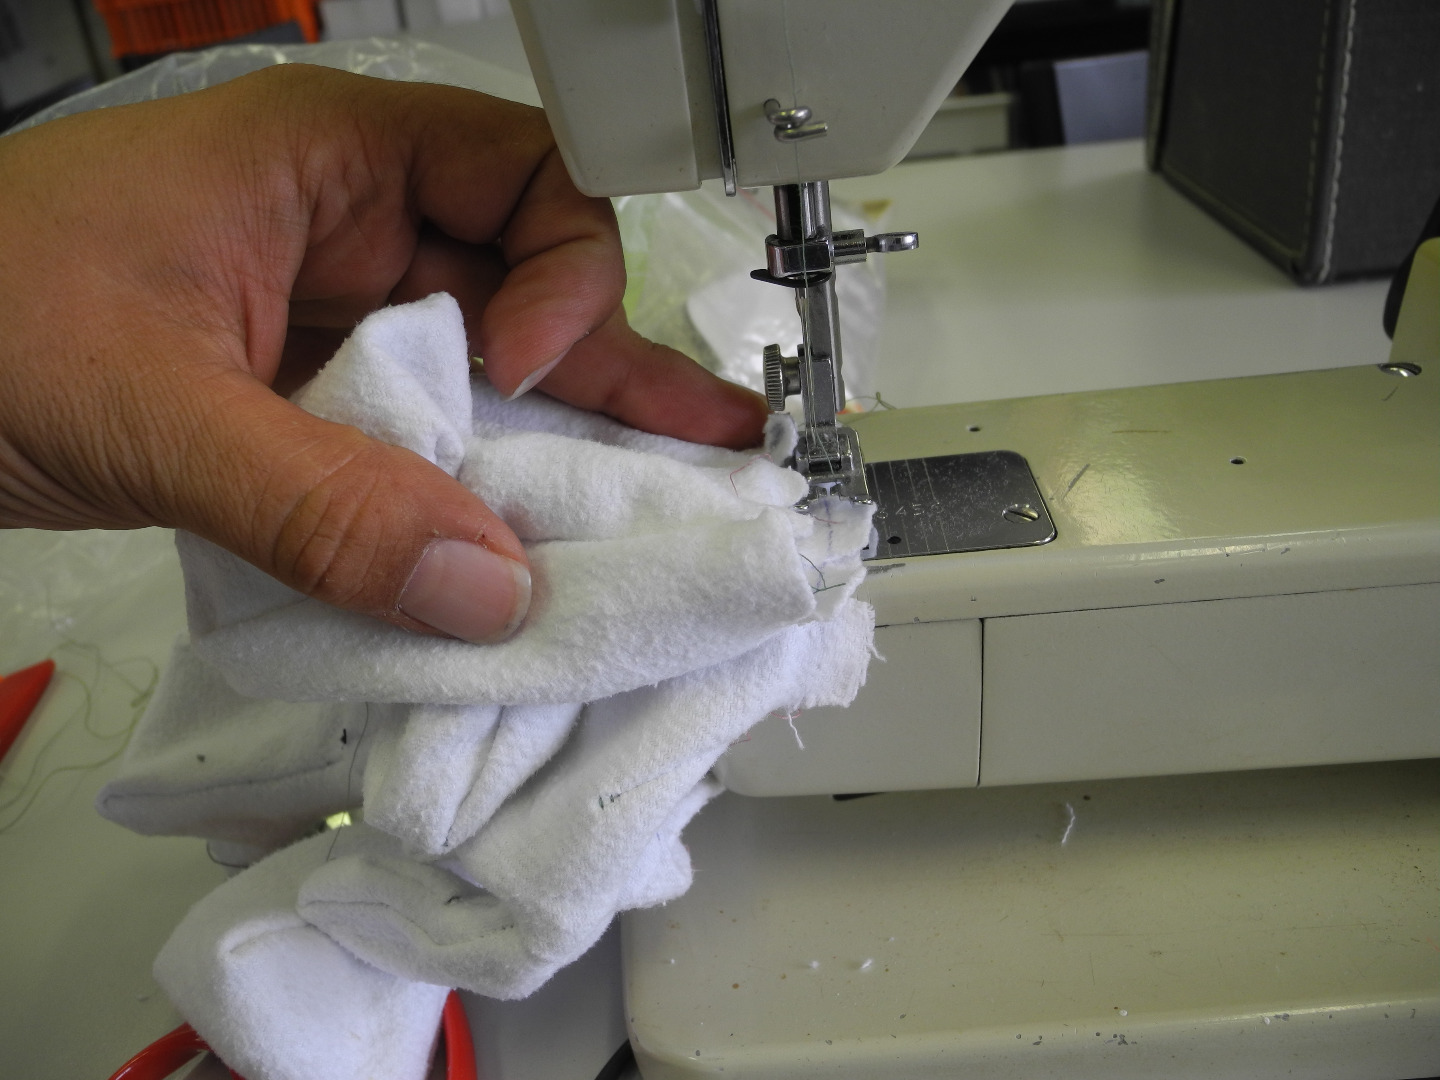
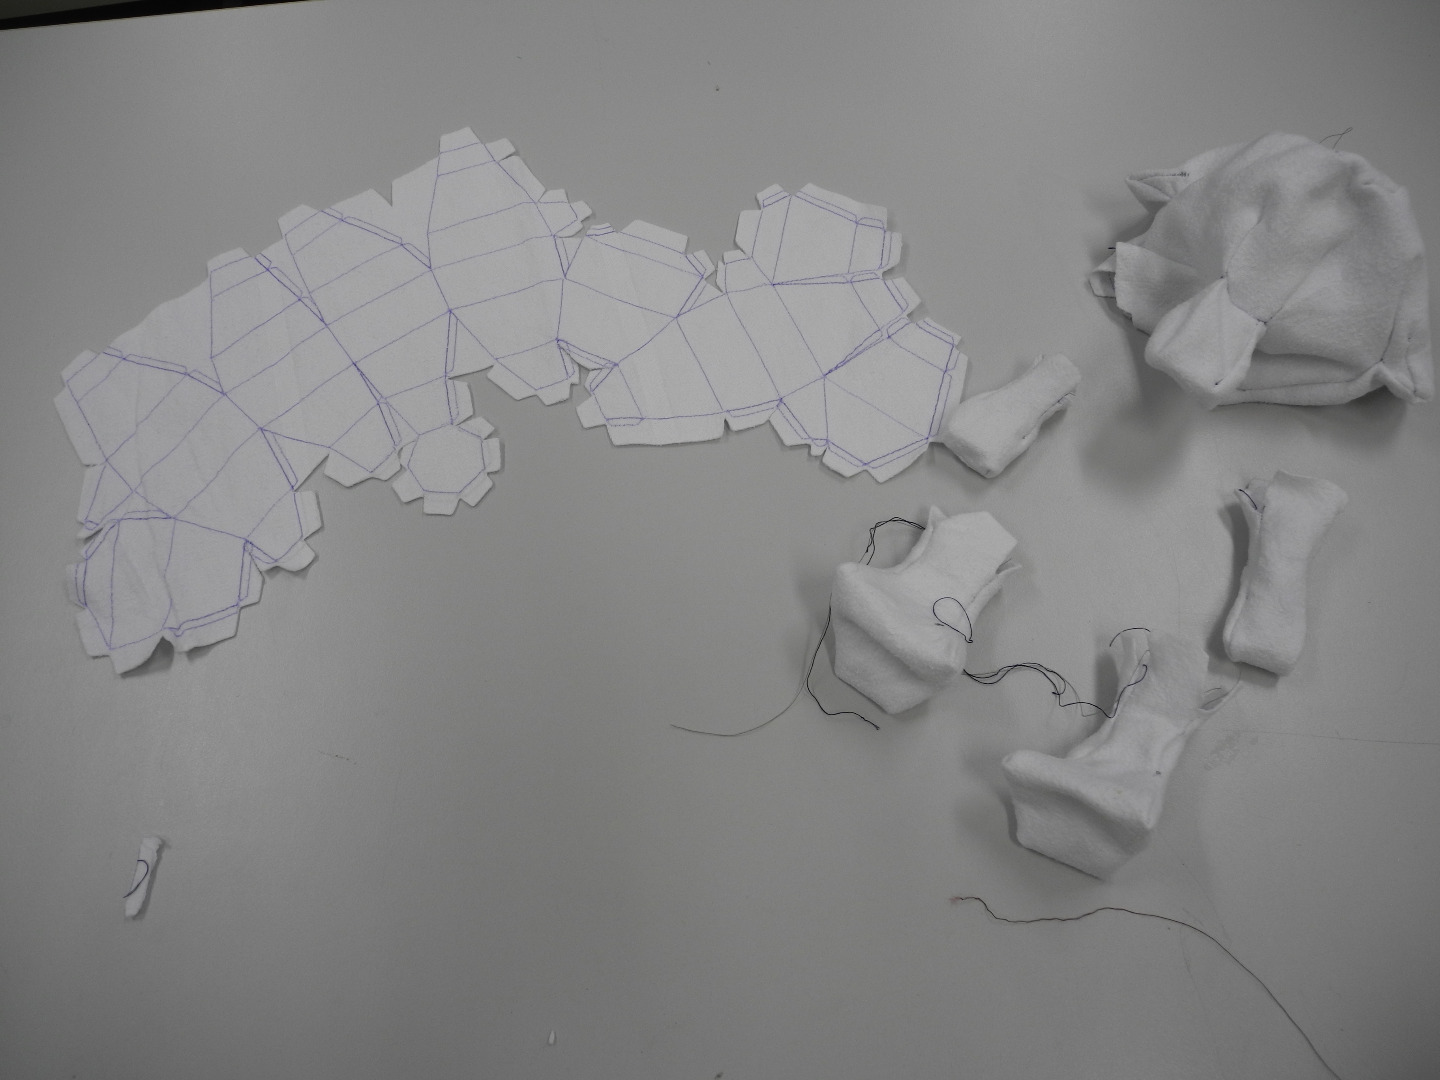
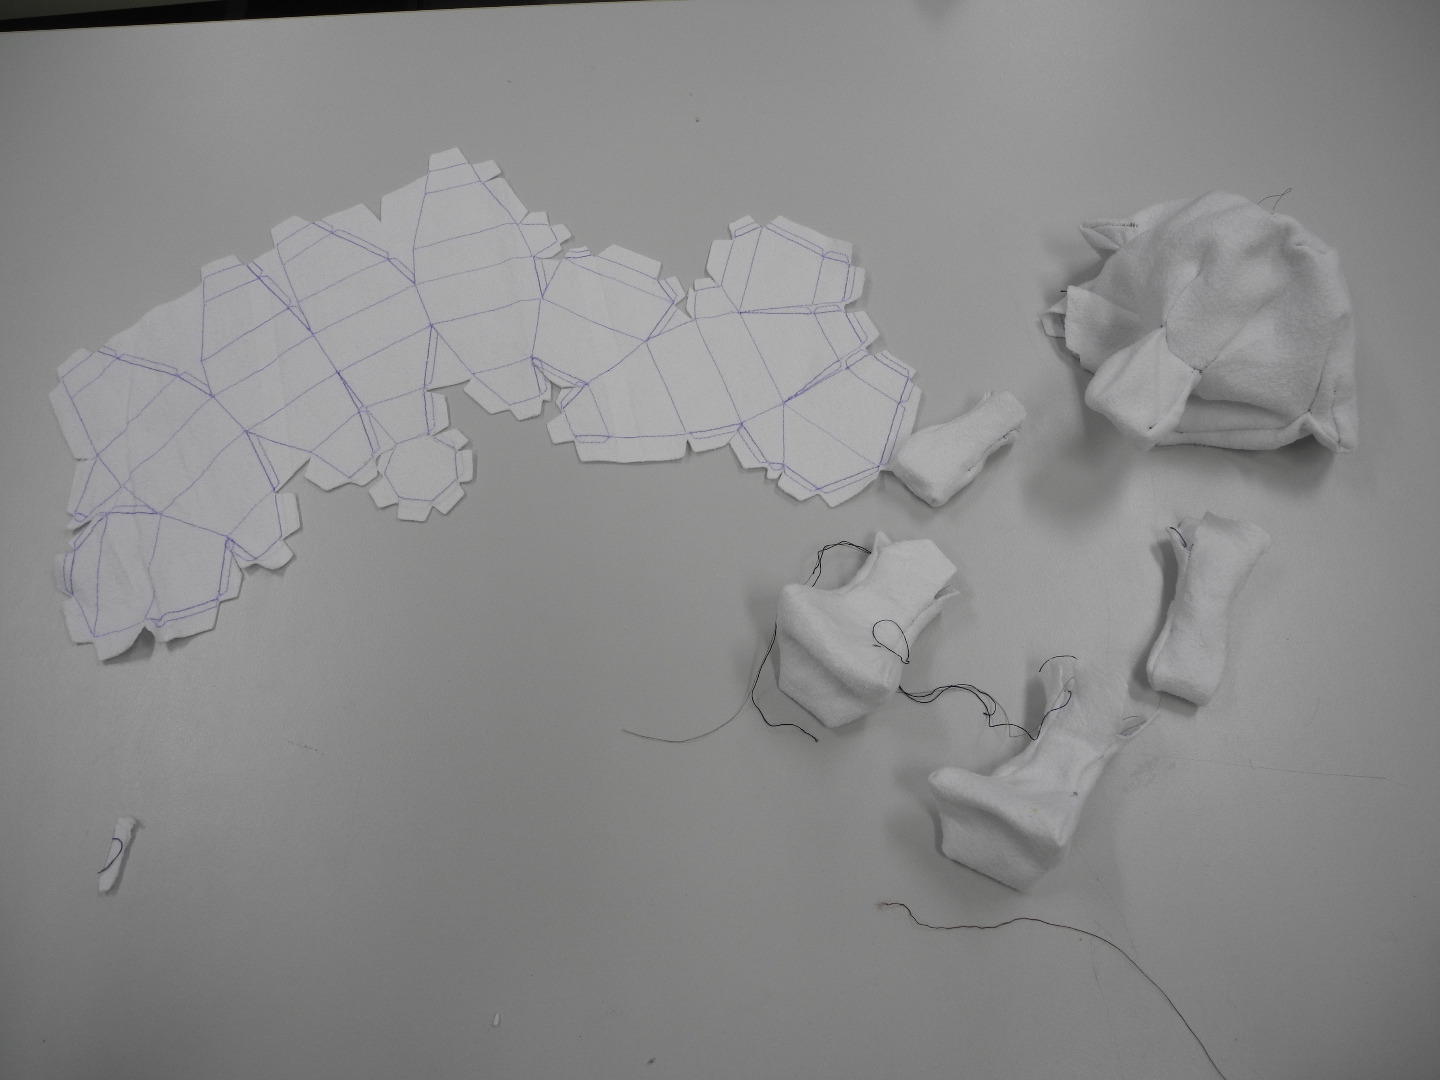
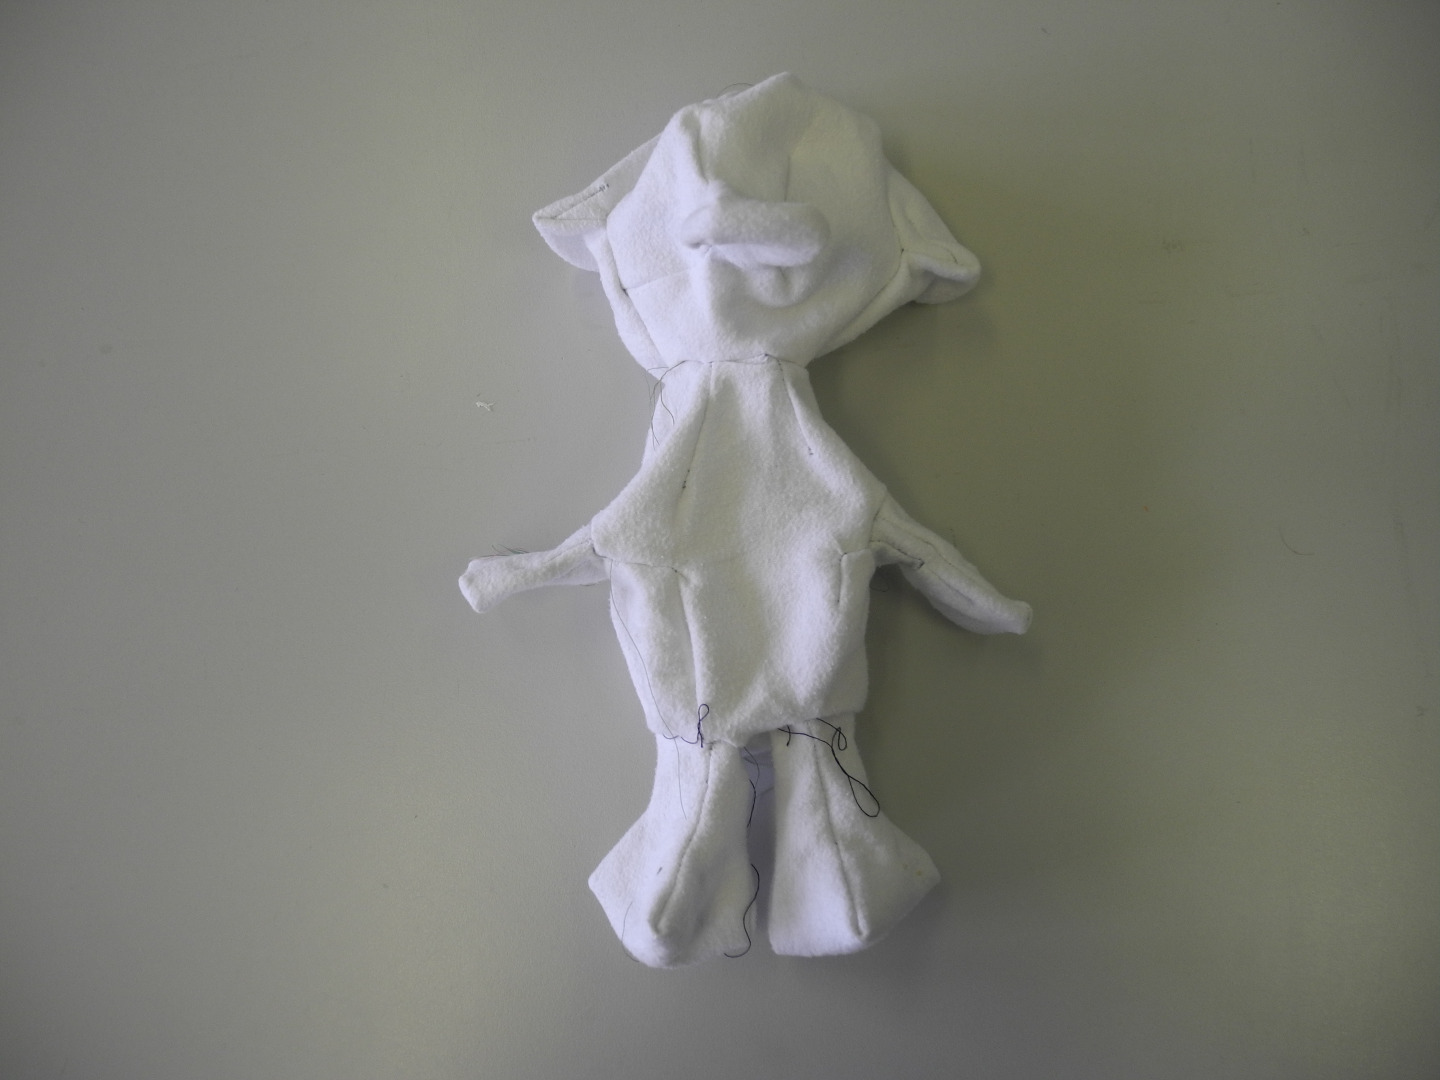
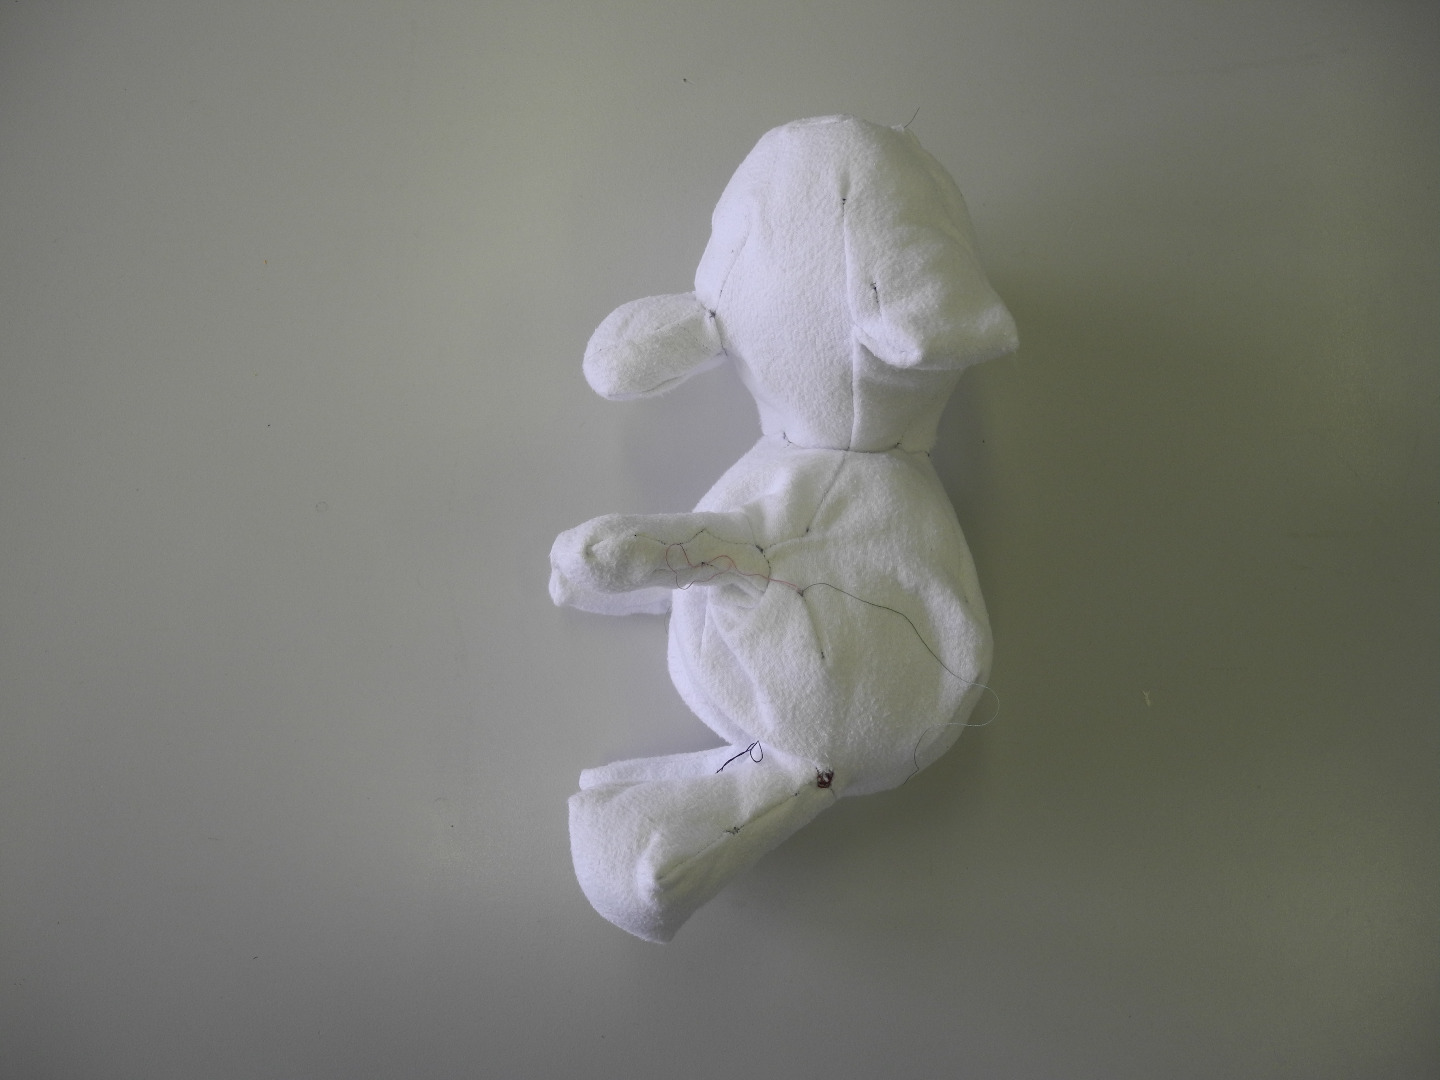
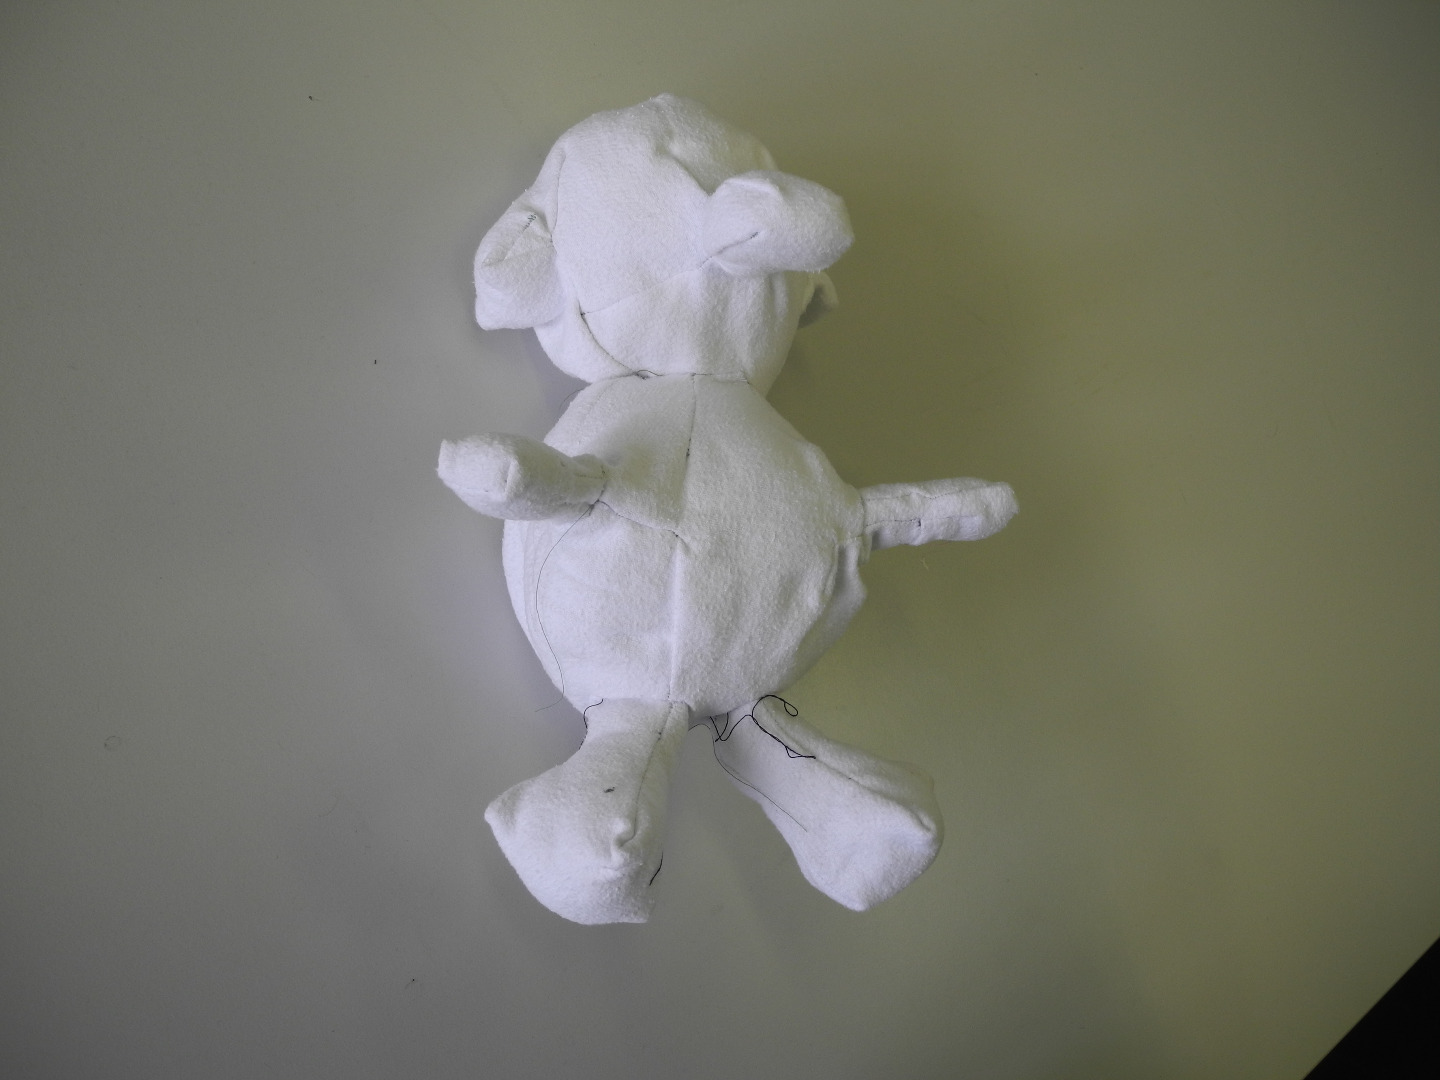


So at this point you have a cut out fabric pattern !! For me the finesse ended here. My sewing on this project was a little more like brute force and our machine kept loosing stitches and binding up. Sadness. We are saving up for a strong replacement or maybe doing the next one by hand. I would recommend making a prototype, then going back and seeing where you should refine the pattern in Inkscape. It is not necessary to have all of the relieving cuts in between all of the tabs for a sewn project, but you have to have them in some places so to start I leave all of them in. Students were all successful and it was incredible to see the virtual thing in our hands. We used a very forgiving recycled flannel bed sheet from the thrift store. the smooth surface from the matted fibers made it hold together well and cut very smoothly. I would recommend this for beginners.
- Start at one folded V corner and start to sew gently along the lined up pencil lines for guidance,
- Just keep working from places that you recognize
- Remember that you sew inside out and then flip at the end. Chopsticks help a lot with this
- Sew limbs first and then tuck inside the body as you go so that they pop out when you flip.
- Leave a hole to turn inside out through.
- Stuff with clean batting and then sew up the end by hand.
- CUDDLE
As before this whole process would work for clothing (See dress above) and for all sorts of other simple stuffed shapes, remember that when they are stuffed they will not be angular polygon models, the surfaces will bulge and smooth.
Hope that was helpful to you. : ) Post with projects if you make some, I would be curious.
More goodies and fun here: