Stained Glass Lantern


Haven't you ever thought, "Wow, stained glass is such a beautiful material!"
Well, we did too!
My name is Shannon Lo, and with my partner Ananya Thota, we designed this Stained Glass Lantern! We loved the look and feel of stained glass, so we started our journey to learn more about it.
The entirety of this project was made in our Principals of Engineering class at Irvington High School, taught by Ms. Berbawy, as part of a year-long mission to create something awesome! We decided to build a stained glass lantern from scratch: learning how to cut stained glass, use a laser cutter, and work with wood. This stained glass lantern was made from scratch with the purpose of showing the beauty of stained glass and the changing seasons of a year. The entire process was immensely fun, challenging, and rewarding at the same time!
Supplies

Tools & Equipment
Personal Safety
- Lightweight Protective Face Shield (Jackson Safety)
- As there will be glass dust & shards all around the work area during each process
- PU-coated Work Gloves
- Worn while handling large panes of glass & during the cleanup process after each session to minimize the risk of cuts
- Vinyl Gloves
- Worn as needed during the glass cutting process & under the work gloves while grinding glass
- Face Masks
- Needed during the soldering process
- Safety Goggles/Glasses
- Always worn while cutting glass
- Canvas Work Apron
- Always worn while handling glass
Tools & Equipment (Non-consumables)
- Heavy Duty Glass Running Pliers with Rubber Tip
- A large plier used throughout the project
- Breaker-Grozier Pliers
- A smaller plier used on smaller breaks or tight corners
- Pistol-Grip Oil Feed Glass Cutter
- Glass cutter used to score the glass before actual breaks
- Aluminum Straight Edge Ruler (Starrett)
- Woodworking Clamps
- Wood Sander (Worx)
- 18” x 24” Cutting Mats (U.S. Art Supply)
- Soldering Station (Weller WE1010NA)
- Smoke Absorber (Hakko FA-400)
- Glass Grinder (Inland Craft WizCG)
- Laser Cutter (Universal Laser Systems VLS3.50)
Materials (consumable)
- Glass Cutting Oil (Impresa)
- Fed into the glass cutter
- Diamond File (Delphi)
- Large file to smooth out edges
- Tip Tinner (Thermaltronics TMT-TC-2)
- Removes tip oxidation & re-tins soldering iron
- Tip Cleaner (Hakko 599B)
- 60/40 Stained Glass Solder (Canfield)
- Contains 60% Tin & 40% Lead
- Liquid Flux (Ruby Chemical Rubyfluid)
- Helps the solder stick to copper foil, needed!
- Flux Remover (Chemtronics Flux-Off)
- Removes and cleans flux after soldering
- 6" Layout Block System
- Creates template + establishes boundaries for the glass pieces
- Copper Foil Tape
- Used to put around glass pieces to solder on top
- 12” x 12” Cork Board Tiles
- To secure the Layout Block System
- Wood glue (Gorilla)
- Quarter-inch Wood Panels
Personal Safety


As this project requires the handling of glass, personal safety is extremely important to consider in all aspects of the project. For all handling, it is recommended that hair is tied up, washable canvas aprons, and safety goggles or glasses are worn. Work gloves can be used when appropriate.
First, we recommend that those cutting glass wear easy to work clothes that are somewhat disposable. Long sleeved disposable shirts are best and help protect from stray glass shards and glass dust. Make sure to avoid directly touching glass shards after each break.
While grinding, we wore a windbreaker over our clothes so that the micro glass dust would not get stuck in the fibers of our clothing. We also wore large goggles to protect our eyes and a face shield on top. All grinding was done outdoors in an area away from people who were not wearing protective equipment.
When soldering your glass together, ALWAYS wear face masks as stained glass solder does contain lead. Make sure to point the smoke absorber away from your workplace.
Overall, it's very important to be aware of your surroundings at all times and pay careful attention to all of your equipment!
Creating a Design


The first step to any design is to decide what you will be creating! It’s important to research stained glass to see what designs are possible, and the easiest way to do that is to browse through a gallery of stained glass works. This process is very helpful, as it creates a mental gallery of what ideas are possible, especially for beginners to stained glass.
An essential design decision that had to be made in the beginning was what the theme of the work was going to be. At first, a flower design seemed the most appealing, as all the floral designs on stained glass looked beautiful. However, this was later altered to a general theme of all four seasons, which would be represented in each of the four panels.
Other than coming up with the initial designs, it is important to have an easy-to-edit version, which can be sketched on graph paper! Doing this allows you to create a draft that can be changed as you work, according to your needs. The 2D design on graph paper of each individual panel was sketched out, and you may want to create your designs and drafts to-scale, as it allows you to use them as cutouts during the scoring process, or just to gauge each piece’s fit. Each panel was 8 by 6 inches, so we used graph paper to mark out a frame to fit that size first. It’s also important that each piece of the design is labeled, and that changes are marked on the paper for which colors, textures, and patterns will be used!
At this point, we have not cut stained glass before, and due to this we planned on limiting our designs to geometric shapes, as we believed that it would be easier to cut. However, as beginners in stained glass, it is important to remember that it is difficult to create identical geometric shapes that will fit together perfectly by the end, especially if all cuts are not guaranteed to be as clean as intended. In addition, the grinding process, which is done mostly free-handed, can make it even more difficult to create a consistent size and shape. Due to this, the final design ended up using two geometric flowers and then 2 panes of curvy, flowing cuts that create a landscape of a sunset over hills and mountains. These designs were used to represent summer and autumn.
Stained Glass Basics


When starting out with stained glass, it’s important to always have a clear idea of what you are making so that you can get the most out of your glass, tools, and materials. Let’s start off with some basics with stained glass!
There are many ways to break glass, however, it is more similar to cutting than breaking when you work with stained glass. The very first thing to learn is how to score glass, you always want to start with the side that is the smoothest, especially when you use multi-textured glass! To start off, grab your sharpie, a pistol grip glass cutter, and a metal ruler. Using sharpie or any other permanent marker on glass can cause smudges, however, you should outline the pieces required for your design, to ensure that the cuts are smooth. Place the tip of the glass cutter 1/16’’ in. or 2 mm from the edge, and apply even pressure. You can either cut towards or away from yourself, and with straight lines, it is recommended that you cut towards yourself, as you will be able to follow the metal ruler better. However, with cuts that require a template or following a curved line, it’s important to cut away from yourself as to see the outline on the glass clearly.
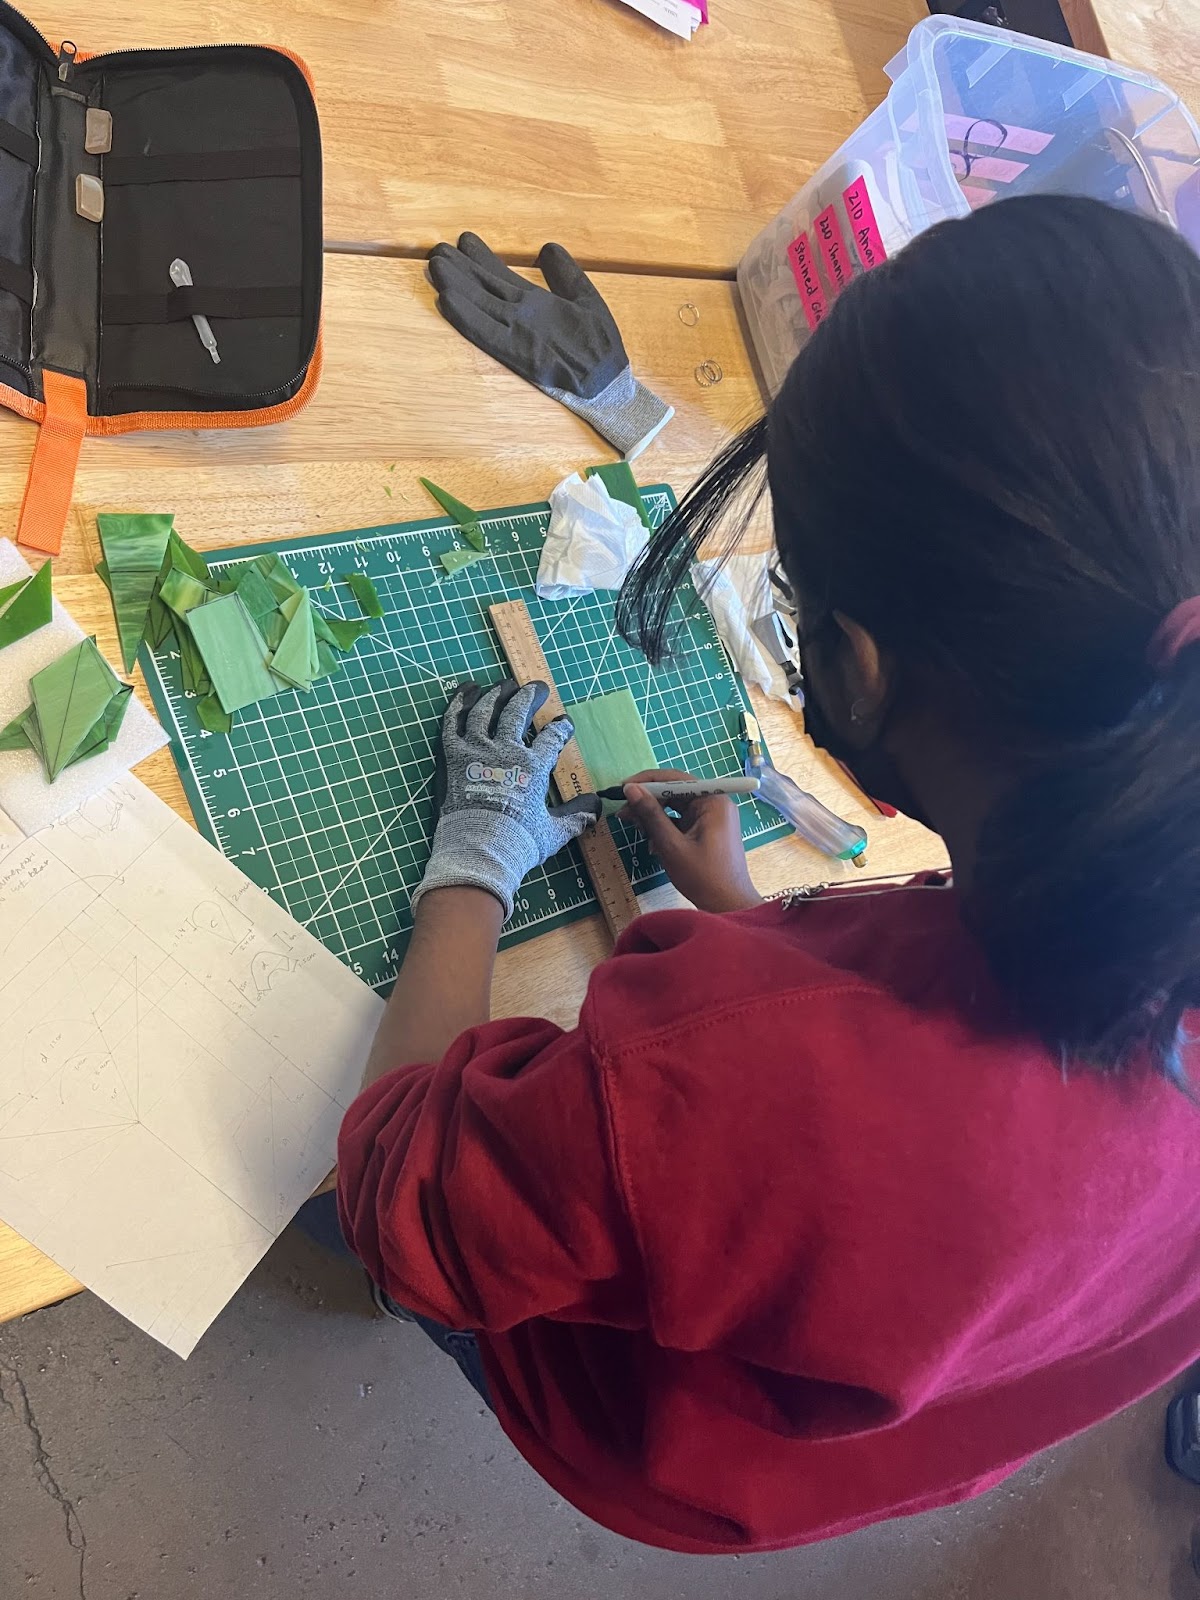
Always apply even pressure downward and forward with each score line, as pressing too hard can cause white glass dust to form, which is an indicator for you to apply less pressure, since you're turning stained glass into dust! After scoring, make sure that there is a nearly invisible cut across the score line to ensure that there will be a clean break!
The copper foil tape is necessary for the solder to stick, and it requires the addition of flux, which is a chemical that aids in the soldering process by allowing the stained glass solder to flow smoothly. In terms of copper foiling, it is important to completely center the narrow tape against the edges of the glass, as even copper foiling means even solder lines! The tape we used is 0.5 inches wide, which is perfect for the dimensions of the glass we have. First, you must always clean the edges of the glass with isopropyl alcohol (and wash your hands!) to ensure that the tape can adhere properly to the glass.
Measure the amount of tape needed for a particular piece by wrapping the tape, with its backing, around the perimeter, and cut to apply. To start, begin at any point other than the corners or tight turns, and peel a little of the backing away at a time. Then, while not touching the adhesive, hold the glass vertically and pivot to make sure that the tape is centered by looking at the amount of tape on both sides of the glass. When the tape is centered, pull the tape towards you and press to ensure that it’s flat against the glass. Repeat until the entire perimeter of the glass is covered, and then use something flat like a marker cap to press down hard against the tape and ensure that there are no crinkles in the tape.
Choosing Stained Glass


You can use any color, pattern, or texture of glass for your project! As a beginner, purchasing stained glass off of Amazon may be the best choice, as these products are usually more affordable, which makes room for any mistakes! It’s important to keep in mind that while any type of glass can be used, non-textured and smooth glass may be easier to cut. For this project, we chose to use many colors and textures of glass, however, we encountered some issues scoring the glass due to the rippled surface of the glass. The color palette consisted of summer, spring, winter, and autumn colors; lots of more natural colors such as reds, oranges, and yellows, in addition to pinks, purples, and blues!
Grinding Stained Glass
.jpeg)


Not all cuts of stained glass will be smooth to the touch or will perfectly fit the shape you were aiming for, and that’s okay! You might need to grind and smooth out the stained glass pieces, and for this we used an Inland Craft Glass Grinder called the WizCG.
The kit includes one ¼ inch grinder bit that is used for precise grinding of a smaller scale, and a ¾ inch bit that is used for smoothing out most other cuts. The parts that need to be assembled include a work surface with a grid pattern, the main grinder housing, and a coolant reservoir tray that can hold 1½ cups of clean water, a bit insert, a coolant sponge, and an allen wrench.
Personal safety is also super important when working with a glass grinder. Please be sure to wear a windbreaker or jacket, a face shield, an apron, latex AND work gloves, and a mask. During our first session, the glass dust and debris seeped through the work gloves, so we realized that we should double layer both latex and work gloves in order to avoid this problem in the future. After each session, you must also wash or rinse the work gloves!
To protect your work environment, always turn off the grinder when not in use, even for a few minutes. When practicing with scrap glass or mirror, use moderate speed and work carefully to avoid over-grinding the pieces. All edges of the ground glass will have chips, but this should not be too worrisome as copper foiling covers most of it.
During the process of working with stained glass, there are certain things to keep in mind that can help ensure a successful project. It is important to review the outlines of your design and use sharpie to draw which parts to focus on during the grinding process to achieve the correct shape and size. Additionally, you should dry the glass periodically during grinding if glass dust or debris accumulates. It is crucial to check the size, shape, and fit of the glass with the rest of the pieces regularly to ensure a cohesive final product. Having a cork board and metal layout block system can be extremely helpful in making sure everything fits together nicely as well!
Using a sharpie to outline the cut can be helpful, but it is also important to be mindful that water and handling can cause the outlines to rub off. As beginners, we had some uneven edges that we were able to clean up by buffing.

During the project, multiple work sessions may be required, so it is important to thoroughly clean up after each session. It is helpful to maintain the condition of the grinder for future use by using water to rinse out the removable tray and drain. Vacuuming glass debris such as powder, shards, or any remaining unseen pieces with a vacuum brush attachment can help protect the work environment. It is also important to wipe down all tables and surfaces after use and use wet paper towels to pick up any remaining glass shards. Wearing gloves during cleanup if necessary can also be helpful.

Overall, these reminders can help ensure a successful and safe experience when working with stained glass.
The Pane Designs


Our winter and summer themes panes show two geometric flower designs while the spring and fall are let rigid and more flowy! We made the latter two more landscape based with softer edges as we became more familiar and comfortable with using the grinder. The designs are fairly simple and represent the seasons through the color schemes.
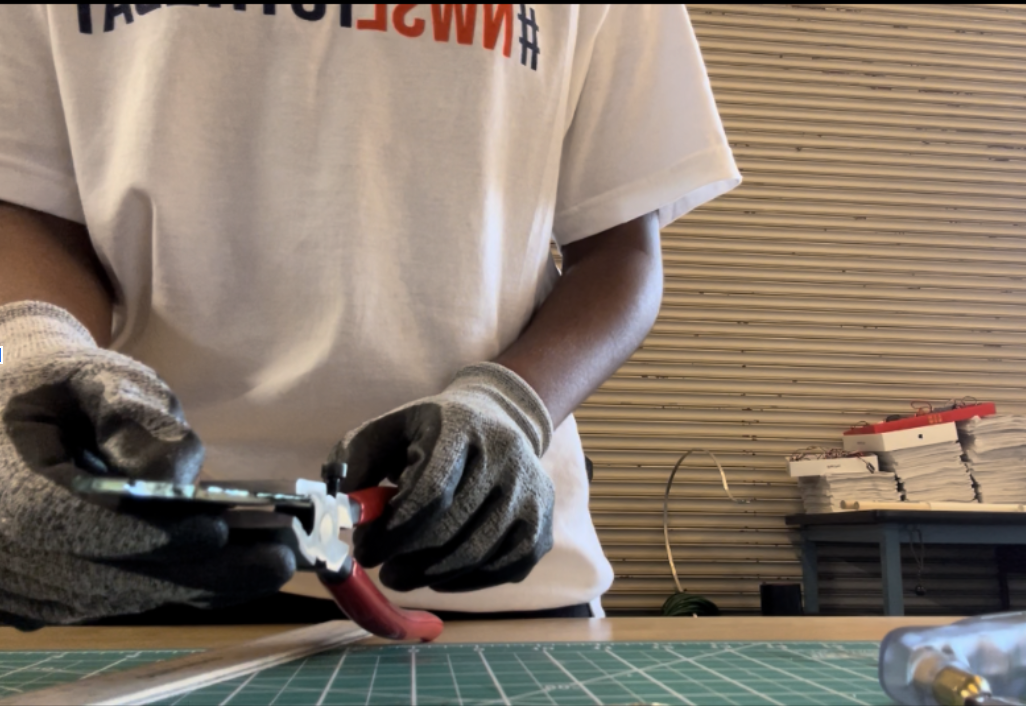
Soldering Stained Glass


We used the Weller soldering station (WE1010NA) and Thermaltronics tip tinner (TMT-TC-2), along with a Hakko smoke absorber (FA-400) and tip cleaner (599B). The solder we used was specifically made for stained glass, and it's the Canfield 60/40 Stained Glass Solder which contains 60% tin and 40% lead.
To assemble the soldering kit, always make sure to use a tabletop mat such as the 18” x 24” Cutting Mats from the U.S. Art Supply to set up atop of, and choose an area with good air circulation so that the smoke absorber can properly remove any fumes. For the soldering iron, attach the chisel top by screwing off the top of the iron and inserting it, and ensure that the tip is properly attached before plugging it into the station. A thicker iron tip makes for easier use, so we chose to use the ETC chisel, with a 3.2mm thickness.
Before you start, always remember to apply caution when handling a soldering iron, glass, and any other very hot surfaces. Never set your soldering iron on your work surface, return the soldering iron back into its holder before doing anything else.
All pieces to be soldered must be copper foiled and cleaned with isopropyl alcohol first. With a small brush, apply an even layer of flux using a brush or cotton swab. We used this liquid flux by Ruby Chemical. After heating the iron up, hold the solder almost parallel to the glass to ensure that the tip comes into contact with all of the solder. During soldering, make sure to first apply tip tinner after heating the soldering iron and use the tip cleaner to make sure that all residue is gone before beginning work on the stained glass.
Hold the stained glass solder against the tip of the soldering iron and let it melt. Then, apply a bit of solder as a joint between 2-5 individual pieces to solder first so there is always a strong bond between the pieces. Then, you can start from these points and apply solder to create a line of solder along the seams, remember to cover the whole copper foil tape! Continue to use the soldering iron to smooth out the solder, and repeat the process until all pieces have been soldered together.
The Wooden Frame


Once we had a general idea of the design we wanted to use, we began to inventory our materials and learn how to use the Laser Cutter (Universal Laser Systems VLS3.50). We cut all our wooden pieces out with the laser cutter which helped us make sure all of our holes and cuts were accurate.
Using the Universal Laser Systems VLS3.50 Laser Cutter
- Create vector images on Adobe Illustrator
- Check with your own laser cutter to make sure you have the right stroke and color which allows you to cut out the wood accurately.
- Place in laser cutting machine and upload the file you want to cut out onto the laser cutting program
- Adjust the location of the cut and make sure it is on top of the wood itself.
- Adjust settings to make sure the material is correct, wood is the right thickness, the laser itself is focused, and the mirrors are clean.
- Begin cut and make sure to observe as the wood is being cut and watch for fires (stop the cut when it starts to burn and restart after fire extinguished)
- Tips and Insights on using Laser Cutter
- Make sure to stop the machine immediately when the wood catches on fire. When the fire is left to burn, the laser doesn’t seem to be fully concentrated which resulted in some of our wood not being fully cut through
- Keep your cuts close, but not too close to the edge of the wood. When we placed our cut extremely close to the edge of the wood slab, we were not able to take off the edge as it was too minuscule to simply snap off
- When you create your adobe illustrator designs, make sure you do not have any overlapping lines. Overlapping lines results in the laser cutter going over the same part multiple times, thus increasing the likelihood of it catching on fire.
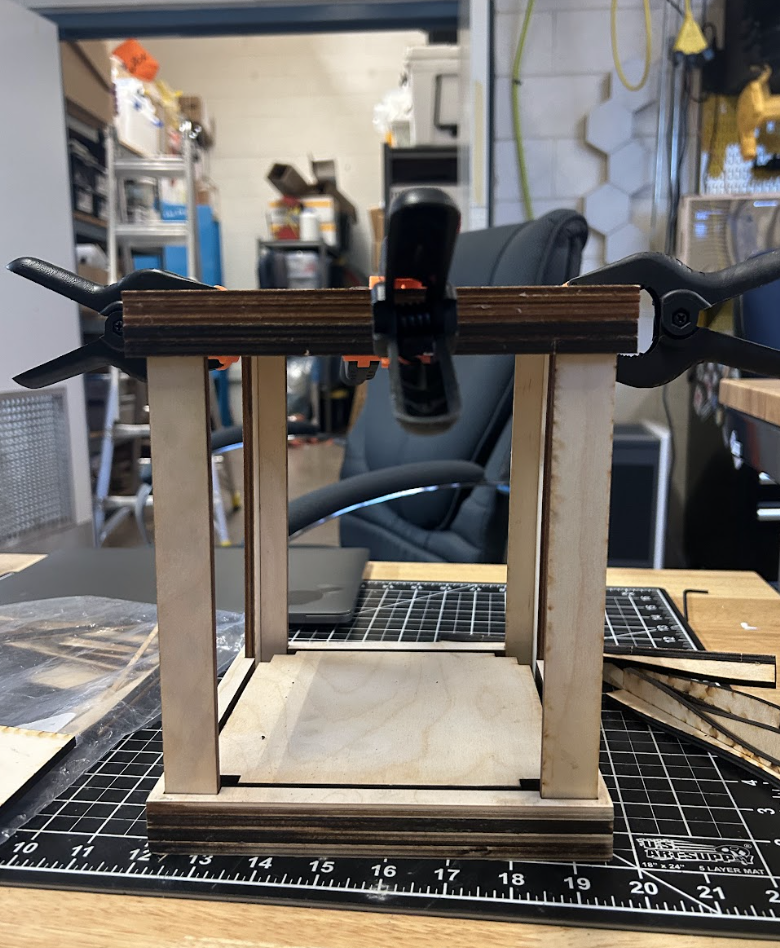
Frame overview
We designed our frame so that every single piece can slide in easily slots and remain in their positions strongly. Essentially, our design didn’t even need glue to hold it together. To make this possible, we created a strong and sturdy base which had holes cut out for our glass and pillars– this allowed the pieces to slide in perfectly. The lid would be almost a replica of the base (with an opening in it for easy access to the inside) allowing us to fit all the pillars and glass into their slots easily. Keep in mind that each of our wood cutouts were all .25’’ thick. All of our plans and dimensions were created with the intention of using .25’’ thick wood.
Base
Our base was made by stacking multiple pieces of wood on each other. The holes in the wood lined up. We were able to insert the outer pillars, inner pillars, and glass into the base.
- Dimensions
- Our base dimensions were 1’’ x 7.5’’ x 7.5’’
- The slots for glass and pillars were .5’’ deep
- The slots for pillars were .25’’ from the edge of the slab
- The slots for glass were .5’’ from the edge of the slab
- The base was made by stacking four .25’’ wood slabs on top of each other
- The inner rectangle is 6.25’’ by 6.25’’
- Laser cutting
- File name: base laser cut pieces
- Gluing together
- We stacked and glued the inner and outer rectangles on top of two 7.5’’ x 7.5’’ wooden slabs with no cuts. Below is the final look! The clamps helped us keep the panes stacked in the right location

Pillars
Our pillars are as tall as our glass. This allows for us to rest the lid on top without putting all the weight on the glass itself.
- Dimensions
- Our outer pillars are 8’’ x .89’’ x .25’’ and 8’’ x .74’’ x .25’’
- Our inner pillars are 8’’ x .75’’ x .25’’ and 8’’ x .5’’ x .25’’
- Laser cutting
- File name: base laser cut pieces
- Gluing together
- We glued the individual pillar rectangles to each other, creating a 90° angle with the two pieces. The photos below show us fitting together pillars with the base

Top Lid
Our top lid is the exact replica of the bottom base. The only difference is that the top lid has a hole in the middle which allows for easy access to the inside of the lantern. Because of this lid, we can add in whatever types of lights and make adjustments as needed.
- Dimensions
- The outer dimensions are the same as the base
- The hole dimension are 5.5’’ x 5.5’’ and the top hole dimensions are 6’’ x 6’’
- Laser cutting
- File name: lid laser cutting pieces
- Gluing together
- The picture below shows all the frame pieces put together!
Assembly


Glue and put together all the pieces! To make sure the glass fit inside, we had to desolder our panes near the edges. This got rid of any lumps or ridges that made it hard for the glass to fit in snugly. Some of the wooden pillars were not exactly 90° and thus wouldn’t fit into the lid and base slots. We went ahead and sanded down corners to make the pillars fit mores snugly. We also sanded the edges of the lid and base to even out the color.
Internal LEDs


We decided that LEDs would be the best option for us as they were replaceable and we could change the colors and brightness as desired. Additionally, the LEDs we chose could be powered with rechargeable batteries which allowed for longevity of the lantern. Since the LEDs were extremely dense and wound tightly, we hot glued twist ties to the tops of the inner pillars. We were able to secure the string lights and it also allowed us to distribute the light more evenly.
The Four Seasons (final Design/proj)


Our final design represents the four seasons with different color schemes on each pane! All four panes are pictured in the photos below along with the final setup. Have fun and good luck with your stained glass lantern :))
Thank you to Adobe Illustrator, where we created all of our designs!
We would also like to thank Ms. Berbawy for sponsoring this project!!! From guiding us with our ideas and helping us find materials, to ordering them and supporting us all along the way, we could not have done it without you.