Spark Core Read-a-Tweet (spark.io)
by anouskadg in Circuits > Microcontrollers
11490 Views, 100 Favorites, 0 Comments
Spark Core Read-a-Tweet (spark.io)
Last friday I had a change to fool around with a Spark Core at Fablab Breda during the Instructables Build Night of November.
A friend wanted to control a LED via Twitter, because if that works he can control the whole world! So it was my goal to make it work :) Unfortunately it turned out to be a real pain to work with Twitter. We wanted to make a direct 'connection' with Twitter and not use other websites or services. Turns out that isn't possible anymore since Twitter upgraded their API to 1.1!
So that left us searching for other code examples. A lot of people have made something to send tweets via their Spark Core or display tweets on a LCD display, but none of them were really helpful for us.
We then found CheerLights by ioBridge Labs. They use ThingSpeak to handle the Twitter API. Their setup method didn't completely work though, and the code also had to be modified a bit.
I made some modifications to their method and in this Instructable I will explain how to set everything up so you can turn a LED on and off via Twitter! :)
All you're going to need is:
- a Spark Core with USB cable
- a computer
- a Twitter account
- and preferably a tablet or smartphone
Connect Your Spark Core!
You can obviously skip this step if you've already set up your Spark Core. If you haven't set it up yet, here's how to do it!
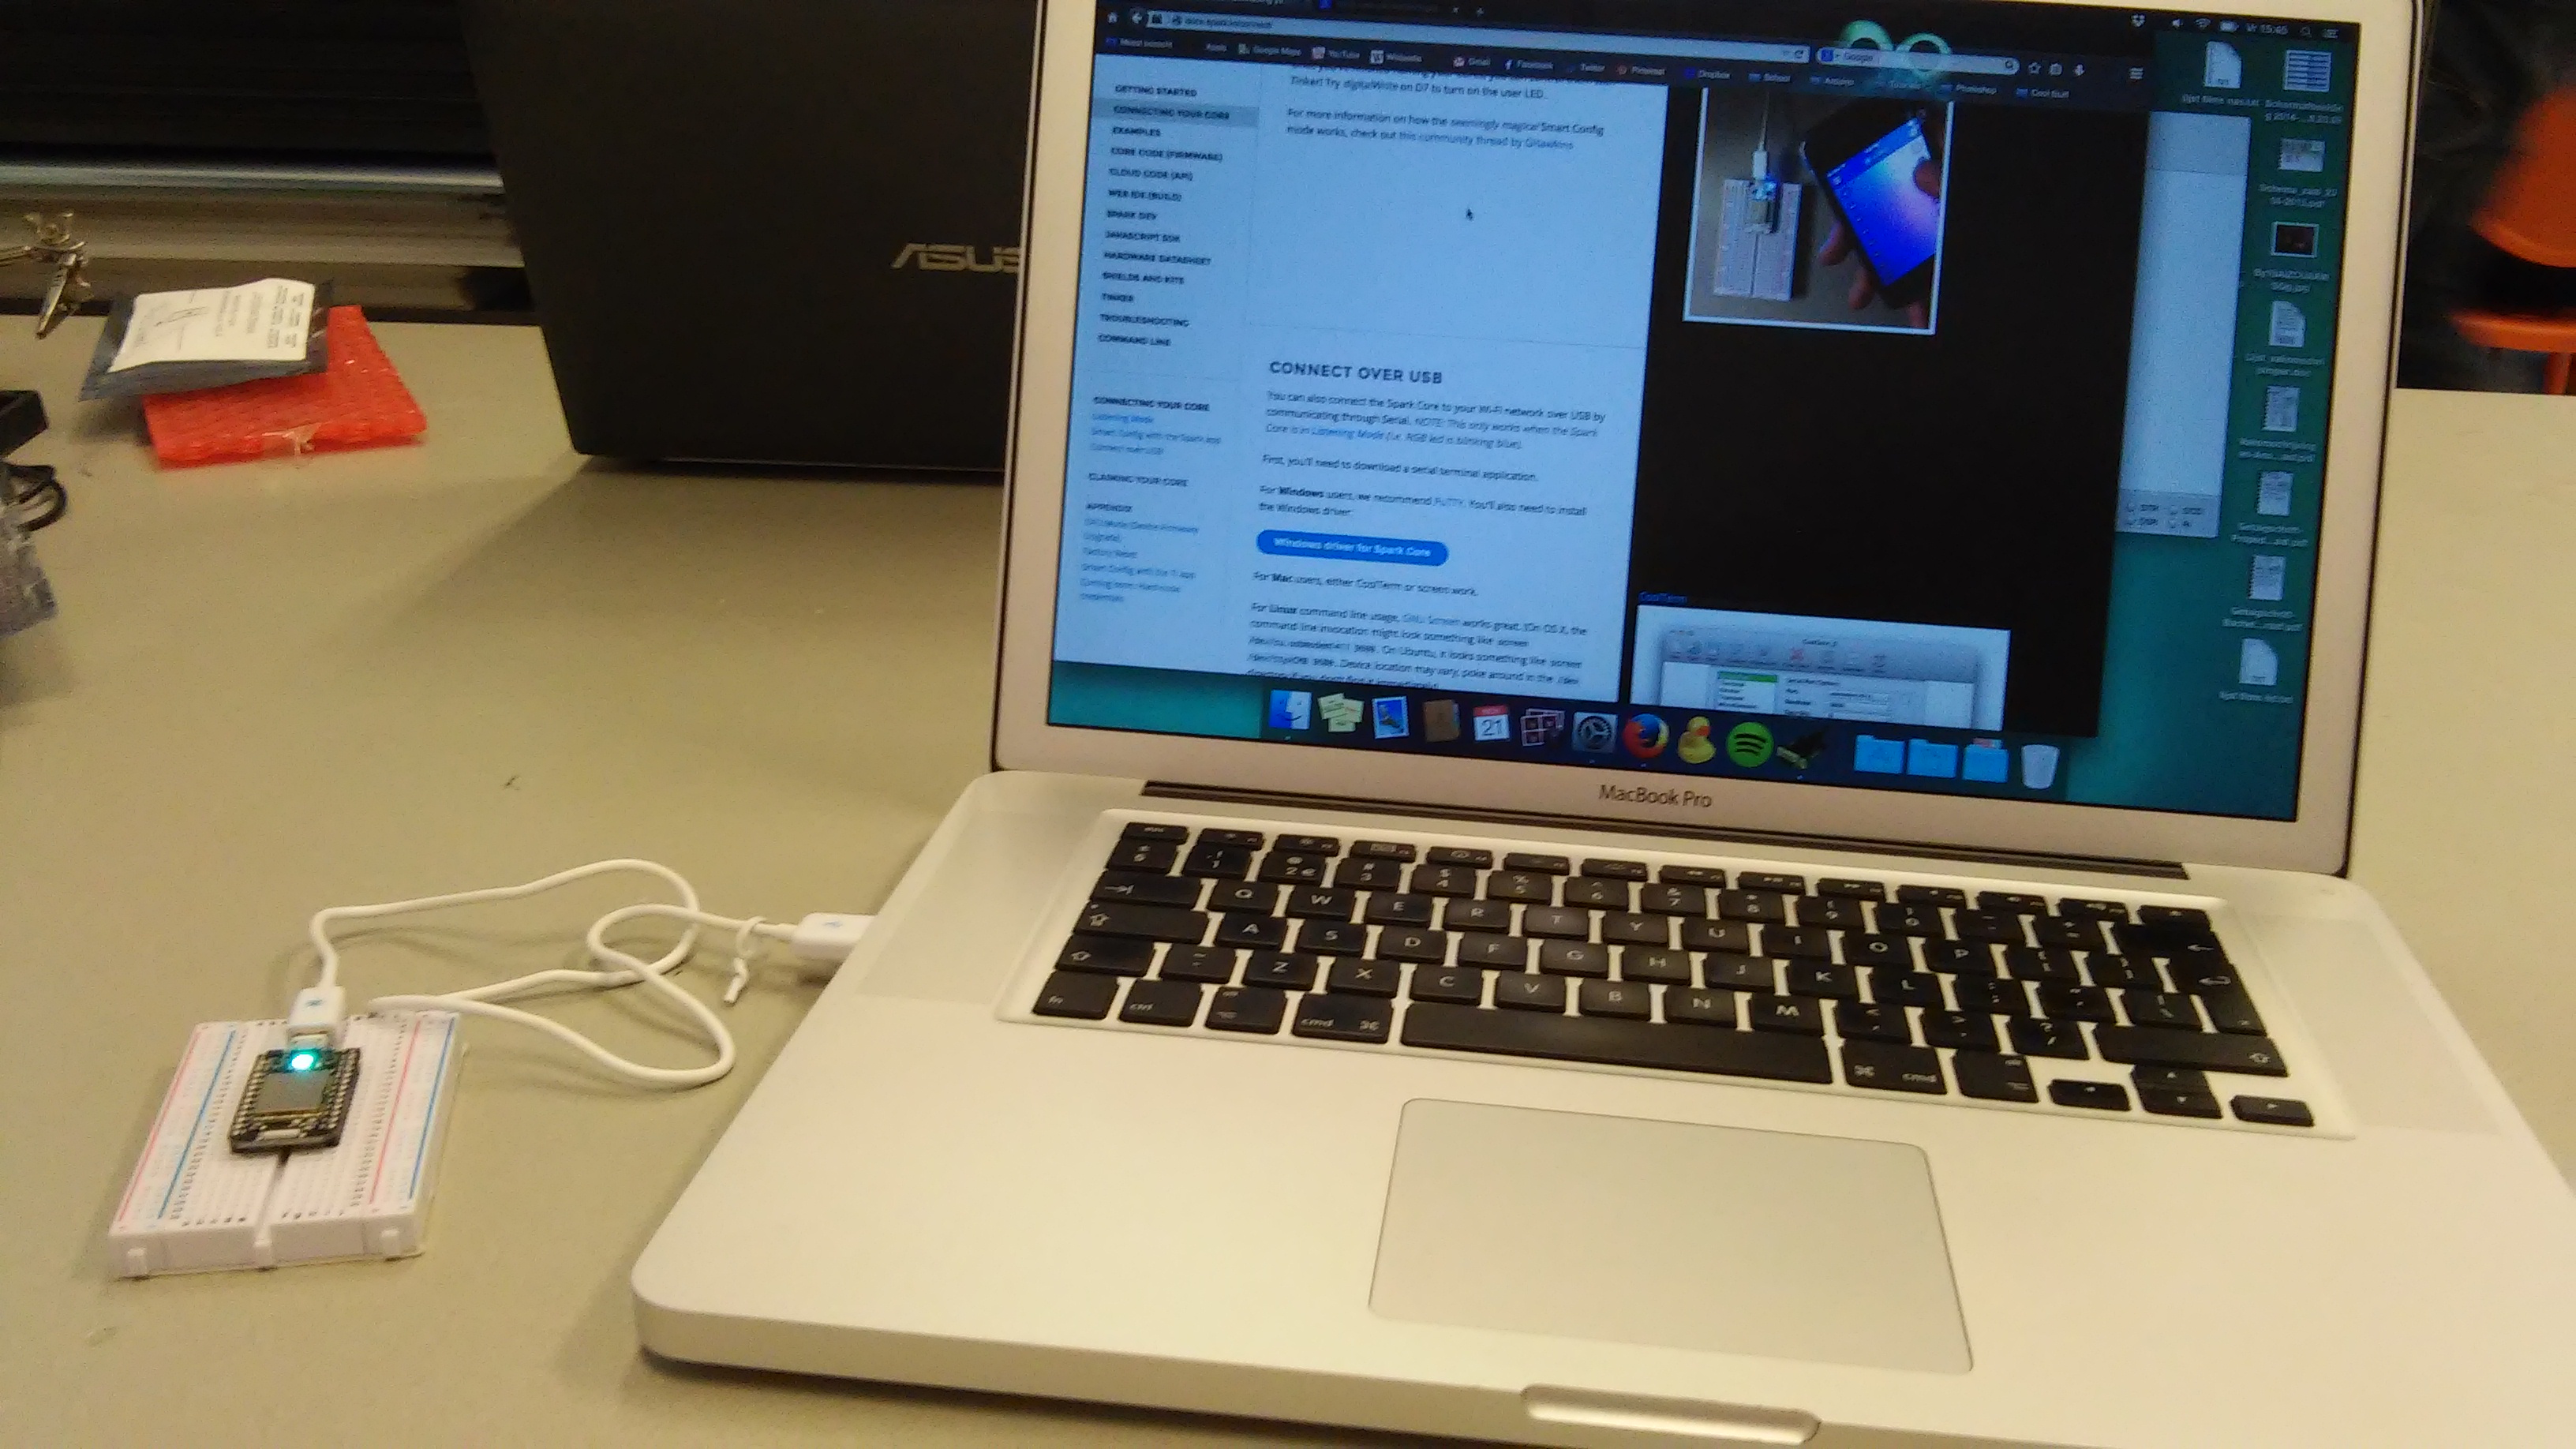
First off put your Spark Core on the breadboard (see image). Then plug the USB cable into your Core and computer. The Core should start blinking blue.
Next up is downloading the Spark Core app. It is available for Android and iPhone.
Now that you have downloaded the app, there are two ways to connect your Core. The easiest way is Smart Config with the app. You can find how to do that on this page: http://docs.spark.io/connect/#connecting-your-cor...
However, if you're in a place where multiple Cores are being connected (like I was), then it is better to connect your Core via USB. This is better because it will prevent confusion of accidentally claiming another core. You can find how to connect via USB here: http://docs.spark.io/connect/#connecting-your-core...
Once you've connected your Core, the last step is to claim your Core. If you used the app to connect your Core, it should do it automatically. If you connected via USB or if it didn't claim automatically, you can claim it manually.
To claim our Core we're going to need our Core ID and claim it via Spark Build. First open a serial connection to the Core like you did when connecting it. This time we're going to press the 'i' key on our keyboard. It should show a number like this: 55ff68064989495329092587. Copy this number and open Spark Build. Sign up if you haven't yet. After logging in click the Cores button on the left (second button from the bottom). Then click the yellow Add new core button, paste your Core ID and click the blue Claim a core button.
That's it! Your Spark Core should now be connected and claimed.
Make a ThingSpeak Account
Go to www.thingspeak.com and click the big red Get started now button. Fill in all the fields and click the blue Create account button at the bottom.
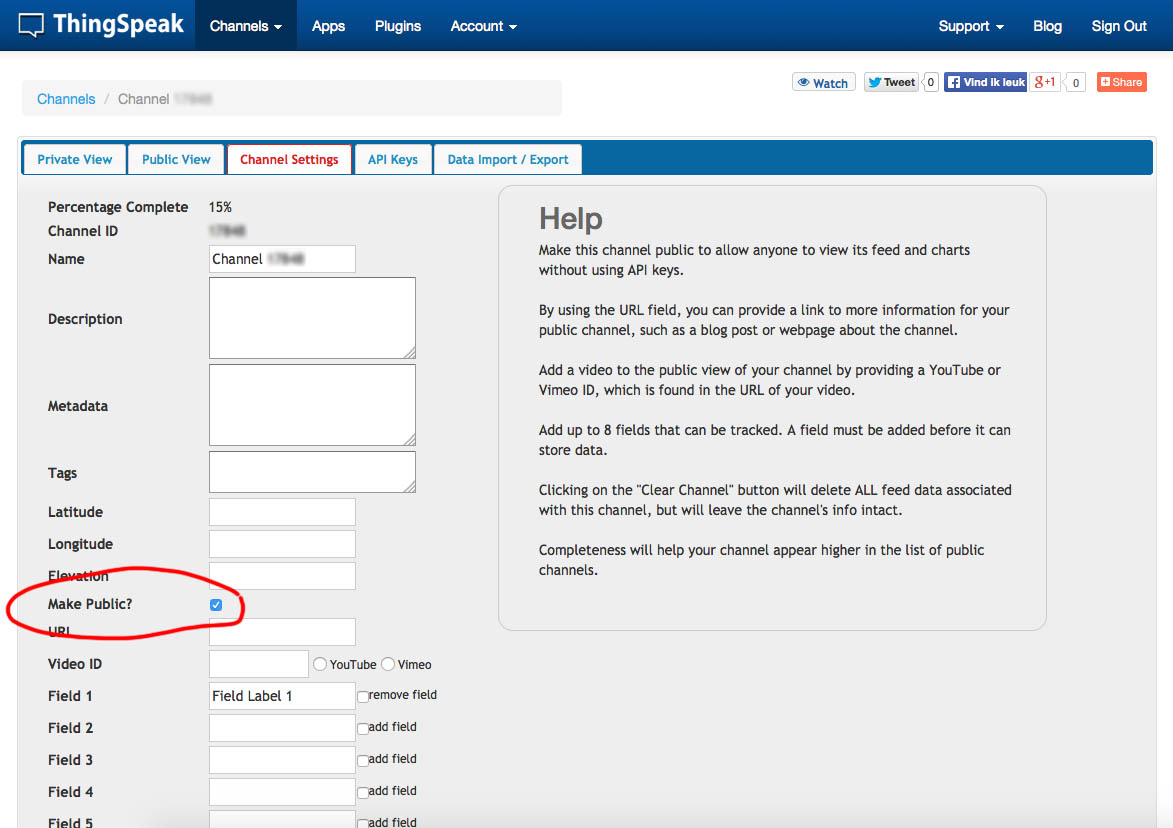
The next step is to make a channel. Click the blue New Channel button on the left. It will then forward you to the Channel Settings page (see image). On this page you will see a lot of input fields. About halfway there is a checkbox with the question Make public? Check this box! Then click the Save Channel button at the bottom.
Set Up ThingSpeak Apps - ThingHTTP Core
After we made a ThingSpeak account we'll have to set up the apps. You can do this by clicking Apps in the top menu bar. You will see 6 apps on the left. We are going to use ThingHTTP en TweetControl, but we're going to start with ThingHTTP, so click that button.
After you clicked that button it will take you to the ThingHTTP page. Click the blue New ThingHTTP button. This first ThingHTTP will handle the communication between ThingSpeak en your Spark Core
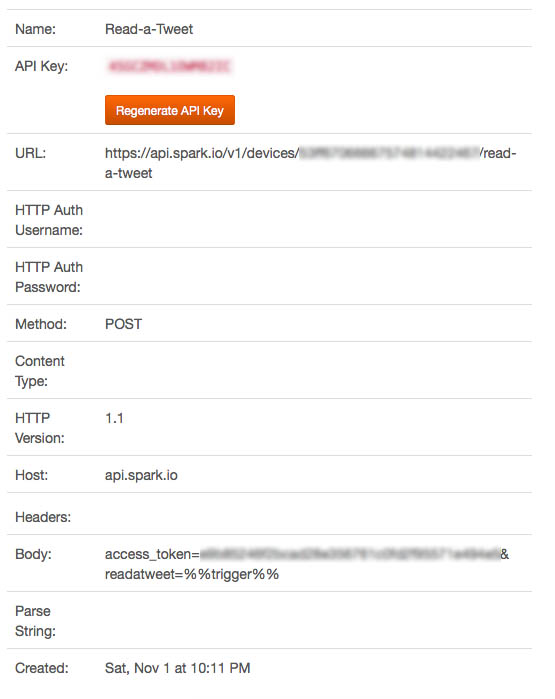
We'll have to fill in a couple of these fields. First up the Name field. It now has an autogenerated name, but it'll be helpful to give it a meaningful name. I will call this one: Read-a-Tweet.
Next we have to fill in the URL. For this field you are going to need the Device ID of your Core. The URL will be as follows: https://api.spark.io/v1/devices/DEVICE_ID/read-a-tweet
Make sure to replace DEVICE_ID with the ID of your core! (Spark build > Cores)
Next we have to select POST in the Method dropdown. Our Host will be api.spark.io
Lastly we have to fill in the Body. For this one you are going to need the Access Token of your Spark account. The body will be as follows: access_token=ACCESS_TOKEN&readatweet=%%trigger%%
Make sure to replace ACCESS_TOKEN with the access token of your Spark account! (Spark Build > Settings)
The last step is to click the Save ThingHTTP button.
We have now made our first ThingHTTP!
Set Up ThingSpeak Apps - ThingHTTP Twitter
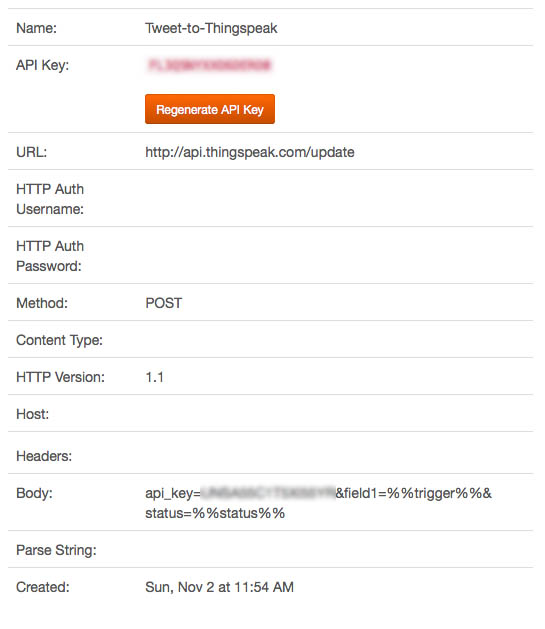
In this step we're going to make another ThingHTTP. This time to handle the communication between ThingSpeak and Twitter. So again go to Apps in the top menu bar, then to ThingHTTP and click the blue New ThingHTTP button.
We will again start by giving our ThingHTTP a meaningful name. I will call this one: Tweet-to-Thingspeak.
Next we have to fill in the URL. This time the URL will be as follows: http://api.thingspeak.com/update
The Method will be POST again, so select that one in the dropdown menu.
Lastly we have to fill in the Body. For this one you are going to need the Write API Key of your channel. You can find your key by going to Channels > My Channel in the top menu bar. Then go to API keys and copy your Write API Key.
Then back to our ThingHTTP! The body will be as follows: api_key=WRITE_API_KEY&field1=%%trigger%%&status=%%status%%
Make sure to replace WRITE_API_KEY with the key of your channel!
The last step is to click the Save ThingHTTP button. And that's it for our second ThingHTTP!
Set Up ThingSpeak Apps - TweetControl
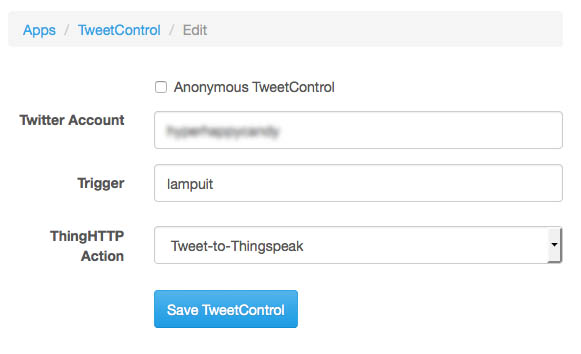
The next step is to tell ThingSpeak to which tweets it has to listen.
Go to Apps and then TweetControl. Click the blue New TweetControl button.
You can choose to let anyone trigger your TweetControl or to fill in a specific account. If you want anyone to be able to trigger it, check the little box at the top. If you want to use a specific account, then fill in the account name.
Next up you'll have to fill in a trigger word for TweetControl to listen to. For example: ledOn or ledOff. (Triggers are not case sensitive).
Lastly you'll have to pick your ThingHTTP Action. This will be the ThingHTTP that handles the communication with Twitter. So in my case I have to pick Tweet-to-Thingspeak.
Then click Save TweetControl and repeat this step for every trigger you want to use. In my case I made one to turn the LED on and one to turn the LED off, so that's two TweetControls in total.
Let's Test If ThingSpeak Is Set Up Correctly!
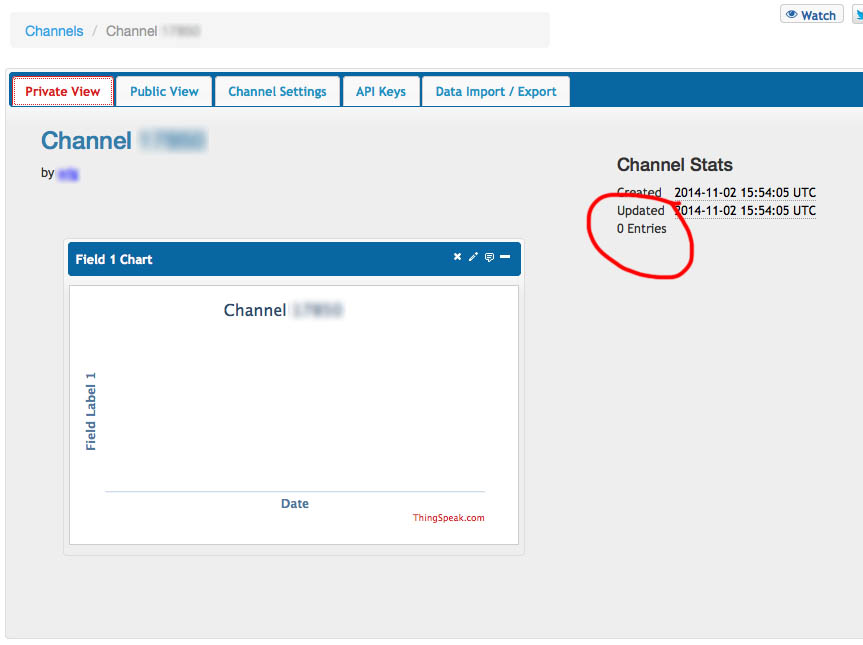

Before we continue it would be smart to check if our ThingSpeak is set up correctly.
Go to Channels > My Channel > Private view.
At the right you will see "0 Entries" under Channel Stats (see first image). This is what we are going to use to check if our ThingSpeak is set up correctly.
Before we go to Twitter, let me explain how TweetControl works.
Each tweet has to contain a filter and a trigger. The filter is used to filter the tweets to our Spark Core from the 'normal' tweets. The trigger is used to trigger an event on your Spark Core.
You can filter tweets with the following key words:
- #thingspeak
- thingspeak
- #tweetcontrol
- tweetcontrol
- #iobridge
- iobridge
- #cheerlights
- cheerlights
(more about filters and how to use your own filters can be read here)
So every tweet you send will contain a filter and a trigger. For example:
"ThingSpeak ledOn" -> ThingSpeak = filter, ledOn = trigger
But "ThingSpeak please turn ledOn" will also work, because it contains a filter (ThingSpeak) and a trigger (ledOn)
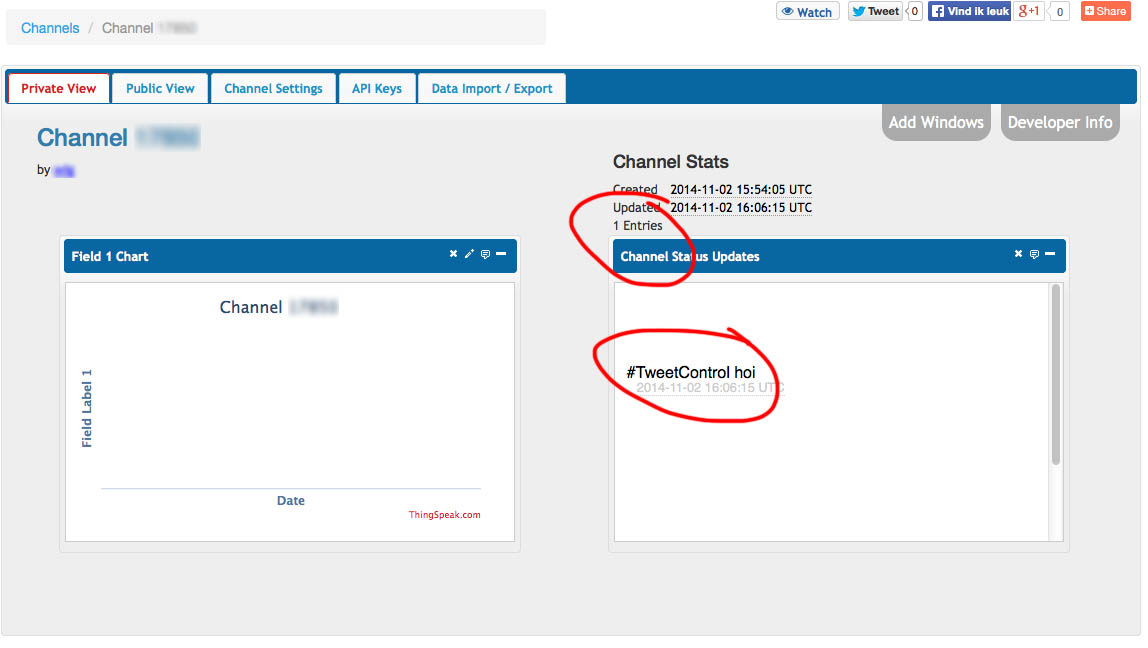
We know now how the tweets work, so let's go to Twitter. Go to the account you filled in in TweetControl, or go to any account if you checked "anonymous". Send a tweet with a filter and a trigger (see second image).
Now we have to wait for a minute or so for TweetControl to refresh. After a minute, go back to your Channel page and refresh. It should now say "1 Entries" under Channel Stats (see third image).
If this is the case; Congratulations! Your ThingSpeak is set up correctly! :D
If it doesn't say "1 Entries" after one or two minutes, please go back a couple of steps and check if you filled in everything correctly.
The Code
Next up is the code.
The code provided will listen to two triggers and turn the build-in LED on pin D7 either on or off. But before you can use the code, you have to change a couple of things.
Go to https://www.spark.io/build and log in with your account. Click on the blue Create new app button. Give your app a name in the left menu. Then copy the code attached to this Instructable to Spark Build.
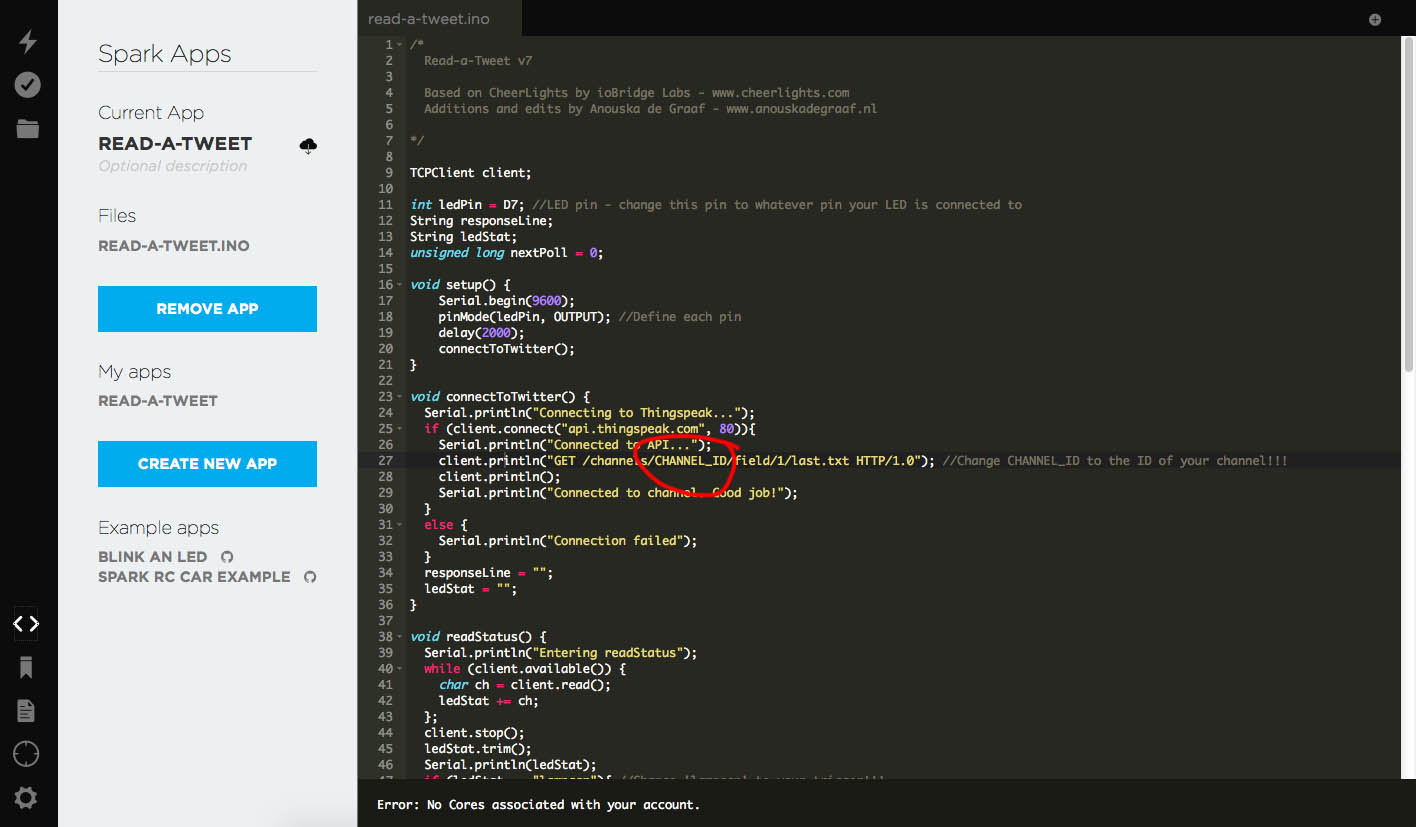
On line 27 you'll have to fill in your Channel ID on ThingSpeak. You can find your Channel ID by going to Channels > My Channel > Channel Settings. Replace CHANNEL_ID on line 27 with the ID of your channel (see first image).
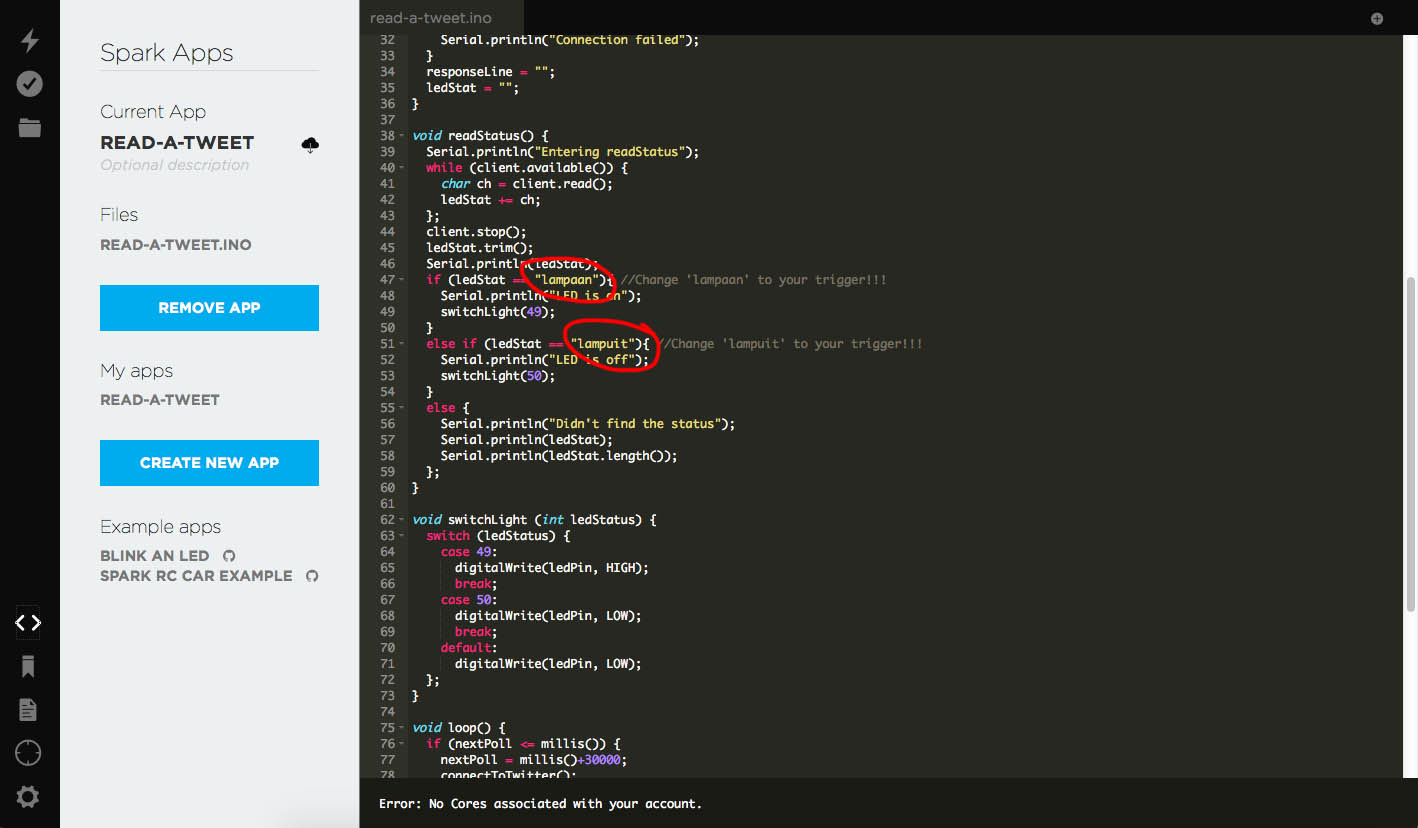
Next up is changing the triggers. On line 47 en 51 you will find the triggers. I used 'lampaan' to turn a LED on, and 'lampuit' to turn a LED off (see second image). Change these two words to the words you filled in on TweetControl.
That's it! You can now flash the code to your Spark Core.
You can do this by simply clicking the lightning bolt icon in the upper left corner. It'll then flash the code to your Spark Core.
Tweet Away!
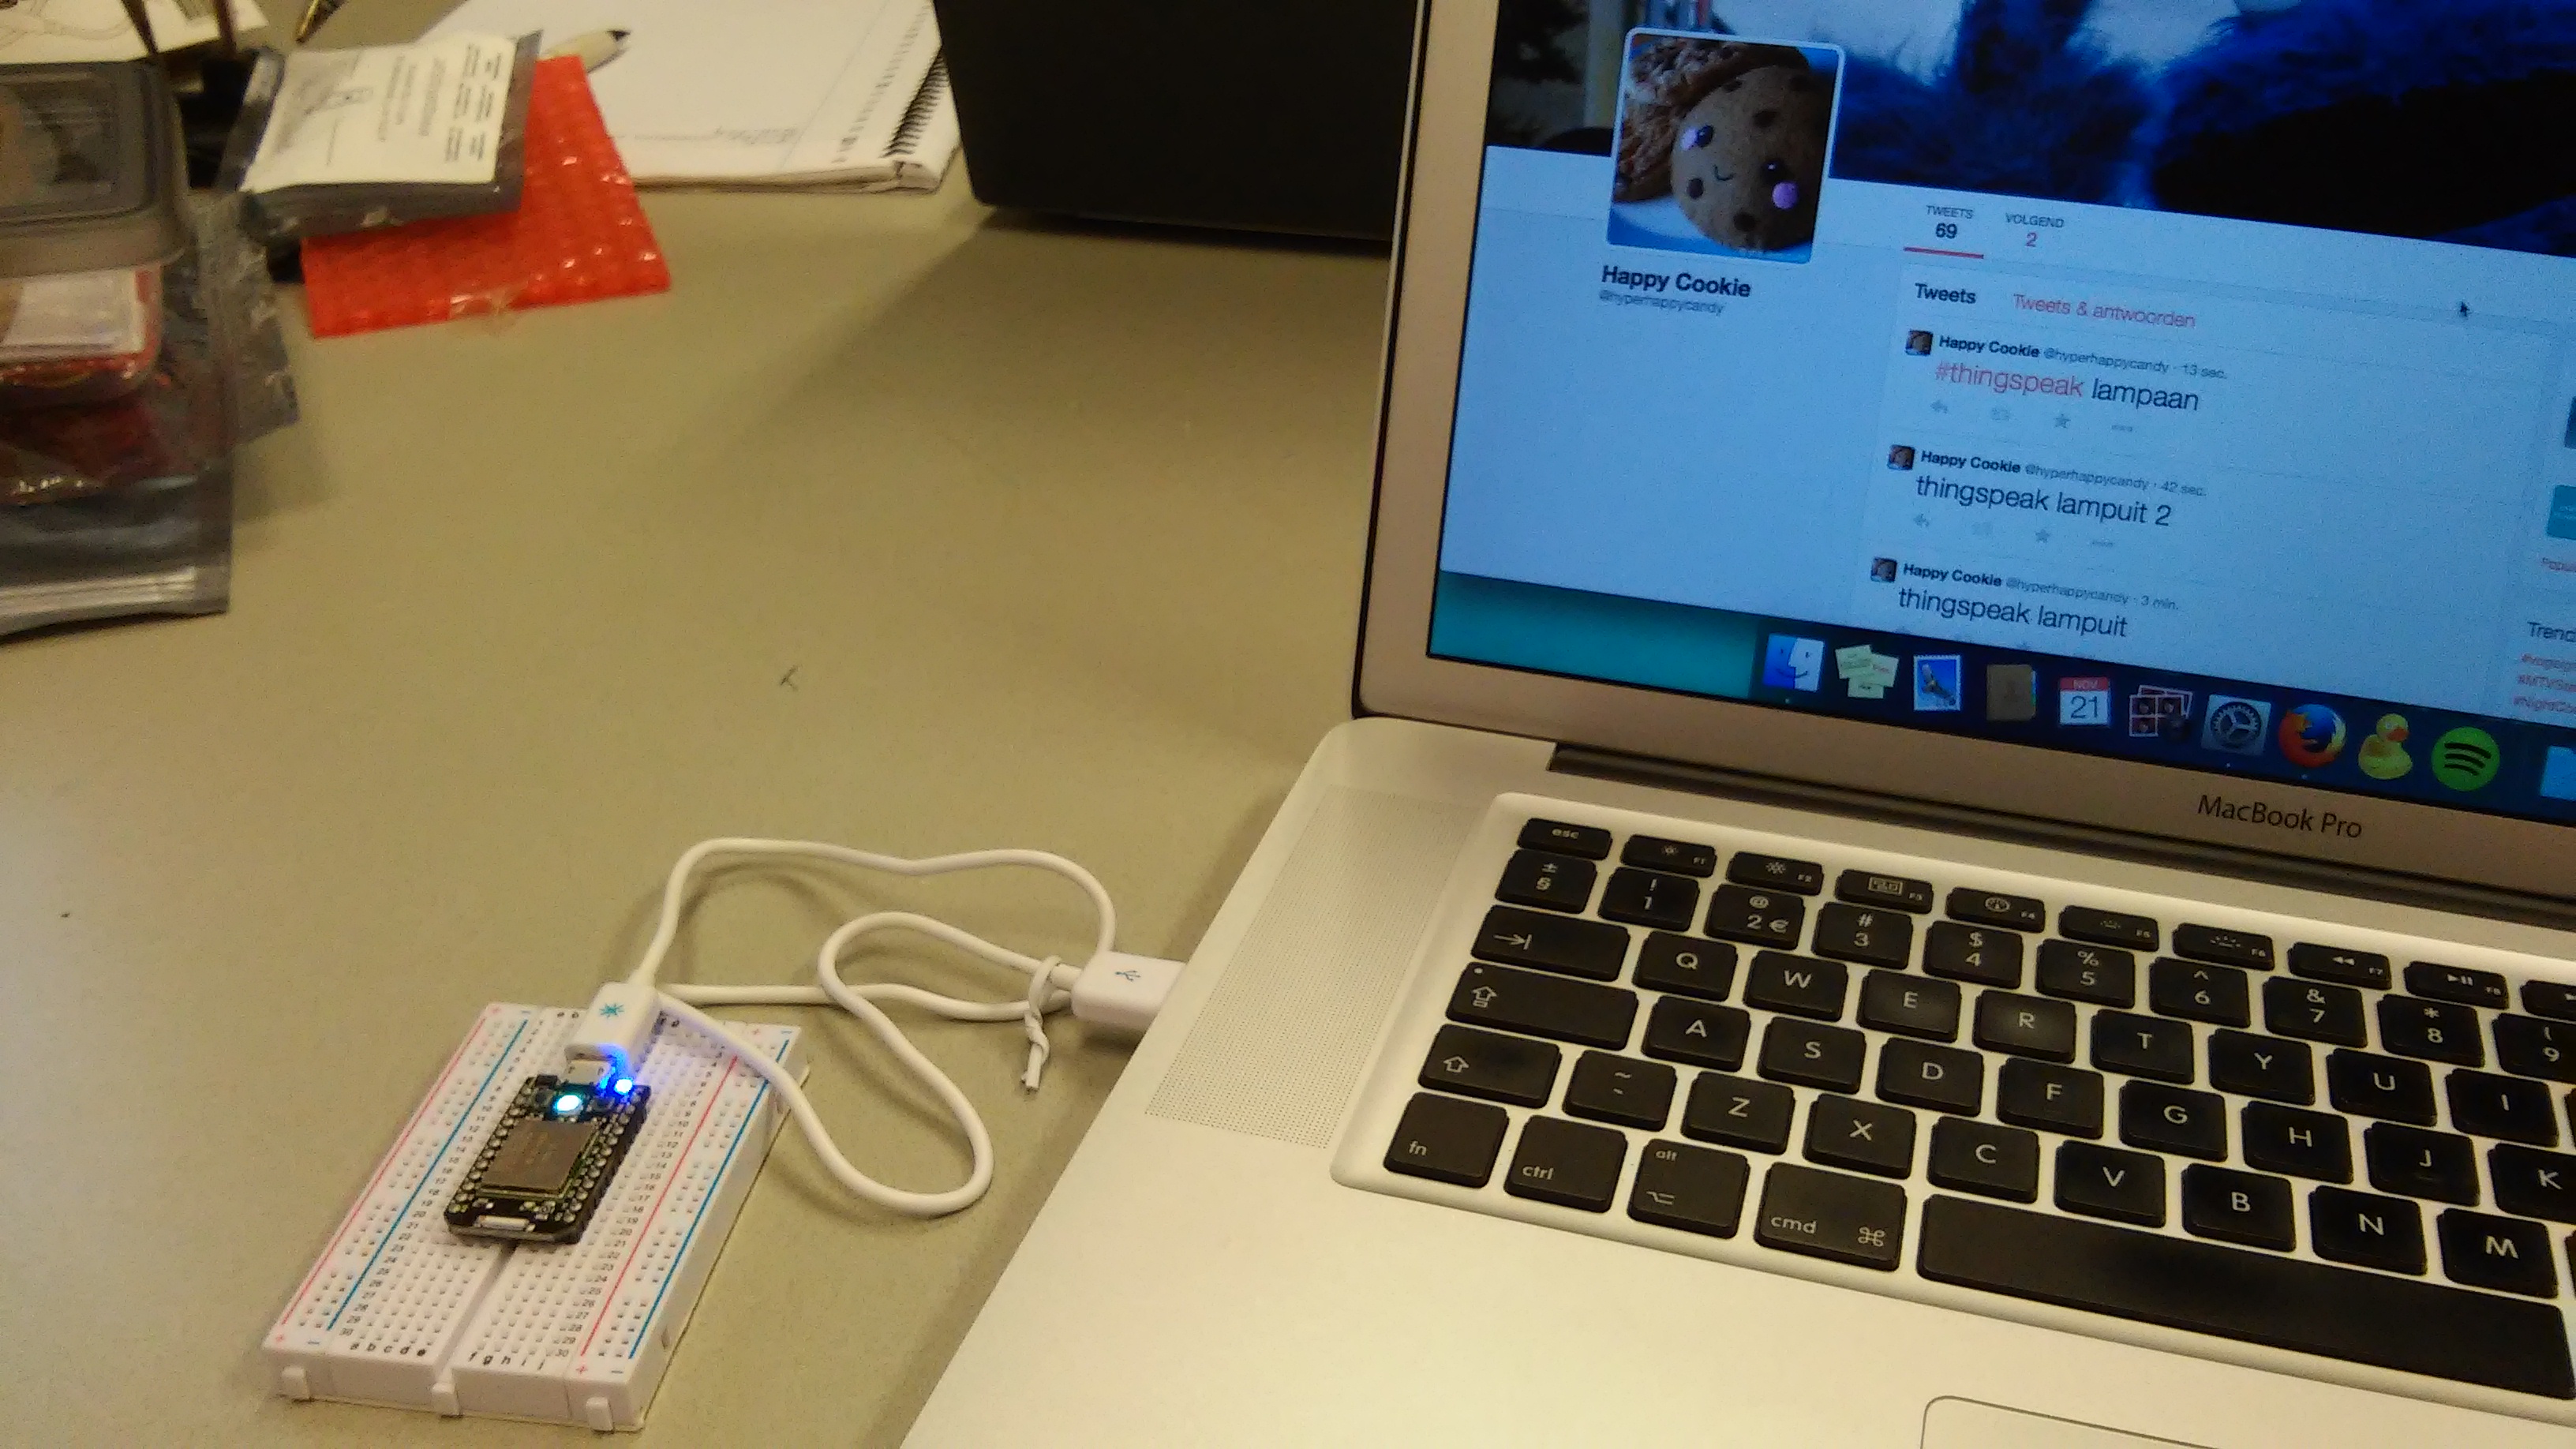
Everything should be working right now. So tweet a filter and trigger, and watch your LED go on and off!
Feel free to modify the code so it fits your needs. Or maybe try to connect your Twitter to IFTTT (or another service) and let the LED go on everytime you receive a new email!
You can also check out my Send-a-Tweet Instructable if you want.
Let me know in the comments what kind of cool stuff you build! :)