Smartphone Light Diffuser
by WarriorStudio in Workshop > Lighting
7334 Views, 10 Favorites, 0 Comments
Smartphone Light Diffuser


With how powerful smartphone cameras are becoming, why not make use of it?
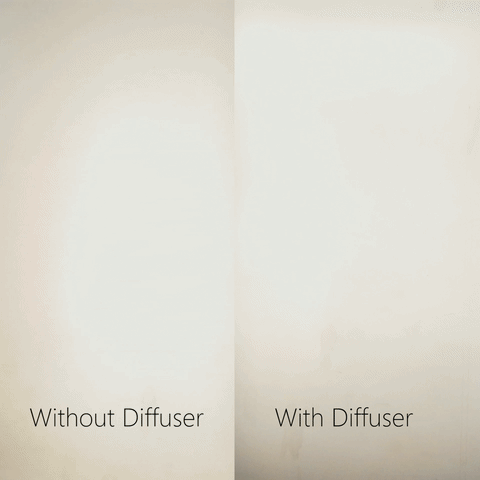
A diffuser can illuminate the scene without harsh lighting. It can also reduce glares
This project also directs the light, increasing brightness of the flash
Equipment and Tools


Prominently, a rotary tool (Dremel) was used, but this can be done purely with hand tools.
Tools:
- Rotary tool (with cutoff and sanding wheels)
- Epoxy or superglue (mixing stick and plate if epoxy)
- Marking implement (sharpie and pencil)
- Small clamp or tweezers
- Safety glasses and respirator
CDs have a foil backing that makes a mess, so try to remove it if you can. I found that wedging something beneath it or bending the CD loosened the foil, making it easier to feel. Try to save it, we can use it later in this project
CD dust is like glitter; makes a mess and is probably not good to inhale... wear a mask.
Creating the Sides


I was aiming for a type of trapezoid, with the smaller side facing the light
Carefully cut and grind the shape, either trapezoidal or funnel shape
two sides are going to be longer than the other, since the light sensor on my phone was directly beneath the camera flash. Didn't want to block that.
This had some trial-and-error, but i've highlighted the whole process in pictures
Messing With Bevels


A method that was cleaner was four simple trapezoids with bevel edges. This seemed to work better than other configurations that I messed with. The reason I won't release a template is that everyone's phone and phone case is different, so this really depends on how you want to form it.
A rotary tool with a cutoff wheel really makes this go by, but if you don't have one of those, a coping saw with plenty of teeth should do the trick, and fine-grit sandpaper.
The angles don't have to be perfect, as long as they are mostly symmetrical
Diffuse Filters


I mixed up epoxy, and ended up using superglue. It happens, so having other adhesives on hand really helps.
I experiment with two variations before I glued my third and final diffuser together with superglue
After it dried, I glued the foil i had remove from the CD on the inside of the trapezoidal shape. This would help refect light outwards.
It was then trimmed with a sharp craft knife to have it all nice and flush
Placing Inside the Case


To be more functional, I wanted to permanently affix it to my smartphone
I attached two stripes of paper to the diffuser, then glued it t the inside of my phone case
It's not completely flush with the case, but it barely sticks out.
Diffuse and Reuse


Onto the diffuser part of this 'ible!
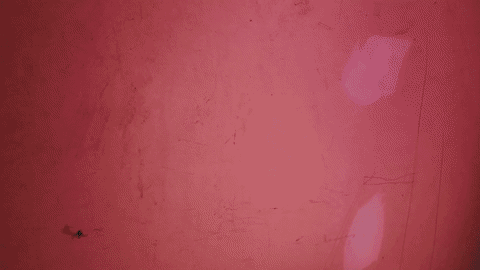
Cutting up a plastic cup from the garbage bin by the water cooler, I folded it and colored it with dry-erase markers
A sharpie or other marker might work better, but I use what I have around.
Here's a test vid of red and green filters
If you liked this or found it intriguing, let me know!
And please VoTe! It's your American Right!