SmartParking

Parking your car in big cities seems impossible? You always go round in circles before finding an empty spot? Here we have a solution to offer: the Smart Parking.
With our answer to this problem, there is no need to undertake big civil engineering, you just have to put autonomous magic boxes next to the parking spaces. Then, a live map showing the state of the parking spaces is available on the Internet and allow people to quickly decide where to go.
Moreover, we added little improvements to this system in order to append more added value to the product. We let you discover them further ;-)
Interested by this idea? Next steps will teach you how to build the total system.
Note: This project has been developed by engineering students from Polytech Paris-UPMC.
Required Material
![20170211_204214[1].jpg](/proxy/?url=https://content.instructables.com/FI6/KCYL/IYYT7R6E/FI6KCYLIYYT7R6E.jpg&filename=20170211_204214[1].jpg)
![20170211_204027[1].jpg](/proxy/?url=https://content.instructables.com/FLU/C0LS/IYYT7R5S/FLUC0LSIYYT7R5S.jpg&filename=20170211_204027[1].jpg)
![20170211_204324[1].jpg](/proxy/?url=https://content.instructables.com/FGR/3A7T/IYYT7R3H/FGR3A7TIYYT7R3H.jpg&filename=20170211_204324[1].jpg)
![20170211_204458[1].jpg](/proxy/?url=https://content.instructables.com/FV6/7RU4/IYYT7RAH/FV67RU4IYYT7RAH.jpg&filename=20170211_204458[1].jpg)
The following material is what we used to build our prototype, you are free to replace any component with a more suited one, but keep in mind our tutorial was written according to the following hardware components :
Electronical part:
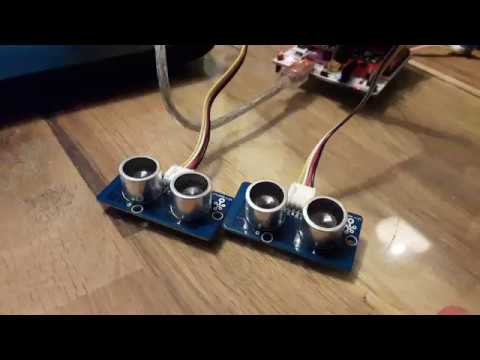
- x2 Ultrasonic Ranging Module HC - SR04
- x1 Humidity and Temperature sensor DHT(11 or 21 or 22, all three should be comaptible) http://wiki.seeed.cc/Grove-Temperature_and_Humidity_Sensor_Pro/
- x1 Arduino extension board : Grove base shield for Arduino https://www.seeedstudio.com/Base-Shield-V2-p-1378.html
- x1 microcontroller: STM32L476 Nucleo-64 https://developer.mbed.org/platforms/ST-Nucleo-L476RG/
- x1 photovoltaic panel (large enough) 3W Solar Panel 138X160 (Seeed) https://www.seeedstudio.com/3W-Solar-Panel-138X160-p-954.html
- x1 battery: Lipo Rider Pro (Seeed) https://www.seeedstudio.com/LiPo-Rider-Pro-p-992.html
- x1 Sigfox module: Akene module (Snootlab) http://snootlab.com/lang-en/snootlab-shields/889-akene-v1-en.html
What is SigFox ? SigFox (from the french company SIGFOX) provides cellular connectivity for the Internet of Things. using Ultra Narrow Band technology (UNB) to transmit data. SigFox qualifies as Low-power Wide-area network (LPWAN), as it requires low energy. This makes SigFox one of the best choices when it comes to transmitting a relatively small amount of data (which is our case) for some distance. Note that currently, SigFox allows 140 transmissions of data per day, which is sufficient in our case (we will let you do the math for a single parking slot).
You can find more details about SigFox here: https://www.sigfox.com/en
Software part:
- A mbed developer account (it’s free) https://developer.mbed.org/
- x1 micro-USB to USB cable
- An Actoboard account http://www.actoboard.com/
Now as you have all the components, you can go to the next step.
Programming the Microcontroller

For this project, we use the NUCLEO STM32L476RGT6 microcontroller. While a standard Arduino board would have done the job with its easy to use development platform, we choose this board because of its lower energy consumption, which linked to the solar panel will optimize its durability. This last point is rather relevant since this is basically an obstacle detector we are implementing outdoors, which can be quite the challenge for most of the IoT projects.
Still, our board includes Arduino based connectivity through ST Morpho headers: we can therefore expand the development platform of Arduino onto our board: how we plug and wire each of our components together is therefore simpler, more details to come in the plugging and wiring part.
For more details about its features, check: https://developer.mbed.org/platforms/ST-Nucleo-L476RG/
The idea is to program this board using the mbed Compiler development platform, popular when it comes to creating IoT projects based on ARM microcontrollers.
1. Access your dashboard using your account with the following url : https://developer.mbed.org/compiler/
2. Import the board settings by going to https://developer.mbed.org/platforms/ST-Nucleo-L4... and clicking “Add to mbed compiler”
3. Create and name a new program while selecting Nucleo-L476RG as programmable device and using the Hello World template.
4. Five main libraries are used in our code:
- Mbed.h : Automatically generated and included, this library describes the device and the available standard functions and pinouts for a standard mbed supported board.
- Softserial.h : Since we are not using an Arduino board, we have to tinker with some of the pinouts definitions: SoftSerial allows us to modify in-code characteristics of the pins so that our board supports our Akene SigFox component.
- Akene.h : Describes the functions that sends data via SigFox network.
- DHT.h : Describes the functions that allow us to collect and manage data from the temperature and humidity sensors.
- Ultrasonic.h : Same for the ultrasonic sensors.
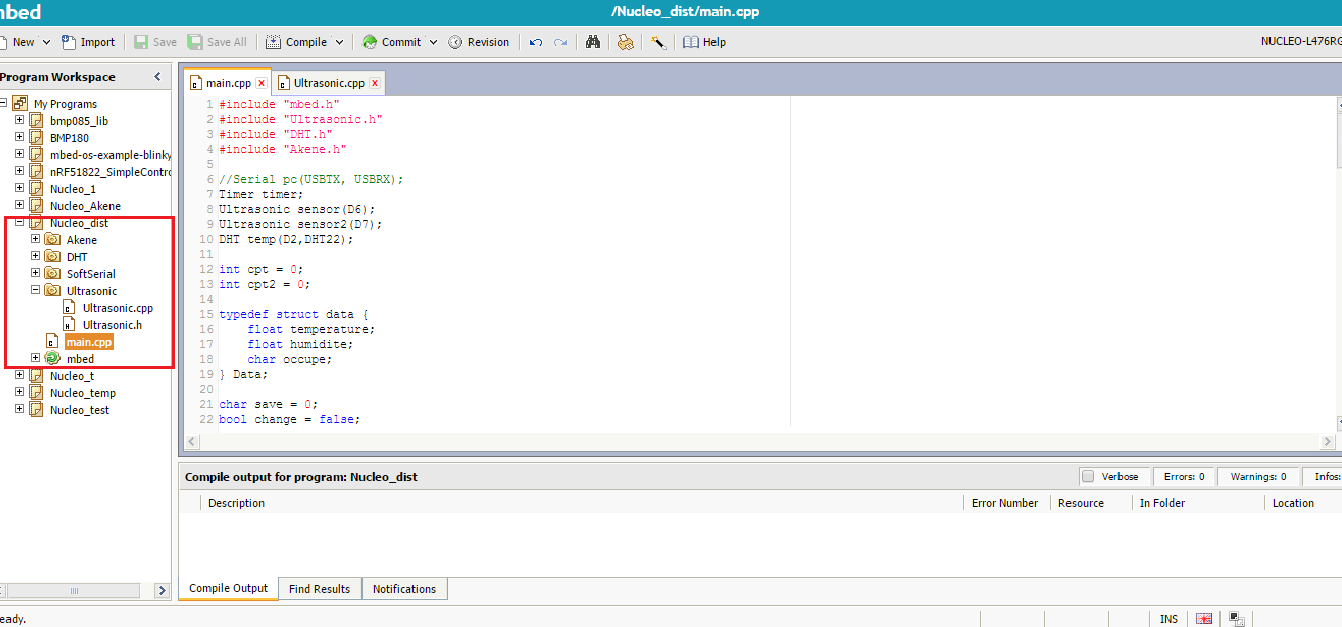
We will import the SoftSerial, and DHT libraries using the Library Wizard of the mbed development platform: right-click the main folder of your project and click Import Library to choose the wizard. Use the Search tools to access and import those three libraries.
Create the Ultrasonic library for your project by choosing the other option: include the Ultrasonic.cpp and Ultrasonic.h files into its sub-folder.
Proceed the exact same way for the Akene library, along with Akene.h and Akene.cpp.
Note that these two libraries have to been adapted to work for our hardware, using the features of SoftSerial and the RX, TX ports of the Nucleo board (D4, D5) so that the compatibility is enabled.
5. Now that the libraries are included, last thing we need is our core program that we are going to compile into a binary file, and then flash it into our board.
In order to do this, open the main.cpp file that contains the code of the Hello World example.
Replace the code with the one from the main.cpp available for download.
Quick overview of the code: using the previously mentioned libraries, temperature, humidity and obstacle detection are collected regularly, and whenever the “state of the parking slot” changes (from available to busy or vice versa), a message is sent via SigFox to be displayed on an external platform we will explain in the future. To make sure a change of state is correctly detected, our module will need a certain amount of repetitive detections to validate the change of state: basically, once a car is parked, the module will make sure it stays for more than one minute before assessing a change of state.
Moreover, two ultrasonic sensors are used to monitor one parking slot, to avoid errors due for example to a flying object or even pedestrian passing/standing by.
The code in itself remains quite simple: feel free to adapt it according to your needs, keep in mind that each ultrasonic sensor returns a distance value, in centimeters. (motion/obstacle detection systems)
6. Your MBED dashboard should resemble the top image. Click the compile button to compile and download the binary file (in the case where the compilation is successful).
7. Plug the Nucleo board via USB to the computer and drag the previously downloaded binary file into the memory system of the board.
The board is now a programmed device: the program will therefore execute whenever the board is on.
Note: Some serial printf are implemented in our code: to view the serial output of the program, plug the board via USB, and open a serial communication tool such as Putty on Windows or minicom on Linux. This can prove to be useful if you are looking to implement your own functionalities, as a debug tool.
Wiring the Components
![20170211_210232[1].jpg](/proxy/?url=https://content.instructables.com/FWE/DQH1/IYYT7QXE/FWEDQH1IYYT7QXE.jpg&filename=20170211_210232[1].jpg)
![20170211_210136[1].jpg](/proxy/?url=https://content.instructables.com/FC4/7C2U/IYYT7R13/FC47C2UIYYT7R13.jpg&filename=20170211_210136[1].jpg)
1. All sensors are plugged into the Seeed Grove Shield as following:
- HT sensor on D2
- Ultrasonic sensors on D6 and D7
2. Plug the Seeed Grove Shield onto the Arduino headers of the Nucleo board.
3. Plug the Akene board onto the previously assembled components and make sure the antenna is also connected to the Akene board.
4. Plug the energy output wires from the solar panel to the battery extension and its energy converter, and then connect this battery to the Nucleo board.
Your SmartParking module is up and running !
Display Data With Actoboard

Actoboard is the dashboard meant to be used for Sigfox Akene module but there is a possibility to use other dashboards. Displaying data transmitted through IoT networks become much easier with a tool such as Actoboard.
Actoboard
1. Create your account http://www.actoboard.com/ and log in.
2. Link it to your Akene module in settings (middle tab) with :
- The module number, given with the Akene module.
- The PAC number sent by mail when you buy a Sigfox connectivity subscription.
3. We have to set our dashboard receiving configuration accordingly to the data we want to receive.
Set the data format as the following using the designated fields :
Temperature::float:32
Humidity::float:32
ParkingState::int:8
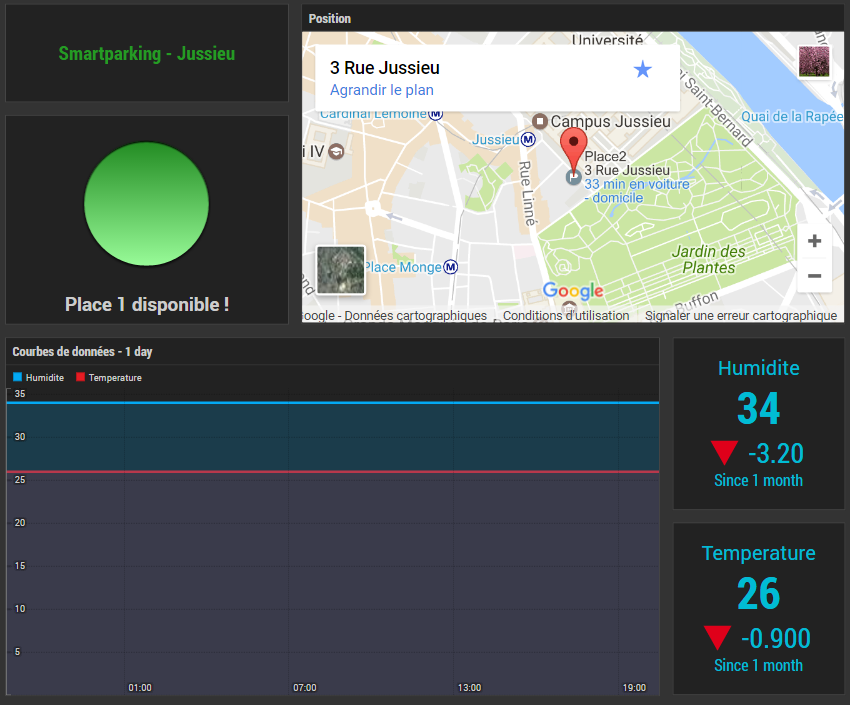
4. Finally, create widgets for your dashboard to display the received data (first tab). See our design above. There are multiple ways to display your data, so feel free to adjust the widgets or create your own according to your needs.
Your Smart Parking module is up and running, check the Actoboard dashboard to see the updates. Check our demonstration video above to catch a glimpse of what it looks like.