Smart PIR Motion Light Control With WiFIRCard
by bruscreator in Circuits > Microcontrollers
682 Views, 3 Favorites, 0 Comments
Smart PIR Motion Light Control With WiFIRCard

Ever fumbled for the light switch in the dark? With a PIR sensor and WiFIRCard — a tiny ESP32-S3 board with Wi-Fi, IR, and dual onboard relays — you can make your lights smart enough to switch on when you enter and off when you leave.
Its compact, credit-card size design makes it easy to drop into any DIY project, while built-in relays let you control appliances directly without extra modules. Simple, power-saving, and a fun way to explore home automation.
Supplies

Hardware or Tools Needed:
- WiFIRCard
- PIR Motion Sensor
- Light Bulb with Holder
- Wires
Software Required:
- Arduino IDE
Wiring Connections
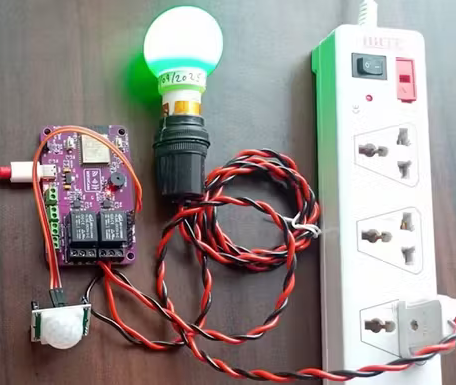


We have to connect PIR motion sensor with board using GPIO and power pins. Also connect load like light bulb which we are interested to operate based on motion, you can change as per your applications. Follow below wiring connections,
1)Wiring connection for PIR Interfacing with WiFIRcard :
WiFIRcard => PIR
5V ---> VCC
GP43 ---> OUT
GND ---> GND
2)Wiring connection of Bulb/Load :
For this connection you can use any one relay channel from two options available. For each relay there are three pins NO (Normally OPEN), NC (Normally CLOSED) and C (COMMON) for wiring electrical device.
- Relay 1 -> NO1, C1, NC1
- Relay 2 -> NO2, C2, NC2
Installing Arduino IDE


Go to Arduino Software Downloads.
Download the latest stable release (Arduino IDE 2.x) for your operating system.
Install it:
- Windows: Run the .exe installer.
- macOS: Drag the .app to Applications.
- Linux: Extract the .tar.xz file and run install.sh.
If you want to install Arduino IDE 2 windows app you can checkout video guide,
Adding ESP32 Boards in Arduino


Open Arduino IDE → File ➜ Preferences (Windows/Linux) or Arduino IDE ➜ Preferences (macOS).
In “Additional Board Manager URLs”, paste:
https://raw.githubusercontent.com/espressif/arduino-esp32/gh-pages/package_esp32_index.json
(If other URLs exist, separate them with a comma.)
Go to Tools ➜ Board ➜ Board Manager, search for esp32. Select “ESP32 by Espressif Systems” and click Install (or Update if prompted).
Once esp32 based boards installed, you can confirm by checking if various boards listed under ESP32 options as shown.
Coding and Testing


Download or copy example provided to Arduino IDE. We have to select suitable board for WiFIRCard, so choose ESP32 S3 Dev Module.
Go to Tools ➜ Board ➜ ESP32 ➜ choose ESP32S3 Dev Module
Now select suitable com port, here we have used native USB so you will get option as shown. Also, enable USB CDC on Boot to monitor any data over serial port. Keep rest default and click upload button to transfer code.
Downloads
Working

Finally testing motion detect and switching light ON if activated else switch OFF light.