Smart Office Security

In this project, we aim to learn how to implement AWS and MQTT into our IoT setup.
With the threat of an insider attack, this application aims to monitor the offices of high authority users. When the user is away from the office, this application will monitor the office.
- It tracks both temperature and humidity values and display it on the web application
- It allows the users to turn on and off the LED
- 2 types of alarm mode
- Alarm On - When alarm is on, the checking of temperature and humidity will stop, while the motion sensors will be turned on. If there is movement in the office, the buzzer will sound and a photo will be taken and users can see what was detected when they are away from their office
- Alarm Off - When alarm is off, there will be checking of temperature and humidity and values will be displayed on the web application while the motion sensors and camera will be disabled
- In both modes, users can still control the LED lights.
- Making use of AWS DynamoDB, we are able to store the images path so that users are able to see the pictures taken
- Also, using AWS, we are able to send an email to the users when there is motion detected during their time when they are away from their office.
Now, lets find out how we manage to implement such a system!
Step 1: Hardware Setup


What you need:
- 2x Raspberry Pi 3
- 2x T-Cobbler Kit
- 1x Breadboard
- Assorted Jumper Cables
- Assorted Resistors
- 1x LED
- 1x DHT11 Temperature and Humidity Sensors
- 1x PIR Motion Sensor
- 1x Buzzer
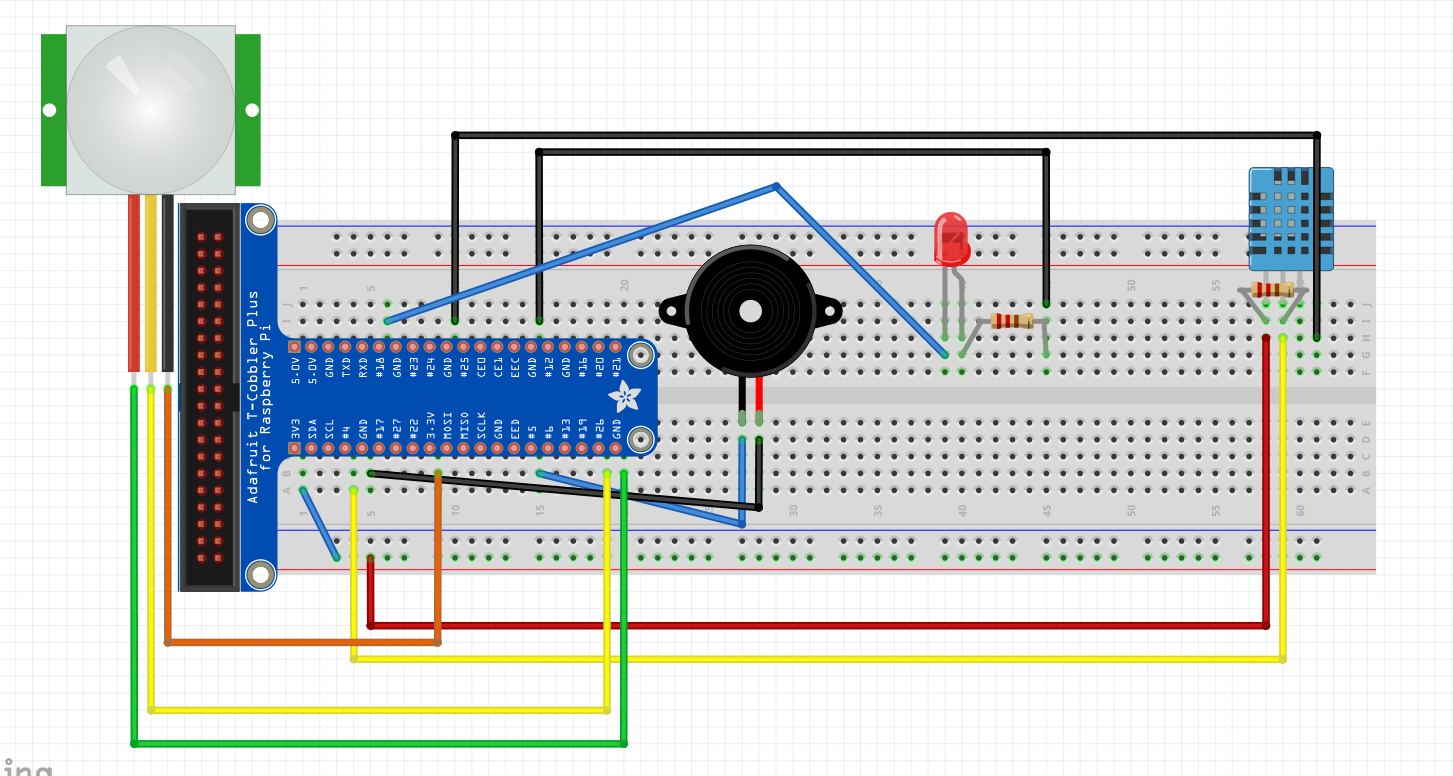
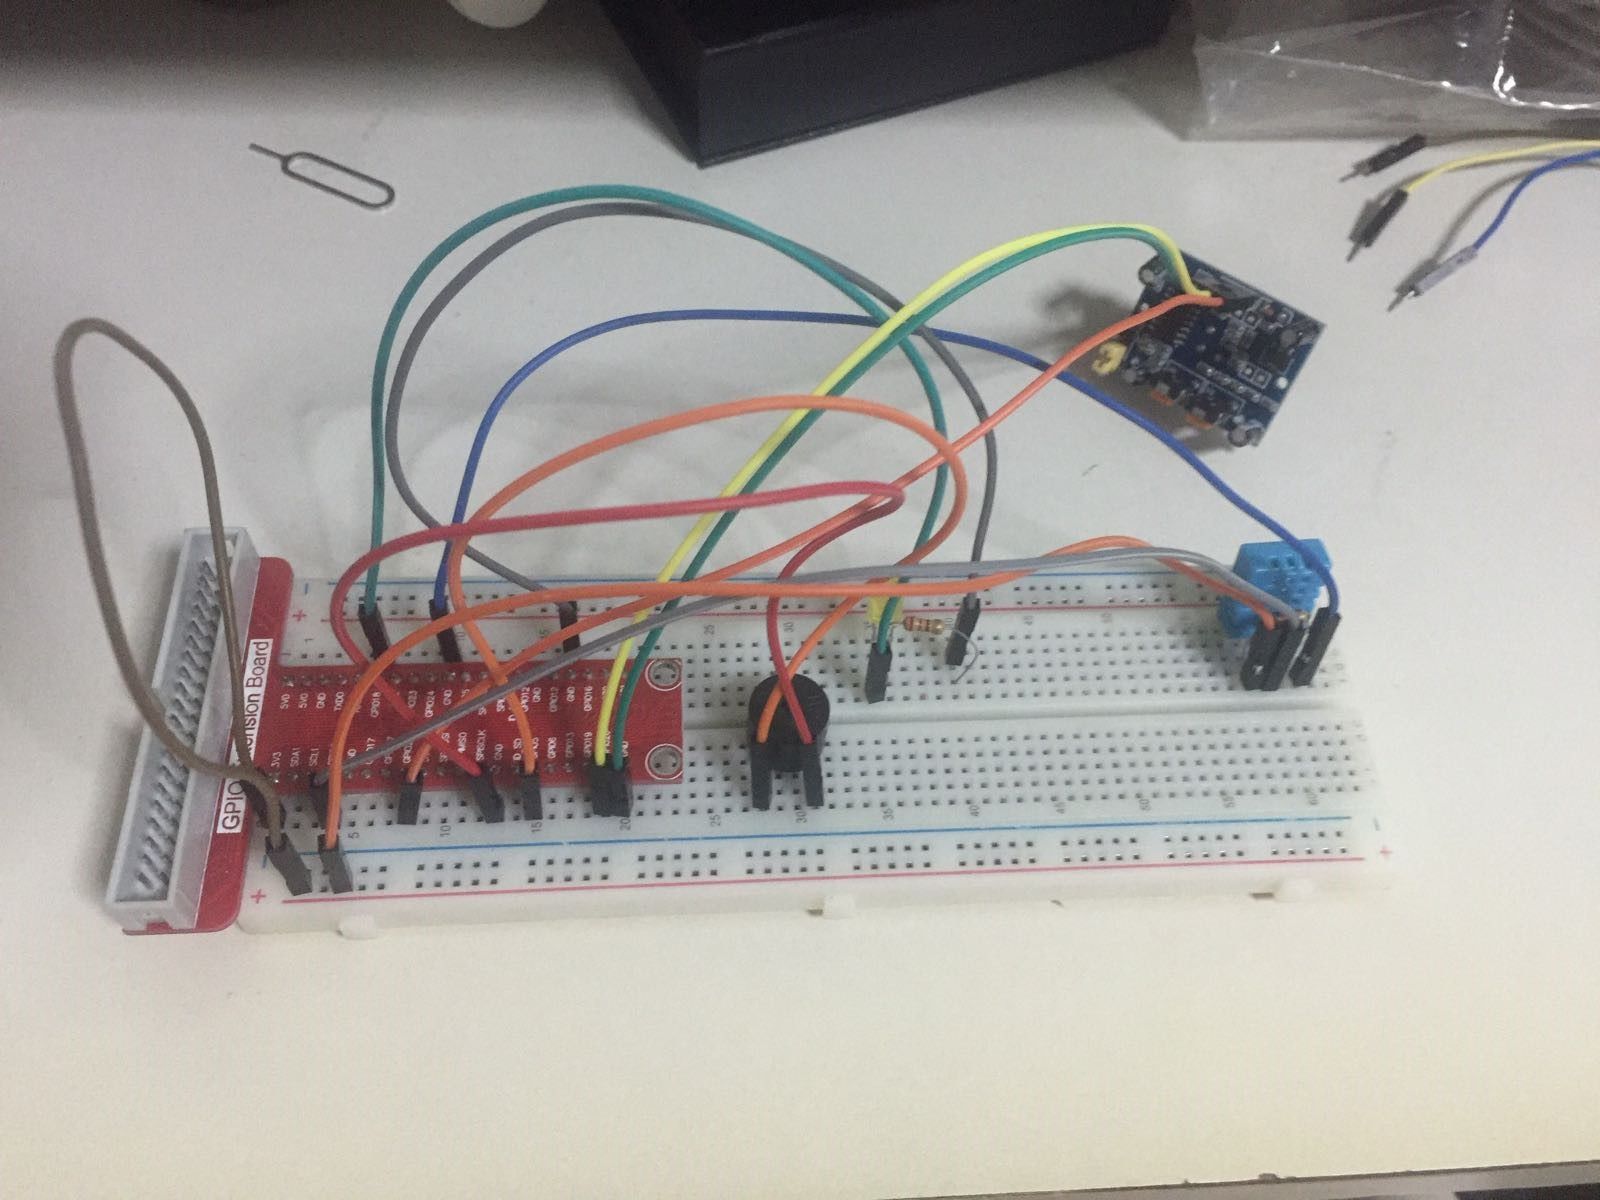
Our set up contains an LED connected to GPIO 18 so that the user can control the lighting in their office. For the recording of the temperature and humidity levels, we will be using a DHT sensor connected to GPIO4. Followed by our PIR Motion Sensor connected to GPIO 26 to detect intruders in the office when the user is away. Lastly, the buzzer to sound an alarm when the alarm is turned on and detected something.
Step 2: Installing and Doing the Prerequisites
AWS
Firstly login to https://awseducate.qwiklabs.com/users/sign_inloca...
1.After logging in, click on catalog on the left hand pane and then click on AWS Educate Starter Account 75
2. Copy the Access Key ID and Secret Access Key for configuration in the raspberry pi later.
3.Click on Open Console
Registering your raspberry pi as a thing
1.Search AWS IOT
2.Click on Manage on the left hand pane and then click on Things
3.Click create on the right hand corner
4.Select Register a single AWS IOT thing
5.Give your thing a name and click next
6. Click create certificate and save the 4 things generated
7.Activate the root CA
8.Create a policy and attach it to your thing
-Give it a name -Action:iot.* -Resource ARN:* -Check the allow Dynamodb
Before everything, run aws configure Use the Access Key ID and Secret Access Key from earlier
Next,
1. Create a file named iot-role-trust.json with the following contents
2. Run the following command: aws iam create-role --role-name my-iot-role --assume-role-policy-document file://iot-role-trust.json
3.Create a file named iot-policy.json with the following contents
4. Run the command: aws iam put-role-policy --role-name my-iot-role --policy-name iot-policy --policy-document file://iot-policy.json
DynamoDB
1.Create tables in Dynamodb for motion sensor and temperature/humidity -For motion image set primary key to sensor -For temperature and humidity use timestamp as primary key
2.Create a rule for motion detection
Attribute:* topic filter: sensors/motion
3.Action: select split message into multiple columns of a database
Lambda
1.Create a Lambda function with the following content
2.Create a rule for lambda
-Attribute:*
-topic filter: sensors/all
3.Actions select invoke Lambda function passing the message
4.Lambda will do the rest for you
SNS
1. Create an SNS topic
2. Input the topic and display name
3. Edit the topic policy to allow everyone to publish and subscribe to the topic
4. Subscribe to the topic with email
5. Go back to the motion detection rule
6. Add another action for this rule called send amessage as an SNS push notification
7. SNS target will be the topic you have created message format RAW
S3
1.Go to S3 and create a bucket for uploading of images
Important things to install on the Pis
Flask - sudo pip install flask
Boto - sudo pip install boto
Boto3 - sudo pip install boto3
AWSIoTPythonSDK - sudo pip install AWSIoTPythonSDK
awscli - sudo pip install awscli
paho - sudo pip install paho
mqtt - sudo pip install mqtt
Step 3: Secure Office - Scripts
In the user's pi, we have 1 script
- client.py - This script will subscribe to multiple topics such as the sensors/temperature and sensors/humidity to get the temperature and humidity values that will be displayed on the web application. It also sends the status of the LED so that the LED status can be changed on the server side.
In the server pi, we have 1 script
- server.py - This script will subscribe to the light status topic so that the LED lights can be turned on and off. At the same time, it will receive temperature and humidity values from the breadboard and publish it to the topic called sensors/all and in the lambda function the values will be published to 2 different topics, sensors/temperature and sensors/humidity.
Step 4: Learning Experience

In this assignment, we have faced many challenges as this module is still new to us. However, through this project, we have learnt a lot. Be it IOT of AWS, we are proud to say that we know how to integrate AWS into our core IoT kit and make it more of an advance system.