Smart Greenhouse
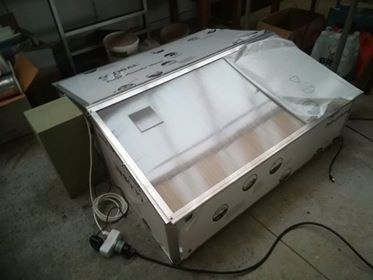
Did
you ever had the problem that it was too hot in your greenhouse, so all your plants died, because you forgot to open the air vents?
Look no further, smart greenhouse is the solution to this problem.
Following step walks you through how to build your Smart Greenhouse or modify your greenhouse to a Smart Greenhouse.
Components
Components:
1 x Servo motor
2 x Temperatuursensor
1 x fan
2 x soil moisture sensor
2 x light sensor
8 x white led
multiple resistors
1 x 4 by 7-segment display
1 x MCP3008
1 x 74HC595
1 x Relais
1 x raspberry pi 3 model b
Breadboard
jumpercables
a small greenhouse
Write Rasbian on the Micro SD Card
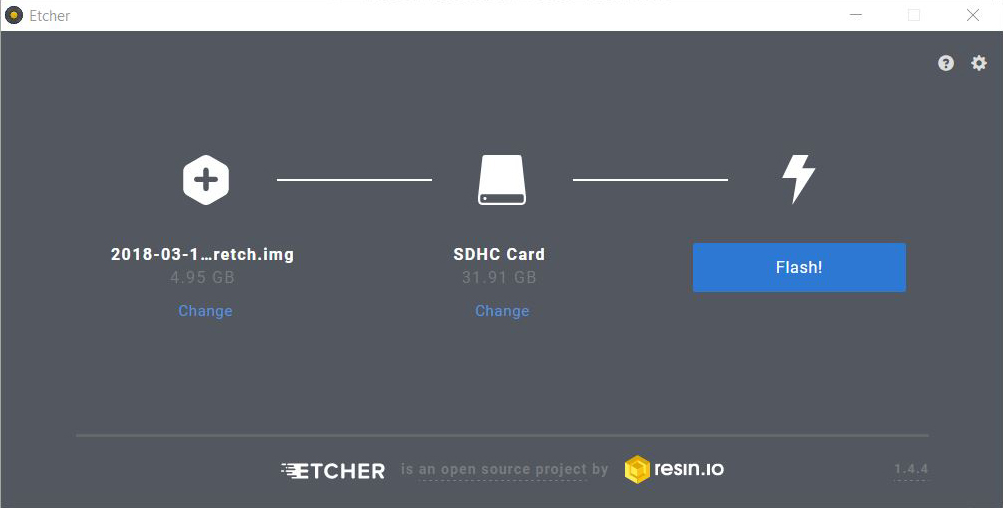
- Download the latest version "rasbian stretch with desktop" from there site: https://www.raspberrypi.org/downloads/raspbian/
- Unzip the raspbian file.
- Download also the latest version etcher from there site: https://etcher.io/
- Reformat the 32GB micro SD card.
- Open echter, select the rasbian img and you micro SD card.
- Click on Flash.
Add Ip and Enable SSH
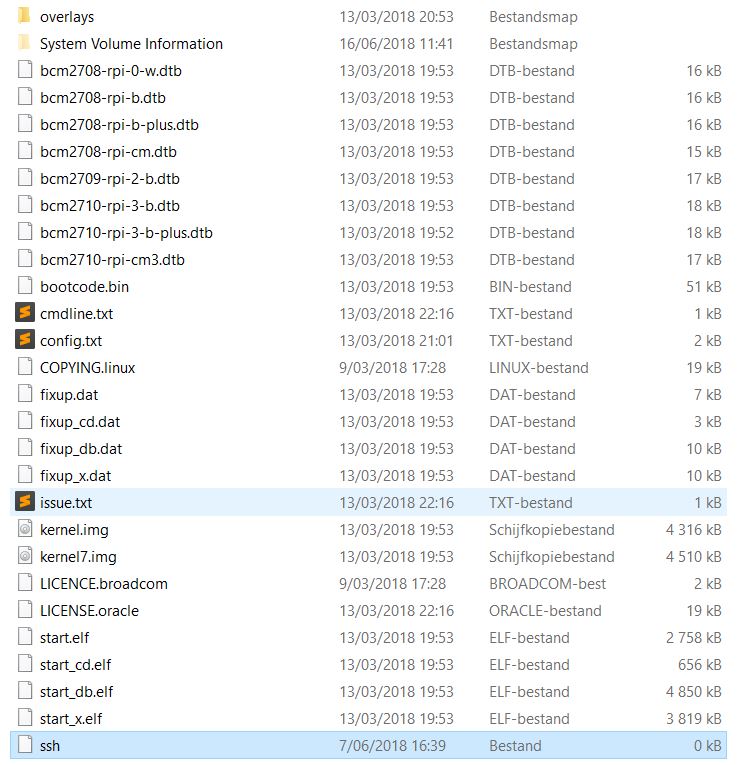

- Add a "ssh" file to the micro SD card.
- Find the "cmdline.txt" file and open it.
- Add "ip=169.254.10.1" at the end.
- Insert the micro SD card in je Raspberry Pi and give it power.
- Connect the Raspberry Pi with an ethernet cable to your pc.
Get Started With Putty
- Download the latest version "rasbian stretch with desktop" from there site: https://www.putty.org/
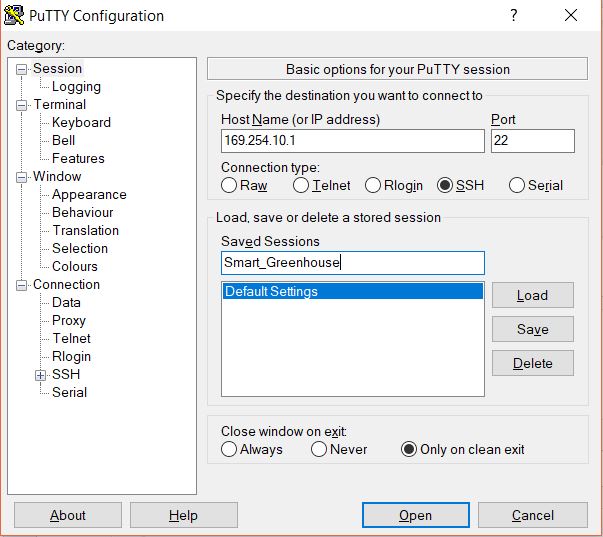
- Open putty and fill in the following details:
- HostName (or IP address): 169.254.10.1
- Connection type: SSH
- Saved Sessions: Smart_Greenhouse
- Click on "Save"
- Click on "Open"
- If you get a security alert from putty, click "Yes".
Raspberry Pi Basics
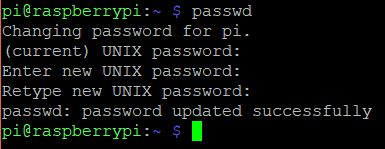
- Defealt cedentials are:
- username: pi
- password: raspberry
- Change default password by typing command "passwd" and enter
- Type first current password raspberry and after that twice your new password of your choice.
Connect to Wi-Fi and Update Raspberry Pi


- Type: sudo -i
- Type: echo “password” | wpa_passphrase “SSID” >> /etc/wpa_supplicant/wpa_supplicant.conf
- Change password to the password of your wifi and SSID to the name of your wifi.
- To check type: nano /etc/wpa_supplicant/wpa_supplicant.conf
-
There should be something in this file that looks like the image above. Use "Ctrl" + "X" to exit the file.
-
Type: systemctl restart networking
-
Type: systemctl status networking
-
Type: reboot
-
Wait 30 seconds, restart putty, click "Smart_Greenhouse" and click "Open"
-
Log in again
-
Type: ping 8.8.8.8
-
After these commands, there should be something that looks like the image above.
-
Type: sudo apt-get update && sudo apt-get upgrade -y this can take a while to update.
Enable SPI and 1-wire
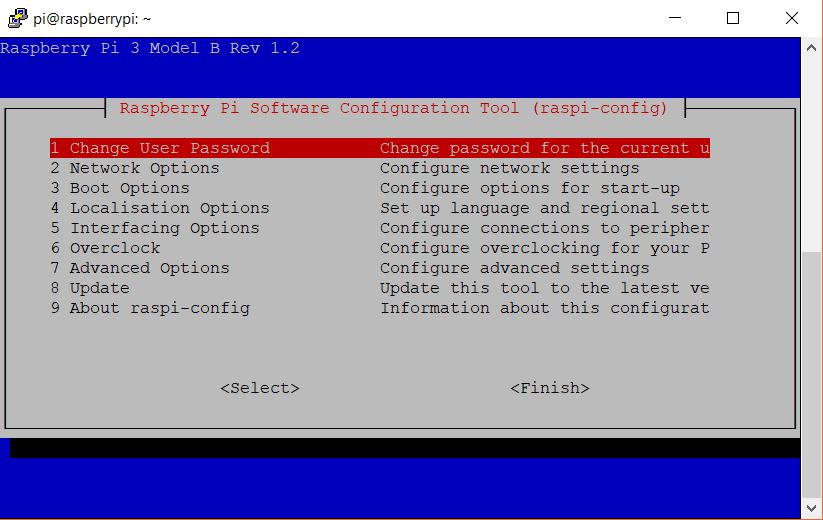
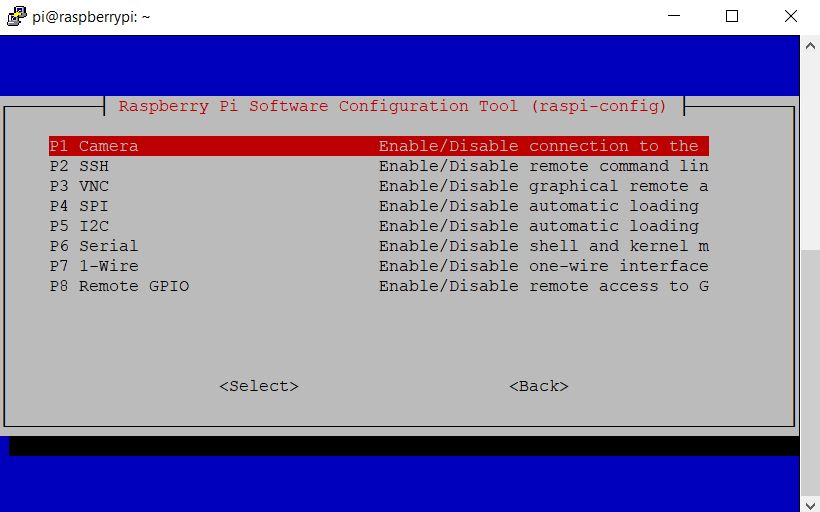
- Type: sudo raspi-config
- Select "Interface Options"
- Select "SPI", say "Yes" and say "Ok"
- Select "Interface Options"
- Select "1-wire", say "Yes" and say "Ok"
- Select "Finish"
- Type: sudo reboot
- Wait 30 seconds, restart putty, click "Smart_Greenhouse" and click "Open"
Create Smart Greenhouse Folder and Download All Necessary Packages
- Type: sudo apt update
- Type: sudo apt install -y python3-venv python3-pip python3-mysqldb mariadb-server uwsgi nginx uwsgi-plugin-python3
- Type: mkdir Smart_Greenhouse && cd Smart_Greenhouse
- Type: mkdir Smart_Greenhouse_frontend && cd Smart_Greenhouse_frontend
- Type: python3 -m venv --system-site-packages env
- Type: source env/bin/activate
- Type: python -m pip install mysql-connector-python argon2-cffi Flask Flask-HTTPAuth Flask-MySQL mysql-connector-python passlib
-
Type: sudo reboot
-
Wait 30 seconds, restart putty, click "Smart_Greenhouse" and click "Open"
-
Type: cd Smart_Greenhouse
- Type: mkdir Smart_Greenhouse_backend && cd Smart_Greenhouse_backend
- Type: python3 -m venv --system-site-packages env
- Type: source env/bin/activate
- Type: python -m pip install mysql-connector-python argon2-cffi Flask Flask-HTTPAuth Flask-MySQL mysql-connector-python passlib
- Type: sudo reboot
- Wait 30 seconds, restart putty, click "Smart_Greenhouse" and click "Open"
Uploade Code on Raspberry Pi
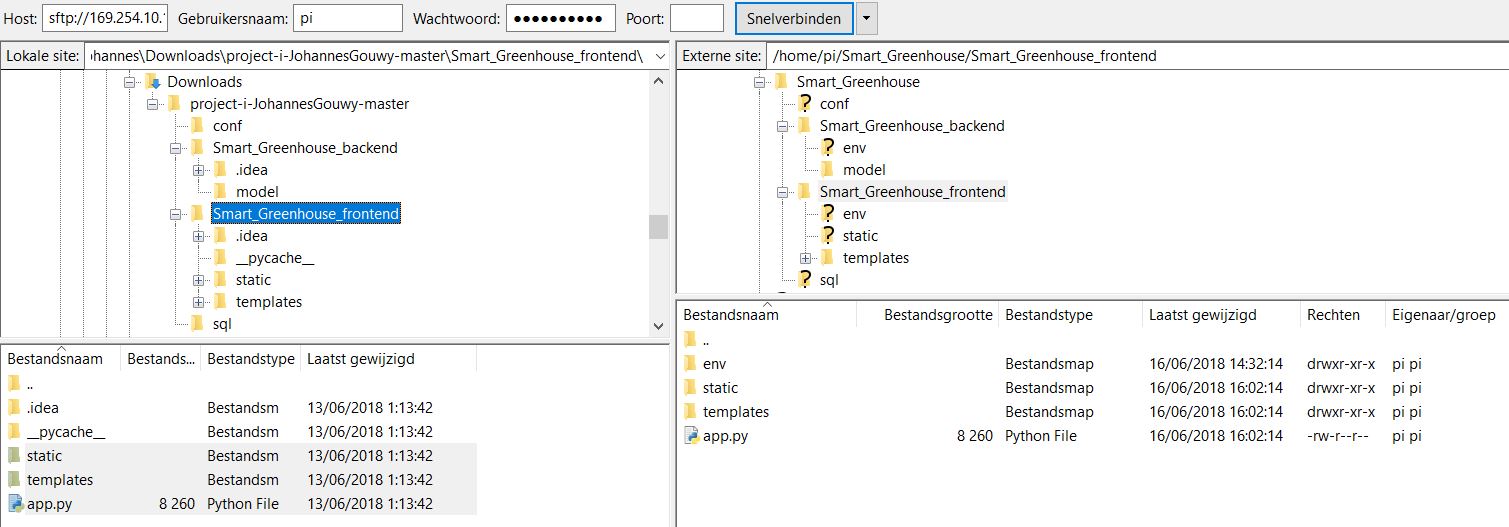
- Download the latest filezilla client from there site: https://filezilla-project.org/
- Download the code from github: https://github.com/NMCT-S2-Project-I/project-i-Jo...
- Start fillezilla and fill in following details:
- Host: 169.254.10.1
- Username: pi
- Password: "password you chose on the Raspberry Pi"
- Port: 22
- Click connect
- In the left side "local site" navigate to the files you downloaded from github
- In the right side "extrene site" navigate to the Smart_Greenhouse folder
Drag the "conf" and "sql" folders to the Smart_Greenhouse folder
Open the Smart_Greenhouse_backend in both sides and drag "model" and "main.py" from the left to the right side
Go back to the previous folder on both sides
Open the Smart_Greenhouse_frontend in both sides and drag "static", "templates" and "app.py" from the left to the right side
It should look like the picture above.
Create Database
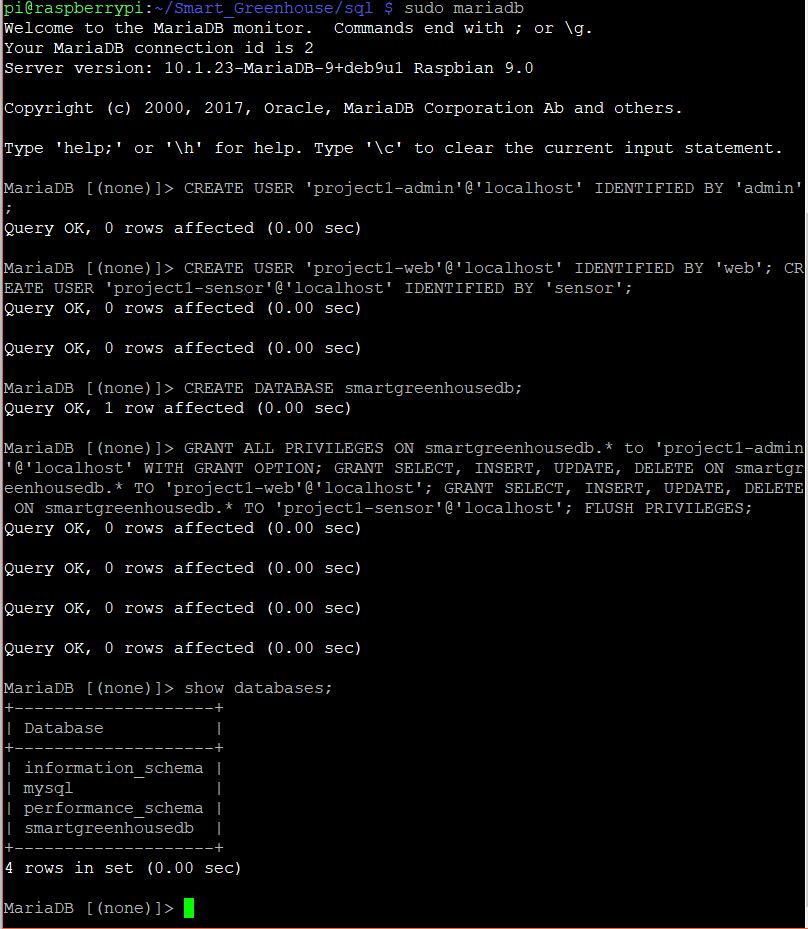
- Start putty and log in
- Type: cd Smart_Greenhouse/
- Type: sudo mariadb
- Type: CREATE USER 'project1-admin'@'localhost' IDENTIFIED BY 'admin'; CREATE USER 'project1-web'@'localhost' IDENTIFIED BY 'web'; CREATE USER 'project1-sensor'@'localhost' IDENTIFIED BY 'sensor';
Type: CREATE DATABASE smartgreenhousedb;
Type: GRANT ALL PRIVILEGES ON smartgreenhousedb.* to 'project1-admin'@'localhost' WITH GRANT OPTION; GRANT SELECT, INSERT, UPDATE, DELETE ON smartgreenhousedb.* TO 'project1-web'@'localhost'; GRANT SELECT, INSERT, UPDATE, DELETE ON smartgreenhousedb.* TO 'project1-sensor'@'localhost'; FLUSH PRIVILEGES;
Type: show databases;
It should look like the picture above.
Type: exit;
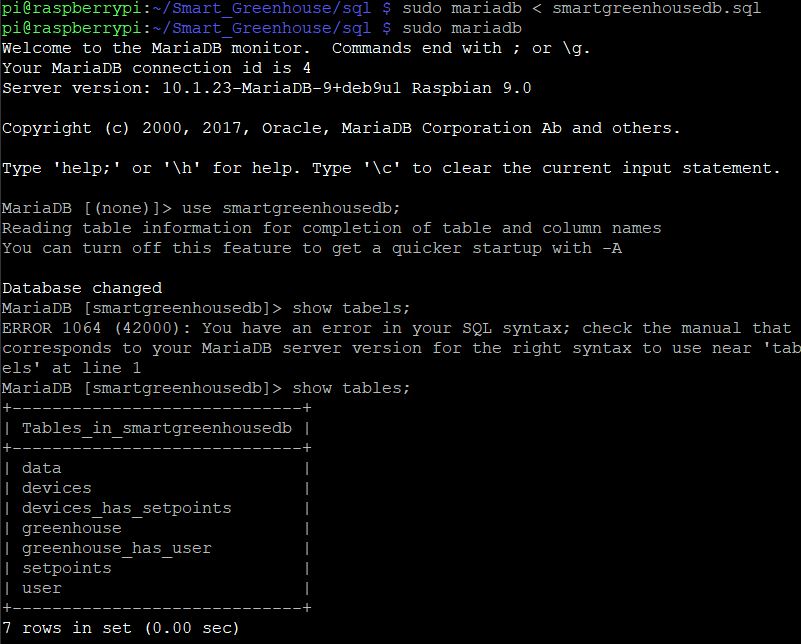
Type: sudo mariadb < sql/smartgreenhousedb.sql
Type: sudo mariadb
Type: use smartgreenhousedb;
Type: show tables;
Type: exit;
Automatic Start of Scripts

- Type: sudo cp conf/project1-*.service /etc/systemd/system/
- Type: sudo systemctl daemon-reload
- Type: sudo systemctl start project1-*
- Type: sudo systemctl status project1-*
- Type: sudo cp conf/nginx /etc/nginx/sites-available/project1
- Type: sudo rm /etc/nginx/sites-enabled/default
- Type: sudo ln -s /etc/nginx/sites-available/project1 /etc/nginx/sites-enabled/project1
Type: sudo systemctl restart nginx.service
Type: sudo systemctl status nginx.service
Type: sudo systemctl enable project1-flask
Type: sudo systemctl enable project1-sensor
It should look like the picture above.
Builds Greenhouse
- Build the greenhouse.
- Add all the components to the greenhouse according to the electrical diagram.
- Add power and enjoy.