Slidee: Non-motorized Automatic Camera Slider
by Shivam Dehinwal in Workshop > 3D Printing
7605 Views, 120 Favorites, 0 Comments
Slidee: Non-motorized Automatic Camera Slider
.gif)
.gif)


Slidee is camera slider. Unlike many other devices, it's not smart. It DOES NOT have Bluetooth, an app, a motor, batteries, LED's or wireless charging. It's a simple camera slider and it slides.
Designing simple things is hard. I wanted to make a camera slider to get sliding shots of my projects but I didn't want another smart device. I wanted something small and manual but with all the benefits of a motorized product.
Slidee was born after more than 15 iterations and I couldn't be happier with the results.
Enjoy making Slidee and let me know if you like it!
Supplies
Here are the supplies you'll need to make slidee:
- Komelon touch lock measuring tape (I used this tape specifically to build speed control in slidee, see step)
- Ball head mount (Any generic one works)
- POM Ball bearings
- suction cups
- M3 brass inserts
- M3 screws 6mm
- 3d printer
- Soldering Iron
Print the Parts

I printed the parts in PLA. If you plan to use slidee outdoors, in summers, I would recommend using PETG or ABS if you can. The reason: PLA starts deforming at around 60C while PETG deforms around 80C and ABS remains fine until 100C.
The infill I used is 25%. You don't need a heavy infill on these parts.
You will need:
1x Slidee body
1x Bottom plate
4x T shaft
1x Tape clip
1x rotating disc
Install Heat Inserts

Use a soldering iron to install the heat inserts in Slidee body. Be extra careful with the soldering iron if you are new to it. See this tutorial for installing brass inserts : https://www.youtube.com/watch?v=UHJmGiUFYhk
Install the Measuring Tape and Tape Clip


- Put the measuring tape in Slidee body as shown. It is important that the push lock (silver part) of the tape faces the bottom.
- Pull the tape out of the body through the door notch and press fit the tape clip as shown.
Prepare the Wheels


- Press fit the bearings on T shaft as shown. The shaft should be flushed with the bearing face or it won't fit in slidee.
- Press fit the shafts with wheels in the extrusions on 4 corners of slidee. The longer end of the shat should face the body.
Install Bottom Plate and Rotating Disc


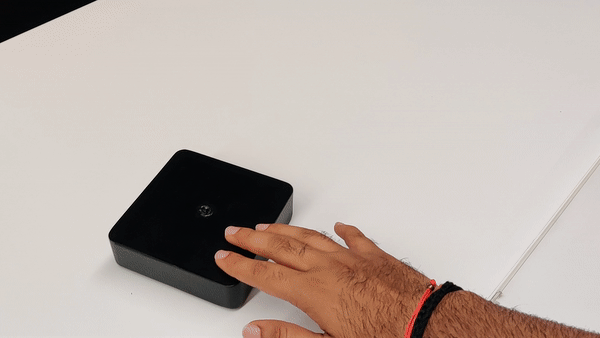
The special thing about the komelon measuring tape is that the silver disc behaves as a push lock. The harder you press the silver disc, slower the tape releases. Slidee uses this feature of the tape measure to enable speed control with the help of the rotating disc. If you tighten the rotating disc, it presses the silver lock of the tape and Slidee slides slowly. On the other hand if you loosen the rotating disc, the push lock of the measuring tape is disabled and slidee slides faster (better for heavier cameras).
Make Sure It Slides
.gif)
.gif)

Slidee can slide in straight as well as curved paths to take curved sliding shots of smaller objects. Just turn the wheels (second picture) so they form an arc and slidee should now rotate in a curved path.
Install the Ball Head


- Use the same process for inserting the the brass inserts to 'inset' the 3/8" screw connector that comes with the ball head.
- Install the ball head over the screw connector.
Optional: Install a Suction Cup

Optionally, you can install a suction cup in the bottom notch of the tape clip as shown in the image to make Slidee completely hands free. Just pull the tape, press the suction cup on a flat surface and let Slidee do it's magic :)
You're Done


.gif)
Here's a raw video that recorded using Slidee. Also, a GIF's from the previous prototype
BTS & More`


I followed a thorough design process of iteration, learning and upgrades to make Slidee. Sharing some images showing the process with the Instructables community!
I plan on building further iterations on Slidee and improve some glitches. Upgrades include:
- Packaging that works as a track (As shown in image, already working on it)
- Better motion control with the rotating disc.
- Clear Slidee, coz it looks dope!! (SLA print shown in image)
Please follow the project and check this space for upgrades!