Skin Image Recognition
by Sathvika Alla in Circuits > Raspberry Pi
176 Views, 0 Favorites, 0 Comments
Skin Image Recognition

Aim:
Users will be able to upload images of their skin. The AI model will analyze the skin type (oily, normal, dry), detect signs of various skin ailments (such as acne, eczema), and offer tailored advice on skincare routines, products, and lifestyle changes.
What Does It Do?
· Image Analysis: Allows users to upload images for detailed skin analysis.
· Personalized Recommendations: Offers customized skincare routines, product recommendations based on the identified skin conditions.
· Educational Resources: Provides informative content about the identified skin condition from reputable sources.
Supplies
Raspberry Pi 5
- Description: Single-board computer for project integration
- Estimated Price: $134.95
USB Webcam
- Description: High-definition camera for video input
- Estimated Price: $9.99
Freenove Project Kit
- Description: Comprehensive electronics kit for Raspberry Pi projects
- Estimated Price: $45
Plywood Board - 8mm
- Description: High-quality plywood for structure and base
- Estimated Price: $5.40
Laser Cutter Access
- Description: Service fee for precision cutting of plywood
- Estimated Price: $2.40 (for approximately 7min)
Wood Glue
- Description: Adhesive for bonding plywood components
- Estimated Price: $5
Sanding Paper
- Description: Fine grit sandpaper for finishing
- Estimated Price: $2
Collecting Data
When collecting data, consider these factors -
- Standardize Conditions: Ensure consistent lighting and background for all images.
- Capture Details: Focus on affected areas for diseases and representative areas for skin types.
- Diverse Demographics: Recruit participants from various age groups, genders, and ethnic backgrounds to ensure diversity.
- Organize Data: Store images in a structured manner with directories for each skin condition and skin type.
- Backup: Regularly backup data to prevent loss.
It is also important to note that we will be training 2 different AI models for this project. One for detecting skin types, which is a classification model and another for detecting skin diseases which is an object detection model. Keep this in mind when cloning images from pre-annotated datasets as the type of annotations required for these models varies.
Annotating Data
Annotating data in Roboflow involves several steps to ensure the quality and accuracy of the labeled dataset. Here's a step-by-step guide on how to do it:
Step 1: Set Up a Roboflow Account
- Sign Up or Log In: Create an account on the Roboflow website or log in if you already have one.
Step 2: Create a New Project
- New Project: Click on the "Create New Project" button on the dashboard.
- Name Your Project: Give your project a descriptive name.
- Project Type: Select the type of project (e.g., Object Detection, Image Segmentation, Classification).
In our case, we have to create 2 projects of 2 different types i.e. object detection and classification.
- Annotation Group: Specify the annotation group or classes you will use.
Step 3: Upload Your Images
- Upload: Click the "Upload" button and select the images you want to annotate. You can also choose to clone image datasets from Roboflow Universe.
- Organization: Ensure your images are well-organized, possibly in folders, for easier management.
Step 4: Annotate Your Images
- Open Image: Select an image from your dataset to begin annotating.
- Annotation Tool: Use the annotation tools provided by Roboflow:
- Bounding Boxes: Draw bounding boxes around objects of interest.
- Labeling: Assign the correct label to each annotation according to your defined classes.
- Save: Save each annotated image after completing the labeling.
Refer to this document for detailed steps - Annotation Guide
Step 5: Quality Control
- Review: Go through the annotated images to ensure accuracy and consistency.
- Edit: Make corrections to any annotations that are incorrect or imprecise.
- Consistency: Ensure that annotations are consistent across similar objects and images.
Step 6: Preprocess and Augment Data (Optional)
- Preprocessing: Apply any necessary preprocessing steps such as resizing, normalization, etc.
- Augmentation: Use Roboflow's augmentation tools to increase the diversity of your dataset by applying transformations such as rotation, flipping, cropping, etc.
Step 7: Export Annotated Data
- Export: Click on the "Export" button.
- Format: For this project we will be working with YOLOv8.
- Copy: Copy the URL to export the dataset.
Tips for Effective Annotation
- Class Definitions: Clearly define each class to avoid confusion.
- Annotation Guidelines: Develop and follow consistent annotation guidelines.
- Tool Familiarity: Spend some time familiarizing yourself with Roboflow's annotation tools.
- Team Collaboration: If working in a team, ensure everyone is aligned on the annotation process.
Training and Evaluating the Model
Training a YOLOv8 model on Google Colab is a practical way to leverage GPU resources for deep learning tasks. Here's a step-by-step guide to help you set up and train your YOLOv8 model on Google Colab:
Step 1: Set Up Google Colab
- Open Google Colab: Navigate to Google Colab and create a new notebook.
- Connect to GPU: Go to Runtime > Change runtime type and select GPU as the hardware accelerator.
Step 2: Install Dependencies
- Install YOLOv8 and Required Libraries: Run the following commands to install YOLOv8 and its dependencies.
!pip install ultralytics
!pip install roboflow
- You will need to restart the session and run this cell again.
Step 3: Prepare Your Dataset
- Get Roboflow Dataset URL: Generate a dataset URL from Roboflow to download your dataset.
Step 4: Download and Load the Dataset
- Download Dataset: Use the Roboflow URL to download your dataset into your collab.
from roboflow import Roboflow

rf = Roboflow(api_key="YOUR_API_KEY")
project = rf.workspace().project("YOUR_PROJECT_NAME")
dataset = project.version("VERSION_NUMBER").download("yolov8")
Step 5: Train the YOLOv8 Model
- Train the Model: Use the YOLOv8 command-line interface to start training.
from ultralytics import YOLO

# Load the YOLOv8 model
model = YOLO('yolov8s.pt')  # Using the YOLOv8n (nano) model, you can choose other models like yolov8s.pt (small), yolov8m.pt (medium), etc.

# Train the model
model.train(data=f'{dataset.location}/data.yaml', epochs=100, imgsz=480, batch=32)
Step 6: Evaluate and Save the Model
- Evaluate the Model: After training, evaluate the model's performance on the validation set.
results = model.val()
print(results)
- Save the Model: Save the trained model for future inference.
model.save('best.pt')
Step 7: Inference
- Run Inference: Use the trained model to make predictions on new images.
# Load the trained model
model = YOLO('best.pt')

# Run inference on an image
results = model('path/to/your/image.jpg')

# Display the results
results.show()
Step 8: Download the Trained Model
- Download Model: Use Google Collab’s file interface to download the best.pt file to your local machine or directly to Google Drive.
from google.colab import drive
drive.mount('/content/drive')

!cp best.pt /content/drive/MyDrive/
Raspberry Pi Setup
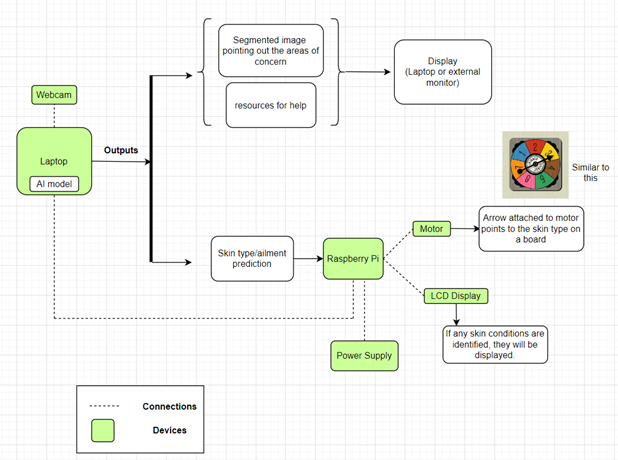
We will need to establish communication between your raspberry pi and desktop in order to control the LCD Display and the servo motor from the project board based on the results from your model.
1. Download and Prepare the Raspberry Pi Image
- Download the Image:
- Download the zipped image to your local computer.
- Unzip the Image:
- Extract the contents of the zipped file.
- Write the Image to SD Card:
- Use Win32 Imager or Balena Etcher to write the image to an SD card (8GB minimum, 16GB recommended).
- If using the Raspberry Pi Imager tool, select "custom" for the image type and do not apply any customization settings.
- Insert SD Card into Raspberry Pi:
- Once the image is written, remove the SD card from your computer and insert it into the Raspberry Pi.
2. Connecting and Configuring the Raspberry Pi
- Boot Your Raspberry Pi:
- Power on your Raspberry Pi.
- Establish SSH Connection:
- Connect the Pi to your computer with a network cable.
- Use Putty or Terminal to establish an SSH connection to 192.168.168.167 with:
- Username: user
- Password: P@ssw0rd
- If logging in directly via keyboard, note that the image is created in QWERTY. If the default password doesn't work, try P2sszàrd (AZERTY layout).
- Prepare the Pi for Further Use:
- Run sudo raspi-config.
- Choose (6) Advanced Options > (1) Expand Filesystem.
- Choose (1) System Options > (S4) Hostname and set a personalized hostname.
- Reboot the Pi (sudo reboot).
- Ensure all necessary buses are activated via raspi-config.
3. Set Up GitHub Repository
- Open Visual Studio Code (VSCode):
- Launch VSCode.
- Use the Remote SSH extension to connect to your Raspberry Pi.
- Enter the IP address 192.168.168.167 and login credentials:
- Username: user
- Password: P@ssw0rd
- Clone the Repository:
- Go to the Source Control extension tab in VSCode.
- Select the option to clone a repository.
- Copy and paste the HTTPS URL of the classroom repository.
- Open the cloned repository in VSCode.
- Set Up Python Virtual Environment:
- Open the Command Palette (View > Command Palette).
- Search for Python: Create Environment.
- Select Venv and choose any Python 3.11 interpreter.
- Create a requirements.txt file in the RPi folder with all the required dependencies for your Raspberry Pi.
- When prompted, confirm the dependencies in RPi/requirements.txt.
4. Modify and Run Bluetooth Server Code
- Modify Bluetooth Server Code:
- Open RPi/app.py in VSCode.
- Replace "device_name" on line 14 with a unique name for your device.
- Verify Python Interpreter:
- Ensure the virtual environment is selected as the Python interpreter (bottom right corner of VSCode).
- Run the Bluetooth Server Code:
- Execute RPi/app.py and check the output for the MAC address of your Raspberry Pi's Bluetooth.
- Commit and Sync Changes:
- Commit your changes to the repository.
- Sync the changes to the remote repository.
5. Clone Repository to Your Laptop and Set Up Environment
- Ensure Python >=3.10 is Installed:
- Ensure you have Python >=3.10 installed on your laptop.
- Clone the Repository:
- Clone the classroom repository to your laptop using the HTTPS link.
- Open the folder in VSCode.
- Set Up Python Virtual Environment:
- Open the Command Palette (View > Command Palette).
- Search for Python: Create Environment.
- Select Venv and choose a recent Python (e.g., 3.10) interpreter.
- Create a requirements.txt file in the AI folder with all the required dependencies for your desktop environment.
- When prompted, confirm the dependencies in AI/requirements.txt.
Connecting the Raspi and Desktop
In the your desktop repository, in the AI folder, add this code to a file named a-client.py
import socket
import threading
import time
import sys


server_address = ('192.168.168.167', 8500)  # Connect to RPi (or other server) on ip ... and port ... (the port is set in server.py)
# the ip address can also be the WiFi ip of your RPi, but this can change. You can print your WiFi IP on your LCD? (if needed)


# Global vars for use in methods/threads
client_socket = None
receive_thread = None
shutdown_flag = threading.Event() # see: https://docs.python.org/3/library/threading.html#event-objects


def setup_socket_client():
    global client_socket, receive_thread
    client_socket = socket.socket(socket.AF_INET, socket.SOCK_STREAM) # create a socket instance
    client_socket.connect(server_address) # connect to specified server
    print("Connected to server")

    receive_thread = threading.Thread(target=receive_messages, args=(client_socket, shutdown_flag))
    receive_thread.start()

def receive_messages(sock, shutdown_flag):
    sock.settimeout(1)  # Set a timeout on the socket so when can check shutdown_flag.is_set in the loop, instead of blocking
    counter = 0 # count the incoming messages, part of demo
    try:
        while not shutdown_flag.is_set(): # as long as ctrl+c is not pressed
            try:
                data = sock.recv(1024) # try to receive 1024 bytes of data (maximum amount; can be less)
                if not data: # when no data is received, try again (and shutdown flag is checked again)
                    break
                print("Received from server:", data.decode()) # print the received data, or do something with it
                counter += 1 # up the count by 1
                response = "{} message(s) received".format(counter) # create a response string
                sock.sendall(response.encode()) # encode and send the data
            except socket.timeout: # when no data comes within timeout, try again
                continue
    except Exception as e:
        if not shutdown_flag.is_set():
            print(f"Connection error: {e}")
    finally:
        sock.close()

def main():
    global client_socket, receive_thread

    setup_socket_client()

    if client_socket is None:
        print("Not connected, is server running on {}:{}?".format(server_address[0], server_address[1]))
        sys.exit()

    # send "hello I'm connected" message
    client_socket.sendall("Hello from AI / notebook".encode()) # send a "connected" message from client > server


    try:
        while True: # random loop for other things
            time.sleep(6)
            print("doing other things...")
    except KeyboardInterrupt:
        print("Client disconnecting...")
        shutdown_flag.set()
    finally:
        client_socket.close()
        receive_thread.join()
        print("Client stopped gracefully")

if __name__ == "__main__":
    main()
On the repository on your raspi, in the RPi folder, add this code to a file named rpi-server.py -
import socket
import threading
import time
from RPi import GPIO


# Global vars for use in methods/threads
client_socket = None
server_socket = None
server_thread = None
shutdown_flag = threading.Event() # see: https://docs.python.org/3/library/threading.html#event-objects


# GPIO setup
BUTTON_PIN = 7


def button_callback(channel):
    global client_socket
    if client_socket: # if there is a connected client
        try:
            message = "Button Pressed!"
            client_socket.sendall(message.encode()) # send a message
        except:
            print("Failed to send message")


def setup_GPIO():
    GPIO.setmode(GPIO.BCM)
    GPIO.setup(BUTTON_PIN, GPIO.IN, pull_up_down=GPIO.PUD_UP)
    GPIO.add_event_detect(BUTTON_PIN, GPIO.FALLING, callback=button_callback, bouncetime=200)


def setup_socket_server():
    global server_socket, server_thread, shutdown_flag
    # Socket setup
    server_socket = socket.socket(socket.AF_INET, socket.SOCK_STREAM) # create a socket instance
    server_socket.bind(('0.0.0.0', 8500)) # bind on all available ip's (WiFi and LAN), on port 8500 (this can be anything between 1024 and 65535)
    server_socket.settimeout(0.2)  # Timeout for listening, needed for loop in thread, otherwise it's blocking
    server_socket.listen(1) # enable "listening" for requests / connections

    # Start the server thread
    server_thread = threading.Thread(target=accept_connections, args=(shutdown_flag,), daemon=True) # create the thread
                                                                               # where you wait for incoming connection
    server_thread.start() # start the above thread


def accept_connections(shutdown_flag):
    global client_socket
    print("Accepting connections")
    while not shutdown_flag.is_set():  # as long as ctrl+c is not pressed
        try:
            client_socket, addr = server_socket.accept() # accept incoming requests, and return a reference to the client and it's IP
            print("Connected by", addr)
            client_thread = threading.Thread(target=handle_client, args=(client_socket, shutdown_flag,)) # thread
            client_thread.start() # start the above thread; where we try to accept data
        except socket.timeout: # ignore timeout errors
            pass

def handle_client(sock, shutdown_flag):
    try:
        while not shutdown_flag.is_set(): # as long as ctrl+c is not pressed
            data = sock.recv(1024) # try to receive 1024 bytes of data (maximum amount; can be less)
            if not data: # when no data is received, try again (and shutdown flag is checked again)
                break # go back to top
            print("Received from client:", data.decode()) # print the received data, or do something with it
    except socket.timeout: # capture the timeouts
        pass
    except Exception as e:
        print(f"Error: {e}")
    finally:
        sock.close()

###### MAIN PART ######
try:
    setup_GPIO()
    setup_socket_server()
    while True:
        time.sleep(10)


        # If you want to send data to AI script / notebook from here
        if client_socket:
            try:
                client_socket.sendall("Hello from RPi loop".encode())
            except Exception as e:
                print(f"Failed to send message: {e}")


except KeyboardInterrupt:
    print("Server shutting down")
    shutdown_flag.set() # set the shutdown flag
finally:
    server_thread.join() # join the thread, so we wait for it to finish (gracefull exit)
    server_socket.close() # make sure to close any open connections
    GPIO.cleanup()
Working With the AI Model
- Import the best.pt files for both the models into your desktop repository. Modify the ai-client.py file to detect / classify any objects using your desktop's webcam footage. For this we will need OpenCV.
- Code for functions to appropriately process the webcam footage.
- We will also need to develop a python dashboard to view our results nicely. For this we will use Streamlit.
- You can also include option to upload files/URLs if you wish.
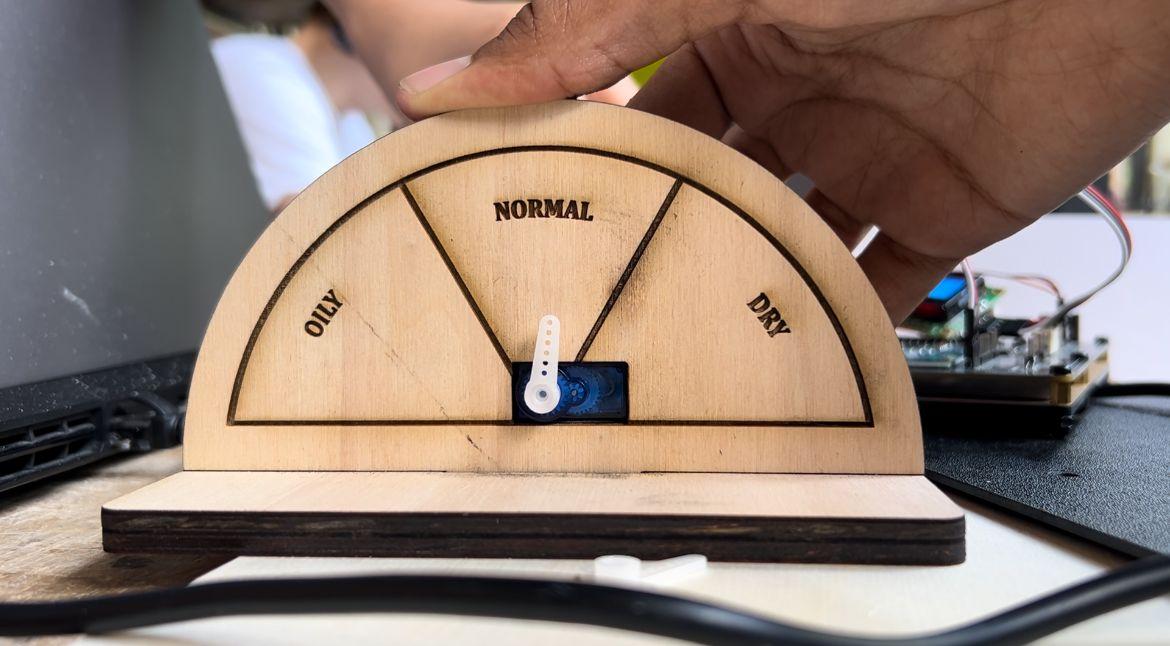
- Once we receive the predictions, we will need to send them over to the raspi to make use of the LCD display and the servo motor.
- Modify both the ai-client.py and rpi-server.py files to establish a connection accordingly.
Making the Wooden Board
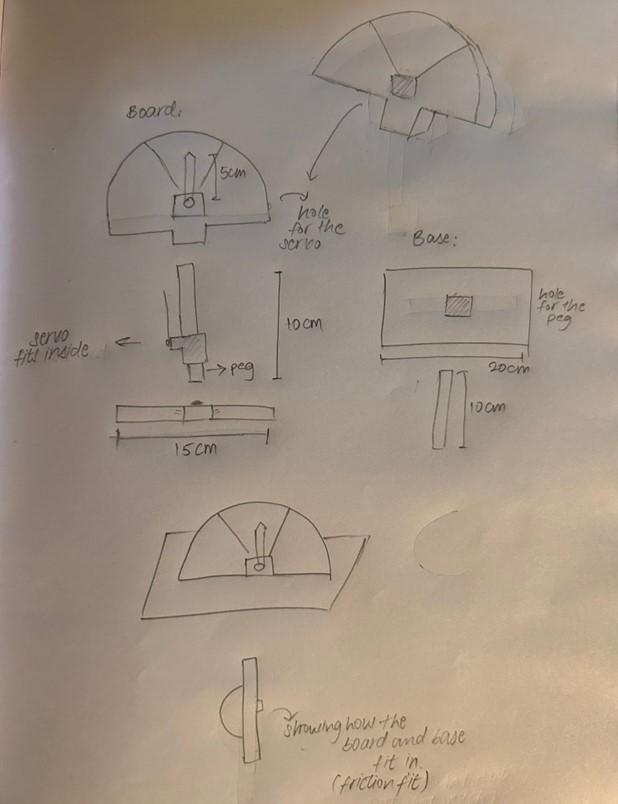
1. Create a Design File
- Use vector graphics software like Adobe Illustrator, CorelDRAW, or free options like Inkscape.
- Set your document size to match the dimensions of your material.
- Create your design using vector paths. Ensure that all lines and shapes are appropriately colored for different operations (e.g., red for cutting, blue for engraving).
- Beware of the positioning of the cut for the servo motor as the arrow is NOT centered.
2. Prepare the Design for Laser Cutting
- Set line weights correctly (usually hairline or 0.001 inches for cutting lines).
- Convert text to outlines to ensure accurate cutting.
- Save your design file in a format compatible with your laser cutter software (e.g., .ai, .svg, .dxf).
3. Set Up the Laser Cutter
- Power on the laser cutter and connect it to your computer.
- Open the laser cutter software (e.g., LaserGRBL, LightBurn).
- Import your design file into the software.
4. Configure Laser Settings
- Adjust the laser settings for your material, including power, speed, and frequency.
- Perform a test cut on a small piece of the material to fine-tune the settings.
5. Place Material in the Laser Cutter
- Secure your material on the laser cutter bed using clamps or tape to prevent movement.
- Ensure the material is flat and aligned with the laser cutter’s coordinate system.
6. Start the Cutting Process
- Focus the laser by adjusting the height of the laser head according to the material thickness.
- Start the cutting process and monitor it closely to ensure accuracy and safety.
- Pause the machine if any issues arise, and adjust settings as needed.
7. Post-Processing
- Once the cutting is complete, carefully remove the material from the laser cutter.
- Clean up any burnt edges or residue using sandpaper or other appropriate tools.
- Assemble or finish your board as required (e.g., painting, staining).
8. Safety and Maintenance
- Always wear appropriate safety gear, such as safety glasses.
- Ensure proper ventilation to avoid inhaling fumes.
- Regularly clean the laser cutter’s lens and bed to maintain optimal performance.
Summary
- Design: Conceptualize and create a digital design using vector graphics software.
- Material: Select and prepare the material.
- Laser Cutter Setup: Configure the laser cutter, import your design, and adjust settings.
- Cutting: Place the material, focus the laser, and start the cutting process.
- Post-Processing: Clean and finish your cut board.
Finishing Up

Now that the connection between the desktop and raspi is established. We can work on coding for the LCD and the servo to respond appropriately to the messages received on our raspi.
Code for these methods appropriarely. The way you code for these components may differ based on the
class LCD:


  I2C_ADDR  = 0x27 # I2C device address
  LCD_WIDTH = 16   # Maximum characters per line
  LCD_CHR = 1 # bit value for bit0; sets mode - Sending data
  LCD_CMD = 0 # bit value for bit0; bit0 sets mode - Sending command
  LCD_LINE_1 = 0x80 | 0x0   # Instruction to go to beginning of line 1
  LCD_LINE_2 = 0x80 | 0x40    # Instruction to go to beginning of line 2
  LCD_BACKLIGHT = 0x08 # Data bit value to turn backlight on
  ENABLE =  0x04 # Enable bit value
  # ENABLE_LOW =
  E_PULSE = 0.0002
  E_DELAY = 0.0002
  BOX = 0b11011011


  def __init__(self) -> None:
    self.i2c = smbus2.SMBus(1)
    self.lcd_init()


  def send_byte_with_e_toggle(self, bits):


  def lcd_init(self):


  def send_bits(self,bits,mode):


  def send_instruction(self, value):


  def send_char(self, value):


  def send_string(self, msg, line):


  def clear(self):


  def display_scrolling_string(self, message, line):


  def set_ddram(self, ddram, msg):


  def segment_string(self, msg):
from RPi import GPIO
from time import sleep
import smbus2


i2c = smbus2.SMBus(1)
pin = 18
GPIO.setup(pin, GPIO.OUT)


pwm = GPIO.PWM(pin, 50)
pwm.start(7)


a6_command = 0b1011
ADC_adr = 0x48


def set_servo_angle():

try:
  set_servo_angle(0)

except KeyboardInterrupt:
    print("Interrupted by user")
finally:
    GPIO.cleanup()
    print("Pins off")
Now, make use of these to make sure the predict skin disease appears on the LCD and the predict skin type is coreectly shown on the board.
Final Product
The final product would look something like this. In my demo, I added a few nice-to haves which aren't necessary for the product to function.
Take a look - video
Visit my repository to get a basic understanding.