Single Bucket Sub-Irrigated Planter
by ejluttmann in Living > Gardening
2447 Views, 24 Favorites, 0 Comments
Single Bucket Sub-Irrigated Planter

How does a Sub-Irrigated Planter work:
Sub-irrigation is the process of watering plants from below, instead of on top. The sub-irrigated planter works when you pour water into the fill tube and it flows down into a water reservoir below the soil. Once the water reservoir is full, the water wicks up through the soil and into the plants roots through "capillary action". This system helps to keep soil consistently moist so you won't have to water as often.
To get the capillary action started, the potting mix must be “primed” by giving the plant a good top-watering at the outset. Allow excess water to flow through to the reservoir. From then on, you only have to add water to the reservoir through the fill tube. You will add water to the fill tube until you so see water coming out of the drain tube, then you know the reservoir is full.
Reasons I was looking at building Sub-Irrigated Planters:
- Very little water is lost do drain-off and evaporation. With a reservoir and wicking system, it keeps the soil at a constant moisture level and helps ensure the plants develop deep, healthy roots.
- With this planter system, any nutrients that are leaked into the reservoir are taken back up into the plant and therefore requires less fertilizer.
- Lower maintenance and no weeding ... you can also add a lid with a hole cut out, or simply cut some weed fabric to fit the top, and this would further help with evaporation.
- Saves space and can easily be moved if needed.
- Costs under $12 per planter - maybe more if you only build a couple, and less if you already have some of the materials on hand.
- It would be easy adapt this to work with the sprinkler system using the garden zone.
After looking at many other two-bucket SIP (Sub-Irrigated Planter) designs, I decided to make my own single-bucket SIP. Using a single bucket gives me almost two planters for the price of one, plus I wanted a design that was inexpensive but easy to build with a minimal amount of steps.
The planters I built cost me under $12 per planter and could be much less if you already have some of the materials on hand or can get buckets for free. After building the first two planters (while working out some kinks), I was able to make 10 more bucket planters under 45 minutes - this was accomplished by doing each step for all the buckets, and then proceeding to the next step. Sort of an assembly line fashion.
This instructable shows you the materials used and the steps I followed.
Supplies


Materials needed:
- One 5 gallon bucket (I used a food grade bucket from Lowes)
- 4" Flexible corrugated perforated pipe (I used FLEX-Drain from Lowes)
- 3/4" PVC pipe - used for fill pipe
- 1/2" PVC pipe - used for drain pipe
- 8" zip ties - I used 8" zip ties because that is what I already had. Could probably get away with 4" as well.
- Potting Mix with fertilizer - it is very important that you use potting mix and not use dirt, soil, or potting soil. Use potting mix to ensure a mixture that allows upwards capillary draw, while also allowing for strong aeration to the roots of your plants. You need the mix to be loose, friable and porous like a sponge.
Tools needed:
- Drill with a 1/4" drill bit and 1/2" step bit
- Miter Saw (or manual Hack Saw)
- Tape Measure
- Wire cutter
Approximate costs per planter:
- ~$5.00 for 5 gallon bucket
- ~$2.50 for water reservoir ($10 for 12' FLEX-Drain pipe, 4 planters per pipe)
- ~$0.85 for 3/4" PVC fill pipe ($6.75 for 10' pipe, 8 planters per pipe)
- ~$0.20 for 1/2" PVC drain pipe ($5.55 for 10' pipe, 30 planters per pipe)
- ~$0.08 for zip ties ($20 for 500 zip ties, ~$0.02 each)
- ~$3.00 for potting mix ($12 for 64 quarts bag, ~16 quarts per planter)
Create Water Reservoir


I am using a 4" Flexible corrugated perforated pipe for this step. It is important that the perforated pipe is flexible enough that it can be bent into a full circle.
First, expand the pipe and trim off the end connector.

Then measure approximately 32" once the pipe is fully extended and cut off one section.
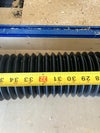


Bend the perforated pipe into a circle and tie the ends together using two zip ties through the holes in the perforated pipe. Pull the zip ties tight and trim off the extra with wire cutters. Set aside for use later.


Drill Holes in Bucket


Using the 1/4" bit drill two holes at the top of the bucket which will be used to secure the fill pipe. I centered these holes between the handle.

Next, drill a 1/2" hole using the step bit on the opposite side of the bucket about 3 1/2" from the bottom of the bucket.


Cut Fill and Drain Pipes


For the fill pipe, measure the height of the 5-gallon bucket, add approximately 1 inch and cut a section the 3/4" PVC pipe to that measurement. For my SIP planters, I cut the fill pipe to be 15". Then cut a 45-degree 'wedge' at the bottom of the pipe, which will make it easier to later insert into the corrugated pipe and it also helps water flow out of the pipe when filling the reservoir.

For the drain pipe, cut a 4 inch section from the 1/2" PVC pipe and drill a 1/4" hole at one end. Then cut a 45-degree 'wedge' at the bottom of the pipe opposite of the end. This will make it easier to insert into the corrugated pipe.


Finally, insert a zip tie into the 1/4" hole, tighten and then trim off the excess. This will help prevent the drain tube from sliding into drain hole.


Assemble the SIP Planter


The final step is to assemble the SIP planter by adding the water reservoir and connecting both the fill and drain pipes.
Insert the water reservoir into the bottom of the bucket, this should fit tight. I made sure the zip ties connecting the two ends of the corrugated pipe were away from the drain hole in the bucket.

Next drill a 1/2" hole into the corrugated pipe for the drain hole, using the drain hole as a guide.

Insert the drain pipe into the drain hole and into the water reservoir.


Follow up with drilling a 1/2" hole into the corrugated pipe for the fill hole, approximate location based on the two 1/4" holes which will be used to secure the top of the fill pipe.

Finally, insert the fill pipe into hole and attached the top of the pipe to the bucket using a zip tie. Trim the excess of the zip tie, but leave enough to tuck into the hole to prevent any sharp edges.


Adding Potting Mix and Priming the Planter
I add the potting mix in stages. I first fill about 1/4 of the bucket with potting mix and then compact the the center of the water reservoir to make sure it is full of potting mix. The center is where the wicking action will take place into the soil, below the water level in the reservoir. Then I soak that first layer with water. Next I fill the bucket to about 1/2 full with potting mix and soak that layer with water. Finally, I add the rest of the potting mix and continue to soak with water until I see water flowing out of the drain pipe.
The planter should now be properly primed and ready for planting. You should no longer have to top-water the planter, just fill the water reservoir using the fill tube until water starts running out of the drain pipe.
Note: if you are starting from seeds, you still might have to top-water until the seed germinates properly.