Simple Garage Door Hack V2
by Pilgrim in Circuits > Remote Control
1374 Views, 8 Favorites, 0 Comments
Simple Garage Door Hack V2


The following is a migration of my Simple Garage Door Hack onto an OpenHAB platform. While this instructable is not detailed step-by-step walk through, it does provide links to step-by-step instructions which can be easily followed to achieve the final outcome.
So why this project? I was looking for a framework/approach that would allow me to easily add my garage door opener to an IoT home automation system that would be easy to secure, maintain and scale and OpenHAB provided this all for me. I use the word "easy" very loosely. In my opinion there is a slightly steep learning curve with respect to OpenHAB but once you are past that it appears to be pretty simple to manage.
Materials:
- Everything found in Simple Garage Door Hack (although someone mentioned that I could have just used something like the following: https://www.aliexpress.com/item/32880024822.html)
- A Raspberry PI, OrangePi, Spare computer or virtual machine to host OpenHAB (I used an old laptop but plan to migrate it onto a virtual machine).
Tools
- Those mentioned in the Simple Garage Door Hack
Software
Building & Configuring Your OpenHAB Server

Follow the instructions: https://www.openhab.org/docs/installation/
Once installed, follow https://www.openhab.org/docs/installation/securit... to secure the server.
OpenHAB does not really have any build-in options for locking down which user-interface people can use. To achieve lockdown as well as provide automatic redirection to the "basicui" interface, I configured nginx as follows:
https://community.openhab.org/t/how-to-limit-acces....
In order to make sure that your addons are not lost when your OpenHAB system reboots, they need to be specified in the /etc/openhab2/services/addons.cfg file.
For this project we need mqtt and so I had the following on the binding line
binding = astro, mqtt, ntp
Under /etc/openhab2/items/demo.items, I had
/* Demo items */
Switch GarageOpener "Garage Door" {channel="mqtt:topic:782f0461:ESPAlarm"}
// vim: syntax=Xtend
And /etc/openhab2/sitemaps/demo.sitemap, I had
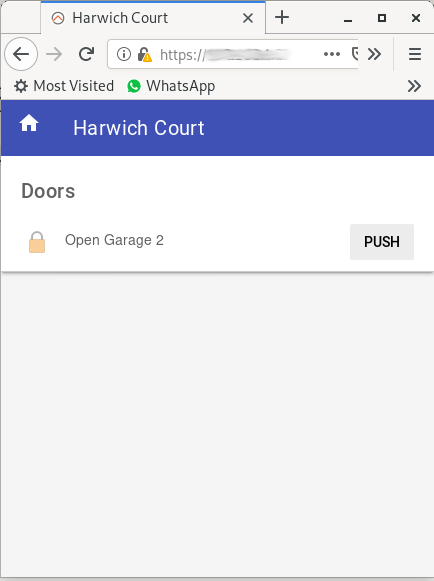
sitemap harwich label="Harwich Court"
{ Frame label="Doors" { Switch item=GarageOpener label="Open Garage 2[]" mappings=[ON="Push"] } }
// vim: syntax=Xtend
Now browse to your OpenHAB server and open paperui.
- Under Configuration go to Things and click +
- Choose MQTT Binding and click MANUALLY ADD THING
- Choose Generic MQTT Thing. Give it a name, location and from Bridge Selection select the MQTT Broker
- Now go to Configuration -> Things and select the Generic MQTT Thing that you have just added.
- Add a channel, choosing On/Off switch for Channel Type and specifying a label e.g. GarageController, and channel ID e.g. GDoorNo1.
- Under SHOW MORE set On/Open value as 1 and Off/Closed value as 0
Except for the Bindings comment higher up, all other points were taken from the below video
Programming the Arduino
Edit the attached code to contain your wifi SSID and password as well as the IP address for your MQTT server, which is the same as your OpenHAB server.
Prepare the Adruino IDE as explained in the Simple Garage Door Hack tutorial and then upload the code.
Downloads
Accessing the BasicUI

Providing that you have setup nginx as mentioned earlier, if you browse to the IP address of your OpenHAB server from a white-listed machine you will arrive at the main OpenHAB interface. From there click on the basicui link. If you browse from any other machine your should be automatically redirect there.
While it is possible to open up your router to allow access from anywhere on the internet this is probably not the best idea. I better approach would be to set up a VPN server (I've used OpenVPN) and then to only allow access via a VPN connection.
If your router has a built in VPN server (check your user manual) then use this option to easily configure your VPN. If not then you will need to install your own VPN server on a box on your network (you could use a virtual machine, a raspberry pi or even the box running OpenHAB). Refer to the VPN's documentation or community forum to complete this task. Once your VPN is running your will then need to install the VPN client on the devices that will be accessing your network remotely. When wanting to connect to OpenHAB remotely, you will first need to connect the VPN client to your VPN server.
One last requirement for your VPN will be that your home connection either has a static external IP or is running a DDNS service that allows you to keep track of what your current external IP is.
Final Comments
As already mentioned, this is more of a high-level overview of how to integrate the Simple Garage Door Hack into a Smart Home Platform which can then be accessed from anywhere via a VPN.
OpenHAB enabled me to create a secure, professional looking system that is easy to scale. I do use the word "easy" pretty loosely in that I am not really finding it that simple to learn but having said this, once mastered, creating a smart and automated home will be a breeze.
While there is not really much automation that I would like to do on my garage door, I do want to add my lights, curtains, heating etc onto this system and having my garage door openers as part of this, so that everything is in the same place, makes sense to me.