Simple ESP32-CAM Controlled Wi-Fi Surveillance Car
by psp50 in Circuits > Arduino
8372 Views, 10 Favorites, 0 Comments
Simple ESP32-CAM Controlled Wi-Fi Surveillance Car

In this tutorial we are going to make a simple ESP32-CAM based Wi-Fi controlled camera car. This project is simple and effective, you can connect and use it from any mobile computer or any such device having an internet browser.
to make this we will require following hardware :
Supplies
ESP32-CAM module:https://www.flyrobo.in/ai-thinker-s-esp32-cam-bluetooth-wifi-with-ov2640-camera-module?tracking=ins
CP2102 (5-pin) USB to TTL UART serial converter Module:https://www.flyrobo.in/cp2102-5-pin-usb-ttl-uart-serial-converter-module?tracking=ins
L298N Motor driver module:https://www.flyrobo.in/l298n_motor_driver_module_for_arduino?tracking=ins
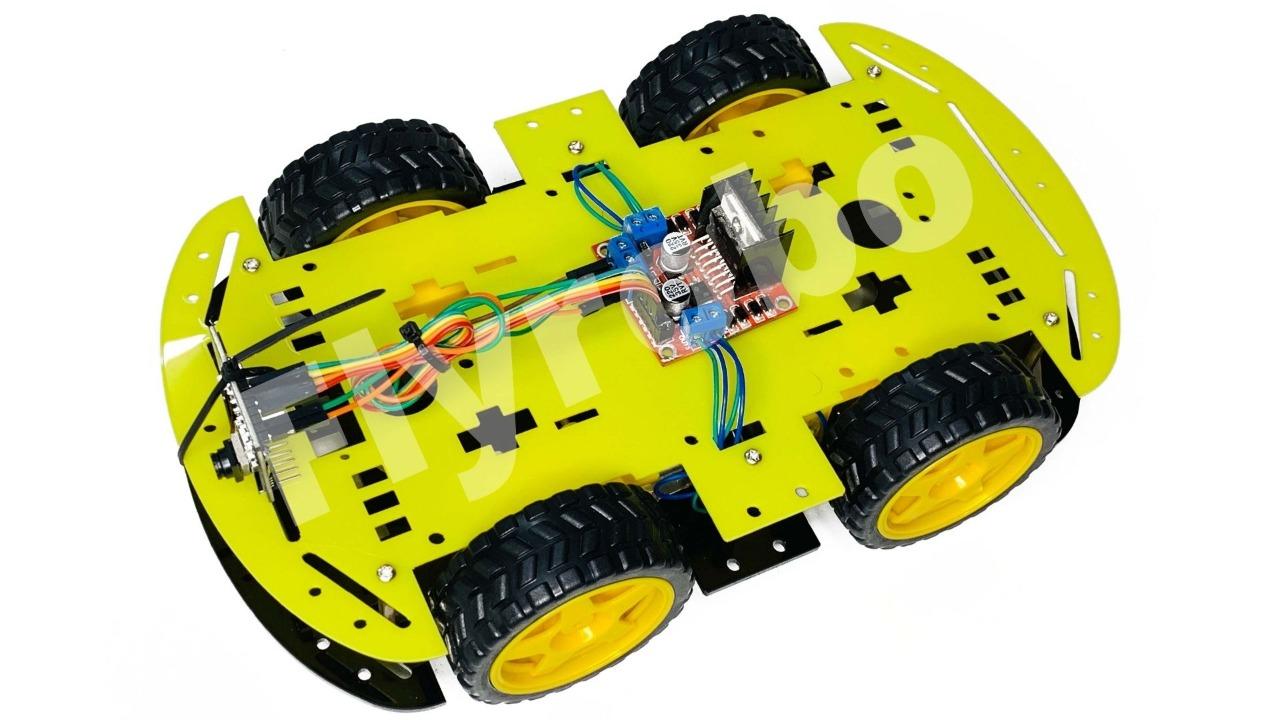
CAR chassis and motors:https://www.flyrobo.in/diy-car-robot-kit-chassis-4-x-motor-4-x-wheels-and-other-accessories-robot-spare-parts?tracking=ins
Battery
Assembling the Chassis
Before assembling chassis and placing motors, solder wires to Motors.
we have used here ready-made acrylic cut-out model for chassis which is easily available in market, by the way you can use any cardboard or simple plyboard cutout as chassis.
Assembling and Uploading Code to ESP32-CAM Module


Plug in the camera to the connector of ESP32-CAM board and close the pin
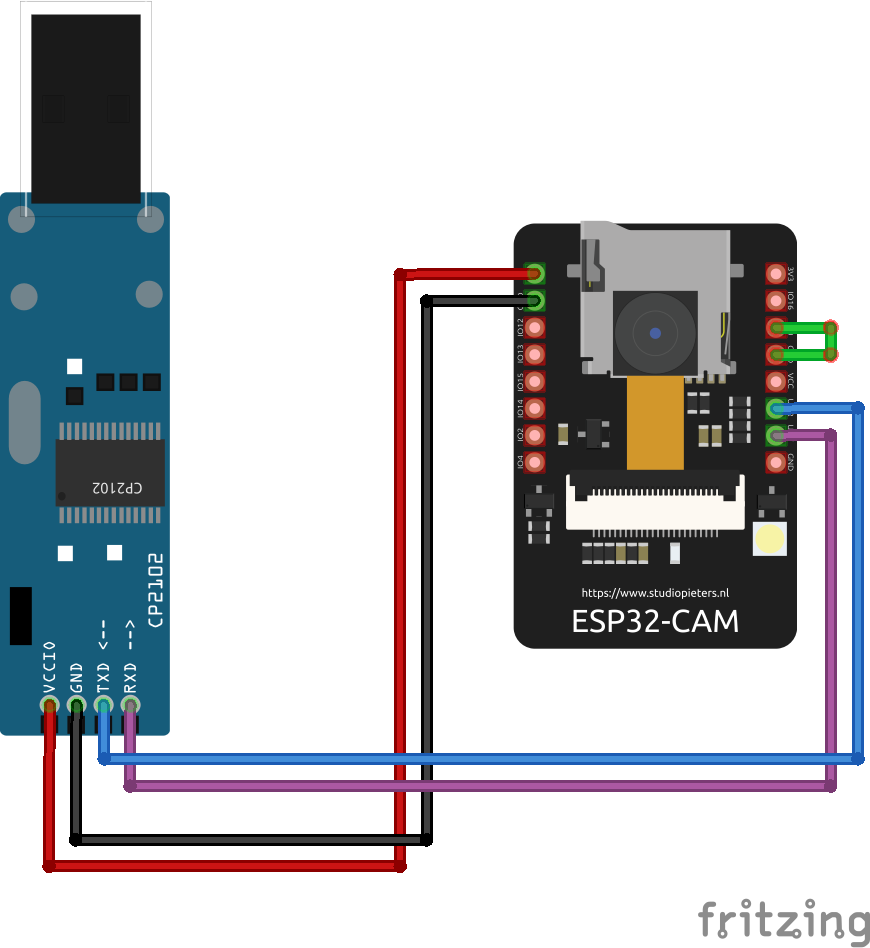
Programming of ESP32-CAM is done via CP2102 USB to TTL UART serial converter Module. First connect the USB to TTL module with ESP32-CAM and short IOO pin of ESP32-CAM to GND according to diagram.
open files menu in arduino IDE. and then open preference and paste the link in additional boards managers URL and press OK:
https://raw.githubusercontent.com/espressif/arduin...
after that install the ESP32 library from include library menu.
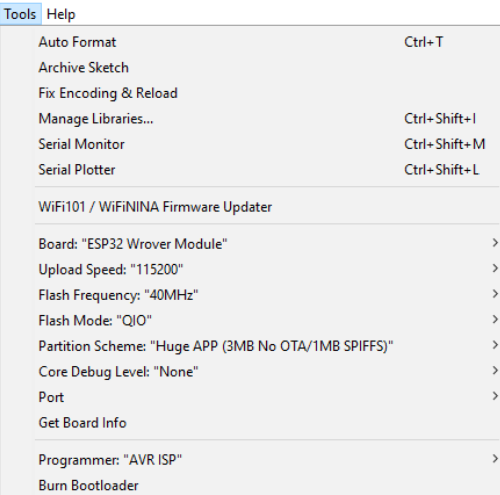
open the tools menu and make changes to parameters according to shown above in images.
In the code give name of the access point to be connected and SSID of that access point
Once done this connect the USB to TTL module to your PC and upload the the code given below. After successfully uploading the code open the serial monitor. after connecting to Wi-Fi the ESP32 will show local IP address. NOTE THAT DOWN.
Downloads
Trouble Shooting
this step is optional and consider only when code is not uploading or error message continue to appear.
1. problem uploading to board:
this is a common problem. first upload the code and wait until the error message to shows up, once the message is visible on IDE press the reset button on ESP32-CAM module and then again upload the code. This time it will be done
2. camera burnout OR camera not detected
If this error shows this mean either your camera is damaged or not connected properly.
also if your PC is unable to deliver enough power to Modules then also this error will be shown.
Wiring and Powering Up the Main Circuit

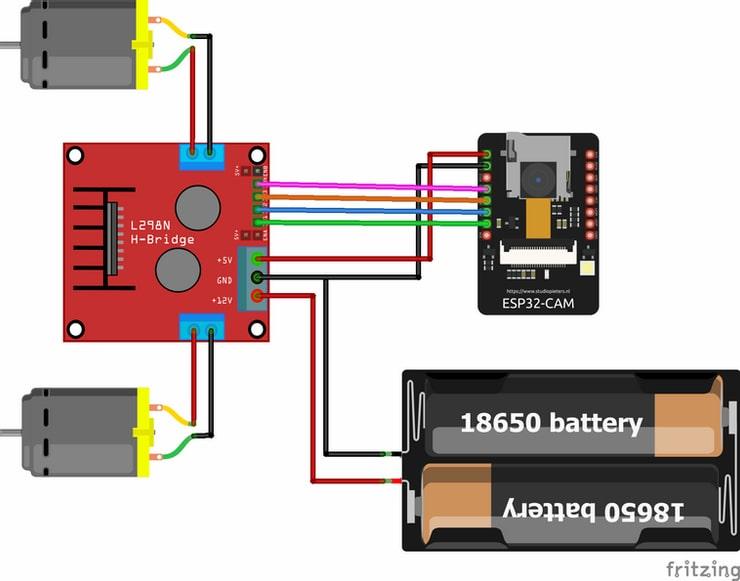
after uploading code disconnect USB to TTL Module completely from ESP32-CAM and connect jumper wires to L298N module as shown in diagram :
Now for powering the car we will use 12v Li-ion battery, connect accordingly
+Ve of battery to ---- +12 of L298N
-Ve of battery to ----- GND of L298N
For powering up the ESP32-CAM module we will use L298N's +5v as source to do this Place the power jumper which is left on board.
connect :
L298N
+5 -------- 5v of ESP-32 CAM
GND -------- GND of ESP-32 CAM
IN1 --------- GPIO 14 of ESP-32 CAM
IN2 ---------- GPIO15 of ESP-32 CAM
IN3 ---------- GPIO13 of ESP-32 CAM
IN4 ----------- GPIO12 of ESP-32 CAM
since we are not going to control the speed of car and will run at max speed place the ENA and ENB jumpers in place.
Final Touch and Running the Car
After everything is ready and powered up. The ESP-32 will connect to Wi-Fi AP provided by you to it in the code.
Open your mobile hotspot setting and turn hotspot on. Wait until ESP-32 to connect, then open the internet browser and enter the IP address provided to you prior in the uploading part.