Simon Makey Makey With a Physical Board! (Customizable Pattern and Multiplayer Options)
by rothepsteinjen in Circuits > Gadgets
4207 Views, 8 Favorites, 0 Comments
Simon Makey Makey With a Physical Board! (Customizable Pattern and Multiplayer Options)
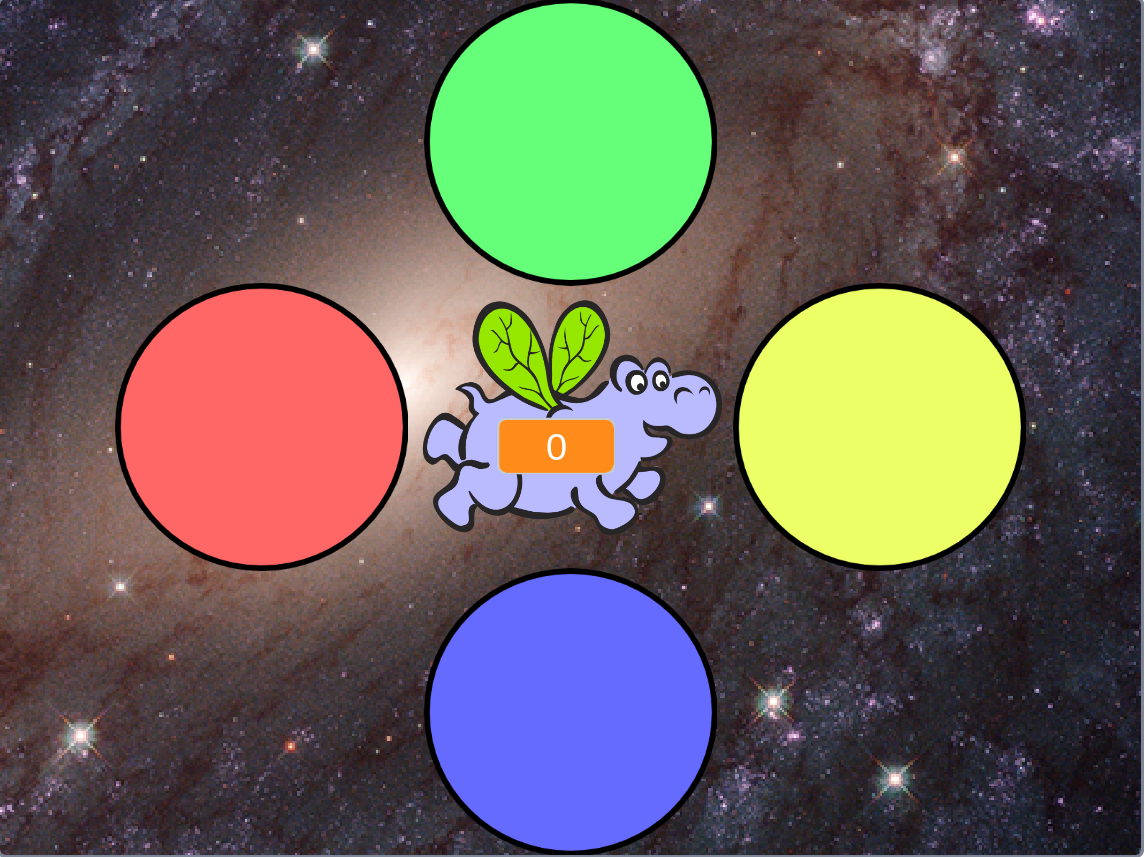
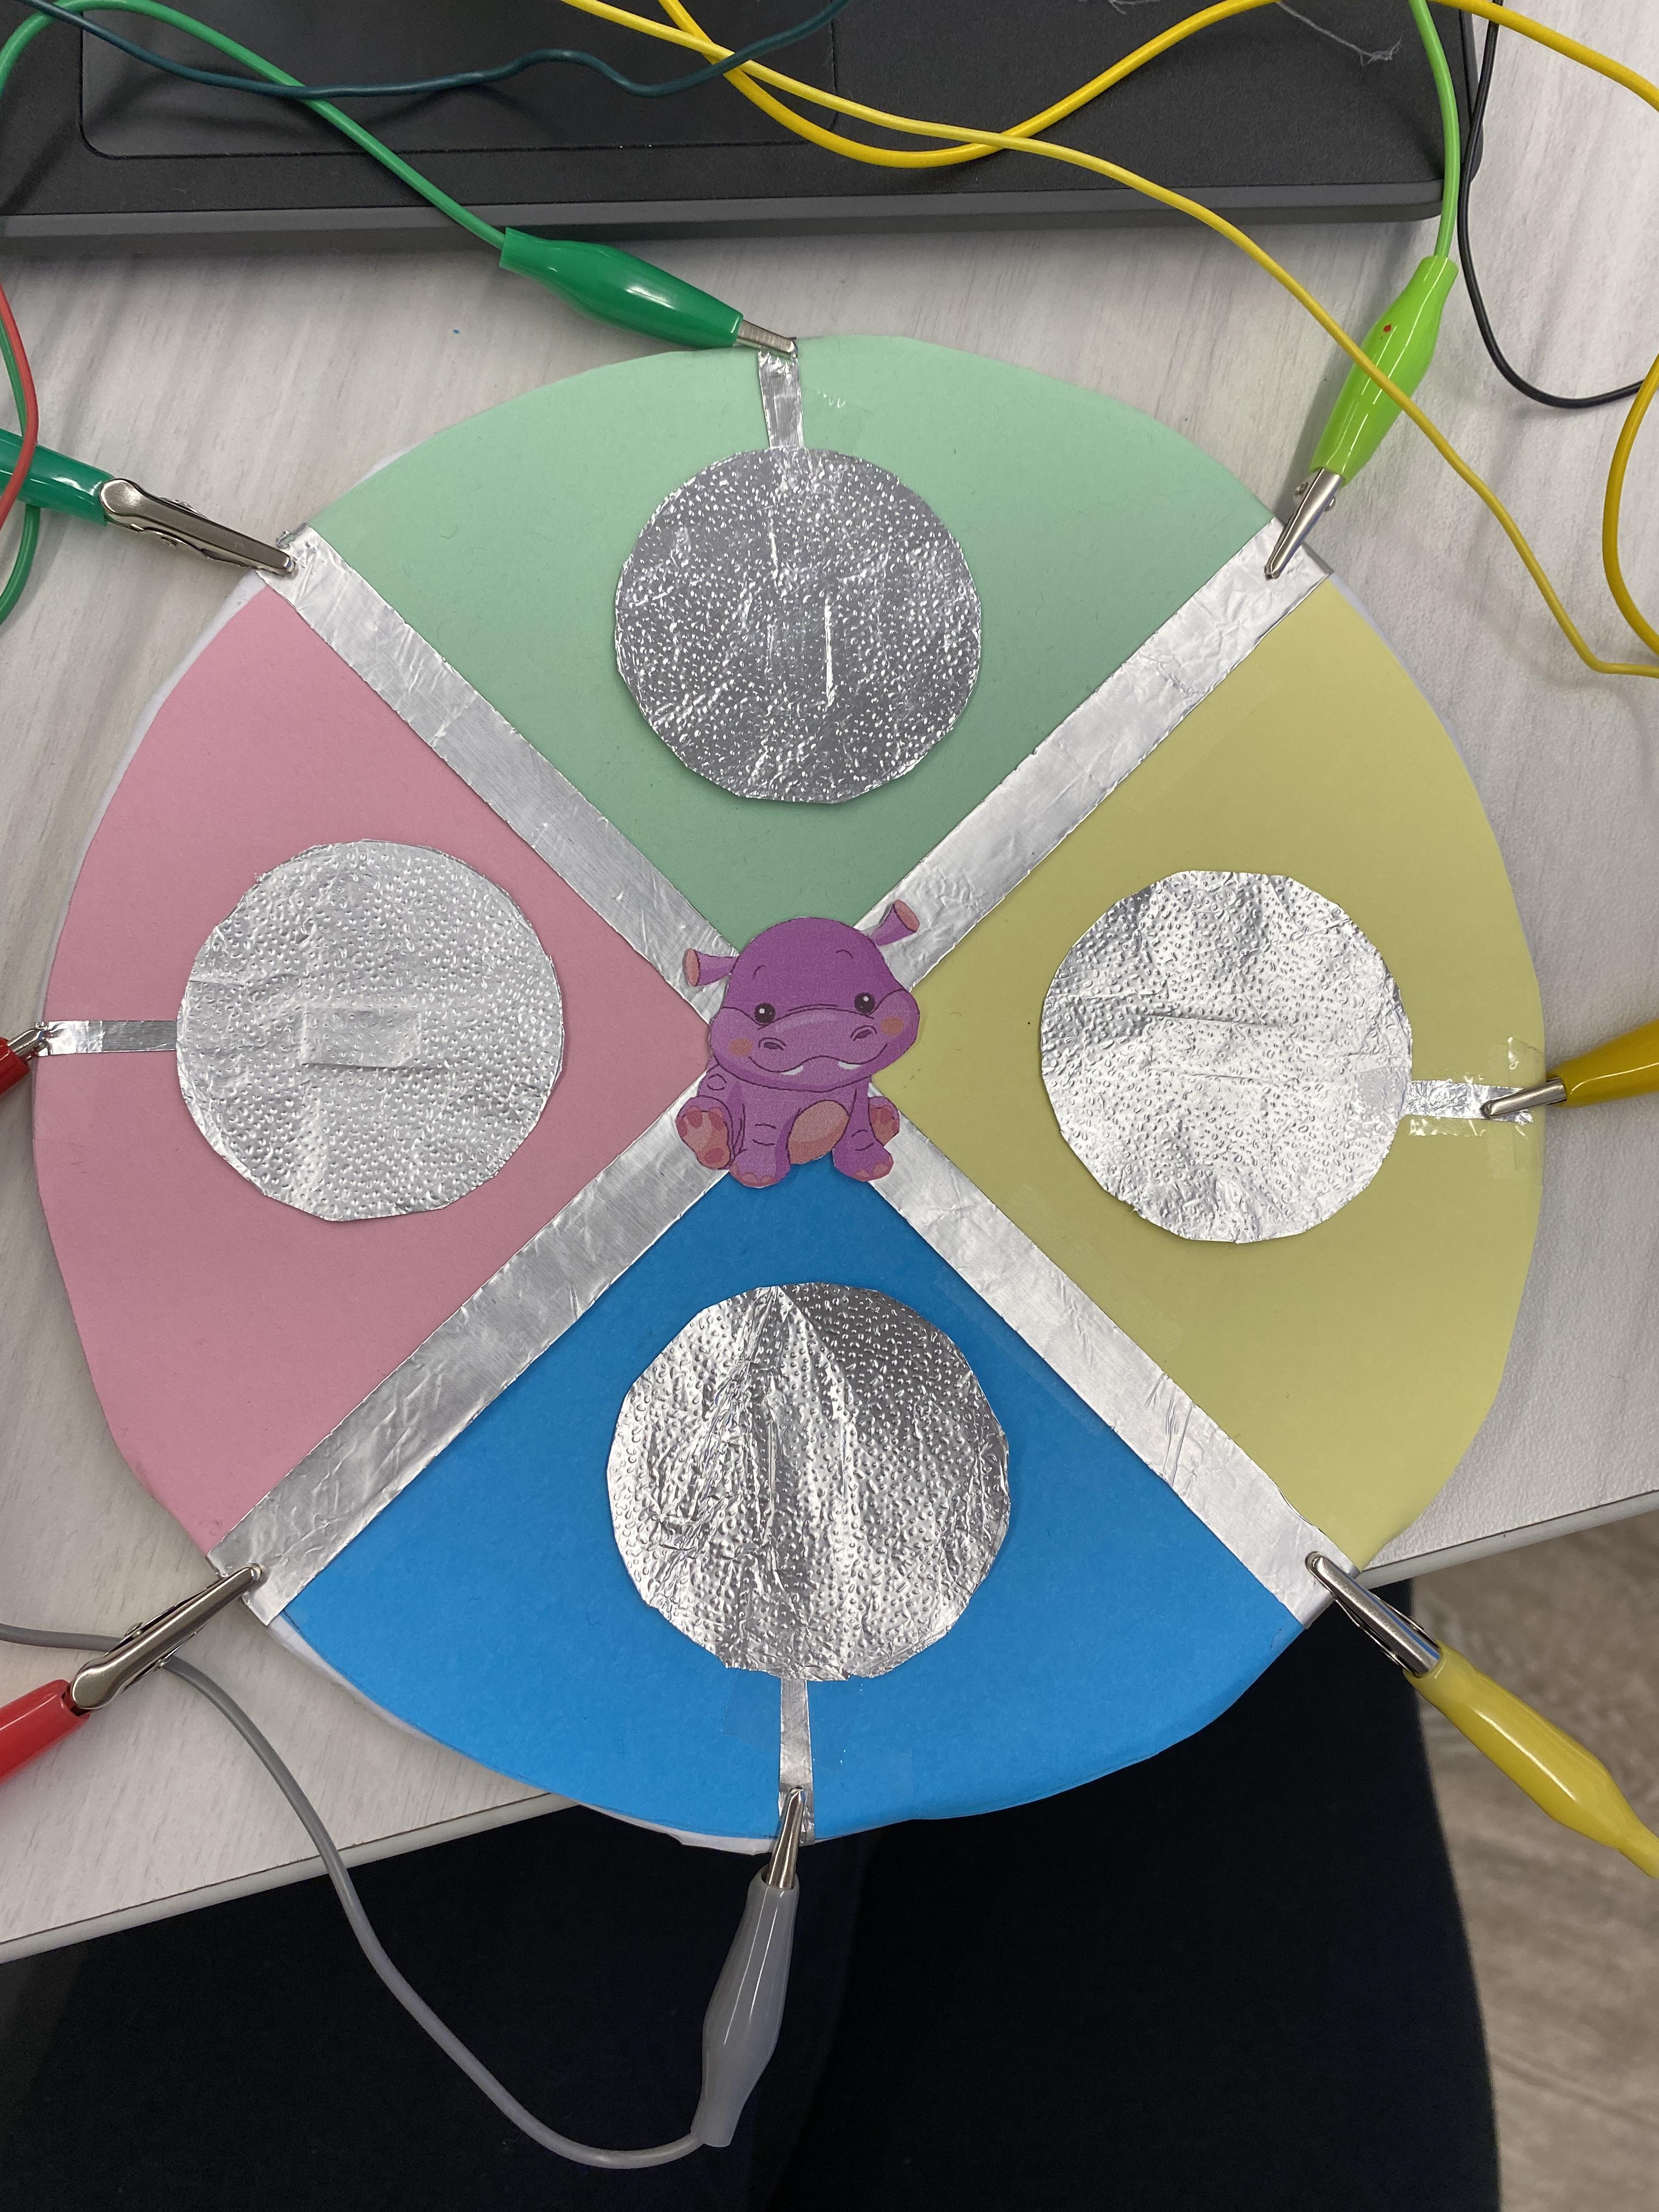
I have made a Simon with extra features.
The features included are a multiplayer option where everyone will receive the same combination, and an option to input the code you want to play back yourself. I used a physical board to allow the user to play this similarly to a regular simon.
Warning: To make this project requires a lot of patience and will involve the use of sharp tools. The process of making this project is not recommended for ages 7 and under due to the difficulty of the code. The parts of the physical construction that involve sharp items should only be operated by someone over the age of twelve and with adult supervision. If under 13 I recommend having a parent or guardian use the sharp tool (a box cutter).
This game is meant for kids and is family friendly! Families and young friend groups can find this useful because there will be no more debates and fights where one person got an easier combination then the others. The custom code input is a way someone can feel better about themselves and their simon says skills, as well as being good for practicing memorization skills. The game simon is a simple game to understand which adds to the appeal. This program is primarily coded for english speakers due to the instructions being in english, however basic simon can be played with speakers of all languages.
Supplies
- MakeyMakey Kit
- Chromebook or laptop
- 9 Alligator clips
- 1 small plastic cup
- A large bowl
- Piece of Cardboard (inches: 10 by 10)(Centimeters: 25 by 25)
- A pencil
- A paper clip or other small piece of metal (doesnt have to be sharp or pointy)
- 5 sheets of paper, white, blue, yellow, red, and green.
- See through Tape
- Scissors
- Tinfoil
- Straight edge (ruler recommended)
- Box Cutter (Razor Blade is possible but Box Cutter is safer)
- Paper Cutter (possible, but extremely difficult without it)
- Color Printer (can be black and white if no color)
- Scratch program (available at https://scratch.mit.edu)
The Next 8 Steps Will Be About the Scratch Program.
This is where you should start with because it can be the most complicated part of the project. Make sure to rely on the pictures for the actual finished code portions because the written instructions are more about what the code is doing then physically making the code.
Resetting/Creating Variables and Making the Program Compatible With Makey Makey.
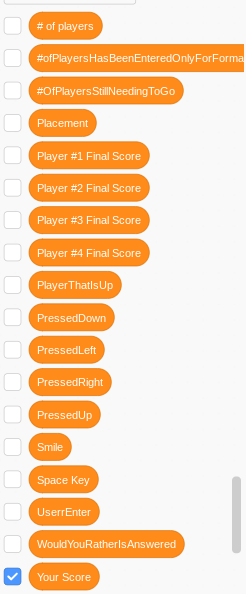
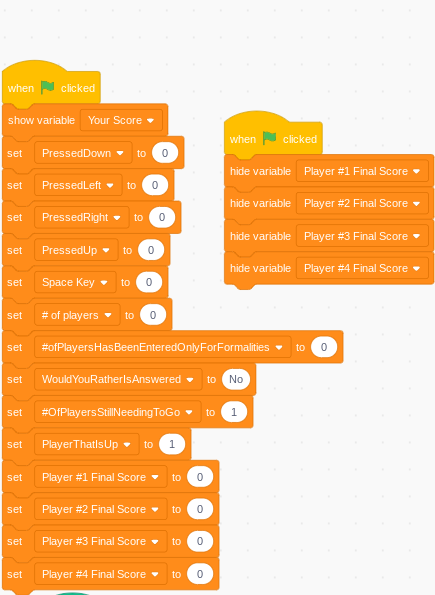
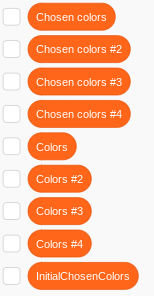
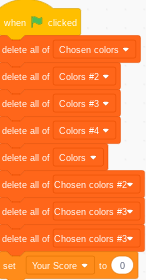

Resetting/Creating Variables and making the program compatible with Makey Makey.
- Create a blank sprite and call it: “Technicalities” 18 variables are included in the program. Create them all as shown in the image:
- Set the variables up as shown. Keep in mind the different broadcasts will be created as you complete the code.
- Creating the lists. 9 lists will be used in this code as shown.
- Reset all of the lists as shown (And the Score variable)
- Next up is to make the keys work with MakeyMakey. To do this you will make it so every time one of the following keys gets clicked, a variable will be changed to equal “1” before waiting 0.3 seconds and switching the value back to “0”. This makes it so the the button will register as having being pressed.
Creating the Beginning Part of the Program.
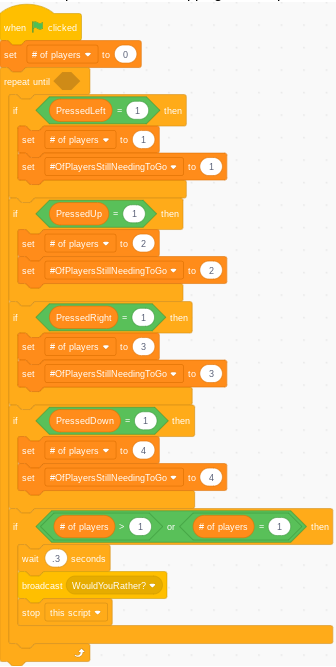
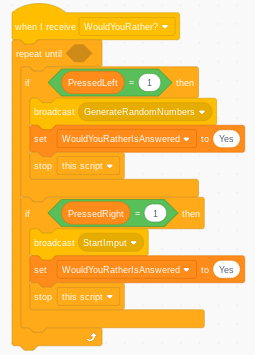
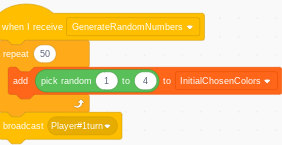
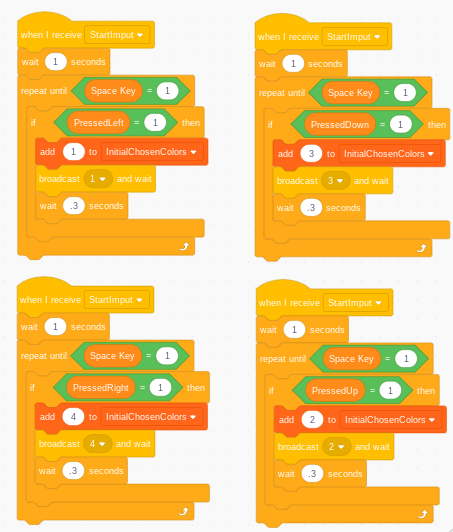
Selecting multiplayer options and selecting custom code or having one randomly generated.
- Create a blank sprite called “Beginning”
- First up is determining how many players there are. You set it up so that the different arrows will correspond to a different number of people. This number will be added to both the “# of players” variable and the “#OfPlayersStillNeedingToGo” variable. The code will repeat until one of the options is chosen. When that happens, the code will broadcast a new message called “WouldYouRather?” which will activate the next part of the process before stopping the script.
- After the player number has been selected, the code will then ask the player if they want a randomly generated code or if they want to custom make the code they will be playing with. You present the player the option in a separate sprite (will be coded later), and it so when the code receives “WouldYouRather?” the code will repeat by waiting for one of the two options to be chosen. Once one of the two options is chosen, the variable that sets the code will be changed and the script will stop. Here the code will split into the two parts temporarily depending on which option is chosen. The chosen option will be broadcasted in two separate broadcasts “GenerateRandomNumber” and “StartImput”.
- The broadcast “GenerateRandomNumber” will randomly create 50 numbers and add it to the list “InitialChosenColors”. The code will then broadcast “Player#1turn” to start the first player’s turn and activate another system.
- The broadcast “StartImput” will allow the player/players to input a code of their own choosing. You make it so that when the message is received, the code will sense if one of the buttons are pressed and when they are pressed, the number corresponding to the color is added to the list “InitialChosenColors”. This part of the code will repeat until the space bar is pressed.
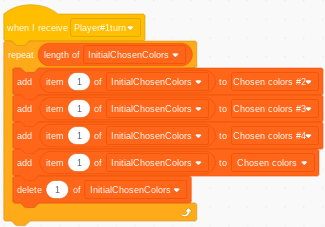
- The next part is to empty the “InitialChosenColor” list into the “Chosen colors”, “Chosen colors #2”, “Chosen colors #3”, and “Chosen colors #4” lists. This basically duplicates the code into 4 separate lists. The first number of the initial list will be added to all four lists before the first number is deleted and the second one becomes the first. At the end the entire initial list will be empty and the other four will be full. These numbers will be used for the combination the different players will be putting in and makes sure every player is given the same combination.
The Hippo, Part #1!
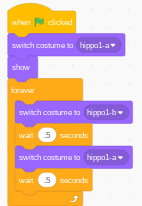


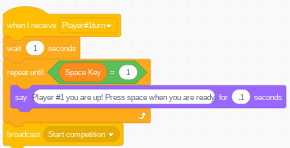
The Hippo will deliver instructions for set up to the user, activate some broadcasts, perform some functions of it’s own, and serve as the center part of the program.
- Creating the aesthetic part of the Hippo! Click on choose a sprite and select the Hippo. Move the Hippo to the coordinates (0,0).
- Make the Hippo Flap by making it so when the code is started, the Hippo will switch to the first provided custom “hippo1-a” wait .5 seconds, then switch to the second provided custom “hippo1-b” waiting .5 seconds and the repeat again. This code will repeat forever.
- The instructions for the beginning. This is a series of 4 scripts that will affect the beginning part of the code. These codes will function to convey a message until a variable is changed. You have already coded the changes in these variables. All of the messages are said for 0.1 second.
- “How many players? Click Red for One, Green for two, Yellow for Three, or Blue for Four.”
- “Would you rather have a random code generated or imput your own? To randomly generate a code chose red. To personalize the code chose yellow.”
- "Pick colors for your custom pattern! Click space to stop the input and start guessing!” This one also has a special job of sometimes broadcasting “Player#1turn”.
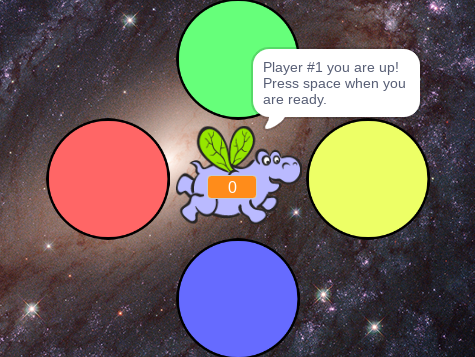
- “Player #1 you are up! Press space when you are ready.” This code will broadcast (create the broadcast) “Start competition” which will start the playing portion of the game up.
4. We will come back to the Hippo to code the rest once the rest of the code in the program is completed due to the rest of the Hippo code being for after the physical game is played.
Inside the Backdrop! / Playing the Game.
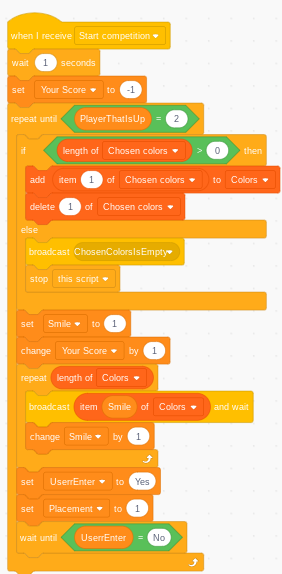
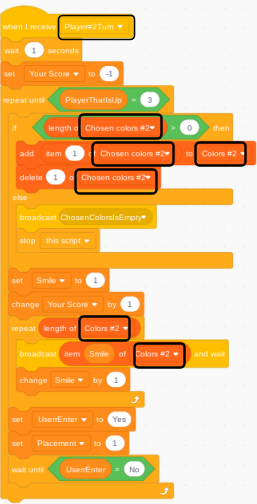
This part of the code is inside the backdrop and possibly the most complicated part of the program. This program interacts with the lists, broadcasts which color is up next, senses if the list is empty, changes the score, and determines when the code is playing and when the user is making an input. The backdrop is also the background of the game.
- Choosing the backdrop. Select “choose a backdrop” and select “Galaxy”. Make sure the galaxy is the backdrop you see.
- Due to the difficulty of the code it is best to use the image provided to copy the code. The score functions in this code reset the score (the -1 is needed), and everytime the user gets the combination correct, the score increases by 1. The repeat until allows the program to repeat until it is the next player's turn. The if “Chosen colors” > 0 sees if there are any more numbers left that the player has not yet used. There almost always is, and so the first number of “Chosen colors” is moved to “Colors” before being deleted from “Chosen colors”. In the event that there are no more numbers left that the player has not used, the message (new message) ”ChosenColorsIsEmpty” will be broadcasted and this script stopped. The variable “Smile” is both a reminder to smile, and is used to read back all of the items inside of “color” and broadcast them in order. After the broadcasts are complete, the variable “Userrenter” will be changed to yes to allow the user to input their response. The code will then wait until “Userrenter” is changed to no from a different part of the program.
- Duplication and replacing. Duplicate the last code 4 times. The next step is changing which lists are interacted with. Choose one of the duplicated scripts and replace all of the places with “Chosen colors” to “Chosen colors #2”, everywhere with “Colors” to “Colors #2” and message “Start competition” to message “Player#2Turn”. Choose the second of the duplicated scripts and replace all of the places with “Chosen colors” to “Chosen colors #3”, everywhere with “Colors” to “Colors #3” and and message “Start competition” to message “Player#3Turn”. Then finally take the final duplicated scripts and replace all of the places with “Chosen colors” to “Chosen colors #4”, everywhere with “Colors” to “Colors #4”, and message “Start competition” to message “Player#4Turn”. The visable replacements can be sceen in the boxed-in parts of the image.
The Circles/Colors.
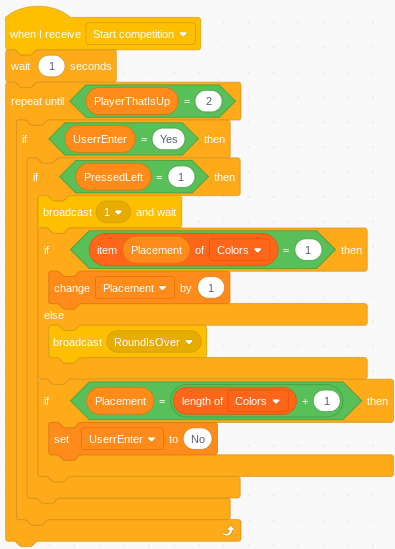
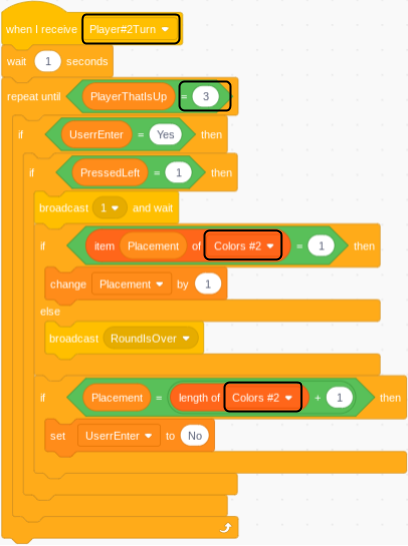

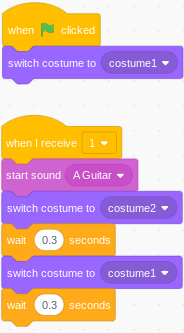

The circles represent the different colors (red, green, yellow, and blue). You will start with making the red one and will later duplicate everything in the red to make the other three.
- Creating the sprite. Hover over choose a sprite and select paint. Name the sprite “Red (1)”. Use the circle tool to make a circle as circular as possible. Change the outline to 4 thickness. Change the fill to a darkish red using the colors. Once that is done, duplicate costume1 to make costume2. Select the circle in costume2 and lower the saturation to make the color lighter. Result should look like this:
- Make it so when the code starts, the costume shown will be costume1. Next make it so whenever message “1” is received a sound is played and the costume is changed to costume2 for 0.3 seconds before switching back to costume1 and having a wait for 0.3 seconds. To get the sound, go to sound, press choose a sound, and search up guitar. Use the sound “A Guitar”.
- This piece of code is the circle’s reaction to being told that its color is up next. This code is started by the broadcast “Start competition”. The code will repeat until it is the next player's turn using the variable “PlayerThatIsUp”. The variable “UserrEnter” senses if it is the users turn to submit the combination or they are still being shown the code. The variable “PressedLeft” senses if the left key is pressed. The broadcast “1” will wait for the sprite to finish blinking. The combination of the list “colors” and the variable “Placement” detects if the number that the player was supposed to input was 1. If it was meant to be 1 then the variable “placement” will be changed by 1 in order to progress through the list. If the number was not meant to be 1, then the broadcast “RoundIsOver” signifies that the person messed up. The next If statement senses if the player has imputed all the numbers that they have been shown so far. After just being changed by 1, the variable “Placement” is compared to the length of List “Colors” + 1. This senses if the value of Placement is greater than the list. In the event that the values are not equal, then nothing happens. However, if the variable “Placement” is equal to the length of List “Colors” + 1 then the variable “UserrEnter” is changed to No to not allow the player to input any more responses.
- The last script is then duplicated 3 times and each one is changed. No changes are made to the original script.
- In the first duplicate, change the broadcast to “Player#2Turn”, the number next to variable “PlayerThatIsUp” changes to 3. Wherever the List “Color” is shown it changes to “Colors #2”
- In the second duplicate, change the broadcast to “Player#3Turn”, the number next to variable “PlayerThatIsUp” changes to 4. Wherever the List “Color” is shown it changes to “Colors #3”
- In the third duplicate, change the broadcast to “Player#4Turn”, the number next to variable “PlayerThatIsUp” changes to 5. Wherever the List “Color” is shown it changes to “Colors #4”
- When (new broadcast) “Game Over!” is received, stop other scripts in the sprite.
Duplicating / Creating Other Colors
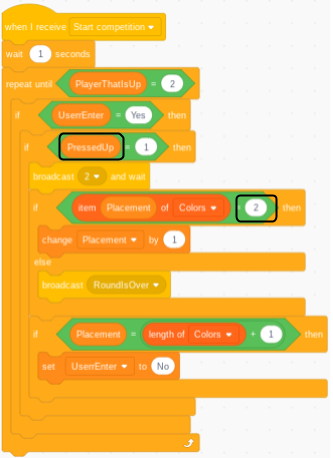


- Duplicate the “Red (1)” Sprite 3 times. Name the duplicates “Green (2)”, “Blue (3)”, and “Yellow (4)”. Go into costumes and change the color of the circles to correspond to the sprites name.
- Changes to the code. Use the script shown and replace all of the “PressedLeft” variables to correspond to the color. In the “Green (2)”, change it to variable “PressedUp”, in the “Yellow (3)”, change it to variable “PressedRight”, in the “Blue (4)”, change it to variable “PressedDown”. In the other marked number placement, change the “Green (2)” to 2, the “Yellow (3) to 3, and the “Green (4)” to 4. Do these changes for all the other codes that start with broadcasts, “Player#2Turn”, “Player#3Turn”, or “Player#4Turn”.
Final Aesthetic
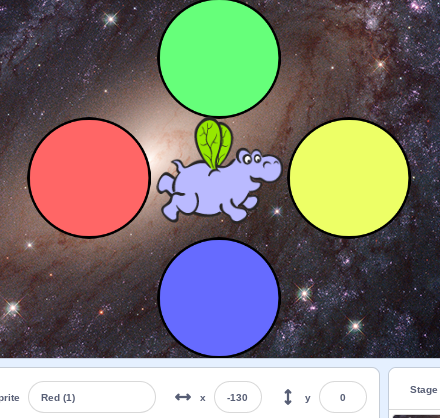

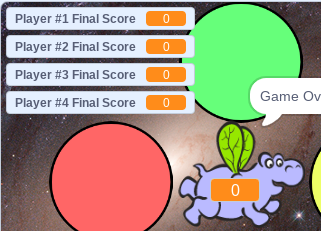
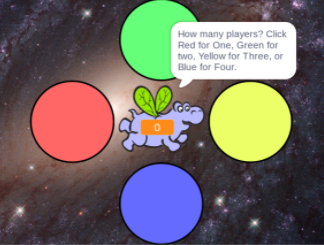
- Position the 4 circles around the circle as shown in the image. The red coordinates are (-130,0), the Green coordinates are (0,130), the Yellow coordinates are (130,0), the Blue coordinates are (0,-130).
- Show “Your Score” variable and make it a large read out. Place in the center of the Hippo.
- Making the other variable that will be shown look good. Show the variables “Player #1 Final Score”, “Player #2 Final Score”, “Player #3 Final Score”, “Player #4 Final Score” arrange them as shown in the image provided and then hide them again.
End of Hippo Code!
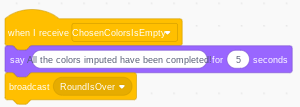
- If the Hippo receives the message “ChosenColorsIsEmpty”, say “All the colors imputed have been completed!” for 5 seconds and broadcast “RoundIsOver”
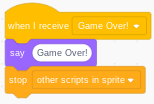
- When the Hippo receives the message “Game Over!” they will say “Game Over!” forever and other scripts in the code will stop.
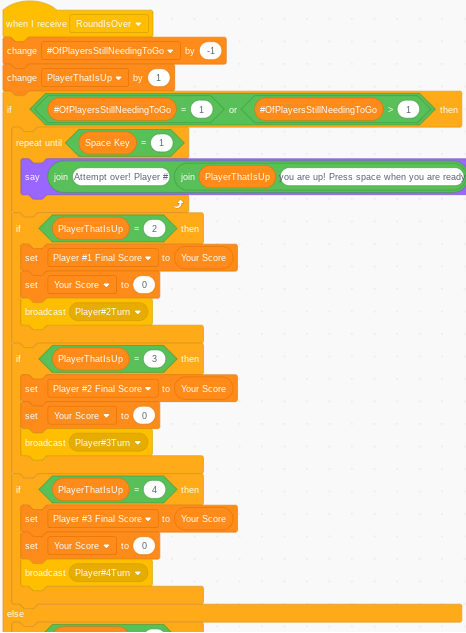
- This script will be in two parts because it is essentially made up of two separate circumstances. This code is triggered when the broadcast “RoundIsOver” is received. The variable “#OfPlayersStillNeedingToGo” is changed by -1 to signify the amount of players who haven't gone yet. The variable “PlayerThatIsUp” is changed by 1 to signify which player is now up. The if statement then detects if the number of players still needing to go is equal or greater than 1. If there is no one left to go, the code will run the If Else section which will be coded after this part. But if there are still 1 or more players remaining, then the Hippo will say “Attempt over! Player #” variable “PlayerThatIsUp” “ you are up! Press space when you are ready.” This tells the players whose turn it is now until that player is ready and they press the Space Key. The next If Statement will sense whose turn it is using the variable “PlayerThatIsUp” and will update the variables that represent the final score of the last player who went. After the score is saved, the visible score resets and the broadcast will allow the next player to start playing. Depending on which player is up, the code will broadcast either “Player#2Turn”, “Player#3Turn”, or “Player#4Turn”.
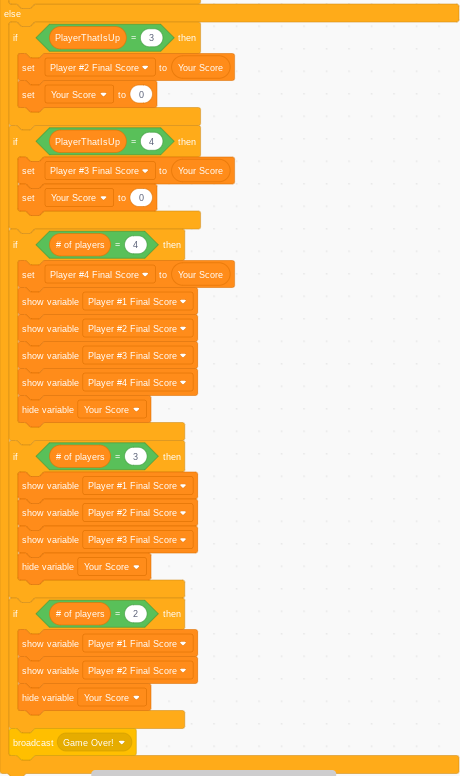
- The second part is for what happens when every player has gone. The main purpose of this code is to display the final score for the player/players. This code allows you to show the final scores of all the players as well as update the final score for the last player that went. Use the image provided for the different variables:
Making the Physical Game!
Now that you have finally finished the scratch program it is time to start making the physical part of your program. The steps of building will also be grouped into smaller groups.
Preparing the Cardboard
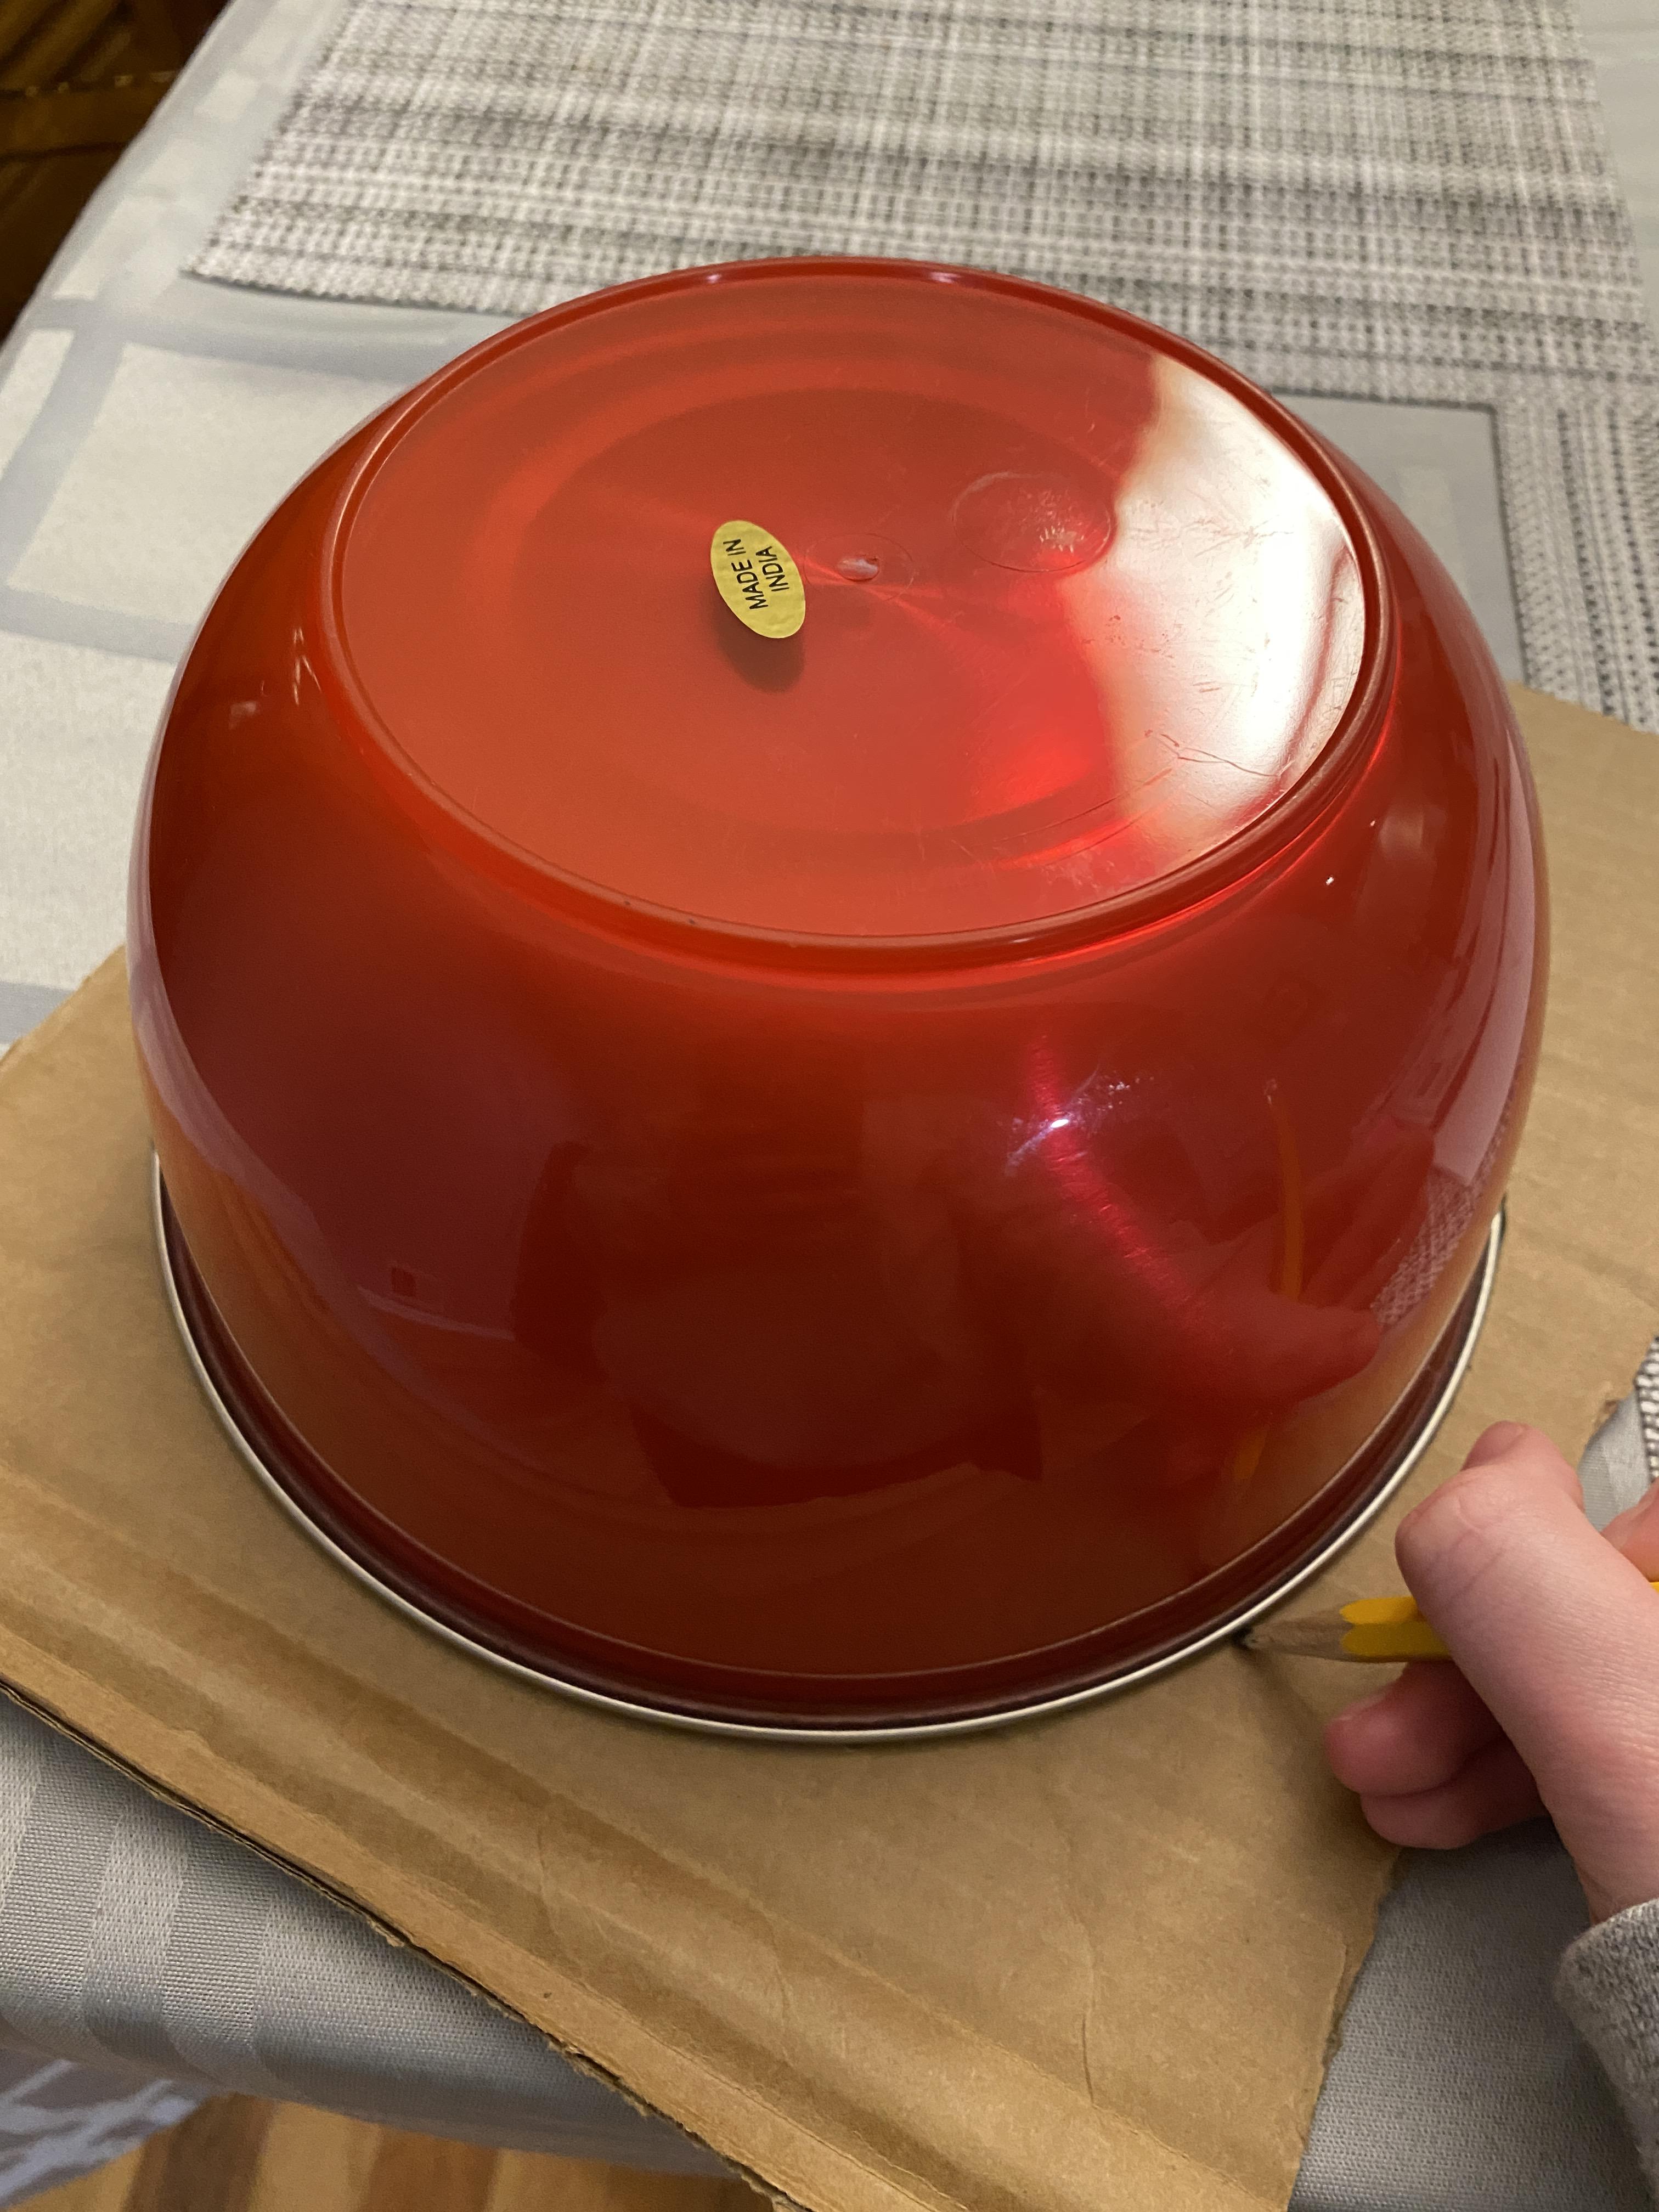
- Take the piece of cardboard and the large bowl. Flip the large bowl over so the large opening is touching the cardboard
- Take a pencil and trace the outside of the bowl on the cardboard.
- WARNING, parent assistance recommended for this step. Take the box cutter (or razor blade) and cut out the circle in the piece of cardboard. Do this step on top of a surface that you don't mind accidentally cutting.
The White Base
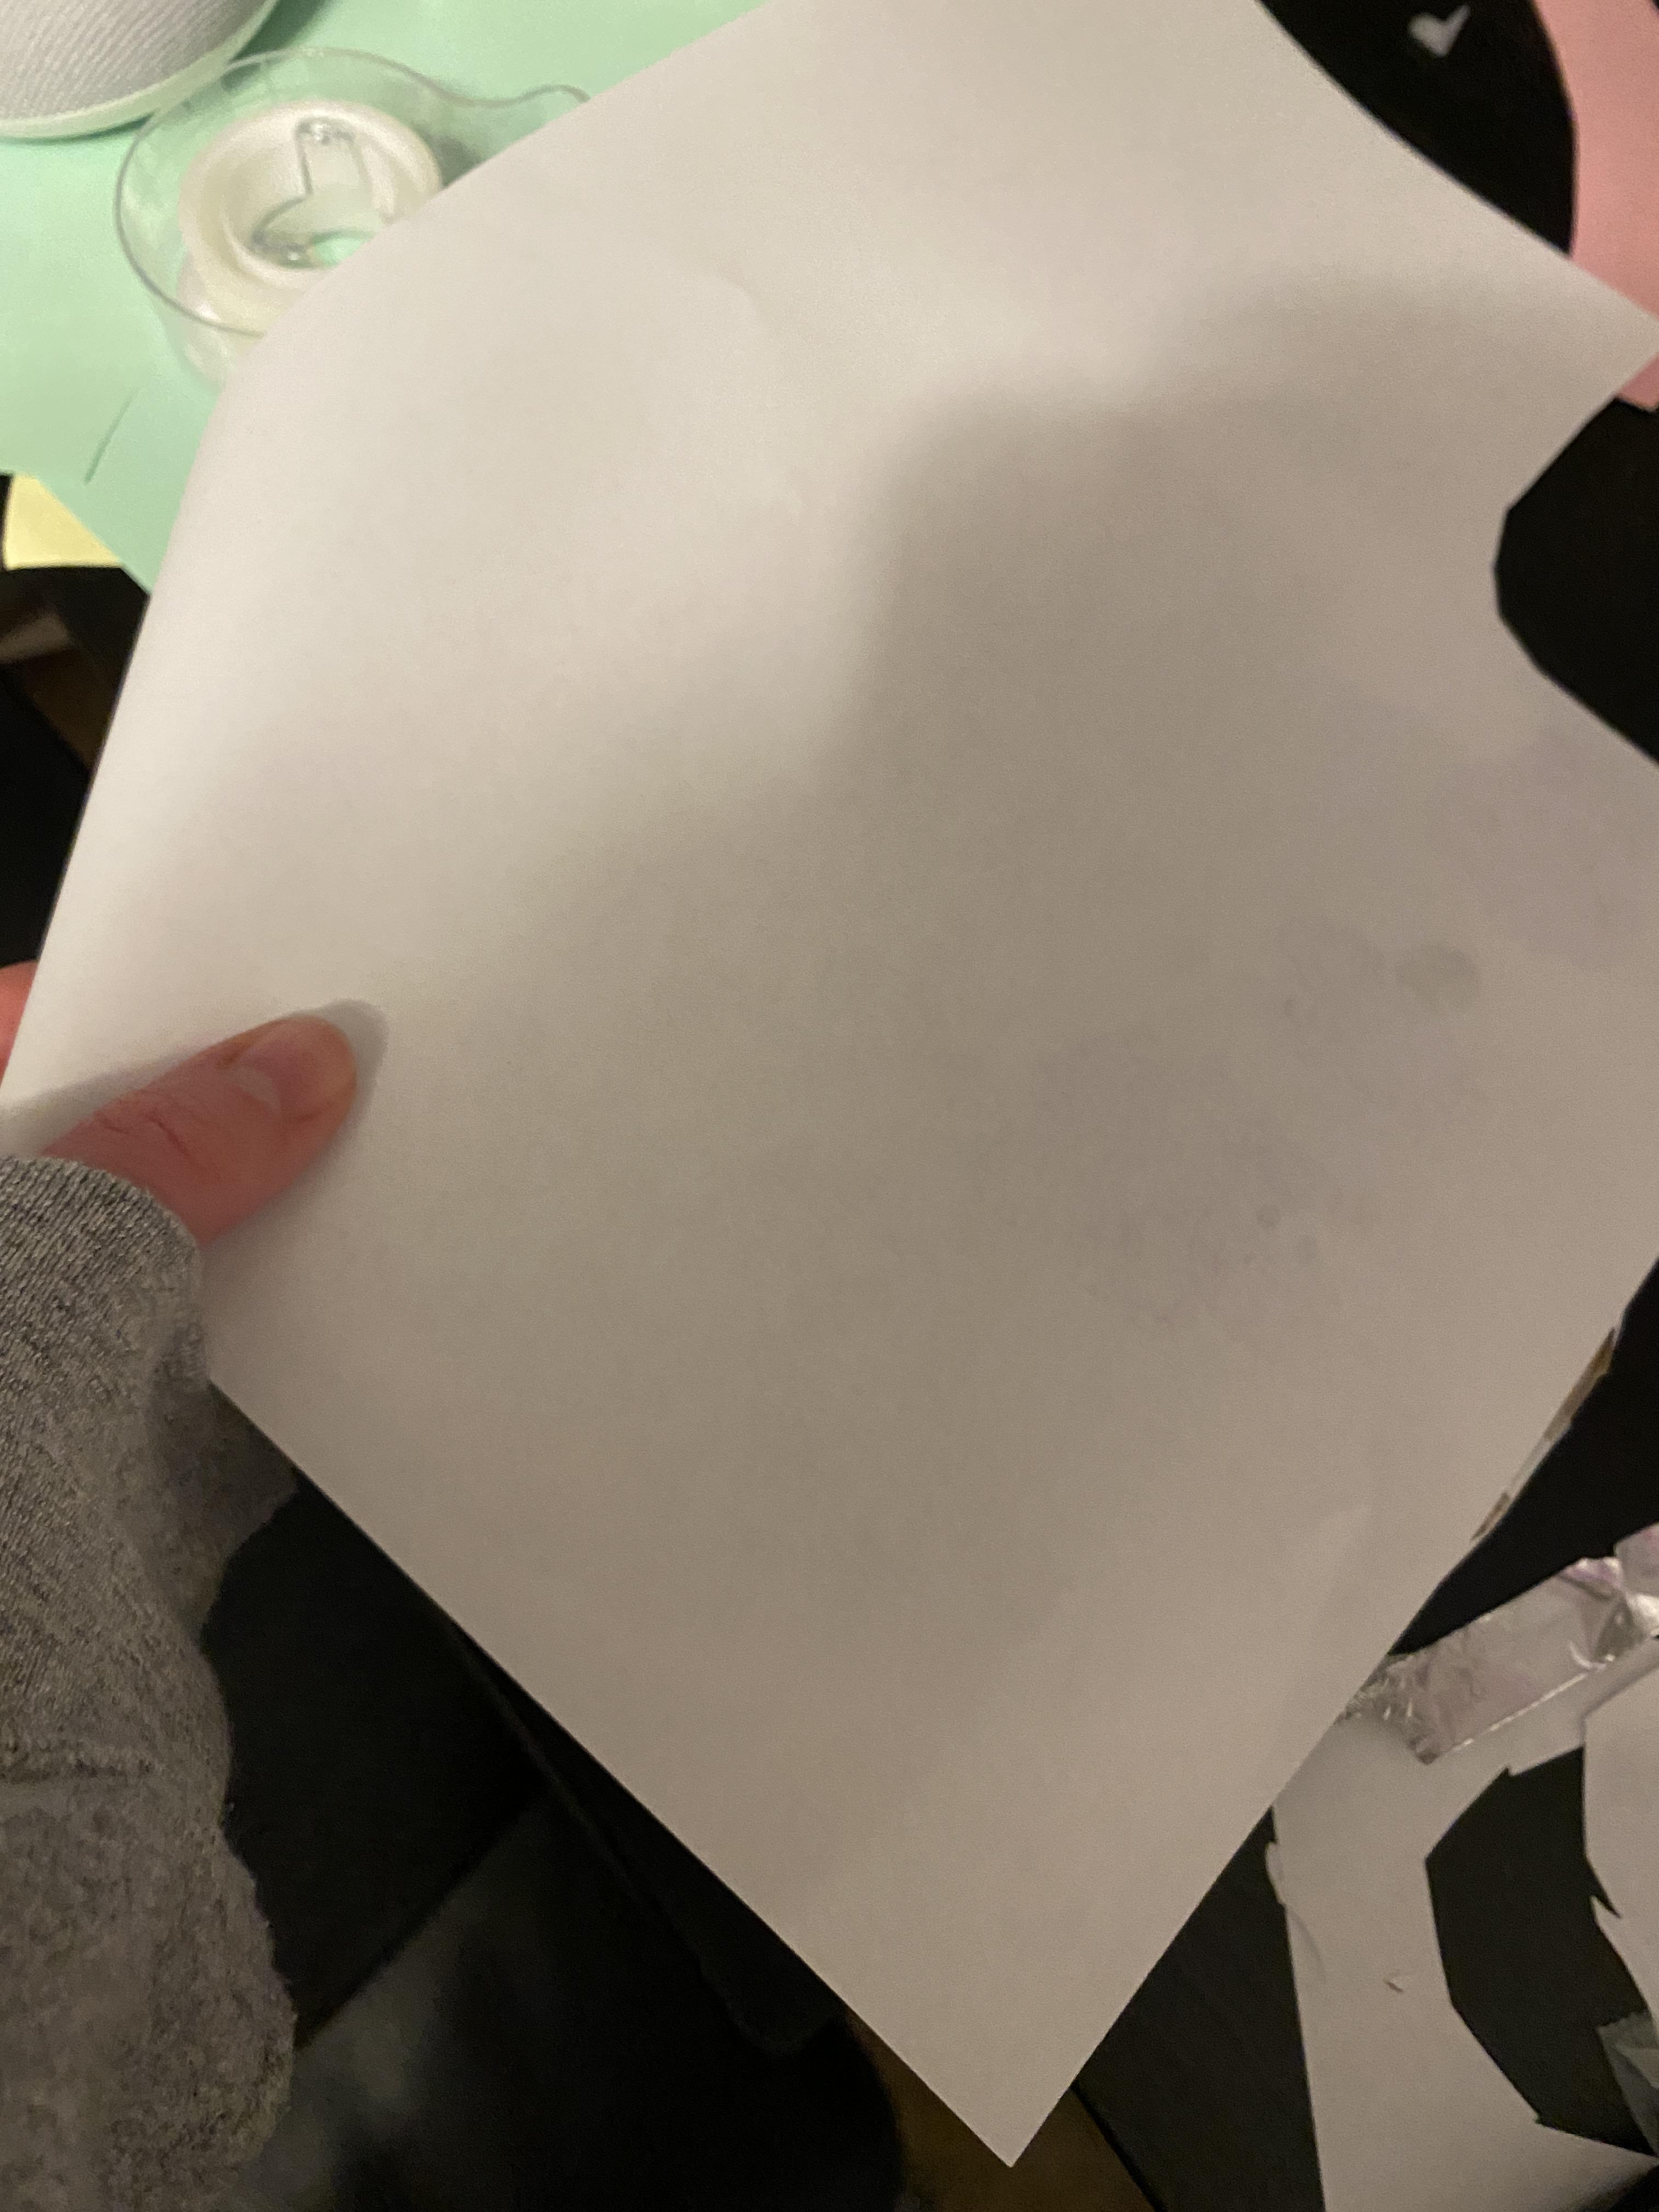
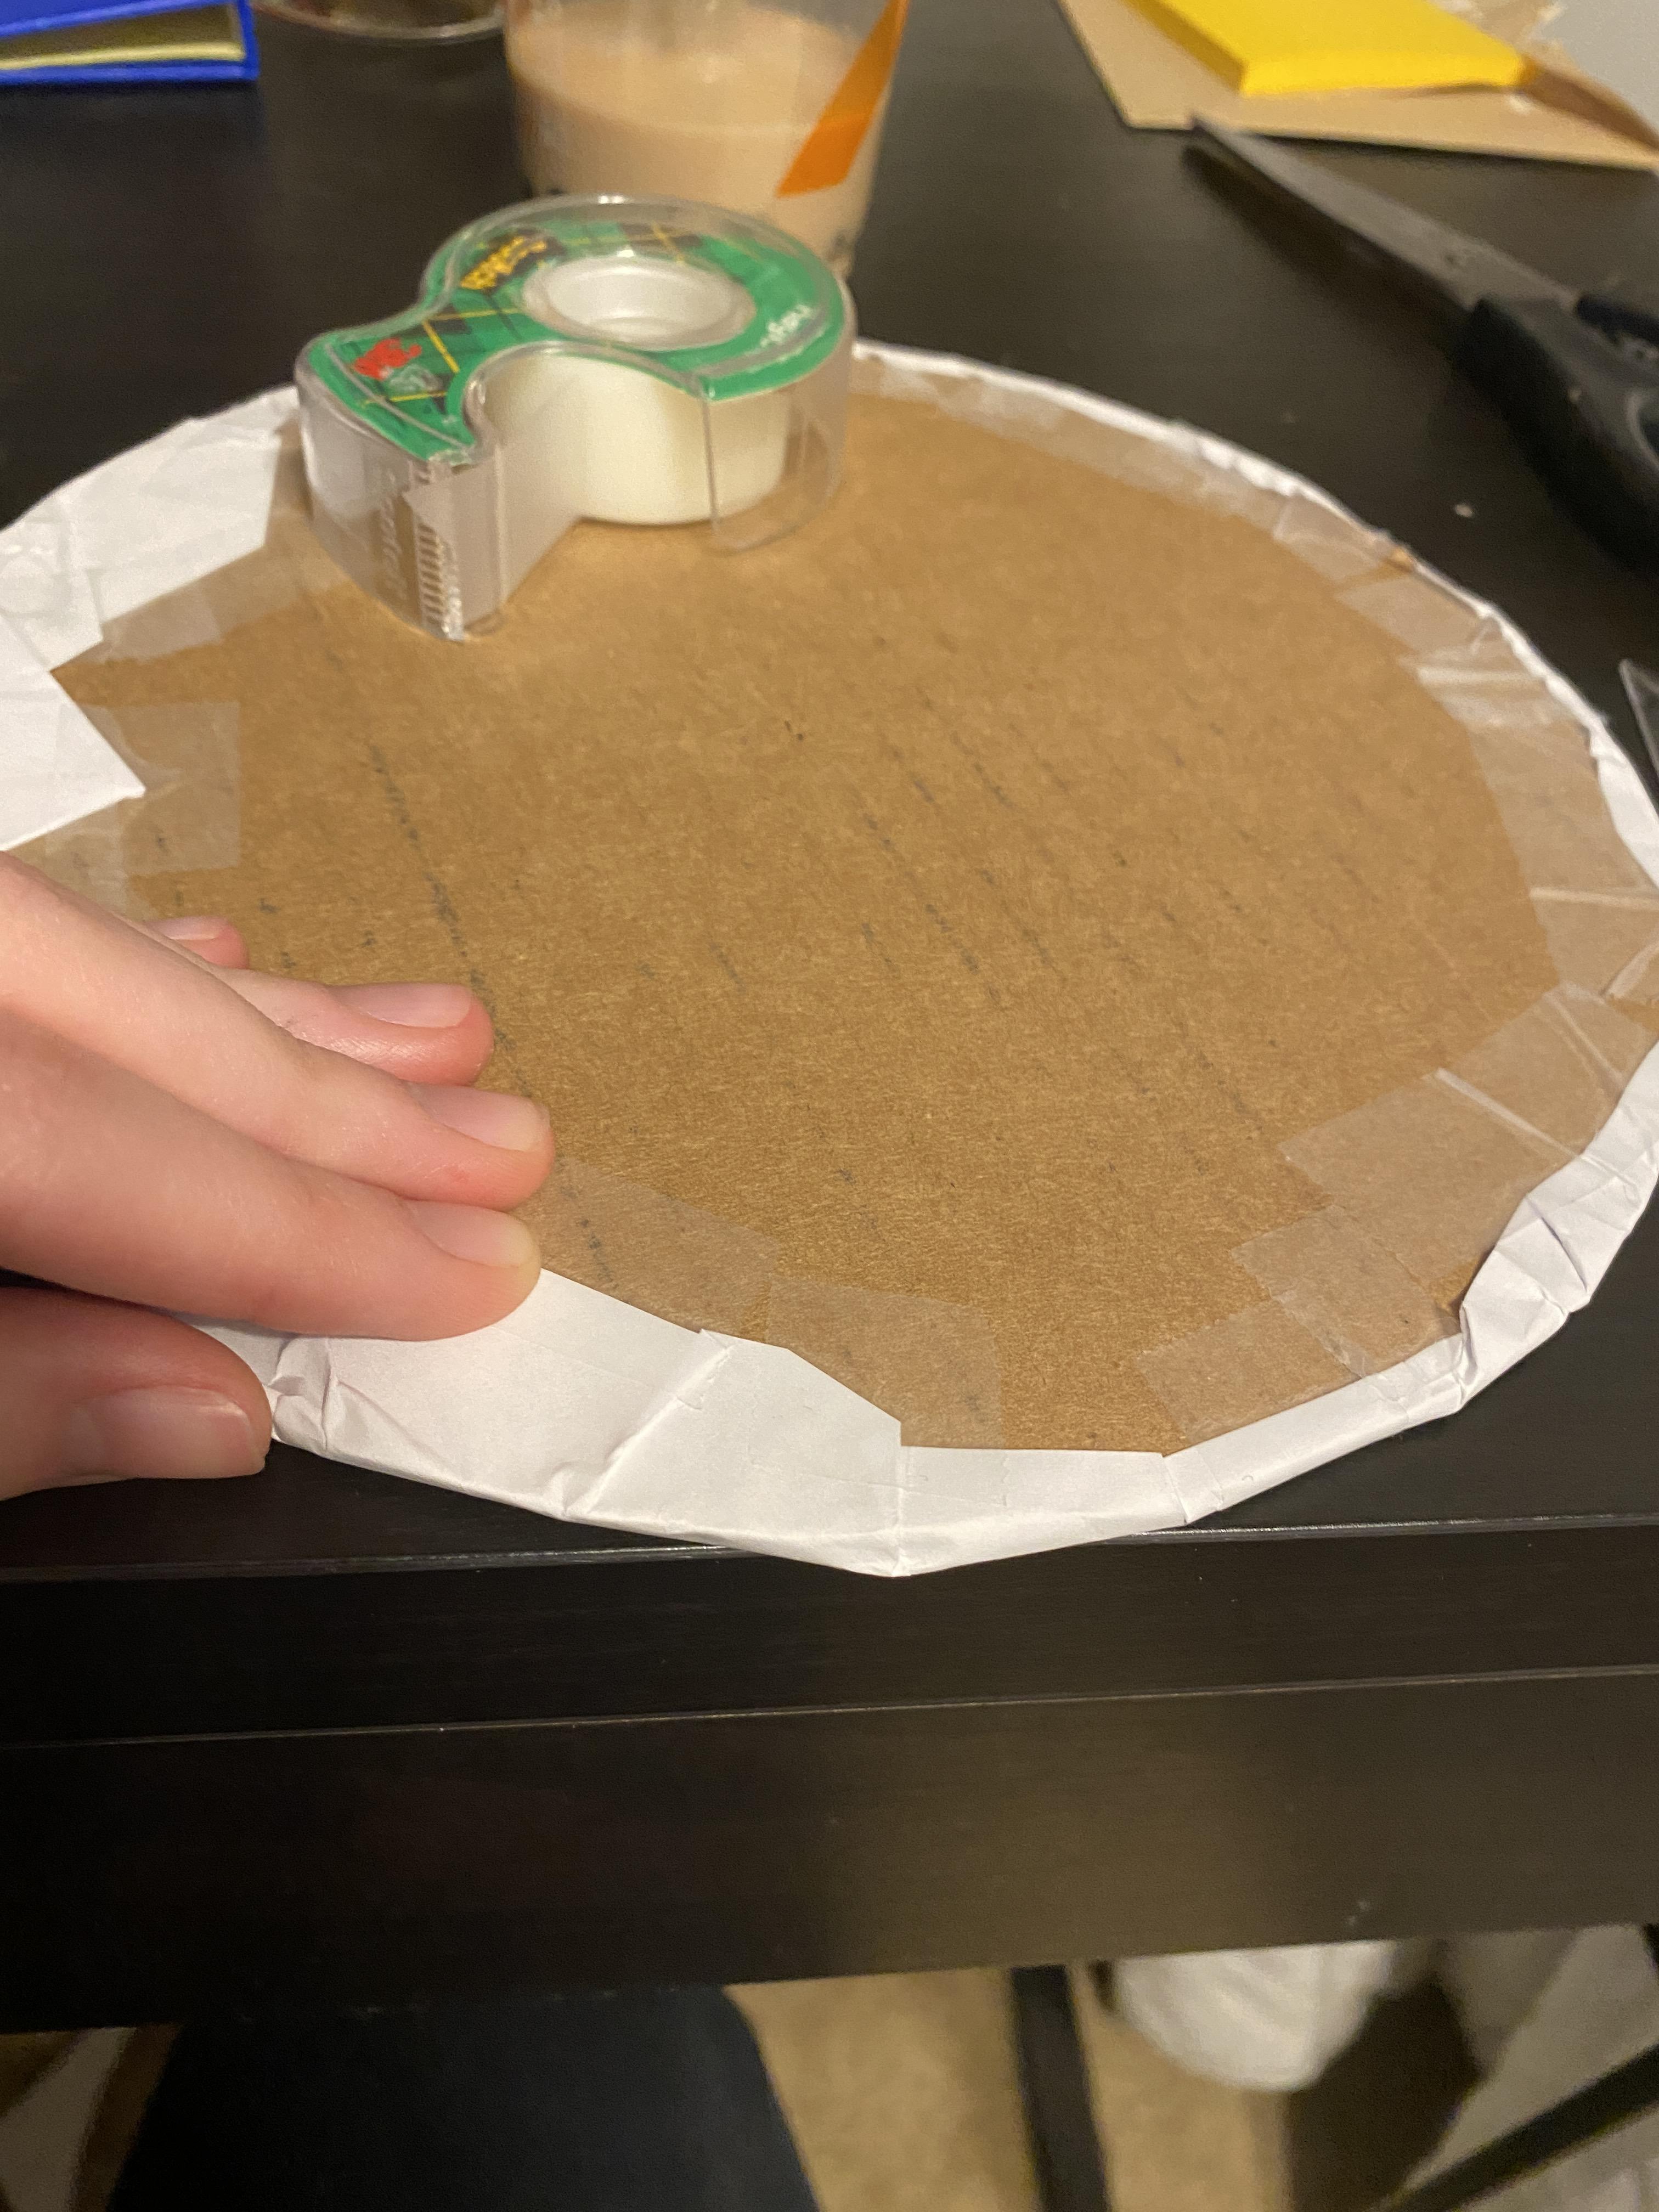
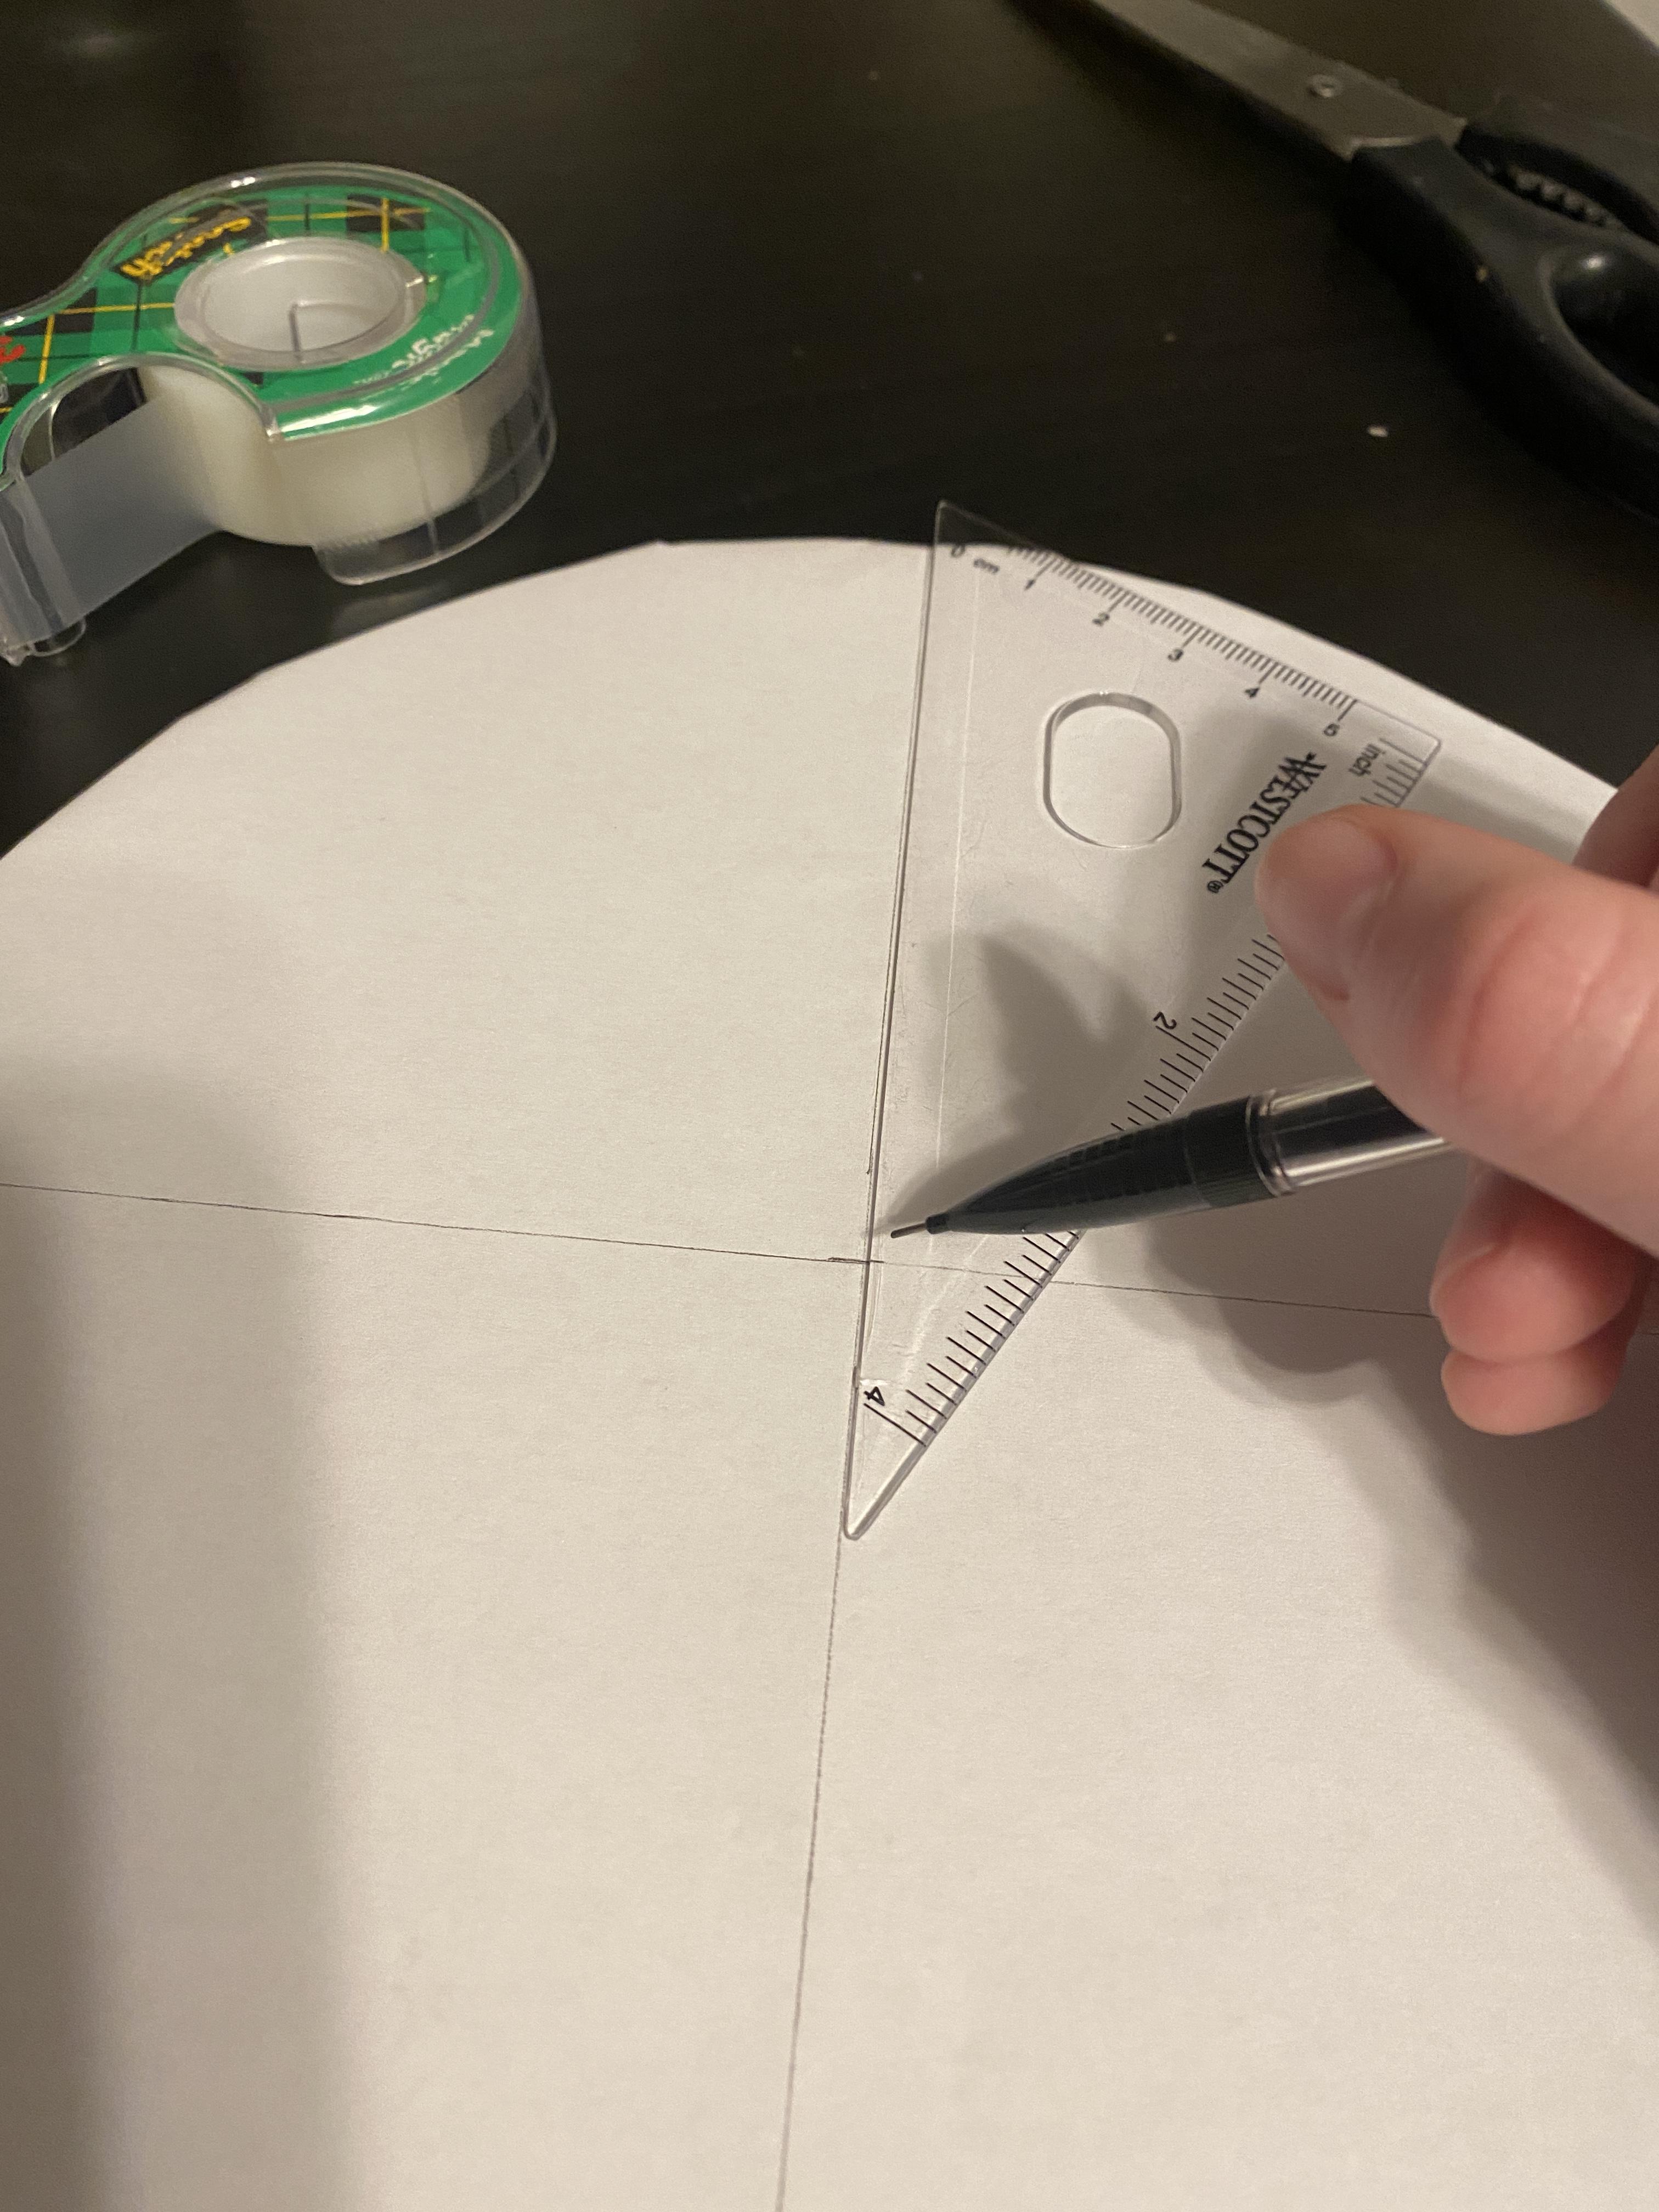
4. Take the piece of white paper and place it on top of the piece of cardboard.
5. Bend the piece of white paper to wrap around the top and sides of the cardboard. Use tape to tape down the paper and secure the ends of the paper to the bottom of the cardboard. Use scissors to excess paper that does not fit comfortably under the cardboard. While doing this you will likely have to bend some parts of the paper, just make sure the bending happens on the bottom of the cardboard. It is okay to use an excess amount of tape, for aesthetic reasons try to avoid putting tape on the sides.
6. Take the straight edge and the pencil and draw two lines to form a “+” on the cardboard. This will mark the separate quadrants so try to make the different quarters as even as possible, however it is okay to be slightly off. Make sure the center of the “+” is as center as possible as it will be the permanent center of the project. It is also okay to erase the lines if they are off, as most of the top part will be covered by other pieces of paper anyway.
Cutting Out the Colored Paper
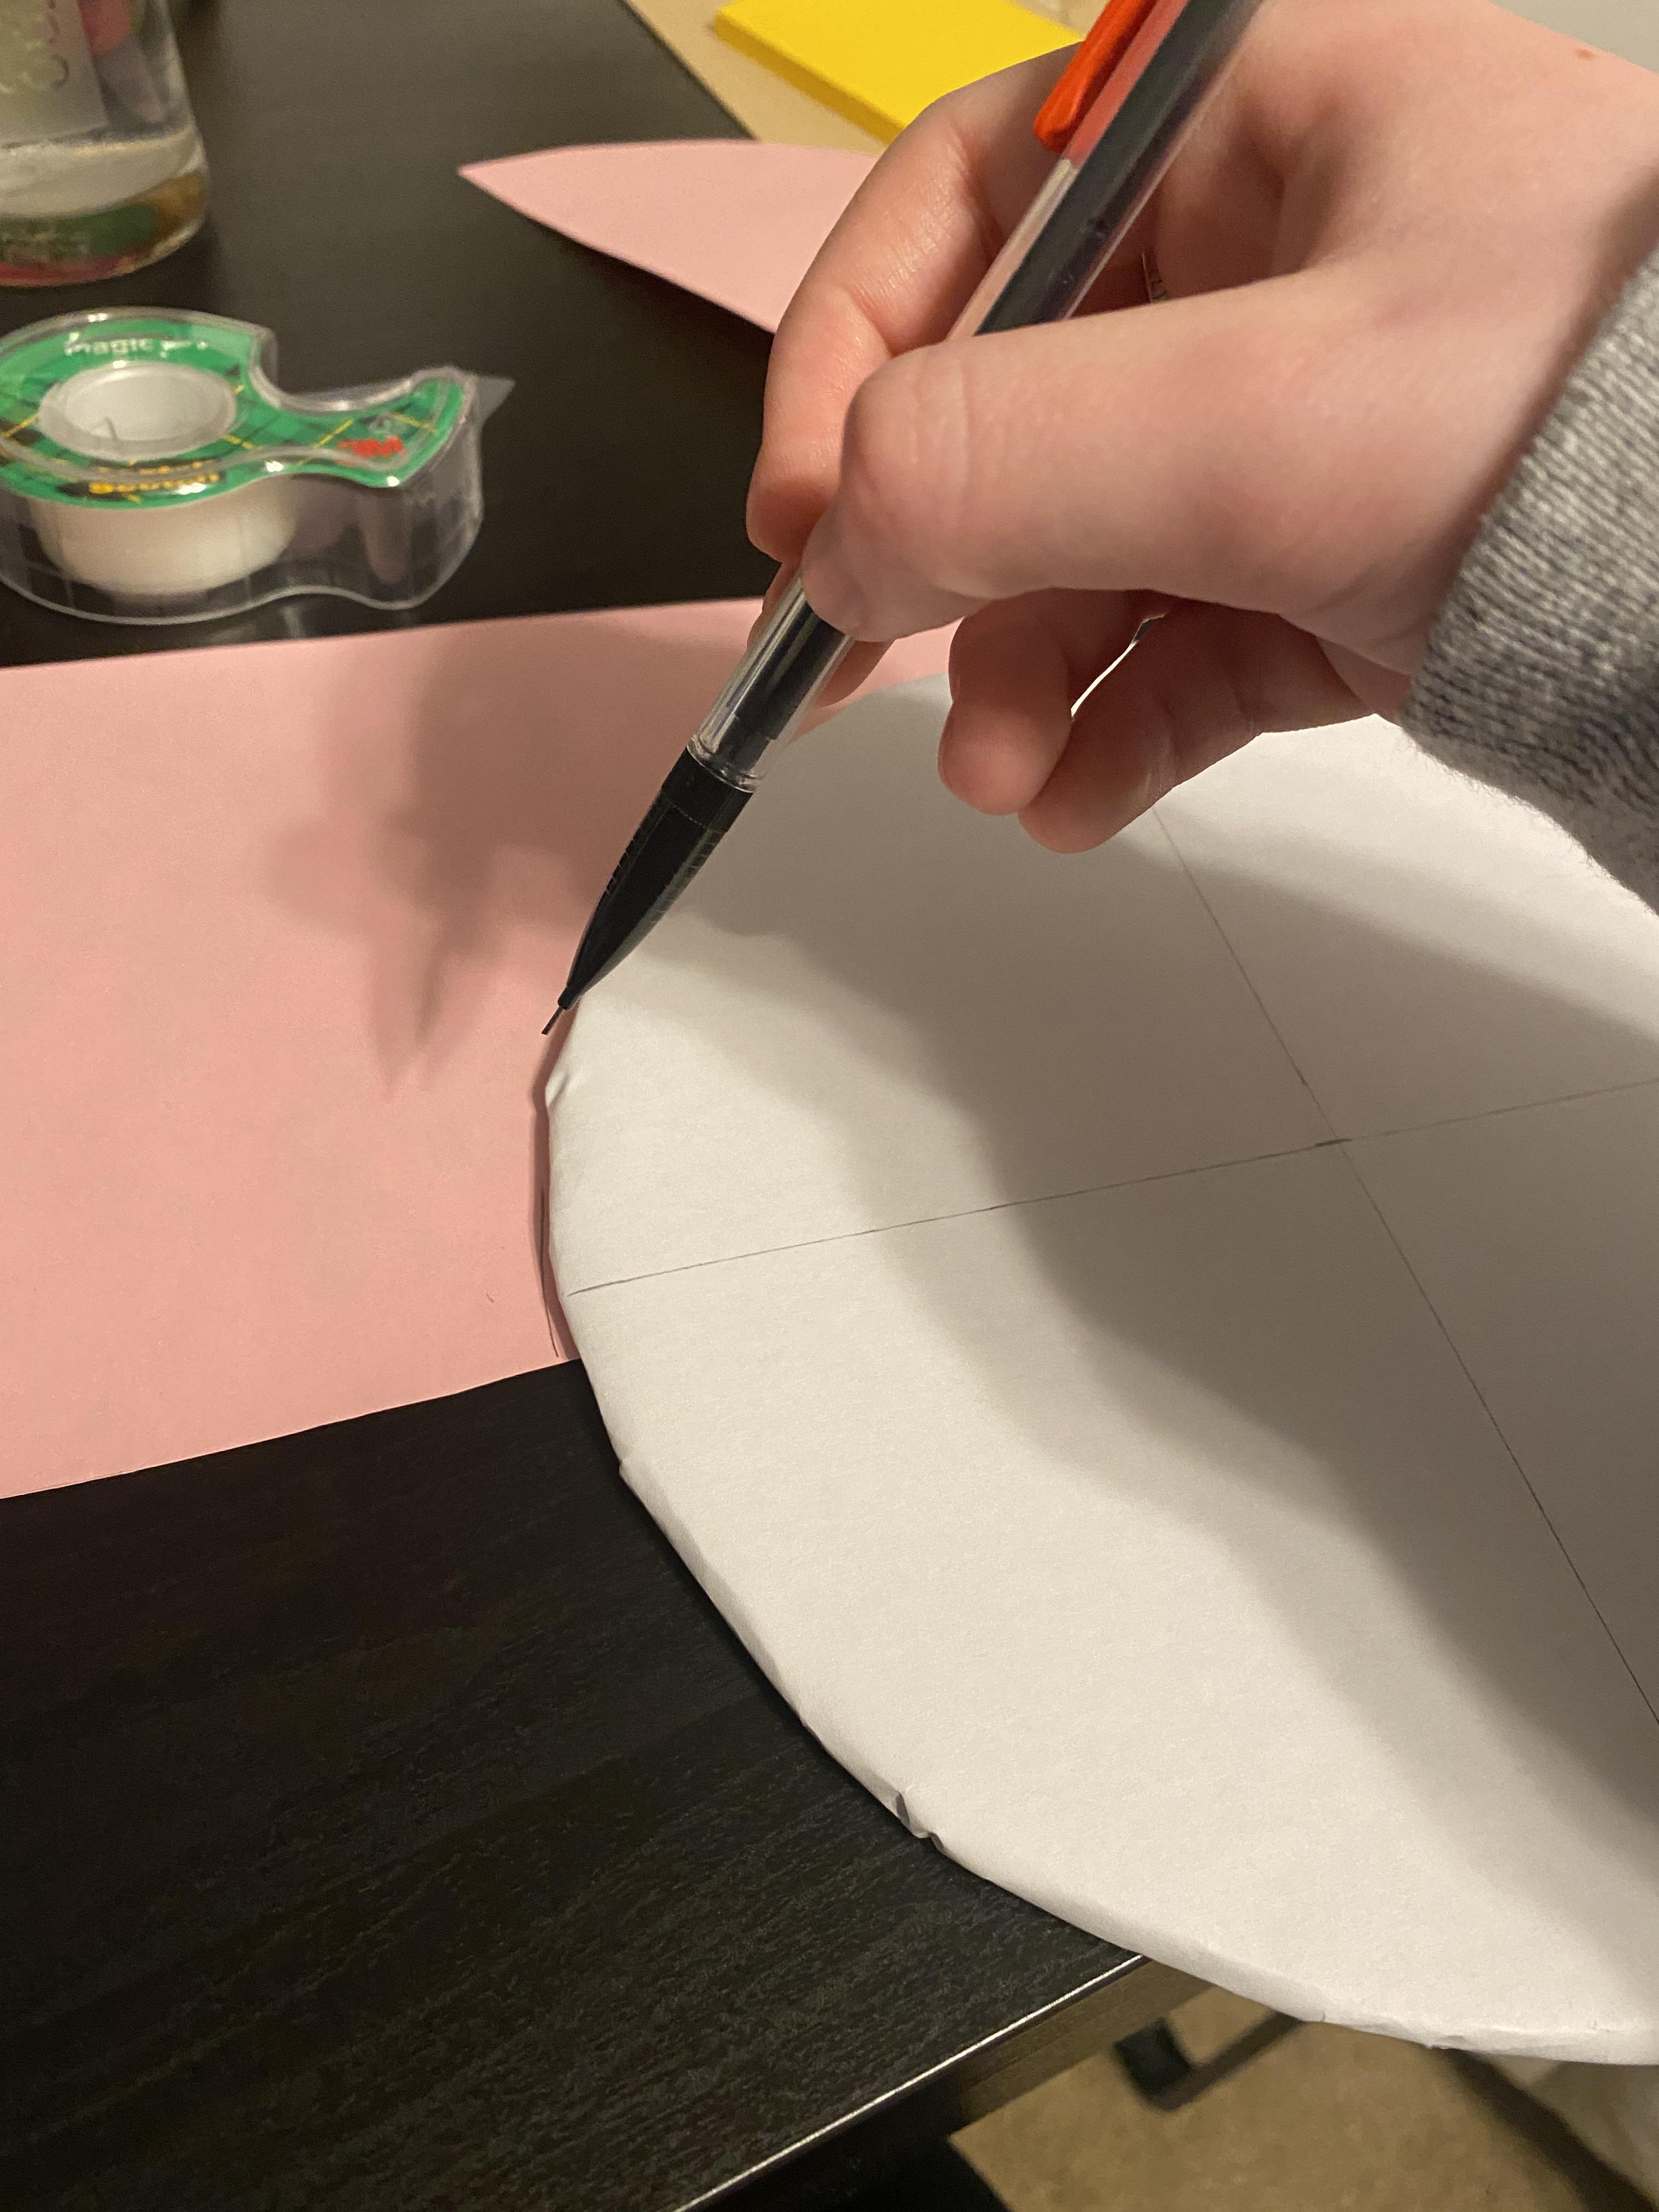
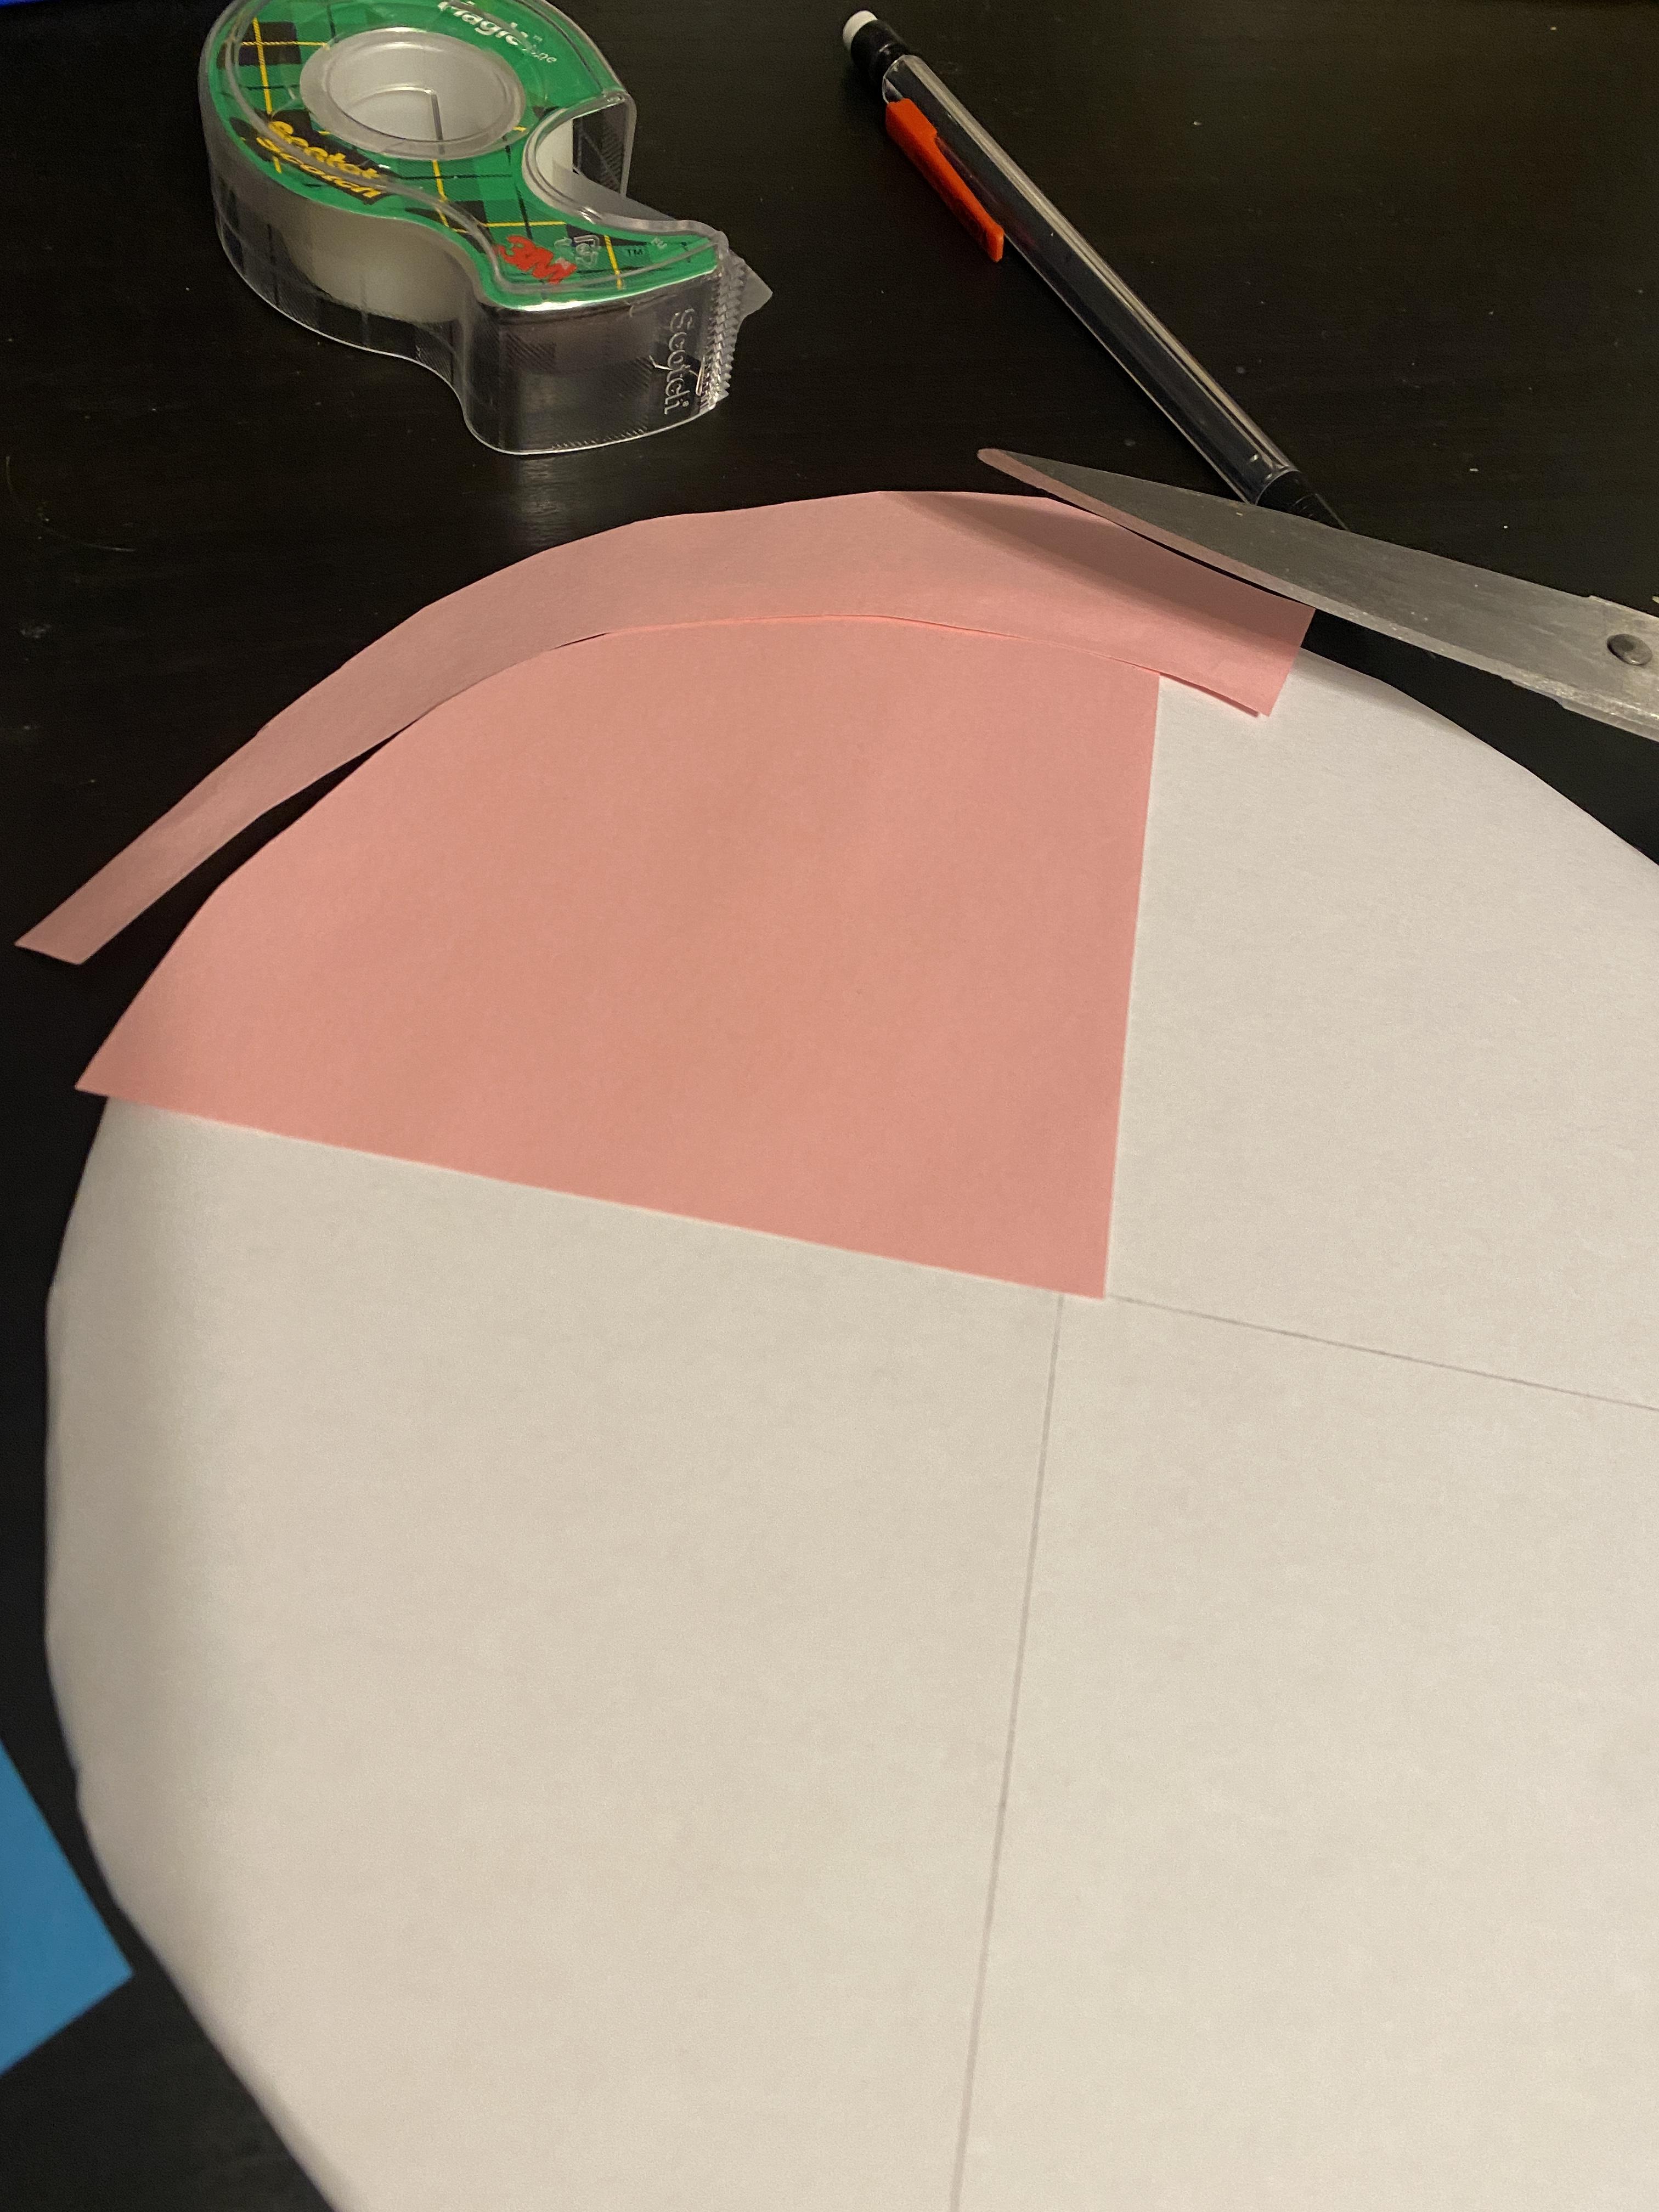
7. Take the red piece of paper and position the paper so the corner is touching the corner in the center and covers one of the quadrants.
8. Move the red paper to the underside of the cardboard and use the edge of the cardboard to trace a round shape on the paper underneath.
9. Carefully cut the red paper along the pencil mark.
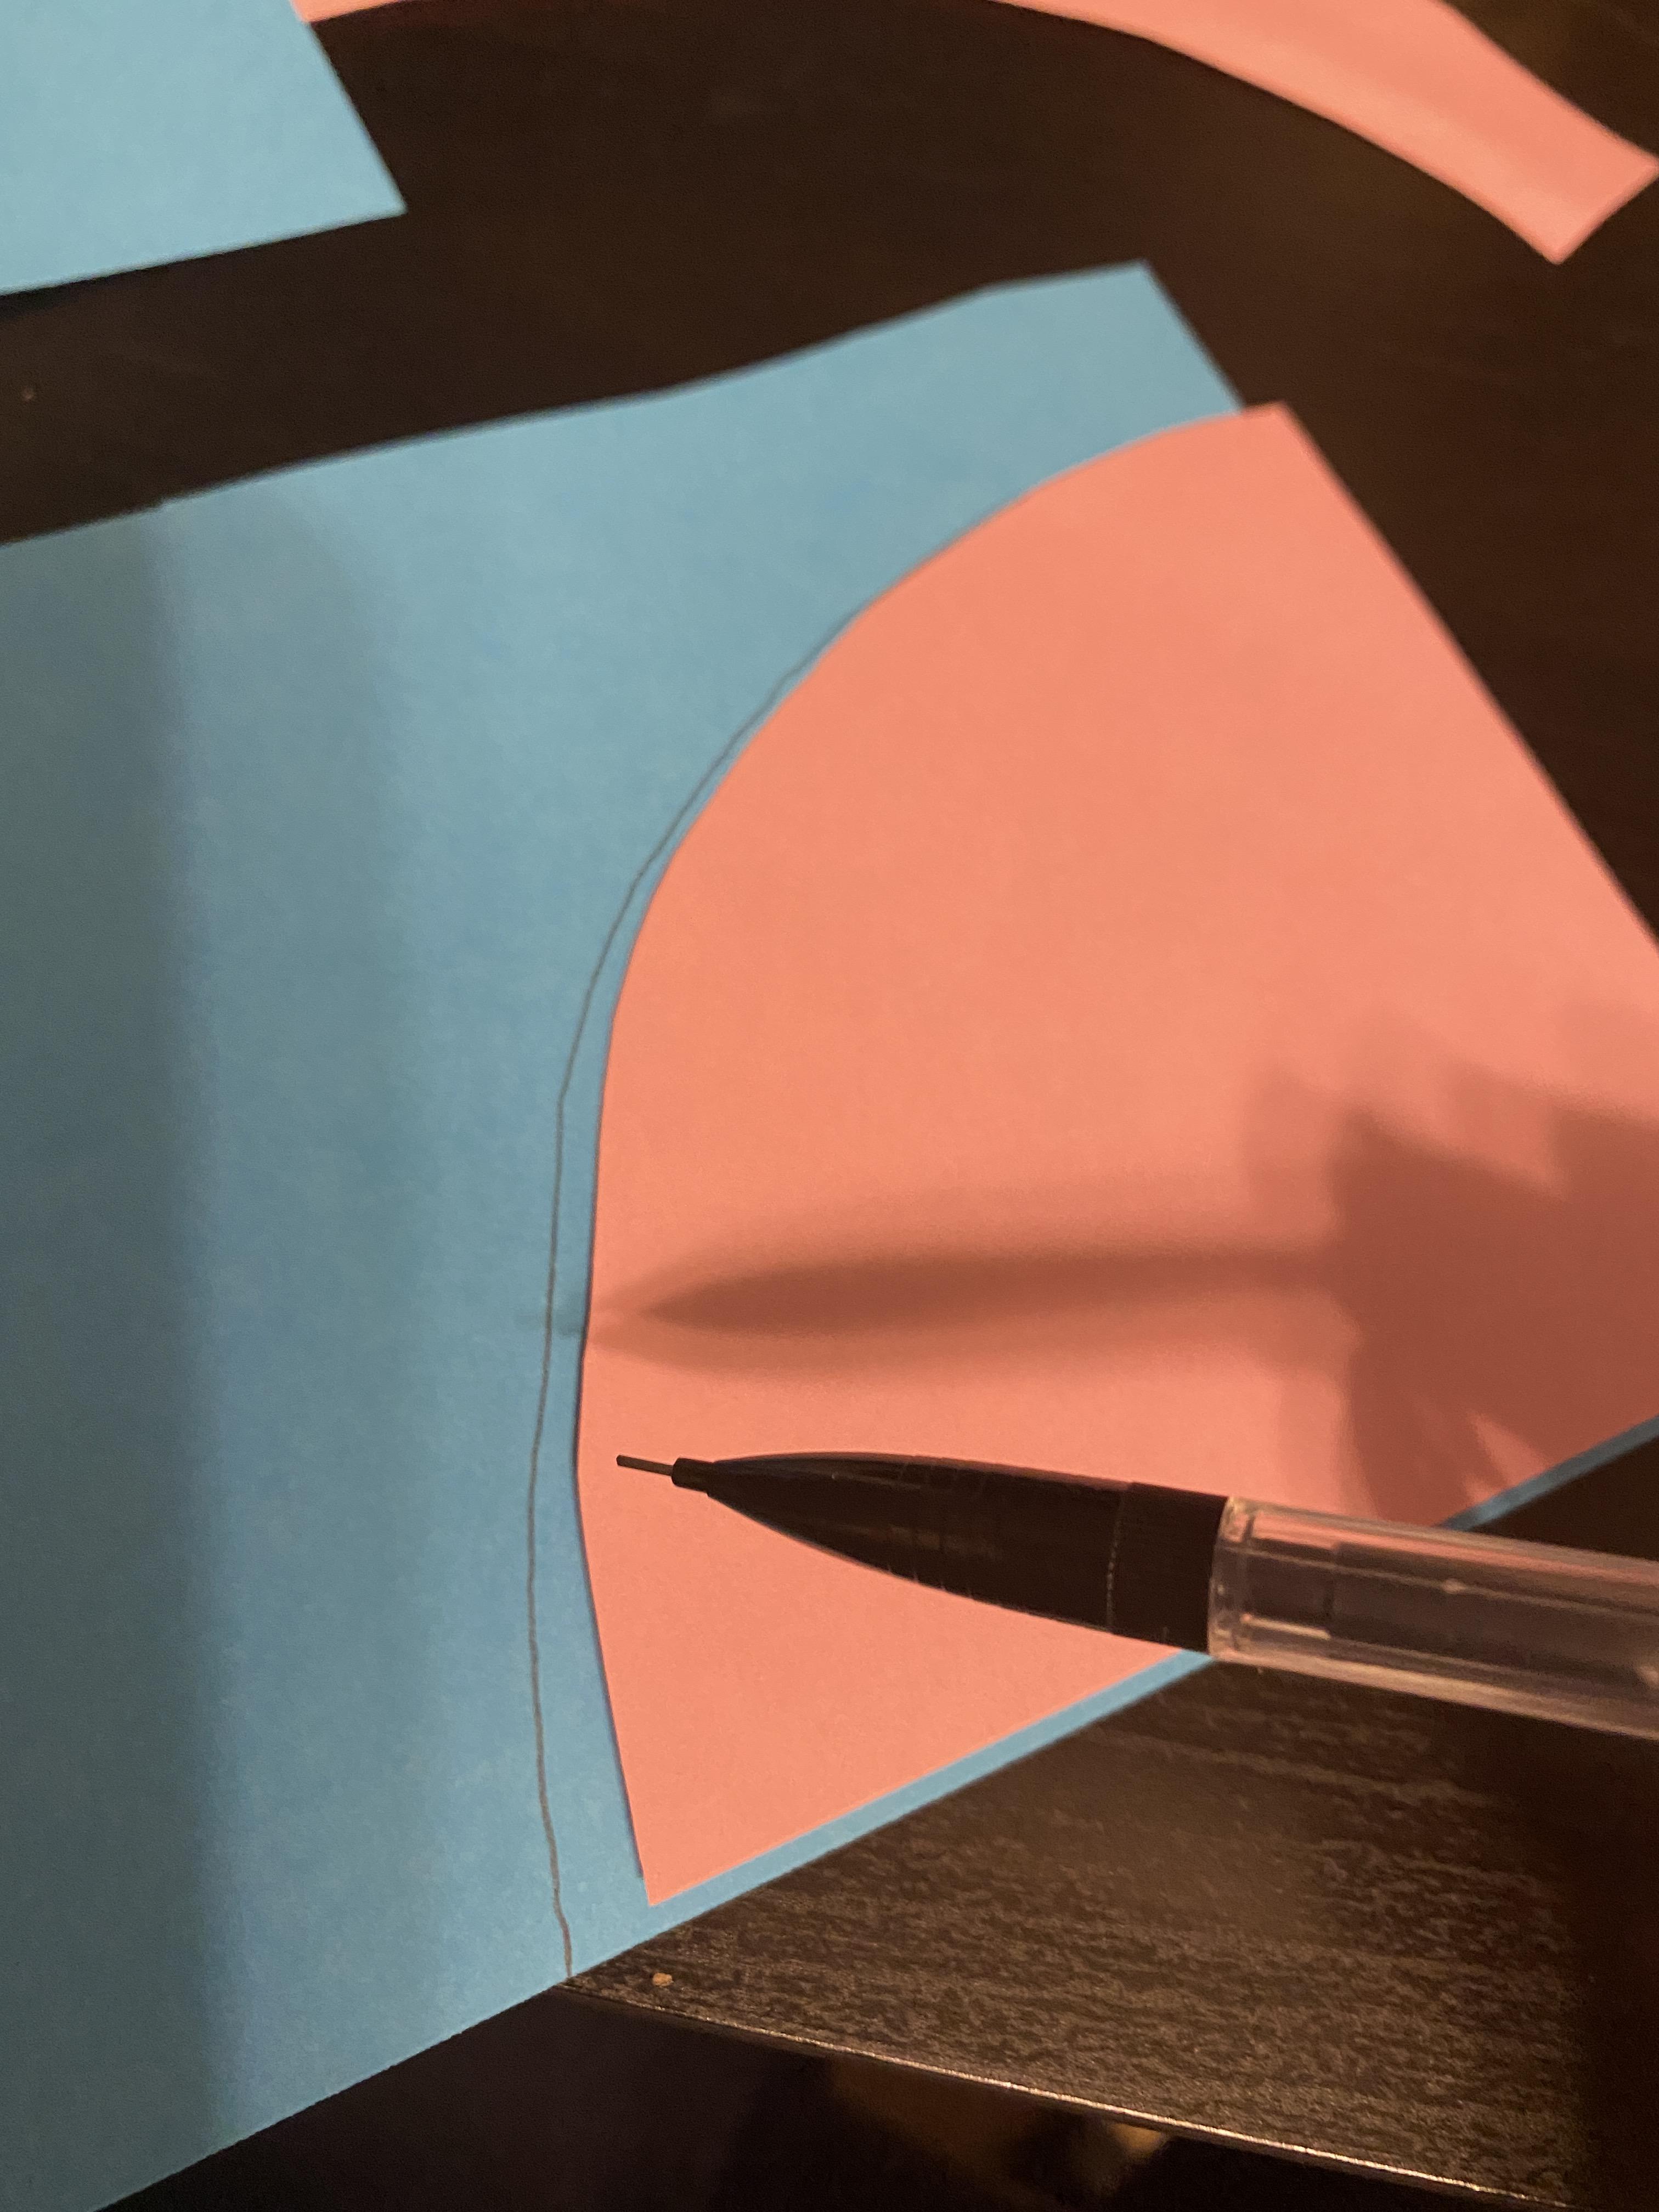
10. Now take the red piece and place it on top of the blue paper and line up the corner. Trace the red paper onto the blue paper. Cut out the blue paper. Repeat this with the green and yellow papers, using the red one as the tracer.
Attaching the Colored Paper to the Cardboard
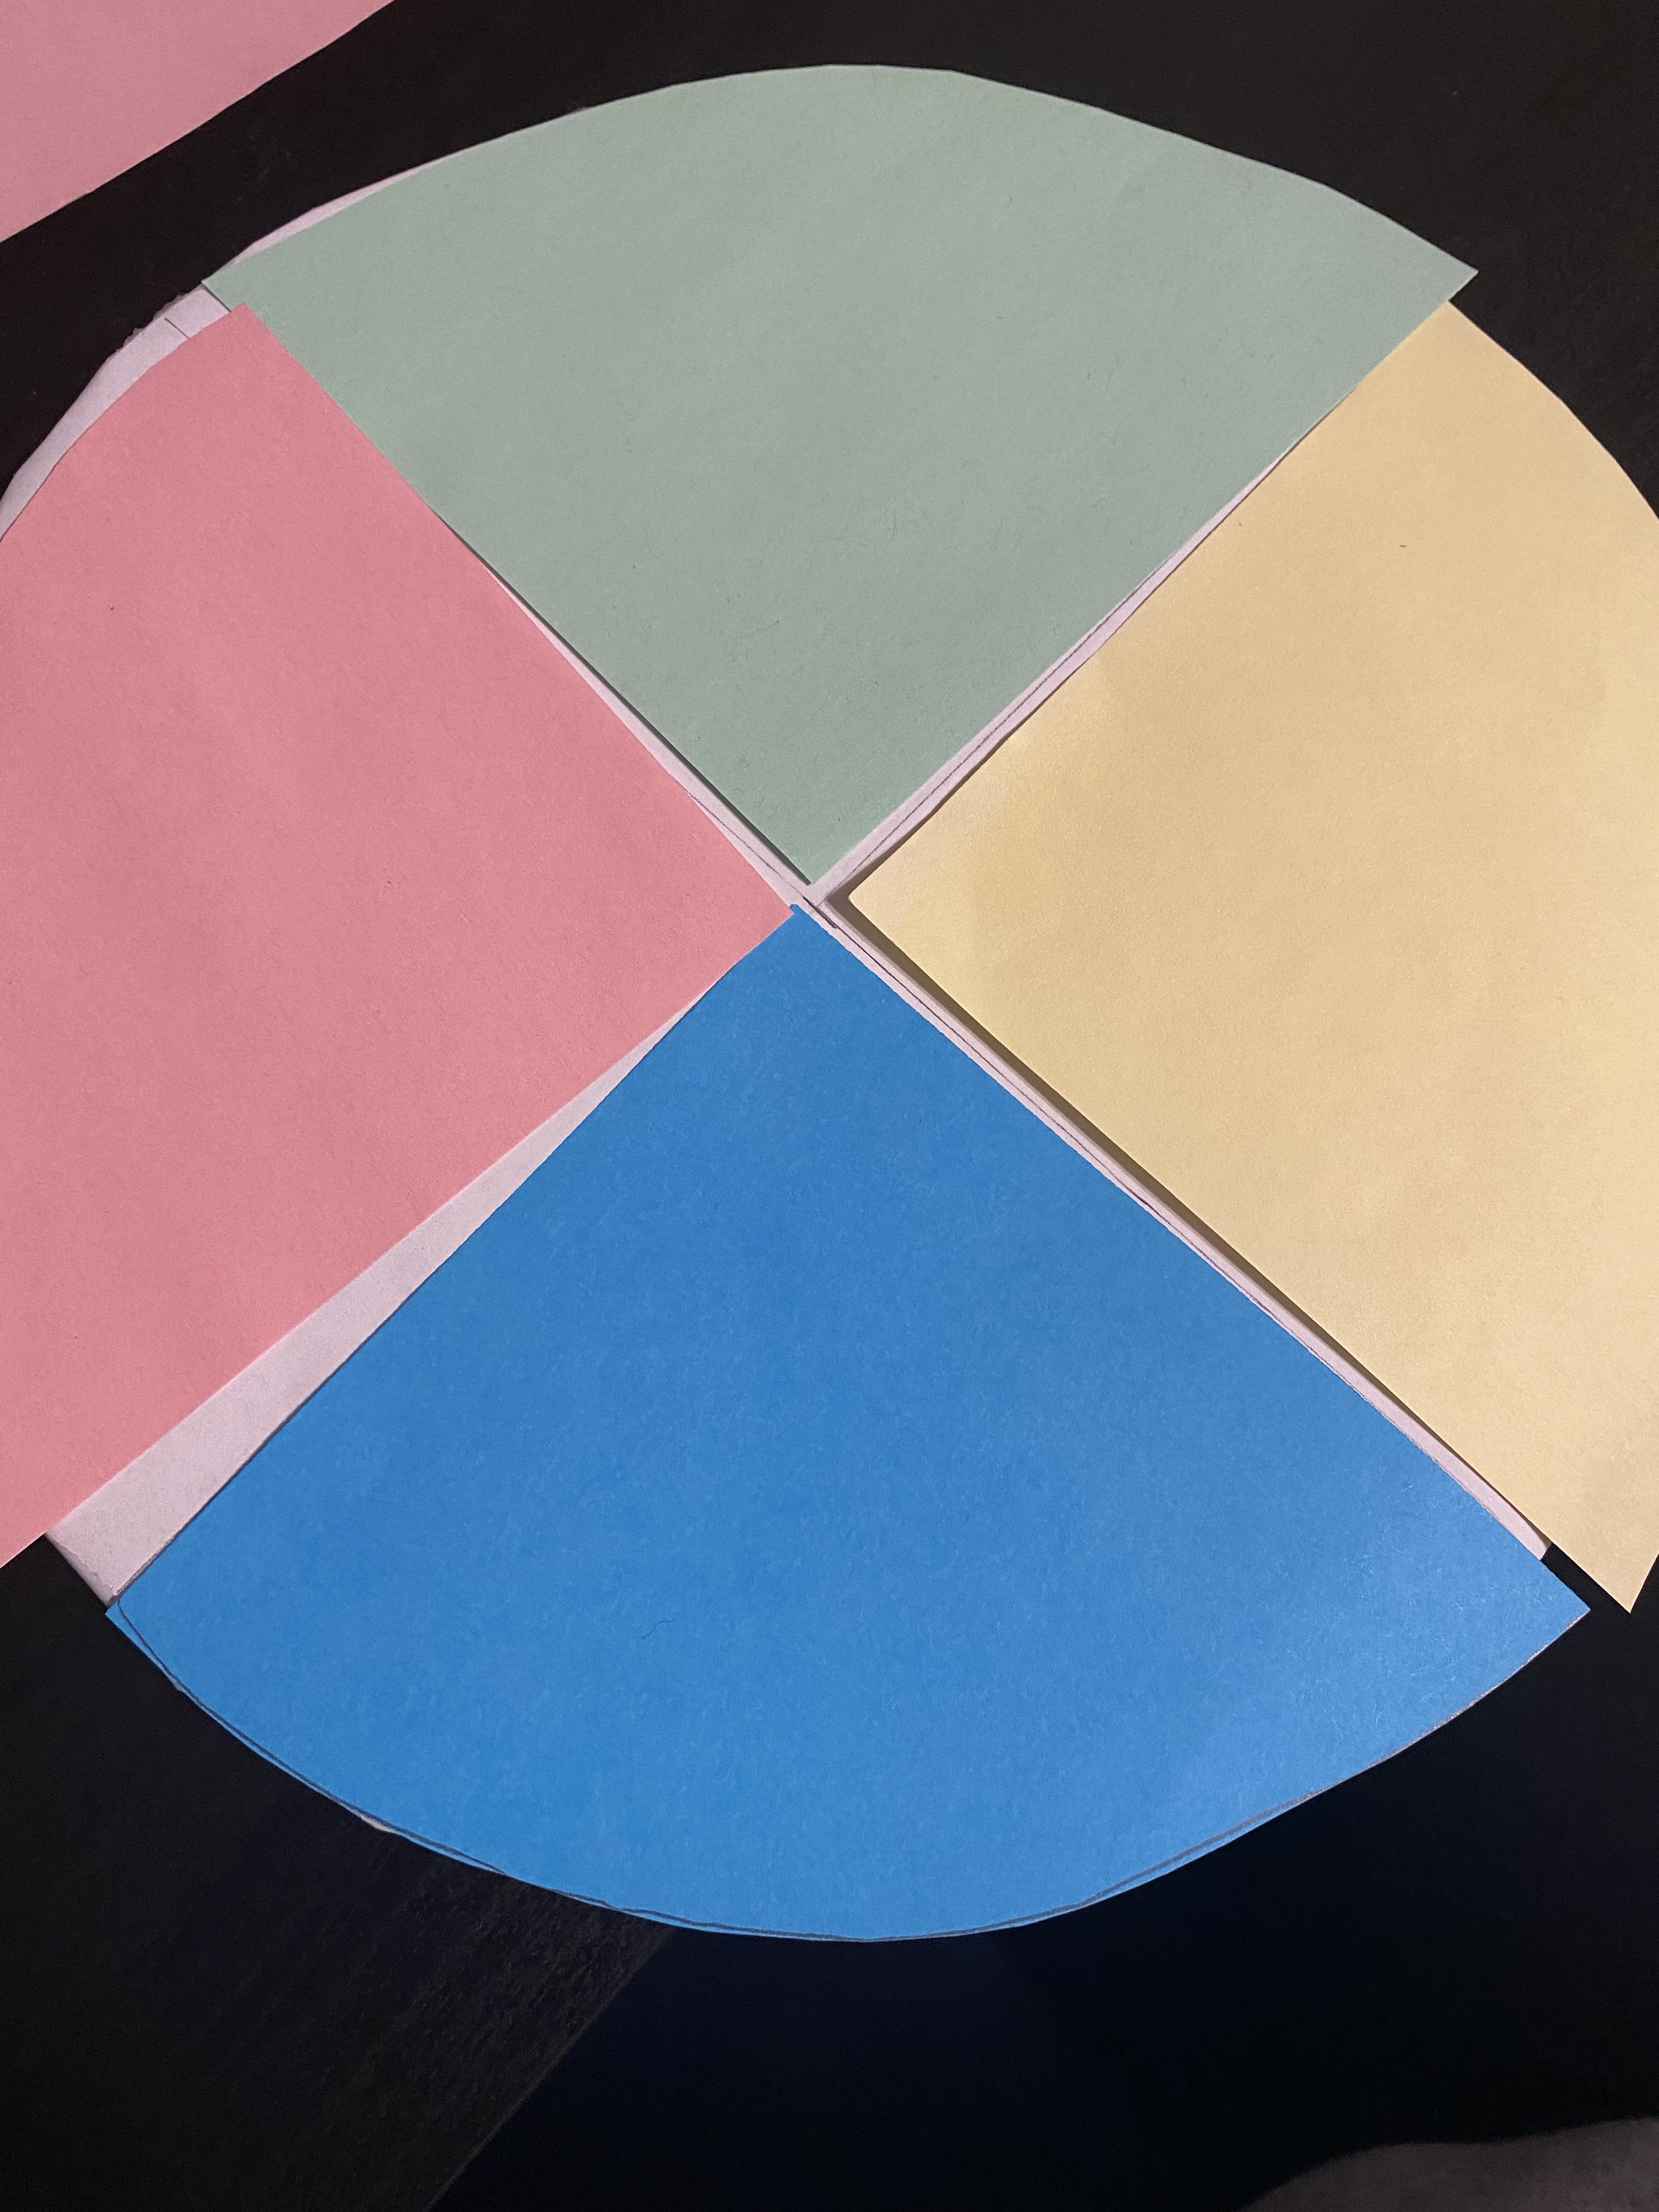
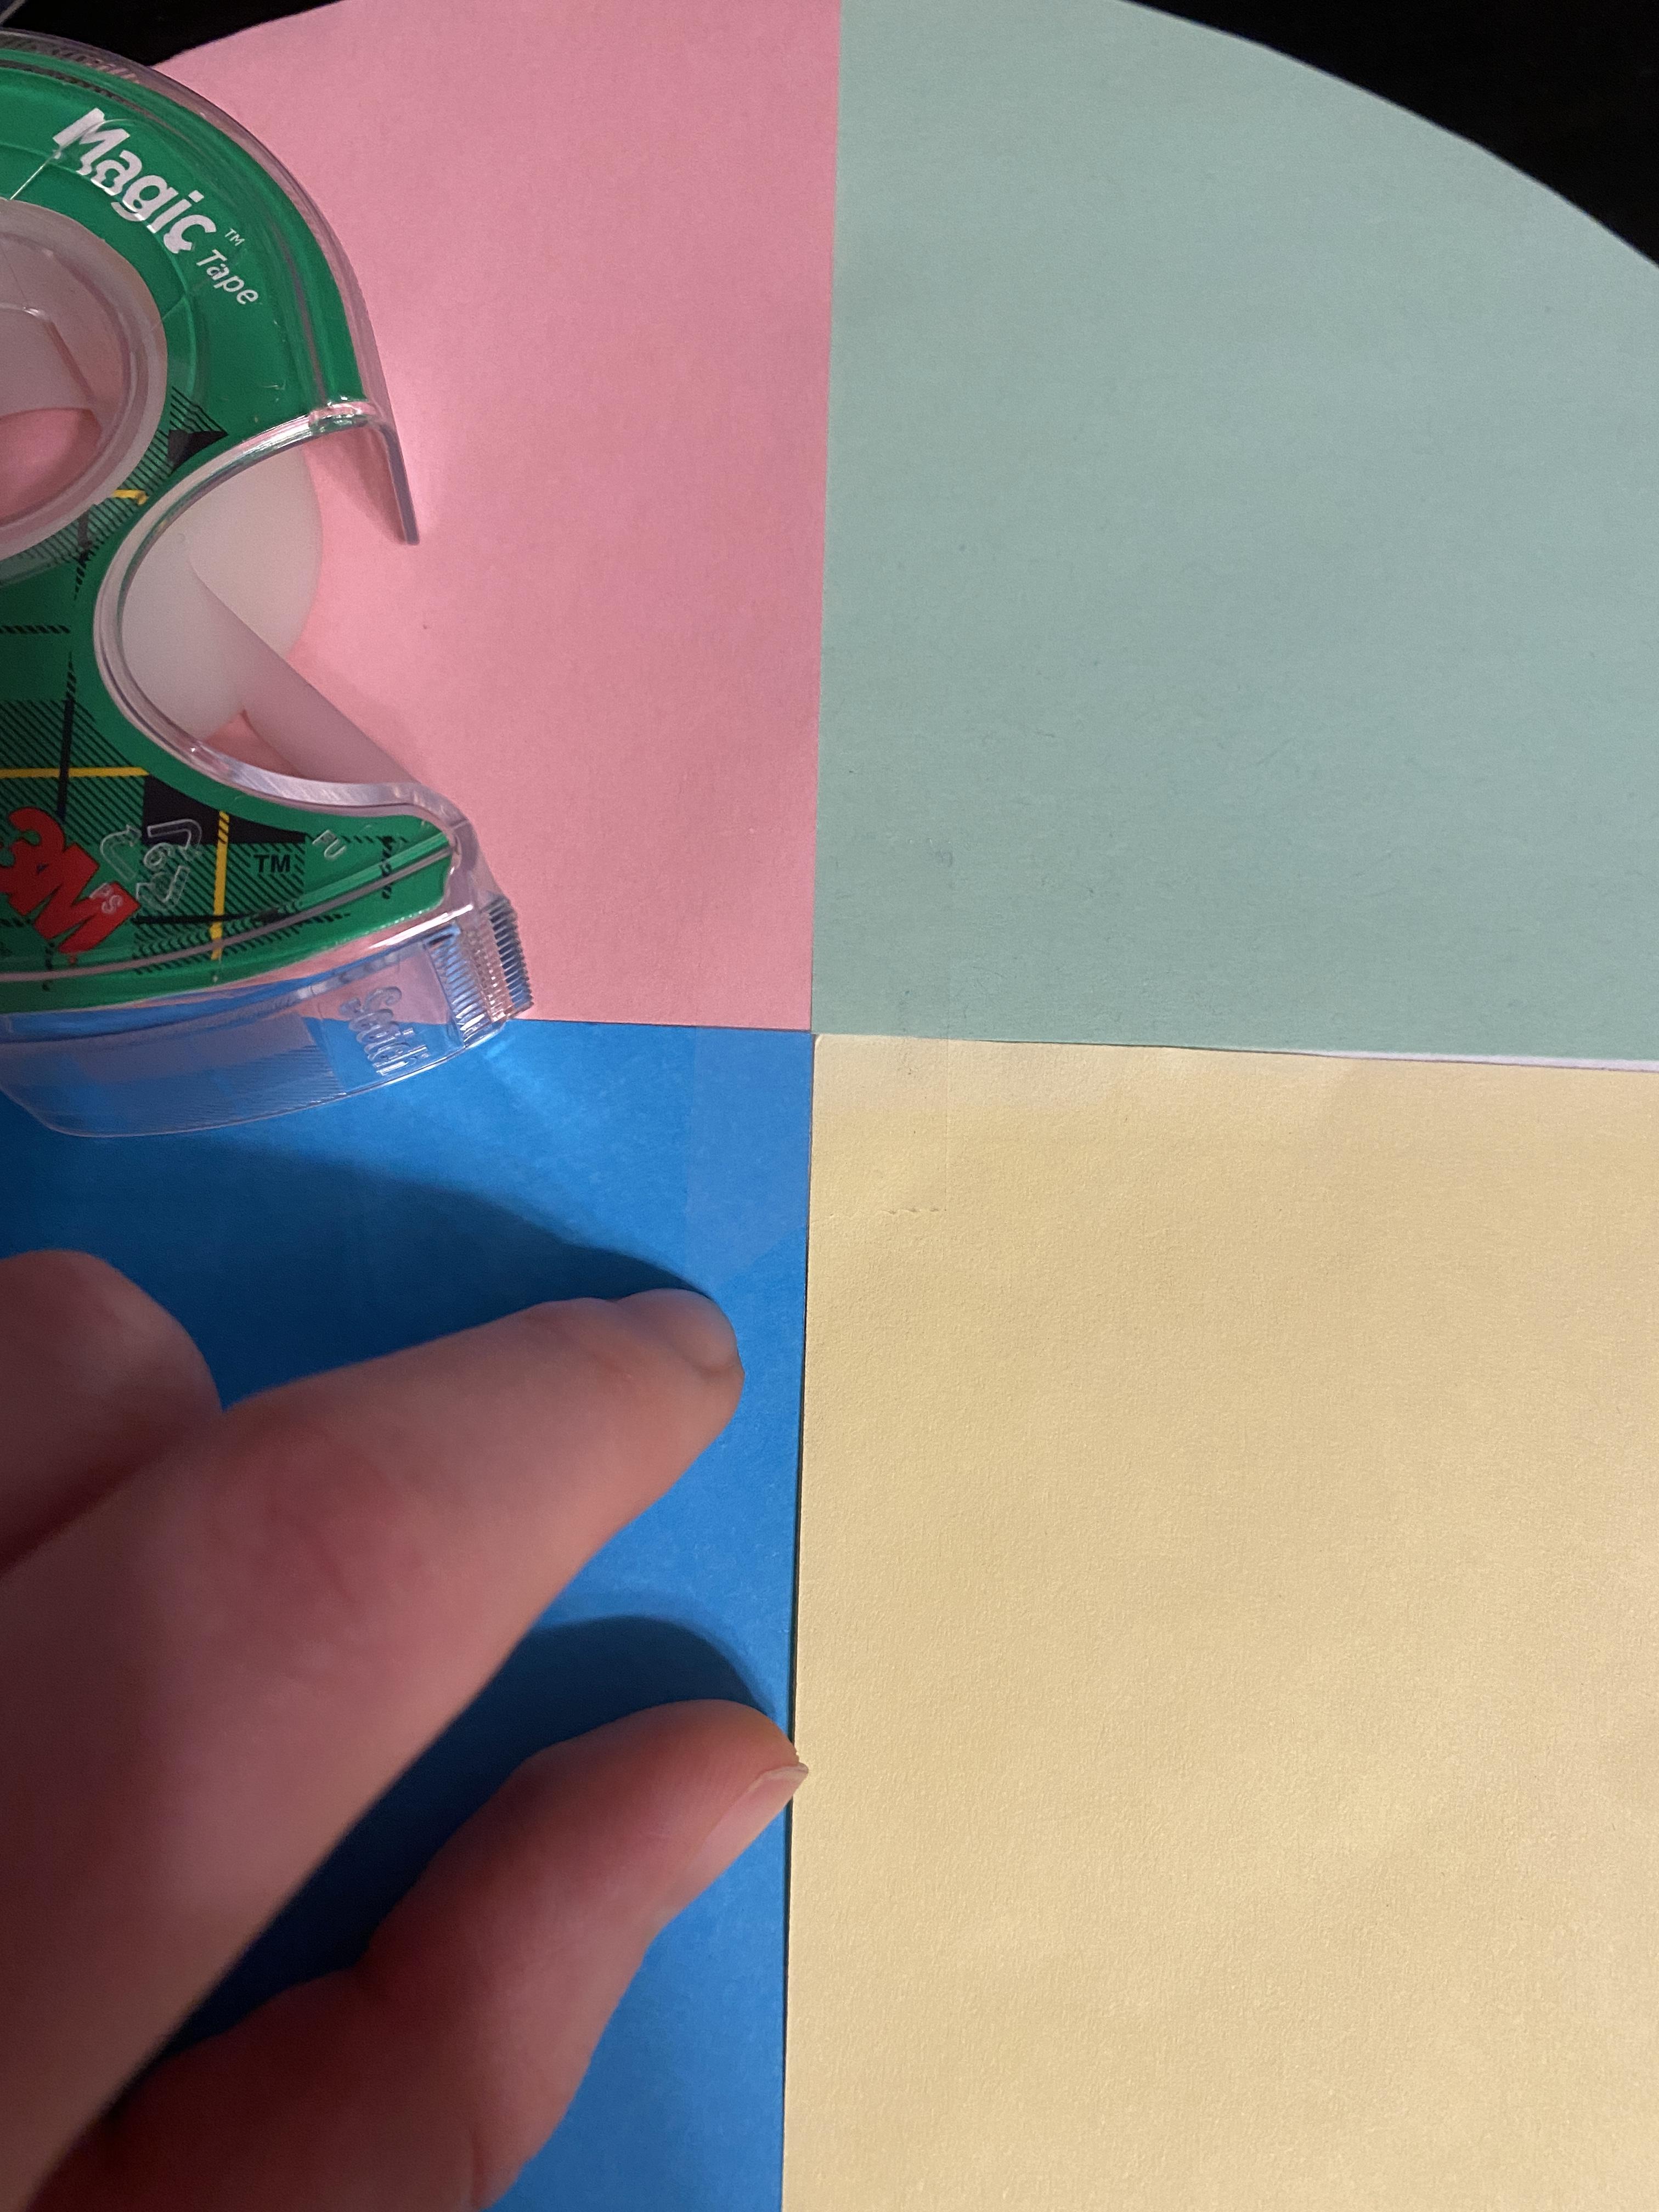
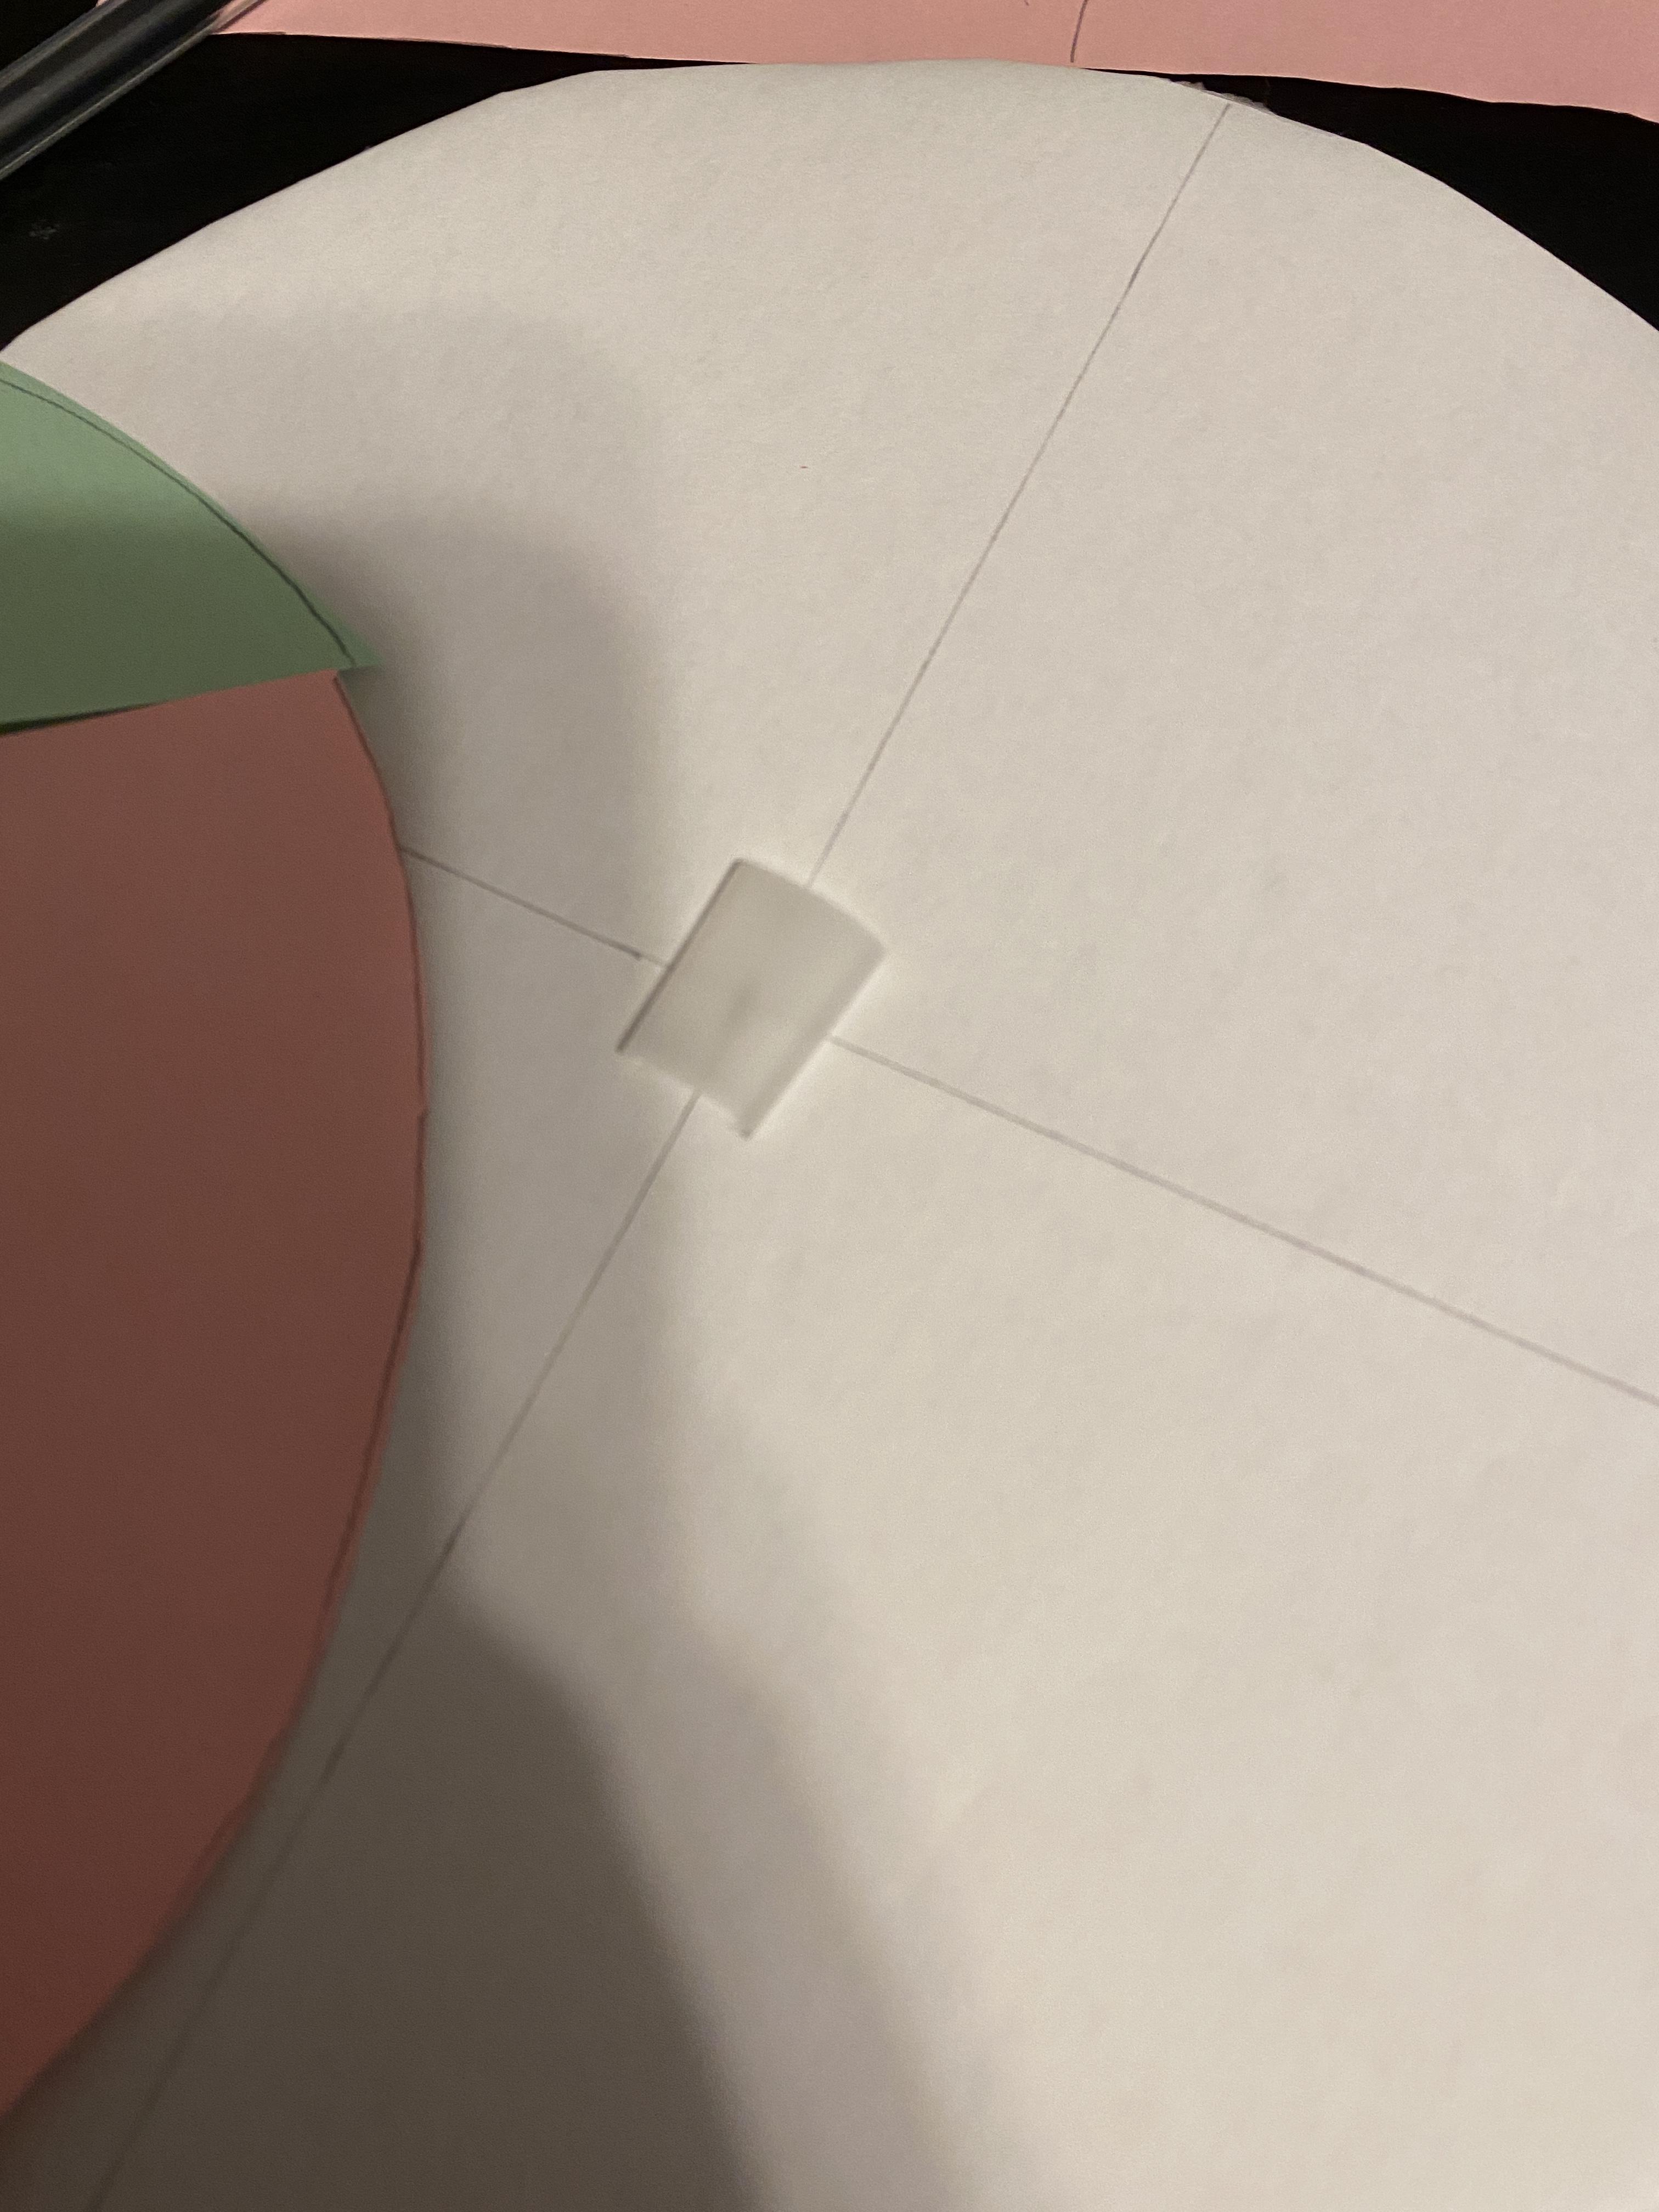
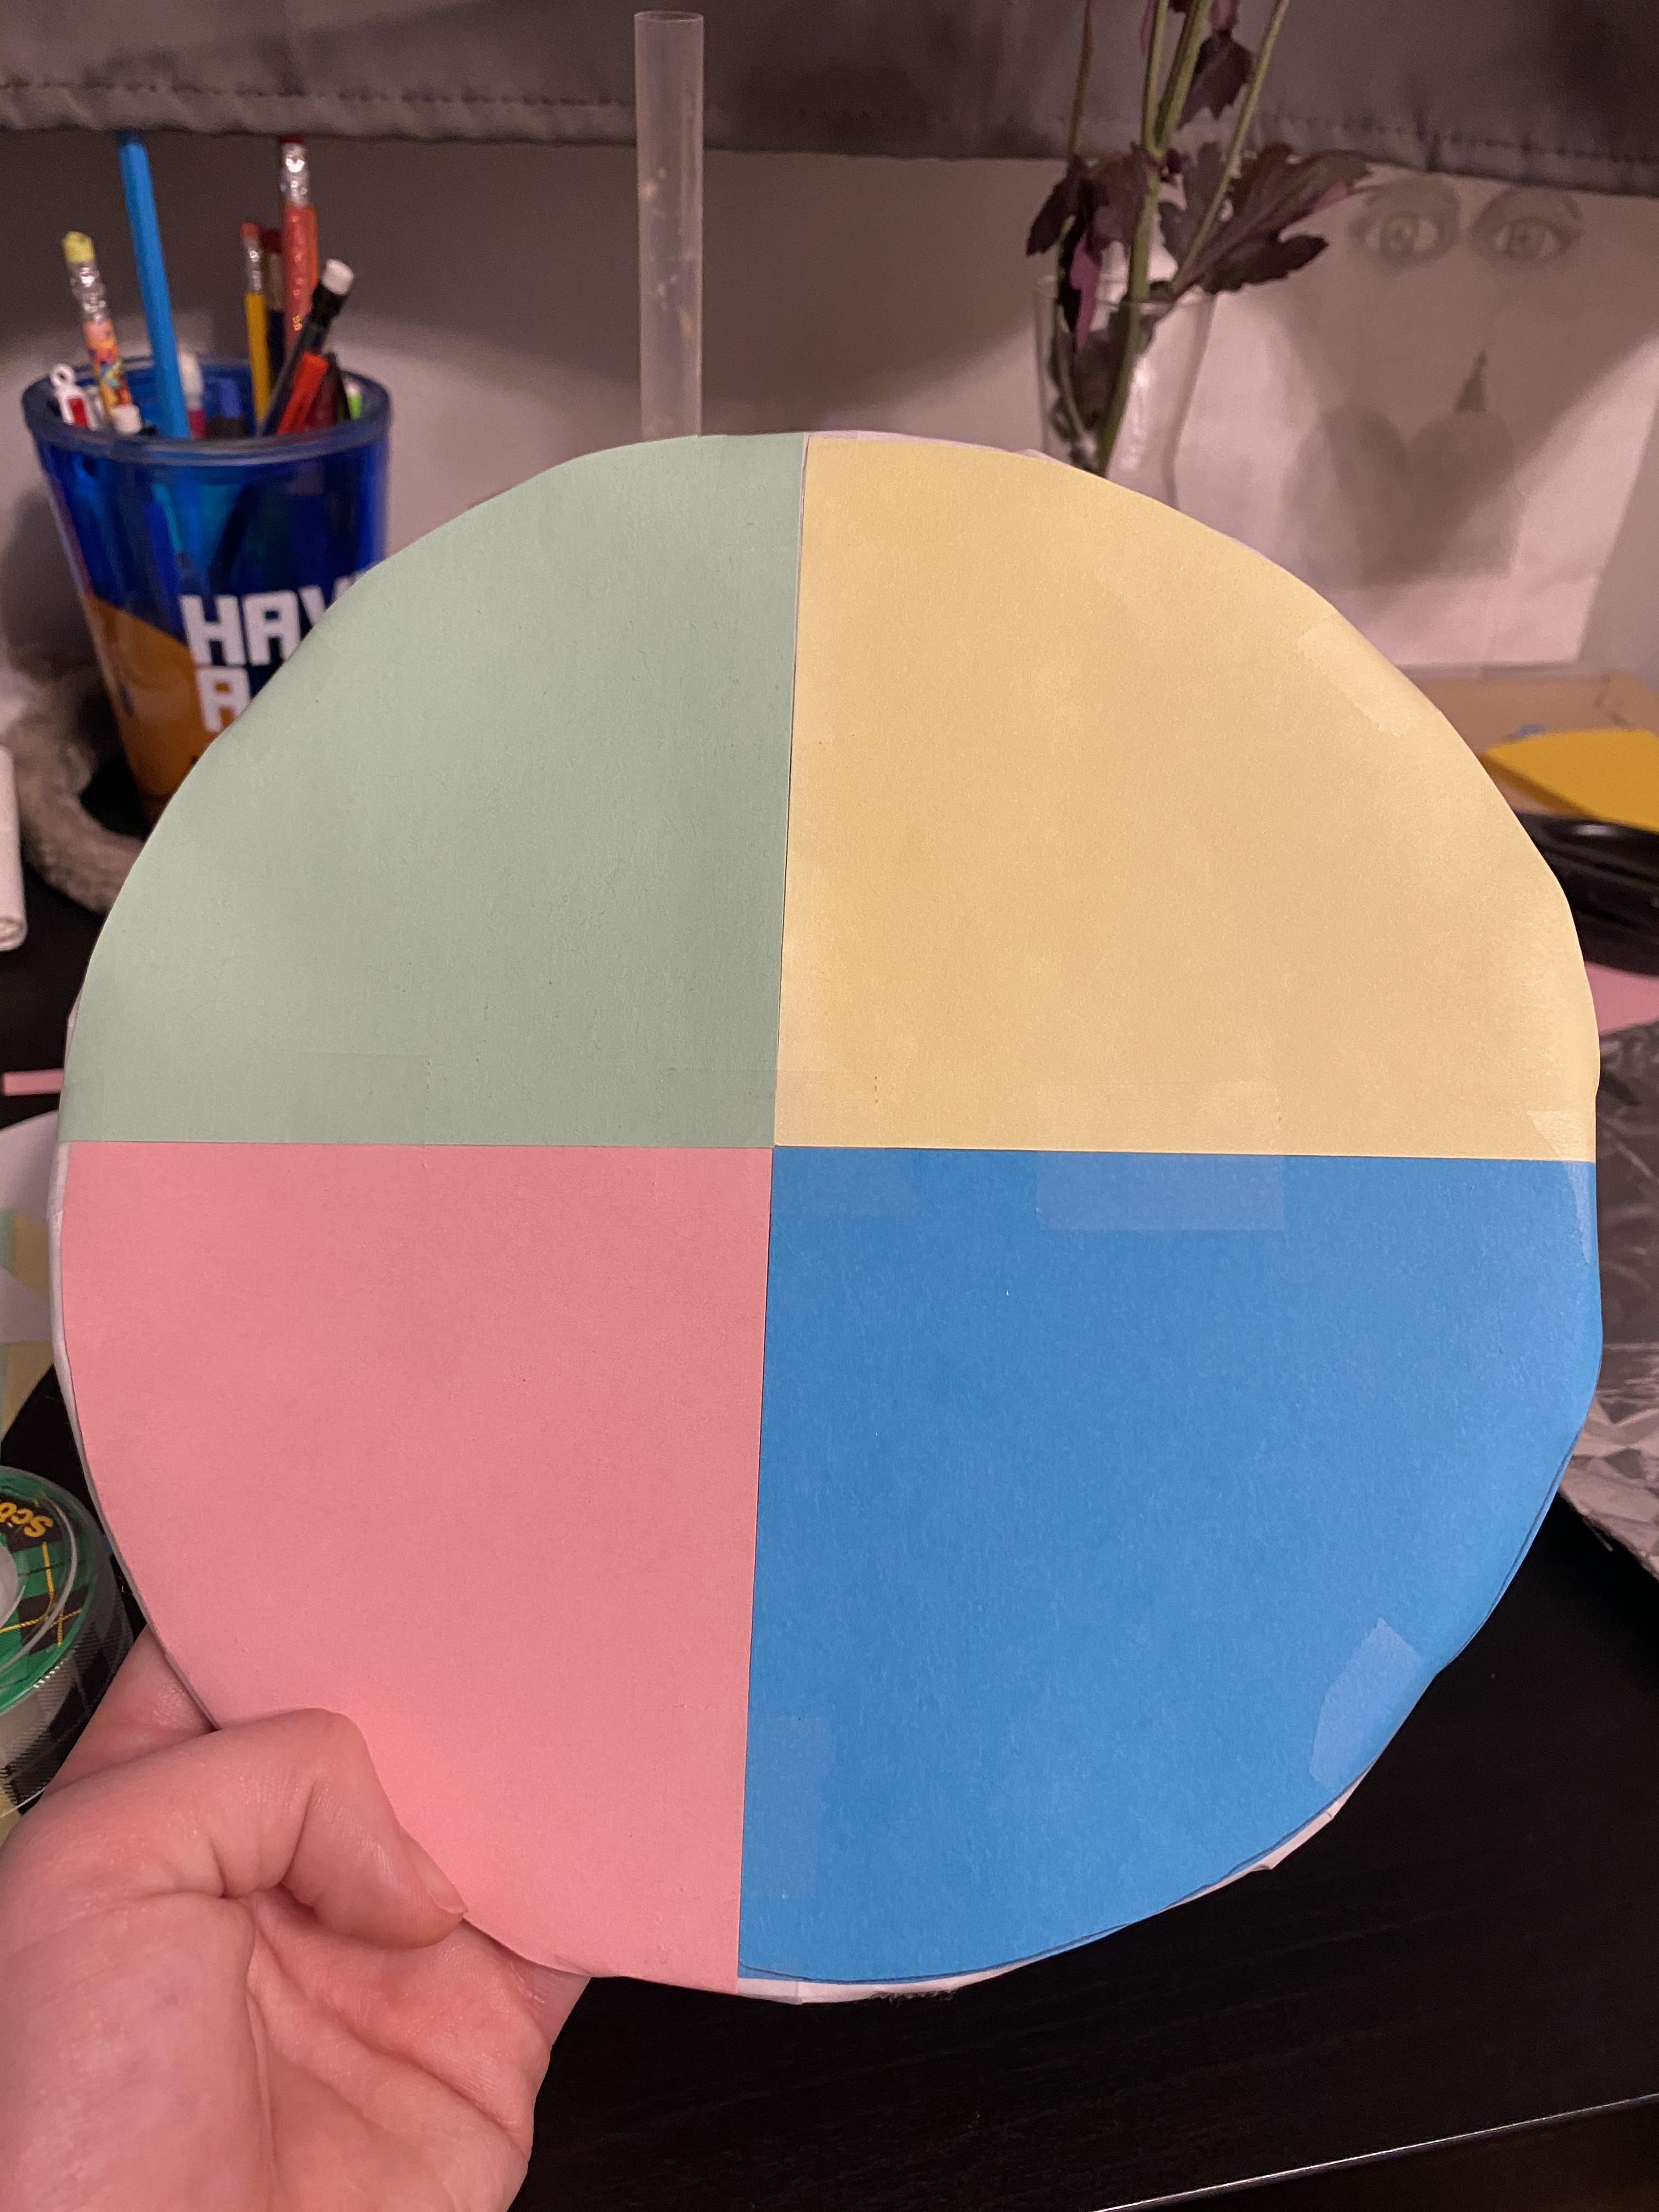
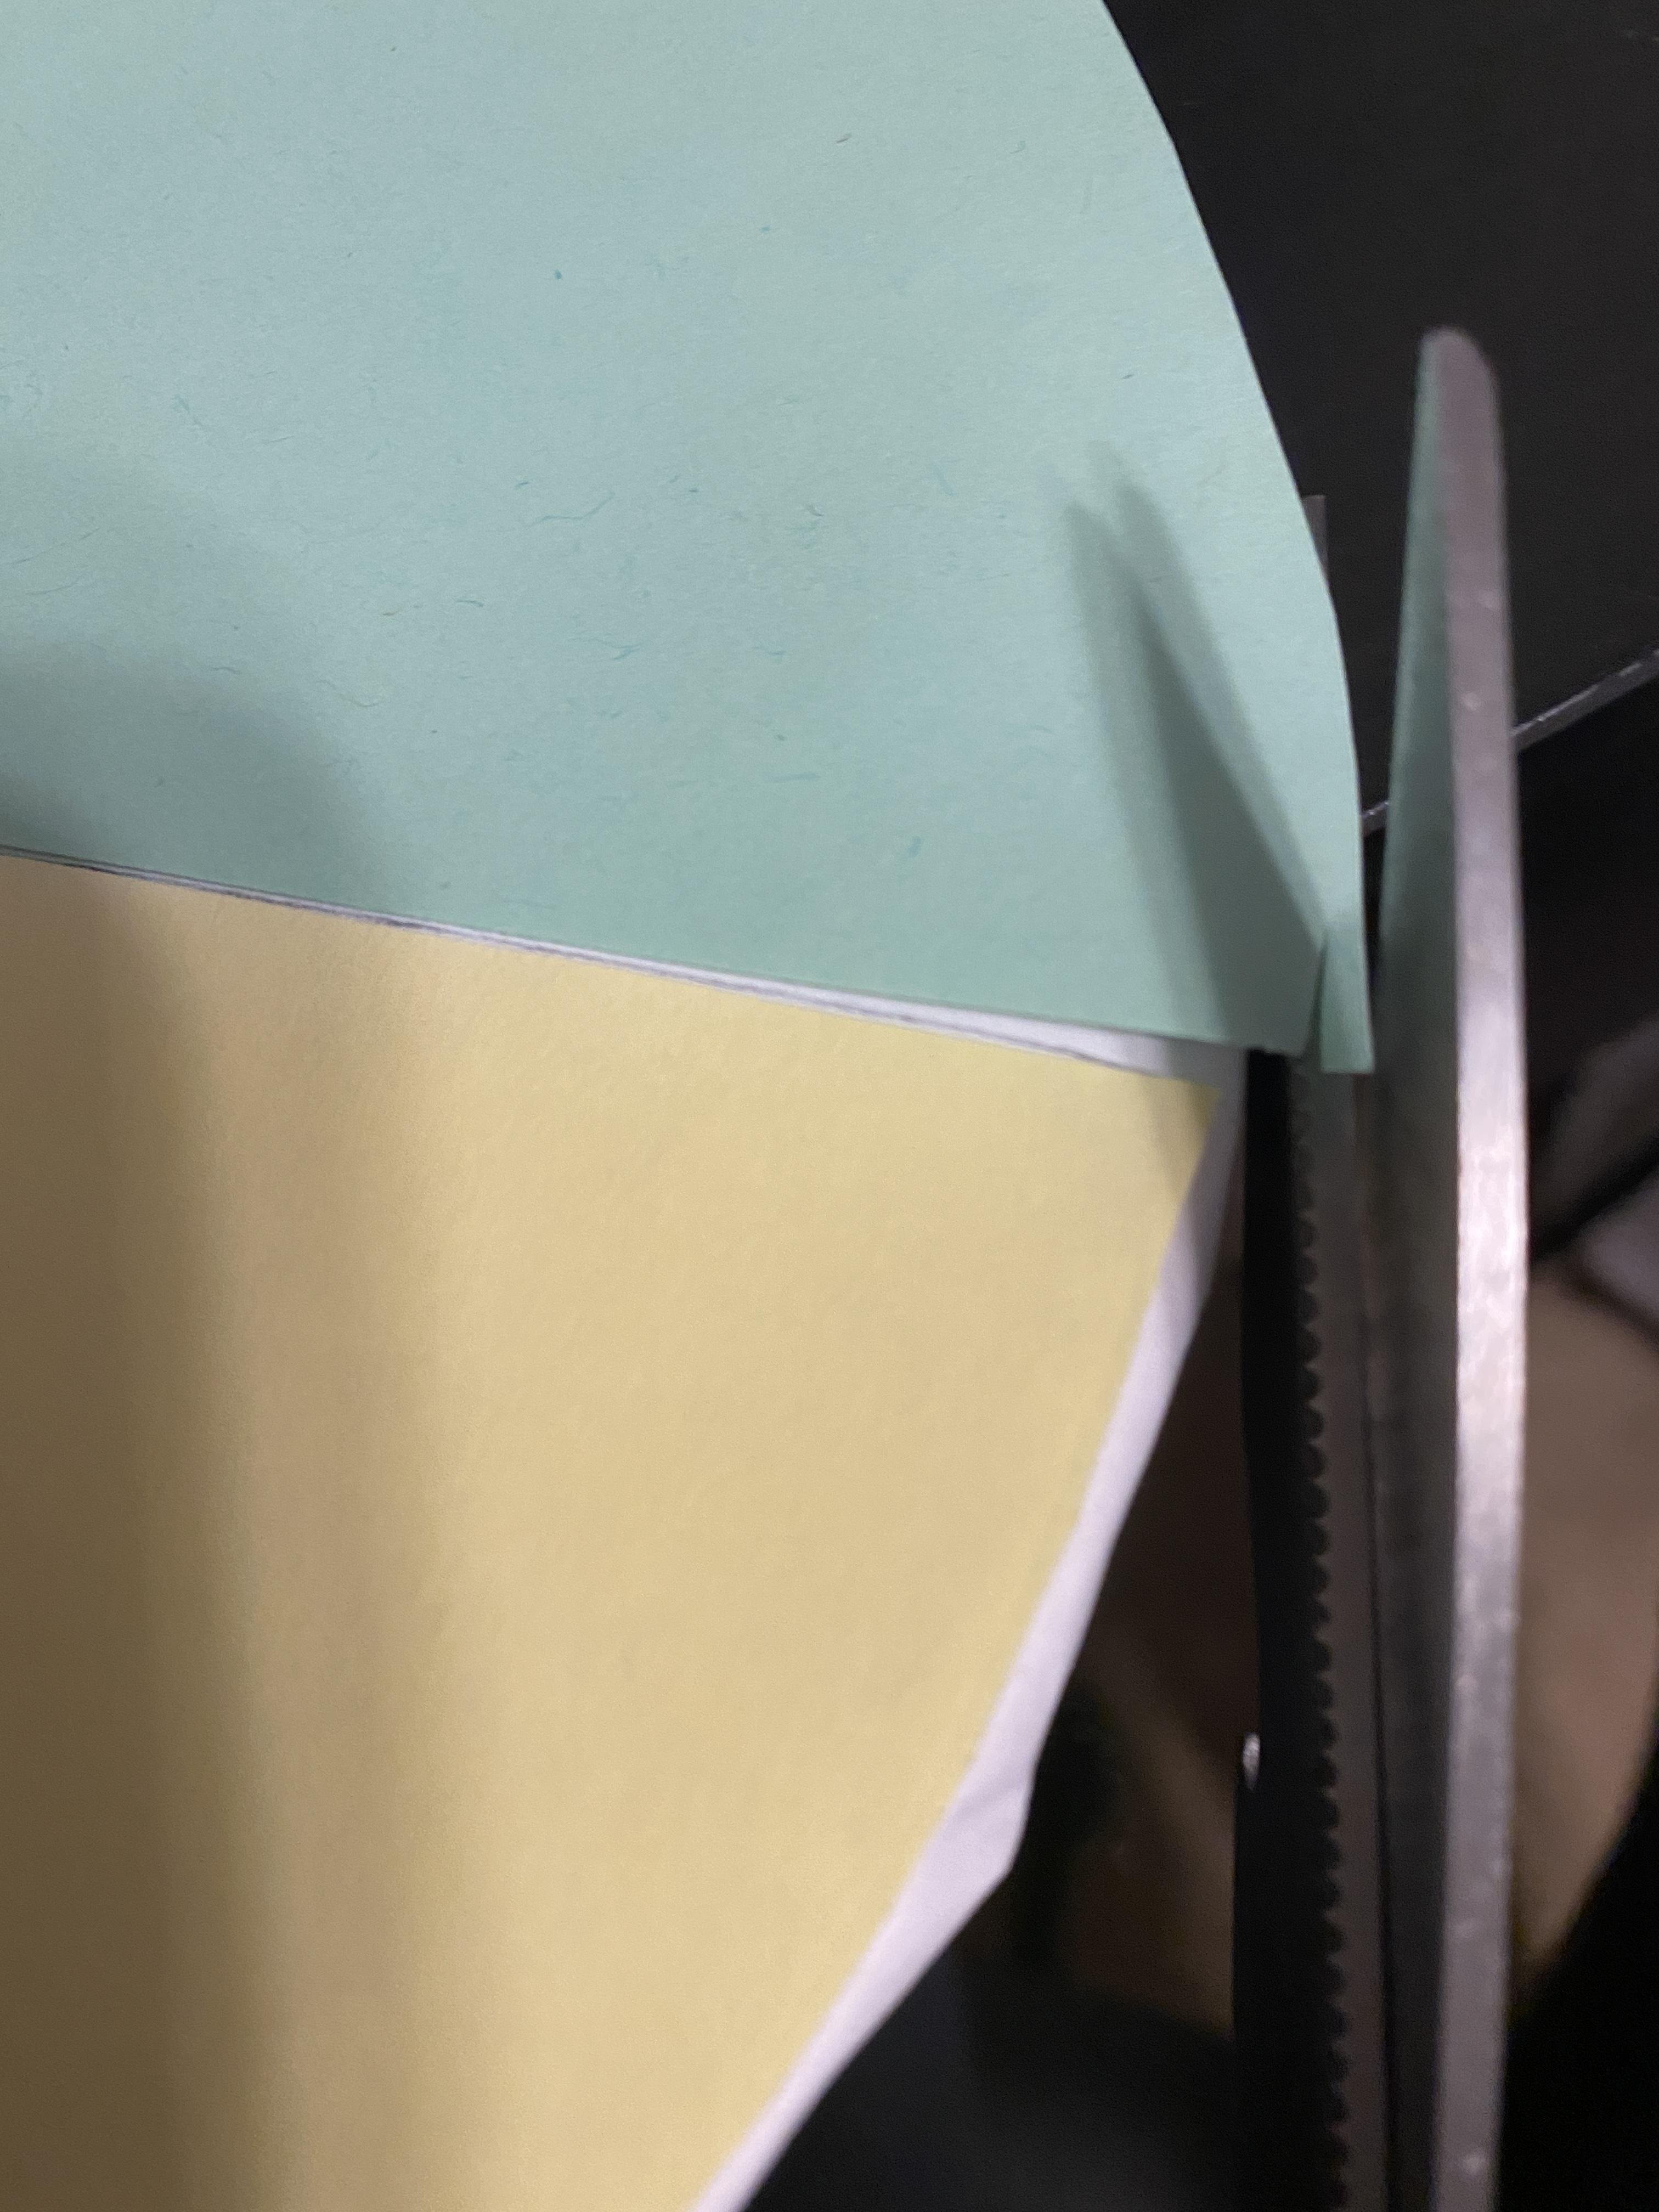
11. Place the cut out pieces of paper on their positions on the cardboard.
12. Use the clear tape and tape them together so they are one solid piece. DO NOT tape them to the board yet.
13. Move the 4-color paper off the cardboard and place a folded piece of tape on the very center of the cardboard.
14. VERY carefully place the 4-color paper back down. Make sure to place the middle of the paper exactly on the piece of tape. After it is down, push it down to make it completely flat.
15. Tape the edge where the joint between two of the colors touches the end and make sure it is secure. Do the same thing with the other joint points. If any of the 4-colored paper is leaning far off the circle, cut it closer to the circle.
The Tinfoil Circles
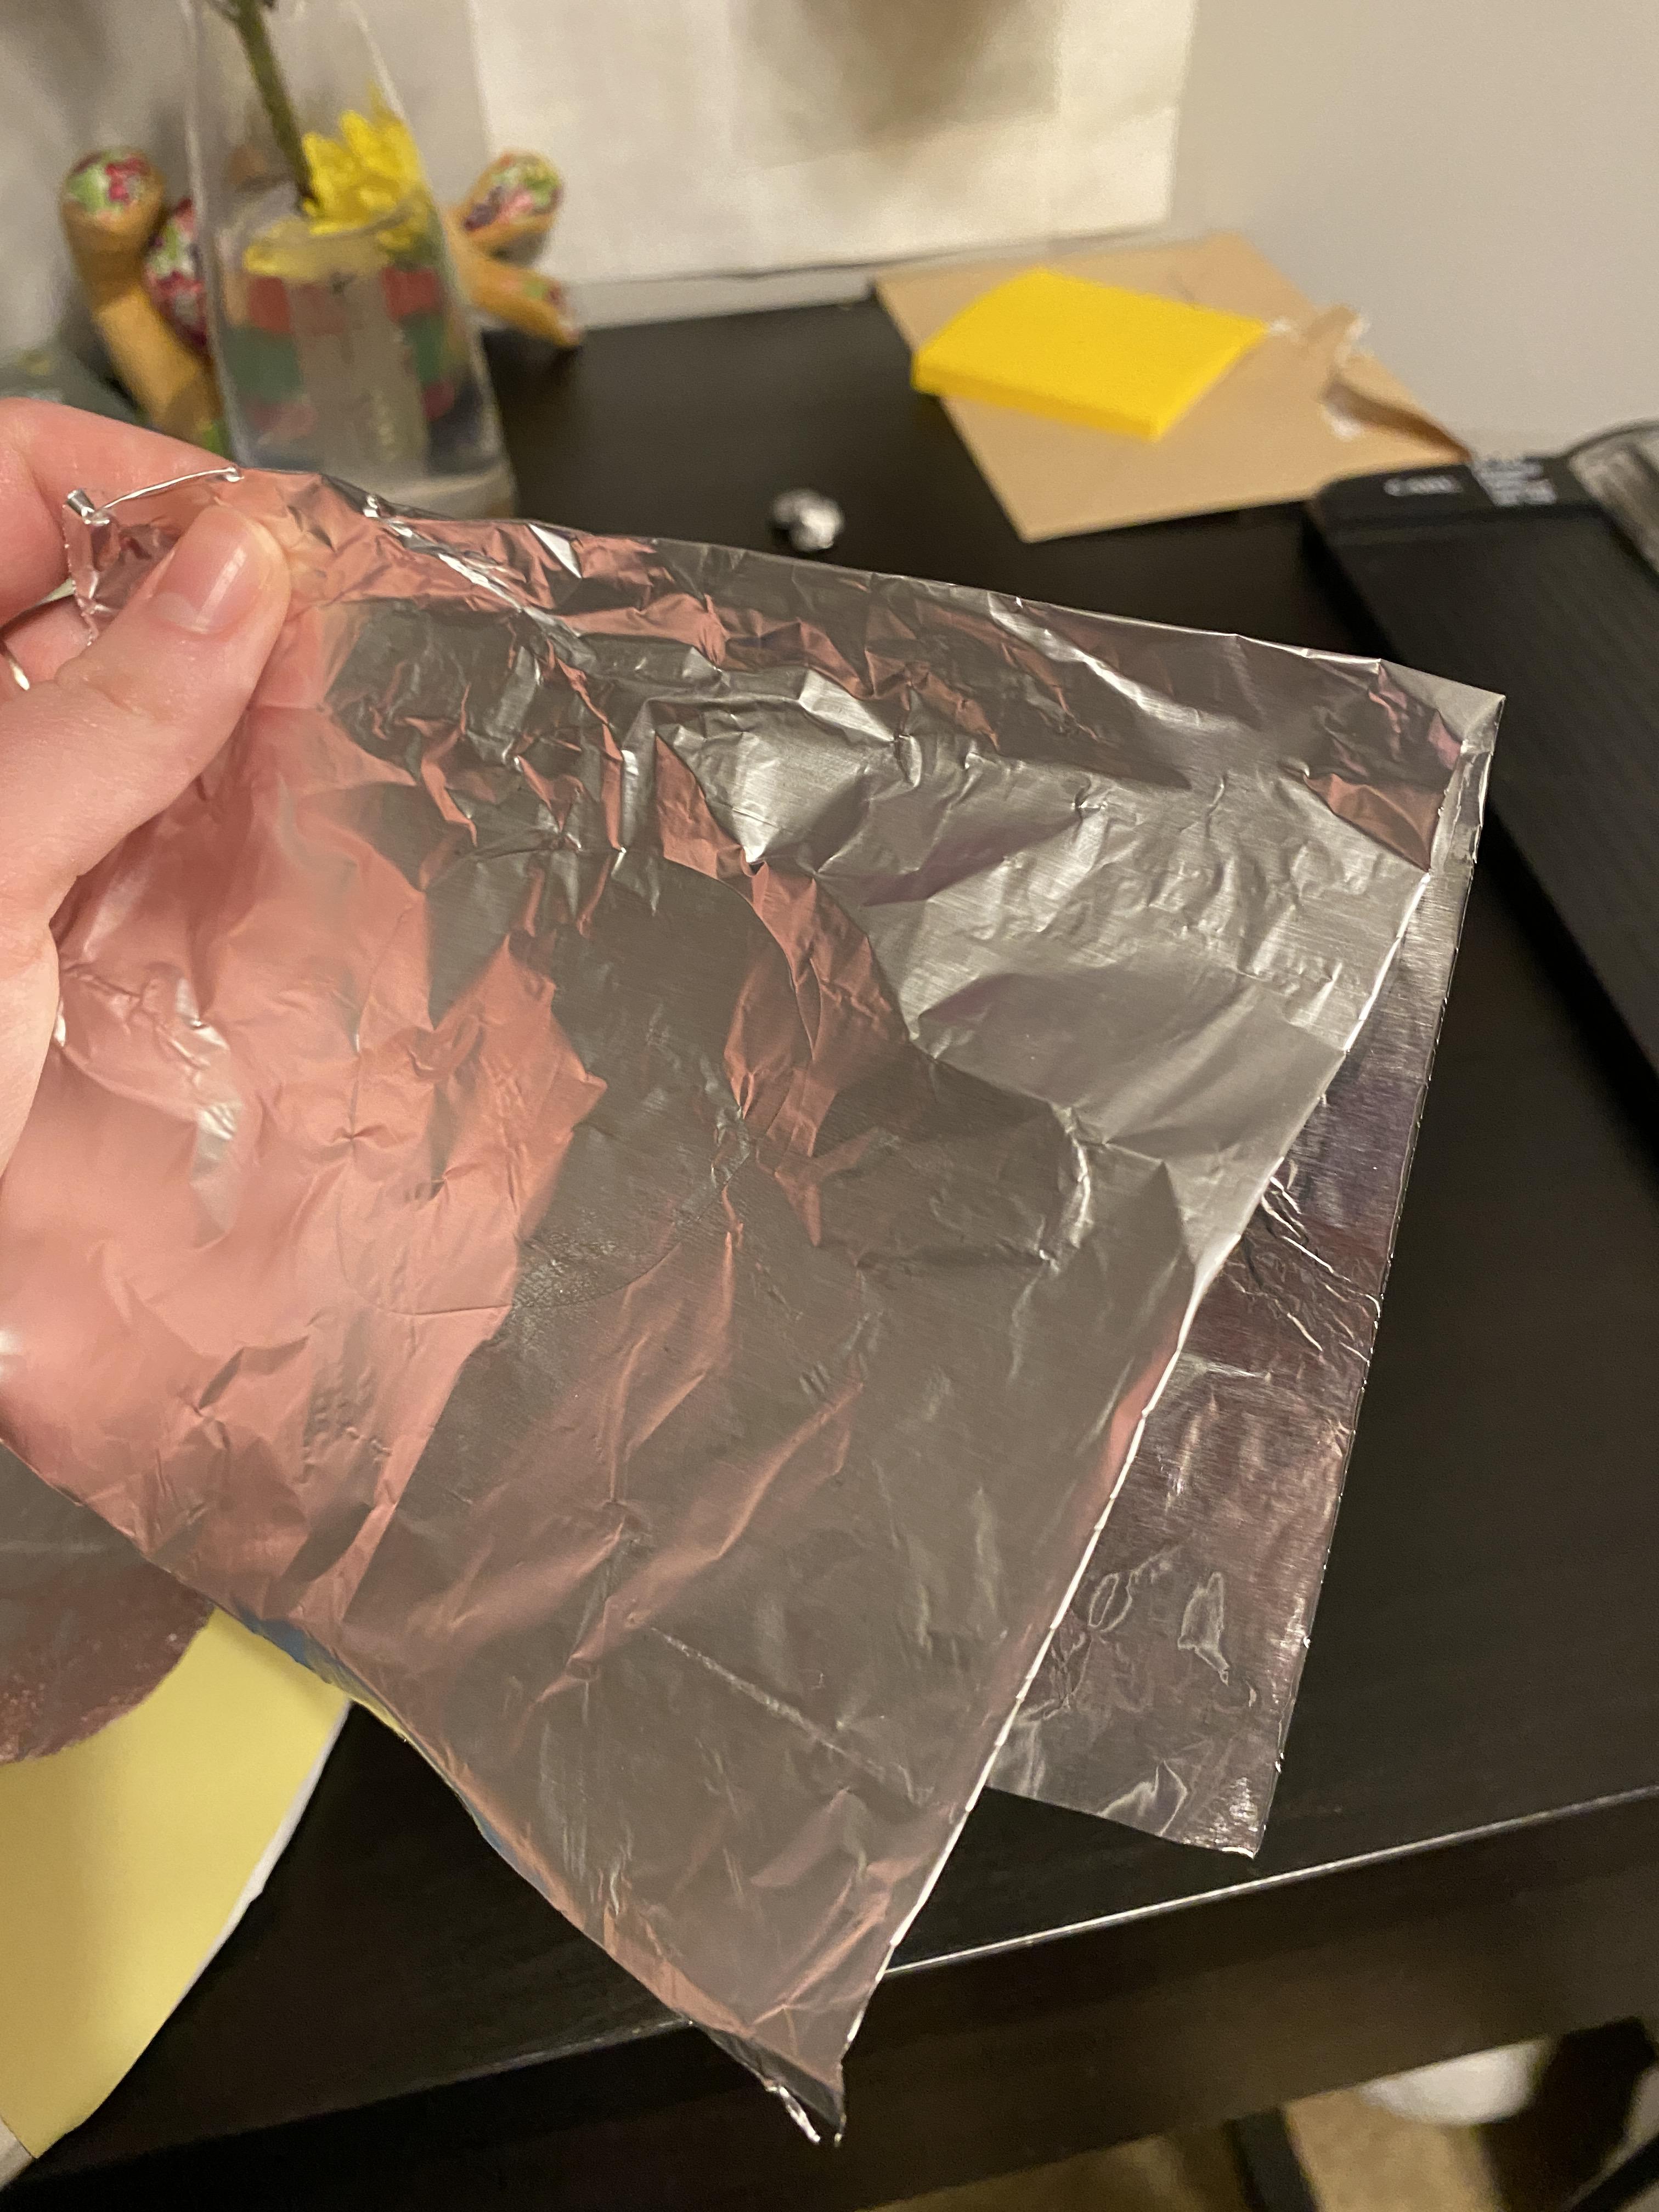
16. Take a semi-large piece of tinfoil and fold it in half twice.
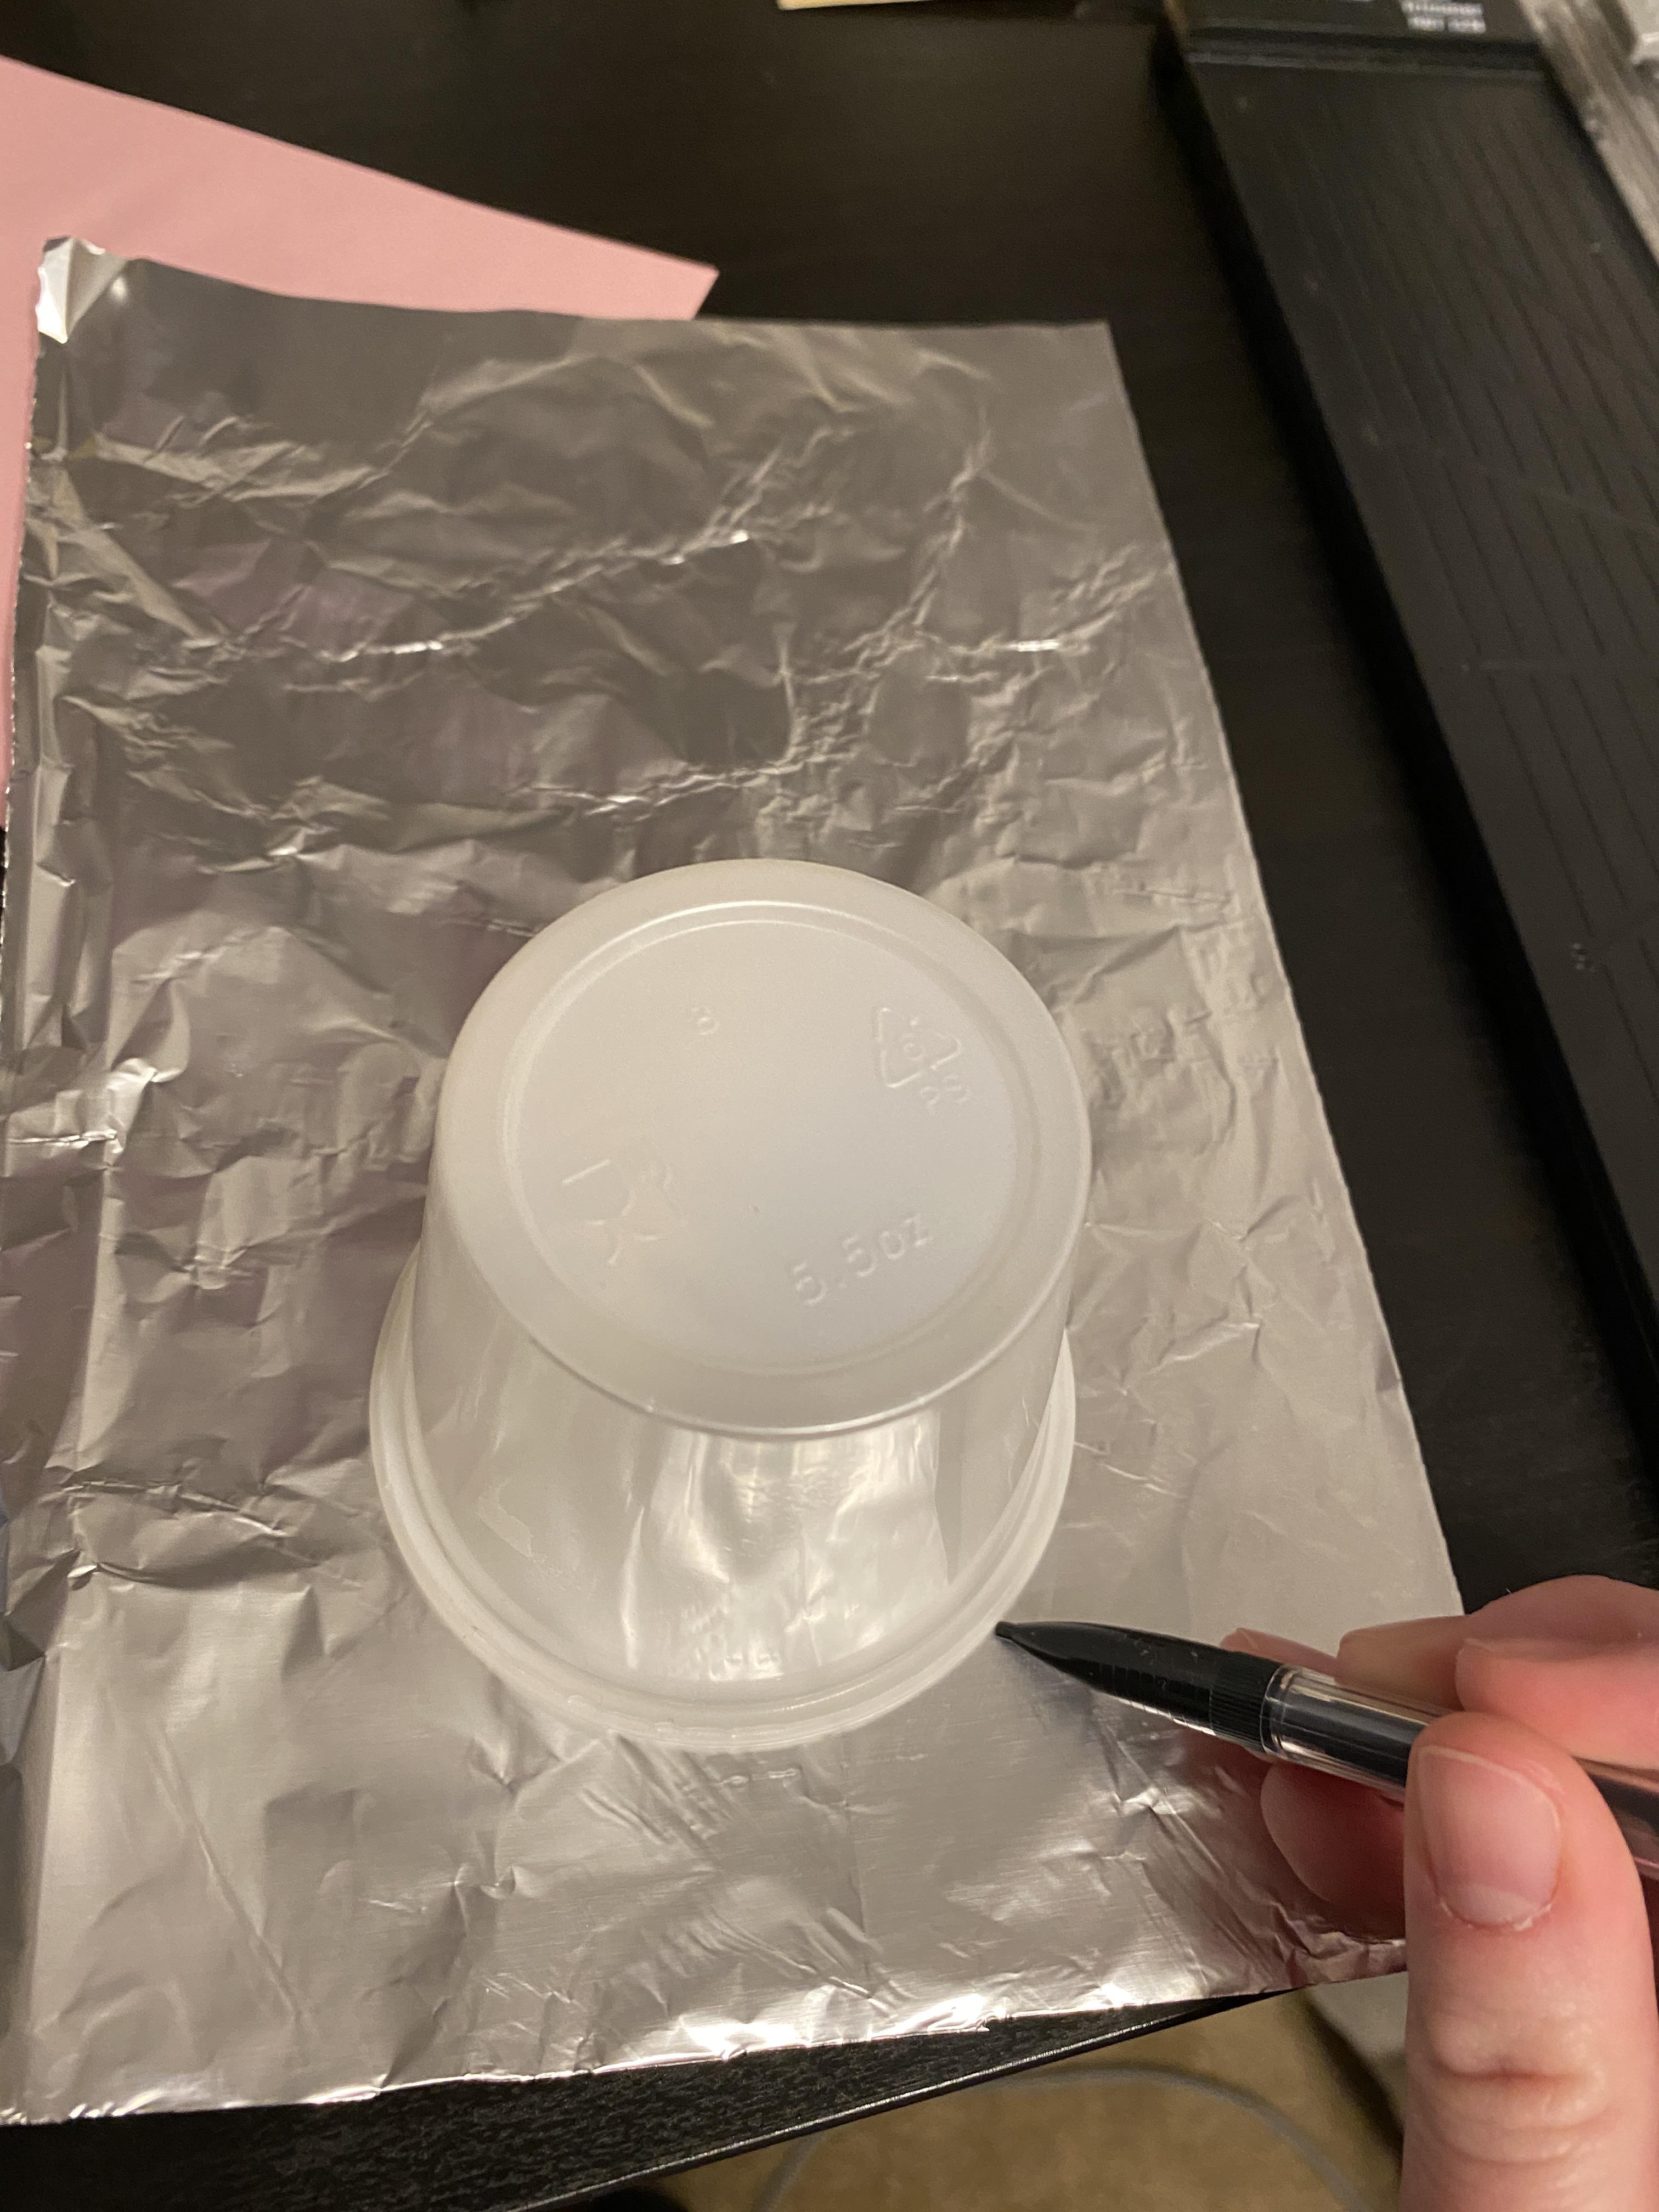
17. Take the cup and place it upside down on top of the tinfoil. Use the pencil to trace the outline of the cup onto the tinfoil.
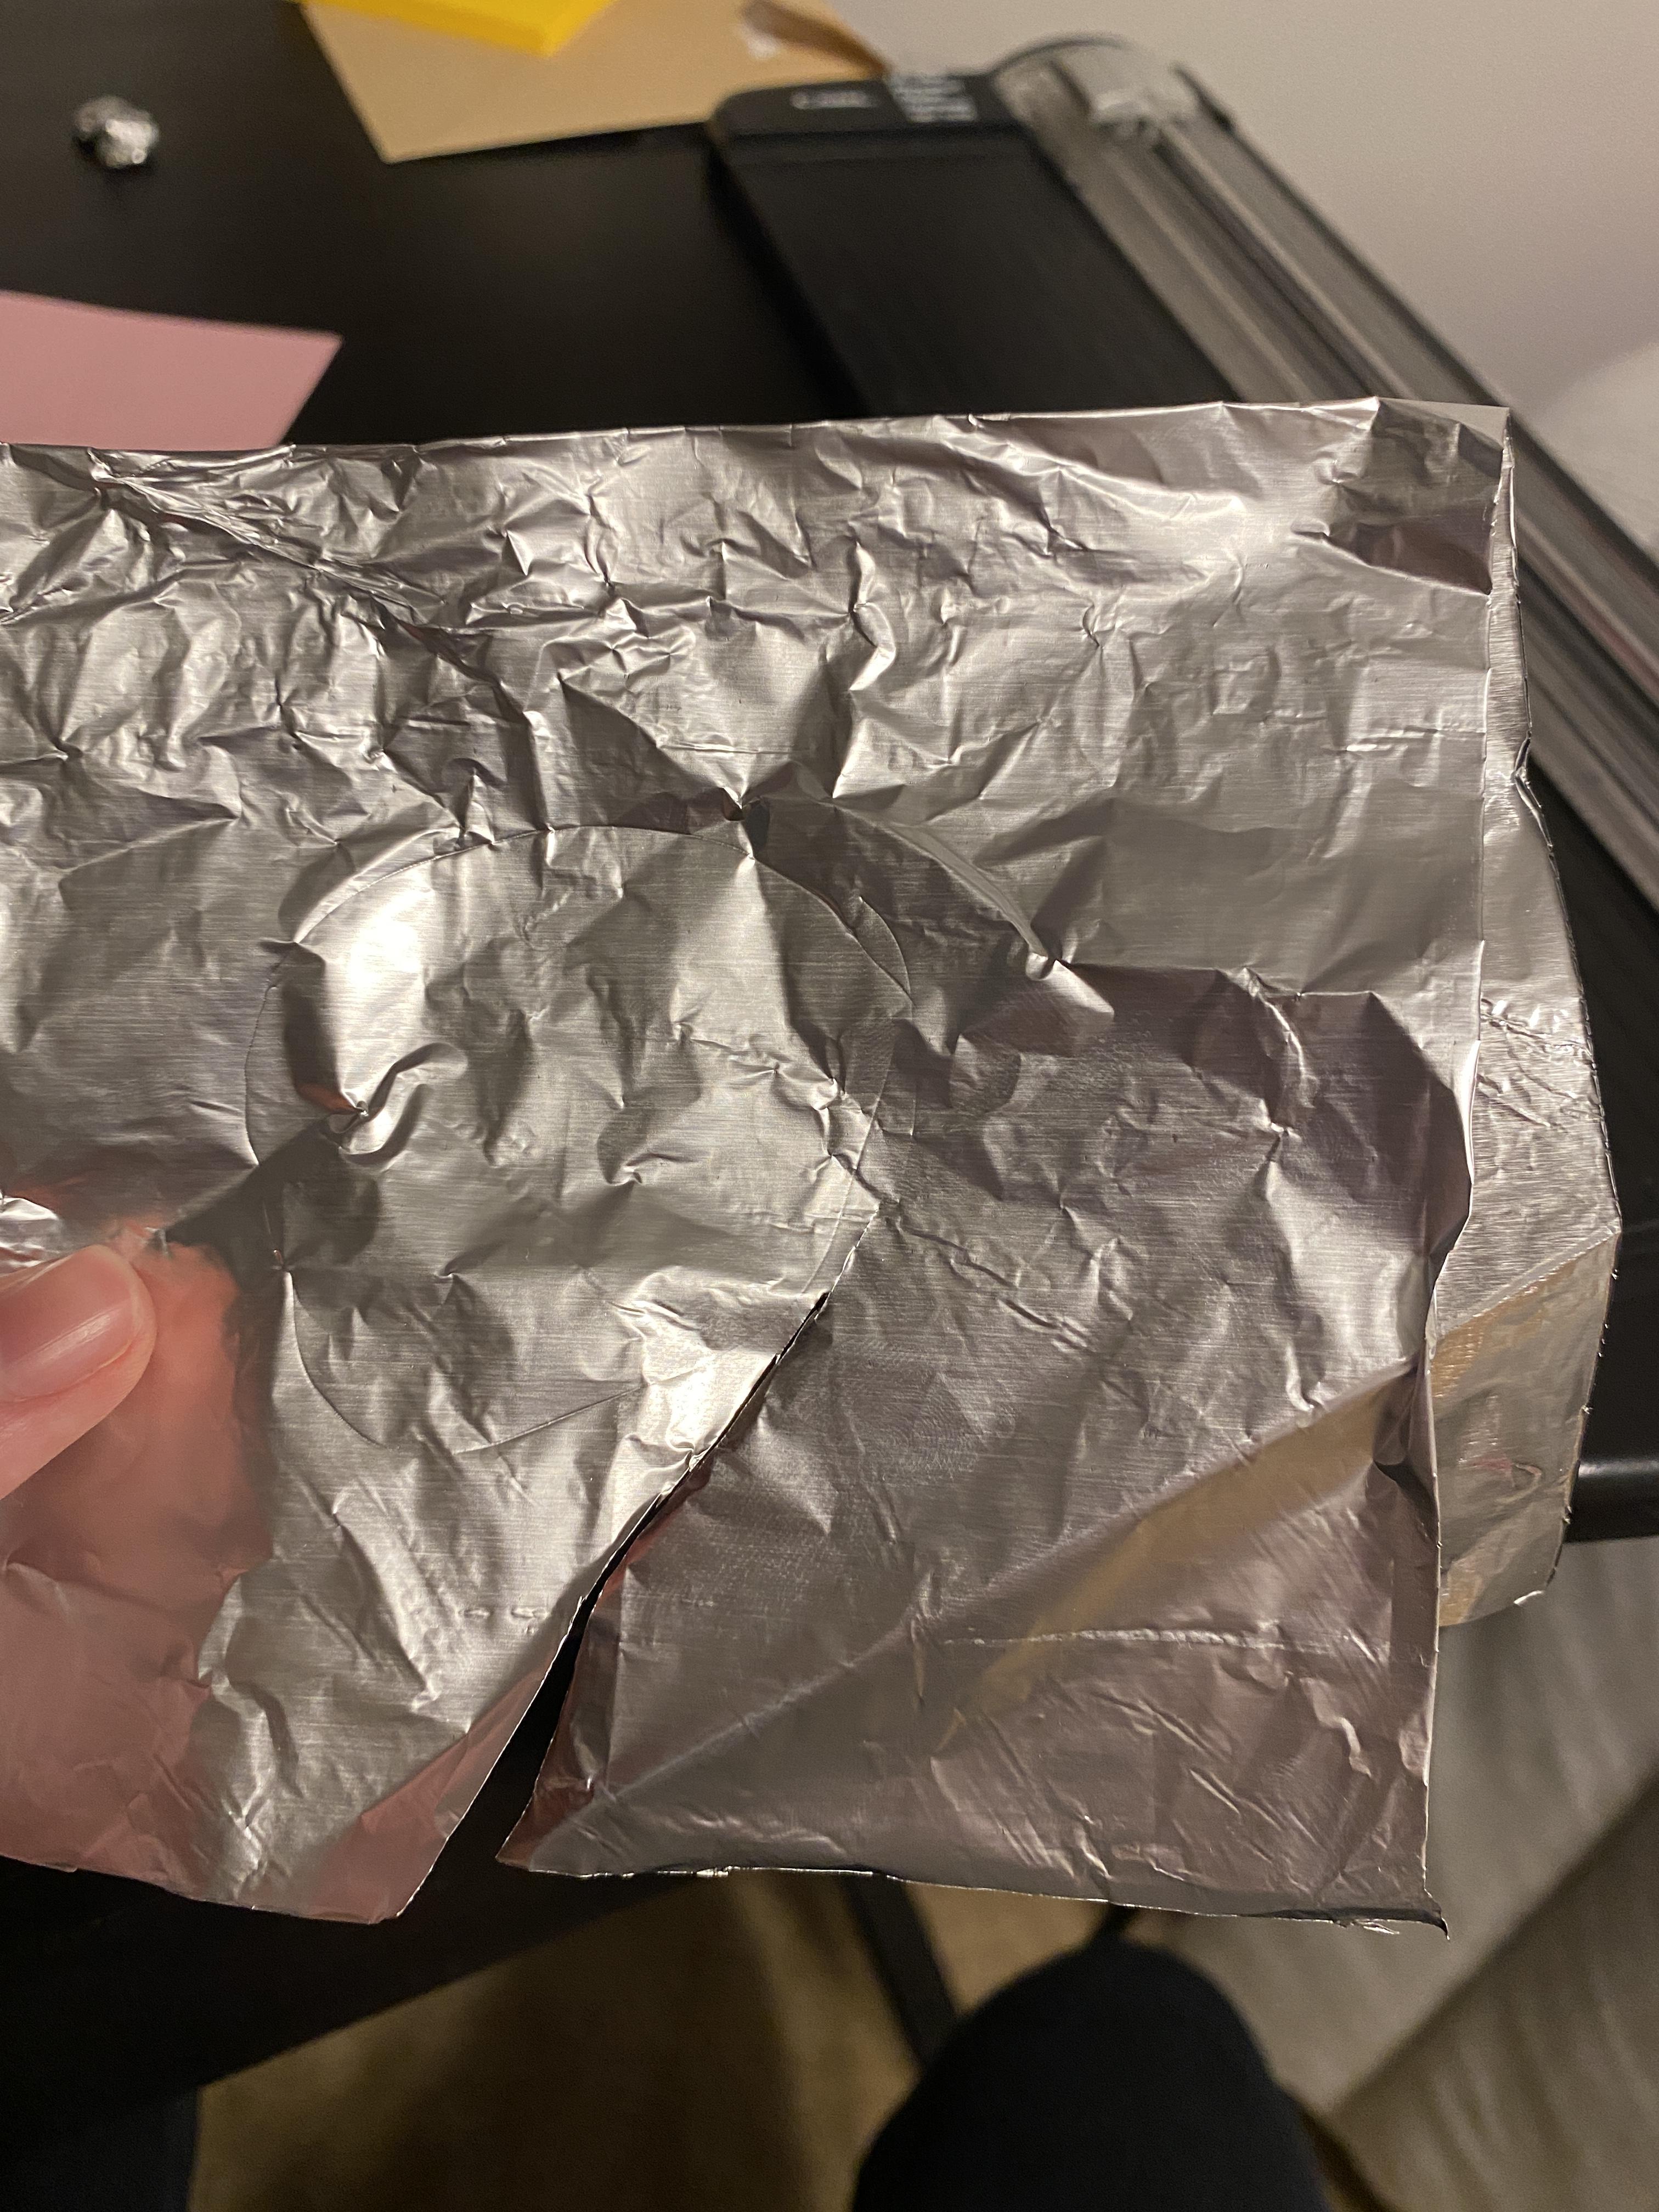
18. Take a scissor and cut along the outline.
19. Peel apart the four tinfoil circles. Put them to the side for now.
The Tinfoil Strips
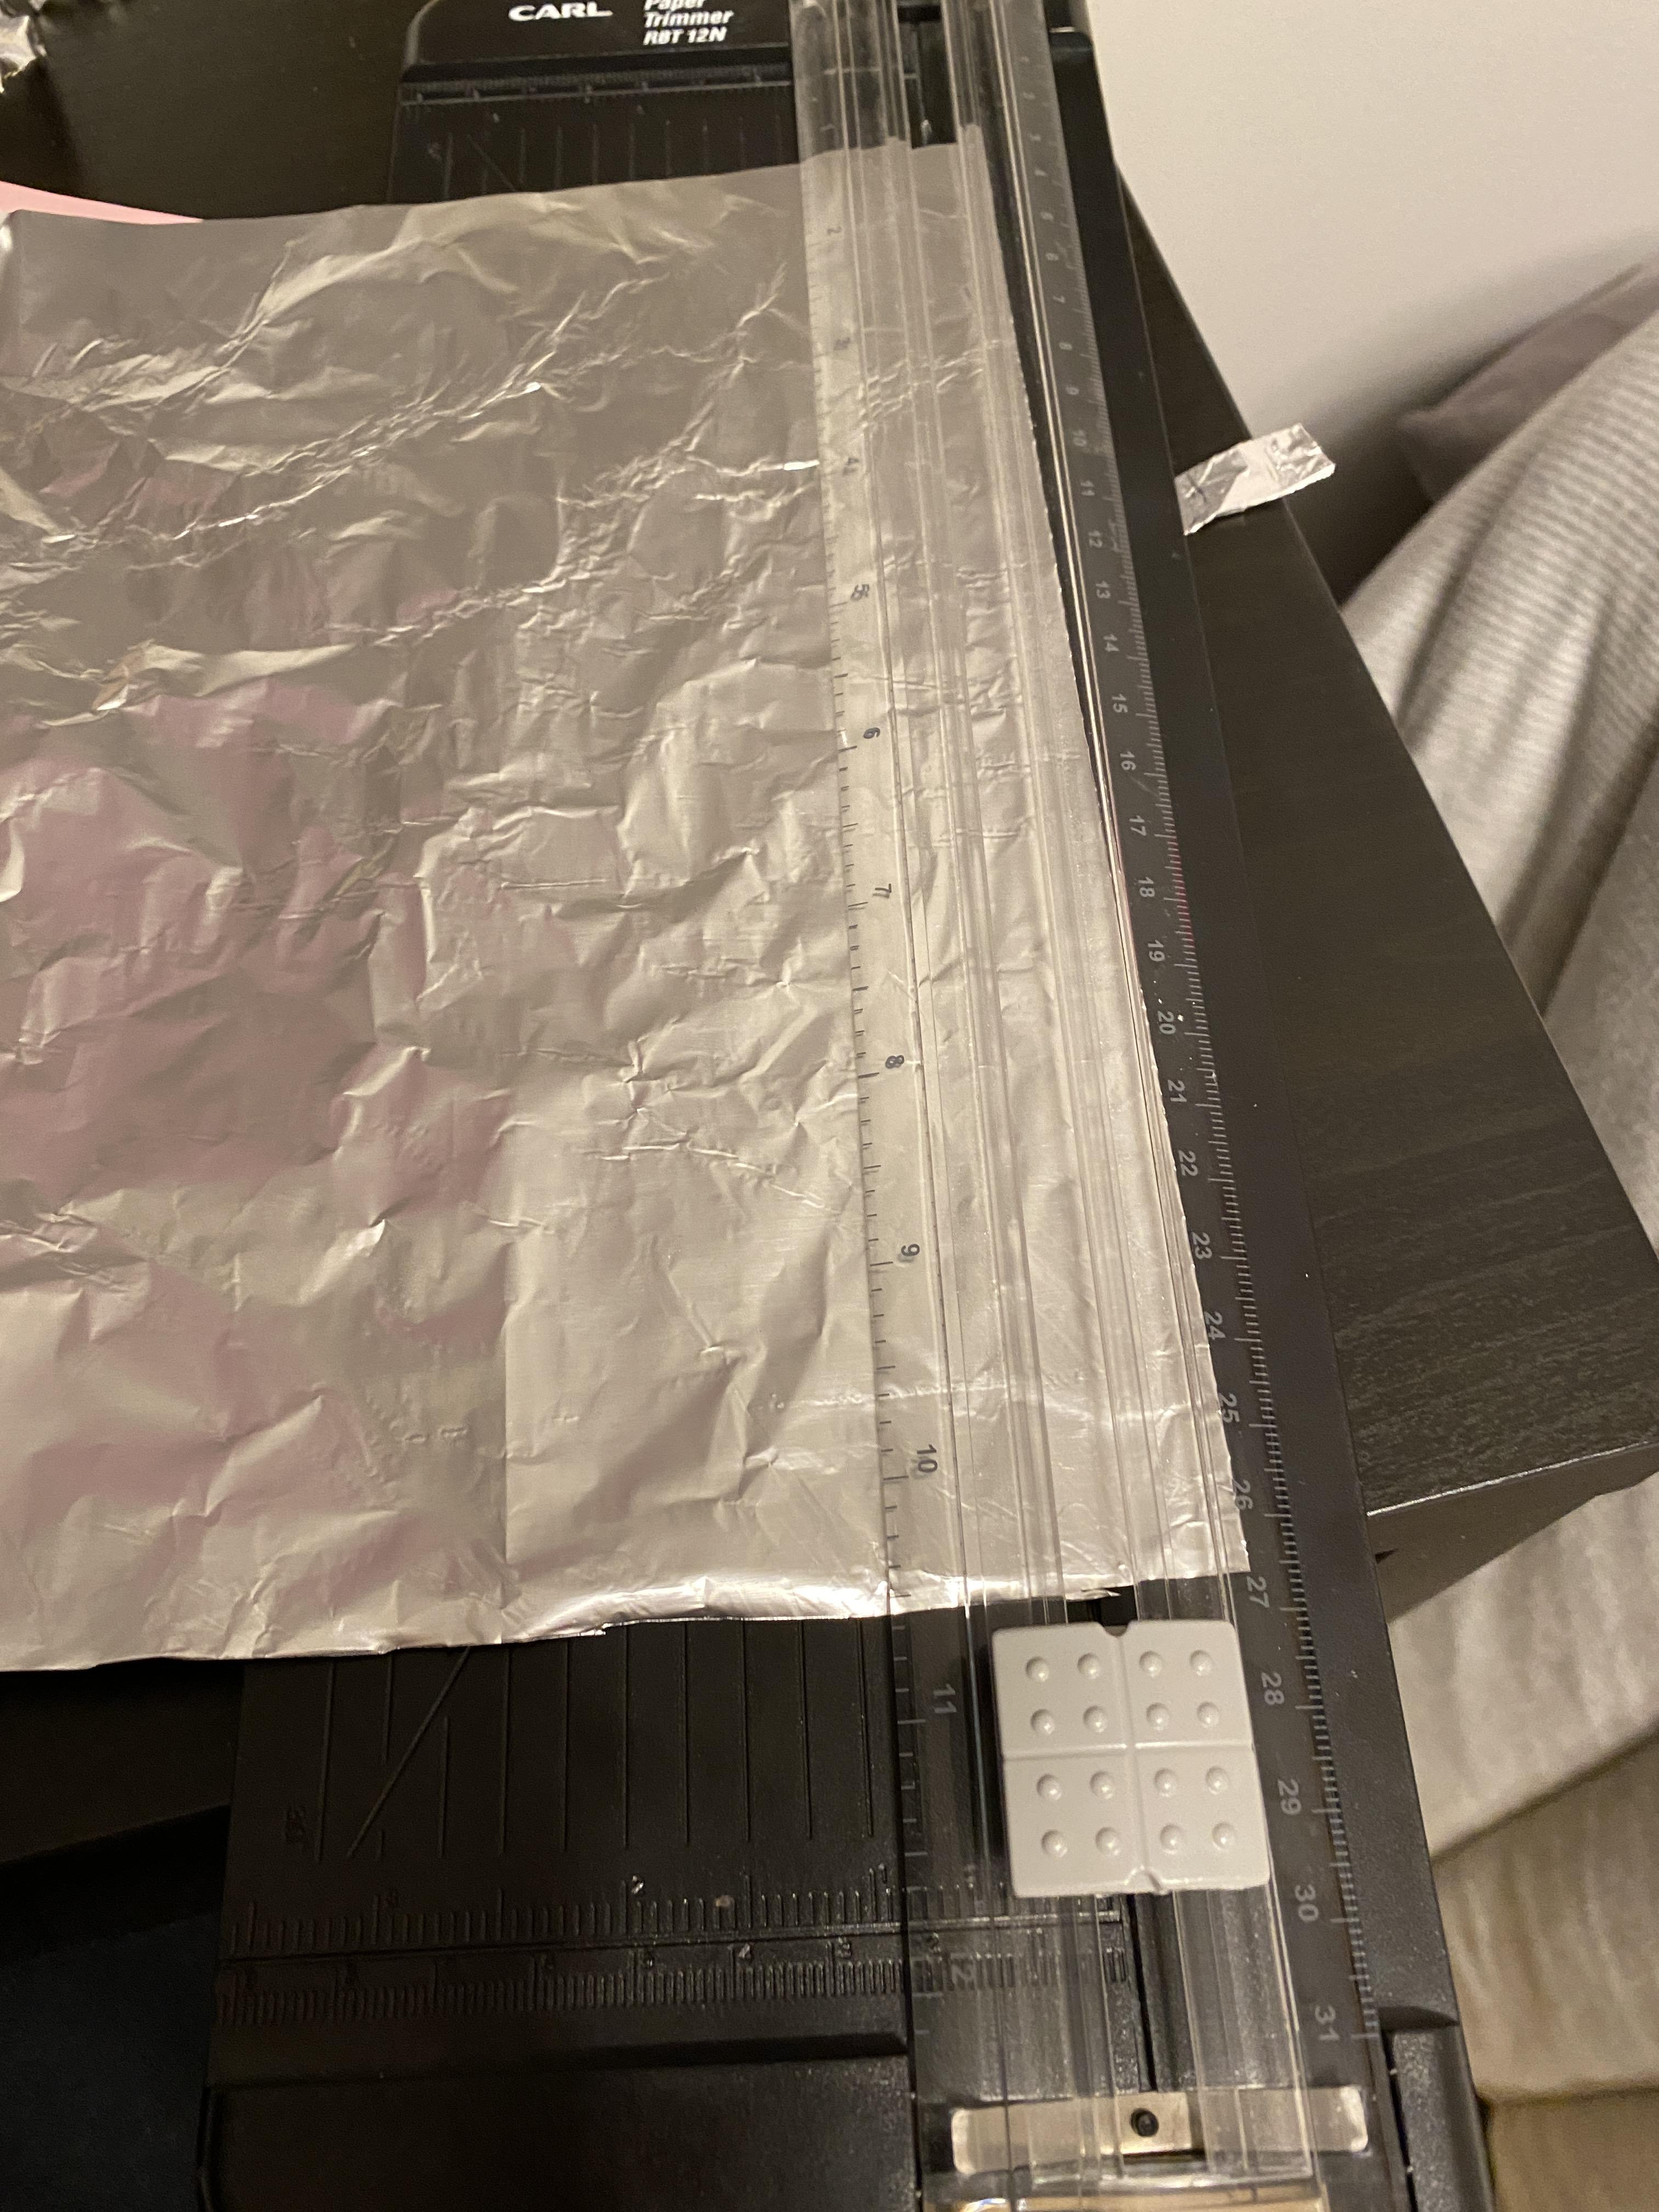
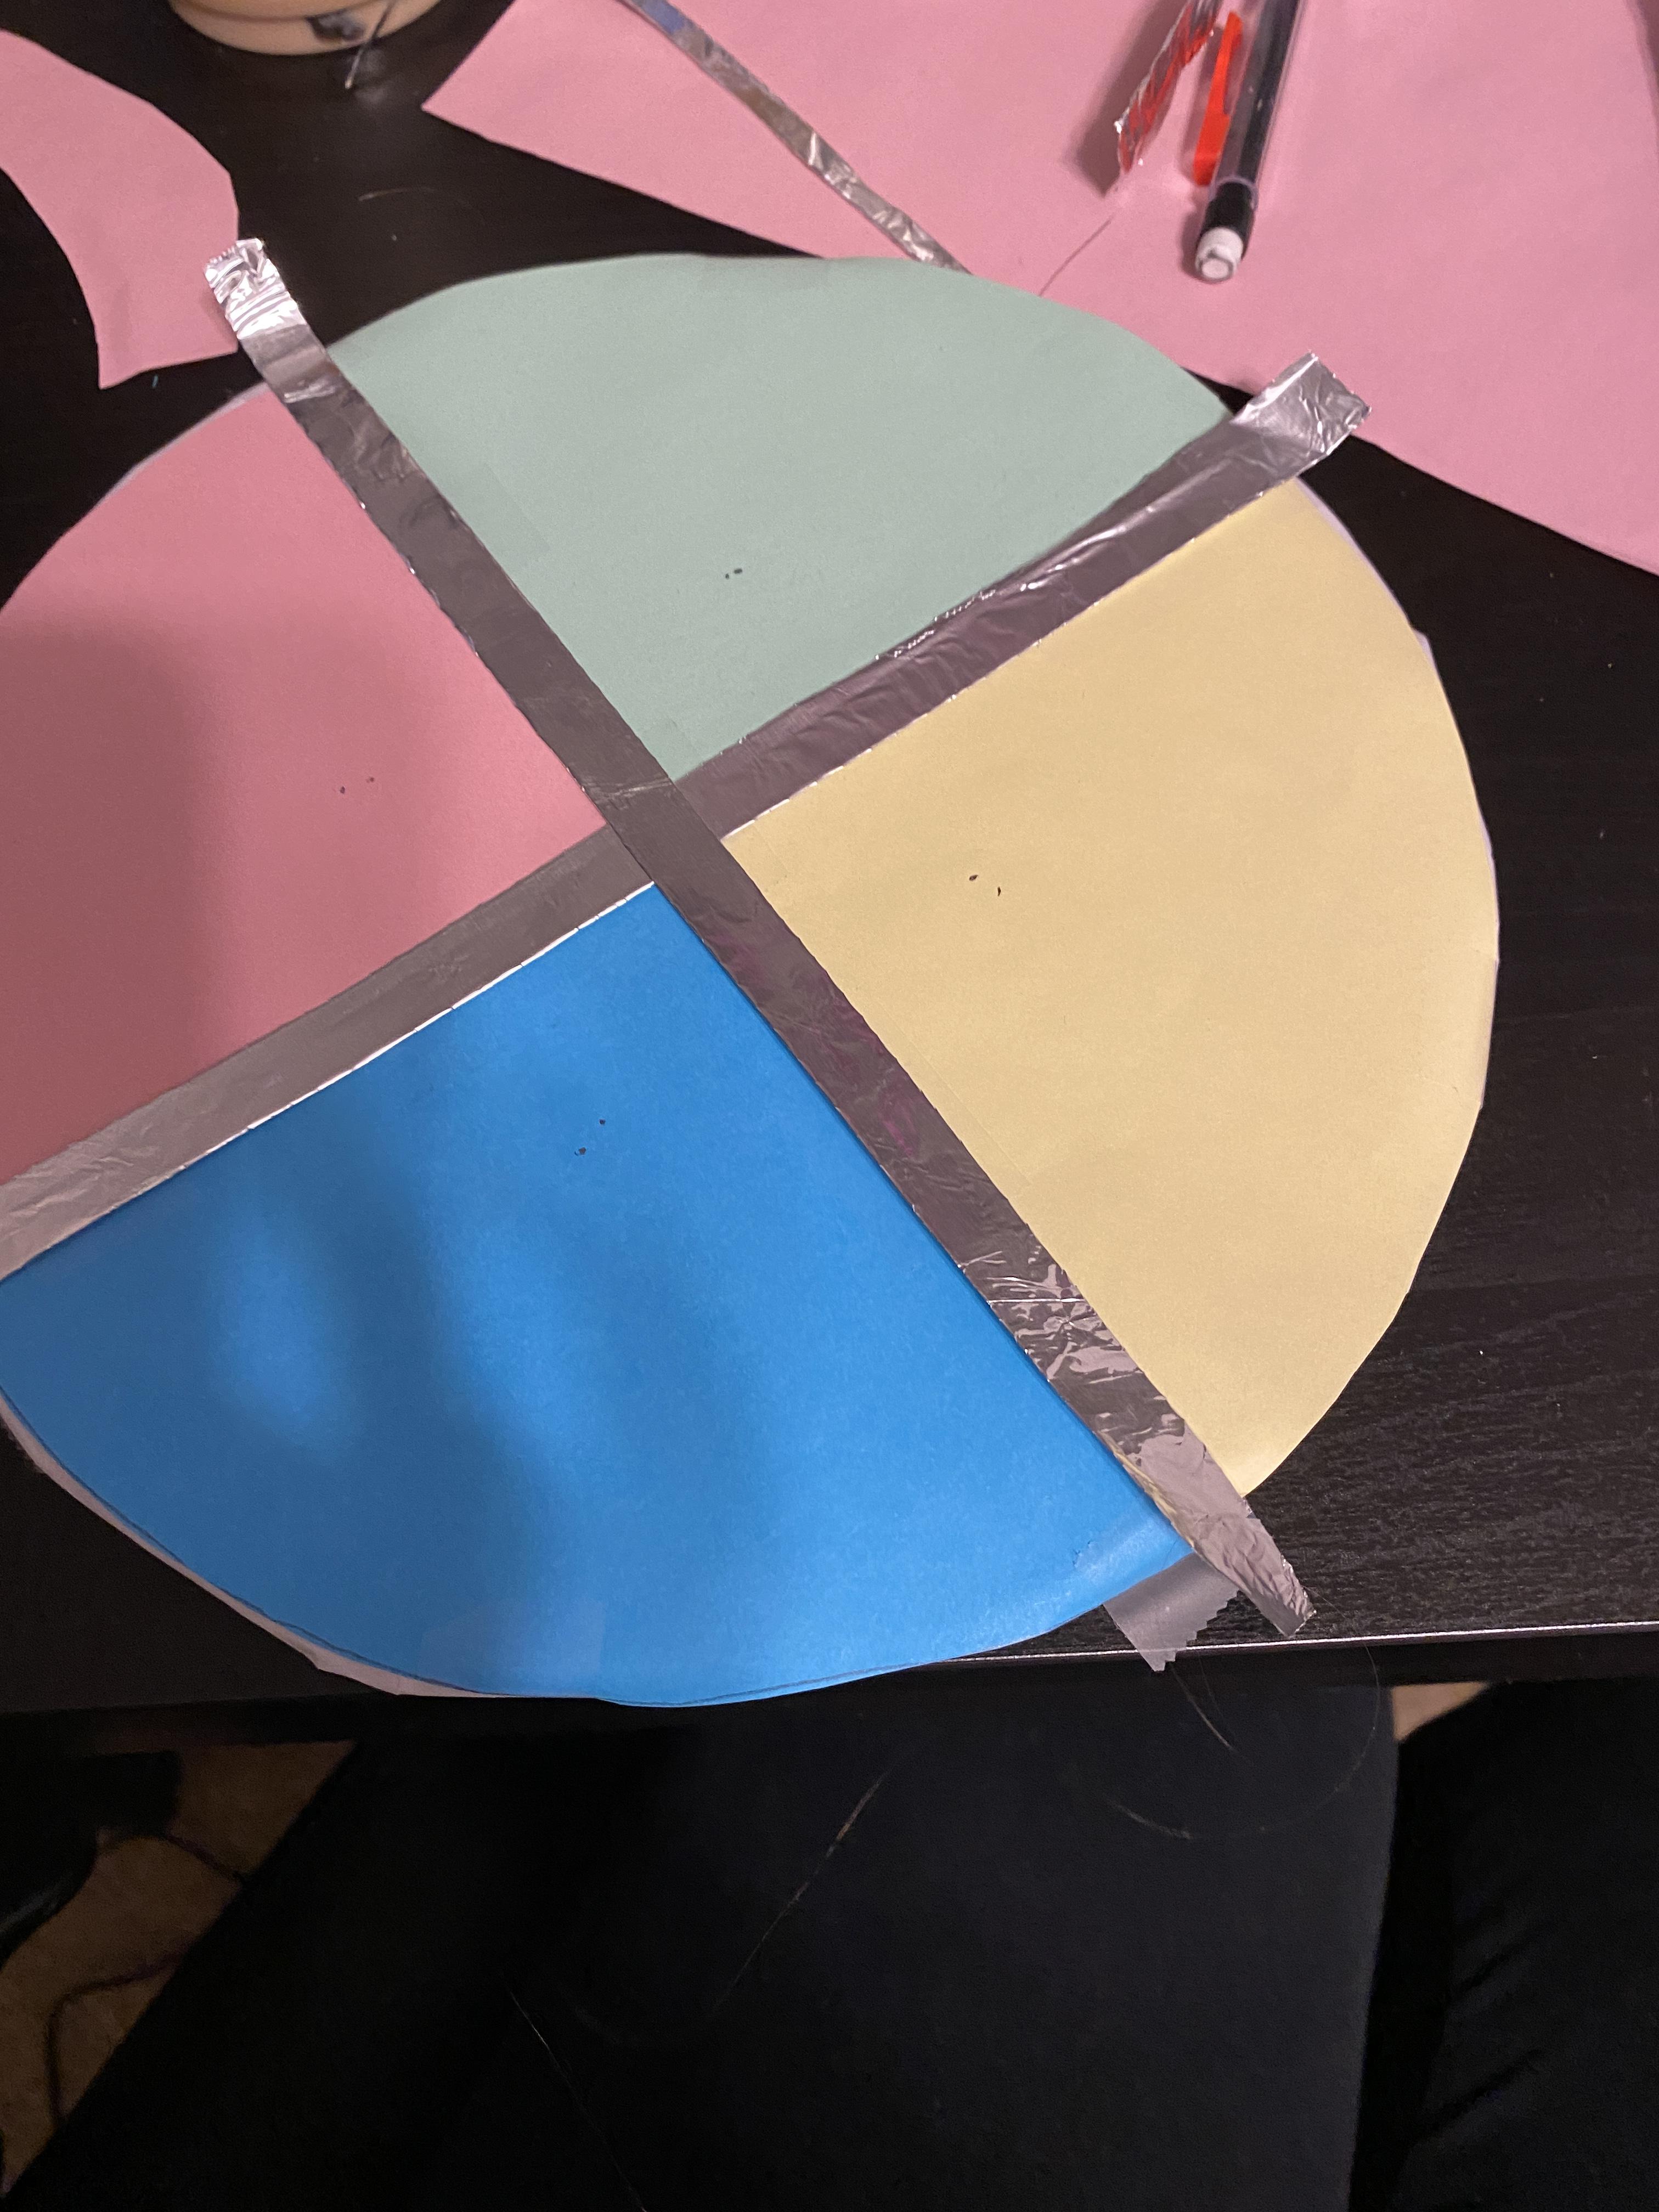
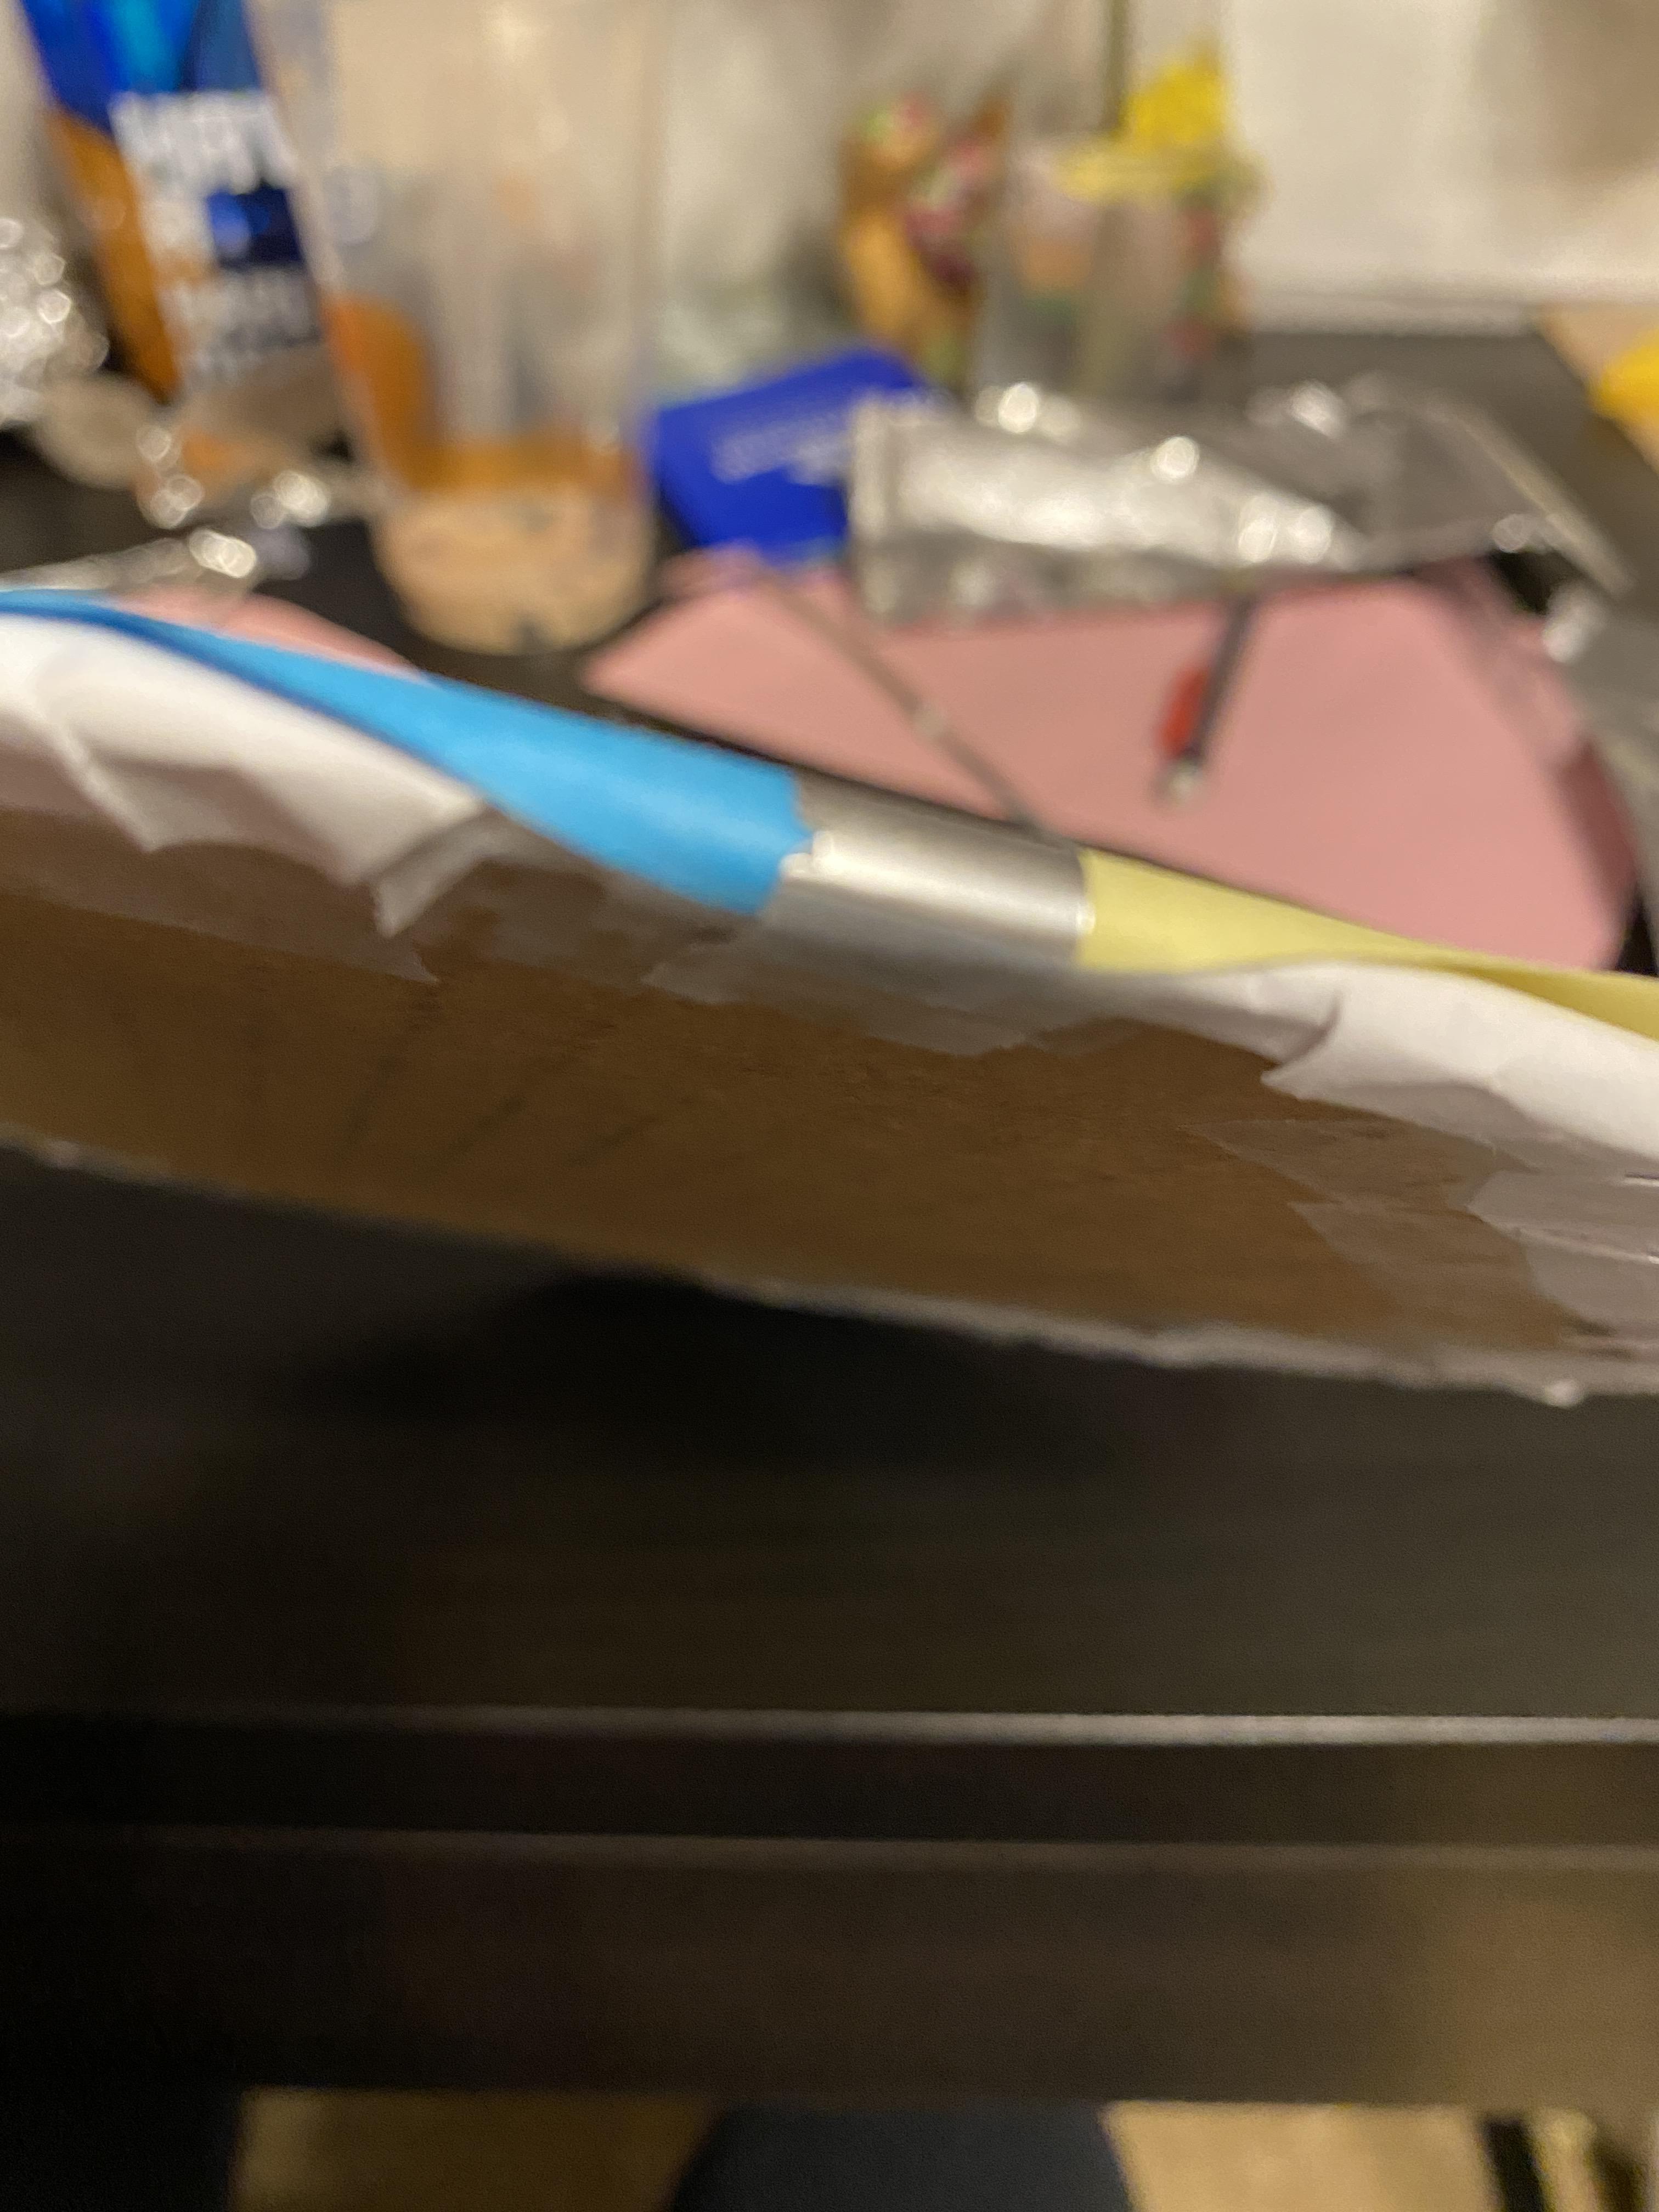
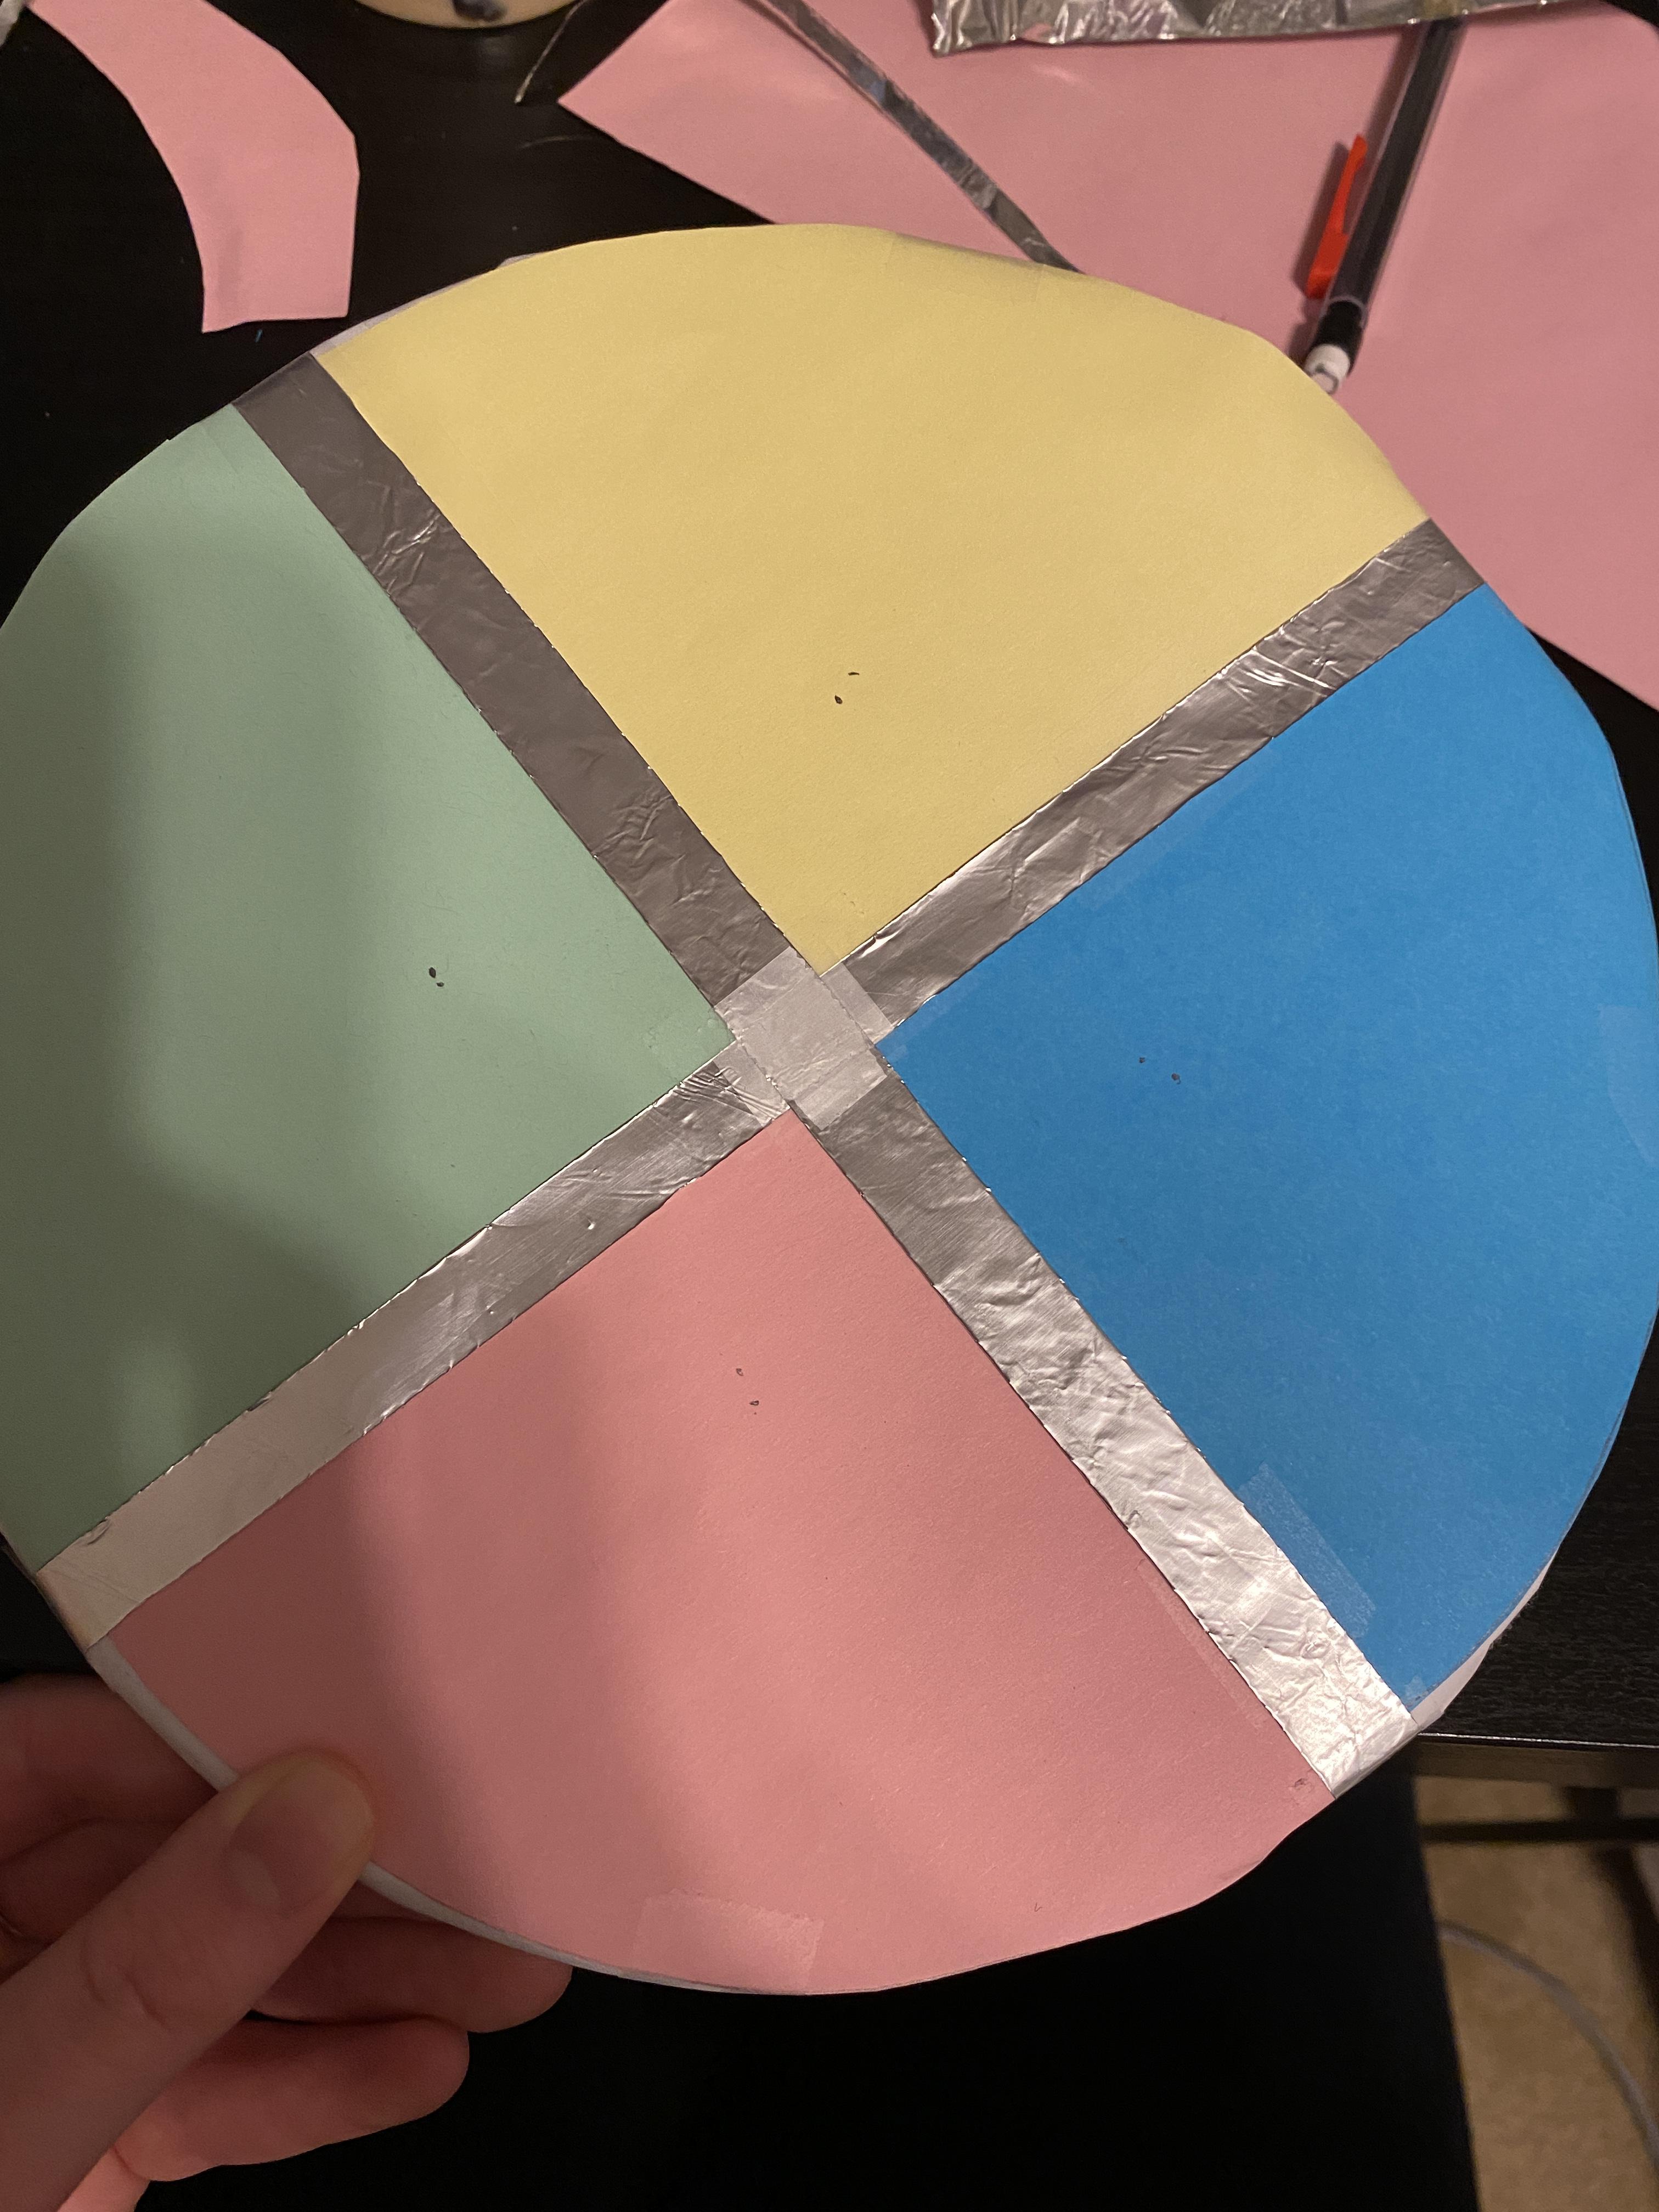
20. Take the paper cutter and a large piece of tinfoil. Use the paper cutter to slice a thin, straight piece of tinfoil. Do this twice.
21. Take the first strip of tin foil and place it along the joint from one side to the other. It is good if the strip goes longer than the cardboard.
22. Tape it down in the center with a single piece of tape. Take the other strip of tin foil and do the same thing, except put it along the other joint. Bend the ends of the tin foil strips over the side and tape them to the bottom.
Attaching the Tinfoil Circles
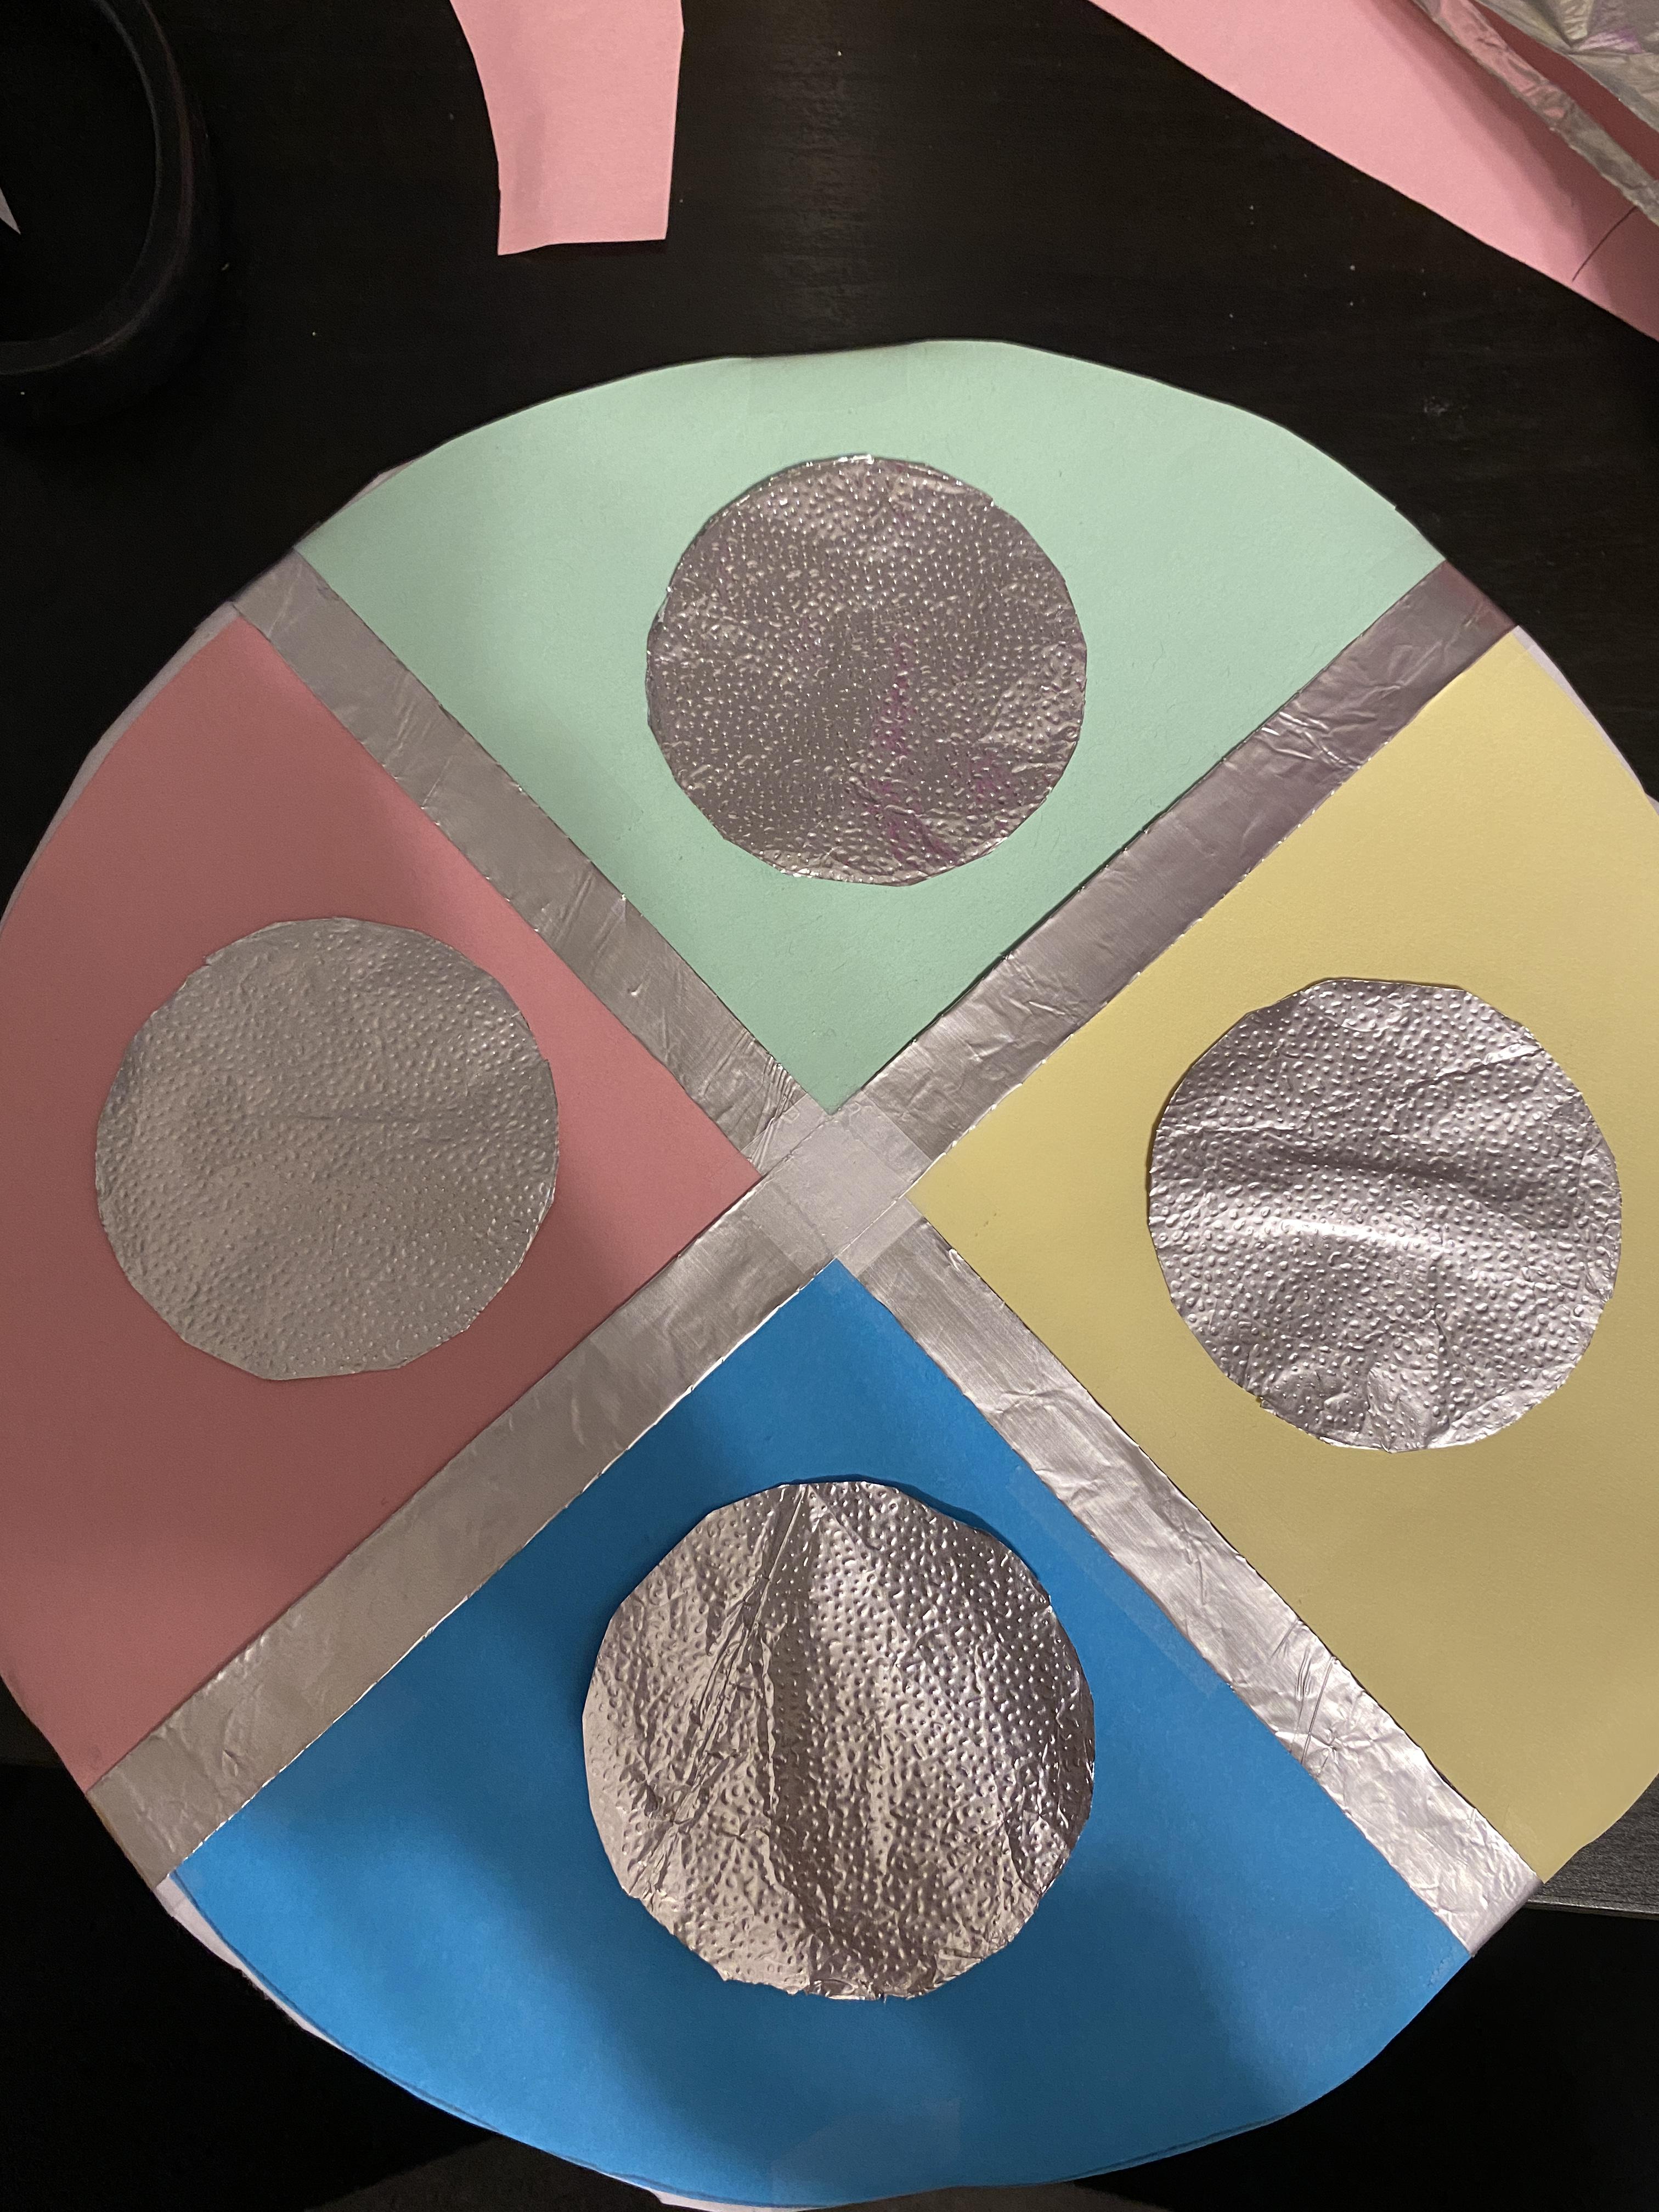
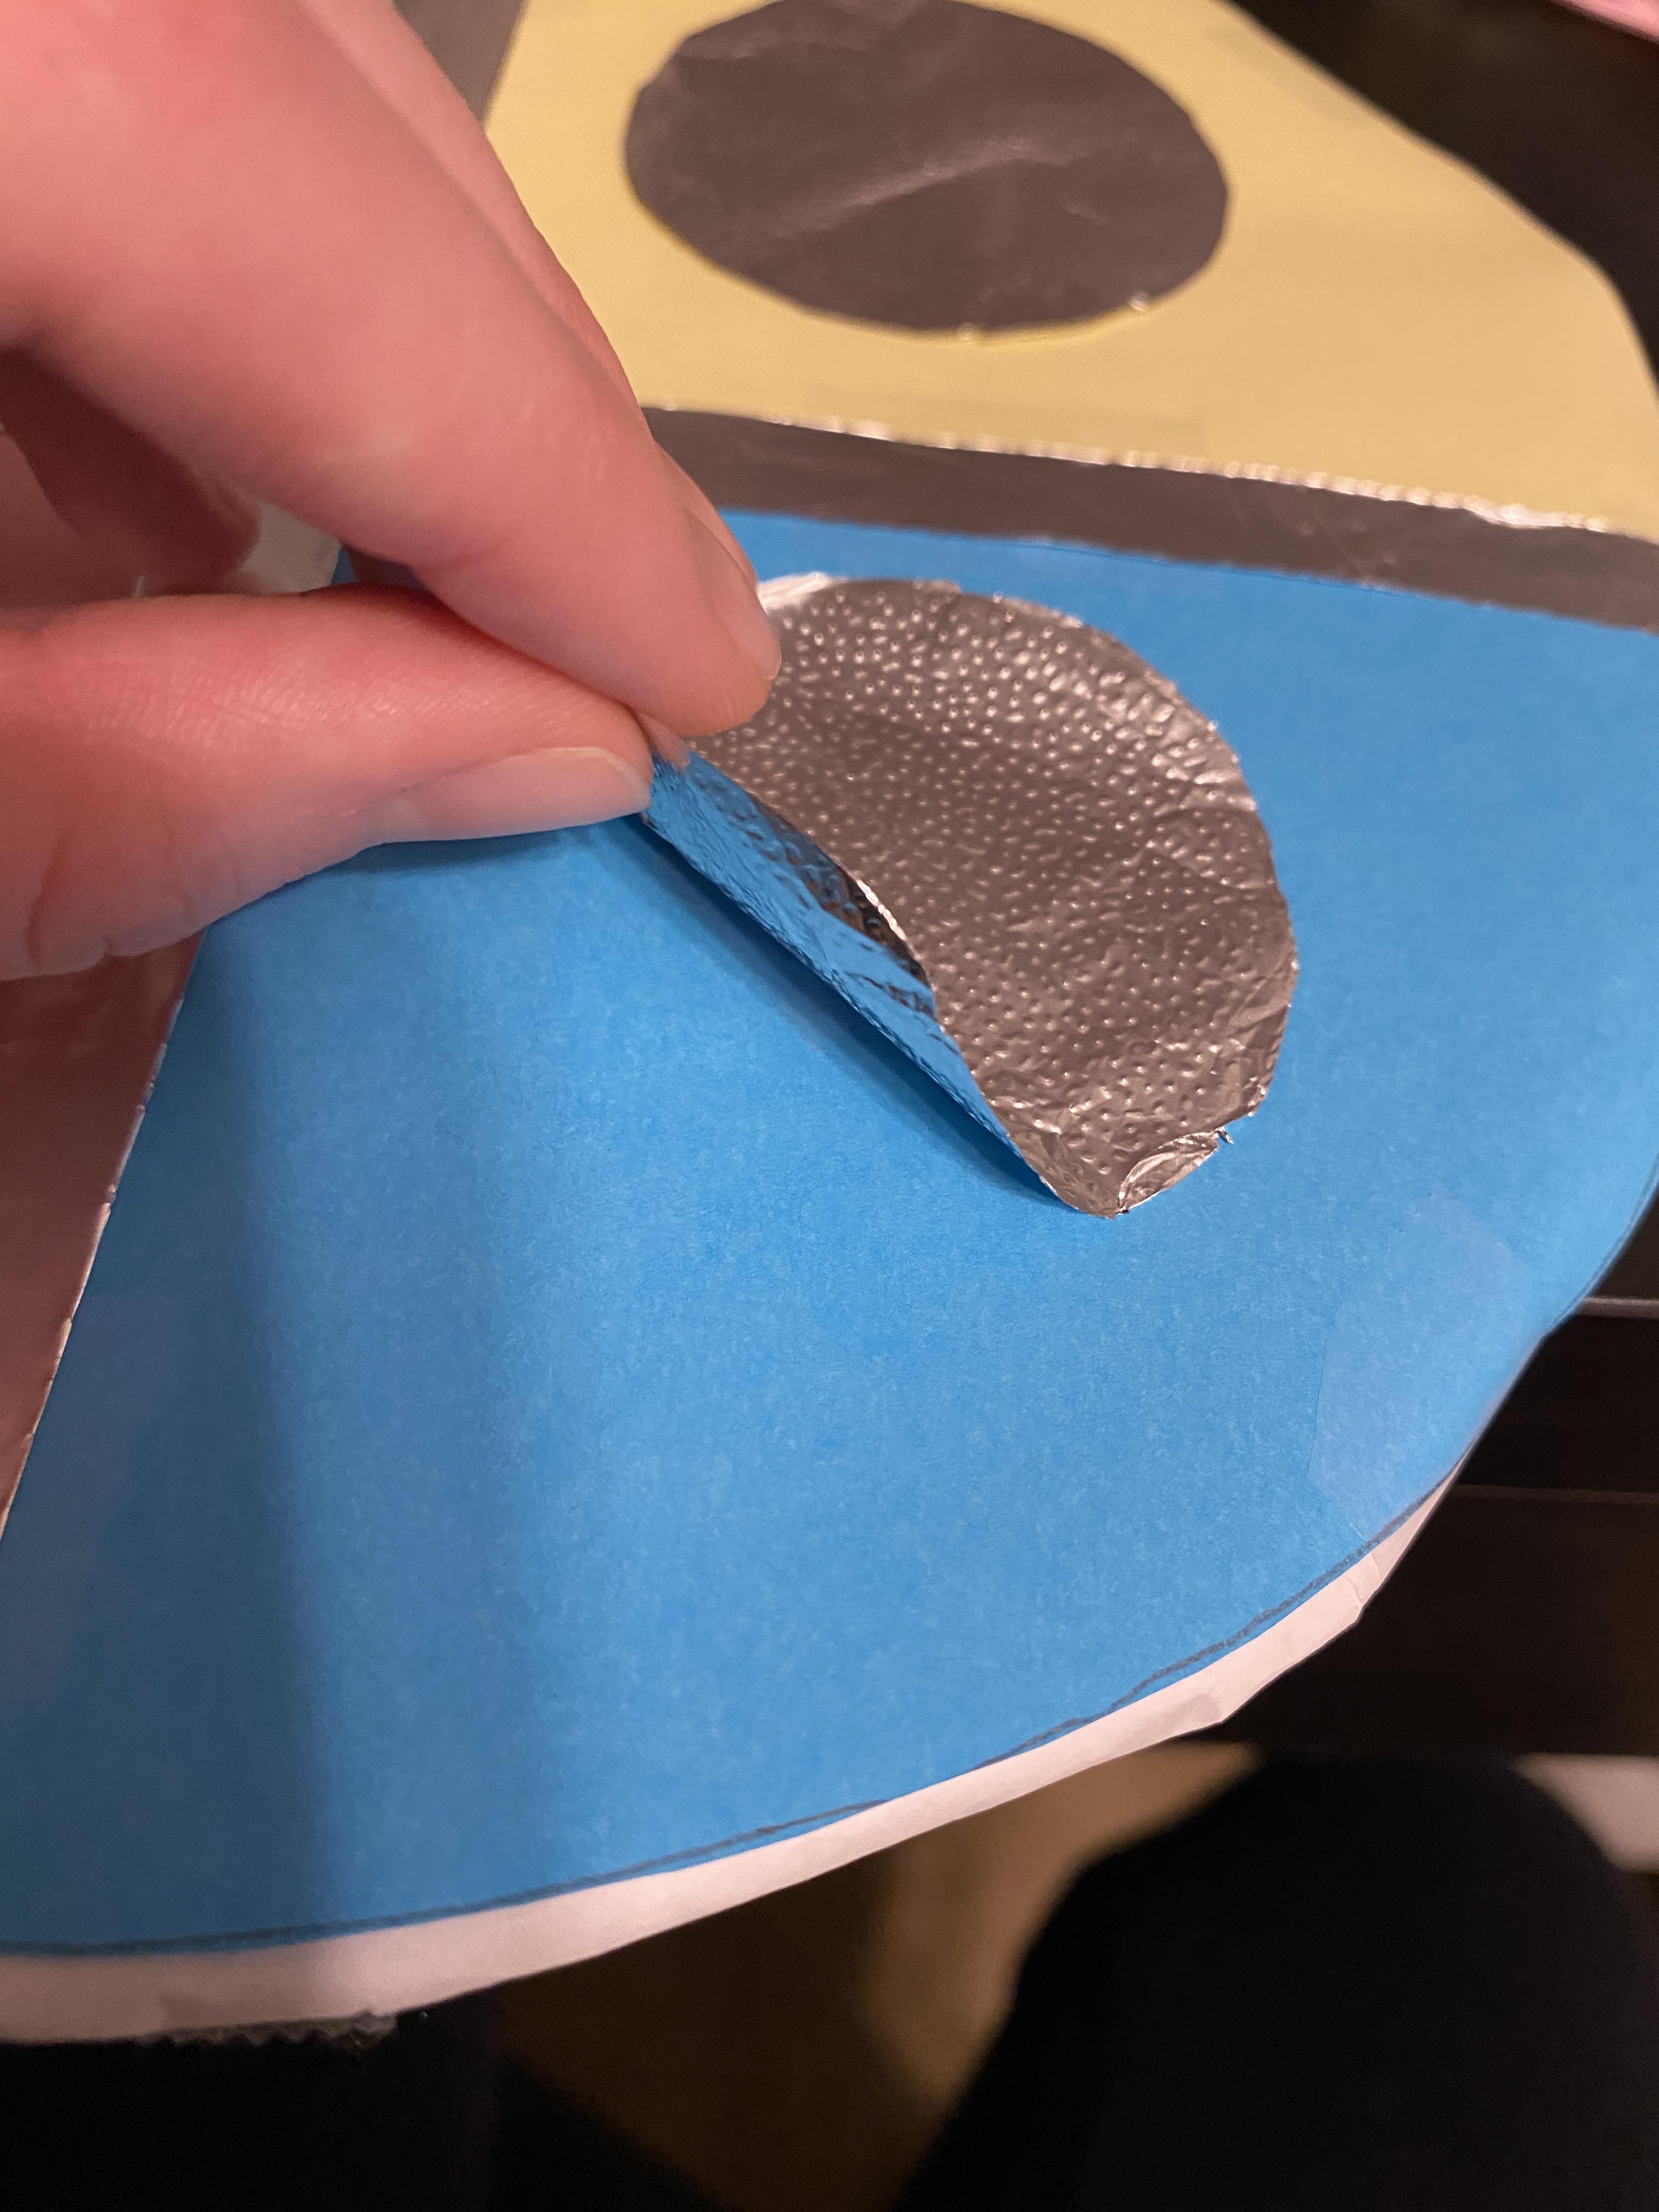
23. Now take the 4 circles of tin foil from earlier and place them in the center of each quadrant.
24. One at a time lift up the circles and place a foiled piece of tape underneath them and stick it down. Try to make it as centered as possible.
Adding Additional Tinfoil
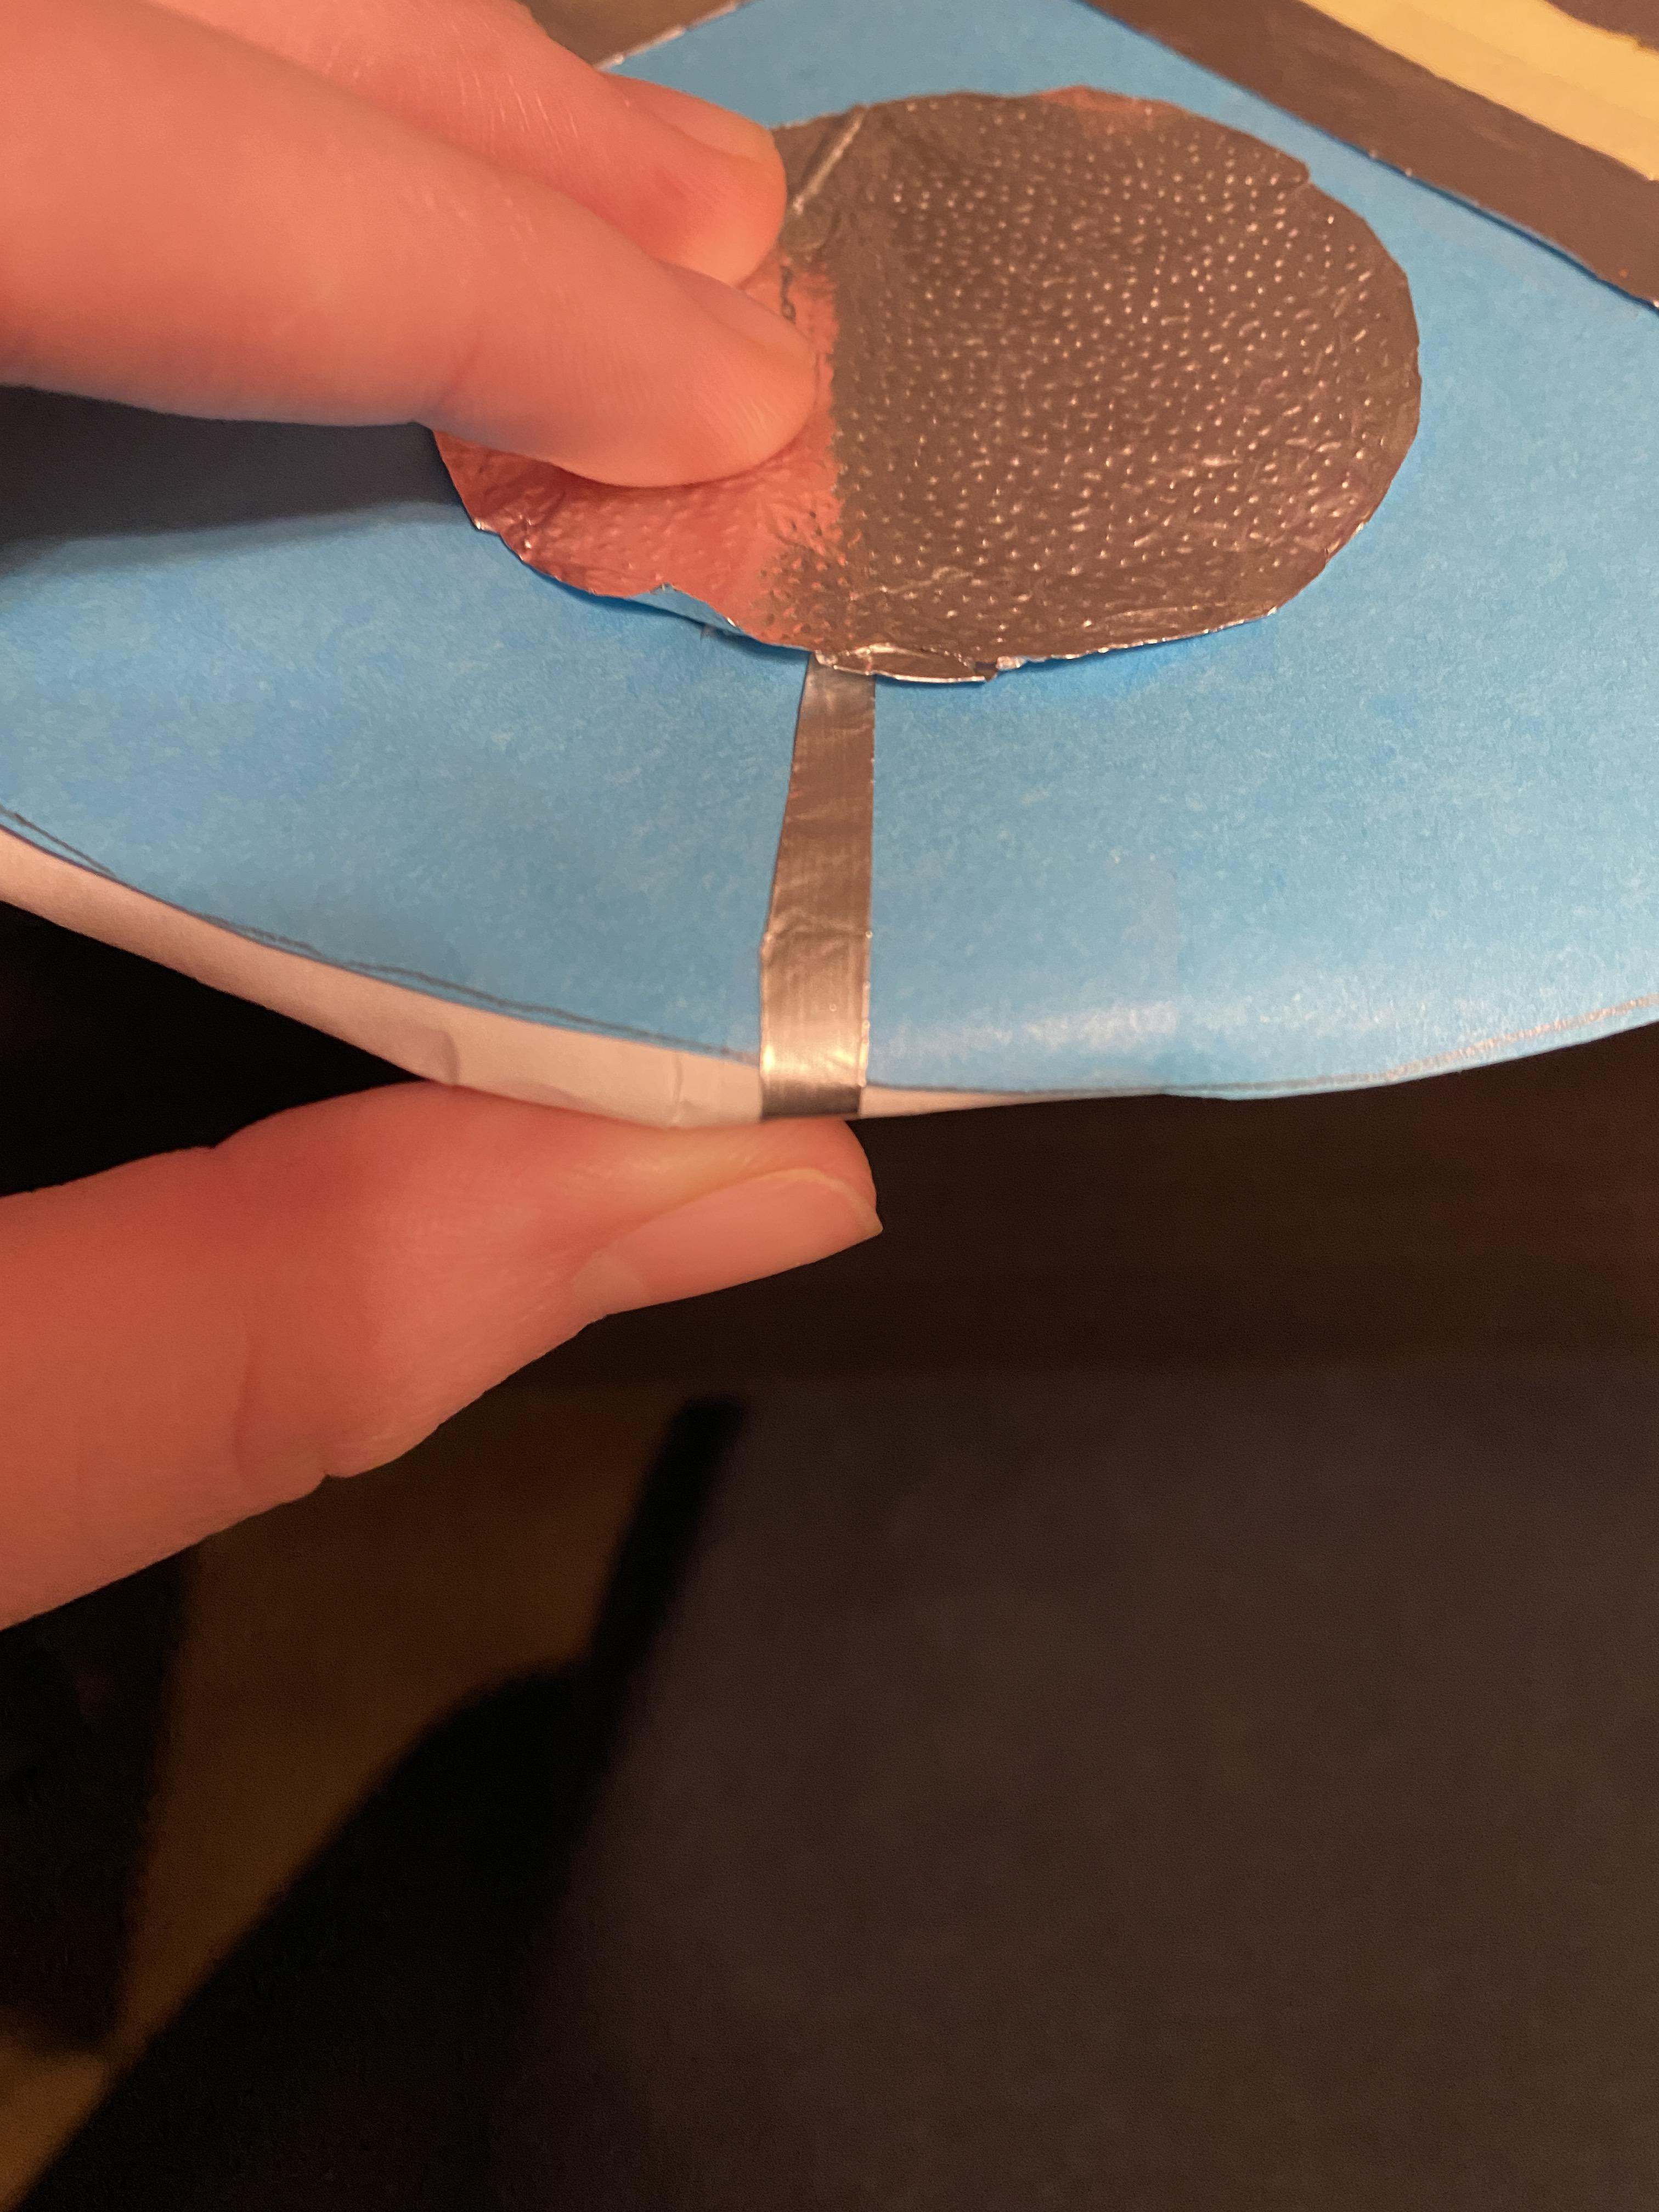
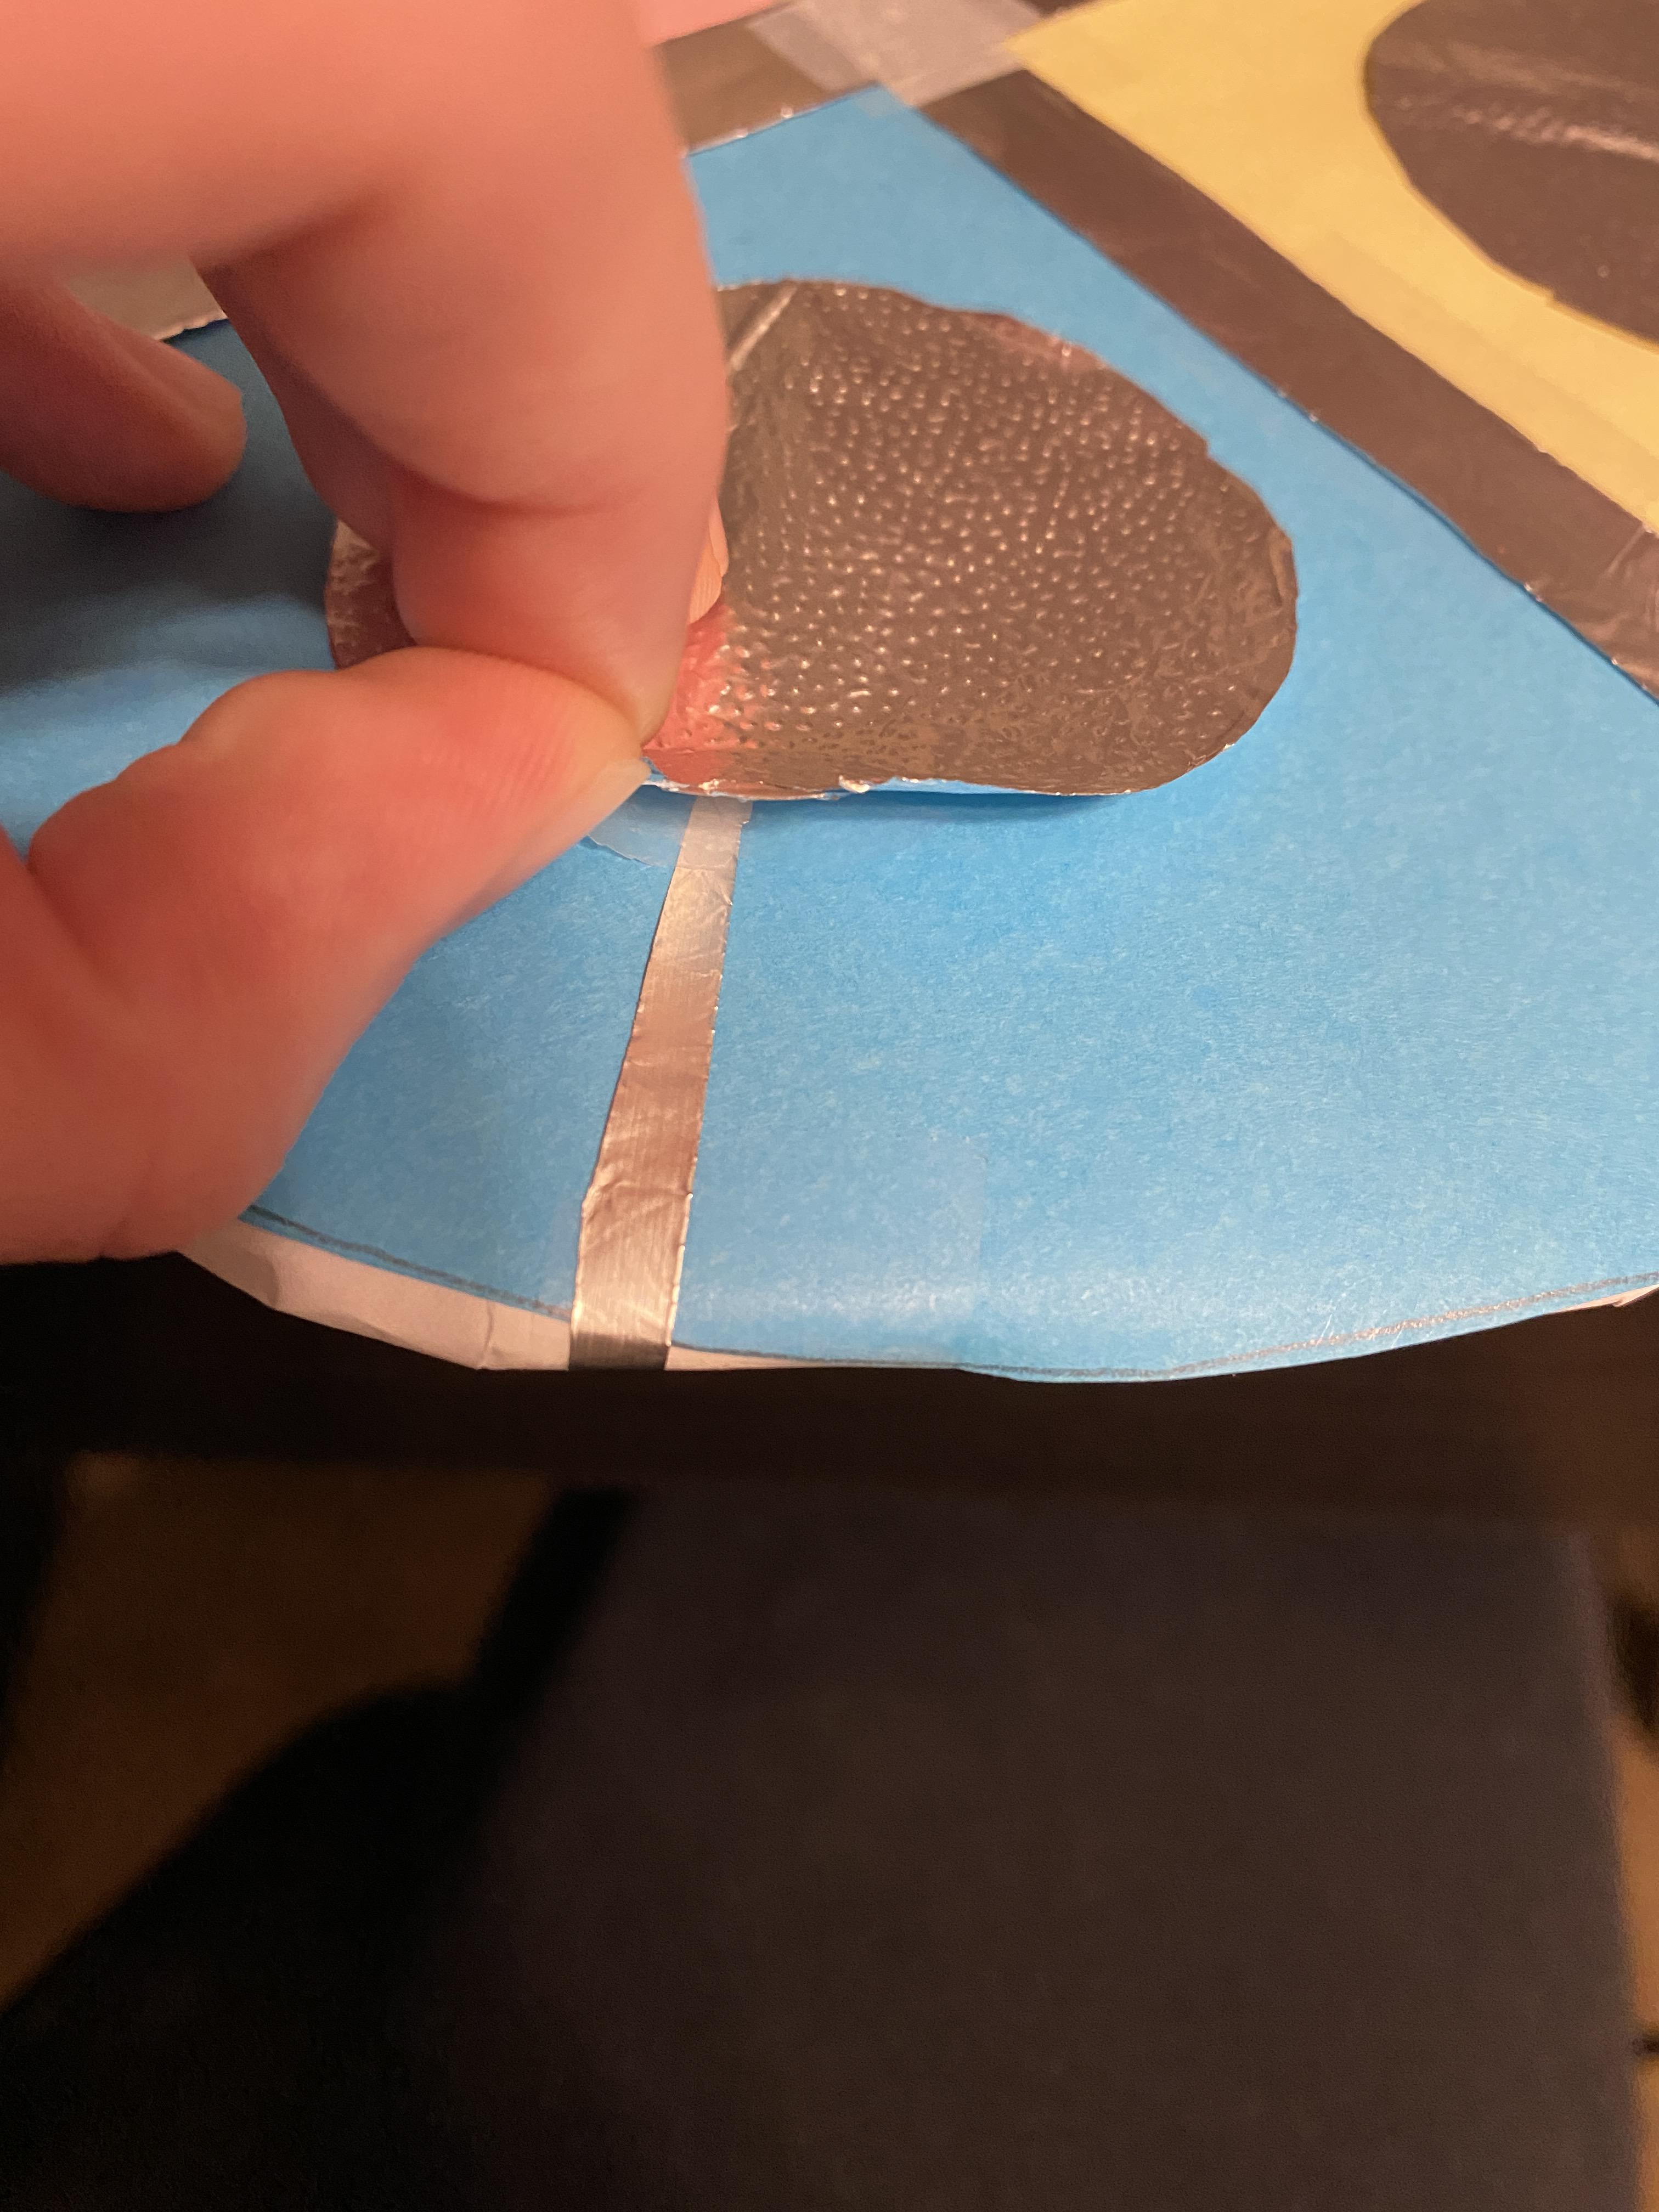
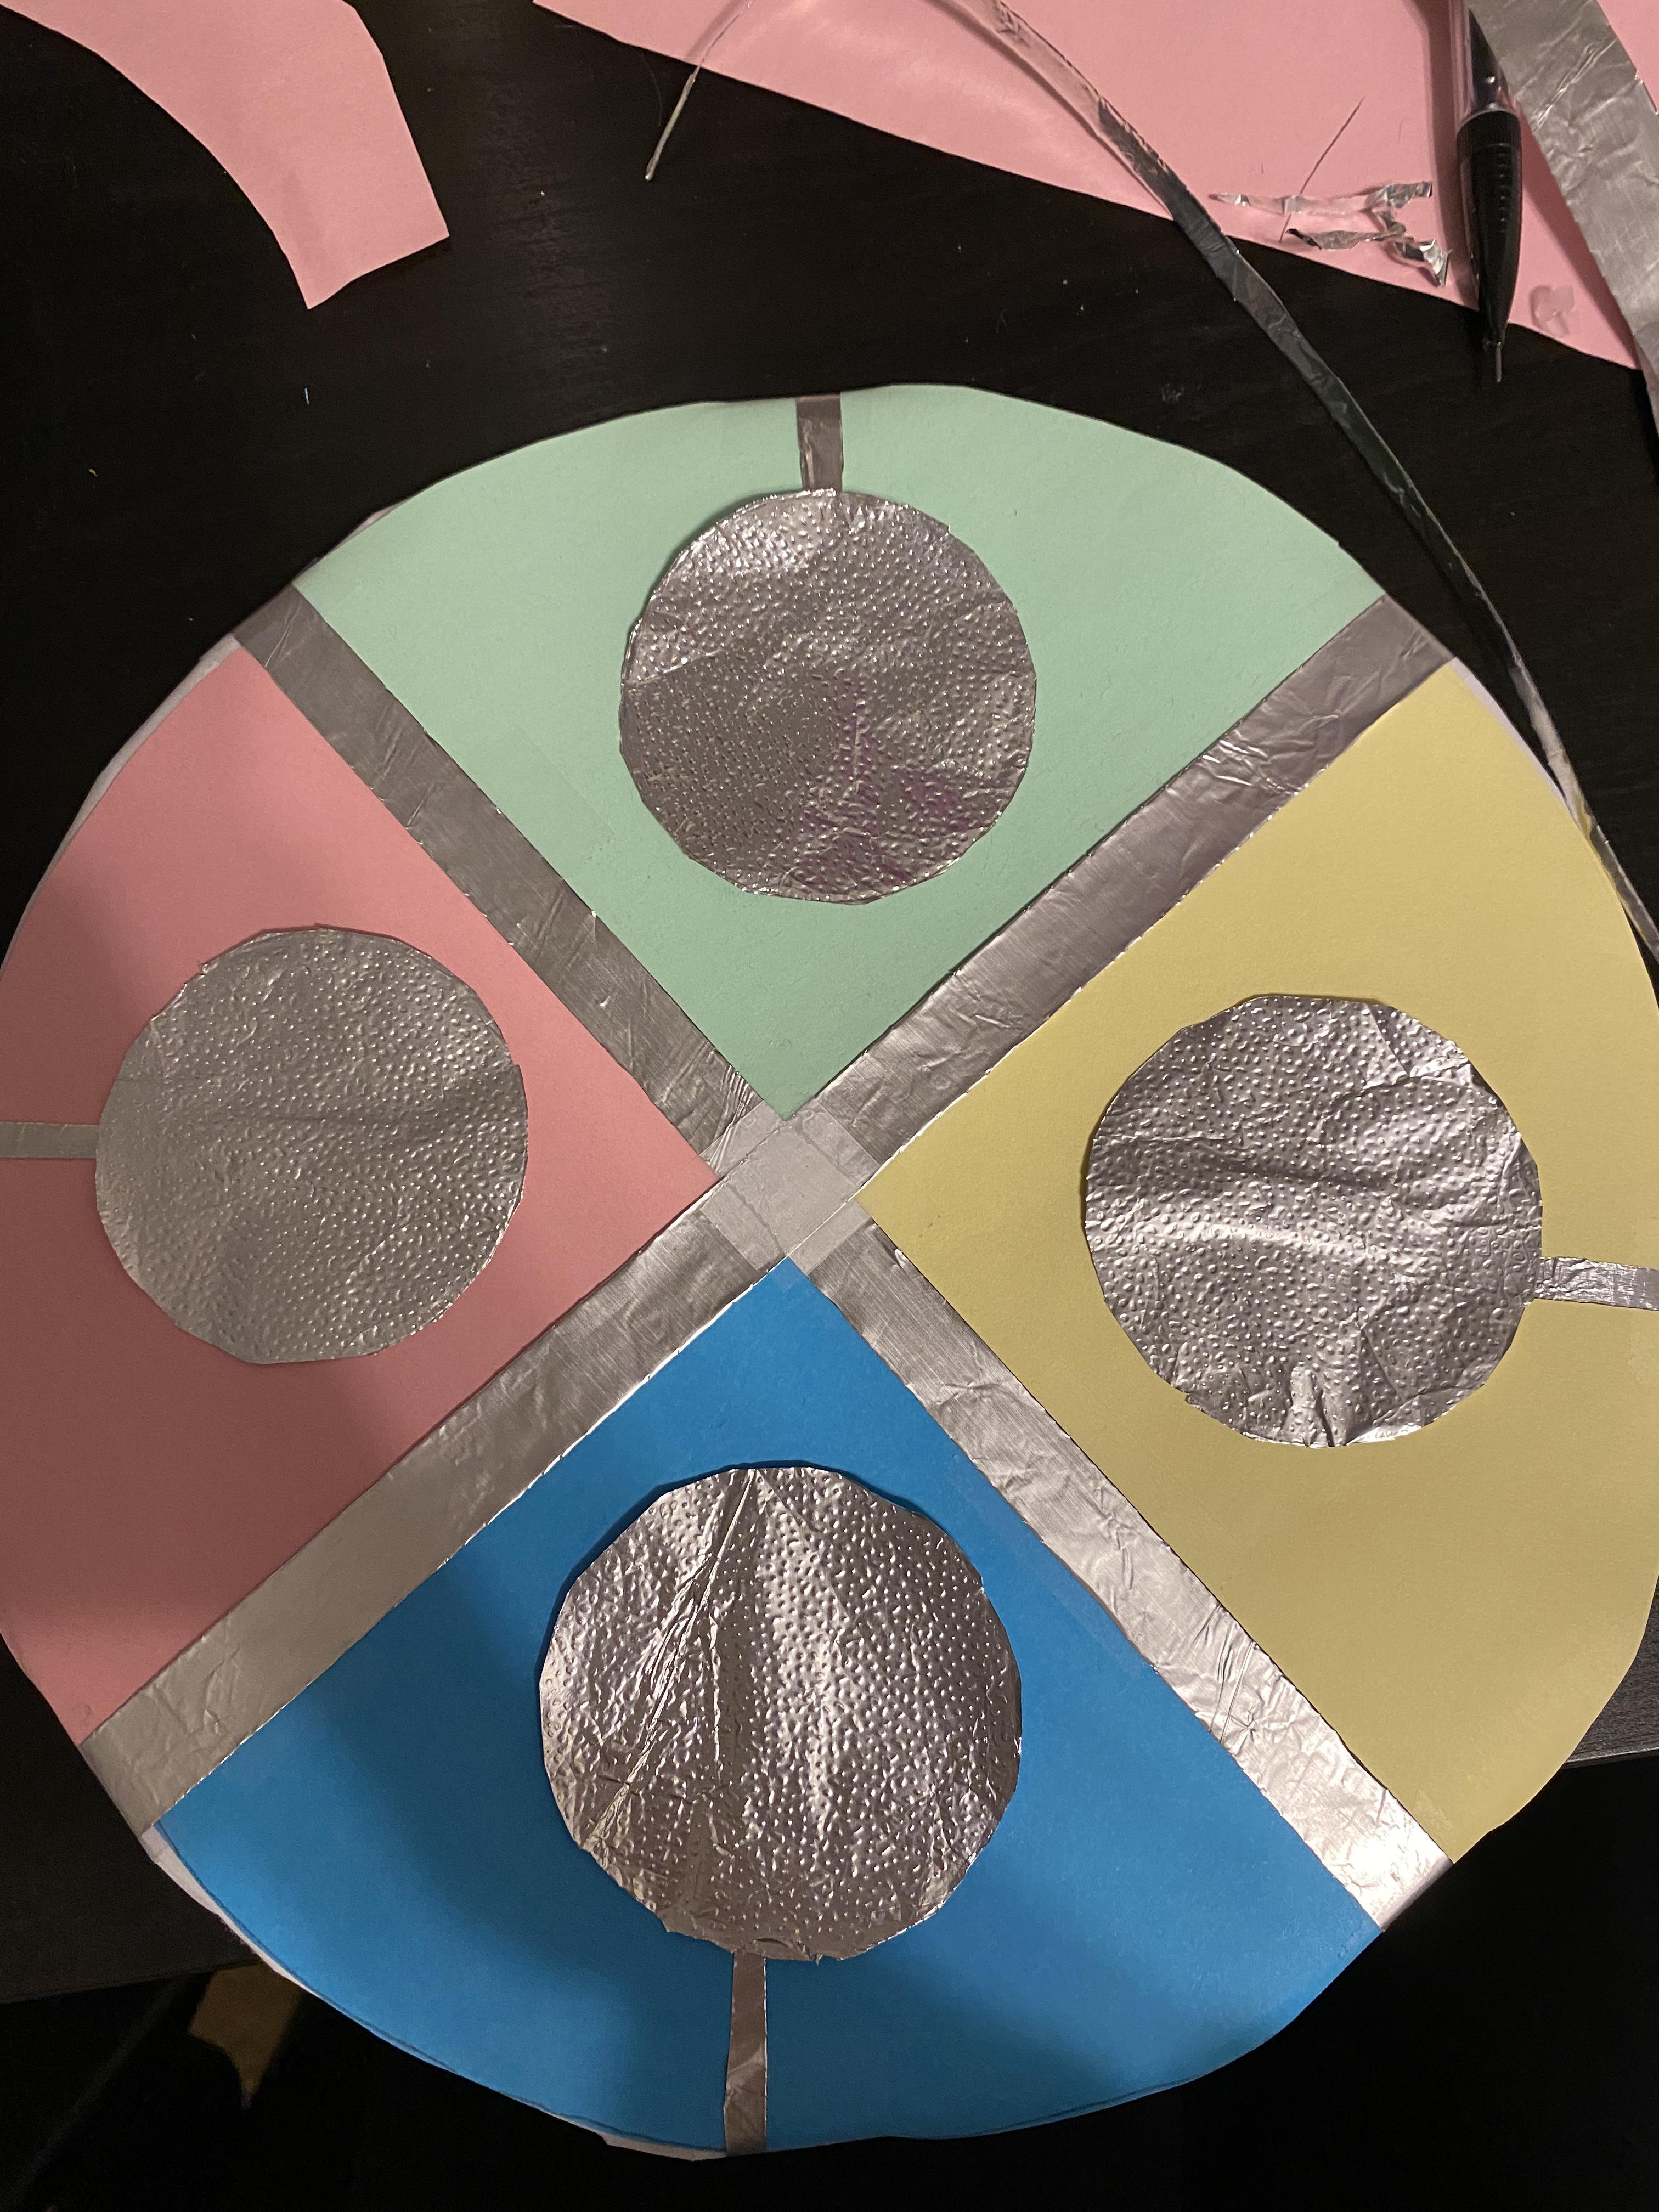
25. Now cut a very thin piece of tinfoil using the scissors.
26. Take that piece and cut it into 4 smaller pieces
27. Put one edge of one of the mini strips under a circle and the other wrap around the edge.
28. Put a tiny piece of tape under the circle and on top of the mini strip to tape it down under the circle.
29. Place another piece of tape on the edge of the end on the bottom to lock it in place.
30. Repeat dd - ff with all the mini strips and the circles.
The Hippo!
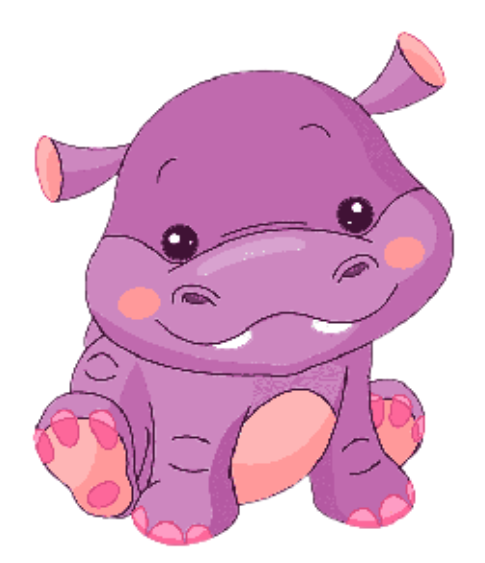
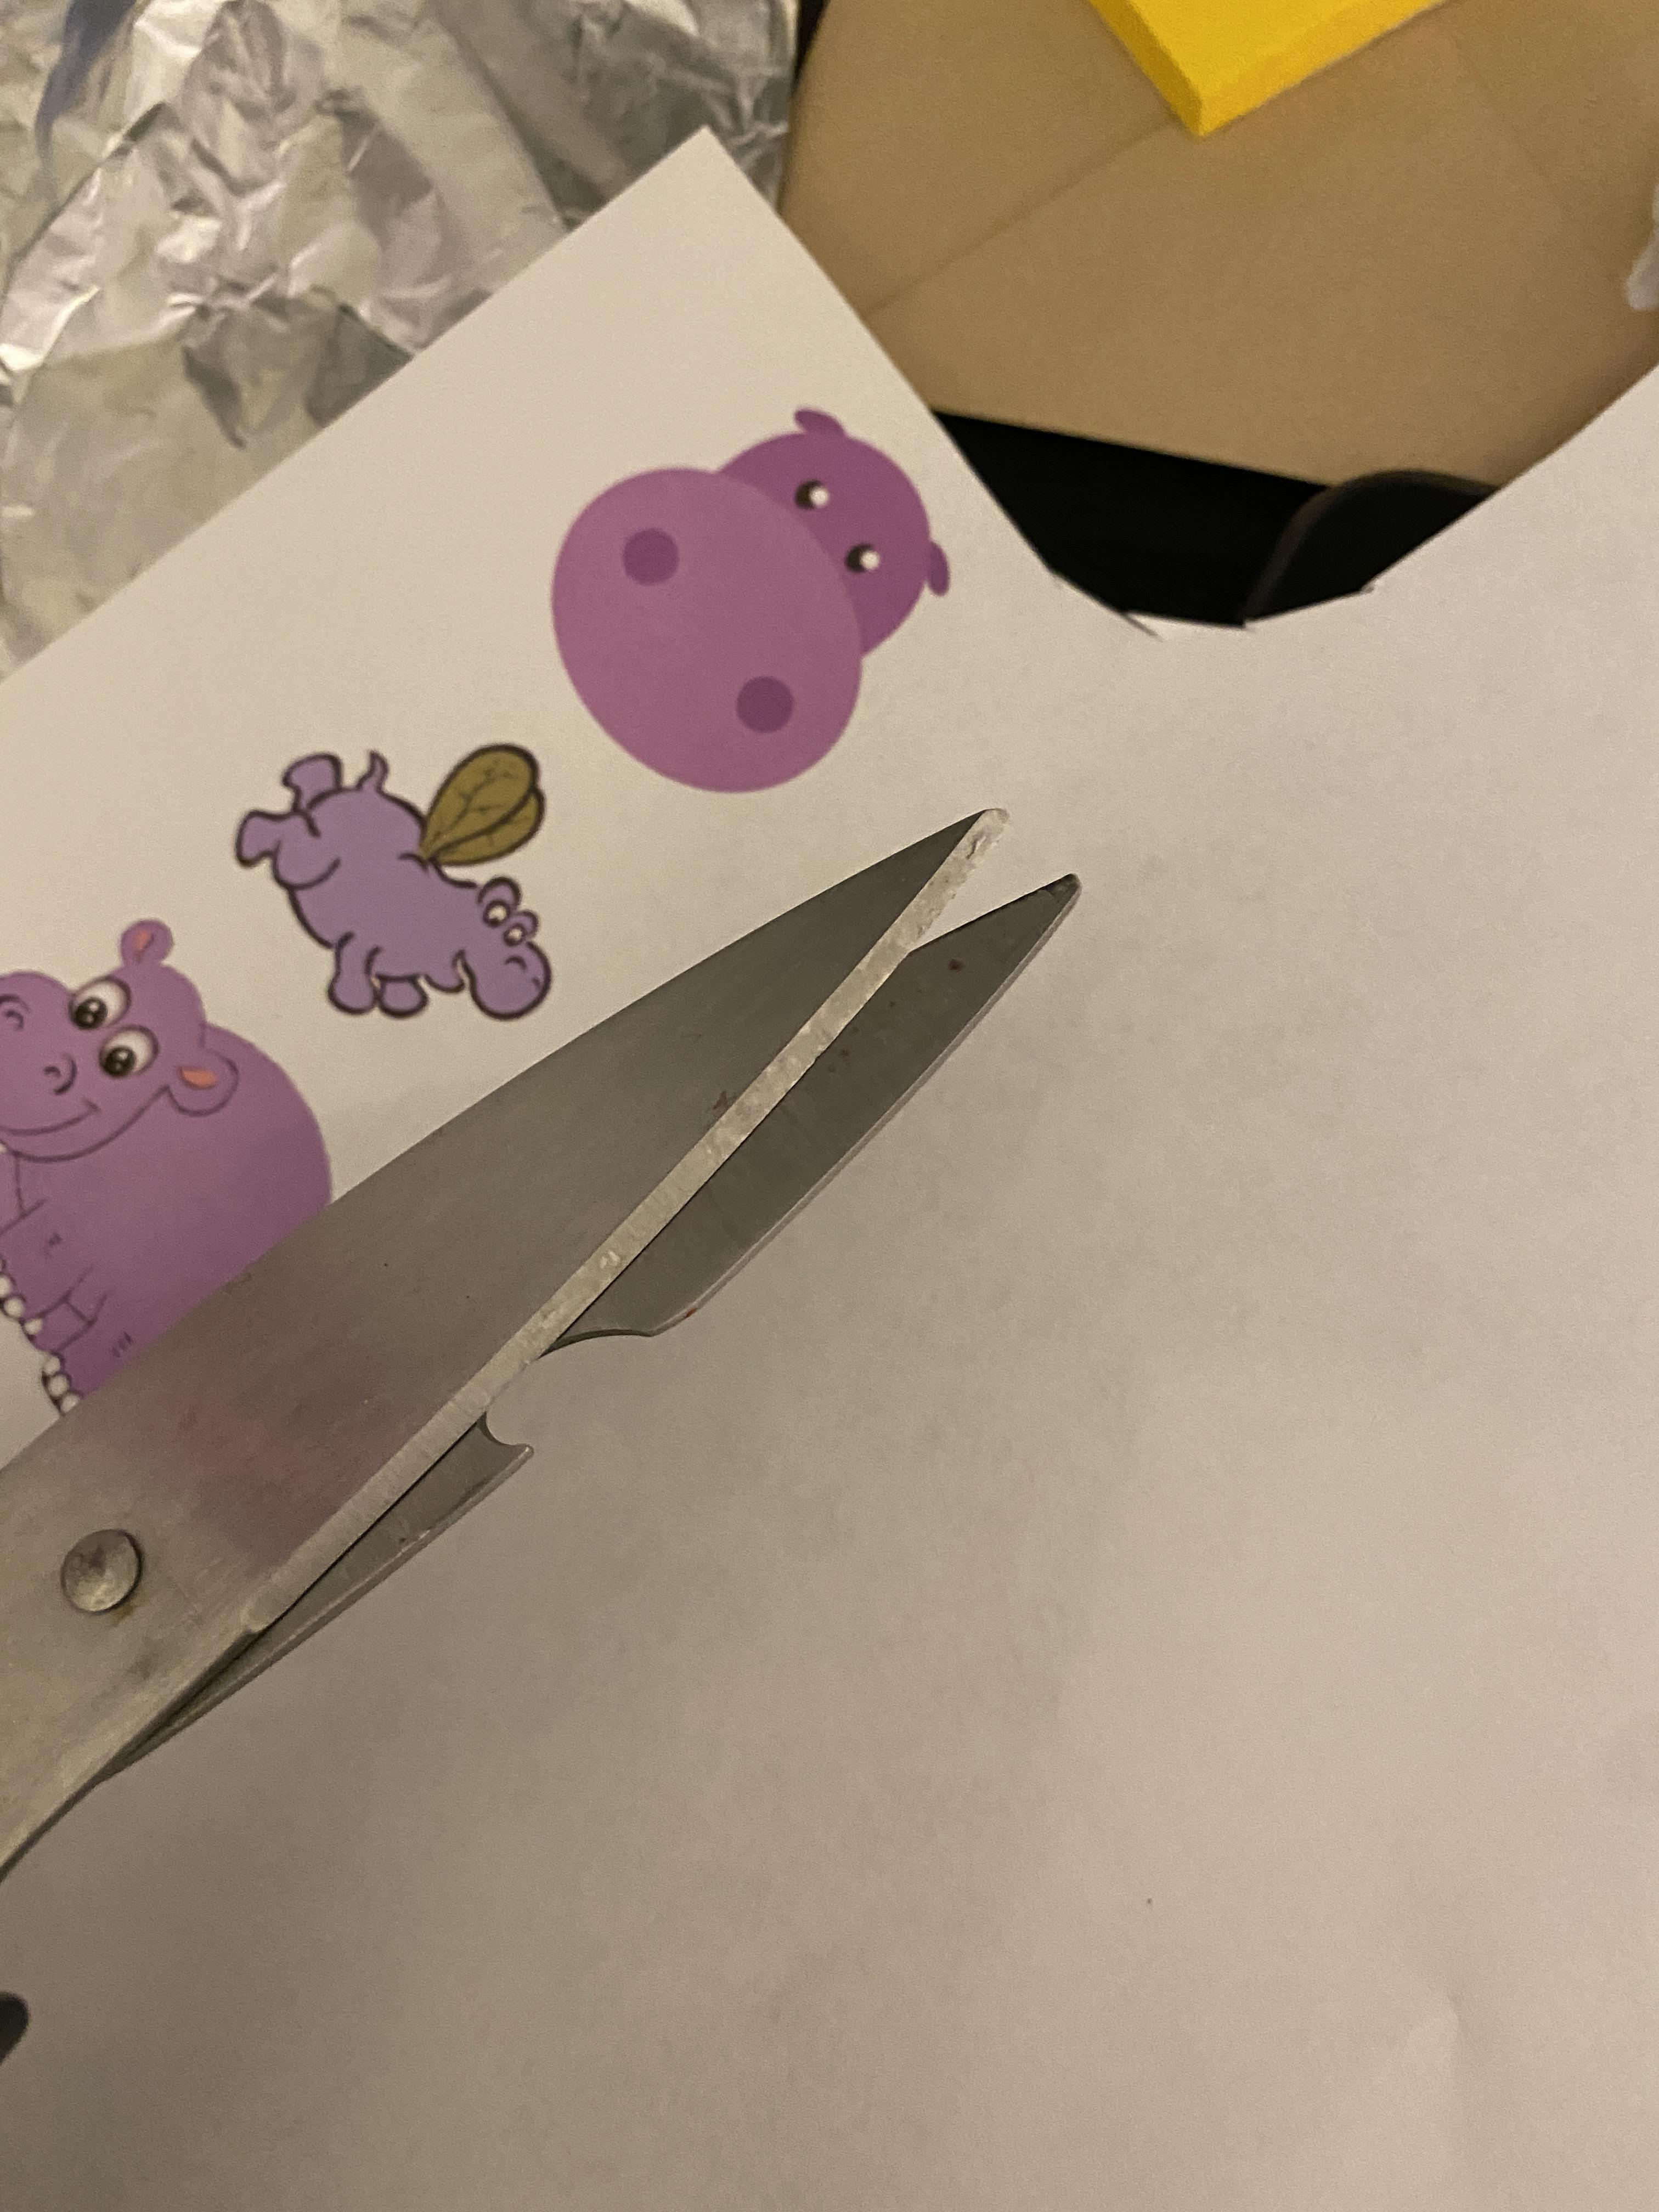
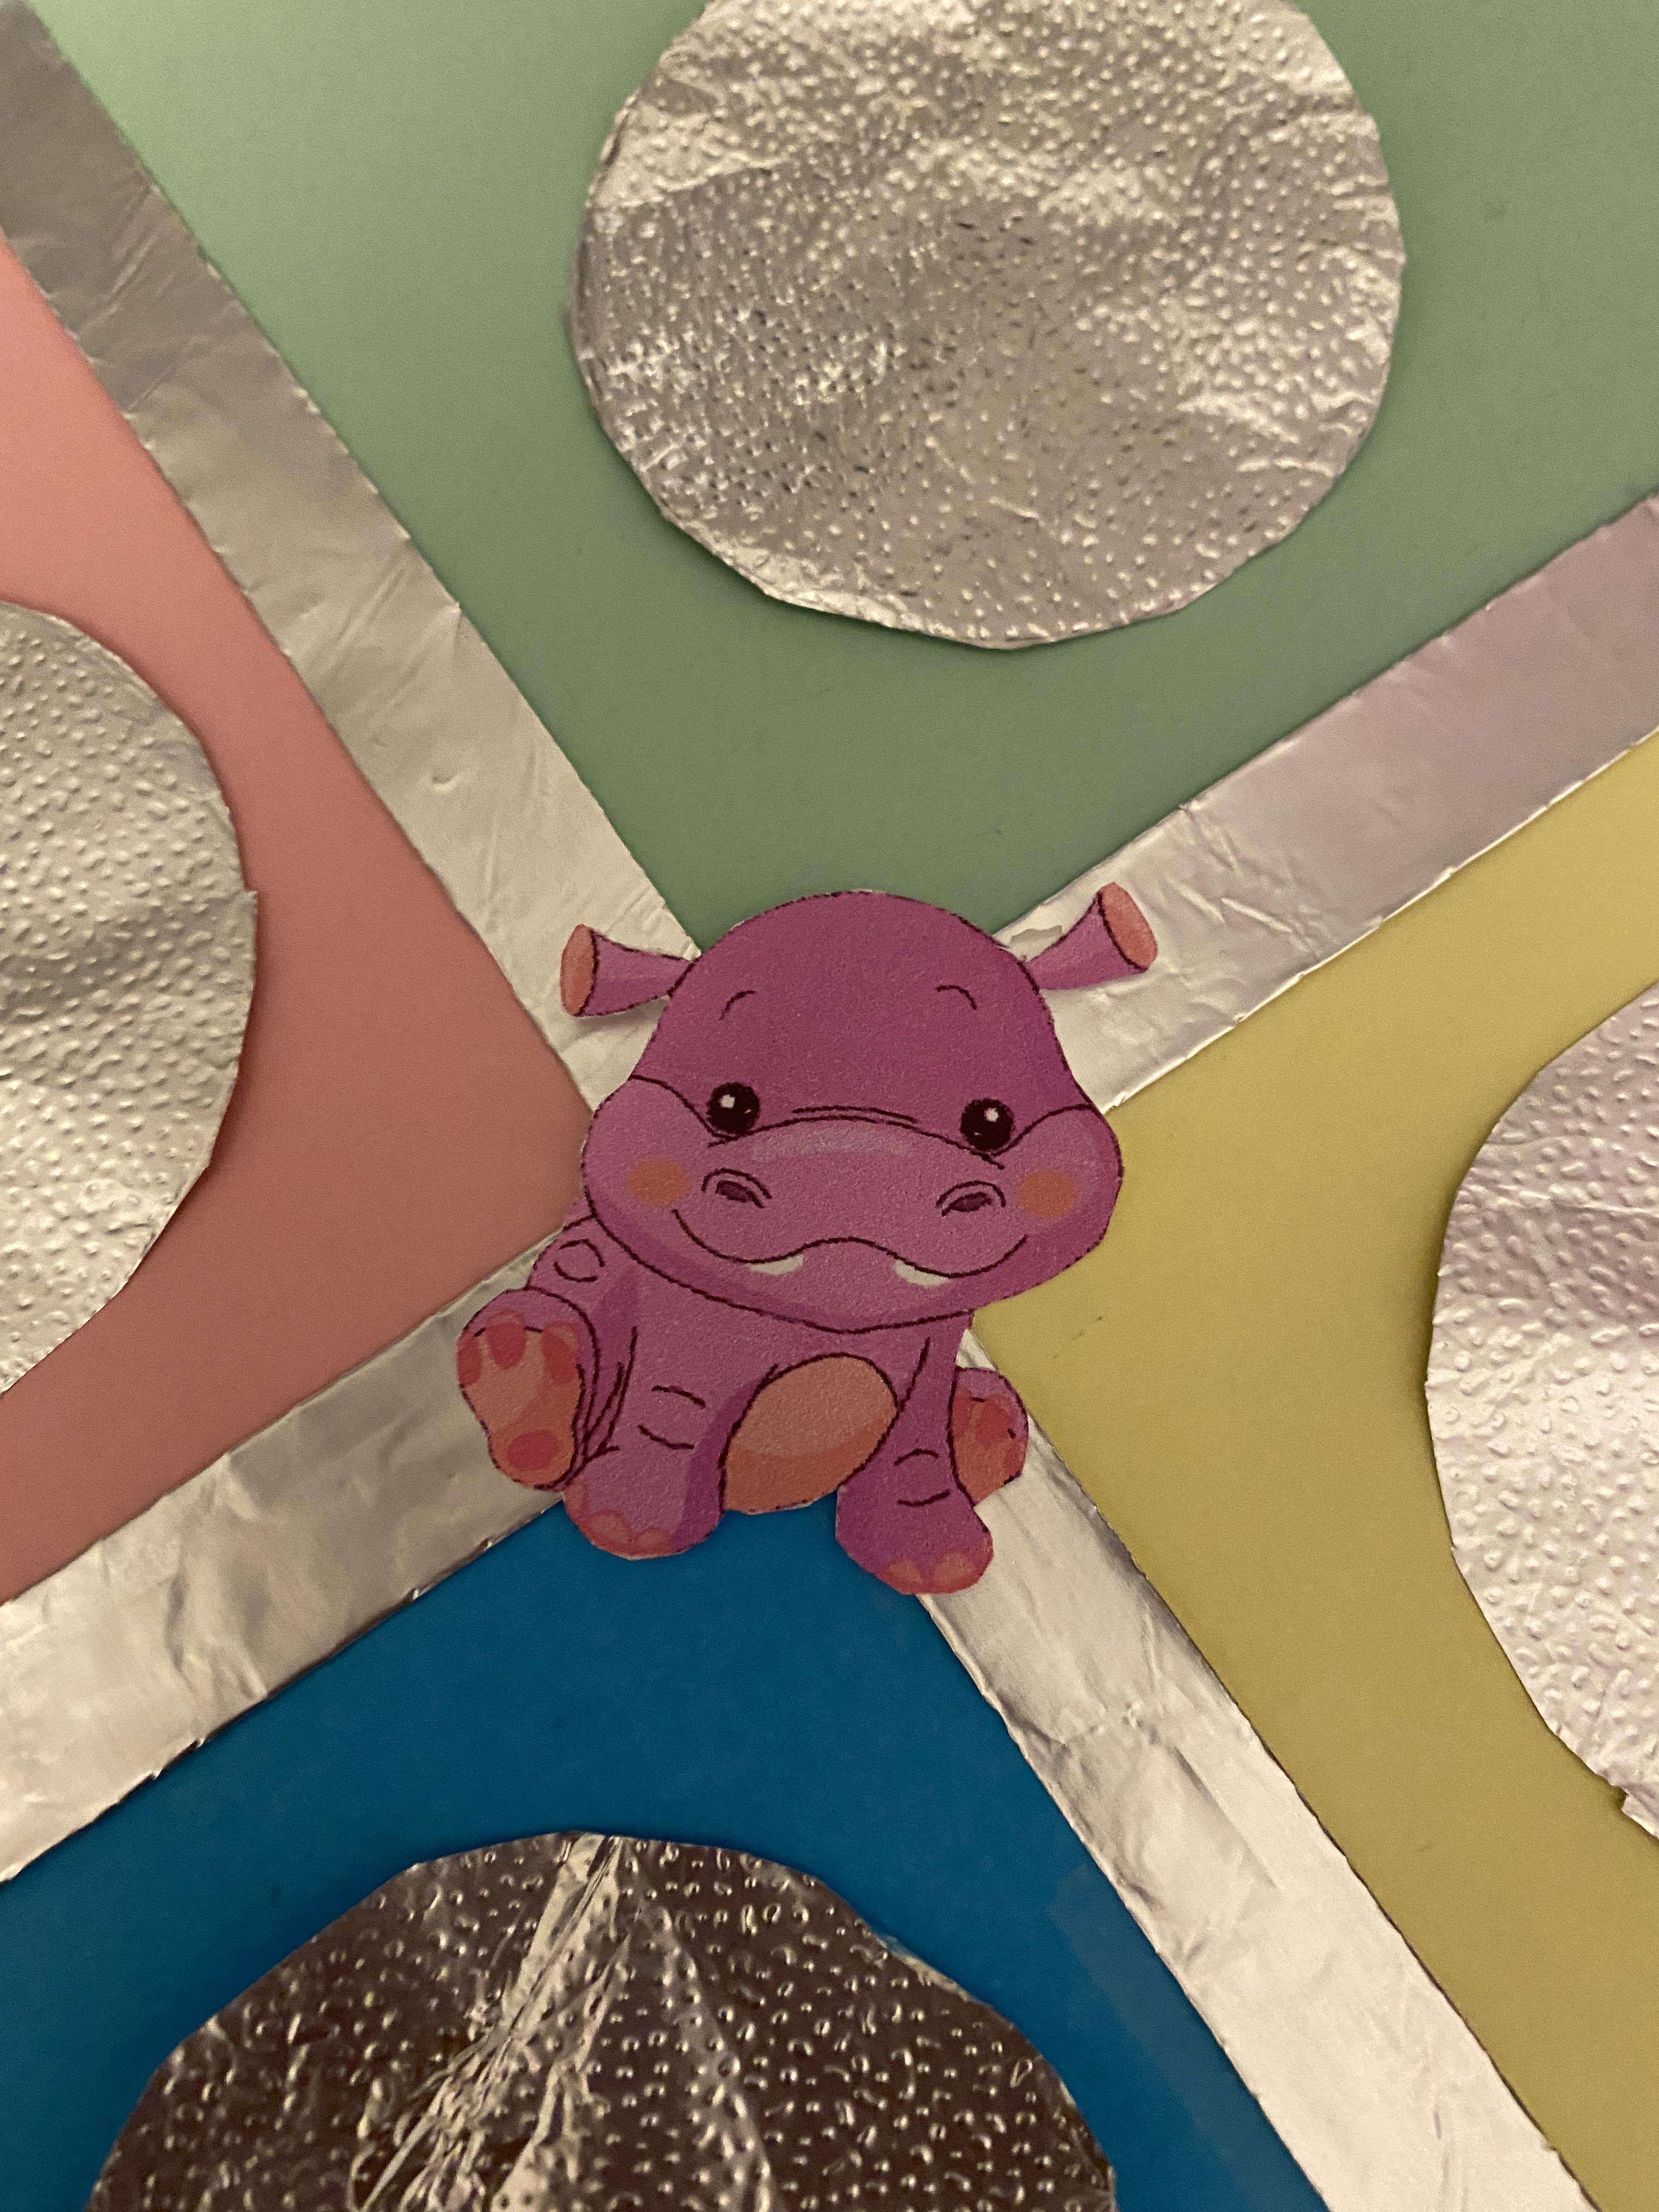
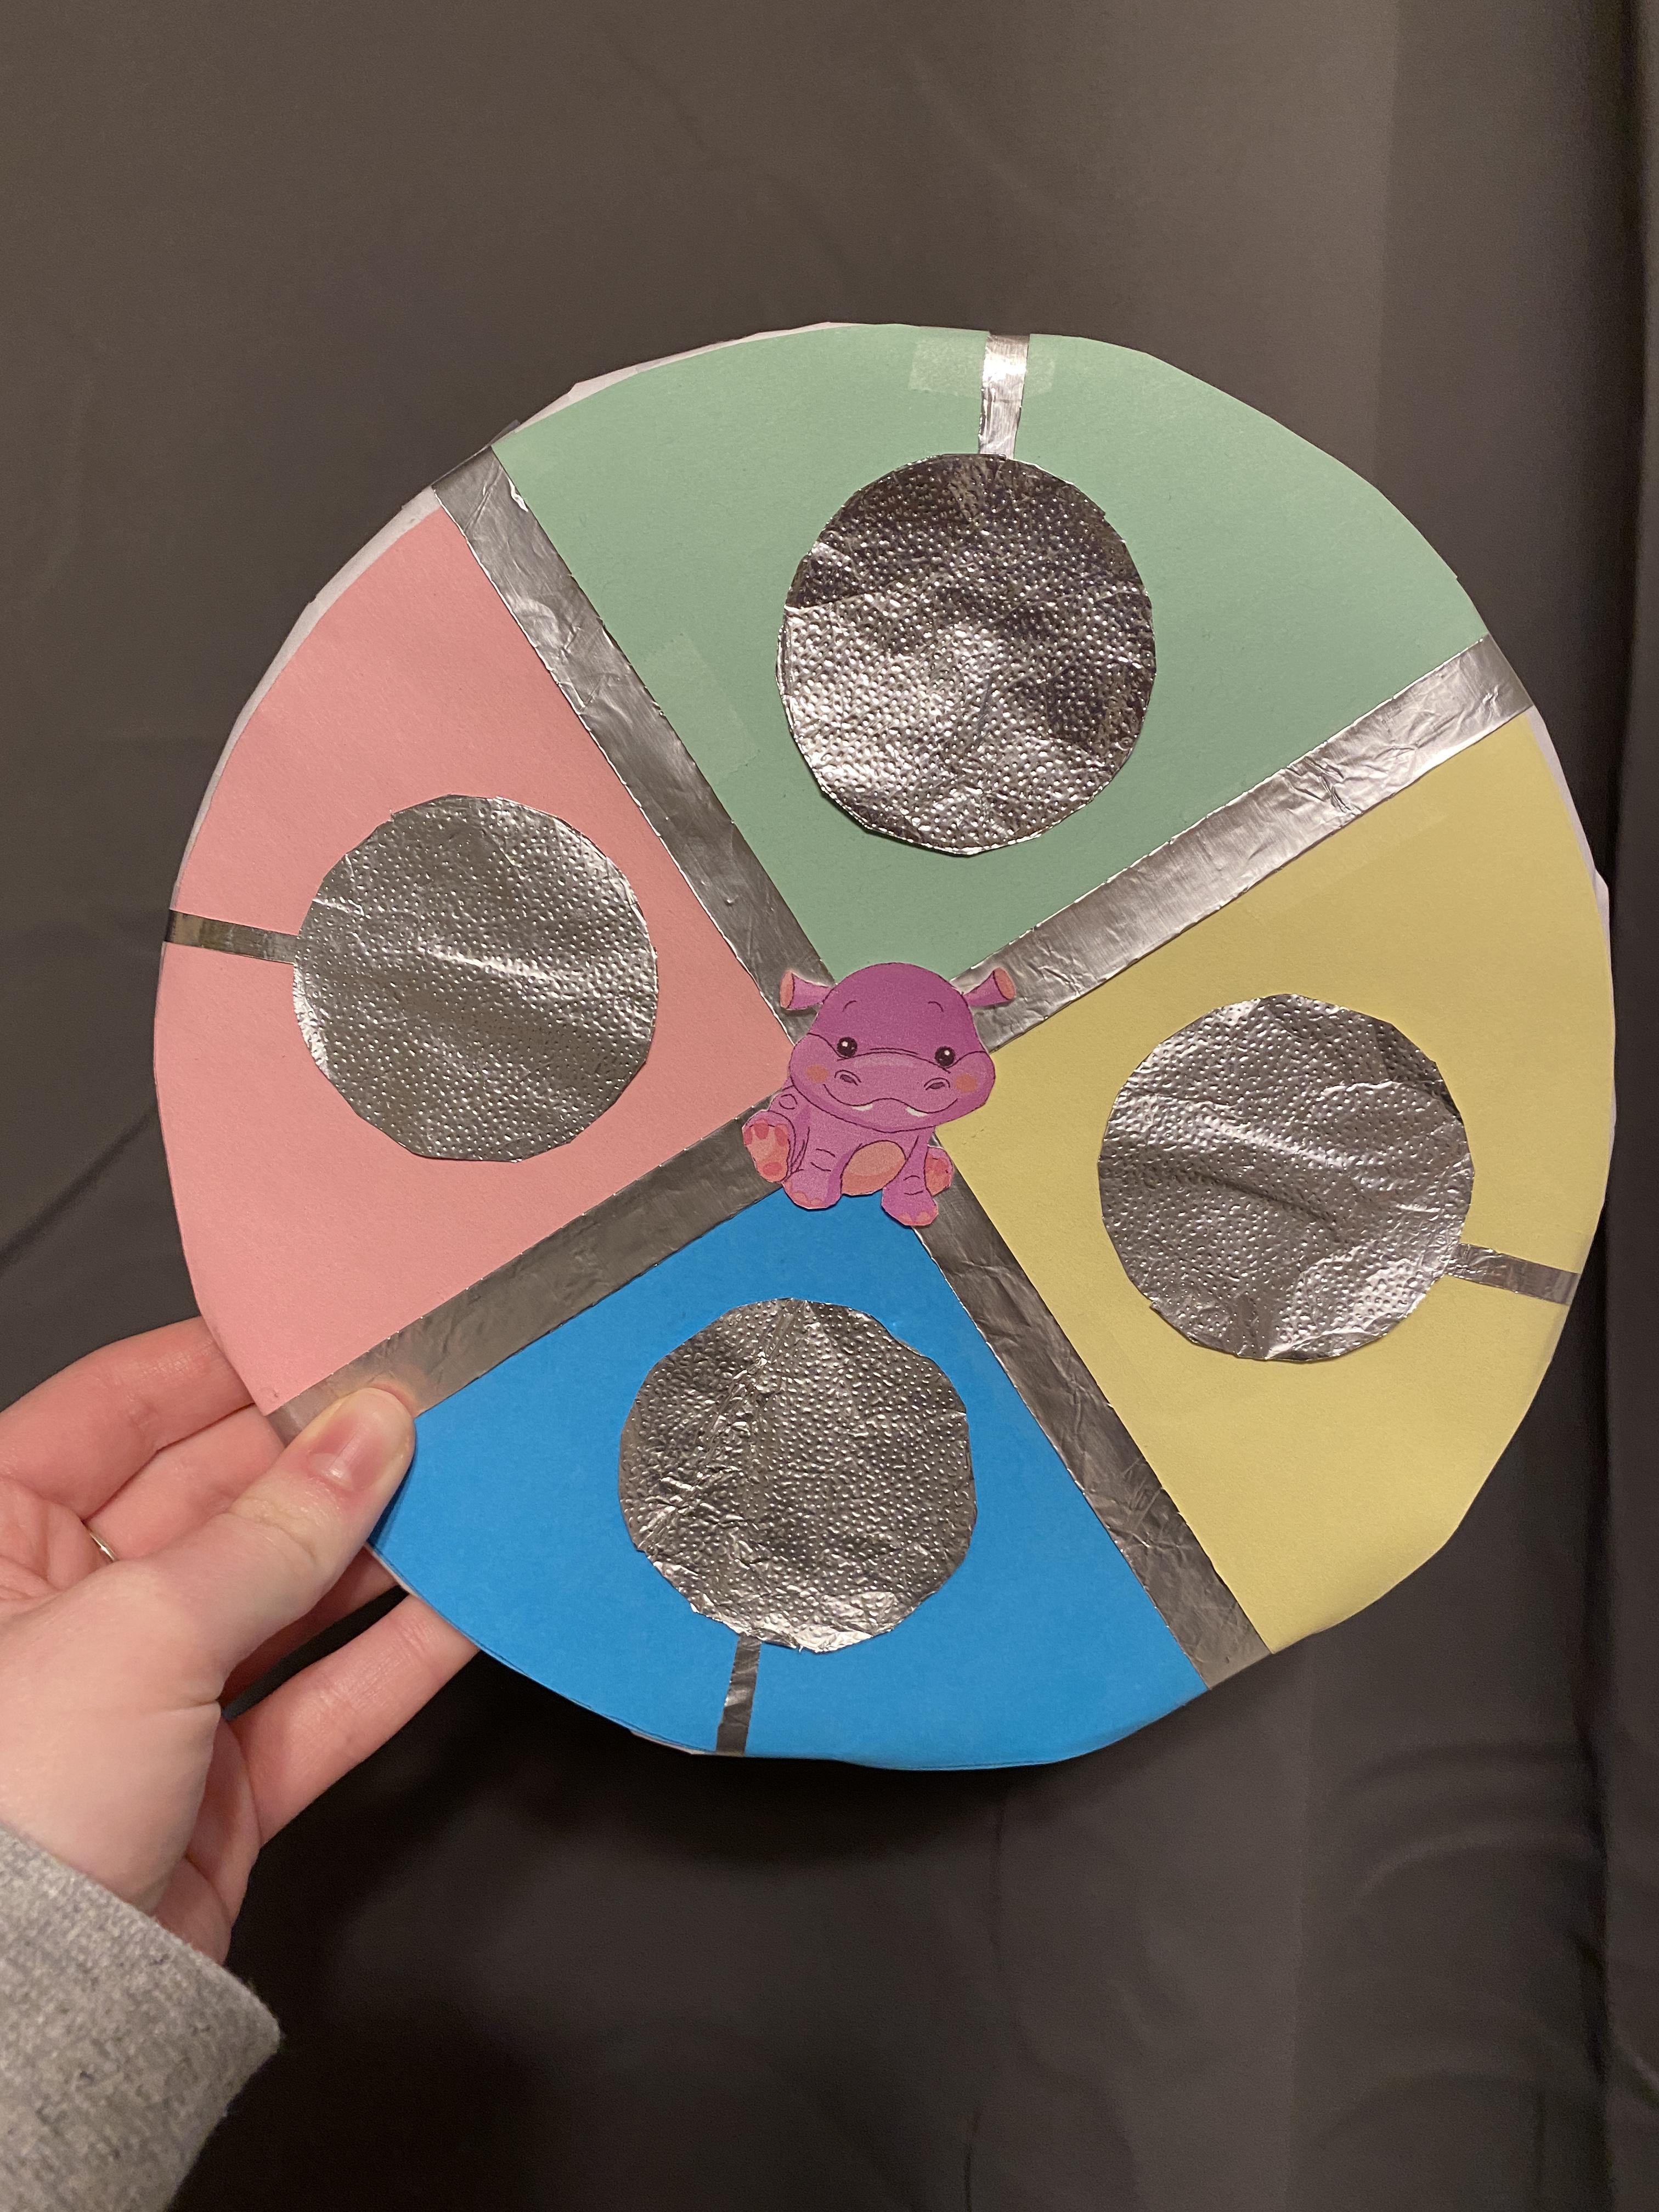
31. Log onto the computer and search up “hippo cartoon” or copy the image provided.
32. Paste your choice into a document and print it. After it finishes printing, take your scissor and cut out the hippo.
33. Place a piece of folded tape in the center of the project and carefully place your Hippo on top of it.
Attaching the Physical Project to the Program! Bringing Everything Together.
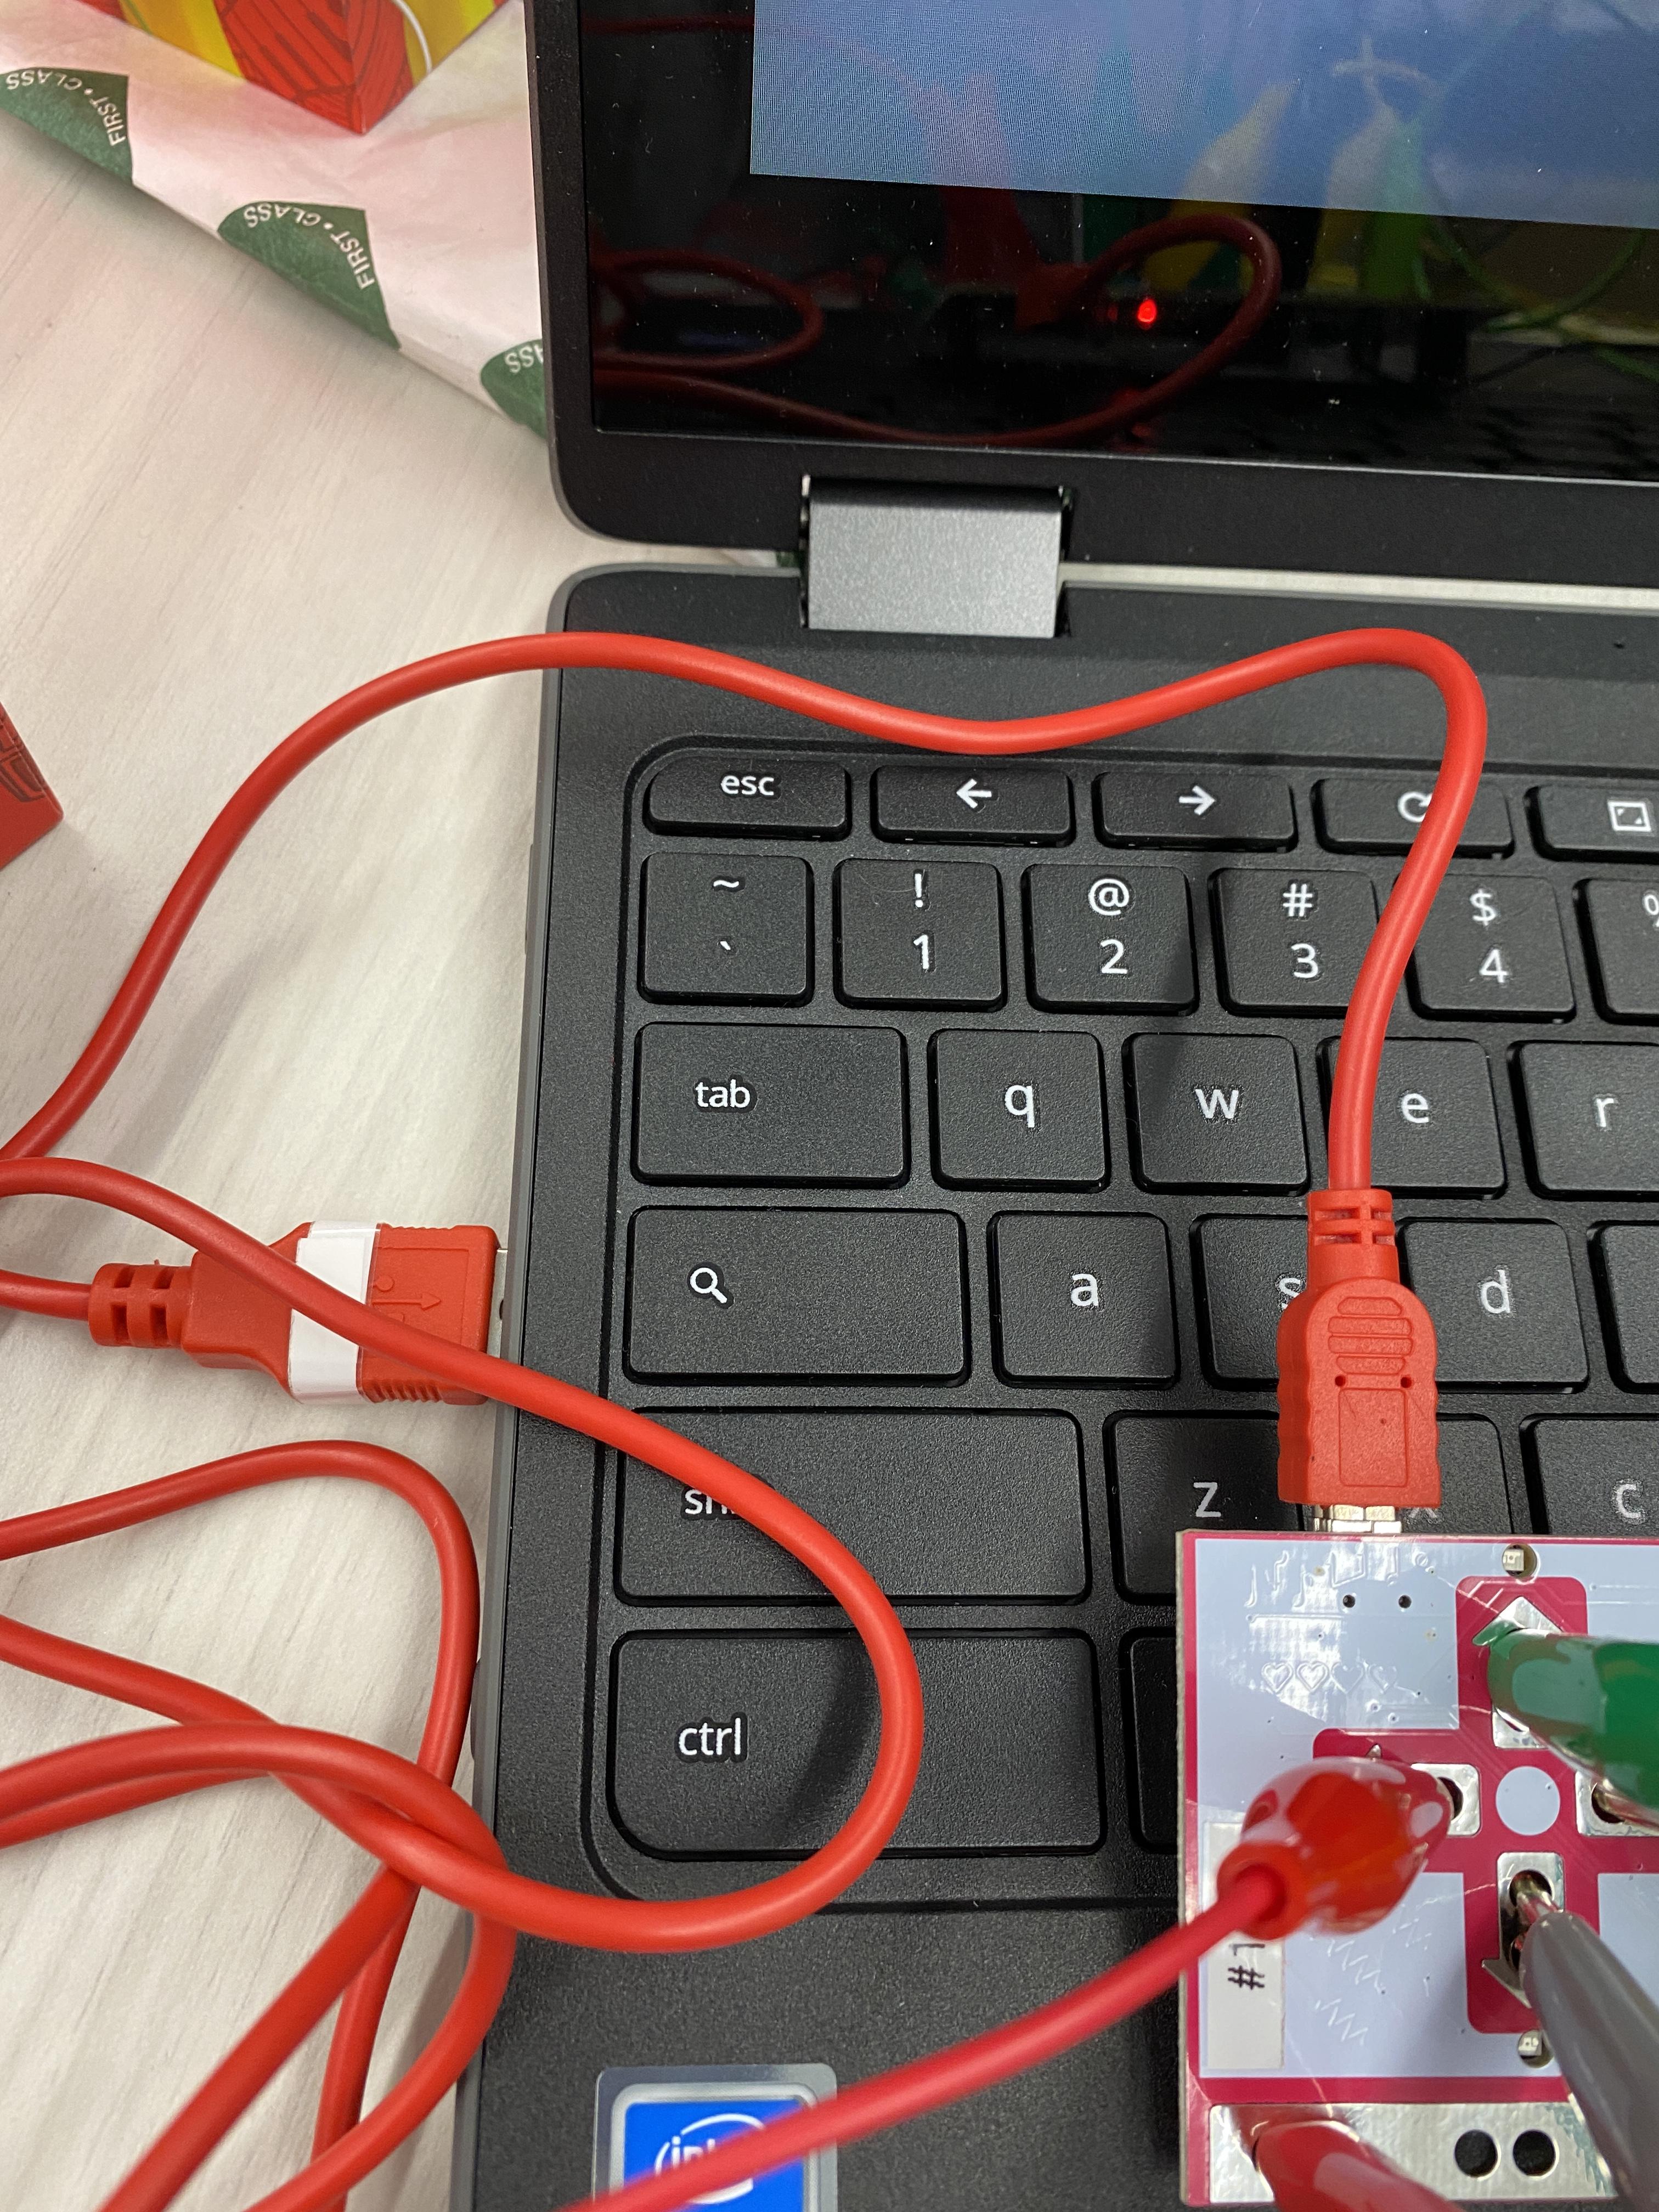
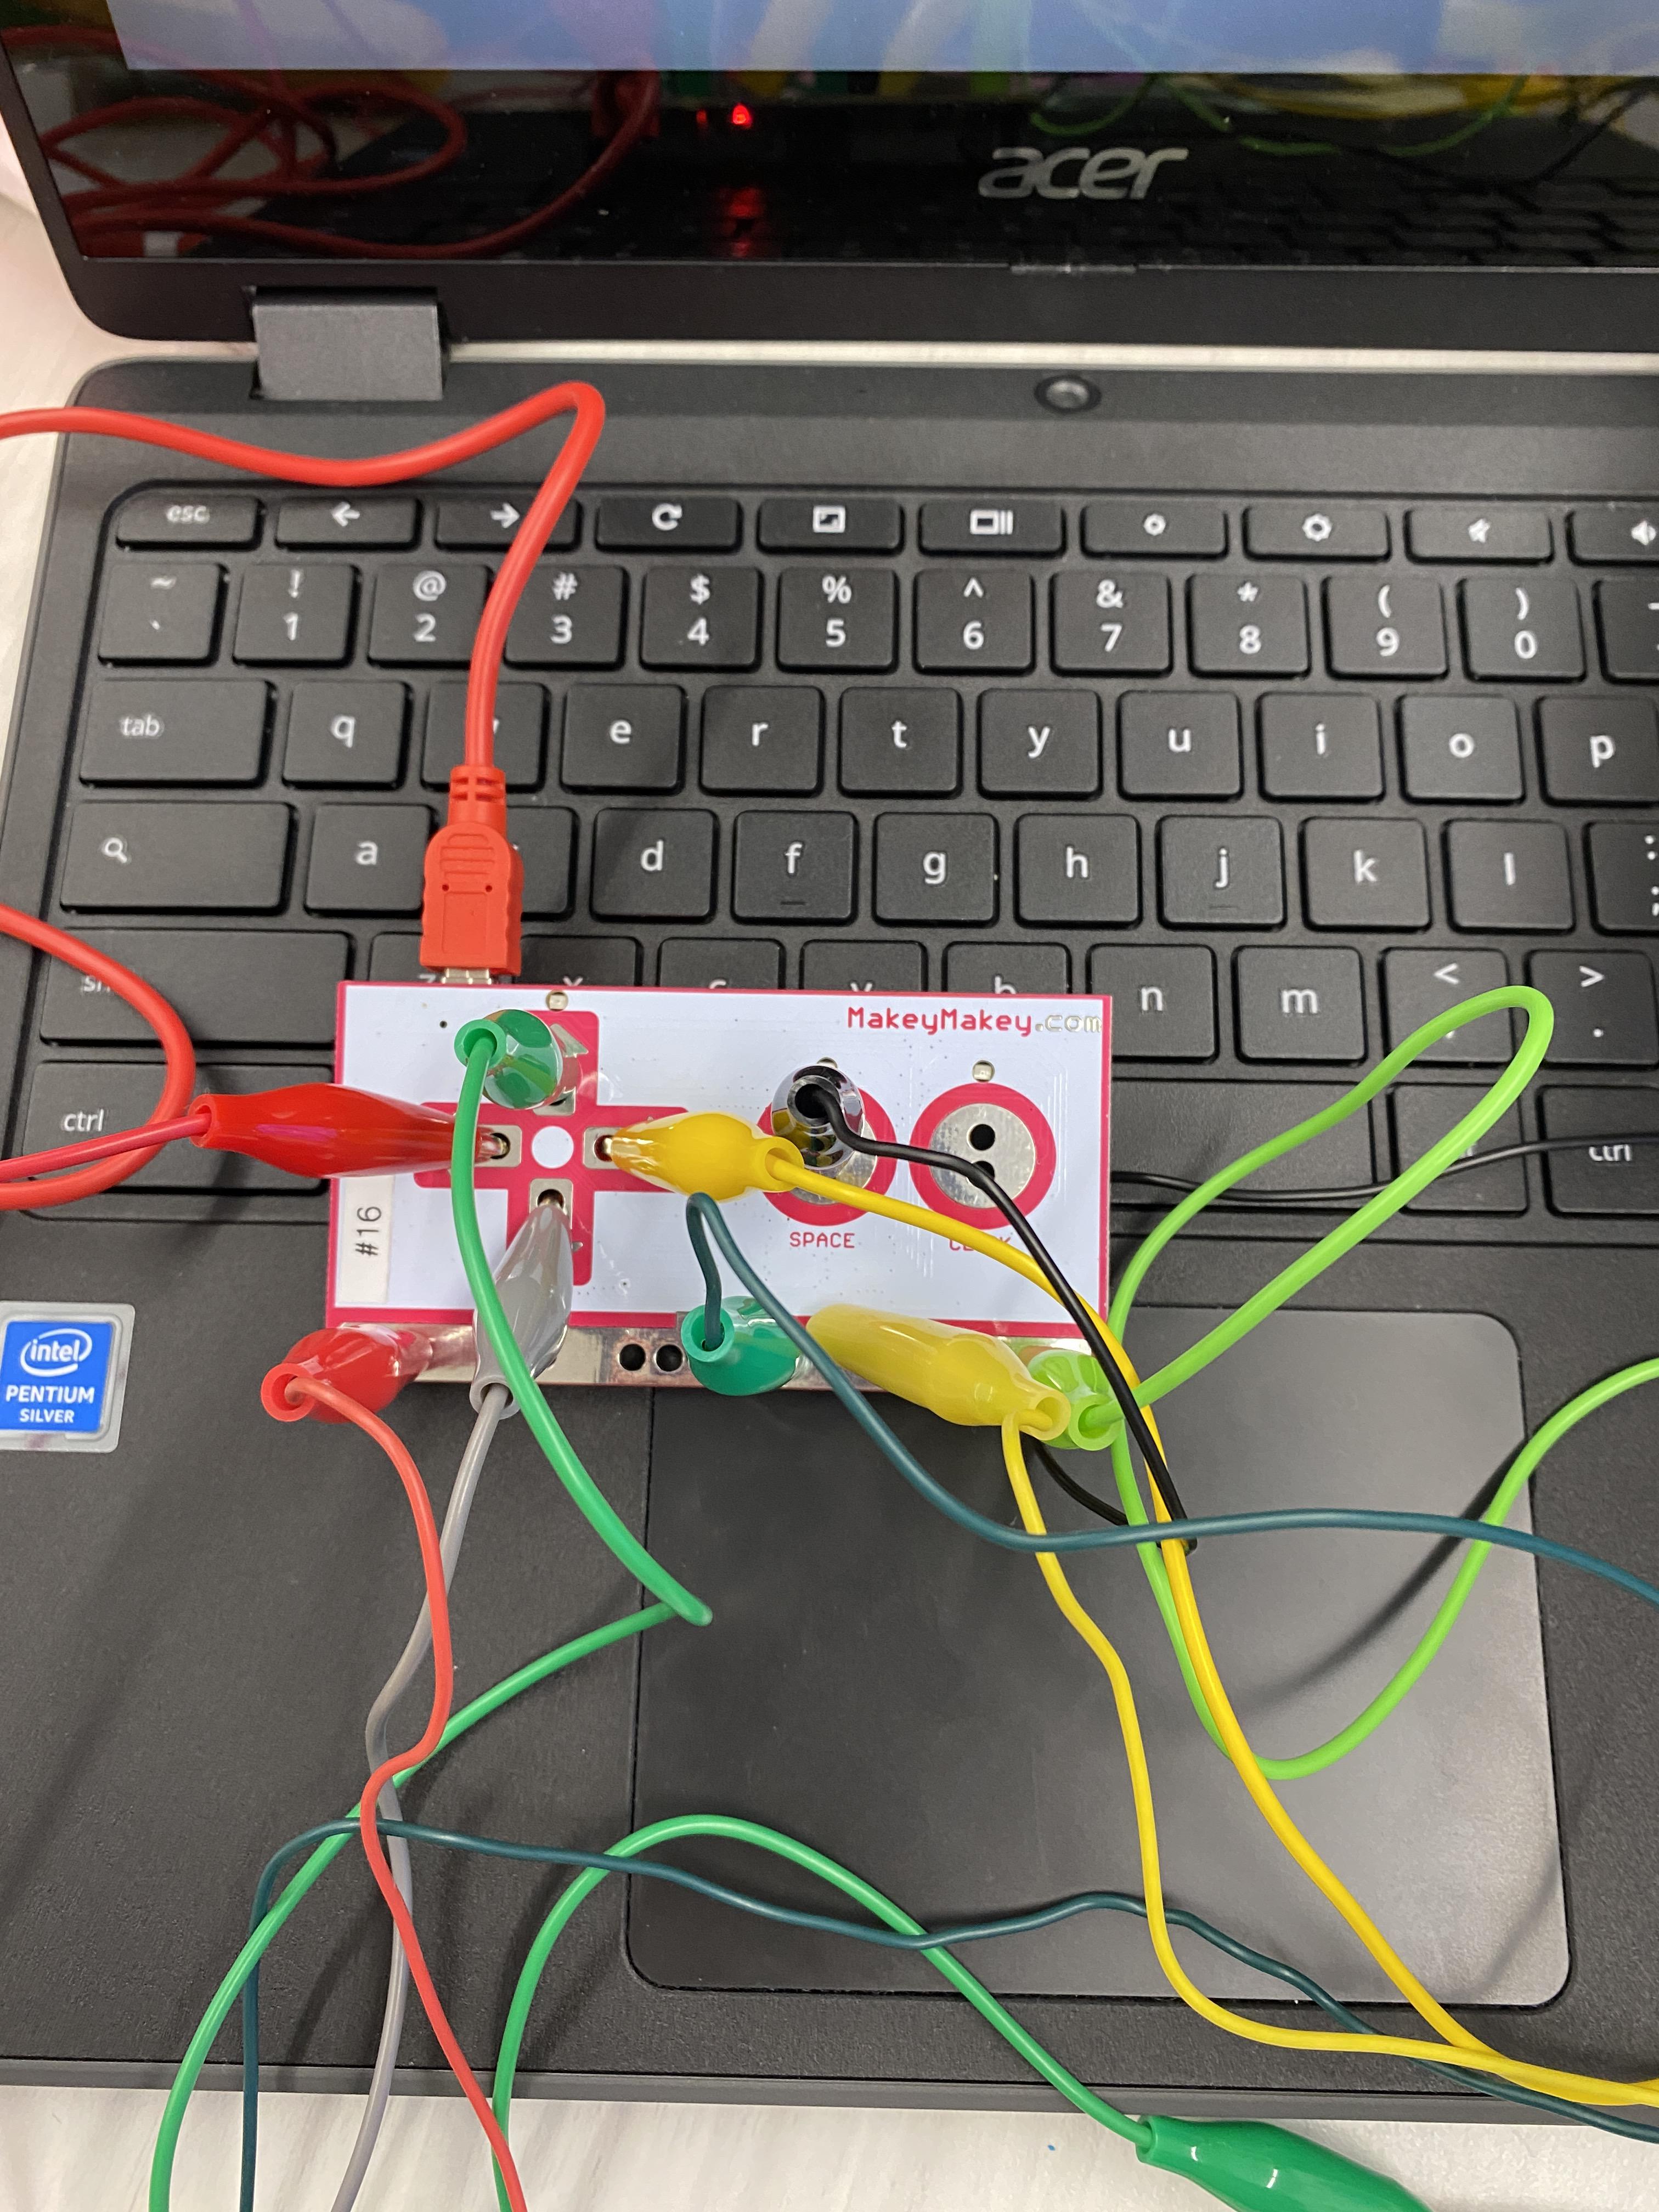
- Insert the USB mini end of the cable into the USB mini slot of the Makey Makey.
- Insert the USB end of the cable into your laptop or Chromebook.
- Go to the Scratch program.
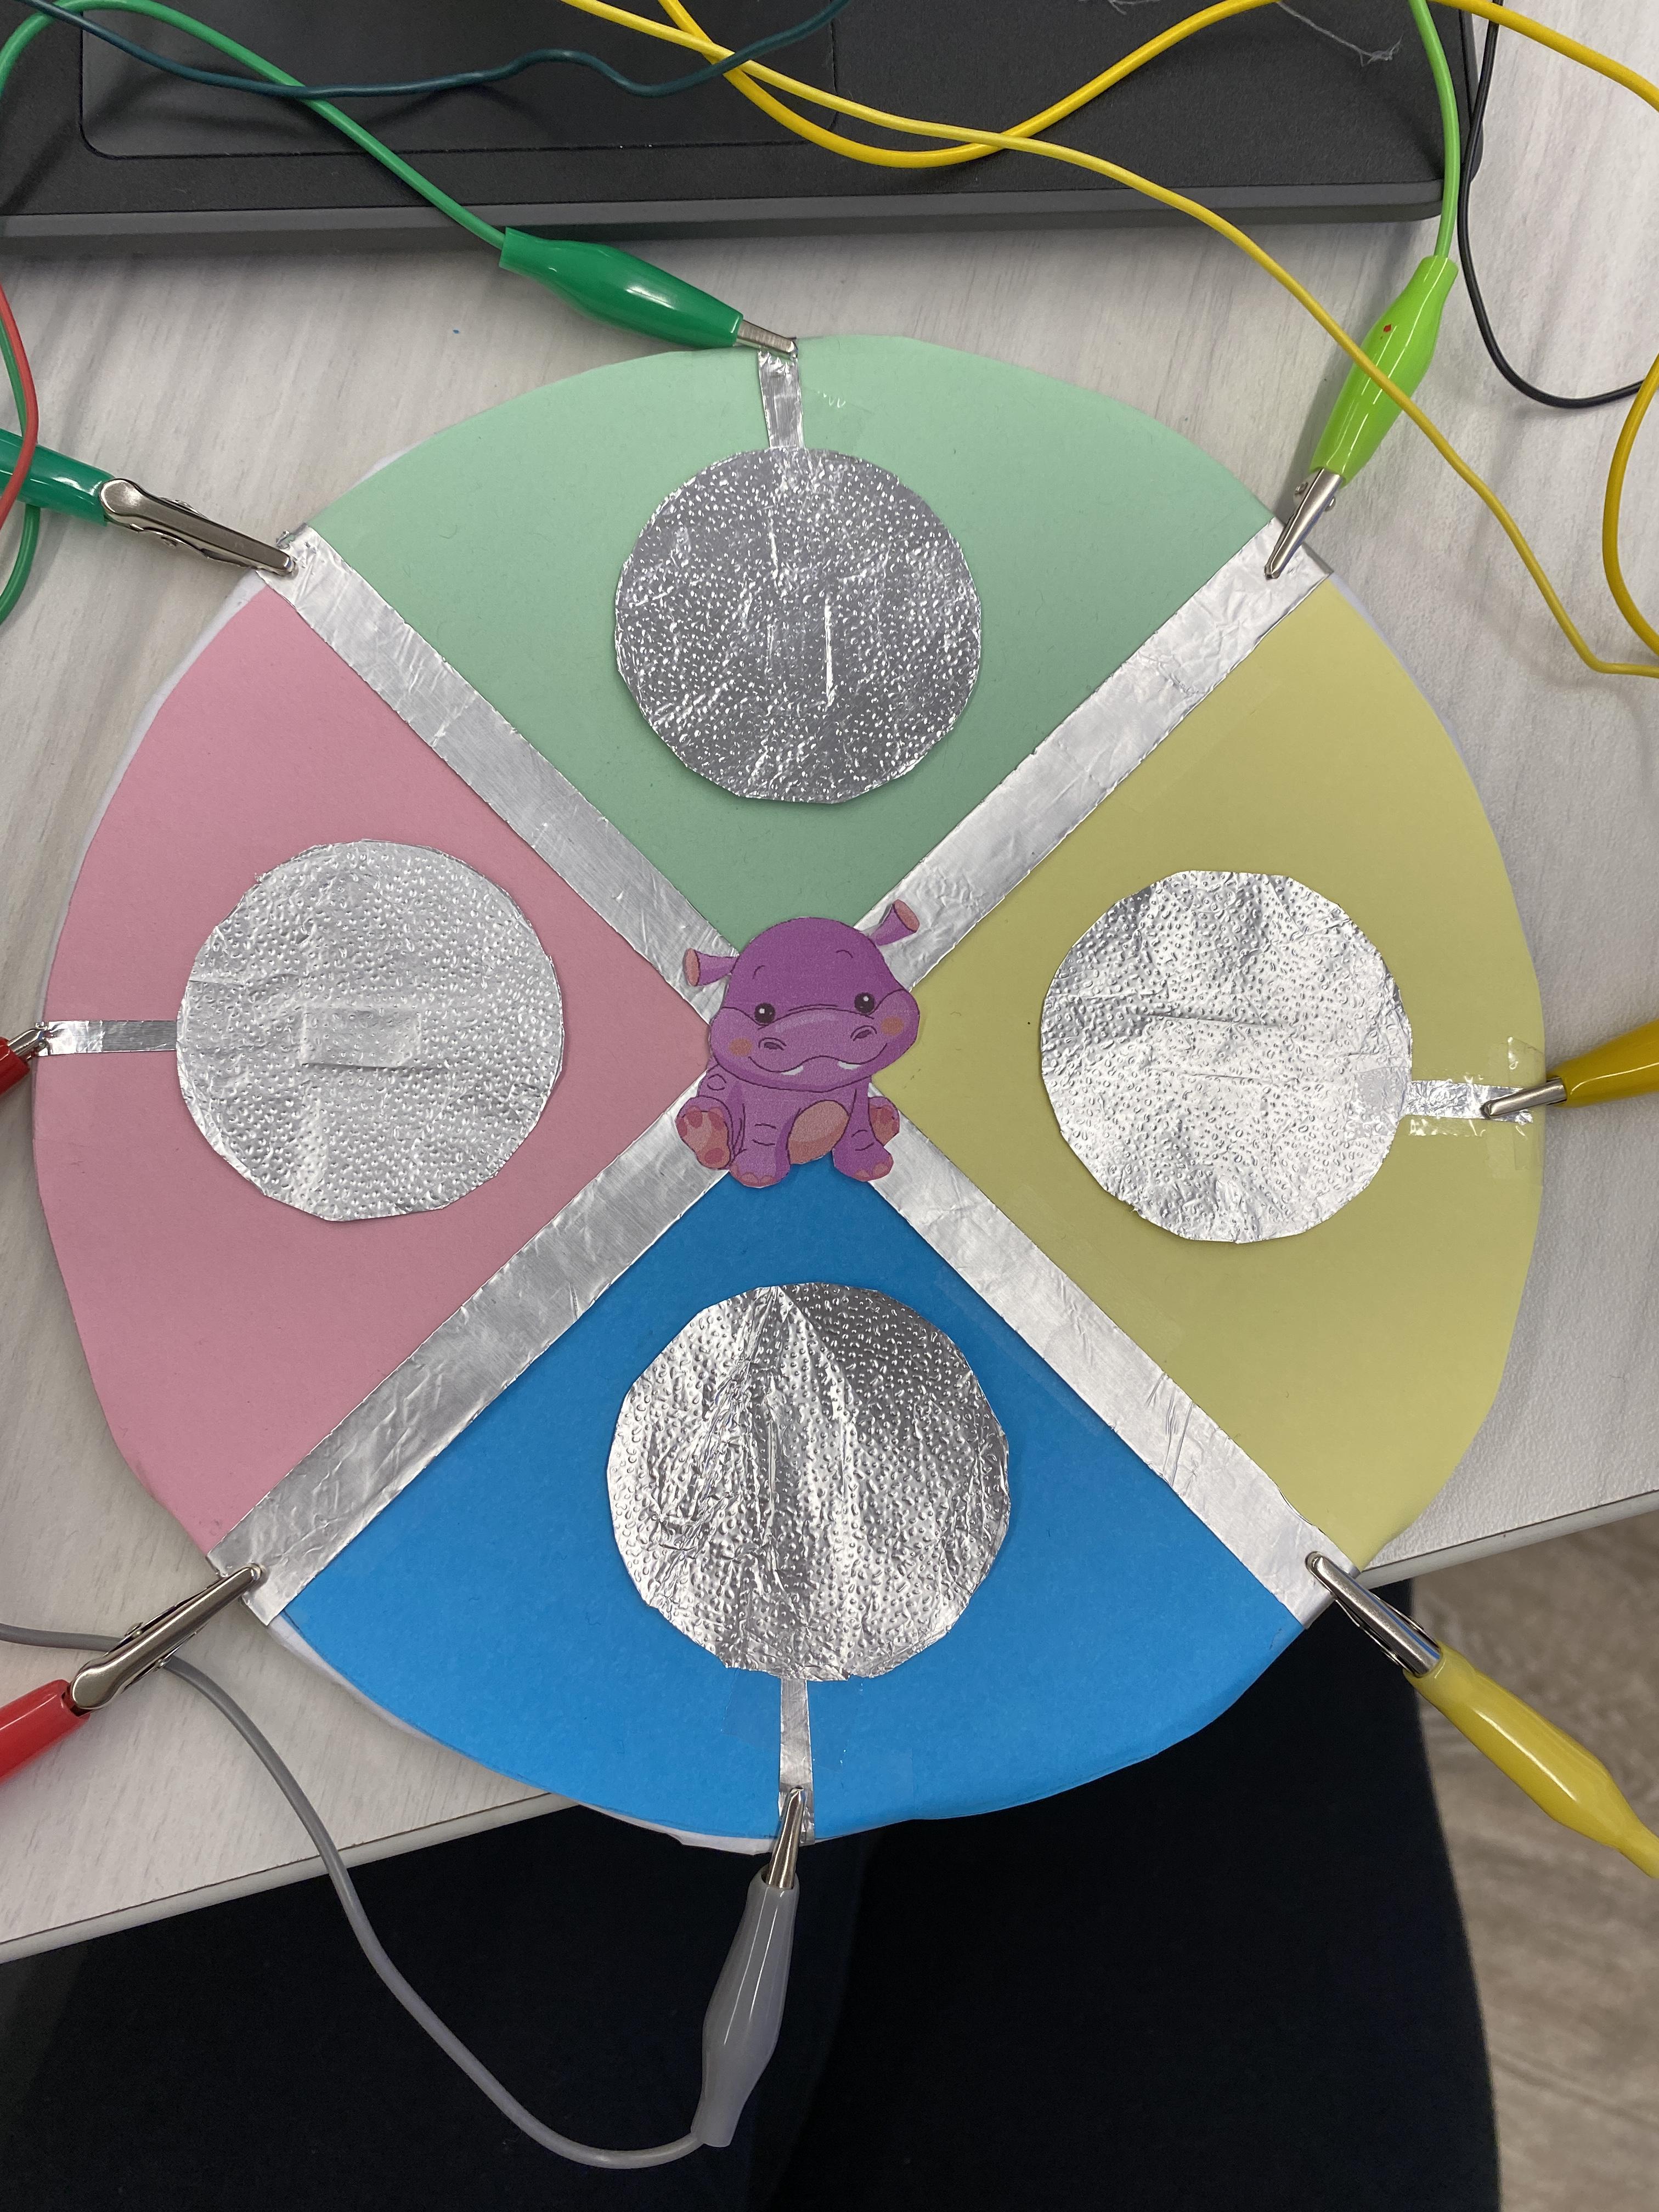
- Take alligator clips and clip them on any piece of tinfoil wrapping around the edge. You will have one alligator clip left over for now. I recommend you stretch out the alligator clips beforehand so you don't accidentally cut through the tin foil. You can color code the alligator clips if you want (:
- Take the other end of the alligator clips and clip them into the designated parts of the Makey Makey. The alligator clip attached to the red foil will clip into the left arrow slot, the alligator clip attached to the green foil will clip into the up arrow slot, the alligator clip attached to the yellow foil will clip into the right arrow slot and the alligator clip attached to the blue foil will clip into the down arrow slot.
- All the clips attached to the long thick strips will clip to the bottom row of the Makey Makey.
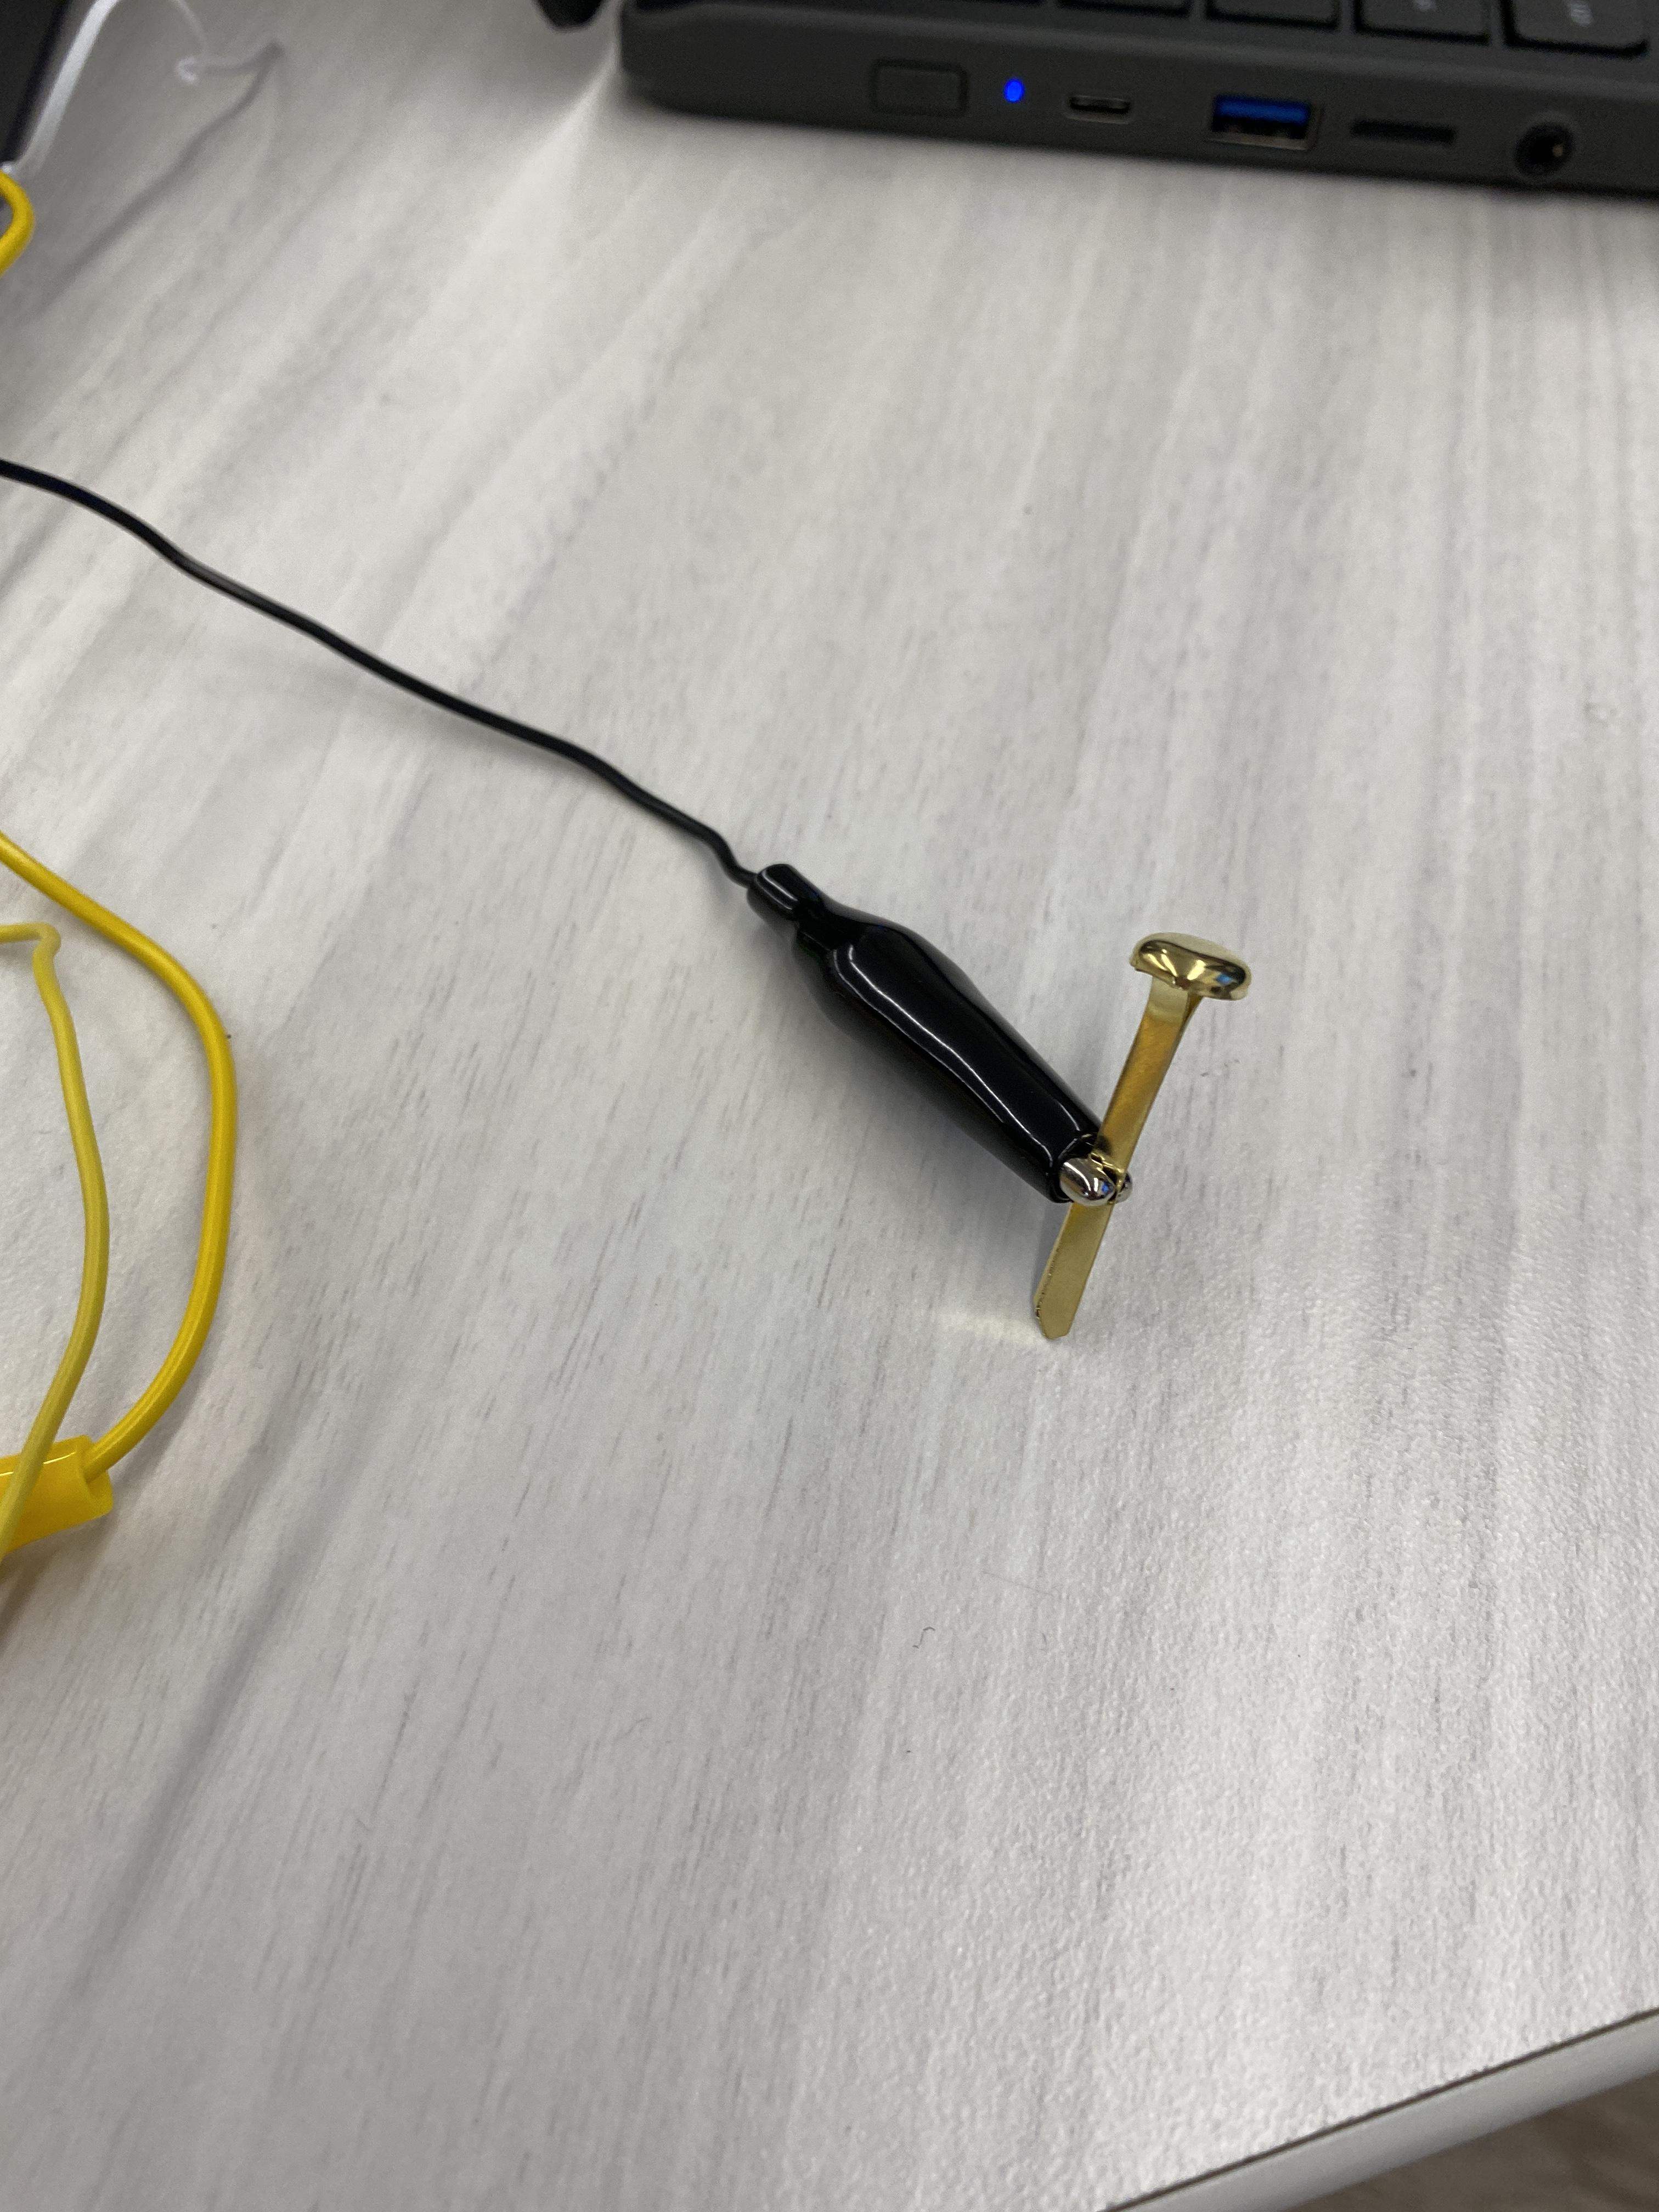
- Take the final alligator clip and clip one end to the space slot of the Makey Makey and the other end to the paper clip or other small piece of metal to serve as a space bar. You can make a better space bar if you wish, but it is unnecessary.
- Step back and take a second to admire the incredible project you have just created!
Final Project!
How it works:
To enter a color: Touch one of the circles and the nearest one of the strips at the same time.
To press space: Touch the space bar to ont of the strips.
Follow the instructions the screen says as you play the game to know when to press what.