Shopping Impulse Blocker (prank)
by EvyatarRevital in Circuits > Arduino
298 Views, 11 Favorites, 0 Comments
Shopping Impulse Blocker (prank)
 - IOT Project)
Everyone has this shopaholic friend who updates you weekly with the endless online orders he did. Did you ever think of helping him? Look no further, because our latest invention is here to put an end to his shopping addiction. Introducing the "Shopping Impulse Blocker" system - The ultimate solution for those who can't help but buy everything they see online. With a series of tedious, time-consuming and even some embarrassing steps, our shopaholic will have enough time to rethink his purchase and avoid impulse buying. Say goodbye to overspending and hello to financial stability.
Our flow:
- The buyer clicks on the Order button.
- An alarming message pops and a siren starts.
- The buyer tries to silence the siren, by putting the CPX in a drawer.
- The siren stops, but a shaming photo is uploaded to the users Facebook group.
- The buyer tries to explain it's not him, and goes back to the order page.
- Now he can't click on the Order button because the mouse jumps into random places on the screen, avoiding the button.
- The buyer, frustrated, screams on the CPX and the mouse stops moving, but...
- A Rickroll clip starts to play on Youtube.
- Now the buyer is free to proceed with the order :)
Supplies

What You'll Need:
- A Circuit Playground Express (CPX) device connected to an ESP8266 Wi-Fi microchip, as shown in the picture above. A6 - RX, A7 - TX.
- Arduino code editor
- 'Blynk' account
- 'Make' account (formerly 'Integromat')
- Facebook account that is the owner of a group
Setting Up Integromat

We will now create an Integromat scenario that will upload an embarrassing photo of the shopaholic to Facebook. To do this, connect to your account, go to the "Scenarios" section, and create a new scenario. Then, add the components that are shown in the picture above in the exact same order. Update the data in each component as follows:
- Webhooks: "Add" > "Save" > "Copy address to clipboard" > Enter the url you just copied in your browser > "Ok". We will use this url in the next step.
- HTTP: In the URL field, insert the URL of a photo that you want to be uploaded to Facebook. You are encouraged to choose an embarrassing one ;)
- Facebook Groups: "Choose an account" > Log in to the Facebook account of the shopaholic and grant Facebook access to the group. In the "Group" field, choose the Facebook group in which you want the photo to be posted. In the "Message" field, write the text that you want to be included with the photo.
- HTTP: In the "URL" field, insert the following URL (don't forget to update [BLYNK_AUTH_TOKEN] to match yours, you will know more about it in the next steps): https://sgp1.blynk.cloud/external/api/update?token=[BLYNK_AUTH_TOKEN]&v1=1
Now your scenario is set up and you can click "Run Once" to activate it. Note that you will need to click this button each time you want to activate the system.
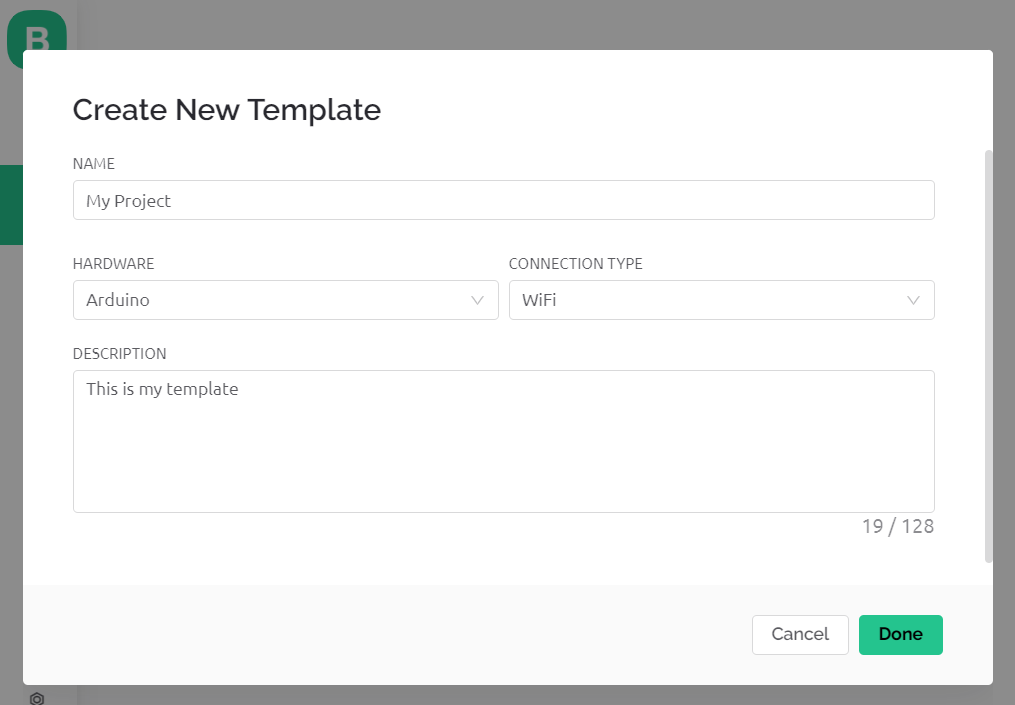
Setting Up Blynk
1. Create a template in Blynk. Make sure you choose “hardware:Arduino” and “connection type:WiFi”.
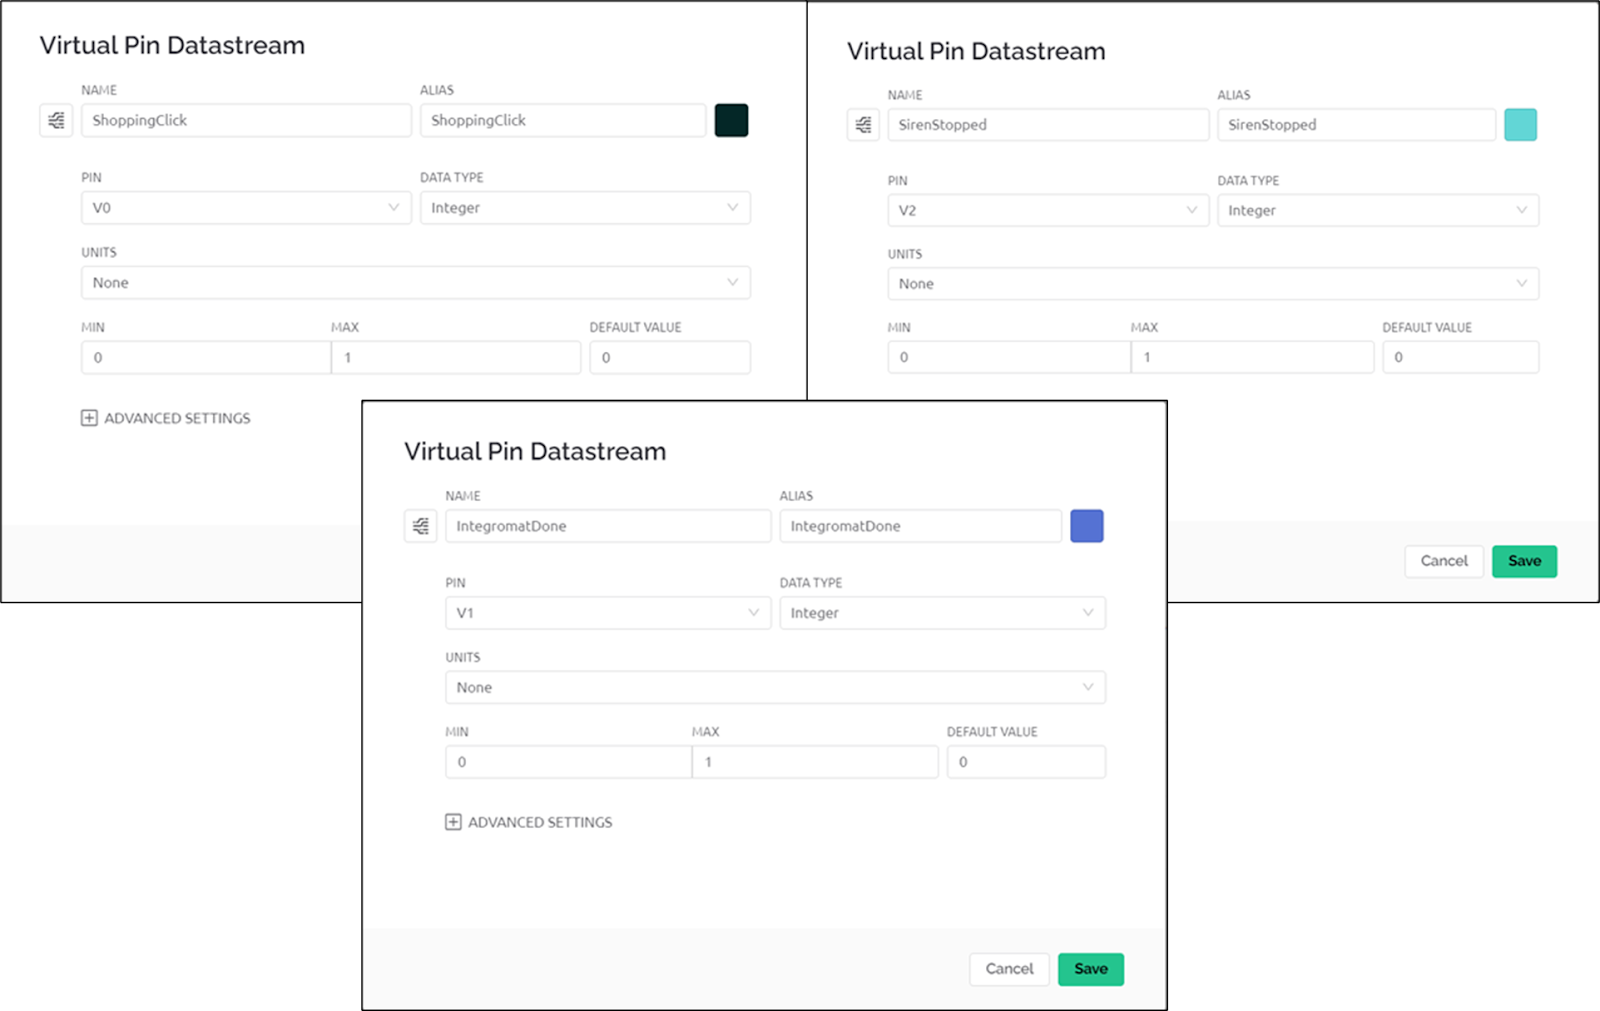
2. In your template, go to Datastreams > Edit > New Datastream > Virtual Pin. (You can read more about datastreams here).
3. Configure 3 new virtual pins (v0,v1,v2).
4. Create new device and connect it to the template you created.

5. Add a webhook to listen on pin v2 (SirenStopped), it will be used to trigger the Integromat scenario).
Go to Settings > Webhooks and add webhook as follows:

The "Webhook URL" need to be taken from the webhook you created in the Integromat scenario at step 1.1.
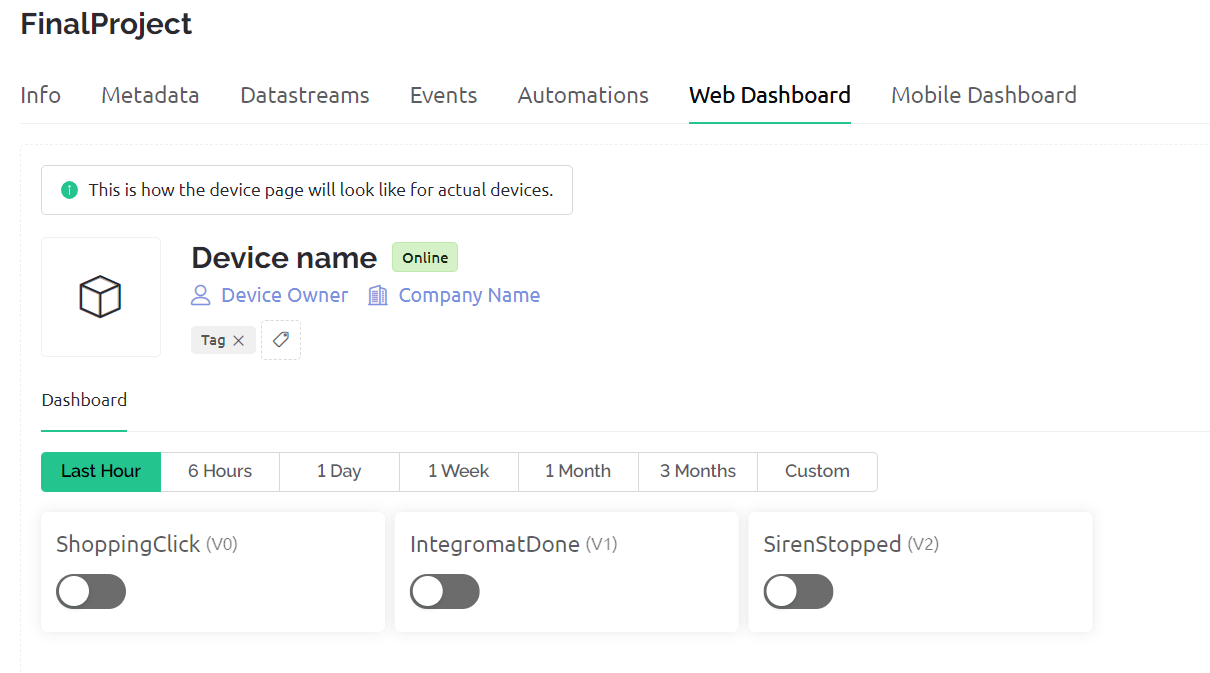
6. Create a dashboard with 3 switches, where each one represents one of the Datastream pins created at step 3. This dashboard is used only to get visual feedback that the flow runs as expected and all triggers are working.
That’s it, your Blynk setup is ready!
Setting Up the Modified Website
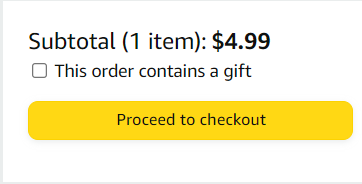
We need to detect a button click on a website. In our case we chose to detect the “proceed to checkout” button click in Amazon.
In order to do something when the button is clicked, we edited the event handler of this button.
This is a javascript code:
function myFunction() {
  const xhr = new XMLHttpRequest();
  xhr.open("GET", "https://blynk.cloud/external/api/update?token=YOUR_BLYNK_TOKEN&v0=1");
  xhr.send();
  alert("shopping is not so easy anymore...")
}

const element = document.getElementsByName("proceedToRetailCheckout")[0];
element.addEventListener("click", myFunction);
The code sends an HTTP GET message to the written url. The url is a Blynk API url that allows to update some datastream values (in our case it’s the virtual pin V0). You can read more about Blynk API urls here.
If you want to perform this change on another button - you have to check what is the ‘element name’ of the button using ‘inspect’ tool in the browser and change it in the code (change the “proceedToRetailCheckout”).
In order to insert it into the site:
- Go to the wanted page, where the button is displayed. In our case it is the order page in Amazon.
- Right click > "inspect".
- Go to the "Console" tab, paste the code there and click “enter”:
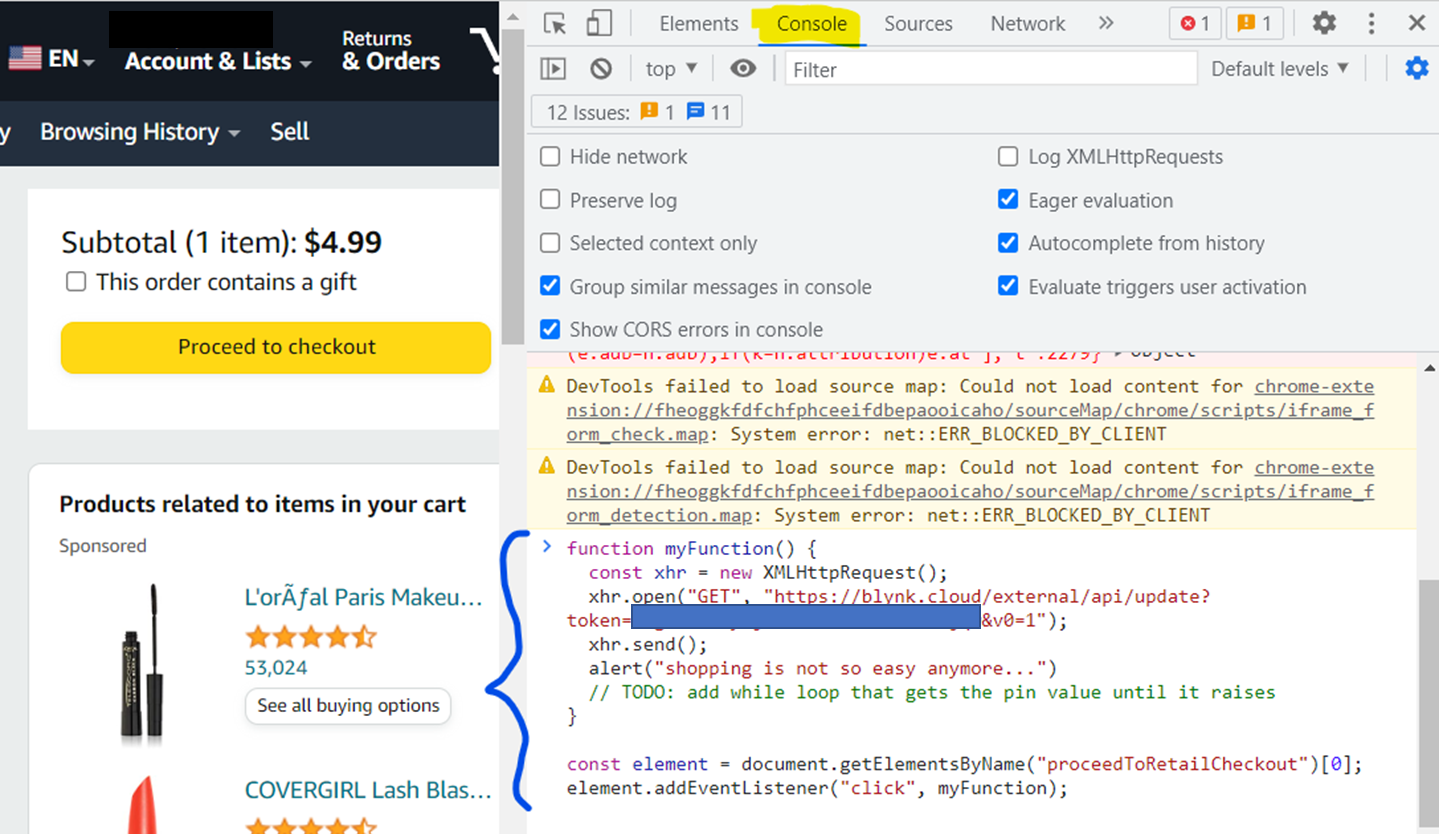
Now this code will listen to a click on the button. If you refresh the site it will disappear and no special actions will be taken when someone clicks the button. So make sure you don’t refresh after you put the code.
Download the Code Files
Before we proceed, you must download all of the C++ code files that will run the entire system and connect its various components. You can find and download these files here:
https://www.dropbox.com/s/5sq5kl4n6d6pbhx/ShoppingBlocker.zip?dl=0
Modify the Code

Open the code file "BlynkConnection.h" and make the following changes:
- Insert your Blynk firmware configuration, which can be found in the "Device Info" section of the Blynk device you created (Search > My Devices > Choose your device and click Device Info), simply copy and paste it.
- Insert your Wi-Fi credentials.
Putting Everything Together
Lets go over the full flow with all the technical "behind the scene" steps:
- Turn on your CPX and put the javascript code in the site.
- The shopaholic clicks on the "Proceed to checkout" button.
- Alarm message pops + virtual pin v0 (ShoppingClick) is updated from 0 to 1 which triggers a siren on the CPX board.
- In order to turn off the siren, the shopaholic must put the CPX in a dark place (a drawer for example).
- Once "darkness" is detected using the light sensor on the CPX, the CPX triggers the webhook in Integromat using pin v2 (SirenStopped) and the scenario is activated.
- The scenario uploads a shaming photo to the Facebook group (the shopaholic is shocked!). When it finishes, it updates virtual pin v1 (IntegromatDone) from 0 to 1 which moves the CPX to the next step.
- After enough time for the shopaholic to comment and explain it's not him, and return to the order page (we used delay in the code) the CPX acts as a mouse and randomly avoids the button on the screen... which is very annoying.
- When the shopaholic will scream on the CPX, the scream will be detected (using the microphone) and trigger the next step which is playing Rickroll clip on youtube (here the CPX will act as a keyboard).
- That's it! now the person can proceed and finish his shopping... if he still has the motivation for that ;)
You Are Good to Go!
Obviously, this project is not designed to be a practical solution to a problem, but rather a humorous and impractical approach inspired by Rube Goldberg machines. You can either replicate the project by following the steps outlined above, or extend and modify it in various ways using the IoT approach and the tools presented here.
We hope you had fun checking out our project and maybe got some inspiration for your own project. If you do, we'd love to see any videos or photos of creative things you come up with inspired by this project :)