Setup and Connection of SunSDR2 Pro
by tribgarry in Circuits > Audio
10590 Views, 1 Favorites, 0 Comments
Setup and Connection of SunSDR2 Pro
.png)
Power supply and computer
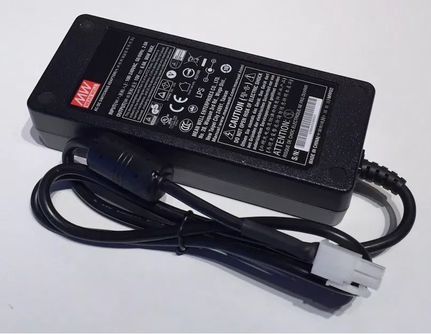
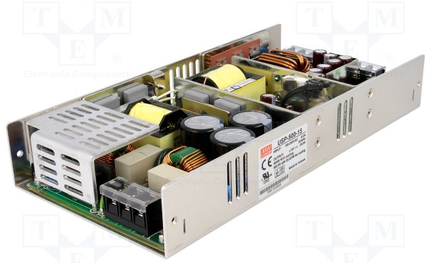
The Suns can be powered by a normal 13.8V power supply, but it is useful to know that they are designed for a voltage of 15V. For the Pro2 there is a small 90W power supply (6A-15V) https://sunsdr.eu/product/power-supply15v-6a-for-... that allows to obtain the maximum transmission power of about 22-24W. Considering the cost you can opt for an industrial power supply of excellent workmanship capable of delivering 30A. For example, I used the Meawell USP-500-15 which has the advantage of delivering up to 30A, of having very effective mains filters and being extremely quiet as it does not use any fan. It is useful to know that the Meanwell voltage can be adjusted from 13.5V to 16.5V, so if you do not need the 15V you can adjust the output to the canonical 13.8V.
On the official website the minimum suggested configuration is " 2 or 4 core Intel Core i3 or Core i5 ". It is important to know that this configuration is suitable for using EESDR with a single receiver. If you intend to use the radio with double RX and other software for contests and/or digital modes, the optimal configuration is an eighth-generation i5 or better yet an i7 with 16Gb of ram. This configuration, among other things, coincides with the characteristics of the computer integrated in the MB1. In all cases it is advisable to equip your computer with a graphics card capable of supporting OpenGL ( Open G raphics L ibrary) which allows you to perform complex graphic applications even in 3D.
If like me, you don't like assembled PCs, because they are big and noisy, I suggest you take a look at the wonderful Intel NUC8i7HVK . They are apparently expensive objects, but they are definitely powerful and reliable, and above all they do not produce noise. I use a fourth-generation NUC i5 (2014) with 16Gb of ram and manages to keep up with the exorbitant demands of EESDR.
First Network Configuration
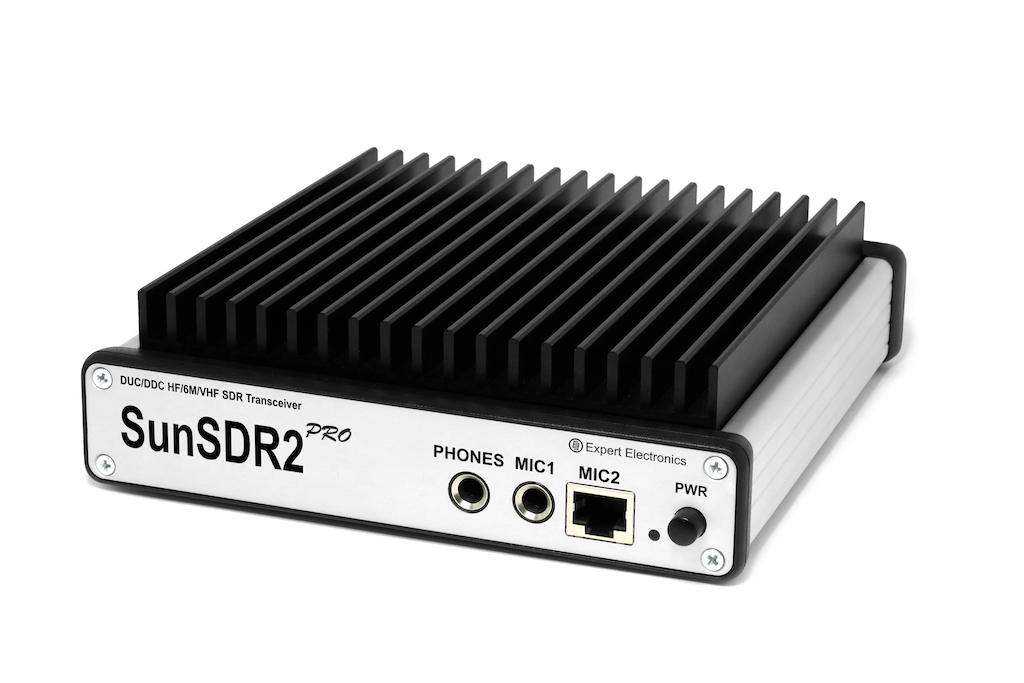
If you buy the new Pro2, you need to know that the default network address is 192.168.16.200. Therefore, if the network class of your intranet is different (for example 192.168.0.x ) it is necessary to change the IP address of the radio.
To do this you need to follow the following steps:
1- Connect the computer directly (not through the router) to the radio through an ethernet cable.
2- Configure the computer's network card to use an IP address of the same class as the radio, for example 192.168.16.15.
3- Restart the computer and, if the radio was on, you should turn it off and on again.
4- Start ESSDR and, from the Opetions-Devices-> menu, search for the radio.
5- Once the radio has been found, click on the Use button and then move to the Expert panel.
6- In the New IP Address area set the new IP address (possibly also the port) and click on the Set IP Address button. For example you can give the address 192.168.0.12.
7- Close EESDR and turn off the radio.
8- Return to the computer's network settings and restore the default settings (those that allow the PC to connect to your intranet).
9- Restart the computer.
10- In the meantime connect the radio to the router and turn it back on.
11- Check that the computer is on the network and that the LED of the Sun is green. At this point, by opening EESDR it will be possible to start using the radio.
If you buy a used radio, it is advisable to communicate the last IP address assigned to the radio or you will be forced to perform a hardware reset to ensure that the address is the default.
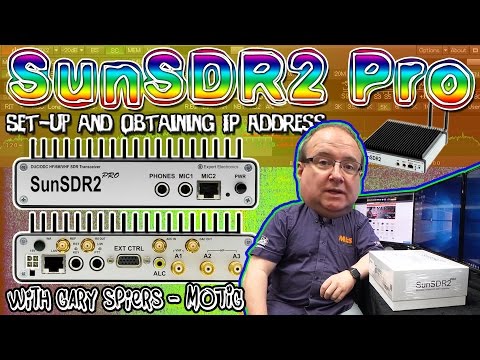
The process just described is the same that can be followed in the video below.
To avoid connection problems, it is advisable that the computer and radio are connected to the router via an ethernet cable. The use of wifi can be a solution provided that in the home network there are no other devices that are displaying videos or using the network to make a sustained streaming. Typical cases are videos displayed on smartphones or smart TVs and game consoles, such as PlayStation, X-Box and Wii, which heavily engage the network.
Another trick to use is to intervene on the home router by reducing the pool of addresses that can be assigned by the DHCP server. The configuration I use in my intranet sees a pool of IP addresses ranging from 192.168.10.31 to 192.168.10.230. Addresses below 31 are reserved (via the mac address) from the devices I use for the radio (in my case SunSDR, station computer, station controller with arduino and rotor). Addresses above 230 are booked by other home devices such as wifi extender, games console and smart TVs. In this way there is no possibility of network conflicts occurring and above all we will be certain that some particular devices will always have the same network address.
Speaker and Sound Card Configuration

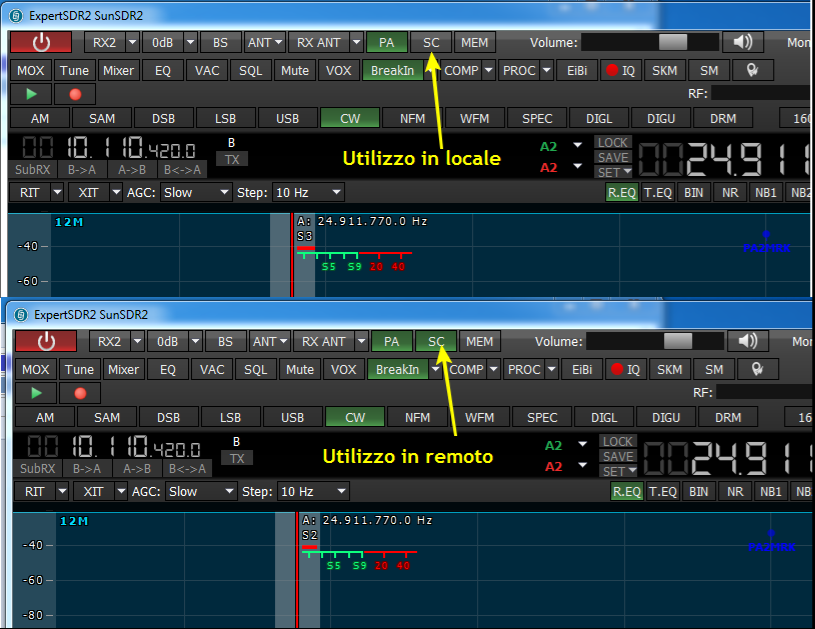
The sound of the Pro2 can be heard in two ways: through the headphone output, placed on the front of the radio, or through the computer's sound card. The choice must be made based on the type of use: local or remote.
- In local use you can use headphones or powered speakers connected to the front socket of the radio.
- In remote use, the only possible option is to listen to the speaker or computer headphones through the sound card. Local use is to be preferred whenever possible (ie when operating next to the radio), as the processing times of the PC sound card are completely eliminated. The speakers I recommend you use are produced by Bose. The Bose Companion 2 Series III model in addition to having a perfect audio response for radio use has the following advantages:
- double input that allows you to listen to two audio sources simultaneously, in our case radio and computer; - front exit for headphones;
- the speakers can be powered at 12V through the station power supply, eliminating the annoying wall power supply, which can sometimes be a source of RF noise.
During the combined use (radio - computer) it can happen to hear a background noise due to the bad isolation between the mass of the PC and the ground of the radio. The problem is easily solved with a pair of galvanic isolators easily available from Amazon.
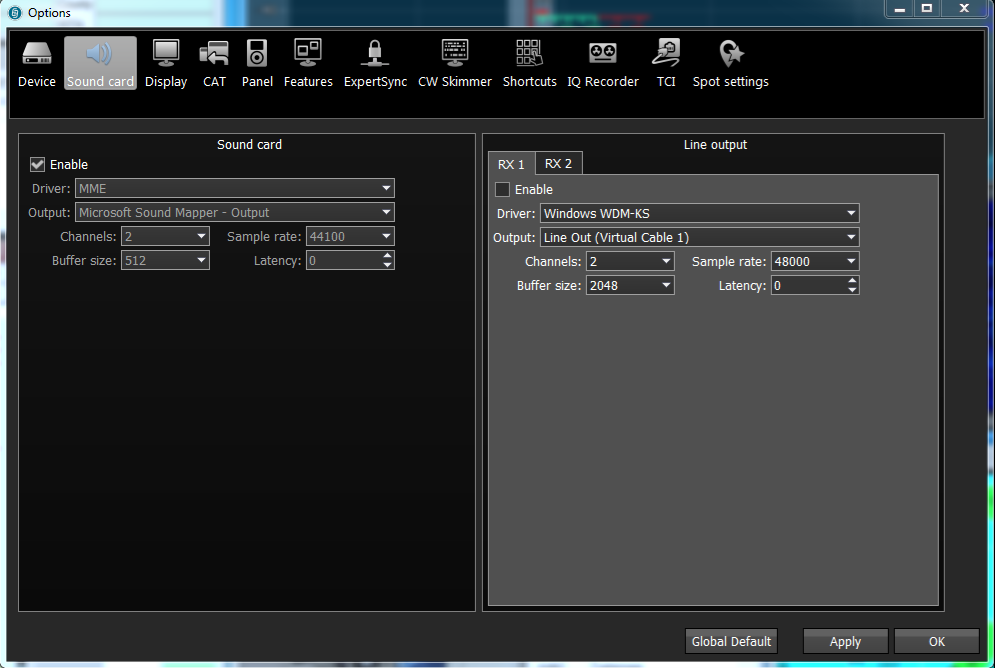
In local use it is convenient to disable the computer's audio output. Thus the speakers will receive audio directly from the audio jack. In remote use it is necessary to enable the sound card by listening to the sound from the PC audio output. The two configurations are shown below
Amplifiers ... the Apparent Problem of the SunSDR2 Pro
The first necessity that is found in the use of the SunSDR2 Pro is that of being able to have greater power.
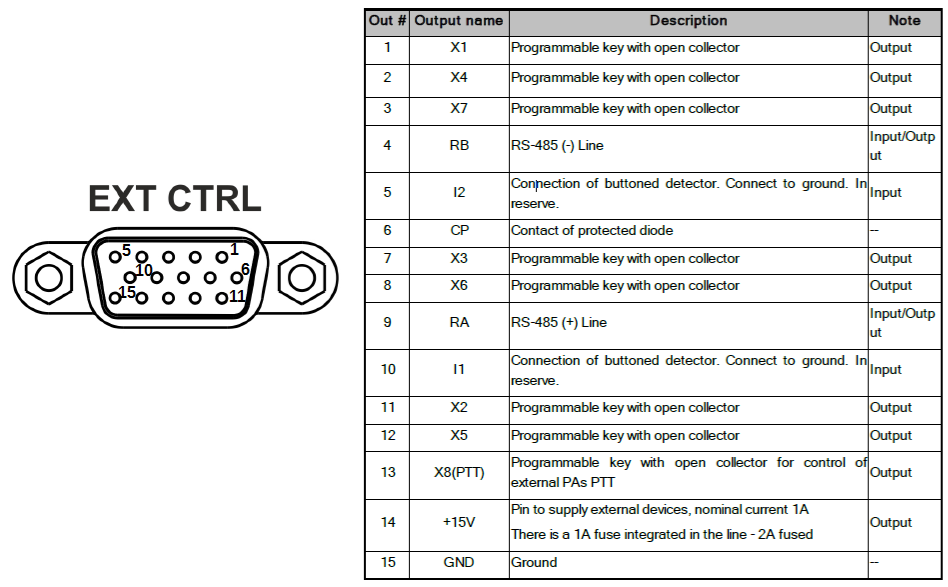
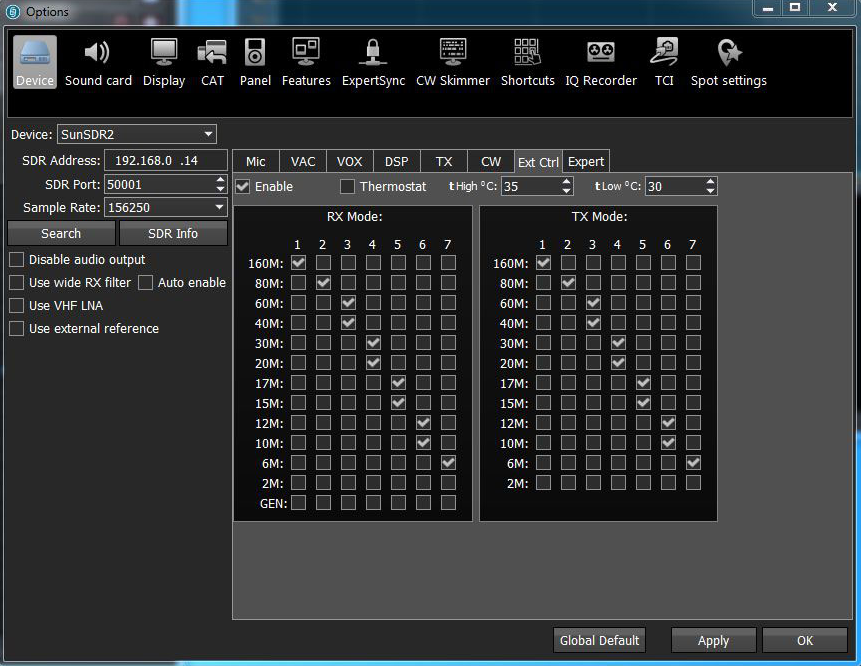
The Pro2 does not have a physical serial port to dedicate to the connection with the linear amplifier. Therefore if you have an amplifier of this type it is necessary to connect it to the PC in order to have the frequency data and the automatic band change. The rear door of the Pro2, called EXT-CTRL, provides programmable outputs for each band through EESDR. This is currently the best way to have the automatic band change without having to use a serial port connected to the computer. Furthermore, as can be seen from the diagram below, on the connector there is a RS-485 serial connection, but at the moment this functionality is not yet implemented.
WARNING! The EXT-CTRL connector is a 100% DB15 compatible with that of the VGA graphics cards, but you MUST NOT ABSOLUTELY USE A VGA CABLE because in that cable many pins are connected together and you will surely damage the radio.
With the 20 watts of the PRO2 you can get the legal power from many amplifiers currently on the market. For the canonical 100 watts there is the expensive solution of the Elecraft KXPA100 that you can see in action in this video or the cheapest DIY solution of theHardrock 50.
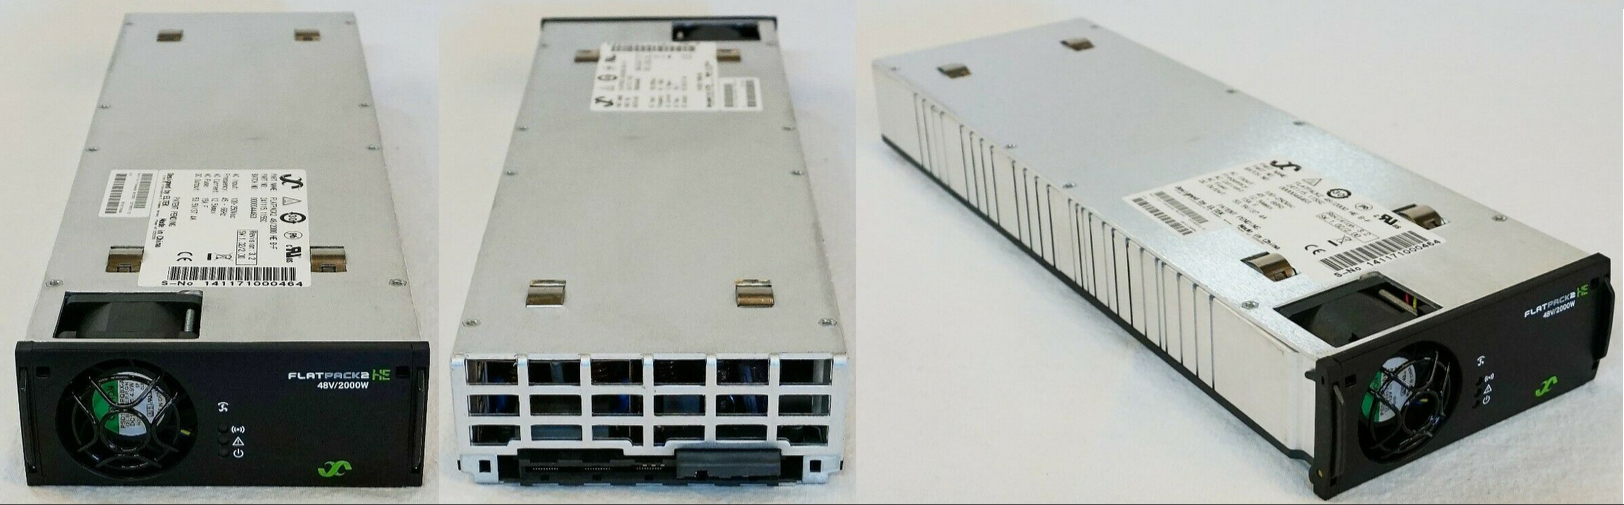
Another solution, no less expensive, but with more power, is the EB300 dedicated amplifier that you can see on the EB104.ru website. In this case, a ready-made cable is available that allows data exchange between the radio and amplifier, having the feeling of using a 300 watt radio. The drawback of this solution is having to buy a separate 50V power supply that with about € 150.00 can be purchased from ebay. The amplifier manufacturer suggests the Eltek Flatpack2 48V / 2000W model. It is a power supply of extraordinary power and above all very silent (electric and environmental).
The configuration of EESDR for automatic band change with the EB300 is shown below. The same configuration can (or must) be used with other types of amp that support the same type of inputs, provided you use a suitable cable.
Configuration of Serial Ports
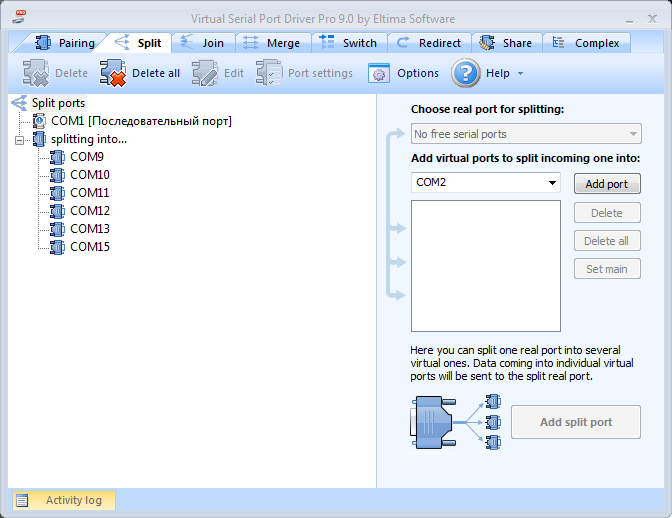
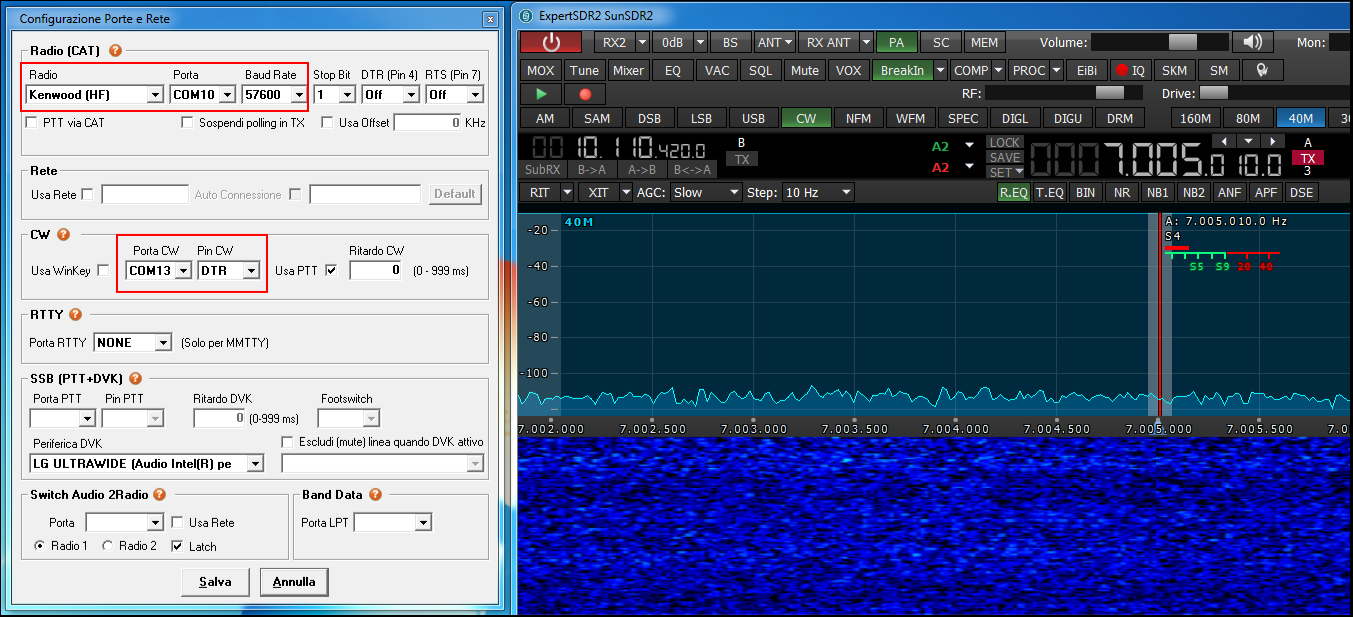
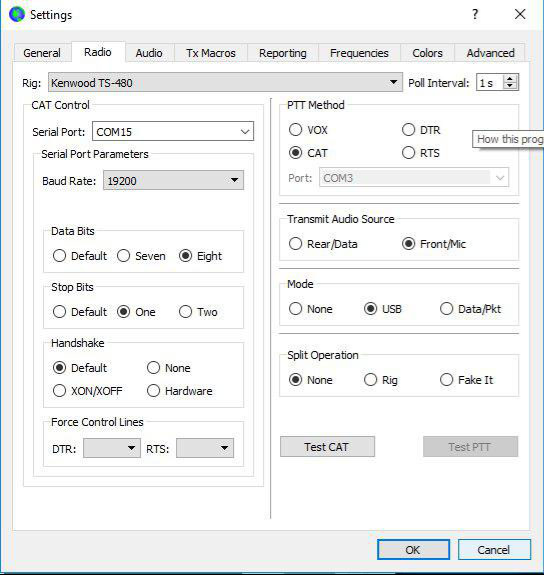
The connection between EESDR and the radio is via the network cable. The network protocol is not open, therefore software that allows a direct interaction with the radio cannot be used. EESDR, in addition to allowing the use of all the functions of the radio, implements a virtual RTX for each receiver. The CAT protocol used is that of the Kenwood TS-480, so the external sw can interact with the Pro2 as if it were a TS-480. Through a virtual serial port driver (I recommend using Virtual Serial Port Driver Pro ) it is possible to set CAT ports.
VSPD pro can be configured (the port numbers can obviously vary).
- COM 9 - Connector (for use by EESDR for the CAT of RTX1)
- COM 11 - Connector (for use by EESDR for the CAT of RTX2)
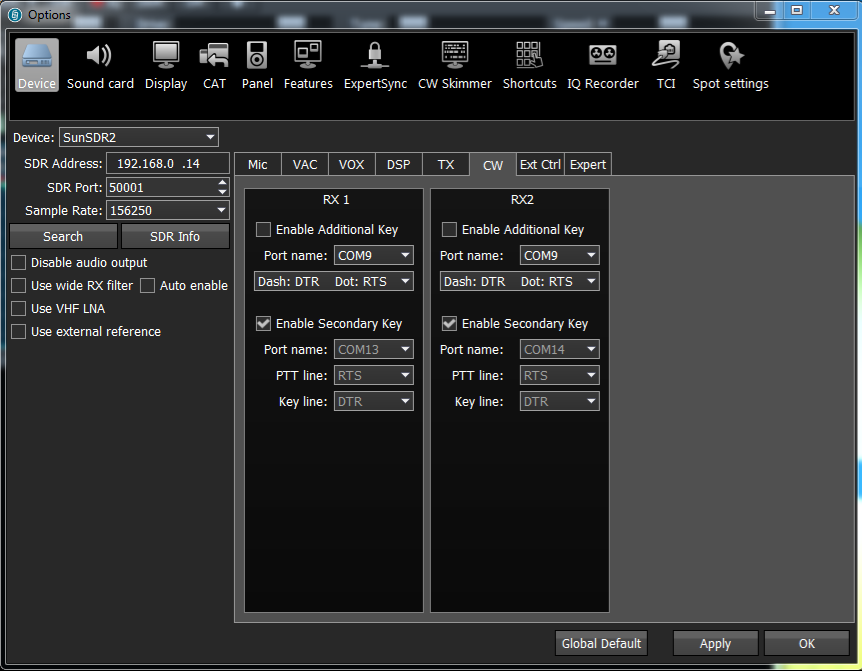
- COM 13 - Connector (for use by EESDR for the secondary CW key of RTX1)
- COM 15 - Connector (for use by EESDR for the secondary CW key of RTX2)
- COM 9 => COM 10 - Splitter (COM 10 will be the port to indicate in any SW that needs CAT connection with RTX1)
- COM 11 => COM 12 - Splitter (COM 12 will be the port to indicate in any SW that needs CAT connection with RTX2).
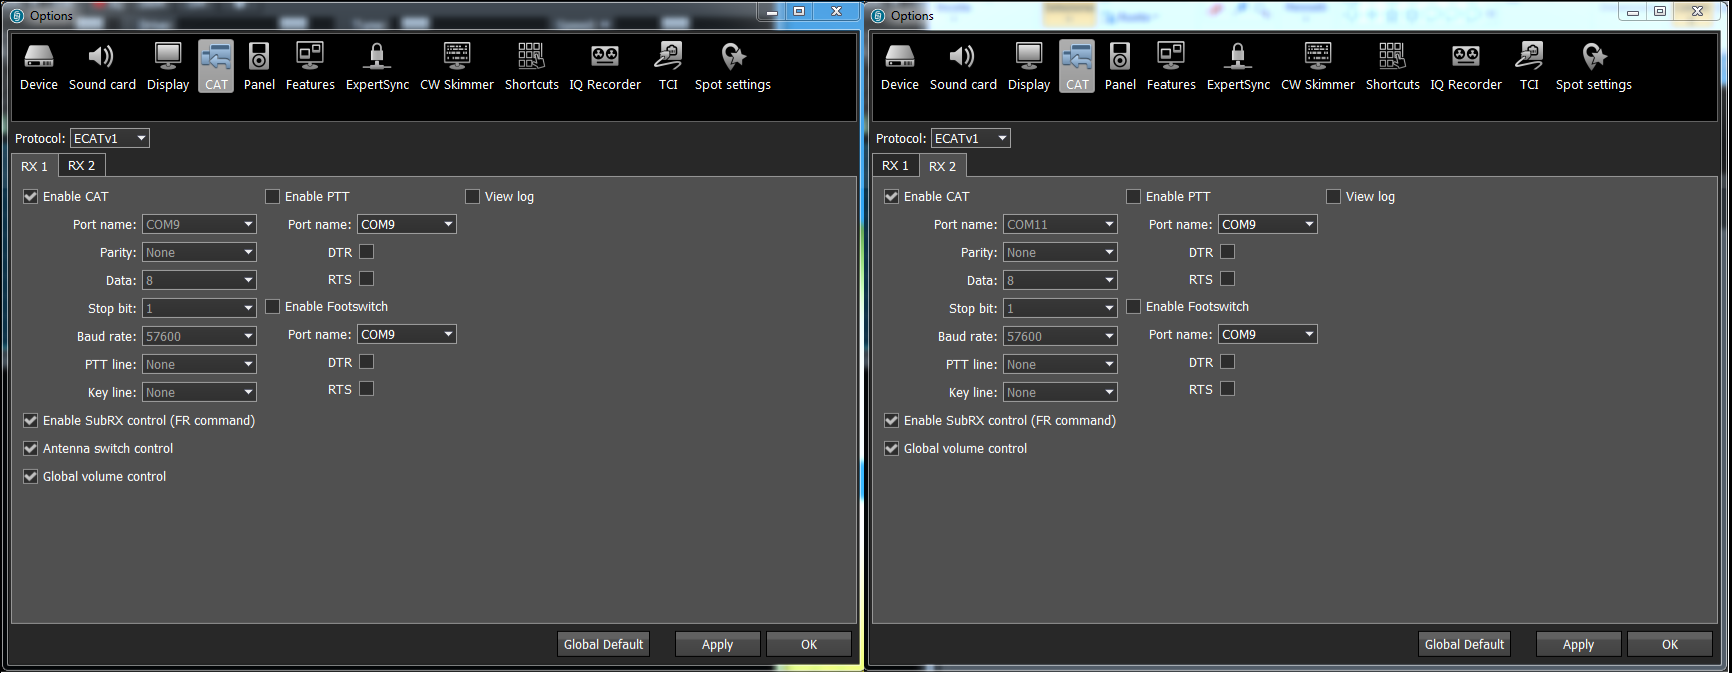
EESDR is configured as shown in the figure
Now the various Logs and software for digital modes will see:
Receiver 1 as a TS-480 connected to COM 10
Receiver 2 as a TS-480 connected to COM 12
CW RTX1 interface connected to COM 13
CW RTX2 interface connected to COM 14
The COM 10 and COM 12 ports are configured as splitters, so more software can use them simultaneously. It should be pointed out that an unscrupulous use of serial splitters can significantly slow down the response of EESDR to CAT commands. For very complex configurations it is advisable to use the UT4LW SDC.
In EESDR there is also the possibility to configure additional serial ports to be used as PTT or Footswitch buttons to be connected to software for digital or voice modes. Since I only work in CW, I don't have any particular configurations to suggest, but if you have a particular configuration to share, you can let me have it by email. In this regard, further useful information can be found in the Addendum, already mentioned at the top of the page.
We see a possible configuration of QArtest that uses the serial ports configured previously.
Many Ways to Generate CW
The PRO2 is a radio decidedly devoted to telegraphy. There are many ways to generate morse signals. The best way depends on our preferences and the conditions of use.
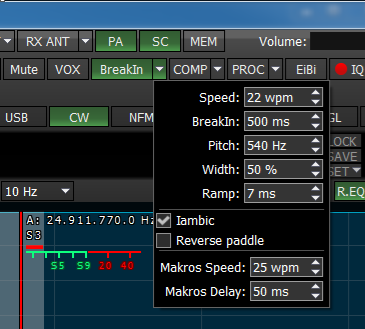
1- Front Jack - The button, bug or paddle should be connected to the jack on the front of the radio. The tone is generated by the sound card inside the radio and sent to the external speakers or to the PC sound card (if the latter has been activated with the SC button). The paddle requires the internal keyer to be enabled which is very precise even if it generates the code at a higher speed than the one set by about 15%.
2- External Keyer connected to the Front Jack - The paddle is connected to the external keyer which in turn is connected to the front jack of the radio. In this case the internal keyer must be deactivated by removing the check from the Iambic entry .
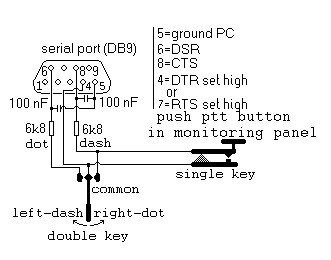
3- Physical key or paddle connected to the PC - It is the preferred connection when operating remotely. The telegraphic key, paddle or keyer, must be connected to the serial port of the computer through the adapter shown next. Although it is not mentioned in the official manual, it is useful to add a couple of capacitors and two resistors for debouncing the contacts. The key must be enabled on receiver 1 or on receiver 2 through the Options-> Device-> Enable Additional key menu.
4- Secondary CW key - As shown in the previous section, each receiver can be equipped with a virtual key connected to a serial port, also virtual. This port can be controlled by a sw for contest or a macro generator. It is a sw system equivalent to the hw interface described in the QARTest manual. This interface uses a PNP transistor which is driven by the DTR or RTS signal of a serial port. Also in this case the key must be enabled on receiver 1 or on receiver 2 through the menu Options-> Device-> Enable Secondary key.
5- Button connected to the E-Coder controller - This is also a type of connection to use when operating remotely. The E-Coder controller connects to the PC's USB port, and the telegraphic button connects to the appropriate jack on the back of the E-Coder. In this case there is no serial port to be enabled, but it is necessary to configure and activate the E-Coder in the Options-> Panel menu.
The video alongside illustrates how the E-Coder works and the CW paddle used in remote mode.
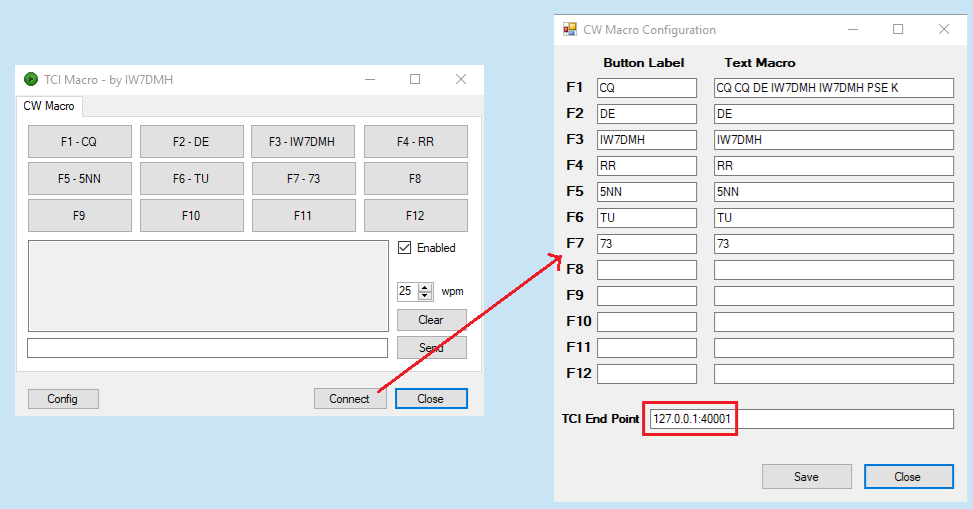
6- Macro CW (TCI Protocol) - Unlike many commercial radios, SDR and not, EESDR does not natively offer a system for the automatic sending of CW messages, commonly known as MACRO. In reality EESDR, in addition to all the usual connection systems, such as serial ports, sound cards and virtual audio cables, provides a network connection that uses a protocol called TCI - Transceiver Control Interface. Later we will see the advantages (sensational) of the TCI protocol, but for now we are interested in knowing that with a third-party program it is possible to configure your macros and send them to the radio using the function keys. One of these programs is TCI-Macroavailable on my site and is a small supplement to EESDR. After installing it, you can add it to the programs to run automatically when ESSDR starts. (Menu Options-> Features). More details are available on the dedicated page.
SDC Skimmer - a Powerful Free Skimmer Cw

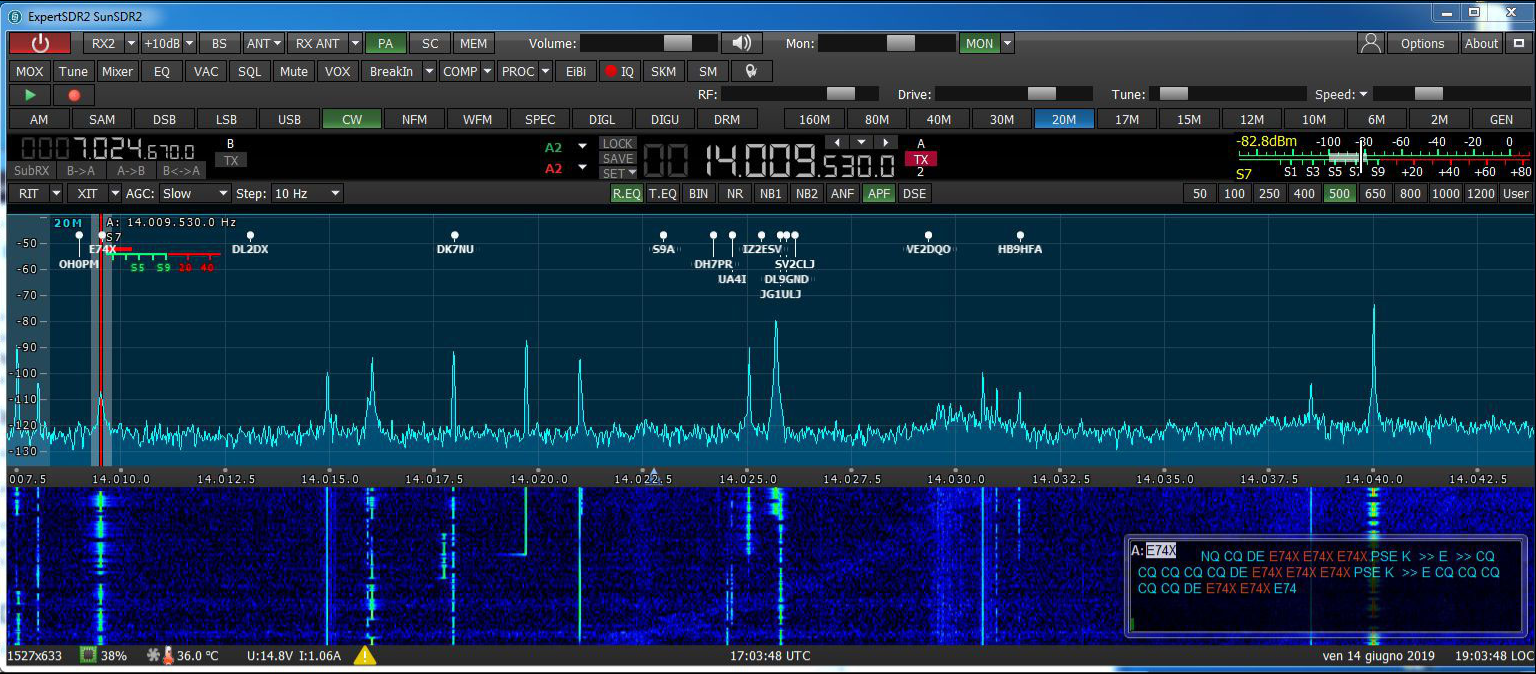
Among the many features that SDC provides, for which I refer you to the Addendum manual, here we describe the most interesting for those who practice telegraphy: the CW skimmer.
The configuration that will be illustrated does not use virtual audio cables, nor does it use virtual serial ports, nor is it necessary to use Omnirig to maintain the synchronism between the radio and skimmer. The only configuration required is the activation of the TCI protocol both on EESDR and on SDC. It will also be possible to configure an external cluster and a cluster aggregator that gives the possibility to view the spots decoded by the skimmer together with those coming from clusters on the Internet. Also for this complete setup, I refer you to the dedicated page on my site. Here it is important to see the final result.
The decoded spots can be sent to the panadapter, making it unnecessary to keep the skimmer window active alongside that of EESDR.Moreover, positioning on the trace of a signal it is possible to visualize the whole qso that in the meantime SDC has decoded.
Digital Modes (by Graziano - Iw2noy)
While waiting for the digital modes to be supported by the TCI interface, we see a possible configuration of EESDR and WSJT for the FT-8/4 mode.
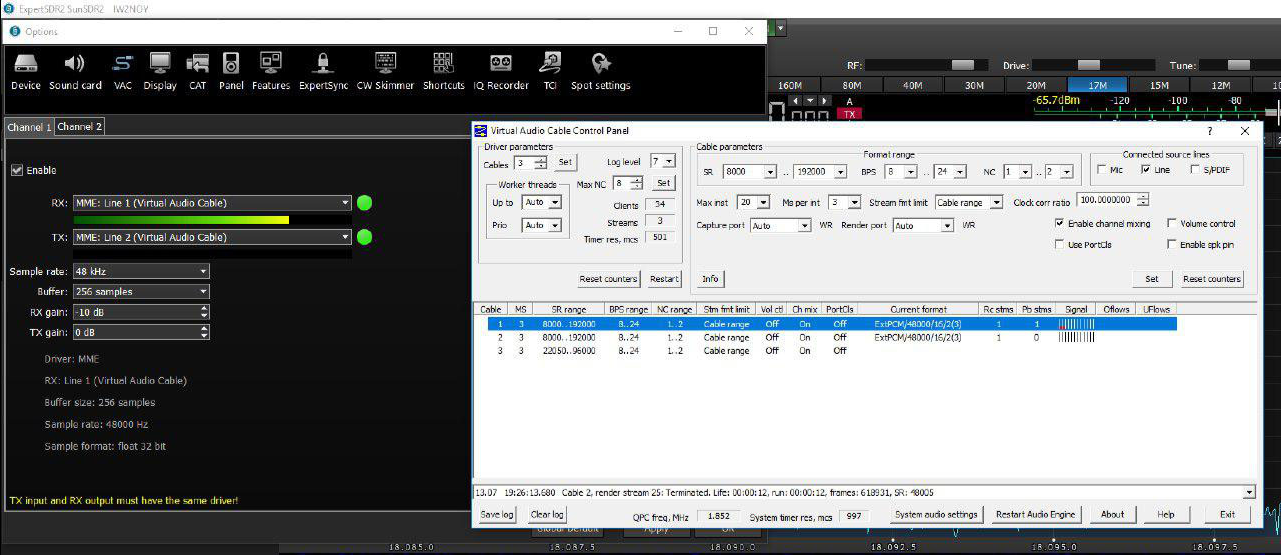
Using a program for virtual audio cables like VAC 4.60 configure two audio cables as shown in the figure below. Line 1 (or cable 1) will be configured in EESDR as an RX audio cable, Line 2 (or cable 2) will instead be configured as a TX audio cable.
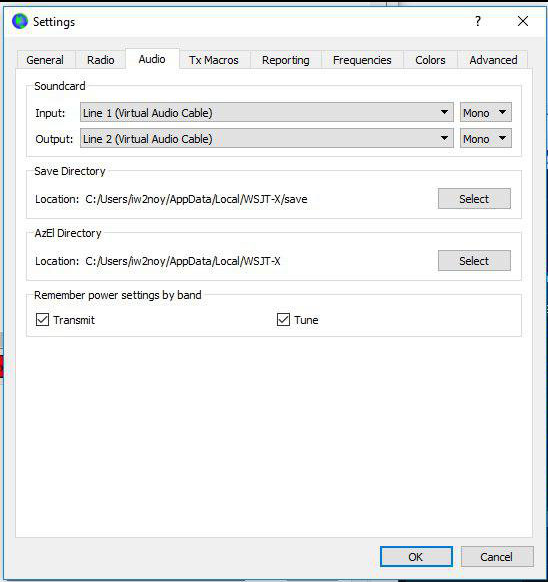
The next step is to configure the other end (so to speak) of virtual audio cables. To do this it is necessary to intervene on the program used for digital modes (in our example WSJT): in the section dedicated to Audio, the Input / Output channels are configured as shown in the figure.
The last configuration required is frequency control. WSJT provides different modes. As for the PRO2, simply select the "Kenwood TS-480" Radio model as shown in the figure.
Remote Use of the Sun SDR2
There are several possibilities for using the Sun SDR2 remotely.
Expert Remote System is the official solution developed for the Sun. It is actually two applications:
- ExpertRS is the server application that must be run on a remote computer capable of communicating directly with the radio.
- ExpertRC is the client application that can be executed remotely. For both applications different versions are provided for the various operating systems. More information is available at the link of the manufacturer https://eesdr.com/en/expertsdr2-en/software-en
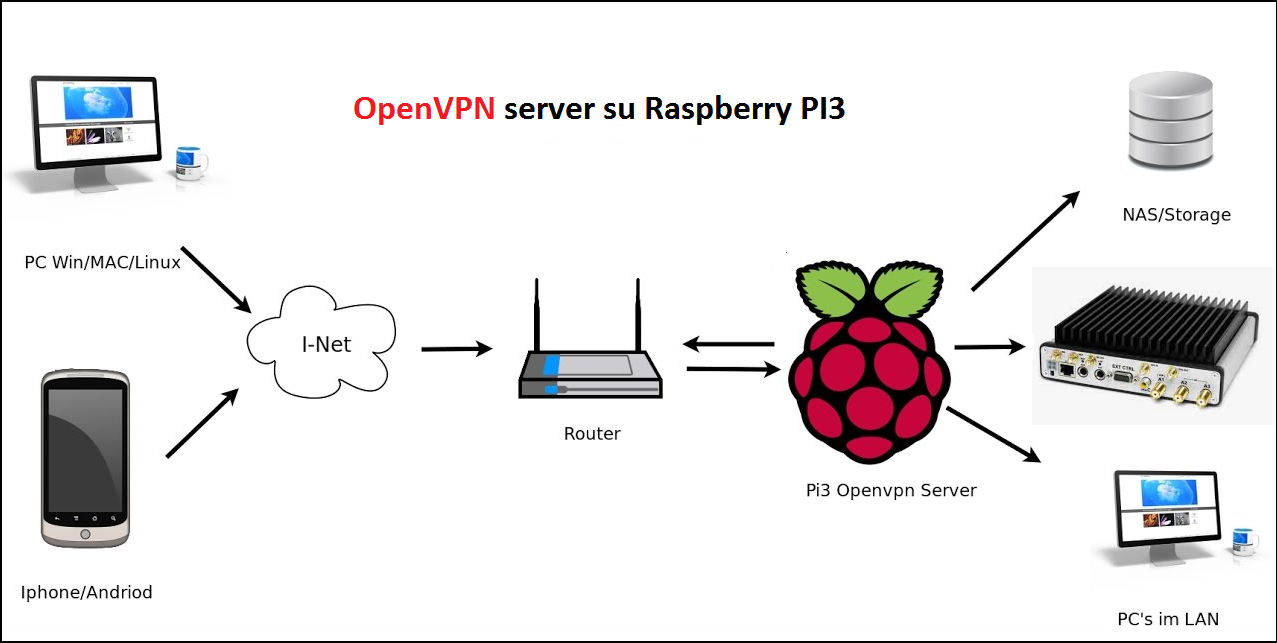
This solution is not very nice to me first because the use of the radio requires a PC turned on next to it and secondly because the RemoteR-C / S application does not implement all the features already present in EESDR. Therefore I suggest you use a virtual private network, or VPN, which allows you to remotely access your home network and use the radio (and any other device on your network) as if your computer were physically at home. I have experimented with various solutions, both software and hardware (ie ADSL router with its own VPN server) and in the end I opted for the software solution of the tried and tested and universally supported OpenVPN system. For the configuration of an OpenVPN server I refer you to the appropriate page of my site. Here it is sufficient to know that OpenVPN solution is independent of the ADSL provider used, that a public IP address is required or at least the registration to a dynamic DNS service (no-ip, Dyn-Dns, etc.) and that it is necessary to invest in the purchase of a Raspberry PI3 with 8-16 Gb SD card. OpenVPN also has the significant advantage of being natively supported by all operating systems, including IOS and Android.
https://iw7dmh.jimdo.com/ Thank you for the information.