Setup 2: First 3D Adaptive Roughing
1690 Views, 3 Favorites, 0 Comments
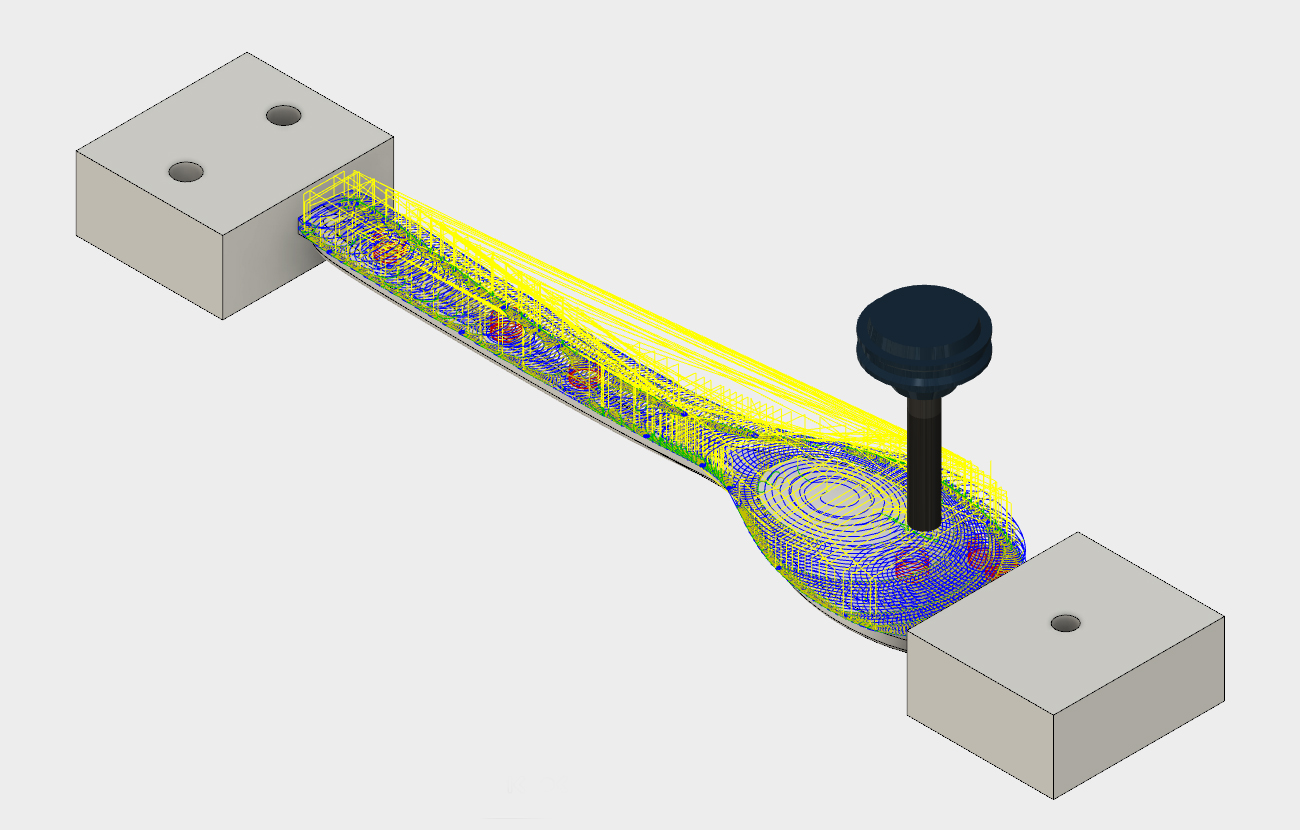
Setup 2: First 3D Adaptive Roughing
Just like the first side, you will will start the second side by roughing. This time, however, there is less support because less stock is contacting the spoiler board, so you will use more conservative settings.
1) In the ribbon, choose 3D>Adaptive Clearing.

2) Click Select next to Tool.
3) Choose the 1/2" flat EM Long. Click OK.
This tool should be labeled #5.


5) Click the Geometry tab.
6) Next to Machining Boundary, choose Selection.
7) Select the same contour that you chose for the Parallel toolpath in Setup 1--the one that runs around the side of the spoon.
A green silhouette will appear (see isometric and side views in the attached images). By default, Adaptive will remove all the stock that it can reach. In Setup 1 you already removed almost all the stock you need to get rid of, other than the material inside this contour. Selecting this contour will make the toolpath much more efficient. Confirm that the Tool Containment is set to Tool outside boundary, with an Additional Offset of 0.
8) Uncheck Rest machining. It's easier to constrain this toolpath with a selection in the Geometry tab, rather than relying on Rest machining, which can take a prohibitively long time to process and gives you less control.

9) Click the Heights tab.
10) Add a Bottom Height Offset of 0.75.

11) Click the Passes tab.
12) Change Optimal Load to 0.1.
In Setup 1, for Adaptive roughing you chose an Optimal Load of 30% of the tool diameter. However, now the spoon has much less support and is more prone to chatter - machining vibration. These vibrations can lead to a bad finish, or worse, the part coming loose from the workholding. It's important to be more conservative now, using 20% of the tool diameter.
13) Change Maximum Roughing stepdown to 0.2.
In Setup 1, your Adaptive stepdown was 50% of the tool diameter (0.5"), but again, you are being more conservative this time by only using 40% of the tool diameter.
14) Click OK to generate the toolpath.
Simulate!
1) Click Setups (above Setup 1), or click Setup 1, Shift, Setup 2 to select both.

2) In the ribbon, click Simulate. It's important to always simulate all setups, so that you can see what your stock actually looks like at any given time.

3) Inspect the part. Notice the area around the head of the spoon needs some attention. Keep the model visible, make the stock transparent, and view from the side. There's too much stock still here to go right to finishing. You could edit this operation to address this material, by setting a lower Bottom Height, but that could result in a lot of 'air cutting', where the tool is not engaged in the material. Instead, you'll address this in the next lesson, by creating a second Adaptive Roughing toolpath.