Setting Up and Binding MicroBee Drones to FrSky Taranis Q X7 Radios
by shu_engineering in Workshop > Science
1113 Views, 0 Favorites, 0 Comments
Setting Up and Binding MicroBee Drones to FrSky Taranis Q X7 Radios
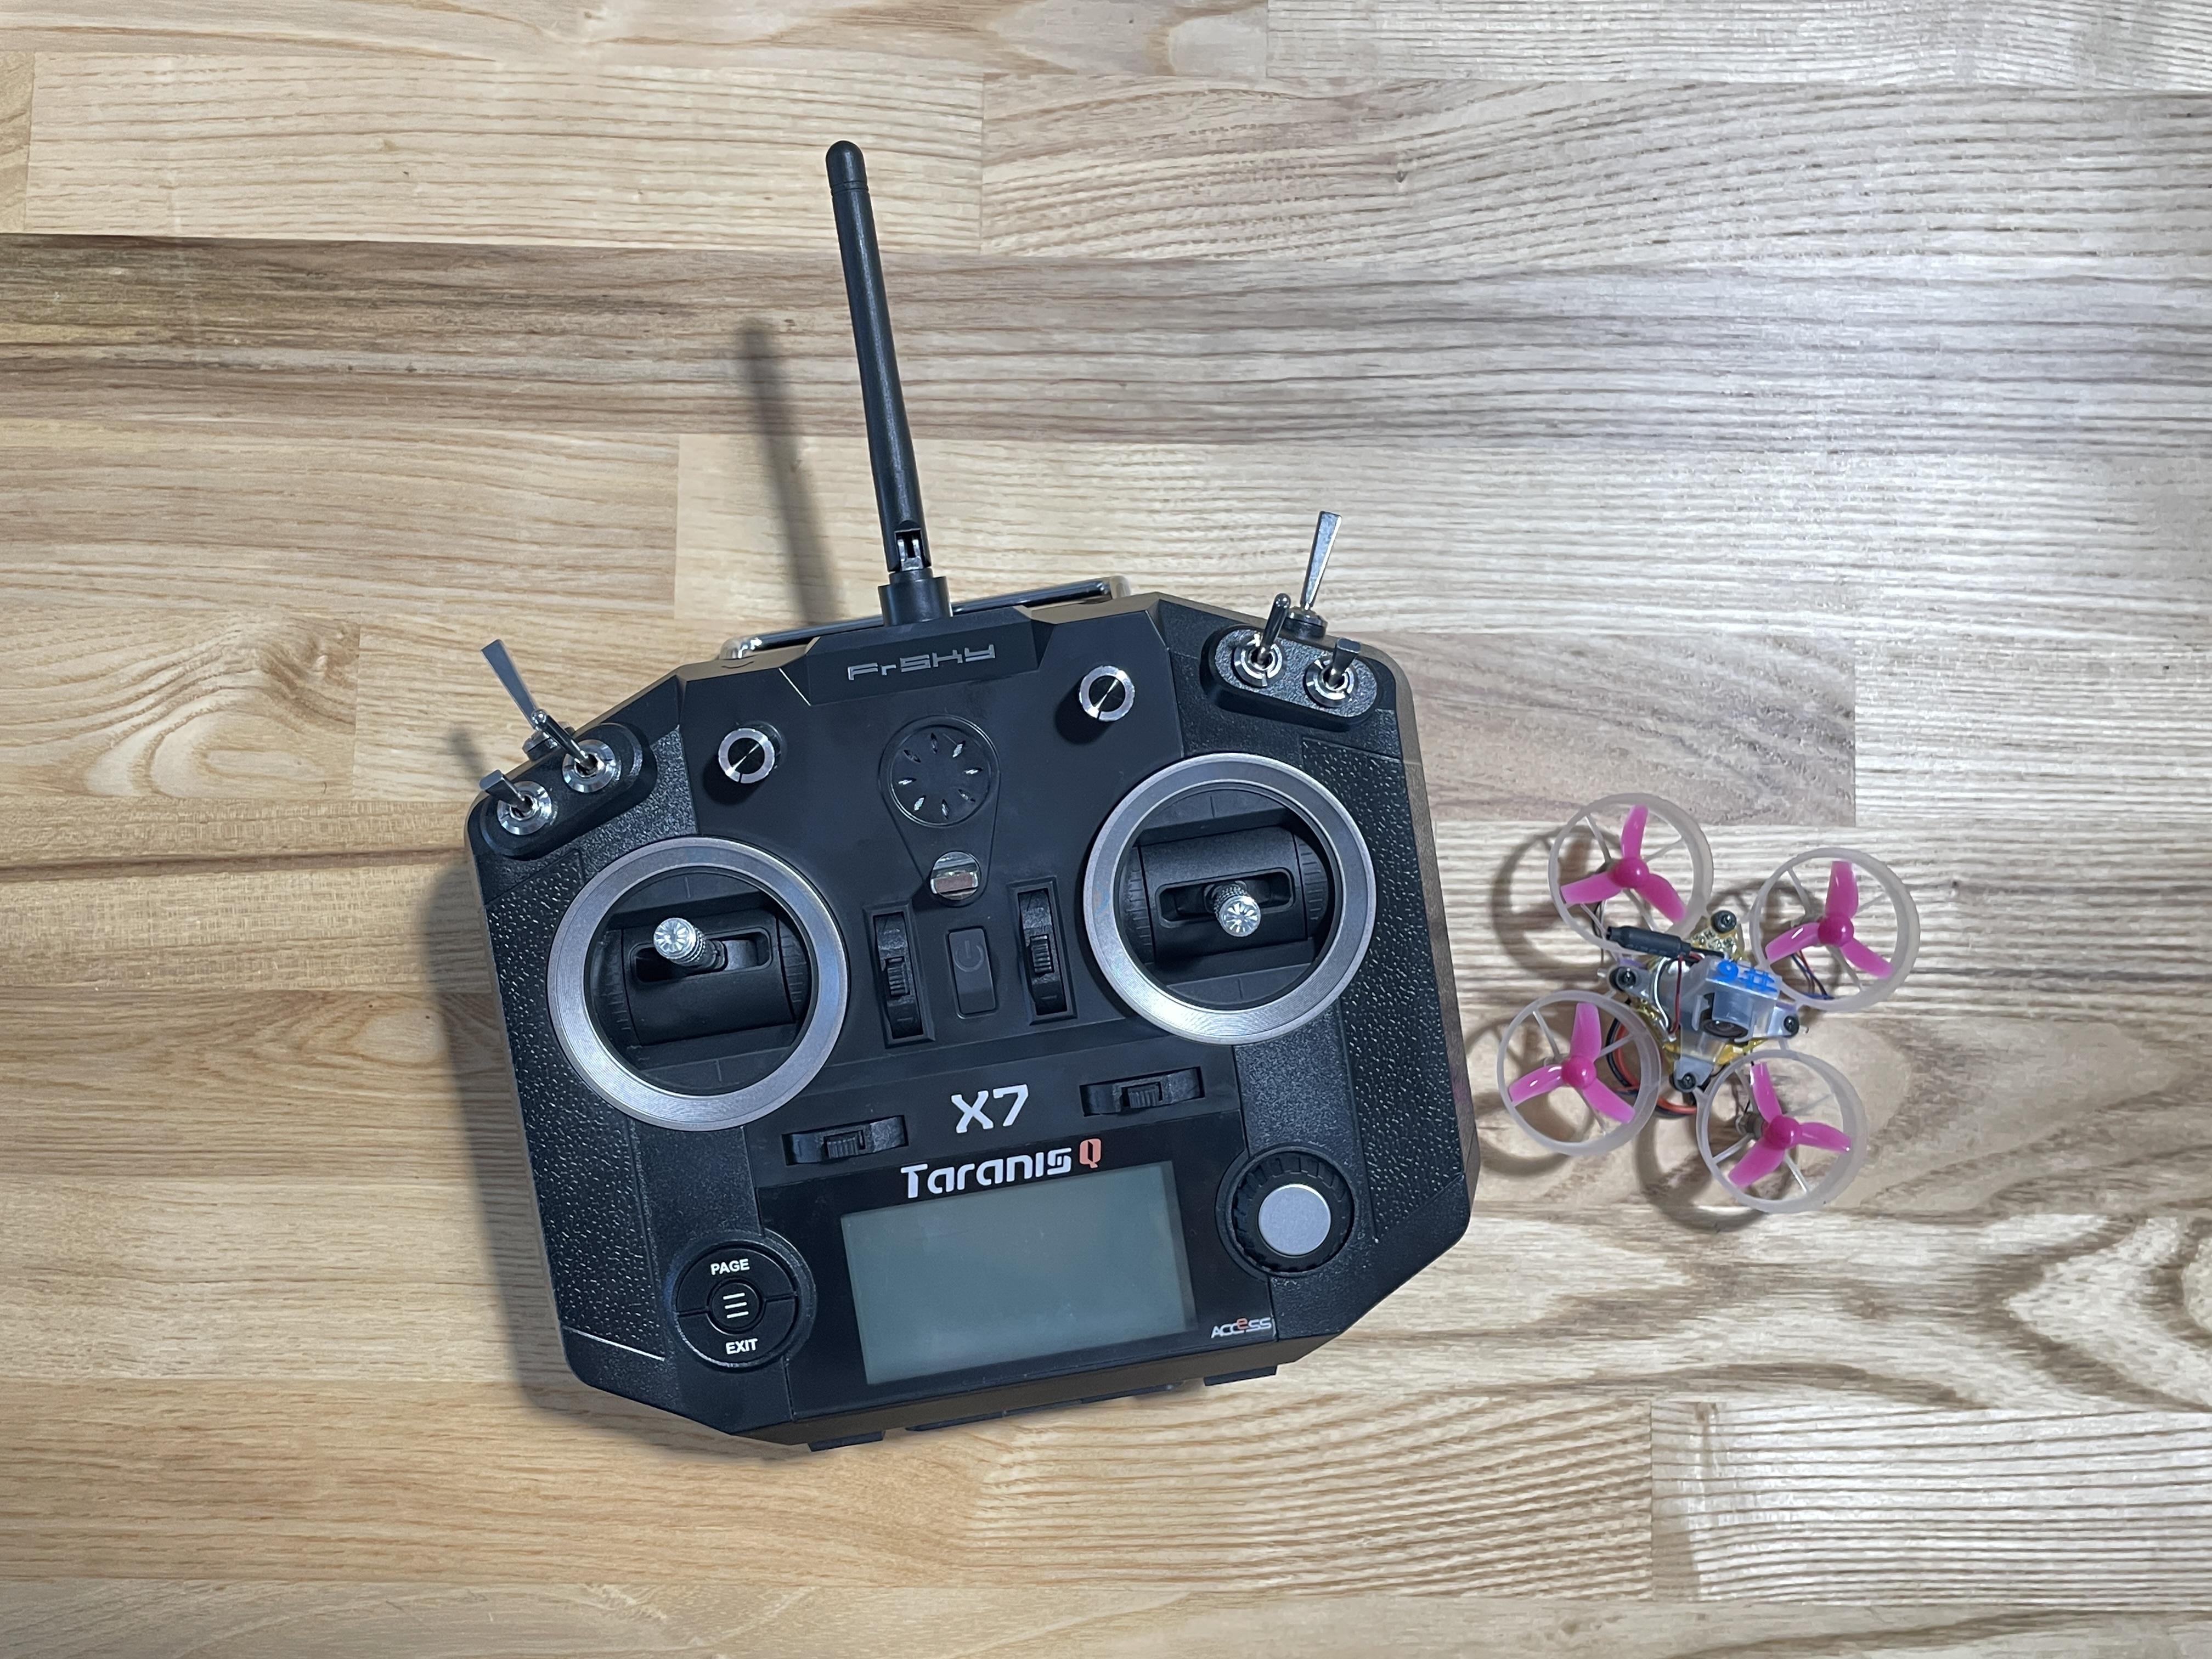
The goal of this workshop is to be able to bind a NewBeeDrone AcroBee with a FrSky Taranis Q X7 Radio in order to fly.
Julia Piascik
Supplies
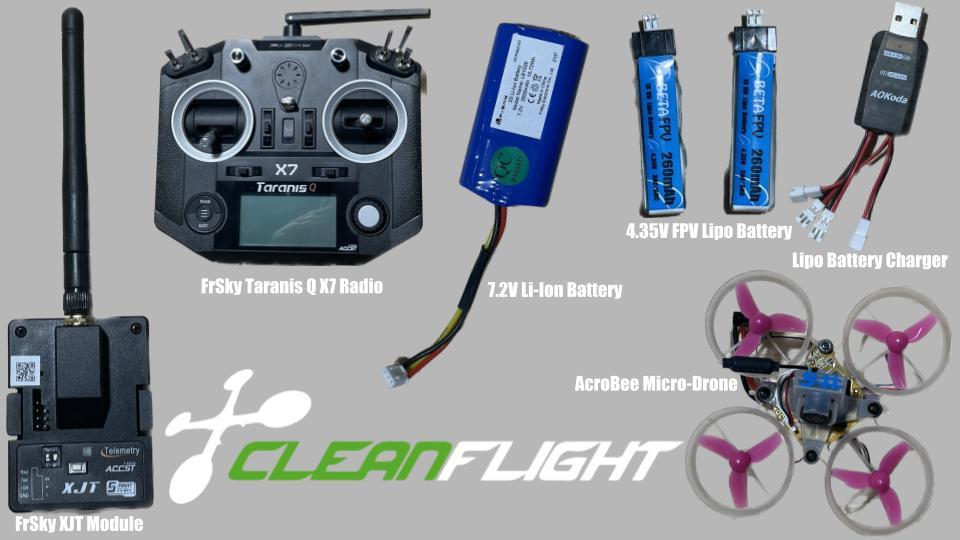
- 1 FrSky Taranis Q X7 Radio
- 1 AcroBee
- 1 4.35V FPV Lipo battery
- 1 Lipo battery charger
- 1 FrSky XJT Module
- 1 7.2V Li-Ion battery
- Cleanflight Configurator
- USB to MicroUSB cable
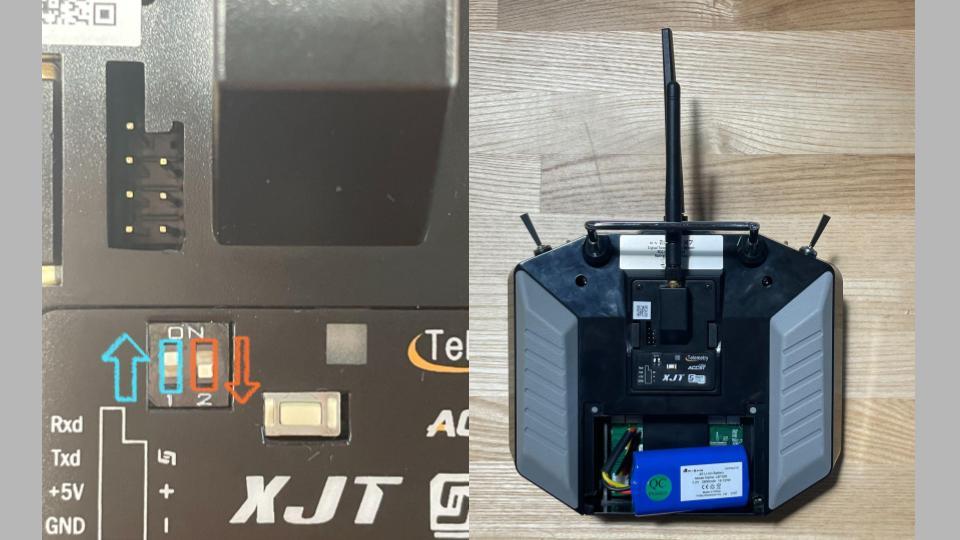
Attaching the Telemetry Module and Battery to Radio
.jpg)
First, we need to set up the telemetry with the radio to make it easier to bind the drone. Before we attach the telemetry to the back of the radio, on the telemetry, Switch 1 should be turned on (moved to the top), and Switch 2 should be turned off (moved to the bottom).
Flip the FrSky Taranis Q X7 Radio over.
Next, insert the module into the top compartment. The cover can be squeezed off and placed to the side as it cannot be attached back on with the module connected.
We will also plug in the 7.2V Li-Ion battery in the bottom compartment. The cover can be slid off and back on once the battery is plugged into the bottom left socket.
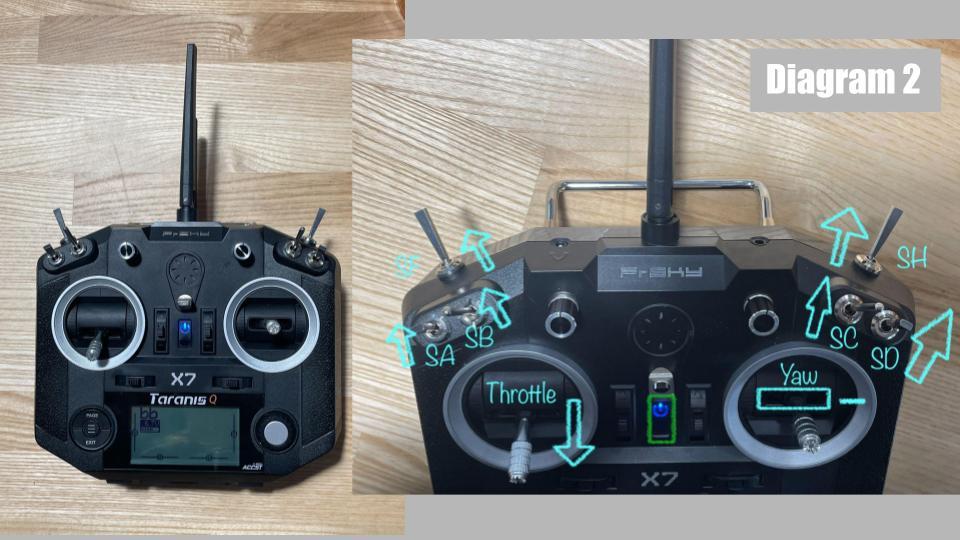
Powering on the Radio
.jpg)
Press the power button. For some radios, it is necessary to hold the power button on the remote until the screen lights up, four dots are shown and a vibration is felt.
If a warning screen pops up, view Diagram 2 to see which switches must be moved and where. Press any button on the remote if a Failsafe warning screen pops up.
Creating a New Channel for the Drone
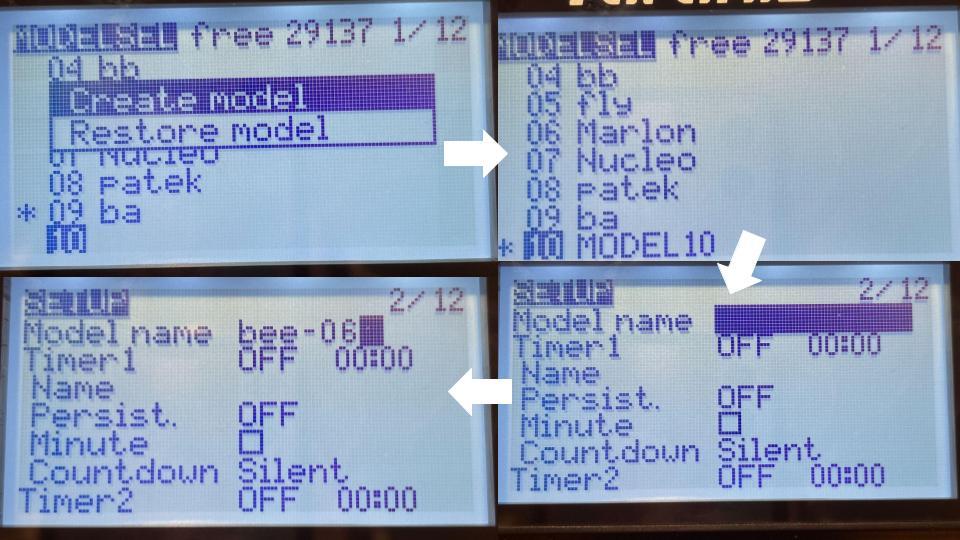.jpg)
Click the three lines between PAGE and EXIT on the radio's left side of the screen.
Twist the scroll on the right side of the screen to find an empty channel; select it by pressing the silver button on the scroll. Press the silver button again to select "Create Model". "MODEL##" will be seen in the channel you selected.
Press the PAGE button.
Make the Model Name correspond to your drone so that it is Bee-## or bee-##. (For example, if you have drone 06, make the Model Name bee-06. ) You can do this by pressing the silver button and scrolling to the letter, number, or symbol you want, then press the silver button again to move on to the next character. Once completed, press the EXIT button on the left side of the screen.
Setting Up the Receiver in the Radio
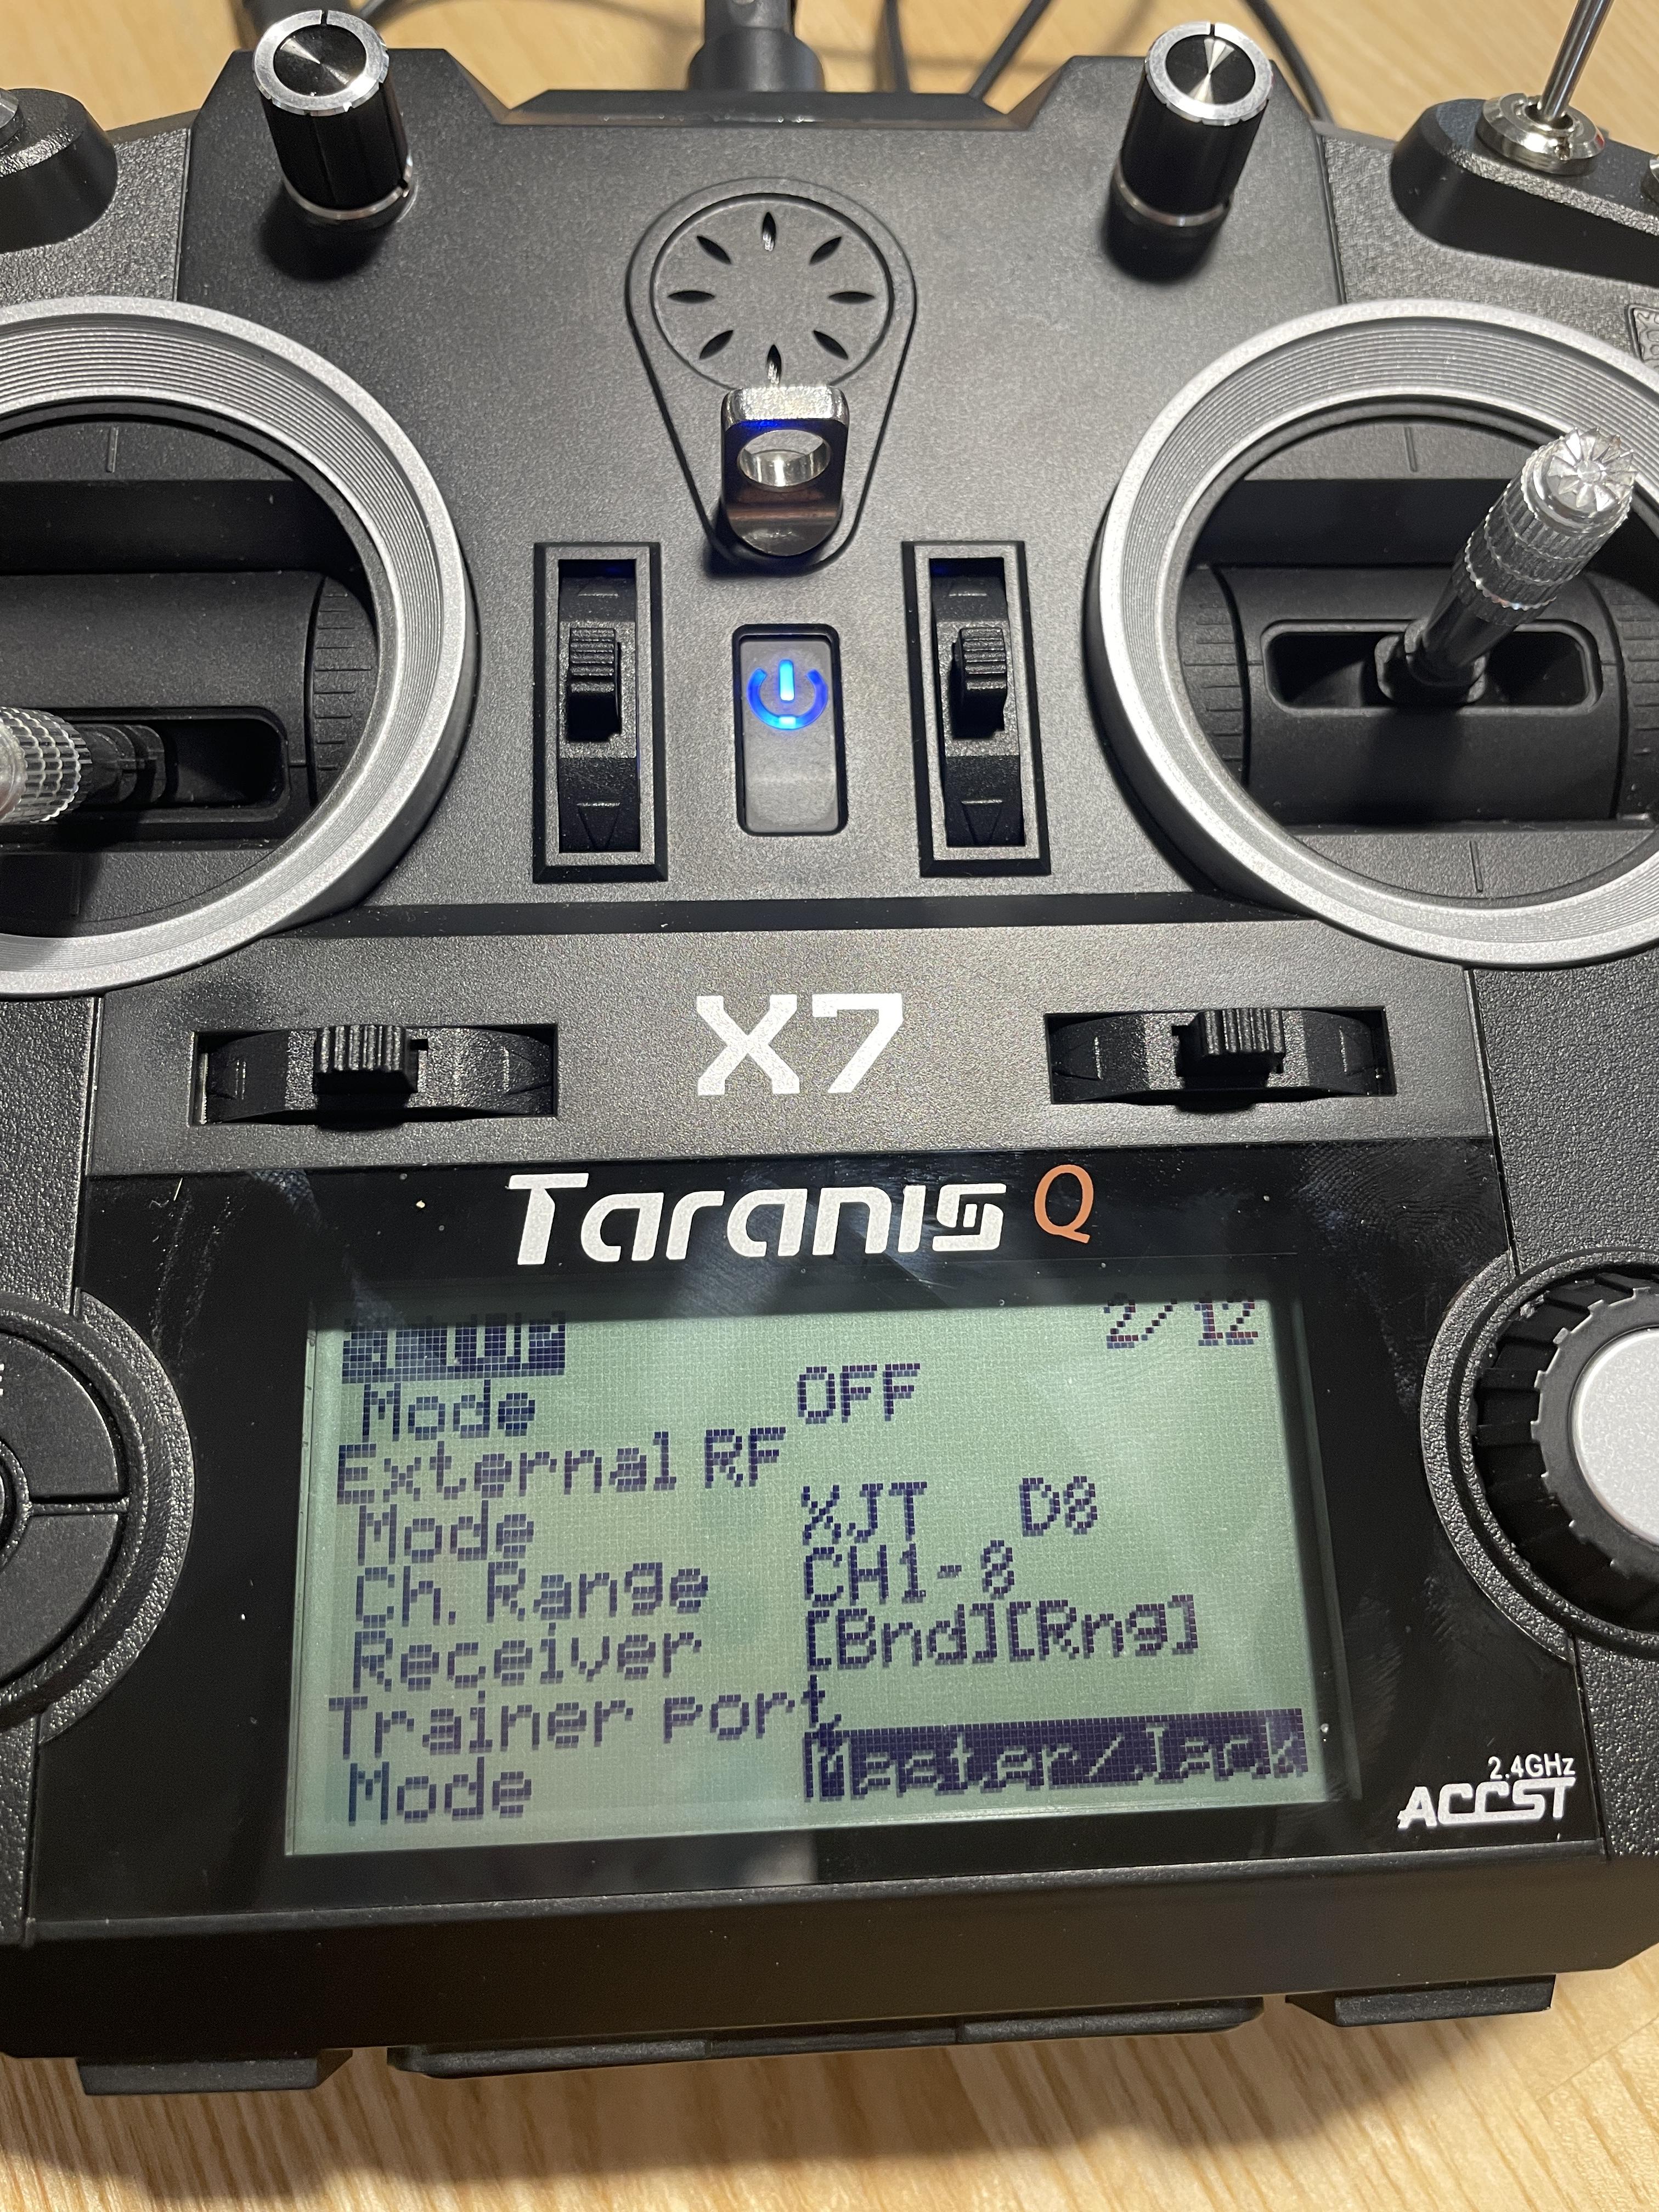
Twist the scroll on the right side of the screen to find Internal RF and External RF.
Make sure the Internal RF MODE is "OFF". If not, press the silver button on the scroll and twist the scroll till you see "OFF."
Make the External RF MODE XJT D8 by pressing the silver button and scrolling till you see XJT. Press the silver button on the scroll again to enter the change. Twist and press the silver button to move and select D8. Press the silver button on the scroll again to enter the change.
Setting Up Arm and Pre-arm in the Radio
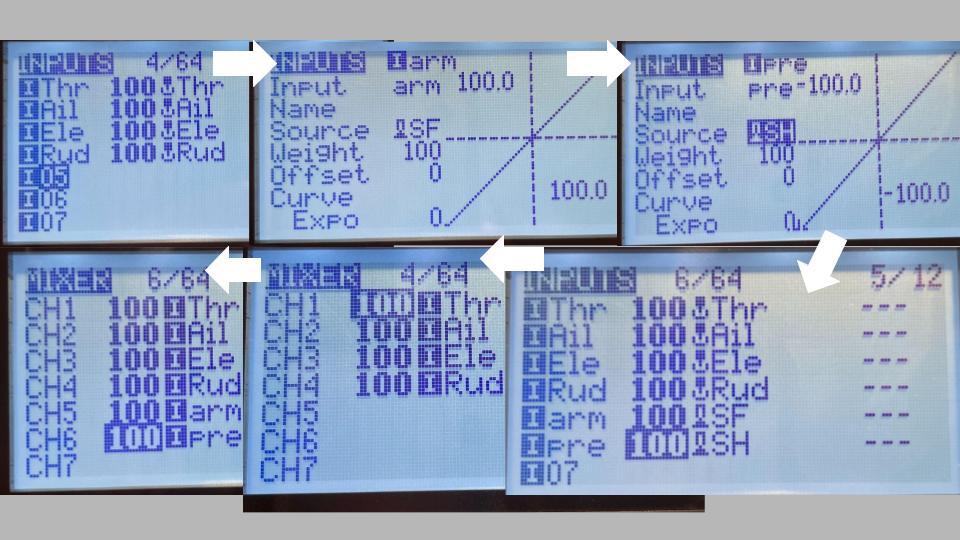.jpg)
We need to set up an arm and pre-arm so the drone does not automatically go into flight once bound and the throttle is moved.
Press the PAGE button on the left side of the screen until you reach the INPUTS. Scroll down to 05 and press the silver button.
Press the silver button again and make the Input name "arm." You can do this by pressing the silver button and scrolling to the letter, number, or symbol you want, then press the silver button again to move on to the next character. Once completed, press the silver button.
Scroll down to Source and select it by pressing the silver button. Flip the SF switch up. Press the silver button again and then the EXIT button on the left side of the screen.
Scroll down to 06 and press the silver button.
Press the silver button again and make the Input name "pre." Once completed, press the silver button.
Scroll down to Source and select it by pressing the silver button. Flip the SH switch up. Press the silver button and then the EXIT button on the left side of the screen twice.
Press the Page button again to go to MIXER or MIXES.
Scroll to CH5 and press the silver button. Scroll down to Source. Press the silver button, wait a couple of seconds, and then press the button again so that it states "arm." Press the EXIT button. Repeat this with CH6, except it should state "pre." Press the EXIT button, then the three lines button, and finally the PAGE button.
Connecting to Cleanflight
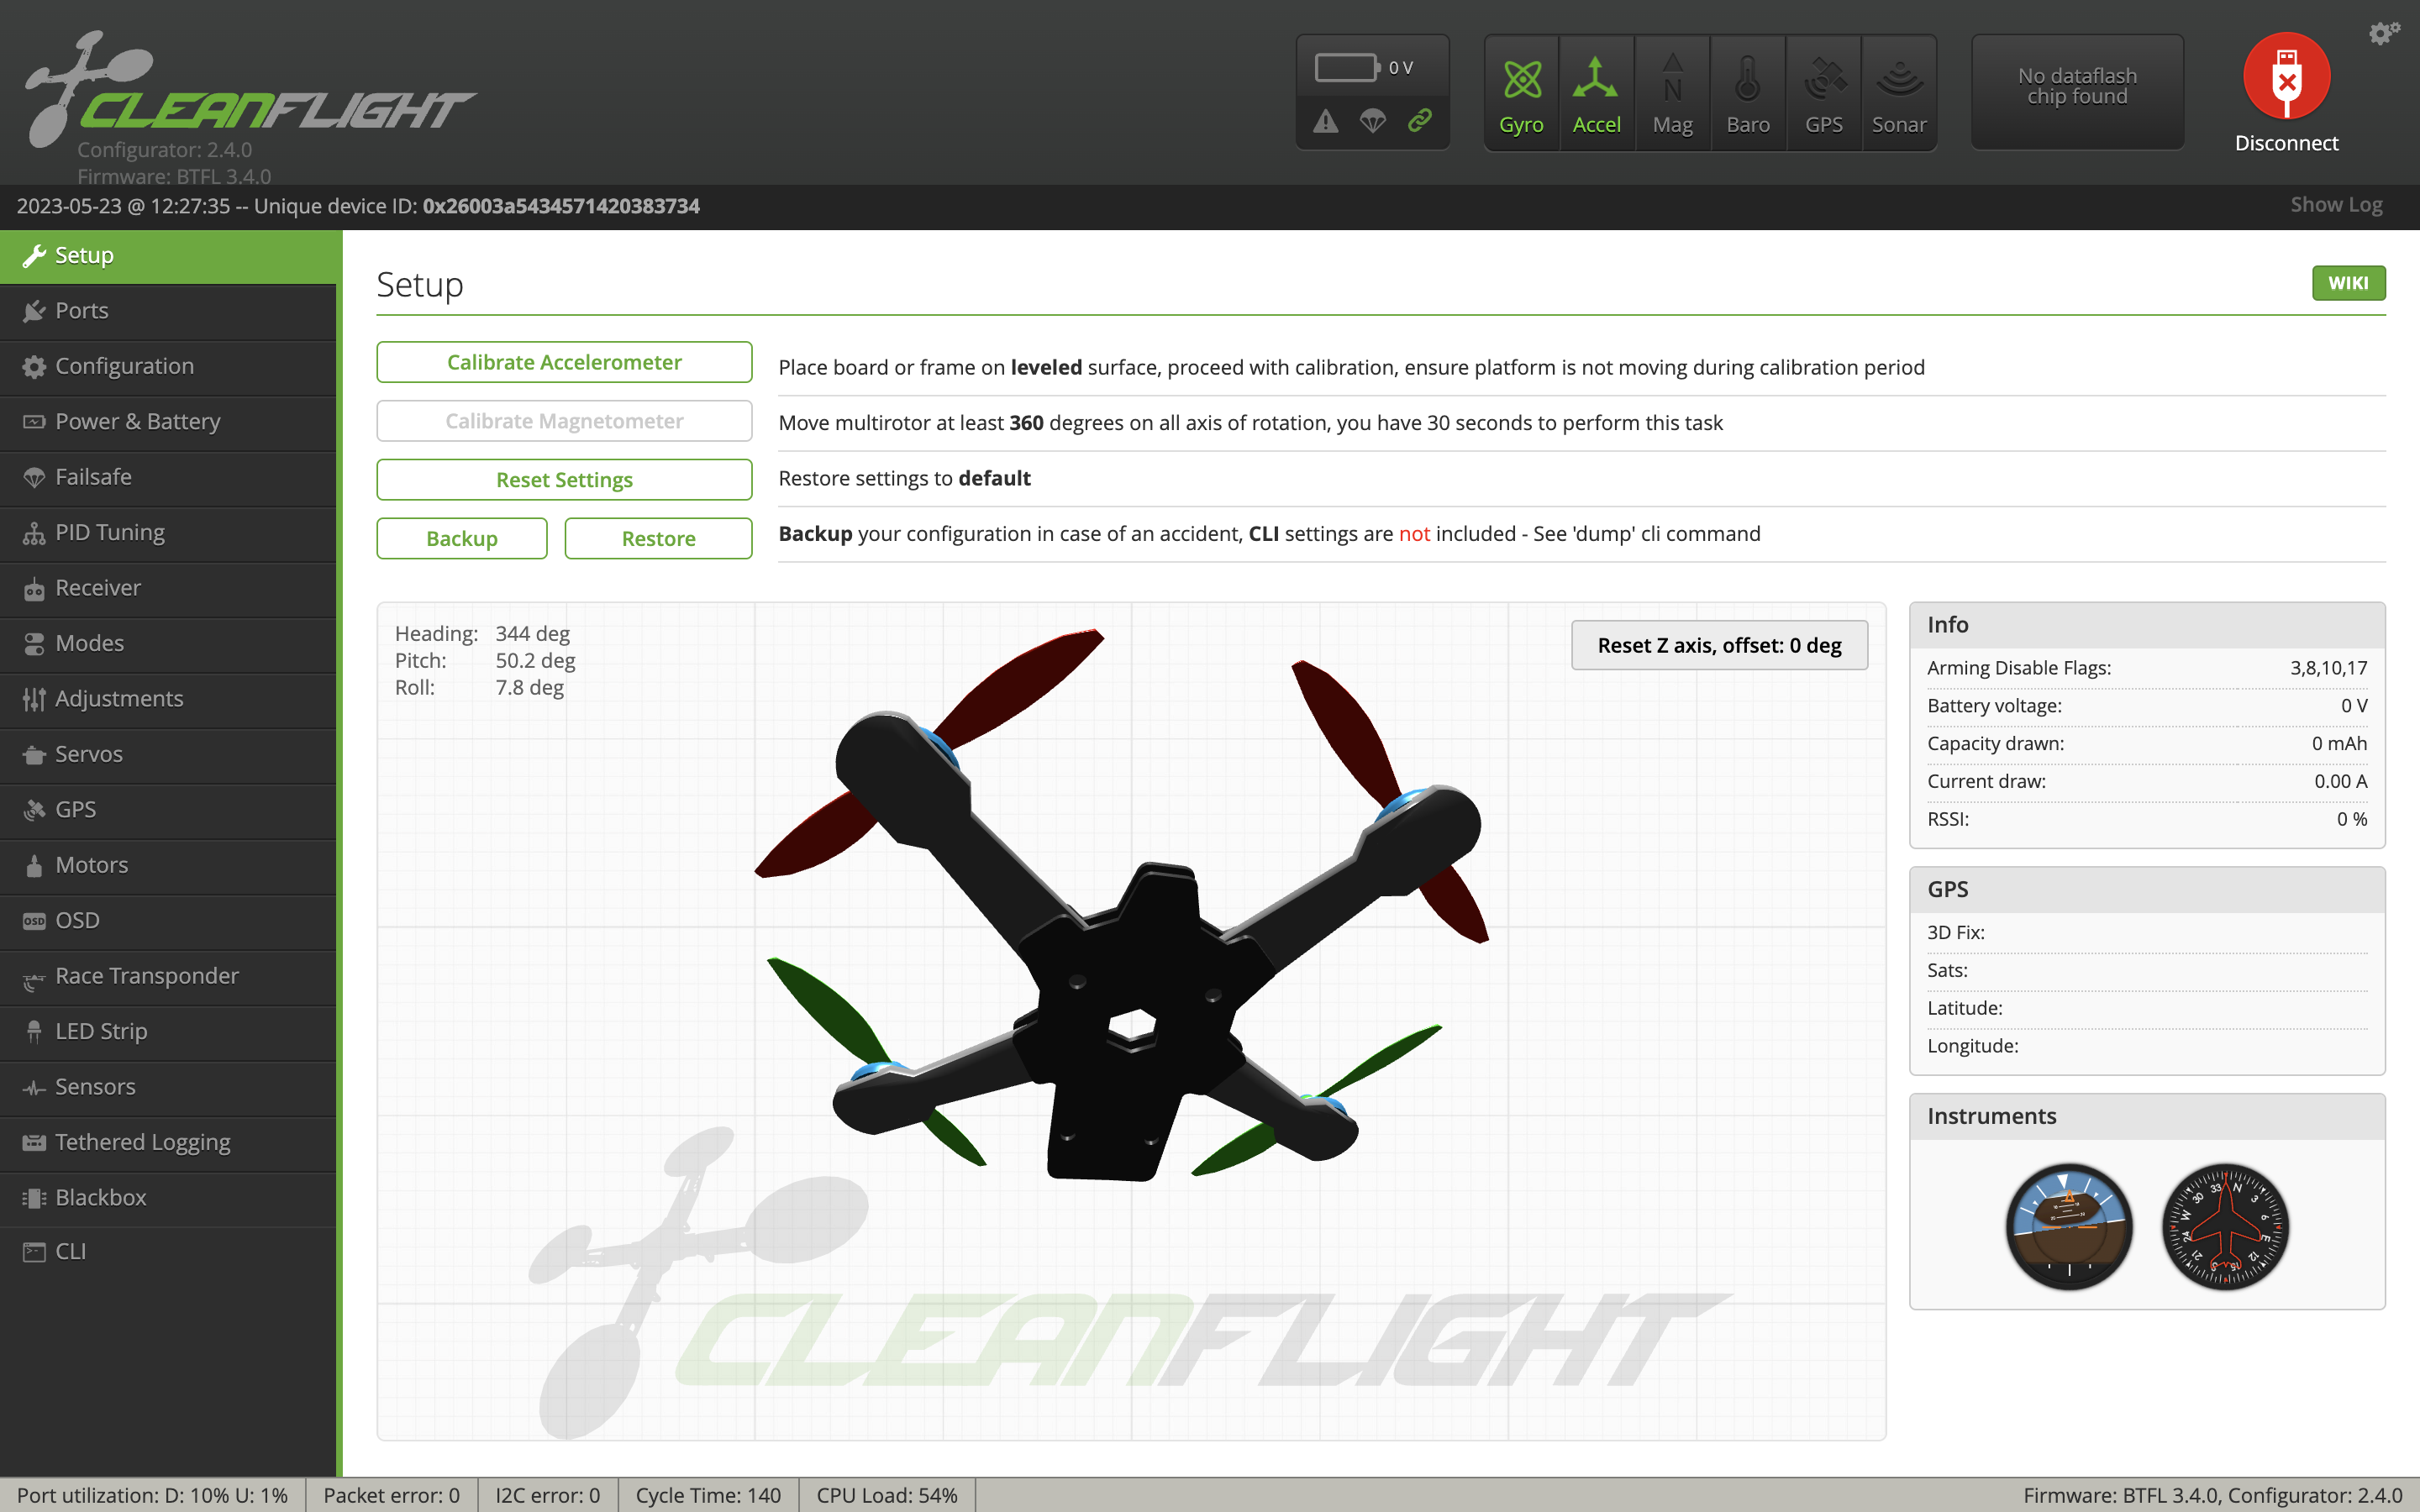
We need to set up an arm and pre-arm so the drone does not automatically go into flight once bound and the throttle is moved.
First, go to Cleanflight and install the software. Open Cleanflight.
Next, connect the drone to your computer using a USB to micro-USB cable. Click Connect in Cleanflight.
Setting Up Arm and Pre-Arm in the Drone
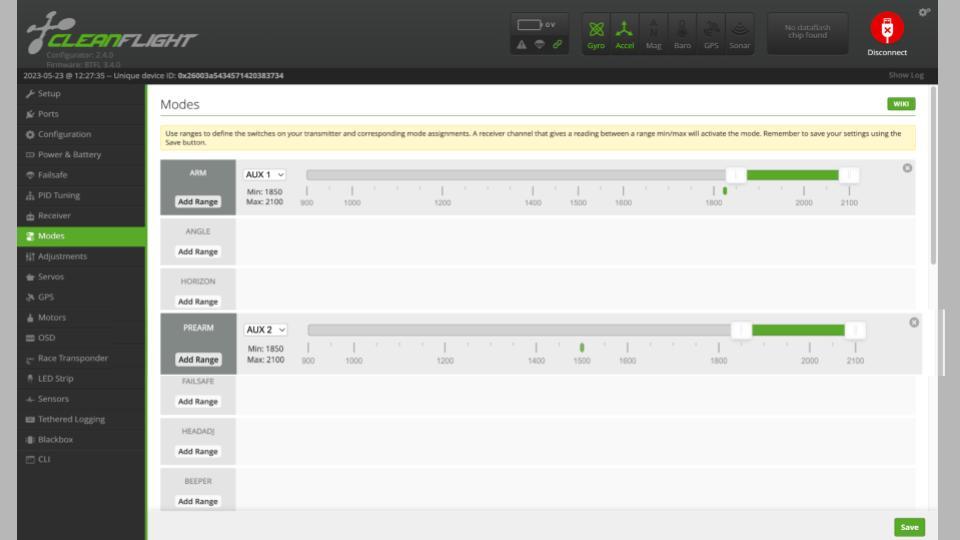.jpg)
Once connected, go to Modes on the left side of the screen. Make the ARM range from 1800 to 2100 by sliding the green bar and change the AUX channel to AUX 1. Scroll down to PREARM. Make the range from 1800 to 2100 again and change the AUX channel to AUX 2. Click "Save" in the bottom right.
Go to Configuration on the left side. Click "Save and Reboot" in the bottom right. The drone should automatically disconnect from Cleanflight. Unplug the drone.
Binding the Drone
Flip over the drone. While pressing the binding button on the micro-drone (It is the tiny black button in between the propellers.) with tweezers, plug in the FPV battery. You should see rapid red flashing on the micro-drone. You can now release the bind button.
Move back to the radio. Use the scroll on the right of the screen to twist down to External RF Receiver and select [Bnd] using the silver button. The remote will start beeping.
You will see the red light on the micro-drone change frequencies. Wait a couple of minutes until the light starts blinking slowly.
Once complete, press the silver button to turn off [Bnd]. This will turn off the binding process.
The red light on the drone should be solid. If not, take out the battery and redo the binding process.
Flying the Drone
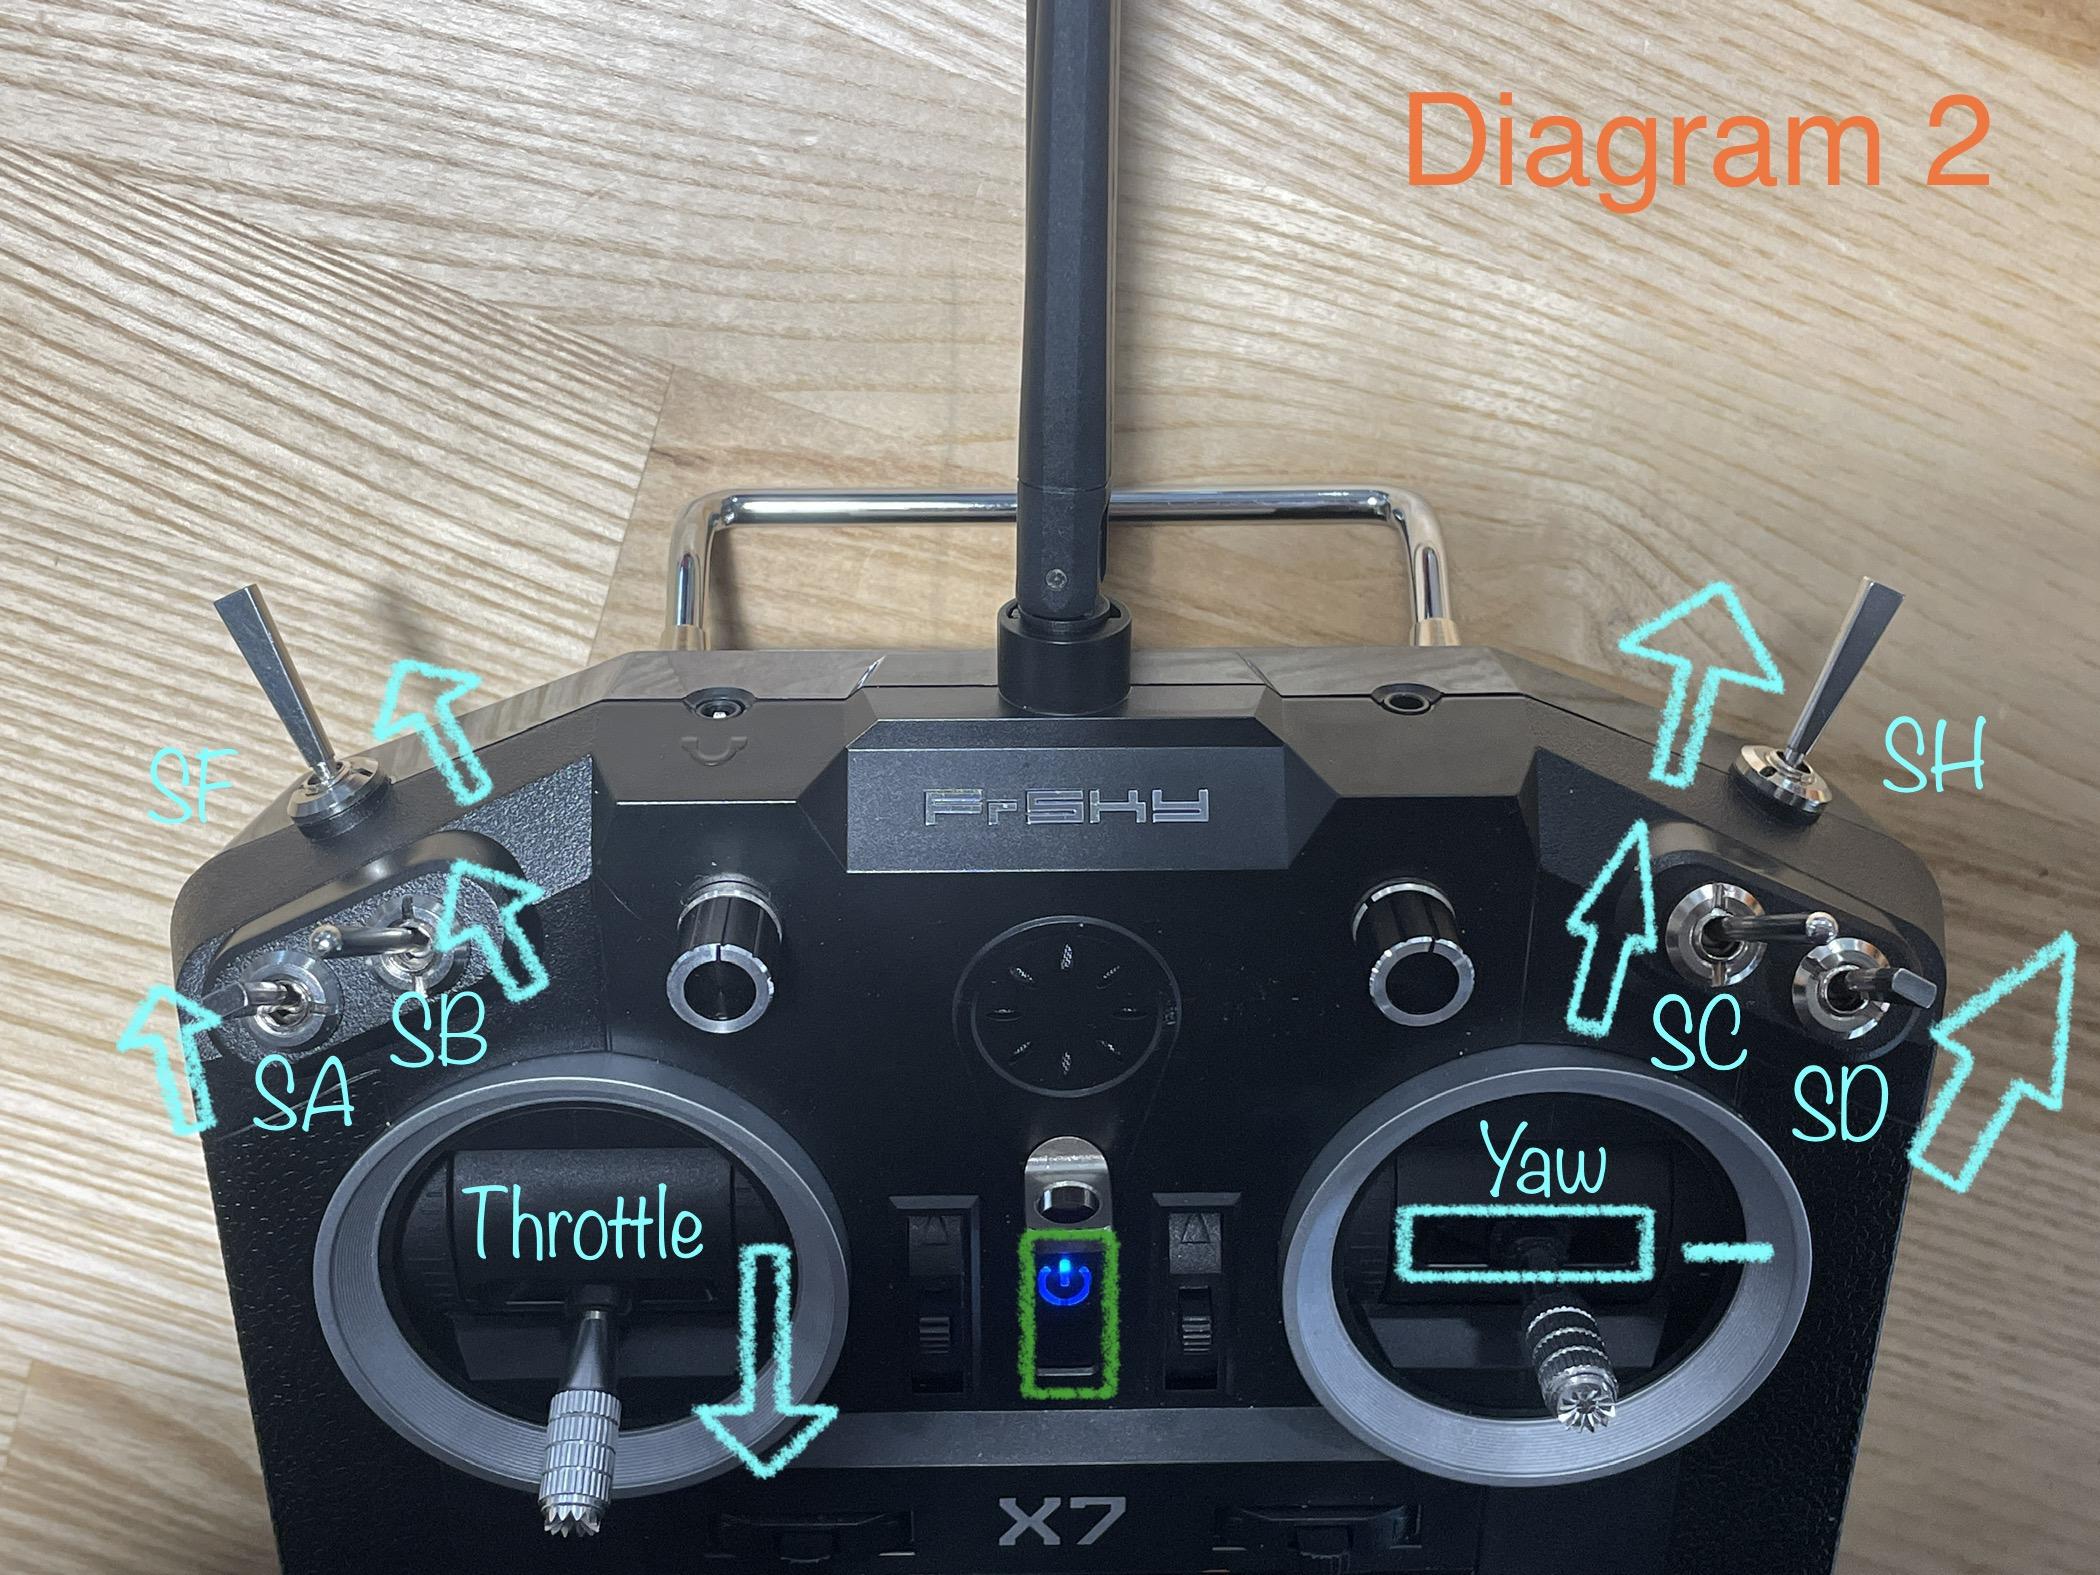
While holding the SH switch up, move the SF switch up. This arms the drone into flight mode.
Gently start moving the throttle switch up to make the drone go up.
Turning Off the Radio and Drone
Once done flying, you can turn off the drone by unplugging the battery and turn off the radio by pressing the power off button until you see a sleeping emoji or four dots, followed by a vibration.