Setting Up a Google Compute Engine (GCE) VM Instance for AI Model Training
by mxsalleh in Design > Websites
1118 Views, 1 Favorites, 0 Comments
Setting Up a Google Compute Engine (GCE) VM Instance for AI Model Training
In this tutorial, you will learn how to set up a Virtual Machine (VM) using the Google Compute Engine (GCE) for high-performance AI model training.
Why GCE?
- Free USD300 promotional credits
- VM Instances can be configured with powerful NVIDIA GPUs that support accelerated computing
- Can be used with NVIDIA Train, Adapt and Optimize (TAO) Toolkit
- User-friendly interface for inexperienced cloud platform users (Google Cloud Platform (GCP) Console)
Using your custom configured VM Instance, you will be able to train AI models for your use-cases within hours compared to days when training on your local machine. Additionally, the use of NVIDIA TAO Toolkit can greatly simplify the model training process, greatly reducing project turnaround time. To complement the use of the VM, you can make use of Google Storage Buckets to make transfer of data between your local machine and the VM more efficient.
This tutorial describes the steps needed to create a GCP account, a VM Instance with recommended configurations, a storage bucket along with instructions on how to setup NVIDIA TAO Toolkit on your VM Instance.
Supplies
Mandatory
- Personal Computer with internet access
- Gmail account
- Credit/Debit card
Optional (For use of NVIDIA TAO Toolkit in Example)
- NVIDIA account
Setting Up a Google Cloud Platform (GCP) Account

To gain access to the Google Compute Engine (GCE) service, you will need to create a Google Cloud Platform (GCP) Account.
Creating a free GCP Account
Upon creating a free account, you will be credited with USD300 in credits to spend over the next 90 days.
- Navigate here.
- Click on Get started for free on the top right.
- Enter Account Information and click on Continue.
- Enter phone number for identity verification & contact information and click on Send Code.
- Enter payment Information for verification and click on Start My Free Trial.
After creation of your free GCP Account, you will be brought to the Google Cloud Console. You can access a variety of services by clicking the navigation menu button at the top left corner.
Note: Users are asked to enter credit card information to make sure they are not a robot. Users will not be charged unless they manually upgrade to a paid account, and if their promotional credits are exhausted or expired.
Upgrading to a full GCP Account
To be able to add GPUs to your VM instances in the later section, you must upgrade to a full account. You will keep any remaining credits to spend during your free trial period (90 days). Automatic billing will start once your free trial ends, where you will pay only for what you use.
- Navigate to Billing under the menu
- Click on Upgrade under the Free trial credit section
- Click on Activate to activate your full account
You have now successfully created a full GCP Account. In the next few sections, you will learn how to use one of GCP's services called Google Compute Engine (GCE) to establish a Virtual Machine.
Creating a Google Compute Engine (GCE) VM Instance

Next, you will be configuring a Virtual Machine (VM) Instance using the Google Compute Engine (GCE) service. In this step, you will learn to configure a VM Instance with the following specifications for high-performance computing to support AI model training:
- GPU - NVIDIA Tesla A100
- 12 vCPUs
- 85 GB RAM
- 256 GB Storage
However, GCE enforces regional quotas on your account to prevent unforeseen spikes in usage. Initially, the NVIDIA A100 GPU quota for your account is set to 0. You will need to request for a regional quota increase for NVIDIA A100 GPUs so that you can add them to your VM instance.
Request for GPU Quota Increase for GCP account
- From the Google Cloud Console, navigate to the search bar on the top of the page and search for All Quotas.
- Search for the quota compute.googleapis.com/nvidia_a100_gpus.
- Select the quota for your region (asia-southeast1 for this example) and click on Edit Quotas on the top left. Enter the new limit (1) in the pop-up window and enter a short description about your use-case for the service providers to evaluate your request. Next, click Done and Next.
- Enter your contact details and click on Submit Request.
- Repeat steps 2 to 4 for the quota compute.googleapis.com/gpus_all_regions.
You should receive an email regarding the confirmation of your quota increase.
Configuring your VM Instance
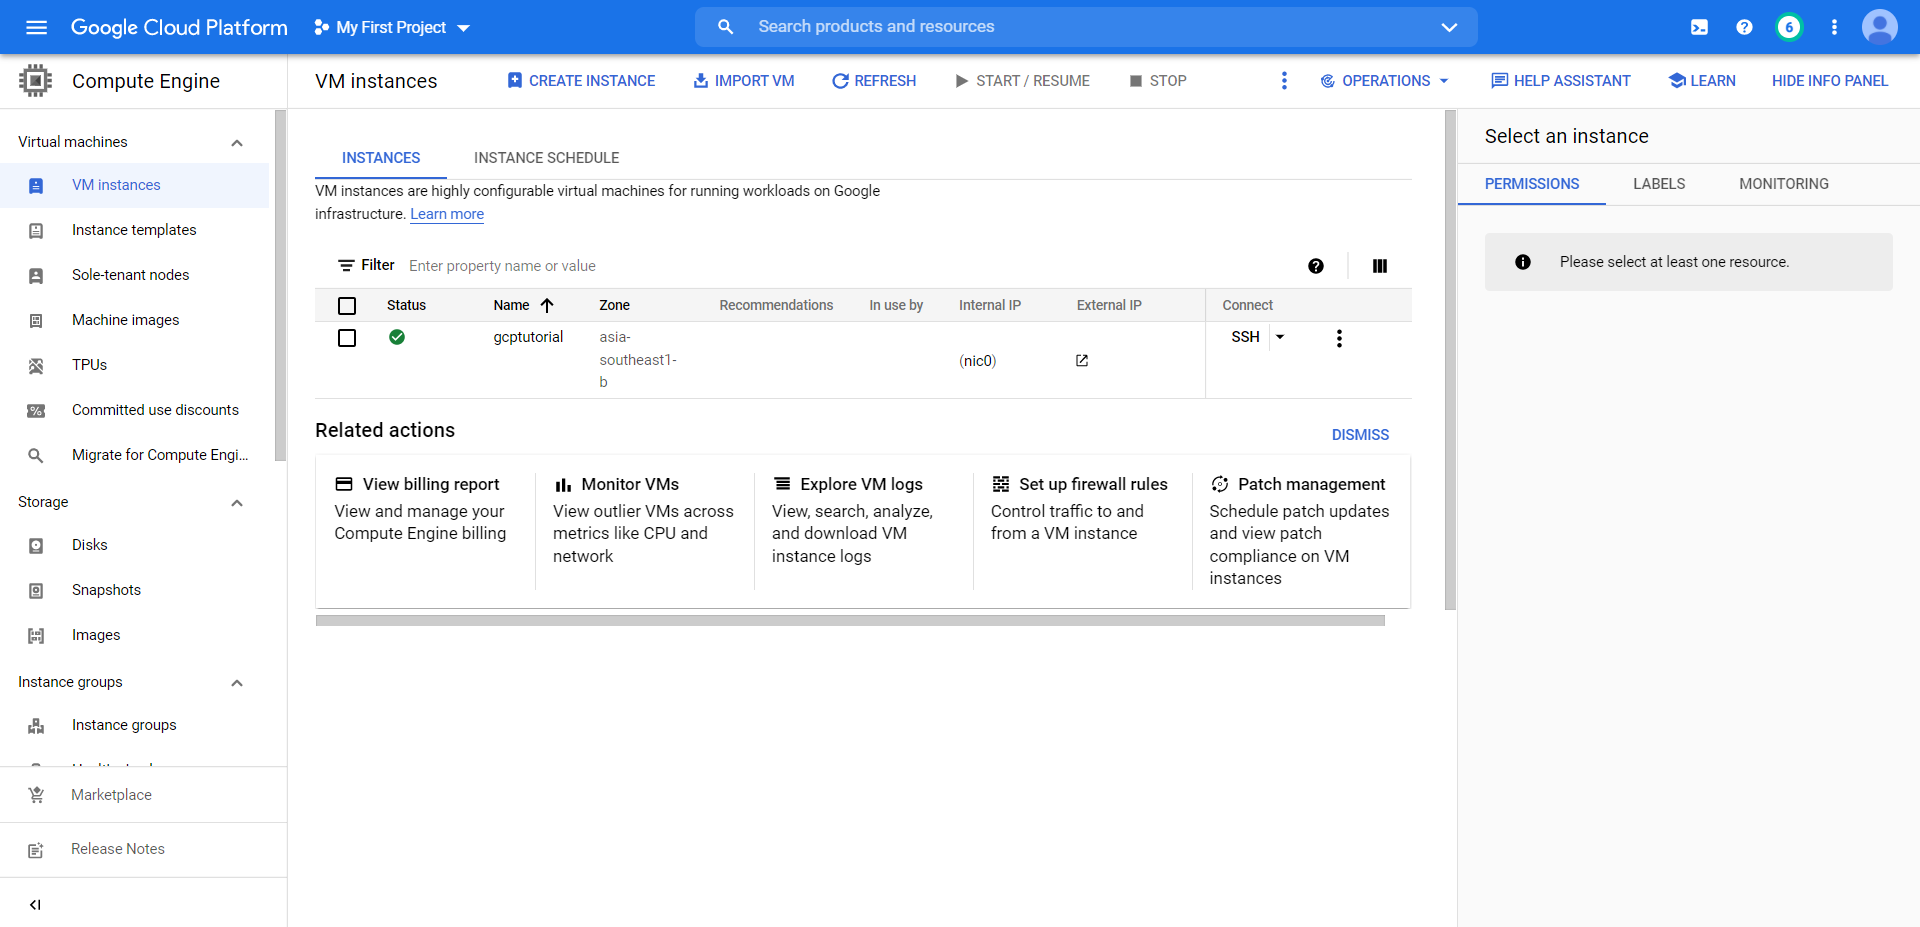
- From the Google Cloud Console, navigate to the menu and select VM Instances under Compute Engine. Next, click on Create Instance to start configuring your VM Instance.
- Under Details, enter the name of your VM Instance.
- Select the region where your VM Instance will be physically located. For this tutorial, we will be selecting asia-southeast1 (Singapore).
- Under Machine configuration > Machine family, select GPU. This will give the default configurations:
- Series: A2 (1x NVIDIA Tesla A100)
- Machine type: a2-highgpu-1g (12 vCPU, 85 GB memory)
- Under Boot disk, click on Change. Enter the following configurations:
- Operating system & version: Ubuntu 18.04 LTS
- Boot disk type: Balanced persistent disk
- Boot disk size: 200 GB (Recommended ≥ 200 GB)
- Under Identity and API access > Access scopes, select Allow full access to all Cloud APIs.
- Under Firewall, check the boxes for Allow HTTP traffic & Allow HTTPS traffic.
- Next, click on Create to create the VM Instance.
You have now created a GCE VM Instance with custom configurations. To connect to the VM, you can click on SSH through the console to open the Ubuntu terminal.
IMPORTANT: Upon creation of the VM Instance, the VM be running and start incurring costs. When not in use, you should stop the VM through the console.
By default, the username of the Gmail account associated with the Google Cloud Platform account is used as the username for the VM.
To set up a password, enter:
sudo passwd
You can then input your new password that will be used for sudo privileges.
Using a Google Cloud Storage Bucket (optional)
A storage bucket can be mounted to the VM Instance for faster exchange of files between your local machine and the VM. The following describes the process of creating a storage bucket and mounting it to the VM using gcsfuse.
Creating a Google Cloud Storage Bucket
- Click on Cloud Storage under the navigation menu from the console.
- Click on Create Bucket.
- Enter your bucket name
- Under Location type, select Region. For Location, select the same location where your GCE VM Instance is located (asia-southeast1 (Singapore) for this example)
- Select Standard storage class
- Click on Create to create your storage bucket. This will bring you to the Cloud Storage console where you can exchange files between your local machine and the storage bucket.
Note: When creating the bucket, you can access the panel on the right to view the monthly costs estimates based on the size of storage used.
Mounting the Google Cloud Storage Bucket to your VM Instance
To mount the storage bucket to your VM Instance, you can use Cloud Storage FUSE which is an open source adapter that allows you to mount Cloud Storage buckets as file systems on Linux systems. From the terminal,:
Add the gcsfuse distribution URL as a package source and import its public key:
export GCSFUSE_REPO=gcsfuse-`lsb_release -c -s`
echo "deb http://packages.cloud.google.com/apt $GCSFUSE_REPO main" | sudo tee /etc/apt/sources.list.d/gcsfuse.list
curl https://packages.cloud.google.com/apt/doc/apt-key.gpg | sudo apt-key add -
Update the list of packages available and install gcsfuse:
sudo apt-get update
sudo apt-get install gcsfuse
Create a directory where you can access the bucket's contents:
mkdir dir_name
Mount the bucket to the directory you have created:
gcsfuse bucket_name dir_name
Every time the VM Instance is launched, you will need to remount the bucket to the VM by removing the directory and repeating the previous two steps.
Note: When viewing the directory after mounting the storage bucket, you will only be able to view the file contents. To view subfolders and their content, you will need to manually create the directories.
Setting Up NVIDIA TAO Toolkit (example)
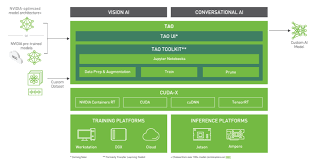
In this example, you will learn how to setup an NVIDIA Train, Adapt & Optimize (TAO) Toolkit on the GCE VM Instance that you had created. NVIDIA TAO Toolkit is a CLI and Jupyter notebook based solution of NVIDITA TAO, that abstracts away the AI/deep learning framework complexity, letting you fine-tune on high-quality NVIDIA pre-trained AI models with only a fraction of the data compared to training from scratch. More information on how to setup NVIDIA TAO Toolkit on GCP can be found in the QuickStart guide here.
Generating an NVIDIA API Key
To access NVIDIA pre-trained models from the NVIDIA GPU Cloud (NGC), you will need to generate an API key associated with your NVIDIA account.
- Navigate here and login with your NVIDIA account.
- After logging in, click on your username at the top right corner and click on Setup.
- To generate your API key, click on Get API Key.
Note: It is advised to save the generated API key in a .txt file etc. as you will need to regenerate a new key after reloading the website.
Setting up your VM & Enabling GPUs
Prepare the OS dependencies and check the GPUs:
sudo apt-get update

sudo apt-get -y upgrade

sudo apt-get install -y pciutils

lspci | grep nvidia
Install the NVIDIA GPU driver:
sudo apt-get -y install nvidia-driver-460

sudo apt-get install python3-pip unzip
Install docker-ce
sudo curl -fsSL https://download.docker.com/linux/ubuntu/gpg | sudo gpg --dearmor -o /usr/share/keyrings/docker-archive-keyring.gpg

echo \
"deb [arch=$(dpkg --print-architecture) signed-by=/usr/share/keyrings/docker-archive-keyring.gpg] https://download.docker.com/linux/ubuntu \
$(lsb_release -cs) stable" | sudo tee /etc/apt/sources.list.d/docker.list > /dev/null

sudo apt-get update

sudo apt-get install docker-ce docker-ce-cli containerd.io

sudo usermod -aG docker $USER

newgrp docker
Install nvidia-docker2:
distribution=$(. /etc/os-release;echo $ID$VERSION_ID)

curl -s -L https://nvidia.github.io/nvidia-docker/gpgkey | sudo apt-key add -

curl -s -L https://nvidia.github.io/nvidia-docker/$distribution/nvidia-docker.list | sudo tee /etc/apt/sources.list.d/nvidia-docker.list

sudo apt-get update

sudo apt-get install -y nvidia-docker2

sudo systemctl restart docker
You can verify the docker installation and the GPU instances, as shown below:
docker run --rm --gpus all nvidia/cuda:11.0-base nvidia-smi

#Output should be similar as follow:
+-----------------------------------------------------------------------------+
| NVIDIA-SMI 460.91.03    Driver Version: 460.91.03    CUDA Version: 11.2     |
|-------------------------------+----------------------+----------------------+
| GPU  Name        Persistence-M| Bus-Id        Disp.A | Volatile Uncorr. ECC |
| Fan  Temp  Perf  Pwr:Usage/Cap|         Memory-Usage | GPU-Util  Compute M. |
|                               |                      |               MIG M. |
|===============================+======================+======================|
|   0  A100-SXM4-40GB      Off  | 00000000:00:04.0 Off |                    0 |
| N/A   34C    P0    53W / 400W |      0MiB / 40536MiB |      0%      Default |
|                               |                      |             Disabled |
+-------------------------------+----------------------+----------------------+

+-----------------------------------------------------------------------------+
| Processes:                                                                  |
|  GPU   GI   CI        PID   Type   Process name                  GPU Memory |
|        ID   ID                                                   Usage      |
|=============================================================================|
|  No running processes found                                                 |
+-----------------------------------------------------------------------------+
Log in to the docker registry nvcr.io by running the command below:
docker login nvcr.io
#Username: $oauthtoken
#Password: <YOUR_NVIDIA_API_KEY>
Installing the Pre-requisites for TAO Toolkit
Installing virtualenvwrapper and jupyterlab
mkdir .virtualenvs

pip3 install virtualenvwrapper

### Add the following lines to .bashrc (Enter vim .bashrc to edit file)
#Virtualenvwrapper settings:
export VIRTUALENVWRAPPER_PYTHON=/usr/bin/python3
export WORKON_HOME=$HOME/.virtualenvs
export VIRTUALENVWRAPPER_VIRTUALENV=/home/<YOUR_USERNAME>/.local/bin/virtualenv
source ~/.local/bin/virtualenvwrapper.sh
###

source .bashrc

#Creating a virtual environment for your TAO Workspace
mkvirtualenv <NAME_OF_YOUR_ENV>

pip3 install jupyterlab
Enabling Jupyter notebook access from your local browser
To access the notebook that you will be launching in the next step through a local browser, you will need to create a firewall rule in the GCP Console.
- Navigate to the menu in the GCP Console and click on VPC network > Firewall.
- At the top, click on Create Firewall Rule.
- Enter the name of your firewall rule for jupyter notebook access.
- Under Targets, select All instances in the network.
- Under Source IPv4 ranges, enter 0.0.0.0/0.
- Under Protocols and ports, check tcp and enter the value 8888.
- Click on Create at the bottom to create the firewall rule.
Downloading and Running Test Samples
Download and unzip the notebooks from NGC:
wget --content-disposition https://api.ngc.nvidia.com/v2/resources/nvidia/tao/cv_samples/versions/v1.2.0/zip -O    cv_samples_v1.2.0.zip

unzip -u cv_samples_v1.2.0.zip  -d ./cv_samples_v1.2.0 && cd ./cv_samples_v1.2.0
Launch the Jupyter notebook using the command below:
jupyter notebook --ip 0.0.0.0 --port 8888 --allow-root --NotebookApp.token=<NOTEBOOK_TOKEN>
You will be able to access the Jupyter notebook through a browser on your local machine by navigating to http://<VM_EXTERNAL_IP>:8888. The VM's external IP address can be found on the GCE console page. The token to access the notebook is <NOTEBOOK_TOKEN>.