Setting Up a Bakery for Your Raspberry Pi
by RobPaige in Circuits > Raspberry Pi
1191 Views, 6 Favorites, 0 Comments
Setting Up a Bakery for Your Raspberry Pi

Kludging together a setup to make your first Raspberry Pi project is certainly forgivable, heck, it’s even to be expected, but if you’re going to do several projects with these versatile single board computers, you’re going to want to step up your game. With a handful of components, you can have a setup that allows you to bake up projects quickly, easily, and with fewer headaches.
Overview

Parts:
Computer monitor/TV: one with 2 HDMI ports and a VGA port is optimal.
HDMI Cable: 3’ is usually fine, 6’ is certainly doable, but may require having to hide excess length.
Micro HDMI adapter: Useful if you’re working with the Pi 0 or 0W.
5V, 2.5A Micro-USB power supply: this will be a dedicated one on hand for your test bench.
USB Switch: change your keyboard, mouse, and game controllers from your desktop PC to your Pi with the push of a button.
USB Card Reader: Get one that can handle SD and Micro-SD cards, or one that can handle SD cards, as all Micros seem to come with the SD card adapter anyway.
Software:
PuTTY: Used for connecting to your Pi via SSH
WinSCP: Connect to your Pi via SSH, and have a GUI. Handy for file management
Etcher: Hands down the easiest way to burn an image, but I prefer Win32 Disk Imager for reasons that will soon become clear.
First things first: Download and install PuTTY, WinSCP and Etcher or Win32 Disk Imager. Etcher is easier to use, but if you’re going to make many of the same object, such as RetroPie units for everyone for Christmas, you’ll want to be able to copy the finished memory card after everything is configured, and this is where Win32 Disk Imager shines.
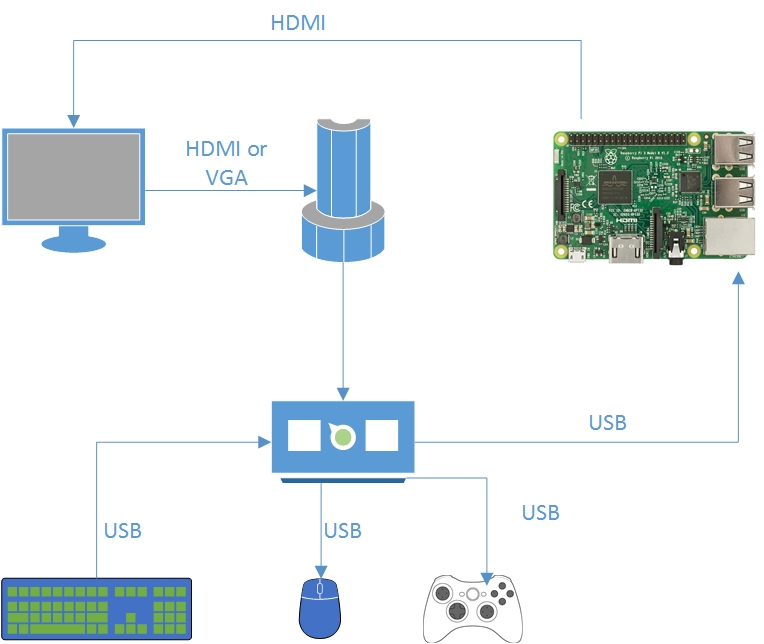
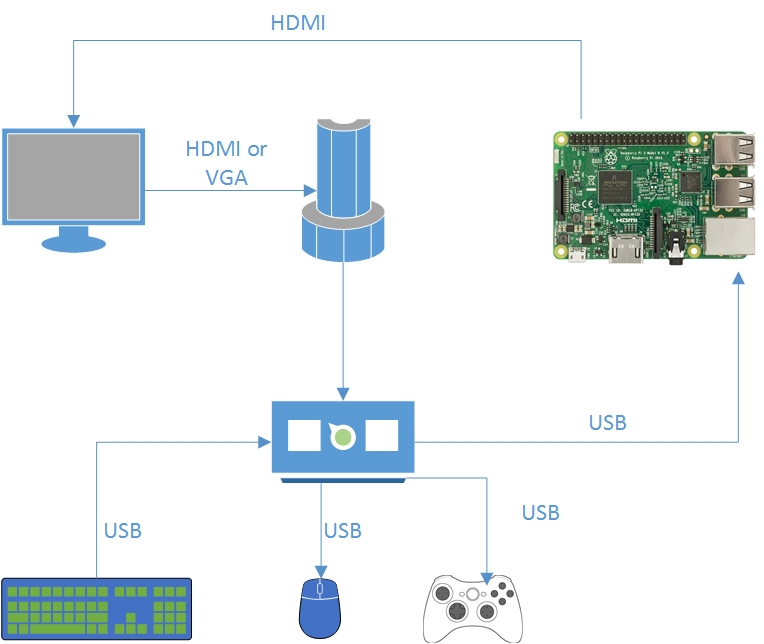
Make your connections: Assuming you’re starting from scratch, you want one VGA or HDMI cable to run from your PC to the monitor, one HDMI cable from the monitor to the Pi, One USB cable from the PC to the switch, one USB from the Pi to the switch, and your keyboard, mouse, and game controller(s) plugged into the switch, see the illustration for details.
Pro-Tips and things to consider:
1. Some distributions for the Pi have disabled SSH by default. You can enable it by doing the following:
Enter sudo raspi-config in a terminal window Select Interfacing Options.
Navigate to and select SSH.
Choose Yes.
Select Ok.
Choose Finish.
Another method is to leave the card for your pi in the SD card carder after you’ve burned the image, open the boot folder, and create a file called SSH within. Go back in and delete the file type (so right click, new, text document, name it SSH, then right click it rename it)
2. Consider assigning a different hostname to your pi. By default, each pi has the hostname 'raspberrypi’ (on Raspbian, anyway). You could also watch your router’s traffic as you power on the pi, and look for the new IP address, but I like to name each pi I use based on its purpose. From the terminal window:
a. sudo nano /etc/hostname.
b. Enter new hostname
c. Ctrl-X to save, Y to confirm.
3. PuTTy: You can save the port number and hostname in PuTTy, and hit load to connect to it. You can also copy from Windows as usual (Ctrl-C) and paste in PuTTy simply by right clicking.
4. WinSCP: You can save the username and password for your pi so it’ll autoconnect, but only do this if your computer is secure.
5. Speaking of security: change the default password. Do that early, and do it consistently. It might not matter if some hacker nukes your retrogaming unit, but it could be disastrous if it’s your home automation system.