Scheduling Tasks on a Particle Argon From a Webpage
by tristenclifton in Circuits > Electronics
129 Views, 1 Favorites, 0 Comments
Scheduling Tasks on a Particle Argon From a Webpage
.png)
In this guide i will show you how to schedule tasks on the Particle Argon device from a webpage
Supplies

Particle Argon and your choice of IDE for HTML and JavaScript
Getting Your Key
.png)
The first step is to generate a new token for the purpose authenticating yourself when making use of the particle API
There is good documentation on particles website for the creation of an access token
https://docs.particle.io/reference/cloud-apis/authentication/
https://docs.particle.io/reference/developer-tools/cli/#particle-token-create
the gist of it is you need to run the command
particle token create --never-expires
in your particle console to create a key
it will look something like
1eae8755bac11dcea2cddbc2################ (hashed out for security reasons)
Particle Code
//Define Varibles
int outputPin = D7;
String monStart = "01:00";
String monFinish = "02:00";
bool running = false;

void setup() {
    //Set pin 7 to be our output pin, this will be set to ON during the time on our schedule
    pinMode(outputPin, OUTPUT);

    //Expose start and finish time of monday so we can read them on our webpage
    Particle.variable("monStart",monStart);
    Particle.variable("monFinish",monFinish);
    //create function to update varibles for each start time
    Particle.function("UpdateMonStart",UpdateMonStart);
    Particle.function("UpdatemonFinish",updateMonFinish);
}

//this function is called to update the start time
int UpdatemonStart(String Command){
    monStart = Command;
    return 1;
}
//tis function is called to update the finish time
int UpdatemonFinish(String Command){
    monFinish = Command;
    return 1;
}

void loop() {
    //use the time function to get the values of the current time
    int currentMinute = Time.minute();
    // returns 0-59
    int currentHour = Time.hour();
    //returns 0-23
    int currentWeekDay = Time.weekday();
    //returns 1-7 with 1 being sunday

    //check to see if it is not running
    //if it is check if it is time yet or not to turn on pin 7
    if(!running){
        if(currentWeekDay == 2){
            //our command comes in the form of a string which we need to convert into int so we can compare it
            int startHour = monStart.substring(0,2).toInt();
            int StartMinute = monStart.substring(3,5).toInt();
            if(startHour = currentHour and StartMinute <= currentMinute){
                running = true;
            }
        }

    //check to see if it is running
    //if it is check if it is time yet or not to turn off pin 7
    if(running){
        if(currentWeekDay == 2){
            int finishHour = monFinish.substring(0,2).toInt();
            int finishMinute = monFinish.substring(3,5).toInt();
            if(finishHour = currentHour and finishMinute <= currentMinute){
                running = false;
            }
        }
    //If running is true, Power on the device
    if(running){
        digitalWrite(led1, HIGH);
    }
    else{
        digitalWrite(led1, LOW);
    }
    delay(1000);

}
Now Flash the code to the device
Test Functionality on the Web
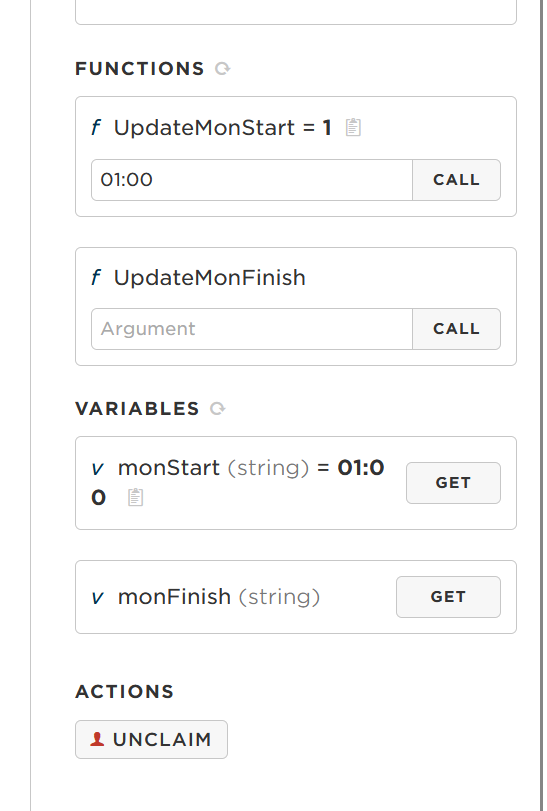.png)
Head over to your device on the particle console, From here you can test if you can get your devices variables as well as write to them
HTML Code
<html>


<head>
    <!-- StyleScript to make our table fancy -->
    <style>
        table,
        th,
        td {
            border: 1px solid black;
        }
    </style>


    <!-- Needed to use the API -->
    <script src="https://cdn.jsdelivr.net/npm/particle-api-js@8/dist/particle.min.js"></script>


    <!-- Embeeded javascript to communicate between the webpage and the device -->
    <script type="text/javascript">
        //This is not considered secure if exposed to the web, local use is fine
        const accessToken = '<------YOUR TOKEN HERE----->';
        const deviceId = '<---YOUR PARTICLE ARGON DEVICE NAME HERE---->';
        var particle = new Particle();


        //This is the function used to get varibles from the Particle ARgon
        function GetValues() {
            particle.getVariable({
                deviceId: deviceId,
                name: "monStart",
                auth: accessToken
            }).then(
                function(data) {
                    //we use the varibles we recive from the particle device and store them in the webpage so the user can see them
                    document.getElementById("monStart").value = data.body.result;
                    //update the status so the user knows the device is working as intended
                    document.getElementById("statusSpan").innerHTML = 'Updated';
                },
                function(err) {
                    document.getElementById("statusSpan").innerHTML = 'Error calling device: ' + err;
                });
            particle.getVariable({
                deviceId: deviceId,
                name: "monFinish",
                auth: accessToken
            }).then(
                function(data) {
                    //store data.body.result in the table on the webpage
                    document.getElementById("monFinish").value = data.body.result;
                    document.getElementById("statusSpan").innerHTML = 'Updated';
                },
                function(err) {
                    document.getElementById("statusSpan").innerHTML = 'Error calling device: ' + err;
                });
        }
        //we call this function to update values on the device
        function SetValues() {
            //we take the value in the mon-start time entry field and send the value to the device using our "UpdateMonStart"
            //function passing the time as a paramiter to the function Note- you can only send strings as paramiters
            cmd = document.getElementById("monStart").value
            particle.callFunction({
                deviceId,
                name: 'UpdateMonStart',
                argument: cmd,
                auth: accessToken
            }).then(
                function(data) {
                    document.getElementById("statusSpan").innerHTML = 'Sent';
                },
                function(err) {
                    document.getElementById("statusSpan").innerHTML = 'Error calling device: ' + err;
                });


            cmd = document.getElementById("monFinish").value
            particle.callFunction({
                deviceId,
                name: 'UpdateMonFinish',
                argument: cmd,
                auth: accessToken
            }).then(
                function(data) {
                    document.getElementById("statusSpan").innerHTML = 'Sent';
                },
                function(err) {
                    document.getElementById("statusSpan").innerHTML = 'Error calling device: ' + err;
                });


        }
    </script>
</head>


<body>
    <div id="mainDiv">
        <h3>Device Status:</h3>
        <!-- Displays status of sent command -->
        <p><span id="statusSpan"></span></p>


        <table>
            <tr>
                <th>Monday</th>
            </tr>
            <tr>
                <!-- Time Entry form, in my experience it works best on phone and EDGE-->
                <td>Mon Start:
                    <input type="time" id="monStart" name="monStart" required>
                </td>


            </tr>
            <tr>
                <td>Mon Finish:
                    <input type="time" id="monFinish" name="monFinish" required>
                </td>
        </table>
        <!-- These buttons call the functions to either update the webpage or the device -->
        <p>Press button get timetable from device</p>
        <button id="updateTimeTableButton" onclick="GetValues()">Update Schedule</button>


        <p>Press button update on device</p>
        <button id="updateTimeTableButton" onclick="SetValues()">Update Schedule</button>
</body>


</html>
using your choice of IDE or even notepad, Save this as a .htm or .html file make sure to update the device name and the access token in order to work with your device
Test Functionality
.png)
Now open the file and test out the two buttons
The Rest Is Up to You
With this heads start you should be able to create a full weekly time table and therefor be able to schedule your particle argon trigger an event at a given time each day, this would be perfect for something like a sprinkler system ;)
Acknowledgment
This was part of my assignment at Deakin University, School of IT, Unit SIT210 - Embedded Systems Development
Feel Free to use my code as i rewrote a large percentage of it to improve its ledge-ability as a guide rather than just posting my project online.