Rushtp #2 - Nextion Editor Serial Upload Not Working - Fixes
by Rushtp in Circuits > Computers
626 Views, 2 Favorites, 0 Comments
Rushtp #2 - Nextion Editor Serial Upload Not Working - Fixes


Background
So you have got your new fancy Nextion 7” Display and have started following the excellent on-line tutorials. I have the Nextion Editor running a windows 11 PC. The Nextion display is connected using a USB to TTL CP2102 UART Module 5Pin Serial Converter.
The TFT File Output option works fine but the Upload option does NOT! Hence this project…
Table of Contents
Step 1: Check the Wiring
Step 2: Check the CP2102 USB to TTL Serial Converter Driver
Step 3: Try Updating the Driver
Step 4: Locate the Device Driver on the Internet and Download It
Step 5: Extract the Files From the Zip Download
Step 6: Back to Windows Device Managed and Update the CP2102 USB
to UART Bridge Controller
Step 7: In Windows Device Manager Change the Silicon Labs CP2102x USB
to UART Bridge Properties
Step 8: Back to the Nextion Editor and Open Your Project File
Step 9: Try the Upload Again
Step 10: “Target Device Does Not Match Selected Device”
Examples of on-line tutorials (in no particular order):
- Nextion Editor Quick Start Guide
- Getting started with Nextion Display
- Getting started with Nextion HMI
- How to use Nextion editor Human machine interface (HMI) Nextion touchscreen display for beginner
- Nextion Display Tutorial
- Nextion Editor: How A Project Done in 30 minutes With Newest TFT LCD Touch Screen Display
- Nextion touch TFT display | Nextion HMI | Getting Started with background image creation
- Nextion Editor Guide
Supplies


- Nextion Intelligent 7" Touch Screen (e.g. NX8048P070-011C) - or any Nextion 7" Display
- USB to TTL CP2102 UART Module 5Pin Serial Converter
- USB extender cable (3m)
- Nextion 7” Display DIY Enclosure (Optional)
- 20mm clear heat Shrink tube (Optional)
Check the Wiring
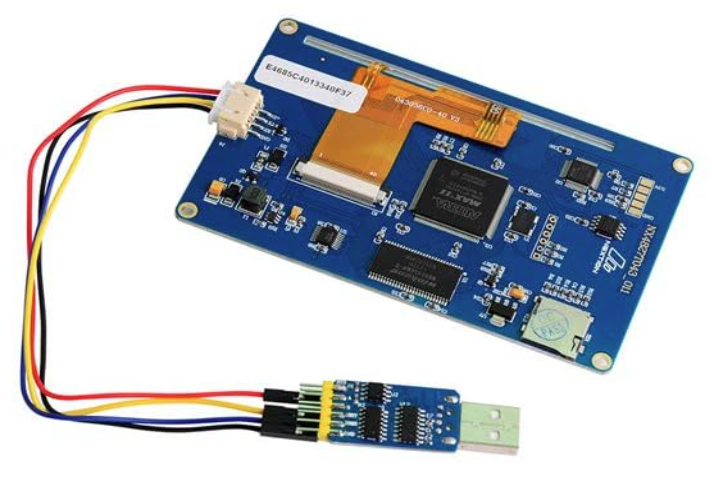


The Rx and Tx connections must be crossed over Rx to Tx and Tx to Rx to ensure the two devices can “Talk” to each other.
Ensure the USB to TTL Serial Converter is not shorting out on anything it is sitting on – I have the Shrink Wrapped version (you can wrap it with 20mm clear heat Shrink tube).
Check the CP2102 USB to TTL Serial Converter Driver


.bmp)
First connect up and plug into a USB port on your PC.
Then to check if the Windows 11 USB to TTL driver is working click on the start button and search for Device Manager. Expand the Ports (COM & LPT) line and look at the CP2102 Bridge Controller.
If it has a yellow triangled exclamation mark there is something wrong.
Try Updating the Driver


Right click on “CP2102 USB to UART Bridge Controller” line and look in the Driver tab.
If the driver is Not Available click on Update Driver and select Search automatically for drivers.
If the return message is “Windows was unable to install your CP2102 USB to UART Bridge Controller” driver go on to Step 4.
Locate the Device Driver on the Internet and Download It


Extract the Files From the Zip Download


Now open the file location and right click on the downloaded zip file.
Extract All into the download folder. Remember where these files are so they can be located again later.
Back to Windows Device Managed and Update the CP2102 USB to UART Bridge Controller


Ensure the Nextion USB is connected.
Follow the same as in Steps 3 & 4 but in this case select “Browse my computer for drivers”.
Locate the Extracted download file folder and press Next.
If all goes well the “Silicon Labs CP2102x USB to UART Bridge driver” will update successfully.
In Windows Device Manager Change the Silicon Labs CP2102x USB to UART Bridge Properties


In my case the driver name has “(COM4)” at the end. You may have a different Port number.
Right click on the driver name and select Properties. The General Tab should indicate that the device is working properly.
In the Port Settings tab set the Bits per second to 115200 (Baud Rate). Then press OK.
Back to the Nextion Editor and Open Your Project File


In the Programs tab change the “baud=9600” value to “baud=115200”.
Then return to the Display tab.
Try the Upload Again


Set the Baud Rate to 115200 and press Go. It should now upload.
SUCCESS!
The First upload takes a little while to complete. However, once uploaded subsequent uploads are much faster.
Postscript – “Target Device Does Not Match Selected Device”


This message occurs when the program file was set to a different Nextion display model.