RetroPie - Overclocked Raspberry Pi 3 for Video Game Emulation
by QuackMasterDan in Circuits > Raspberry Pi
95896 Views, 451 Favorites, 0 Comments
RetroPie - Overclocked Raspberry Pi 3 for Video Game Emulation
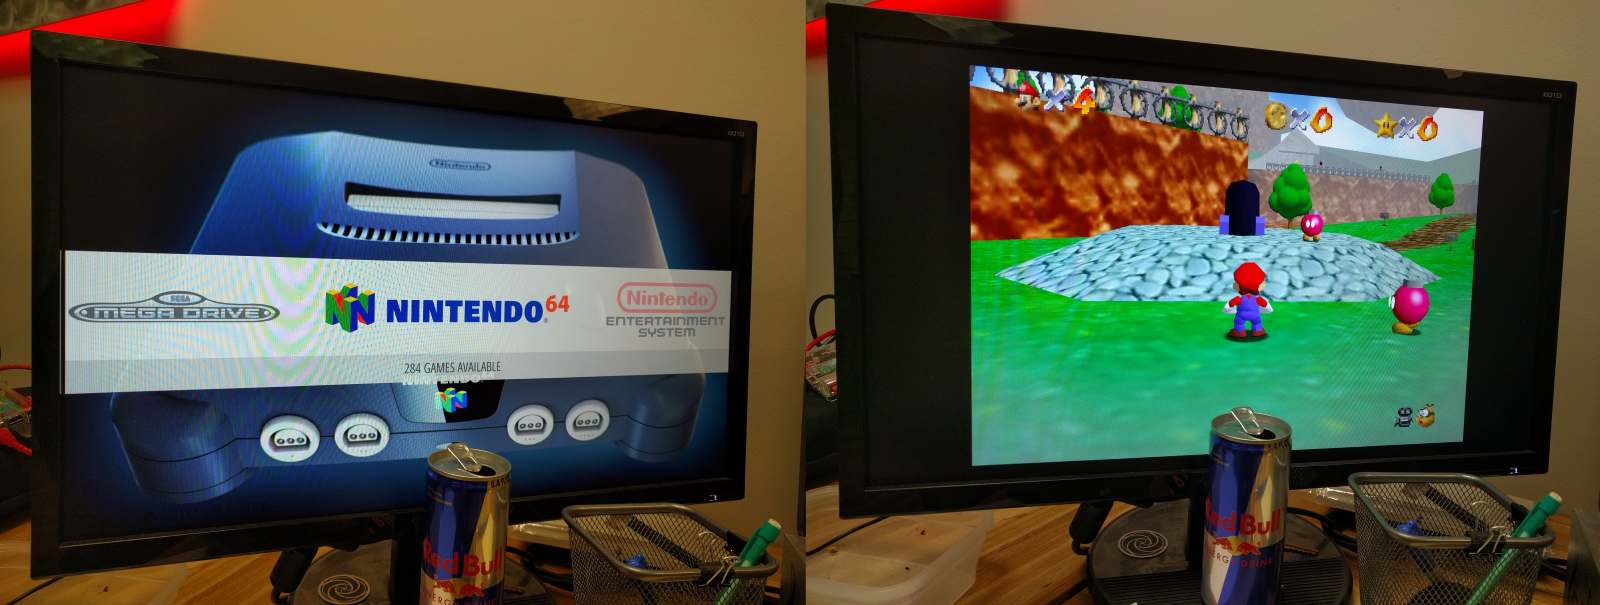
Enjoy a blast to the past with retro video games! N64, Super Nintendo, NES, PS1, the gaming classics are still lots of fun.
This Instructable provides detailed directions for every step to make a fully optimized RetroPie meant capable of playing N64 games smoothly, and older systems (SNES, NES) flawlessly.
Cost is marginal, generally $90-120, but the ability to pull out a computer the size of a deck of playing cards for a world of fun is well worth the cost.
Enjoy, have fun, let me know if this Instructable helped you or you have any constructive comments -- it is always exciting to see what creative people are up to!
RetroPi Emulation - Parts
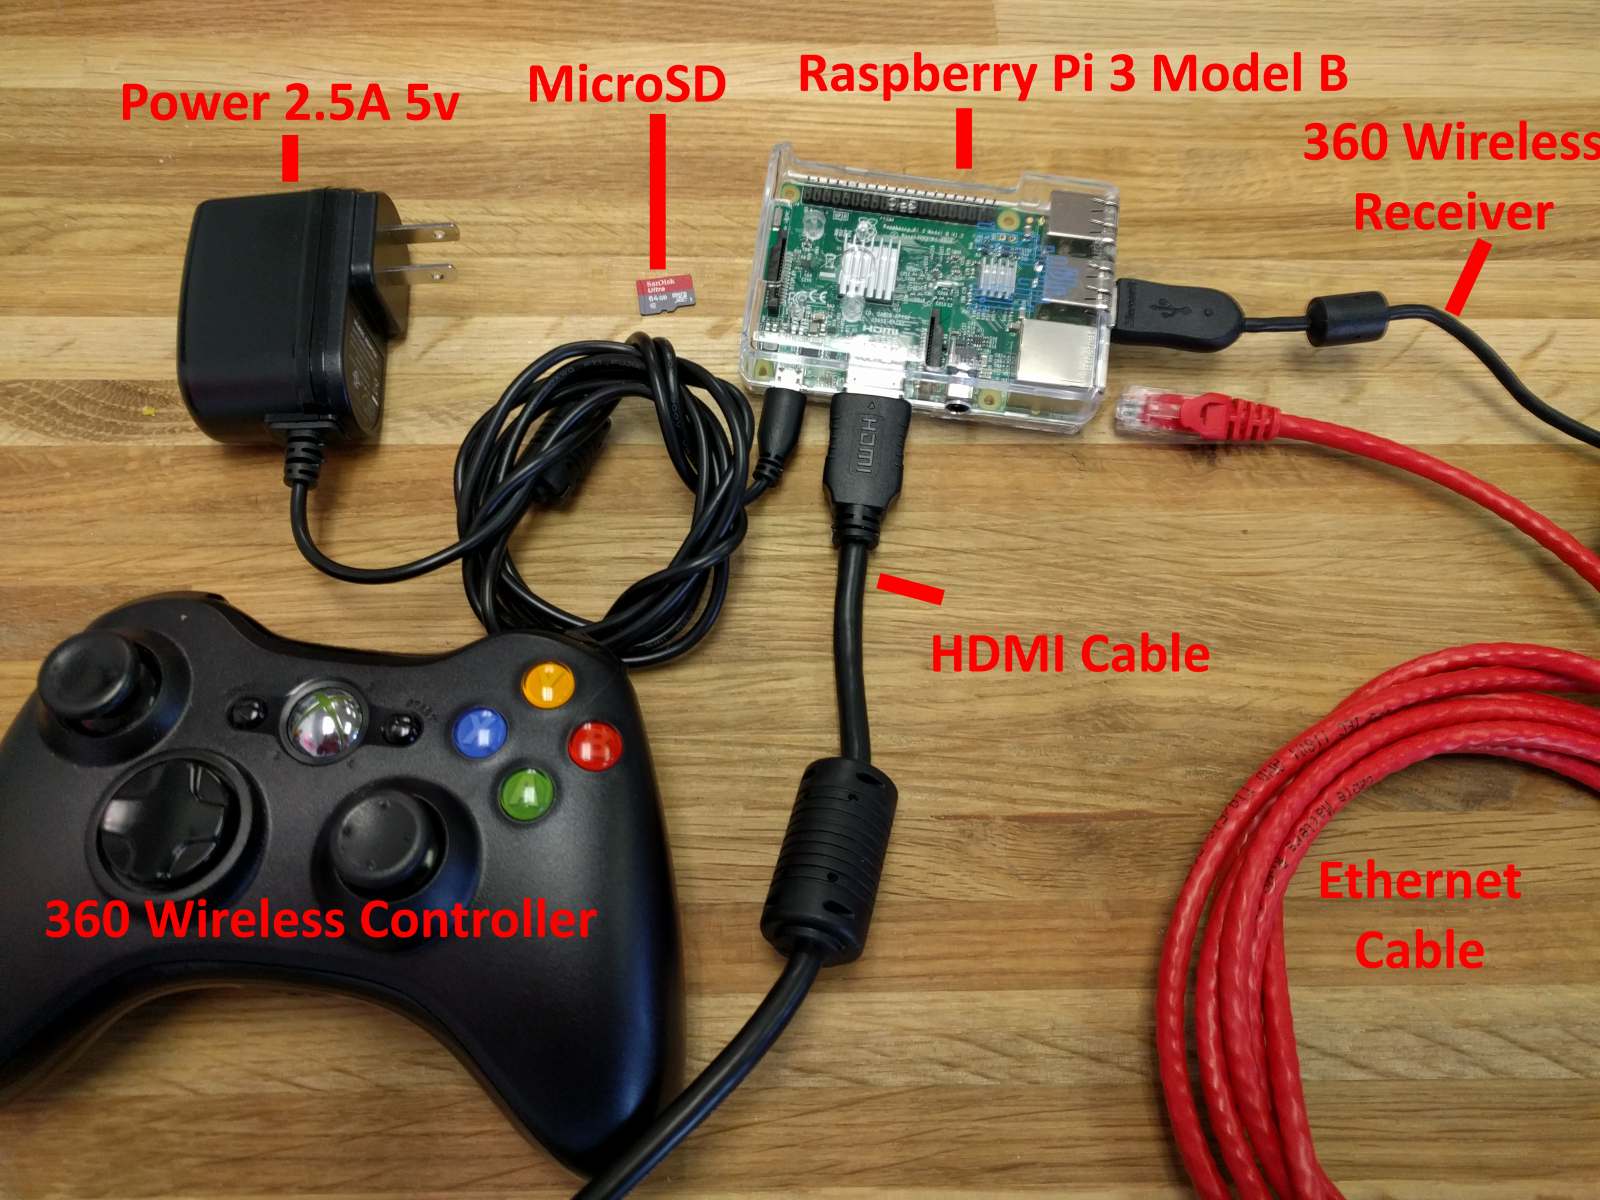
Below are the parts you'll need to pull off a premium N64 Emulation System
- Raspberry Pi 3 Model B, and 2.5A 5v PSU
- MicroSD Card, Class 10 Minimum
- Samsung 64GB U3 (effectively "Class" 30)
- $22 - https://www.amazon.com/gp/product/B06XX29S9Q (May need to click "Other Sellers" for a lower price NEW)
- I recommend a minimum of 16GB, 32GB is the sweet spot for not having to worry about enough space. If you are planning at add countless MAME ROMs or PS1 games, you'll want as big a MicroSD card you can get.
- Official Microsoft Xbox 360 Wireless Receiver
- Get the official Microsoft OEM version. There are third-party receivers that *can* work fine, but I've had bad experiences in the past. The official Microsoft labeled device works the best.
- $20 - https://www.amazon.com/dp/B000HZFCT2/
- Official Microsoft Xbox 360 Wireless Controllers
- You can find them anywhere. Best Buy Price Matching works too.
- $30/ea - https://www.amazon.com/dp/B004QRKWKQ
- Computer Keyboard
- Any keyboard will work, for running more intense menu commands
- Case with Fan
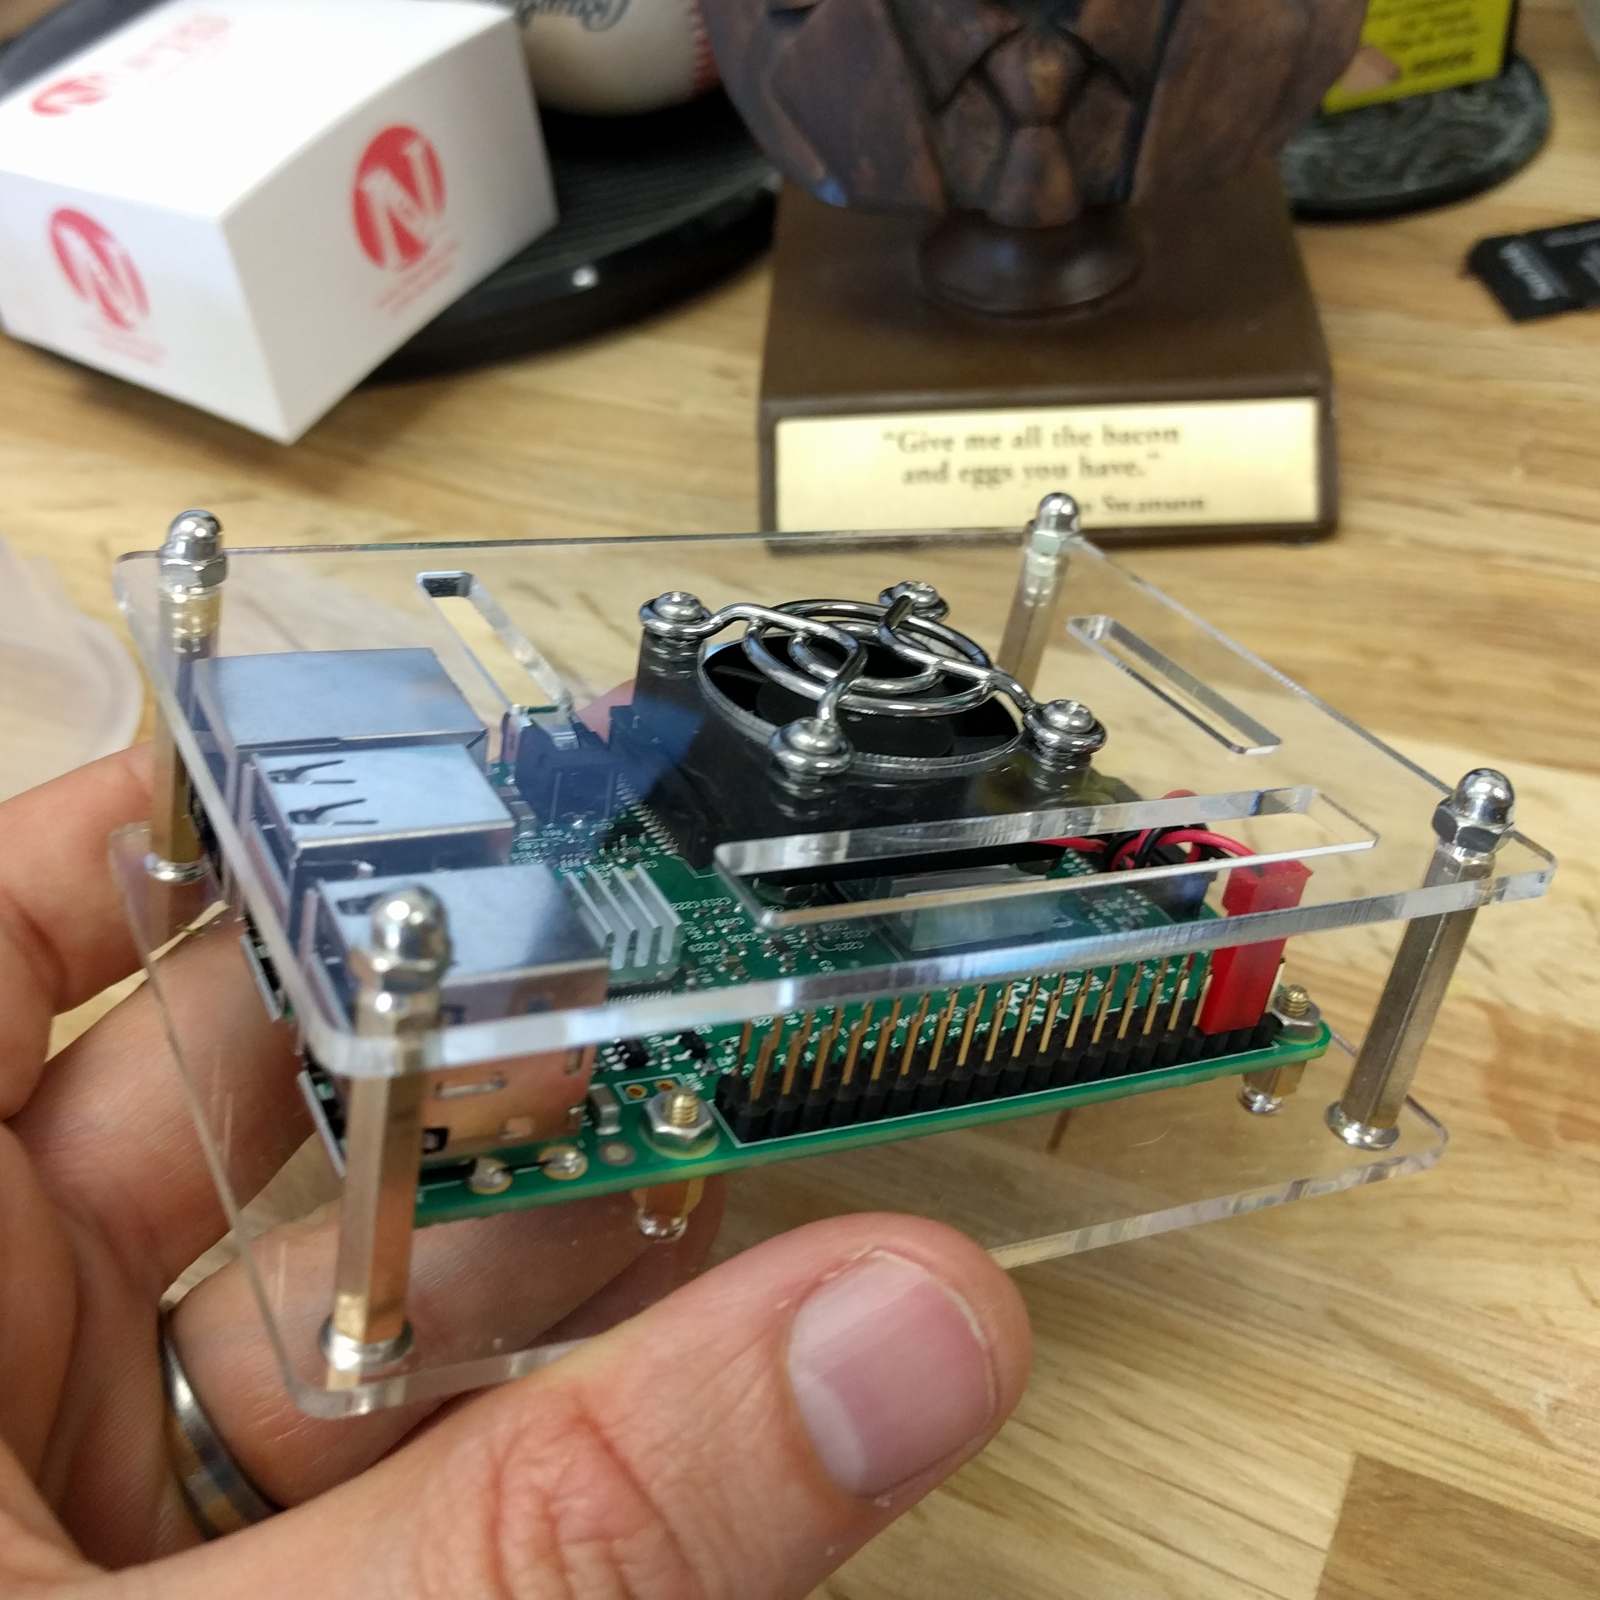
- If you are planning on playing N64 games, I highly recommend purchasing a vented Raspberry Pi case with fans so you can overclock the system, which is absolutely necessary for smooth N64 emulation. Below is what I use.
- $10 - https://www.amazon.com/dp/B01LXSMY1N/
Installing Operating System
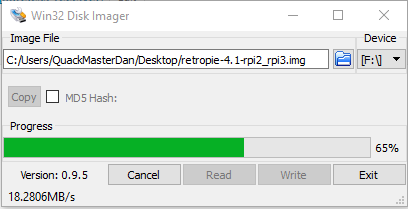
You'll need a way to format the MicroSD card. This is usually done with the included SD Card (full size) adapter, and plugging it into a laptop/desktop/memory-card adapter.
Go download and install Win32DiskImager from Sourceforge. This lets you write a downloaded .IMG file directly to the MicroSD card.
- https://sourceforge.net/projects/win32diskimager/
Download RetroPie v4.X
- The OS is about 600MB. They seem to choose random mirrors for downloads, some go at 30KBps, others at 20MBps, if it's slow, cancel and re-download.
- https://retropie.org.uk/download/
The image file will be a .img.gz (GZIP) file. Extract the .IMG file inside with 7Zip or WinRar to somewhere on your local PC.
Run Win32DiskImager from Start as Administrator (right-click > Run as Administrator) Select the MicroSD card drive letter, browse to your extracted .IMG, and write. -- This will completely erase the selected device (which should be the MicroSD card). Make sure it's the right one. Wait until the write is complete.
Once complete, remove the MicroSD card, and connect it to the Raspberry Pi memory slot. Connect everything together:
- MicroSD
- HDMI <> TV
- Ethernet Cable <> Switch
- 360 Wireless Receiver
- Power MicroUSB
Plug in the power and the system will automatically start.
Basic Configuration and Updating Operating System
Let the Raspberry Pi boot up and wait until you get to the main interface. You will need a controller input
We need to define the base controller button definitions via Emulation Station.
First Boot - Linking an Input
Now that the system is powered up, link your Xbox 360 Controller, to the Xbox 360 Wireless Receiver. Hold the button on the top edge of the 360 Controller until the circular light begins spinning. Then press the sync button on the receiver. The controller should have all four lights blink together -- the controller is now linked.
You can hold any button on the 360 controller to start the "Configure Input" screen. Alternatively, you can connect a keyboard and browse to:
Start > Configure Input > Are you sure? > Yes
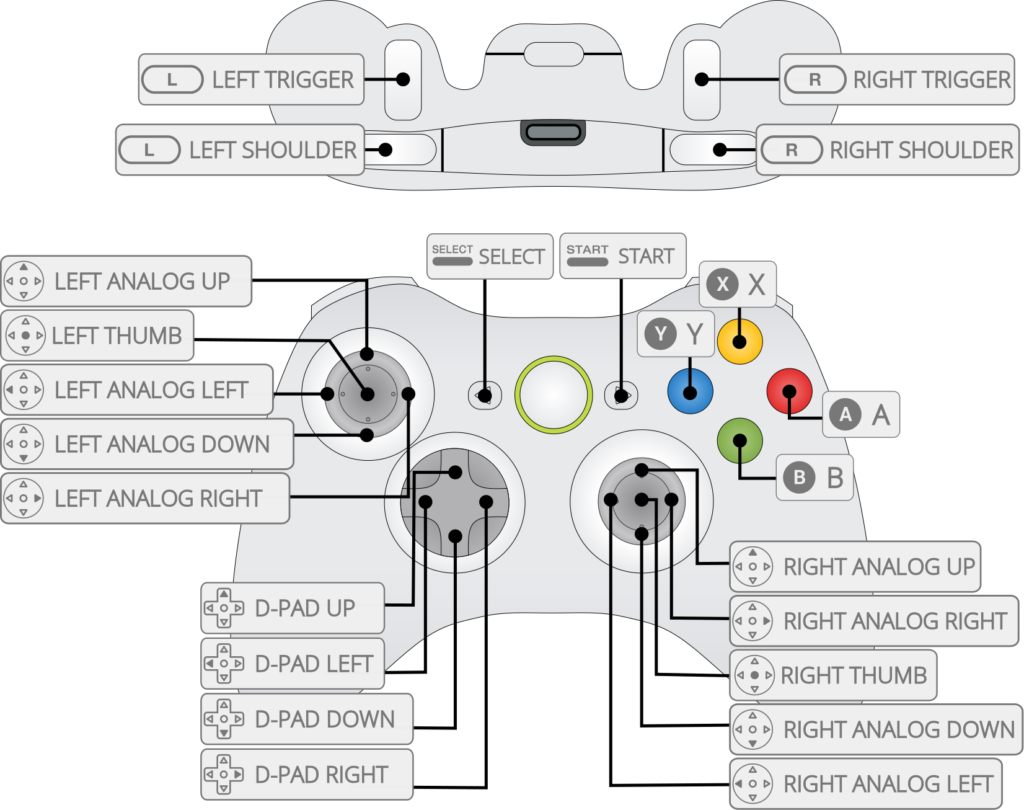
After mapping the buttons per the references below (see photo), we can now make any changes per-system as needed.
Reference 1: https://github.com/RetroPie/RetroPie-Setup/wiki/C...
Reference 2: https://github.com/RetroPie/RetroPie-Setup/wiki/r...
Note -- You are intentionally Mis-Mapping the Xbox 360 Controller Buttons -- this is intended.
For example, the Green button on a 360 controller (A), is being mapped to B for EmulationStation's RetroArch default config. This is correct, it will make your life easier. From there -- the buttons will be remapped again by each core (NES, SNES, Genesis) to match the "feel" of that controller -- automatically.
As an example, on a NES Controller, the B button is to the left of the A button. The "feel" should be the same -- A (360 Button) > B (RetroArch Default Input) > Auto-Remapped to A (NES Controller).
It's an odd system, but it can work really well as long as you follow the mapping below. Some emulators (looking at you N64 non-RetroArch cores Gles2N64 and Mupen64Plus) may require controller customization, as their mappings cannot load the built in RetroArch input file. (The default RetroArch input file is stored at "/opt/retropie/configs/all/retroarch-joypads/Xbox 360 Wireless Receiver.cfg"
Updating OS Packages
Updating the RetroPie OS and packages can provide a 50%+ performance improvement in some cases. Absolutely do this step.
- Open RetroPie
- RetroPie Setup > Update RetroPie-Setup Script > Yes
- Update all installed packages > Yes > Would you like to update the underlying OS packages? > Yes
- Wait 25 minutes (I timed it)That was easy enough...
Adding ROMs / Games
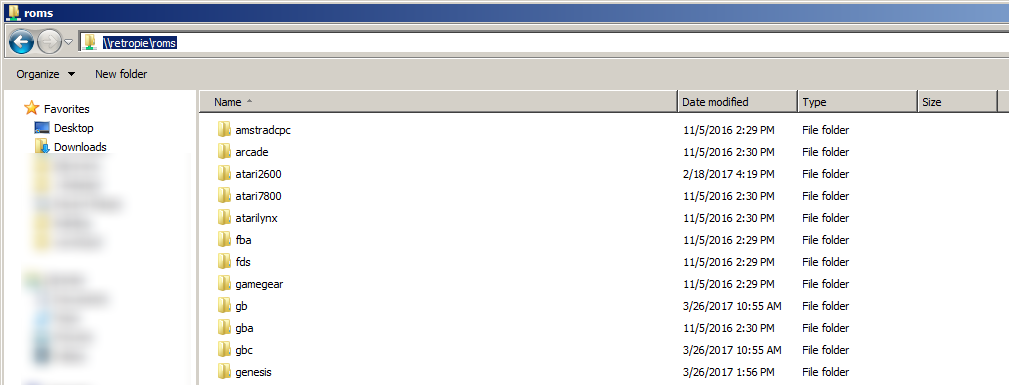
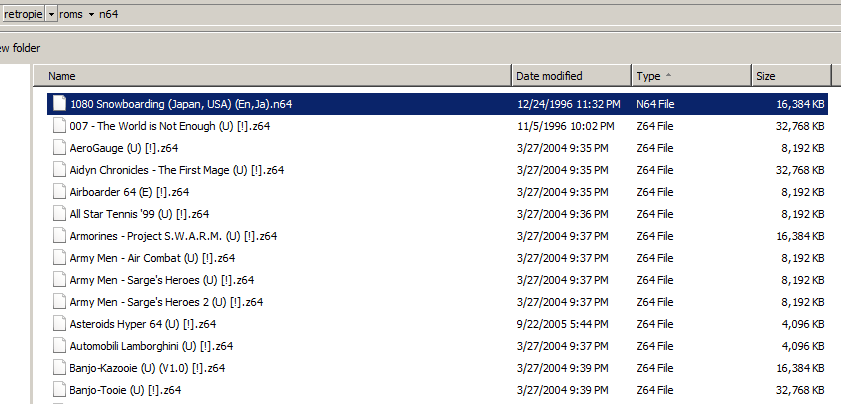
If you've got the ROMs, it's easy. Just remove them from their ZIP files, and copy them to a network share. If you don't yet have ROMs, go find a torrent site and get your game on! Generally releases are call "ROM Collections" or "ROM Packs", so for example go on Google and search for, "N64 ROM collection torrent".
Hop on your PC, and browse your local network. If you can't find anything and you're on Windows, Start > Advanced Sharing > Enable Network Discovery You can also find your IP on RetroPie by going RetroPie > Show IP Then browsing to \\192.168.0.X\ or \\retropie
Go into the roms folder, and start copy/pasting in ROMs for each system. They will need to be unzipped, so a NES game would be something like: Super Mario Bros.NES, a N64 title would be Super Mario 64.z64, and a PSX game would be either a Crash Bandicoot.BIN/Crash Bandicoot.CUE combo, or a combined Crash Bandicoot.PBP file.
If you have systems available in the list you do not want -- remove the content of any game files inside (e.g. ScrummVM)
Configuring System
Raspberry Pi Config
We are going to configure some core OS settings that are related to Raspberry Pi Operating System, rather than the RetroPie FrontEnd Interface. You will likely need a keyboard for this to work, controller buttons can go weird in Raspi-Config.
From the menus, open RetroPie > Raspi-Config
You can also open this by using Putty, SSHing in, and typing "raspi-config".
- This step should not be necessary as of RetroPie v4, but if you find yourself running out of space much earlier than expected:
- Expand FileSystem", this takes the 600MB image you flashed to the MicroSD, and lets you have all of the free space of your 64/128GB MicroSD card.
- Boot Options > Wait for Network at Boot > Would you like boot to wait? > NO
- This makes the Raspberry Pi boot MUCH faster if a network connection is not available. Otherwise you will sit for 30s while the Raspberry looks for a DHCP server and times out.
- Advanced Options > Overscan > Would you like to enable compensation for displays with overscan?
- Select No if you have a modern, 1080p or higher HDTV, or are on HDMI.
- Select Yes if you have an older TV that zooms in on devices so there are no black bars (but it cuts off detail with HDMI/DVI).
Disable Run Command Editor
Whenever you load a ROM, you have 5 seconds to press any button to load the Run Command Editor. That means if any person presses anything during those 5 seconds, time to pull out a keyboard or reboot the system to try again while everyone gets confused. I highly recommend turning this off once your system is dialed in, so if guests or children are playing on the system they can enjoy a better experience.
You will want to leave it enabled to select a per-game Emulator Core setting. For example, StarFox64 runs best under GlideN64. If GlideN64 is not your default, the Run Command Editor lets you select that specific game's default emulator core, which the setting will keep even after you (later) disable Run Command Editor.
- Launch Menu > Disabled
- Launch Menu Art > Disabled
- launch Menu Joystick Control > Enabled
- Select Cancel (should really be named Quit or Exit) > A (or Yes)
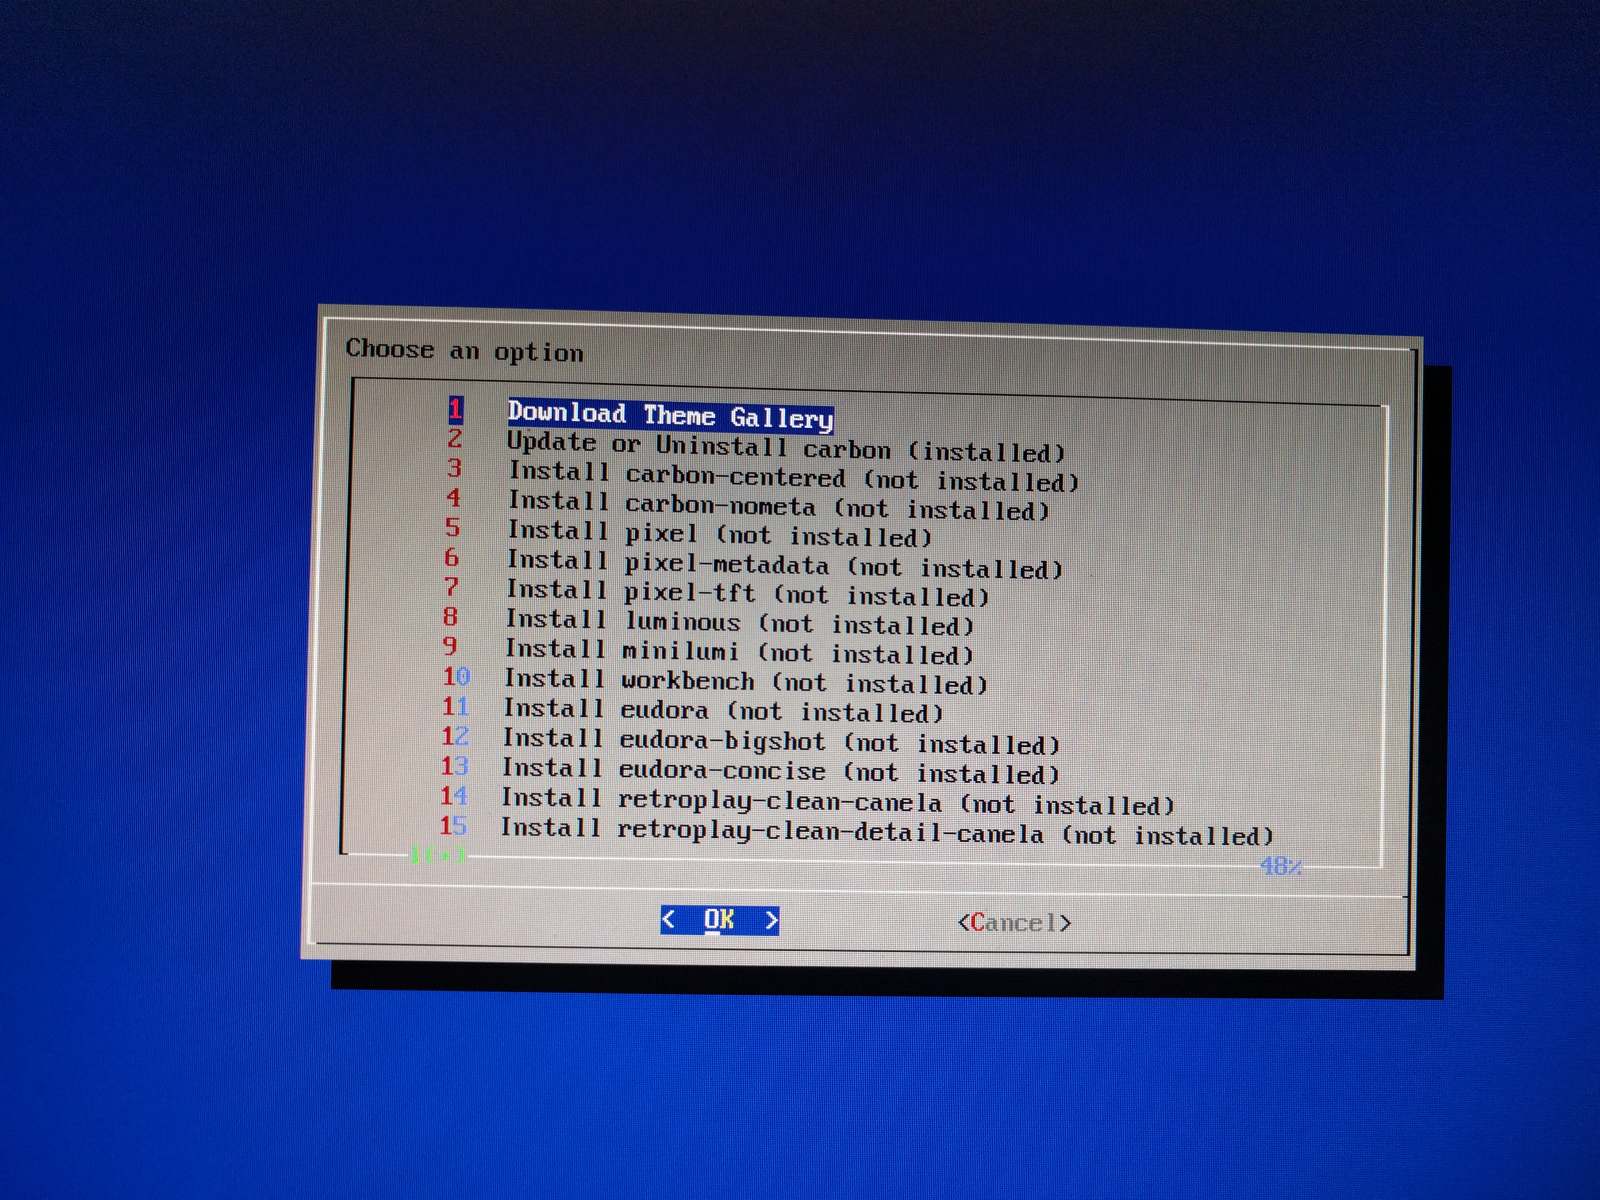
Upgrade Theme / Interface
I personally prefer Tronkyfran (#32 at the bottom of the list), pick whatever you prefer :-)
RetroPie Setup > Configuration / Tools > esthemes (Emulation Station User Interface themes) > 32 - Install Tronkyfran
Go back to home > Start > UI Settings > Theme Set (at the bottom) > Change from Carbon (default) to Tronkyfran (or whatever you use). Some themes may require a reboot to go into effect.
Scrape for Details
A scraper scans all of the games in your system for metadata like year of release, rating, description, title, cover-arts, etc. Very worth the time to run it, makes the system look MUCH prettier. For running an scrape of 2500 games, it took 3 hours to complete.
Do this after copying over your ROM files.
- Plug in a keyboard, hit F4 to close Emulation Station - if it is open, the scraping cannot succeed.
- sudo -i
- sh /home/pi/RetroPie-Setup/retropie_setup.sh
- Configuration Tools > Scraper > Scan All Systems
Change Default N64 Emulator
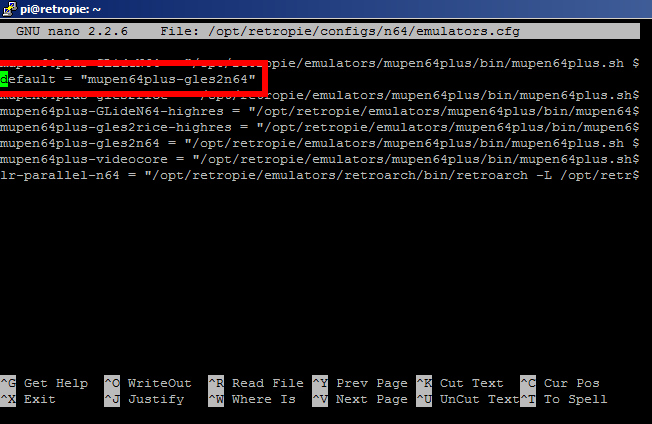
This file lets you select the default emulator. You have the option to assign different emulators to different ROM files with the Run Command before a system launches.
I have personally had better stability and performance with Gles2N64 than GlideN64. Officially, GlideN64 is supposed to be the best current graphical plugin and may one day be the best (isn't everything linux like that though ;-).
At the time of writing this (June 2017) glitchy graphics, stuttering audio, and random buggyness with GlideN64 says otherwise, so I recommend Gles2N64.
Connect via Putty
- sudo -i
- nano /opt/retropie/configs/n64/emulators.cfg
- Change the following line
- (Before) default = "mupen64plus-GLideN64"
- (After) default = "mupen64plus-gles2n64"
- Ctrl + X (Exit) > Y (Yes to save changes)
Performance Improvements
f you want to play N64 or PS1 and have a good experience, you will want to get a case with a fan, and overclock your Raspberry Pi 3. If you are not emulating PS1 or N64, do not worry about overclocking.
This is surprisingly important. I normally don't overclock any equipment, ever, but overclocking really does make a massive improvement on your RetroPi setup, it's the difference between some N64 games working great or being completely unplayable -- if you want to play Goldeneye or Super Smash Bros and have a good time, you'll need this step.
These settings are for a Raspberry Pi 3 in a case with minor ventilation, and the cheapo 14mm x 14mm x 4mm heatsinks on top that come with cheap kits (they only drop temps by 5-8C). A fan however will make a HUGE impact, heatsinks for the Raspberry Pi make a minimal impact once under load. Temperature can be verified by SSH'ing in with Putty, and running the below command.
Temperature can be verified by SSH'ing in with Putty, and running the below command:
#Check temperature. Hit Up-Arrow > Enter to keep checking.
vcgencmd measure_temp
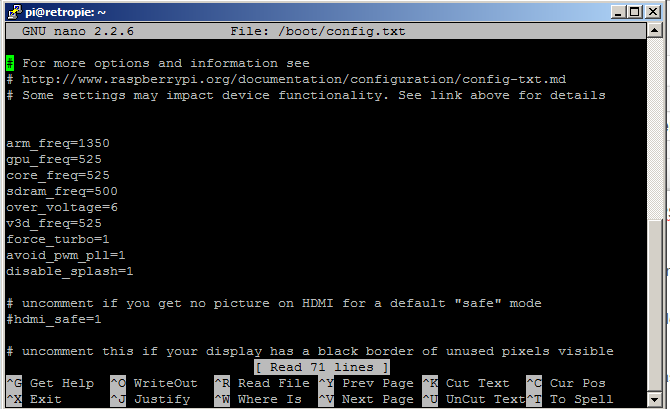
The most important setting oddly enough, is the v3d_frequency. This seems to provide more performance improvements than anything else I've found. disable_splash=1 just speeds up the boot process.
- sudo -i
- nano /boot/config.txt
- Use Ctrl+K to delete the matching lines, Right-Click to "Paste" in the content.
- Ctrl+X to Quit > Y (Yes) to Save)
arm_freq=1350
gpu_freq=525
core_freq=525
sdram_freq=500
over_voltage=6
v3d_freq=525
force_turbo=1
avoid_pwm_pll=1
disable_splash=1
Resolution
This can be a tricky category. Different games run better, and look better, at different resolutions. The higher the resolution, the greater the process/performance demands on the RaspberryPi. In general, I've found it best to have the default video mode for any emulator to be 640x480 (CEA1). For example, even the emulator GLes2N64-HighRes, will look more "HD" running at CEA-1 (640x480) than say, CEA-4(1280x720) and run smoother on Jet Force Gemini. For GLes2N64, CEA-1 though a 4:3 resolution is scaled properly to fit a 1080p 16:9 display -- it looks really good on many games!
Configuring Controllers (Optional)
Only needed if your buttons are not matching up between systems, especially on N64.
There are three ways controller configurations are saved in a RetroPie.
- From the initial setup configuration file
- nano "/opt/retropie/configs/all/retroarch/autoconfig/Xbox 360 Wireless Receiver.cfg"
- From the "live" setup configuration file, what you can change via EmulationStation
- nano "/opt/retropie/configs/all/retroarch-joypads/Xbox 360 Wireless Receiver.cfg"
- From a system-specific configuration file (N64)
- nano /opt/retropie/configs/n64/InputAutoCfg.ini
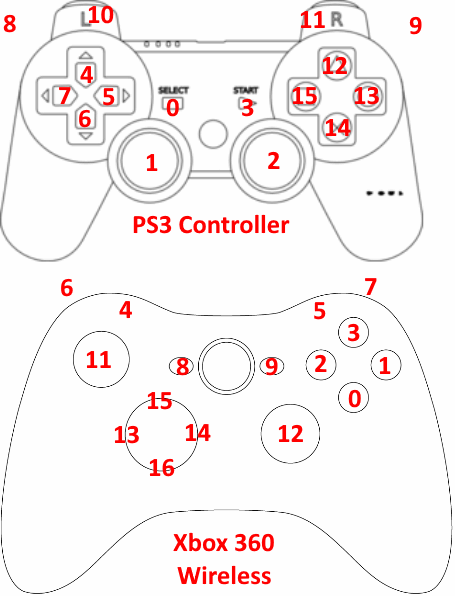
Here are two mapping images that may be helpful. The stock-mapping works perfectly for NES, SNES, Game Boy, (which all use the RetroArch Input File you created through Emulation Station, but goes absolutely bonkers with non-RetroArch cores).
These input mappings were figured out via the RetroCore GUI Configuration Tool (While in a RetroArch game, press Select + X).
Example Code of a default"/opt/retropie/configs/n64/InputAutoCfg.ini" N64 setup (Wrong).
; Xbox 360 Wireless Receiver_START
[Xbox 360 Wireless Receiver]
plugged = True
plugin = 2
mouse = False
AnalogDeadzone = 4096,4096
AnalogPeak = 32768,32768
Mempak switch = button(11)
Rumblepak switch = button(12)
C Button D = button(0) axis(3+)
C Button L = axis(2-)
Z Trig = button(4)
Start = button(9)
Y Axis = axis(1-,1+)
DPad U = button(15)
C Button U = button(1) axis(3-)
A Button = button(2)
DPad D = button(16)
X Axis = axis(0-,0+)
R Trig = button(5)
DPad R = button(14)
B Button = button(3)
DPad L = button(13)
C Button R = axis(2+)
L Trig = button(6)
; Xbox 360 Wireless Receiver_END
Issues are:
- Button (0) [The A button on a 360 controller)], is auto-mapped to C-Button Down AND Right-Stick Down.
- Button (1) [The B button on a 360 controller], is auto-mapped to C-Button up AND Right-Stick Up.
- Button (2) [The X button on a 360 controller], is auto-mapped to A.
- Button (3) [The Y button on a 360 controller], is auto-mapped to B.
If you are using a 360 Wireless controller, feel free to use the below mappings. Edit your config file with a command such as:
"nano /opt/retropie/configs/n64/InputAutoCfg.ini"
Use Ctrl+K to delete by line rather than holding down backspace, a bit faster.
Right-Click in Putty to paste in the code box below:
; Xbox 360 Wireless Receiver_START
[Xbox 360 Wireless Receiver]
plugged = True
plugin = 2
mouse = False
AnalogDeadzone = 4096,4096
AnalogPeak = 32768,32768
Mempak switch = button(11)
Rumblepak switch = button(12)
C Button D = axis(3+)
C Button L = axis(2-)
Z Trig = button(4)
Start = button(9)
Y Axis = axis(1-,1+)
DPad U = button(15)
C Button U = axis(3-)
A Button = button(0)
DPad D = button(16)
X Axis = axis(0-,0+)
R Trig = button(5)
DPad R = button(14)
B Button = button(2)
DPad L = button(13)
C Button R = axis(2+)
L Trig = button(6)
; Xbox 360 Wireless Receiver_END
Interface Controls - ROM Compatibility for N64
Controls
Within RetroPie as the Front-End Interface that lets you select your games, the following are most helpful:
DPad Left / DPad Right = Select between systems
A (Right-most button) = Select Game
B (Down-most button) = Cancel
Start + Select = Quick game currently being played, go back to menu
Left Bumper / Right Bumper = Page Up / Down (Scroll quickly)
Configuring N64 Compatibility
For that first unit, I've always customized each emulator for the most important N64 ROMs. You can define a single ROM to use a specific emulator video-plugin, you can also define the default settings for each plugin. I recommend going lower res for all of the plugins: CEA-1will give you the best performance for modern monitors/TVs. You may want to reduce the frame buffer to the native 320x240.
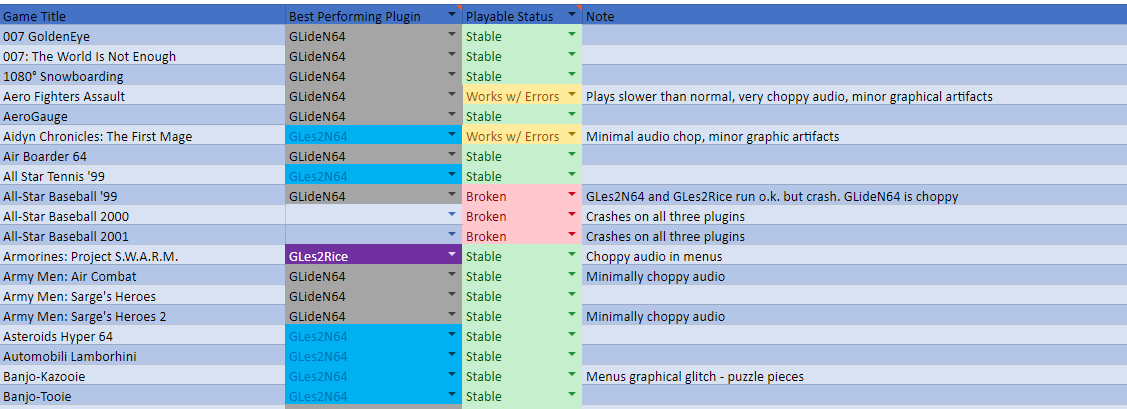
For the below list linked on Google Drive/Docs, I have personally tested all three emulators: Gles2N64, Gles2Rice, and GlideN64, to see which is the most stable and has the most playable performance. Some games simply cannot run smoothly on the RetroPie, others it's a toss-up. You'll need to enable the Command Editor temporarily when you save these changes. Once done, turn it back off. List below, hope it helps.That should be enough to get you a fully operational RetroPie. Enjoy, and have fun!
Using the Run Command editor can be helpful for changing specific setting -- per-ROM. To do so, you would enable the Run-Command editor in RetroPi Setup.
RetroPie Setup > Configuration/Tools > Run Command > Launch Menu (Enabled).
From here, you can define a default emulator overall, and specific settings per ROM. You rarely need to touch the framebuffer, it's usually just the emulator choice, and possibly what resolution you want to run at. Again, Using 640x480 rendered on the RetroPie, will be scaled up to your 1080p screen, and can look better than a 1920x1080 rendering by the RetroPie
RetroPie N64 Compatibility List - Raspberry Pi 3 - Overclocked
I spent a little over 15 hours developing this list since all of the others I found were outdated, conflicting, or not applicable for an overclocked Raspberry Pi 3, hopefully you find it helpful!
https://docs.google.com/spreadsheets/d/12JtPecqKpC...
Final Note
Thank you for reading this far, I hope this guide has helped you in some way, whether that is enjoying gaming classics for yourself, with your kids, with friends, or just tackling a new technical challenge, good luck on your adventures and keep exploring!