Record Your Own Audiobook for Audible
by Travis Daniel Bow in Craft > Books & Journals
97611 Views, 50 Favorites, 0 Comments
Record Your Own Audiobook for Audible
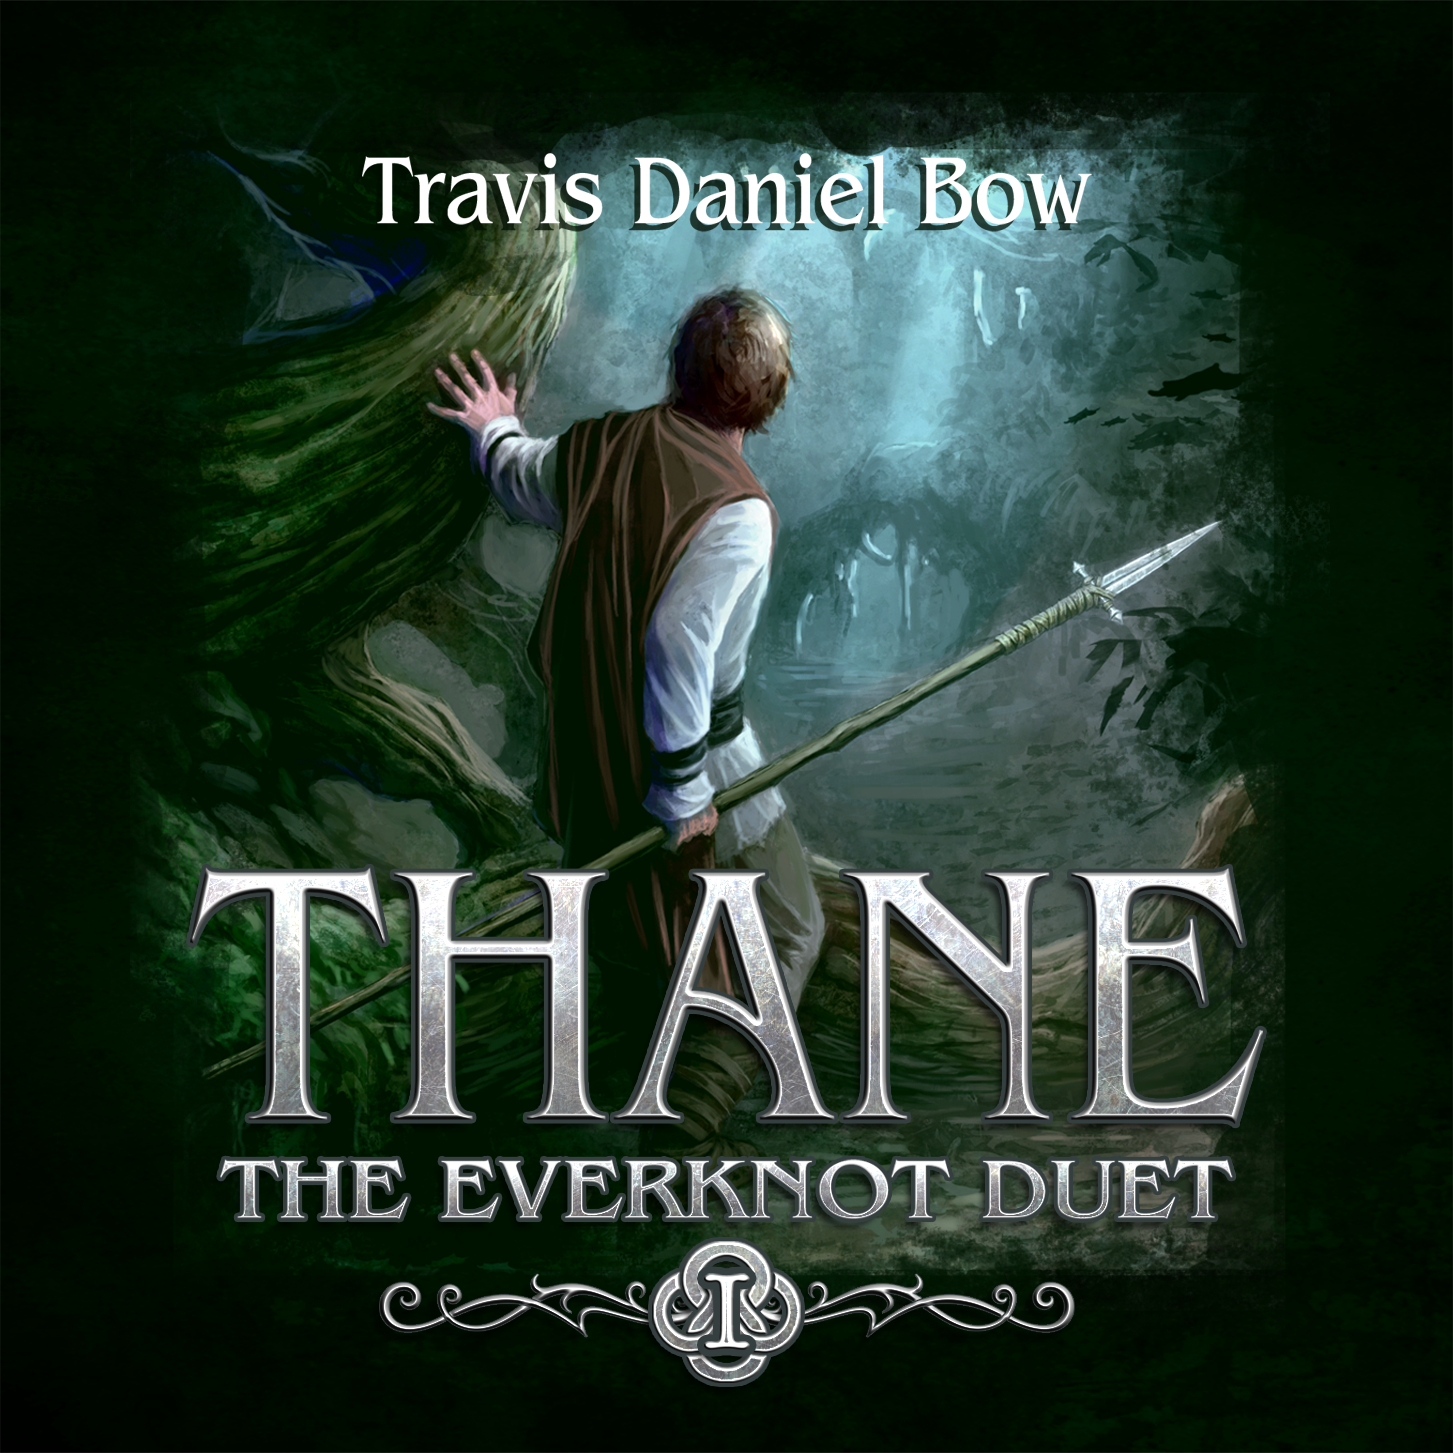
It doesn't take a studio or an audio engineering degree to record your own audiobook and sell it on Audible. With a $130 microphone, some free software, and a little persistence, you can make top-notch audio, and Audible's Audiobook Creation Exchange interface makes it super straightforward to get your book on sale on the largest Audiobook platform in the world.
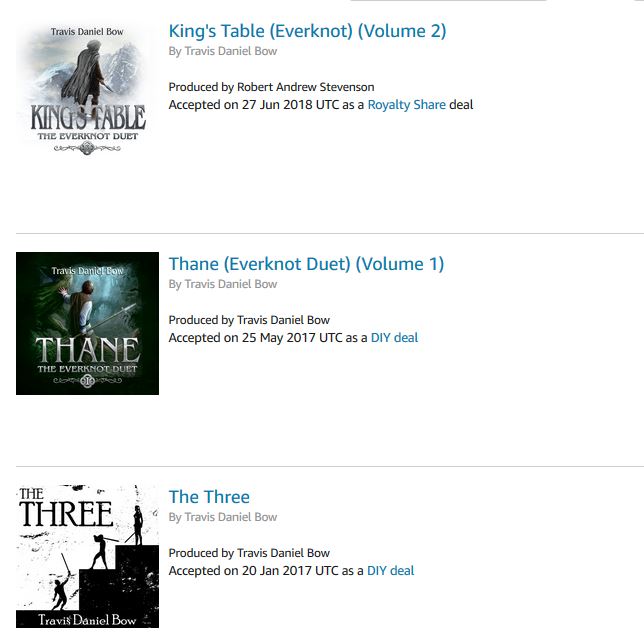
Having gone through this process three times with my books Thane and King's Table and my short story The Three, I've had to glean information from dozens of partial (often conflicting) tutorials, and I've discovered a lot by trial and error. This is my attempt to put it all together in a step-by-step guide that anyone can follow.
Note: almost everything in this article is also applicable to making a very high quality podcast.
Equipment
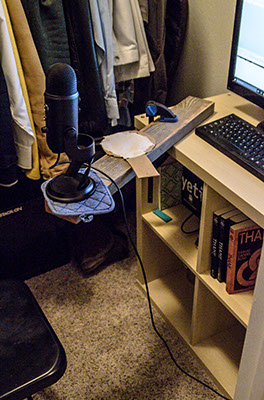
Enthusiasts always recommend the very best equipment, and they tend to think all of it is indispensable. Audio enthusiasts are no different. Just like your bike-fanatic friend who recommends a $3000 bike to get you to and from work, Audiophiles will often insist that you'll never produce good audio without a $1000+ home studio system (or better yet, rental time in a professional studio). This can be intimidating, especially if you're not confident in your ability to judge "good" audio from "bad".
I tend to take a minimalist approach. I decided to make an attempt with the absolute minimum in equipment and setup using one of my short stories as a test case. My audio passed Audible's recording standards with flying colors and was well-received by listeners. So here it is: the minimalist setup guide.
Equipment you really need:
- A computer. A laptop would be nice (they're quieter), but I just used an old desktop.
- A quality USB microphone (a Blue Yeti is a very nice choice, one of the most popular microphones, and will only run you $130 on Amazon. This is what I used. Blue also makes a cheaper Snowball microphone that I've heard of people using. I'm sure it would be fine, but I can't personally attest to it. My co-narrator for King's Table used a Yeti Pro with a mic boom and a shock mount (he got the whole setup off of ebay) and had very good results with it as well.
Equipment that might be worth buying:
- Headphones. Something you can plug into the audio jack on your microphone or computer so you can listen to what the microphone is picking up while you're recording is a good idea.
- A pop filter is good to have. I made one with a piece of cardboard and some old batting for my first book, but didn't use one for my second. I honestly didn't notice much difference. If you don't want to make your own, you can pick one up for $7.50 on Amazon.
And that's it. Really.
Setup
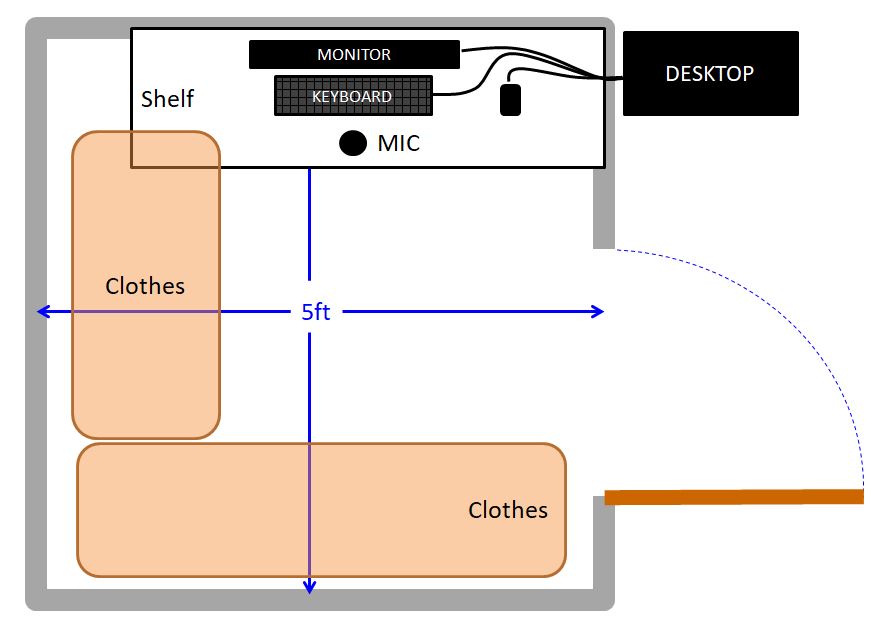
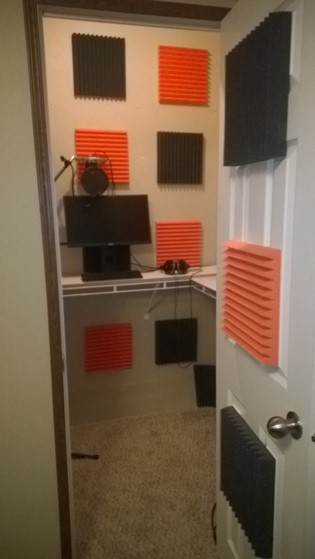
Where you record seems to be the biggest factor in the quality of the recording. If you can get the ambient noise low enough, everything else will be easy.
Closets are popular. Clothes hanging around tend to absorb echoes. If you have a quiet laptop, just set up a comfortable desk or stand in your closet, and you'll probably be more than fine. If you have a desktop, you may have to do as I did and put a hole in the wall so that your noisy desktop is isolated from your monitor and microphone.
Things that are OK to have close to the microphone:
- Laptop (if it's a quiet one) or tablet
- Mouse
- Keyboard
- Monitor
- Tungsten or LED lights
Things to avoid (because they make noise that will show up in your audio):
- Desktop
- Noisy laptop (fans or hard drive spinning)
- Fluorescent lights
- Air conditioner / heater (just turn these off while you're recording if they're a problem)
- Dogs barking / traffic / airplanes flying outside (unavoidable, just pause your recording until they stop, record early in the morning or at night)
Come up with something reasonable and comfortable. You'll be spending a lot of time recording, and you'll never be able to stick with it if you're miserable the whole time.
Examples:
- A diagram of my setup for Thane and The Three is shown above. I had some problems early on with a buzz that I couldn't get rid of, and discovered that by snaking the cords through the door, I was letting in noise from my desktop. I drilled a small hole in the wall for the cords and the problem was solved. Every time I wanted to record I'd turn the AC off, close the door, and record in the closet. The audio turned out nice and clean.
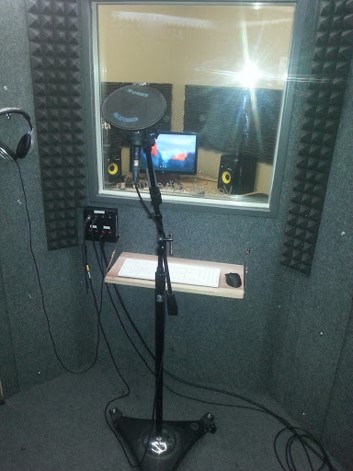
- The first photo above is of the studio at the local university. By the time I co-recorded King's Table, I had dismantled my closet setup and was taking some night classes at the university, so I decided to try recording here. To be honest, I ended up wishing I still had my home studio - audio quality wasn't perceptibly better and I had a harder time finding time to record. But it's an option you could look into if you don't want to set something up at home.
- The second photo is the closet setup of my co-narrator for King's Table. Instead of leaving clothes hanging in his closet, he glued acoustic foam to the walls, which made for a much nicer-looking setup. However, he reports that the audio quality was not significantly better than what I got from my closet.
Software
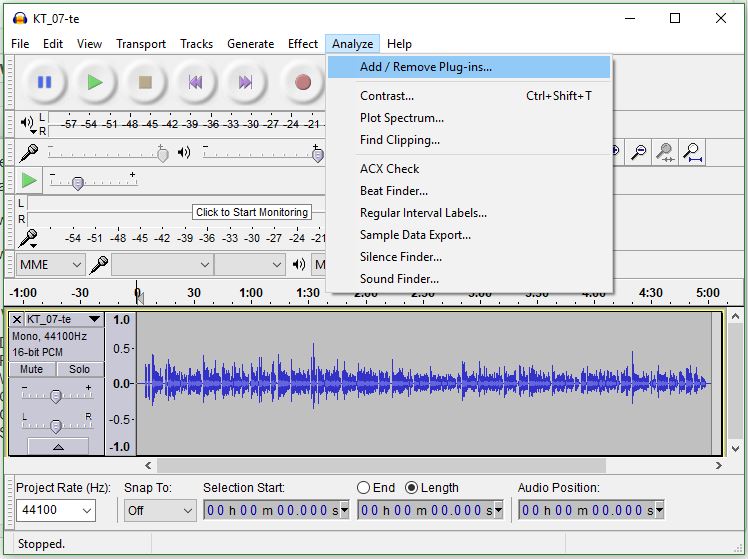
There are a lot of audio recording software packages you could use. I'm going to focus on Audacity, the most popular free one.
You will need to download and install Audacity (very straightforward): https://www.audacityteam.org/download/
You will then need to download and install an add-on:
ACX Check - https://wiki.audacityteam.org/wiki/Nyquist_Analyz...
This will check you audio to make sure it meets ACX's recording standards (more on this later).
- Download the file "Acx-check.ny" from the link above
- Place it in the Audacity "plugins" folder: C:\Program Files\Audacity\Plug-Ins OR C:\Program Files (x86)\Audacity\Plug-Ins
- Open Audacity
- Go to Analyze > Add/Remove Plugins
- Select ACX Check > Enable > OK
Recording Your First Clip
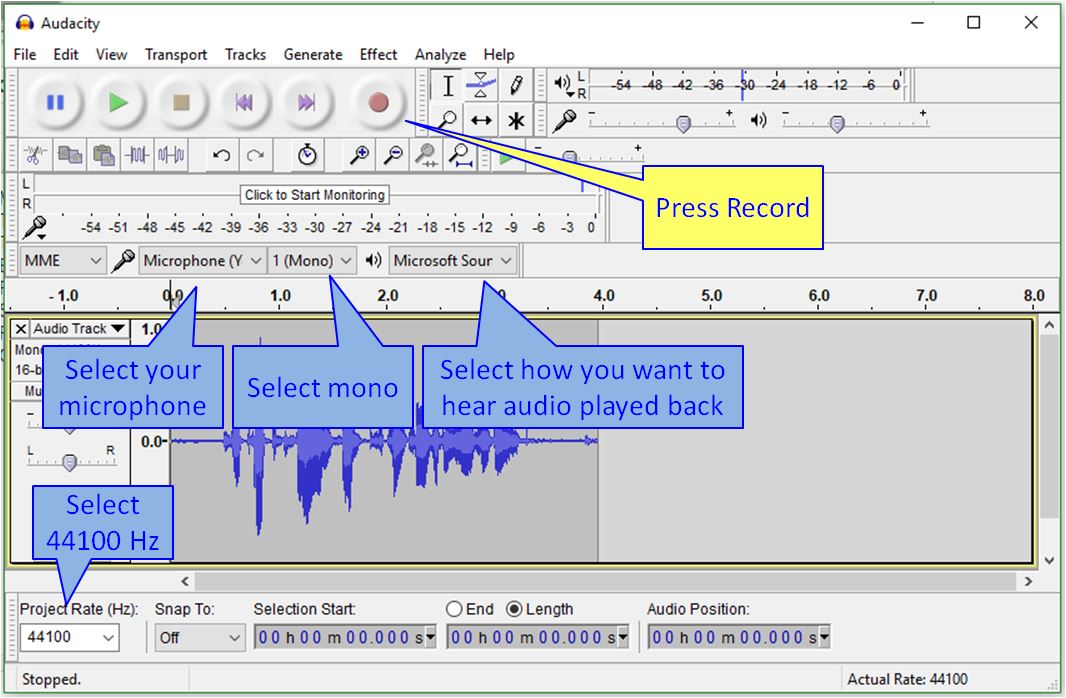
- Make sure your microphone is plugged in.
- The first time you open Audacity, you may have to adjust a few settings (shown in blue).
- Then put your microphone where you think you'll want it while recording (nice tutorial here for positioning your Blue Yeti microphone - use Cardioid mode). TIP: placing the microphone slightly to the side of your mouth (off-axis) can help with breath sounds and plosives.
- Press record (or the "R" key)
- Say something ("The Quick Brown Fox Jumps Over the Lazy Dog!") in the voice you think you'll use to record.
- Press stop (or the "Spacebar" key)
- Go to the beginning of the clip using your mouse (or the "Home" key) and press "Play"
Once you've got waves showing up and you can hear the playback of your audio, you're ready to make some adjustments.
Note: ideally you'll want to be able to listen to what the microphone is hearing while you're recording. This will let you pause if a plane flies overhead or adjust your voice if you're blowing into the microphone.
There are two ways to do this. The first (and best) is hardware playthrough. This is where your hardware (microphone) has an audio out port (like the Blue Yeti does) that you can plug your headphones directly into. The microphone then sends the recorded signal to your computer (via USB) at the same time that it sends it to your years (through the headphone jack). You'll hear exactly what the microphone hears, with no delay.
The second (worse) way is software playthrough. You can enable this at Edit > Preferences > Recording > Software Playthrough. Your microphone will send the recorded signal to your computer (through USB), your computer will process that signal, then send it out through some playback device (your computer speakers, or headphones plugged into your computer). This will cause a delay, which can be very distracting while recording.
Sound Check
Time to record some audio! You have two goals when recording your audio. The first is to minimize noise (hums, buzzes, distant children playing in the corn fields). You did that with your setup (now you'll see how well it worked). The second is to get your volume adjusted correctly. You want it to be much louder than the noise, but not so loud that it "clips" (reaches the maximum the microphone can handle, causing distortion).
A note about volume: Sound volume is measured in dB or decibels, a confusing scale where every 6dB means the volume has doubled (so 26dB is twice as loud as 20dB). To make things more confusing, recording volume is measured in negative dB (where 0 is the maximum volume your microphone can handle, -6dB is half that volume, and -60dB is about 1000 times quieter than that volume).
ACX (where you will publish your audiobook) has certain requirements for volume. It requires the noise in your audio to be quieter than -60dB. It also requires the loudest portion of your audio to be at about -3dB, and the average sound of your audio to be between -23dB and -18dB. It's almost impossible to record in such a way that you meet all these requirements at once. Luckily, you can do a lot of adjusting after recording (called mastering). But to get clean audio to start with, you need to:
- Have the "peaks" or loudest portions of your audio somewhere in the -12dB to -1dB range
- Have the "noise floor" somewhere below -60dB (the more the better)
You see these values using your newly installed add-in (highlight the track you recorded, go to Analyze > ACX check, and look at the results).
You adjust these values by changing:
- The volume of your voice (try for something normal)
- The distance between your mouth and the microphone (constant, probably 3-5" is best)
- The "gain" knob on your microphone (the best thing to adjust)
- The "recording volume" in Audacity (slider by the microphone) (another OK thing to adjust)
Example 1:
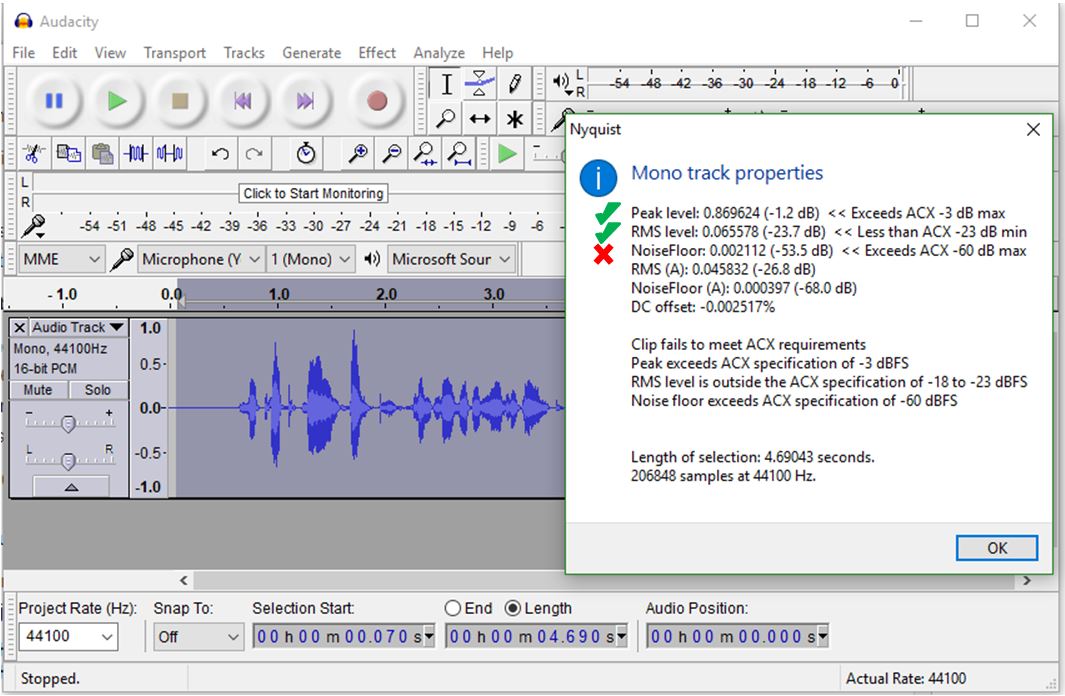
The first screenshot above shows my results from recording a quick clip at my desk in my living room. The results are:
- Peak level: -1.2dB (a little louder than I'd like, but it's in the -12dB to -1dB range, so it's OK)
- RMS level: -23.7 dB (very easy to adjust later, don't even worry about it)
- NoiseFloor: -53.5 dB (this is the most important, and it's way above the required -60dB (almost twice as loud). This is because the microphone is sitting on my desk (and vibrating with the fan motor on my desktop) and because my kids are sitting in the next room trying (and failing) to be quiet.
How should I adjust?
Well, I could turn down the gain until my noise level is at -60.5 dB. This would make my noise "OK", but it would bring my Peak levels down by the same amount (to about -9 dB). When I mastered my track, I'd have to "turn up" these peak values, which would turn the noise back up a little bit too. I probably wouldn't be able to meet the noise floor.
First I should get my microphone off of my desk (where the fans in my desktop can vibrate it) by putting it on a stand or holding it. I should also probably wait until my kids are in bed and/or go into a smaller, quieter room. Then my noise floor will be much lower and I'll have more wiggle room.
Example 2:
The second screenshot above shows my results from recording The Three in my closet. The results are:
- Peak level: -8.6 dB (a little quieter than I'd like, but it's in the -12dB to -1dB range, so it's OK)
- RMS level: -30.3dB (very easy to adjust later, don't even worry about it)
- NoiseFloor: -69.0dB (very nice, well below the -60dB limit, which gives me some room for increasing my low peak volumes).
This is very workable audio, and will be easy to master later on (to raise the peak and RMS levels without raising the noise floor too much).
Narrating - a Few Tips
Now that you have your settings dialed in, it's time to start recording! Here are a few tips I learned along the way:
Decide how voicy you want to be. You don't need to make a unique voice for every character. If you've listened to a lot of audiobooks (as I have - I listen to upward of 50 per year), you've probably noticed that:
- Boldly seasoned. Very few narrators do a unique voice for every character (listen to the sample of Roy Dotrice in A Game of Thrones). This is nice when it's done well; you can tell who's talking before the narrator even reads the "Tyrion said". But it takes a master. Just like you wouldn't go throwing around saffron and turmeric and chili powder if you didn't really know what you were doing in the kitchen, you probably shouldn't try this approach unless you're really good at voices.
- Unseasoned. A few narrators do almost no voices (listen to the sample of Lisa Flanagan in Spinning Silver) . This really isn't all that bad - you quickly adjust to listening the same way you read, supplying your own voices for characters. These books are like unseasoned food - with a little salt and pepper of your own on the table, they taste just fine. I really prefer these to the ones with cheesy voices.
- Subtly seasoned. The vast majority of narrators use small variations in voices for very unique characters (listen to the sample of Kate Reading in Furies of Calderon). This gives the audiobook a bit of flavor and lends personality to the voices, but is much more forgiving of people that aren't voice actors (like myself). This is what I recommend.
Be careful narrating the voices of the opposite sex. If you're a guy, your first instinct will probably be to make a squeaky, high-pitched voice for all your female characters. If you're a girl, your first instinct will probably be to make a gruff, caveman voice for all your male characters. Resist. You don't even need to pitch your voice up (or down) at all. Listen to a few audiobooks with female characters, and you'll notice that narrators focus on the characteristics of the person much more than their gender. If you really want to make someone sound feminine, work on softening or intonation (or vice versa for masculine). Listen to other narrators. And check out this fantastic video by some famous narrators for inspiration and examples: https://www.youtube.com/watch?v=eMnIwAaFx3o
Don't worry about breathing. In my first several hours of narrating, I could hear every breath I took, so I tried to hold my breath or breath in very slowly between sentences. Not only is this exhausting, it leads to unnatural-sounding speech. Breath normally. The sound of you inhaling between sentences is completely natural and almost invisible unless you're listening for it.
Stay well hydrated. There will be mouth noises, clicks when your tongue leaves the roof of your mouth. Some days these will be so bad you might just give up on recording and come back another day. Some days they will be minimal. You can edit them out easily, but the more there are, the more time it takes. There are all kinds of 'remedies' (eating a tart apple, or something acidic, or...), but staying hydrated (well before you start narrating) seems to be the only reliable way to minimize these.
Be a little more dramatic than you're comfortable with. I like an even-toned narration myself, so my first several chapters I worked on not being too dramatic (which I thought of as cheesy). Gradually I got more comfortable (and emotionally involved) and started doing a better job narrating. When I went back and listened to my first few chapters of Thane, I realized that I needed to re-do them... they were so flat and monotone that they bored even me. From then on I focused on inflecting just a tad more than sounded right to me. When I listened back, it sounded like exactly what I was shooting for.
Punch and Roll
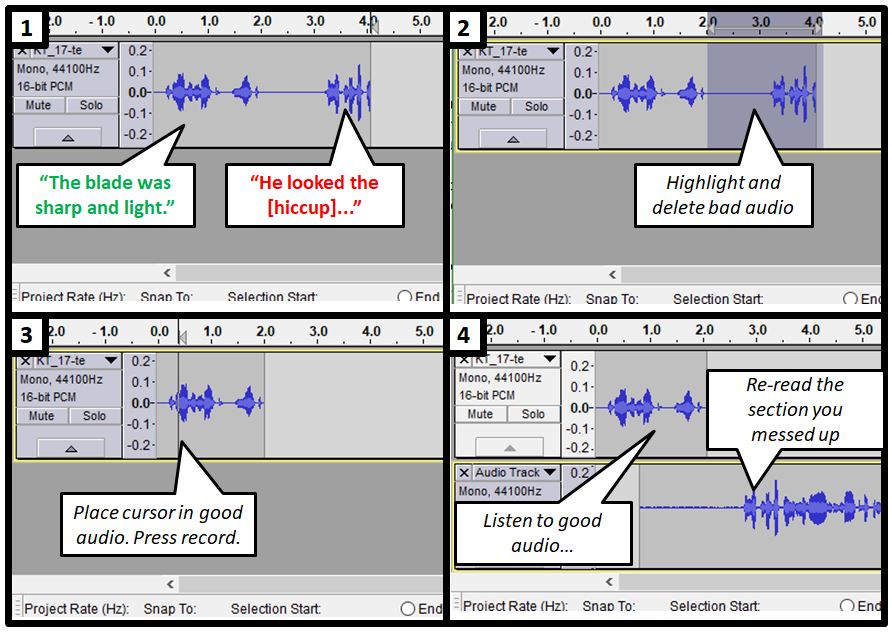
You will make mistakes, or want to re-do a sentence or re-try a voice. There are several ways to do this. The first way is this:
- Press record
- Read
- Mess up
- Pause (keep recording). Regroup.
- Read again
This is the easiest to do while recording, but it has two problems:
- You'll spend a lot of extra time splicing together your attempts later on, trying to get the pause between sentences just right
- Your second attempt will have less continuity (volume and tone-wise) with the audio that comes before.
The better way is to use what is called a "punch and roll" technique:
- Press record
- Read
- Mess up
- Stop recording
- Delete all the "messed up" portion of the audio
- Go back about one sentence into your recording
- Press record (beginning a new track)
- Listen to your good sentence, then try reading the bad sentence again
Example:
- Press R (record)
- Read: "The blade was sharp and light. He looked the [hiccup]...""
- Press spacebar (stop recording)
- Drag over and delete "He looked the Huctan...".
- Go back a bit into the good audio (mouse click)
- Press R (record)
- Hear (in your headphones): "The blade was sharp and light."
- Read (into the microphone): "He looked the Huctan in the eyes..." (and keep reading)
See the diagram above for how this would look in Audacity.
Save Your Audio
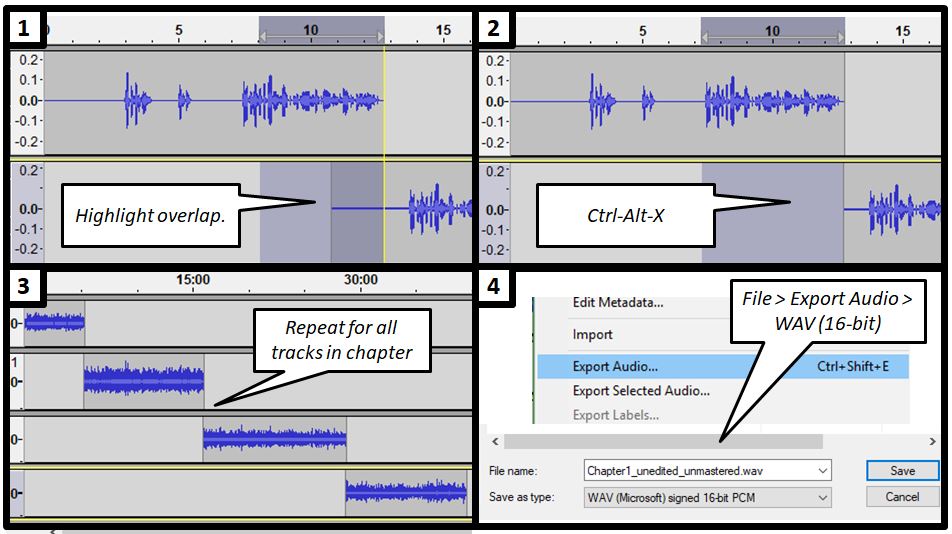
Once you've got a chapter (or track, or podcast) recorded, you'll want to save a copy before you do any mastering or editing. Before you save, though, you'll want to delete those little sections of overlap from your punch and roll recording. If you don't, there might be some noise (remember, you were recording while you were listening to the good audio playback) that you don't want.
Luckily, this is easy, just highlight from the left (cursor will auto-snap to the end of the upper track). Press Ctrl-Alt-X to delete the audio without shifting the track over. Repeat for as many takes as it took you to complete your chapter (Don't worry, this 4-take, 40-minute chapter was very unusual for me... most chapters that long would be in 20 takes at least. I must have been on a roll that night.)
When you're done, File > Export Audio > save as a 16-bit WAV file. This is a pretty much lossless format that makes a good backup for you to come back and edit / master at your leisure.
Edit Your Audio
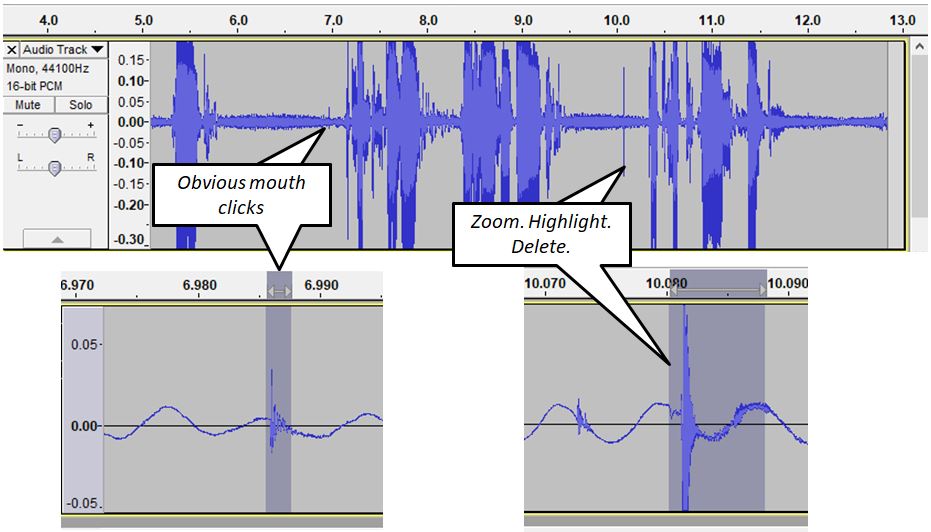
If you've been using the punch and roll technique, editing will be very easy. Just put on some good headphones, turn up the volume, and listen. The main thing you're listening for are mouth clicks. They are inevitable, annoying, smacking noises that show up in the pauses between words. Turn up the volume so they're noticeable. When you hear one, pause (spacebar). Zoom in - you'll usually be able to see them - highlight them, and delete them.
99% of the time, that's all you'll need to do. But while you're listening, look out for:
- Background noises. If a dog barks or someone slams a door in the background, this is the time to catch it and fix it.
- Mispronunciations or delivery you want to fix. Curb your pickiness - if you overthink things too much, you'll have a perfect audiobook that never gets finished rather than a good audiobook that people can actually listen to.
Master Your Audio
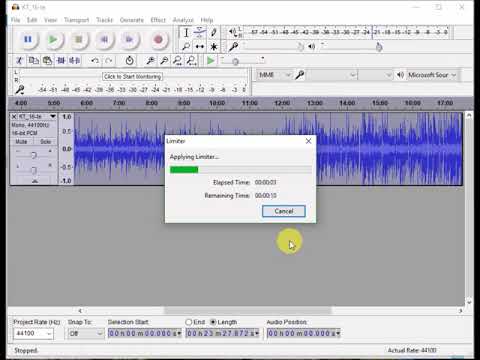
Aside from setting things up, this is the most technical part of the whole process. It's also very easy and very quick - I spent a night or two a week recording and editing for almost half a year, then did all my mastering in a few hours.
If you've recorded all your tracks and saved them as WAV files, then listened to all of them and cut out any weird noises, the only thing that remains is to adjust your audio. This is called "mastering".
*** UPDATE 2021 - Audacity now includes built in tools to simplify many of these steps; thanks to edkgodofthunder for finding the Audacity help link. I'm updating the instructions below. The video still shows the old way with plugins etc. before these options were built into Audacity ***
Step 1:Trim the ends of the audio
- ACX requirements state that each chapter must have between 0.5 and 1 second of "room tone" at the beginning and 1-5 seconds of "room tone" at the end of each chapter. "Room tone" is silence, except with the microphone on (true silence is usually jarring in a recording). So trim the ends of your audio (or copy / paste a little extra if the room tone is too short) to fit these requirements.
Step 2: Lower the noise.
This step is probably optional if you have a high-quality, low-noise recording, but Audacity help now recommends doing it every time. You just need to be consistent - don't use it on some chapters and not others or you may have a noticeable difference between them.
- Select audio
- Go to Effect > Filter curve... > Manage > Factory Presets > : Low roll-off for speech
Step 2: Adjust the overall volume of the audio
This step adjusts the overall volume of your chapter has an RMS (roughly the average volume) of -20dB
- Select your audio (a chapter for example)
Go to Effect > Loudness Normalization...: Normalize RMS to -20dB > OK
- Select audio
- Go to Effect > Limiter
- Choose soft limit > options 0.00, 0.00, -3.50dB, 10.00, No > OK
- Press OK. Audacity will adjust your audio so that the "peaks" are limited to about -3.5dB (just within ACX requirements) without messing up your RMS.
Step 4: Check your audio
- Select audio
- Go to Analysis > ACX Check
- Make sure the audio passes all three requirements (Peak Level, RMS Level, and NoiseFloor).
When you're done, export your audio to an MP3 file. Set the bit rate to 192 kbps, select "Joint Stereo" (similar to mono), and don't worry about entering metadata (ACX will add that to the files for you before they put it on Audible).
This may seem like a lot. It's not too bad - it'll probably take you half an hour to figure out the first time, then about 2 minutes per chapter after that. Check out the quick video above to see how fast the whole process is.
Publish on ACX
Now that you've got all your files, it's time to publish your audiobook!
The actual process is very straightforward.
- Go to https://www.acx.com/
- Click "Sign Up Now". If you don't have an Amazon account, you'll be asked to create one.
- If you have books for sale on Amazon, they should show up as titles that you can start projects for. If not, you can click "assert more titles" and tell ACX they missed your book. You do need to have the ebook in Amazon's system though.
- Start a project as a "DIY deal" (specifying that you will narrate your own book). ACX will walk you through the process, ask you to upload cover art, audio files, descriptions, etc.
- Once everything is uploaded, you'll submit for approval.
- It will take about a week to get your files checked for quality.
- When the files are published, your book will go live for sale on Audible!
You may wonder what the catch is, or how much this will cost. The cost to you, if you record your own audiobook, is nothing - the process is free. You'll earn a percentage (40% if you agree to sell exclusively on Audible, 25% if you don't) of every sale, plus bounties on people that sign up for a long term Audible membership and get your book as their first book . Audible gets more titles they can sell, you get a way to sell your audiobook on a well-known platform, and everybody wins. I've sold about 20% as many Audible copies of my books as I have ebook and physical copies, so this can be a really good way to gain more sales and get your work out there.
Note: ACX also has options to get someone else to narrate your book, either by splitting the royalties with them (this is what I did with a friend, who co-narrated King's Table with me) or by paying them outright.
Resources

There are a lot of good resources out there.
If you're having trouble with your audio, or need someone to listen to a clip, or want to know more about the ins and outs of Audacity, the Audacity forums are fantastic.
Much of my process comes from one of the primary posters on those forums, "Koz", who has a good succinct article with links to a lot of the material I presented here.
Finally, if this article was useful to you, I hope you'll check out my website and Facebook page, watch my cheesy promo video, or maybe even listen to one of my books. Let me know what you think ;)
And as always, post questions. I'll do my best to answer them.
Thanks for reading!