RaspberryPi Islamic Prayers Watch & Alarm
by Abdulrahman Sahloul in Circuits > Raspberry Pi
4508 Views, 13 Favorites, 0 Comments
RaspberryPi Islamic Prayers Watch & Alarm
Muslims around the world have five prayers every day, and each pray has to be in a certain time of the day. because of the elliptic way our planet moves around the sun, which makes the sun rising and falling timings differs throughout the year, that also makes the prayer time inconstant, which is why we need an Islamic watch to remind us Muslims on our praying times each day.
Every Muslim has a way to access the daily praying times weather through the Internet Islamic websites, local Islamic calendars or even by TV, and most of us have Islamic watch devices that has the features of giving us the prayer times, as well as prayer alarms. But what if we made our own Prayers Watch and Alarm device!
Before starting working on the project, there are few considerations that you might be useful for you while reading this Instructable. I'm living In Saudi Arabia so some of my steps and values will differ from yours, and I will explicitly point those during the work. There are steps and pictures that might include Arabic words since I made the interfacing in Arabic, but I also will point out how to make it in English so don't let the Arabic words in the pictures worry you at all, this project can be done in any Language (which is awesome! :D) Also please excuse my typos as English is not my first language.
On to our project! This project will divided into X Major steps, which by the end of Xth step we will be having our project nice and ready! The steps will be as follows:
1-Configuring and preparing the RaspberryPi
2-Installing the RTC Module
3-Making the Azan Alarm program
4-Implementing the watch faces
5-Making the User Interface and..
As every project, we need to prepare the parts we need first. the parts that we need for this project are:
1-RaspberryPi Computer kit Amazon US || Amazon KSA
You can use any Rpi version, just make sure it has Wifi. I used Rpi3B+
2-RTC Real-time clock module
Amazon US || Amazon KSA
You can use any RTC module model, just make sure it has I2C
3-LCD Monitor
4-Mouse and keyboard
and that's.....IT!! That's all you need to make your own Azan clock and alarm
Chapter 1: Setting Up and Configuring the RaspberryPI
First things First! We need to prepare the Raspberry pi in order to work with it.
Raspberry pi is nothing but a computer, it has RAM and ROM, it has a CPU, GPU, I/O.......A computer! just like the one we play games on and browse the web with, only major thing that it's very small! which makes the raspberry a very good choice for making and implementing projects on. because the raspberry pi is small, it has very limited specs that it cannot operate a large demanding OS like windows or macOS, instead, we're going to use Linux as an operating system in order to use the device. there are thousands if not tens of thousands of Linux distros that we could use, but one perfect distro is perfectly optimized specifically for the raspberrypi that we we are going to use, called Raspbian.
1-1: Download the Neccessary Files
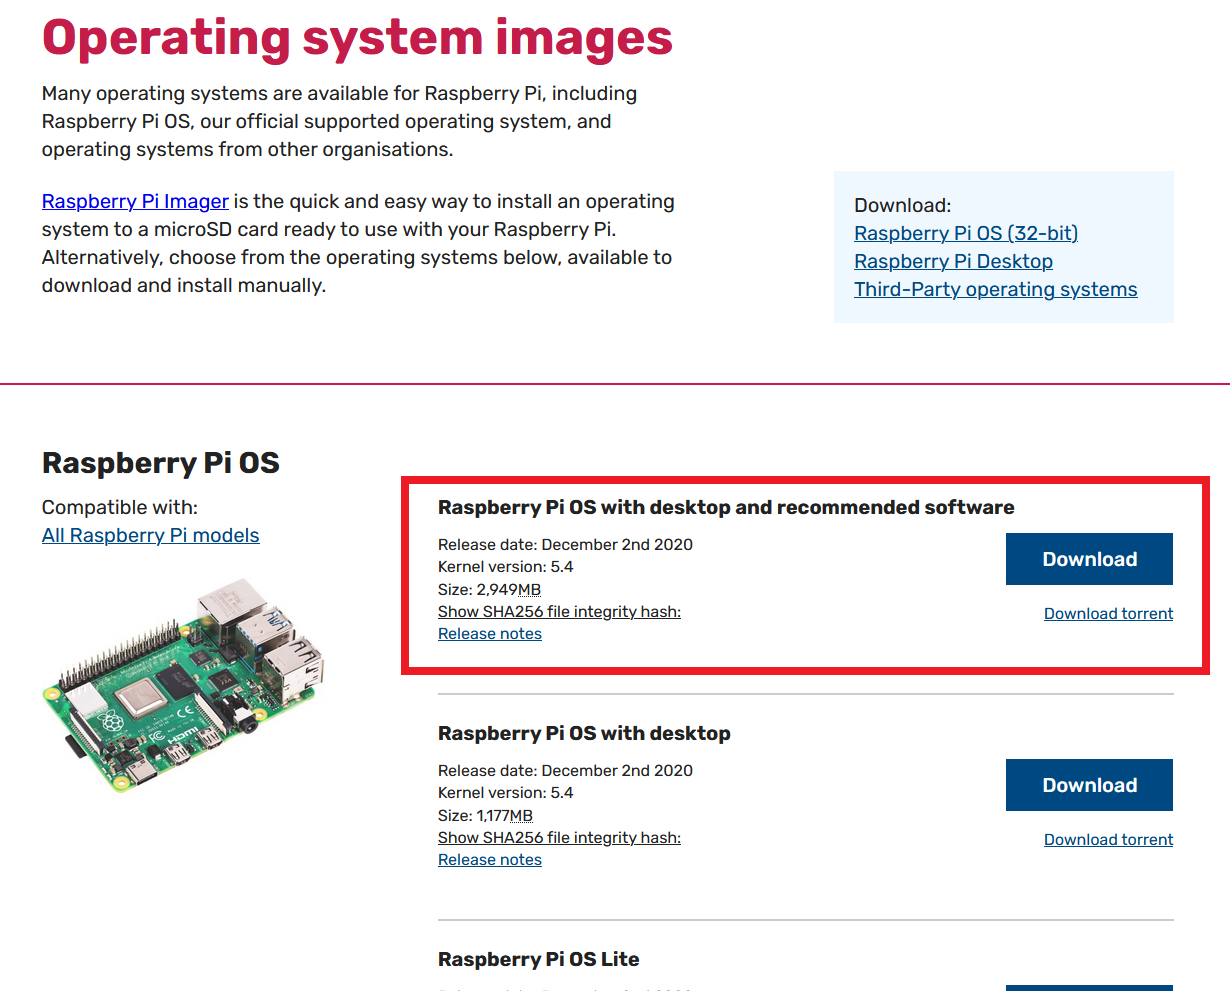

-Go to the official Rasbian Download page at https://www.raspberrypi.org/software/operating-sy... and download the Raspberry Pi OS with Desktop file
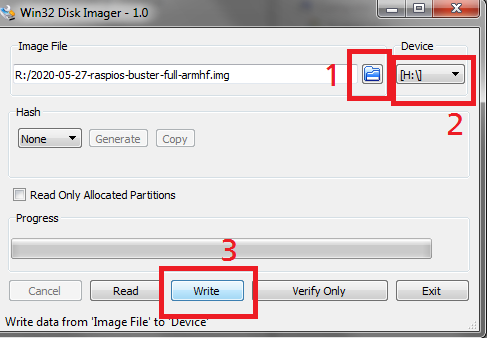
-While it's downloading, go to https://win32diskimager.org/ and download and install win32DiskImager, you can use any image burning software that you like
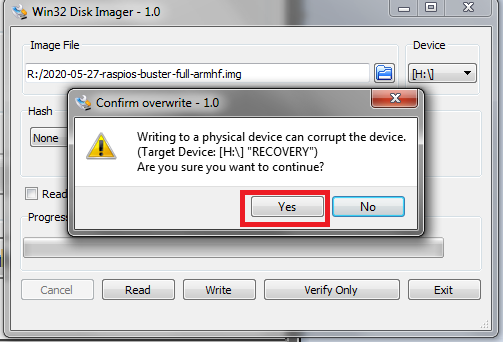
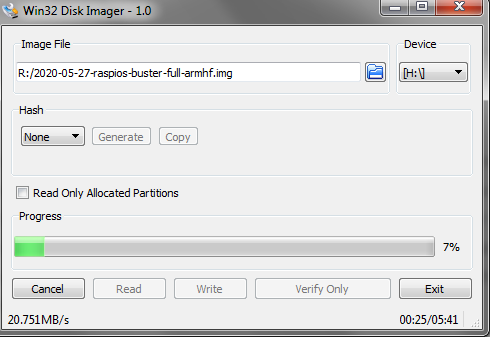
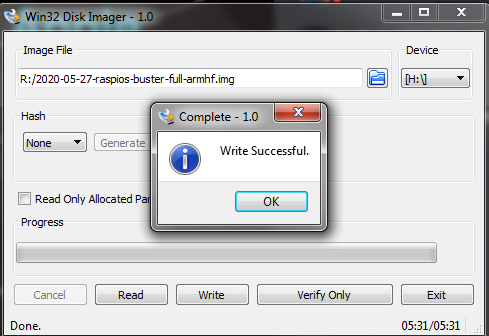
once the download is done, You'll have an .img file containing the RaspberryPi OS. next, plug your SD memory card in the computer (usually with a USB card reader) and launch win32diskimager software. the steps for burning the image into the SD memory is very simple, you just need to 1- Select your memory letter 2-select your OS files that you downloaded and 3-Click write! Make sure that you've selected the right device letter from the list and your memory is empty, as by pressing write you'll be promoted with a warning that tells you that anything on the device will be erased! Press yes to confirm the write and wait for it to finish. this might take up-to 20minutes.
Once it's done, you'll have the full Rapbian OS on the memory, you can go ahead and put it in the Rapberry Pi, connect the Raspberry Pi to the monitor through HDMI, connect the mouse and keyboard through USB and lastly, connect the power.
1-2: Configuring the Raspbian System
After Connecting the cables and the power, you'll see that the OS has turned on, it will automatically reboot and then it will display the Raspbian User Interface (which looks similar to windows). the first thing you'll see is a welcome window, which will take you through the steps of configuring your RaspberryPi for the first time. the windows and steps will be as follows:
1-Press next on the first "Welcome" window
2-Next window will be to configure your location. select your Country, language and timezone. after that, it's highly recommended to check the "Use English language" as this will be the Operating system interface language. YOU MUST CHECK THE "US ENGLISH KEYBOARD LAYOUT BOX" WE NEED ENGLISH KEYBOARD TO WORK!
3-Next, you'll be asked to enter a password for your raspberry, this is important for security but we will leave it unchanged for this project. note that the default Username and password are:
username:pi
password:raspberry
4-Next window will be connecting the raspberryPi to your WiFi network. select your wifi name and enter your wifi password
5-next, you'll be asked to update the raspberry pi libraries and system files. this step will take a huge amount of time (maybe in hours) but it's a very important step to every time a new raspberry pi is being setup.
6-once the update is done, you'll be asked to restart the system. do that now.
Great work! Now we have an updated system, we still need to do some more stuff to configure the system to work, but now, will begin to use the Linux Command Line.
1-3:Using the Command Line to Set Up Rpi Settings


Once you finish rebooting from the system update, the system will show the user desktop once it's done booting. now if you look at the top left of the screen, you'll find some buttons, A button with raspberryPi Logo which is the Rpi menu button, a globe-shape which is the internet browser, a folders button which is.....folders and finally, a button with a black screen window, which is the most important button in any linux system, The Command line. go ahead and press that button, you'll see a black window popping up.
The command line is how everyone interacts and use the linux system, just like windows has its own command line only in widows we don't need to use it very often. in linux, it's the basic thing every linux user has to learn and master. the command line can be used by....COMMANDS! what you see in the black window is the command-prompt waiting for the command to be written by the user and executed. in this guide we will give all the command that you need to perform this project, so don't worry.
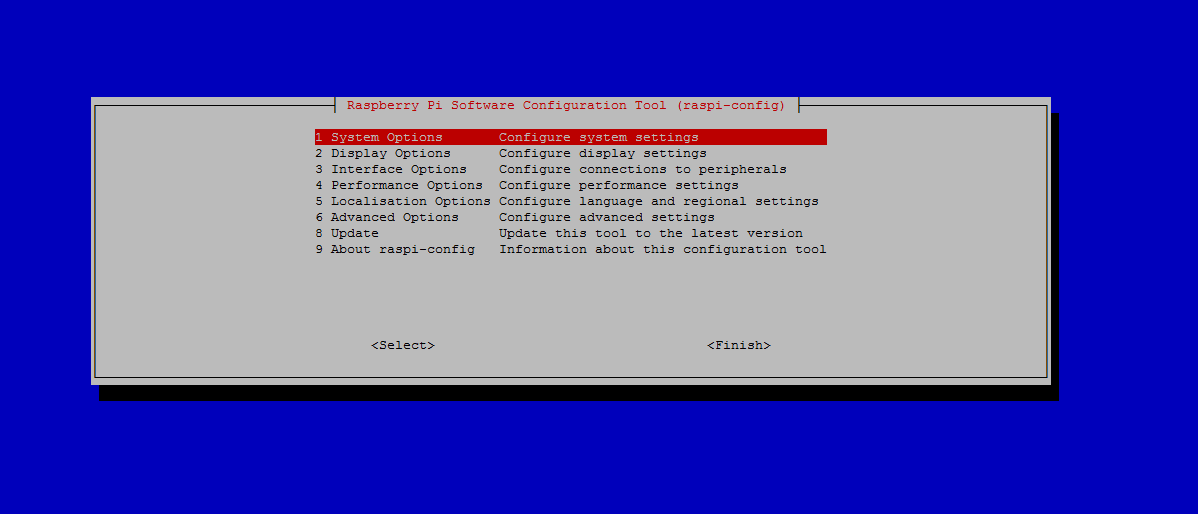
the very first Linux command we're going to use is another configuration command, note that all the commands from now on will be put inside a code box, so you can differentiate it from regular steps. Bring your keyboard and type the following and hit enter:
sudo raspi-config
If you do that correctly, you'll see that the screen turned screen turned blue, with grey little box in the middle (see picture). we will use that to make our final configuration before we start coding.
now, you'll need to use your keyboard arrow keys to navigate this menu.
1-Go to Interface options >> I2C >> YES >> hit enter. this is enable the I2c communication protocol so we can use the RTC
2-Go to Advanced options >> Expand filesystem.
and that's all the configuration that you need from this window. on the main page, go down and press enter on "finish" and "YES" to reboot the system.
Once the system finish rebooting, we're all done configuring! the device is ready for the big steps! The next step will be installing the RTC module and use it with the system.
Chapter 2: Mounting, Configuring and Using the RTC Module


RTC (or Real-Time Clock) module is a small device which has a little battery on it, it does what the name implies to, Clocking! so when you disconnect it to power the clock keeps on working and does not stop. why do we need this? well, the raspberry pi really has no method of storing clock data once it's powered off, it relies on connecting to the internet upon booting to update it's date and time, but the problem is that we don't always have internet access, and this is why we need the RTC module. the RTC will act as a clock for the raspberry pi so once the Rpi is booted it will take the Date & Time from the RTC, that will keep the RaspberryPi time updated all the time.
there are multiple models and looks for the RTC, there are the DS1307 and DS3231. you can use any RTC module that you find as long as it has I2C protocol communication (you can indicate this is you can find SDA and SCL pins on the module pins.
like anything in this guide, I used other guides to achieve my goal in the project, this instructable will guide you and tell you exactly what to do to make this project, but if you need to modify or you need more depth into any of the steps, I'll link the more fruitful guide at the end of each step.
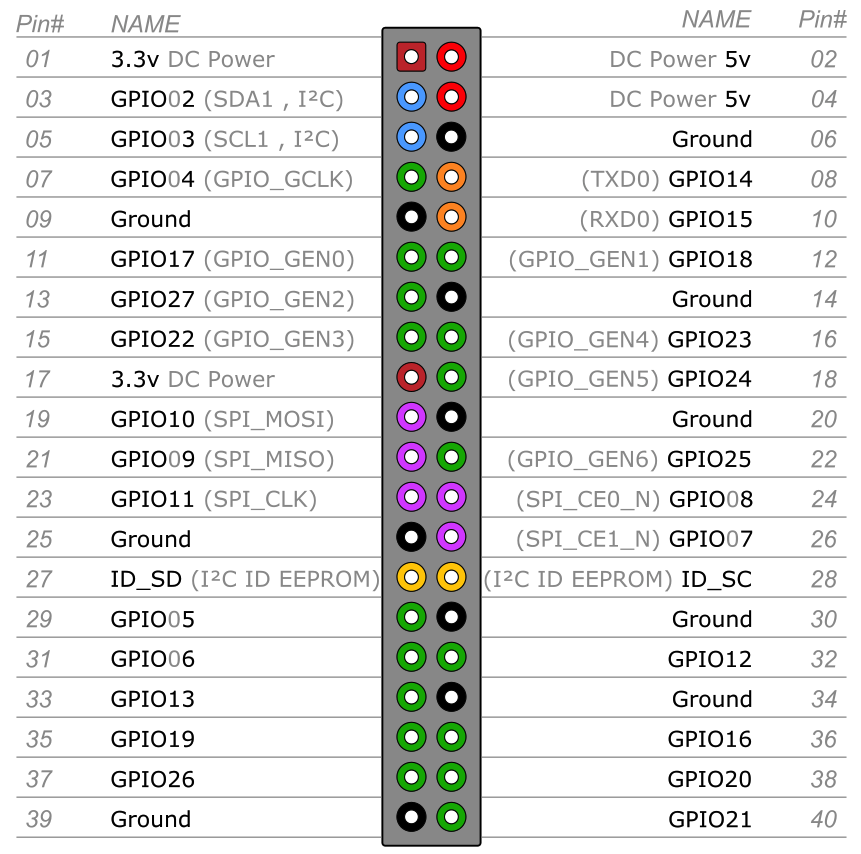
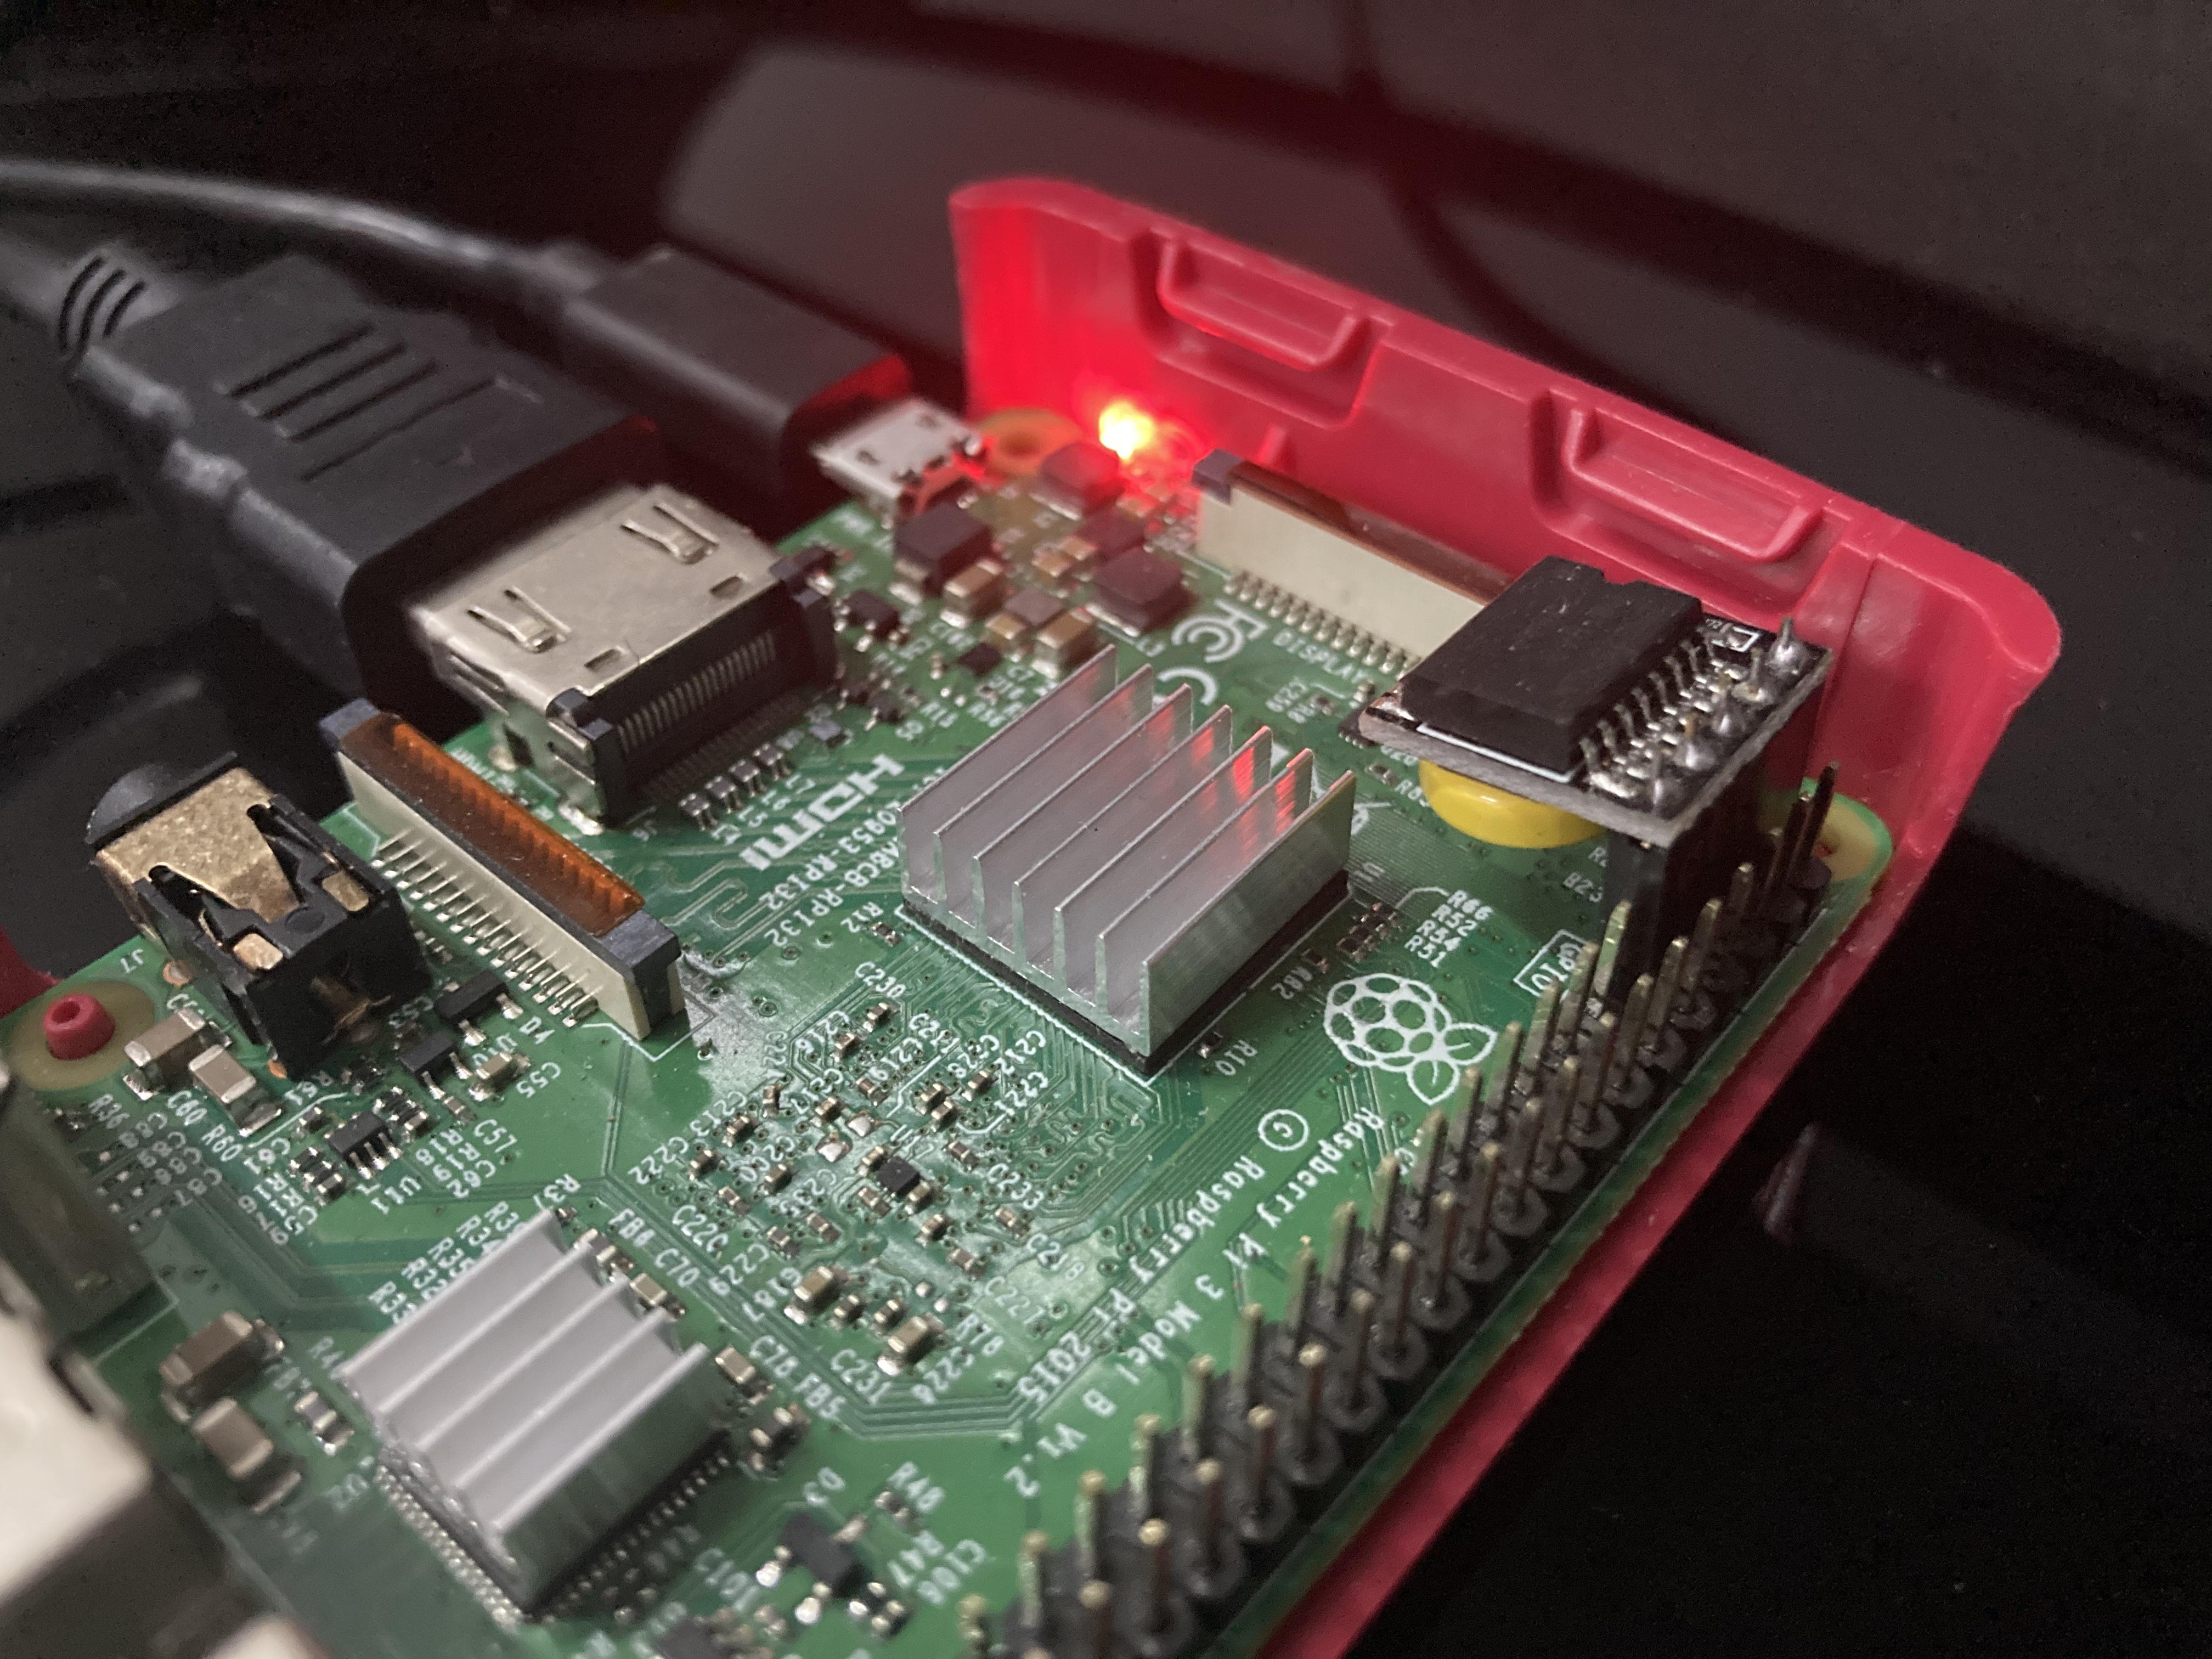
Once you've got your RTC module ready (solder the header pins and put the battery on), you can connect it to the RapberryPi pins as follows:
RTC PIN----------------Rpi Pin
GND===========> PIN 6 (GND)
Vcc============> PIN 1 (3.3V)
SDA===========> PIN 3(SDA)
SCL===========> PIN 5(SCL)
or depending on what RTC module you got, you can mount it directly on the RaspberryPi (Make sure the pins are correct!!! as you might damage the Rpi/RTC if not)
Once you've connected the RTC, let's configure the Raspberry.
2-1: Module Setup
Before starting, go to the command line and type:
date
This will will give back the current date and time on the Raspberry, take note of that very useful command, and note the current date and time so we can check when the module is working or not.
now, let's begin the setup, type the following to update the Rpi libraries, one line at a time:
sudo apt-get update
sudo apt-get -y upgrade
once that's done, we need to modify system files to enable i2c module and add RTC, to modify a file system we're going to use a software called Nano. nano is a light built-in software that is basically a text editor, just like the one in widows. so any command that starts with nano followed by the file name, will open that file in nano text editor. you've noticed that we also used something called Sudo, in short, sudo acts like an assurance for the linux system that tells the system that the user who made that command is the Device owner, not someone else, and give privileges like editing/deleting to the user. for example, if we opened a nano file without sudo, we would be able to view that file, but we can't edit it or delete it.
now, we need to modify the modules file, we can do this by typing:
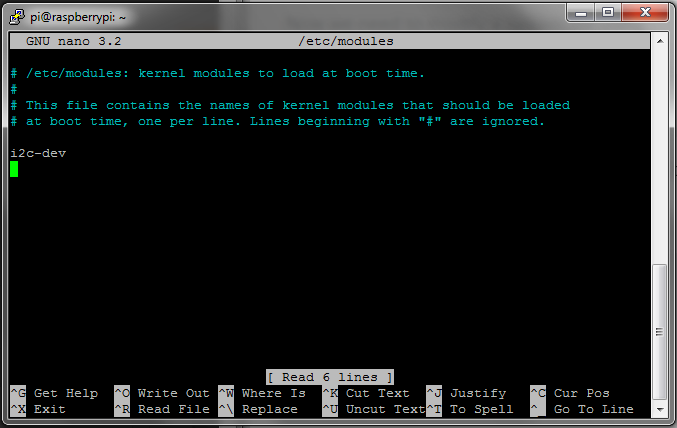
sudo nano /etc/modules
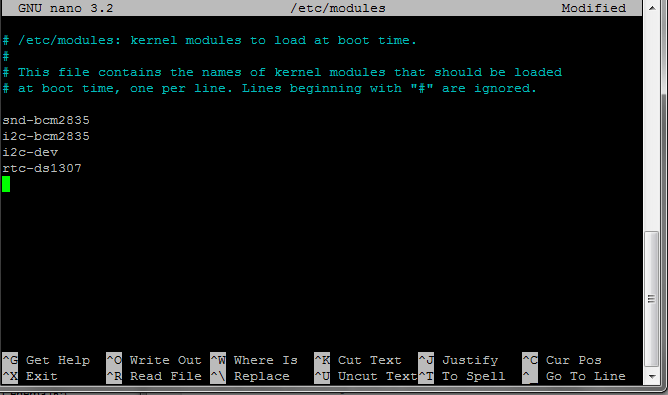
once you do that, you'll find the contents of that file (see pic). use the arrow keys to put the cursor at the end of the text and add the following:
snd-bcm2835
i2c-bcm2835
i2c-dev
rtc-ds1307
press CTRL+S to save, and CTRL+X to exit
2-2: I2C Interface
Now we've connected the RTC and enabled i2c, let's connect everything together.
type the following into command prompt:
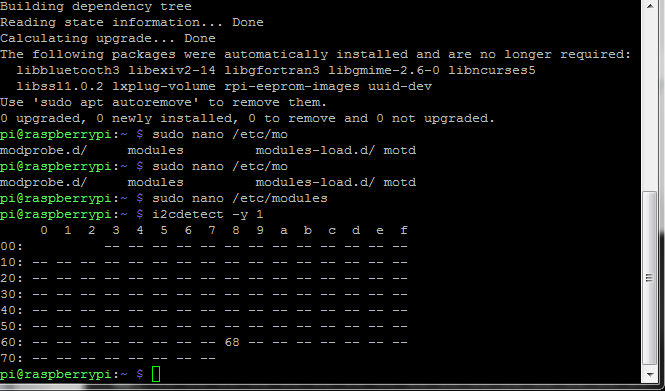
i2cdetect -y 1
you'll be given an array of blanks, but you'll notice that there are a number somewhere, that number is your RTC module address. in my case it's 68. take note of that number. if you don't see that two digit number, that means you're probably connected the RTC wrong.
now, we need to modify the rc.local file so we can enable the RTC module on boot and let it save the date and time to the system. first, open the rc.local file:
sudo nano /etc/rc.local
Before the exit0 line, add the following:
echo ds1307 0x68 > /sys/class/i2c-adapter/i2c-1/new_device
hwclock -s
where 0x68 is your device i2c address. once you're done hit CTRL+S CTRL+X, then reboot your system by:
sudo reboot
2-3: Testing the RTC
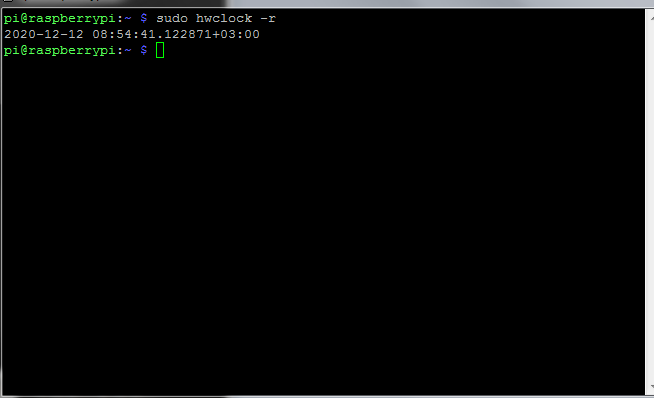
Once the system is rebooted, we can check weather the RTC is working or not. first, run:
sudo hwclock -r
you'll be given back the date and time on the RTC module. if you're given something else, make sure you've done the steps correctly.
now, to modify the time and date on the RTC, we need to modify the Date & Time on the system first, THEN wrtie the modifications to the RTC. to do so, run:
sudo date -s "29 AUG 1997 13:00:00"
and ofcourse, change the date and time acoording to your local time and date, before you hit enter. once you get the time on the Rpi right, run the following to save the date and time on the RTC:
sudo hwclock -w
aaaaand that's it! you can check if it's working by hwclock -r and see if the date on the RTC is correct or not, then disconnect the rpi from internet and then power it off for some time and then power it on again and see if it has the correct time and date. you're done!
Full Guide on how to setup RTC module can be found here
https://www.raspberrypi-spy.co.uk/2015/05/adding-a-ds3231-real-time-clock-to-the-raspberry-pi/
Chapter 3: Making the Azan Alarm Program

making a watch is a one thing, sure, we can look at the clock and the prayer times and see when the time comes, but wouldn't be even WAY better if we could add a sound alarm to notify us about the prayer times? EVEN BETTER, we make that alarm as the sound of AZAN! let's see how we can accomplish this.
for our programming, we're going to use python as our prefered programming language as python goes perfect with RaspberryPi. to make a code file in python, we do the same as openning a text file, but now we save it as .py. to run the program, we need python environment installed of the raspbery, luckily, Raspbian comes with python and python3 pre installed! so all we have to do is programming. in this guide, we will not talk about the language and teach how it works and the functions, but I will give you the necessary codes so you can make the project.
to start, we need a sound file of our prefered azan sound (in .WAV) we need two files, one for al-fajr azan and another for regular azan. once you get that put it on a stick drive and copy it on the desktop of the raspberrypi.
now we have the files, I was looking for a way to play sound audios on the raspberryPi and to my surprise, there wasn't much ways we I could do this, but I found this answer on stackoverflow that gave me what I needed
https://stackoverflow.com/questions/20021457/playi...
i tested that method and it worked! so lets see how we can implement this method in our project...
3-1: Let's Play a Sound!
first, navigate to desktop by:
cd Desktop
then make a new python code file by:
sudo nano AzanPlay.py
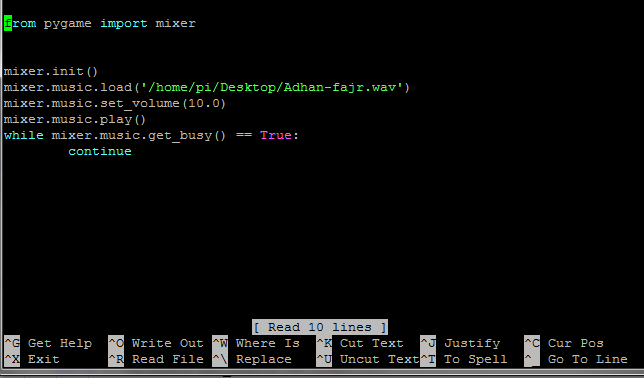
this will make a new file called AzanPlay with the extension on a python file .py, we will have an empty black screen to allow us to write our code. simply write down these lines (be careful not to change any indentation or spaces, as this is EXTREMELY important in python):
from pygame import mixer


mixer.init()
mixer.music.load('/home/pi/Desktop/Adhan-Makkah.wav')
mixer.music.play()
while mixer.music.get_busy() == True:
	continue
Where /Desktop/ is where you put your sound files in, and 'Adhan-Makkah.wav' is my Audio file, which is the Azan sound recording in makkah.
now to test our code, we run it with python by typing:
python AzanPlay.py
and you'll have the sound playing wither from your HDMI LCD or your AUX port that's on the Raspberrypi. if you don't hear it from the LCD speakers, plug a headphone into the AUX and check.
3-2: Get Prayer Times
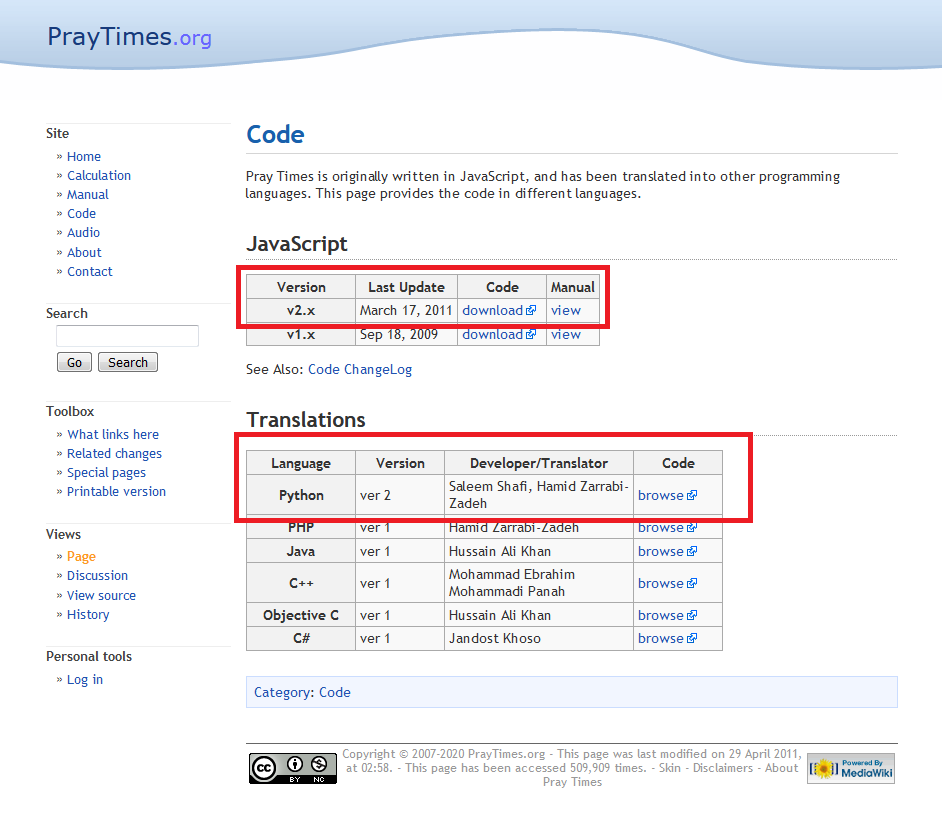
As we know, prayer times differ from one place on earth to another, and even for a specific location, it differs through the years, that means we need to find a way to keep our prayer times in the system updated all the time, and for that we need specific and very complex functions and calculations in order to get it right. Fortunately, our brother Hamid Zarrabi-Zadeh has made all the functions we need into one function that we can use easily to get the time depending on our location and current time, AMAZING! you can find the library and source files at
So, we're going to use these awesome files to get our prayer times and implement it in the system. first, download the codes from the website and put it inside an /adhan/ folder, (We need both the JS and Python codes).
now, lets head to that folder and test the library, and what it can do:
cd adhan
there, we need to make a new test file in python so we can test the function:
sudo nano testAd.py
inside, write down this code:
import praytimes
from datetime import date
tmm = praytimes.PrayTimes().getTimes(date.today(),[LONGTITUDE,LATITUDE],GMT)
print(tmm)
Before saving the file, you need to change LATITUDE with your location Latitude, same with LONGTITUDE, and change GMT to your time zone. in my case, it will be:
tmm = praytimes.PrayTimes().getTimes(date.today(),[21.3236,39.1022],3)
print(tmm)
Finally, CTRL-S and CTRL-X and then run the code:
python testAd.py
finally, you'll be given back your prayer times for today, for your location.
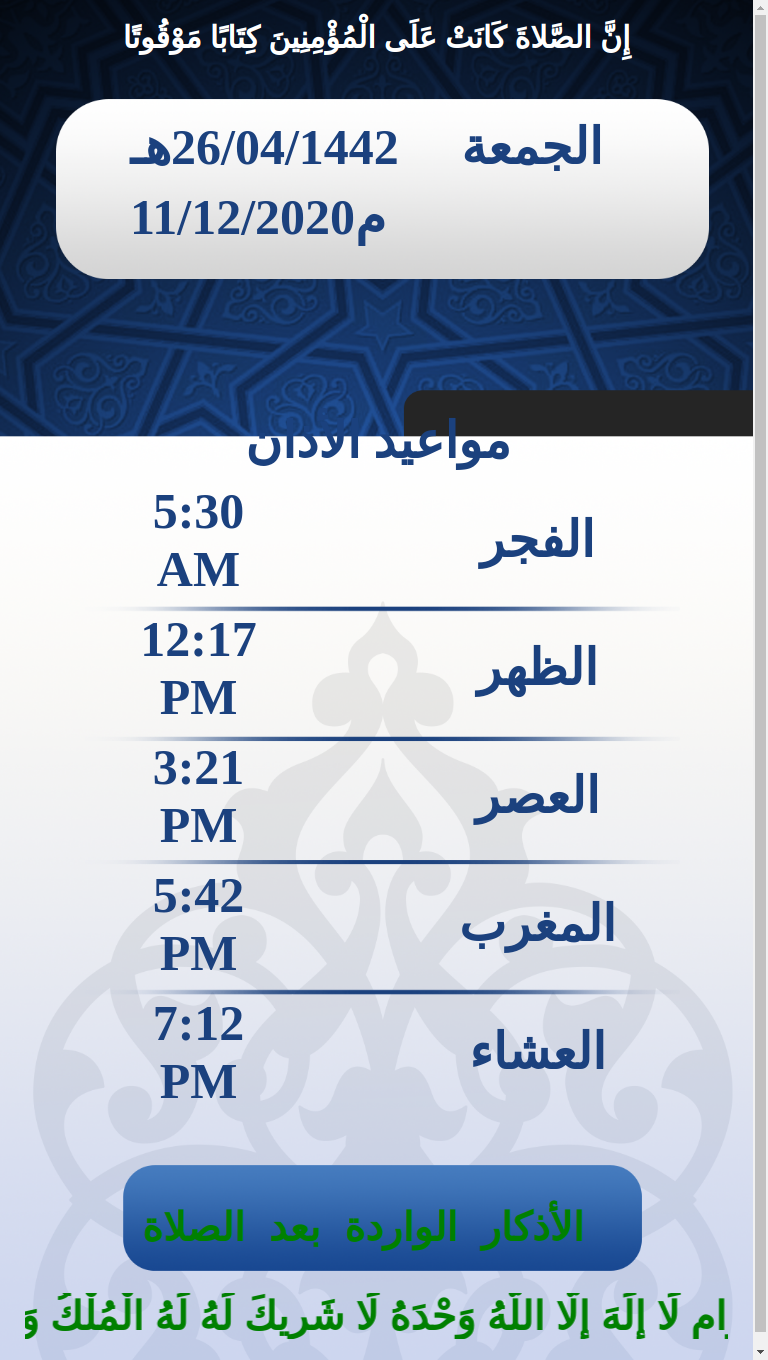
{'isha': '18:58', 'asr': '15:22', 'sunset': '17:43', 'dhuhr': '12:17', 'maghrib': '17:43', 'imsak': '05:23', 'midnight': '00:17', 'sunrise': '06:52', 'fajr': '05:33'}Great! now that we've got our prayer time and we now know how to play sounds, let's merge these two codes together into one main code.
3-3: Making the Final Azan Alarm Code
by finishing the previous two codes, we learned how to get the accurate prayer times according to our location and how to play the Azan sound. now, we're going to merge thse two codes into one code that we're going to use as our final project, and this code will be working on the background, as when the Azan time comes, it will play the Azan sound.
I've wrote the whole code, you can copy it and paste it, and make your own changes as you see fit. The code is:
import time
from pygame import mixer
import string
import praytimes
from datetime import date

while (1):

        tmm = praytimes.PrayTimes().getTimes(date.today(),[21.3236,39.1022],3)
        FAJR=tmm['fajr']
        DHUHR=tmm['dhuhr']
        ASR=tmm['asr']
        MAGHRIB=tmm['maghrib']
        ISHA=tmm['isha']


        tempT= time.strftime(str('%H'))
        currTime= tempT
        tempT= time.strftime(str('%M'))
        currTime= currTime +':'+ tempT
        if currTime == FAJR:
                mixer.init()
                mixer.music.load('/home/pi/Desktop/Adhan-fajr.wav')
                mixer.music.play()
                while mixer.music.get_busy() == True:
                        continue
        if currTime == DHUHR:
                mixer.init()
                mixer.music.load('/home/pi/Desktop/Adhan-Makkah.wav')
                mixer.music.play()
                while mixer.music.get_busy() == True:
                        continue
        if currTime == ASR:
                mixer.init()
                mixer.music.load('/home/pi/Desktop/Adhan-Makkah.wav')
                mixer.music.play()
                while mixer.music.get_busy() == True:
                        continue
        if currTime == MAGHRIB:
                mixer.init()
                mixer.music.load('/home/pi/Desktop/Adhan-Makkah.wav')
                mixer.music.play()
                while mixer.music.get_busy() == True:
                        continue
        if currTime == ISHA:
 		mixer.init()
		mixer.music.load('/home/pi/Desktop/Adhan-Makkah.wav')
                mixer.music.play()
		while mixer.music.get_busy() == True:
                        continue
If you look at the code and compare it to what we made previously, you'll see that we did nothing much new, at first, we included our needed libraries and then we opened an infinite loop. in the loop, we constantly calculating the prayers time with our location and time zone, and storing the whole result in variable tmm. then, we store each prayer time from tmm to an independent variable. that will allow us to compare times. next, we take the system time and store it in an independent variable. lastly, we keep comparing the system time with the prayer times, if the system time matches any of the prayer times, it will play the Azan sound.
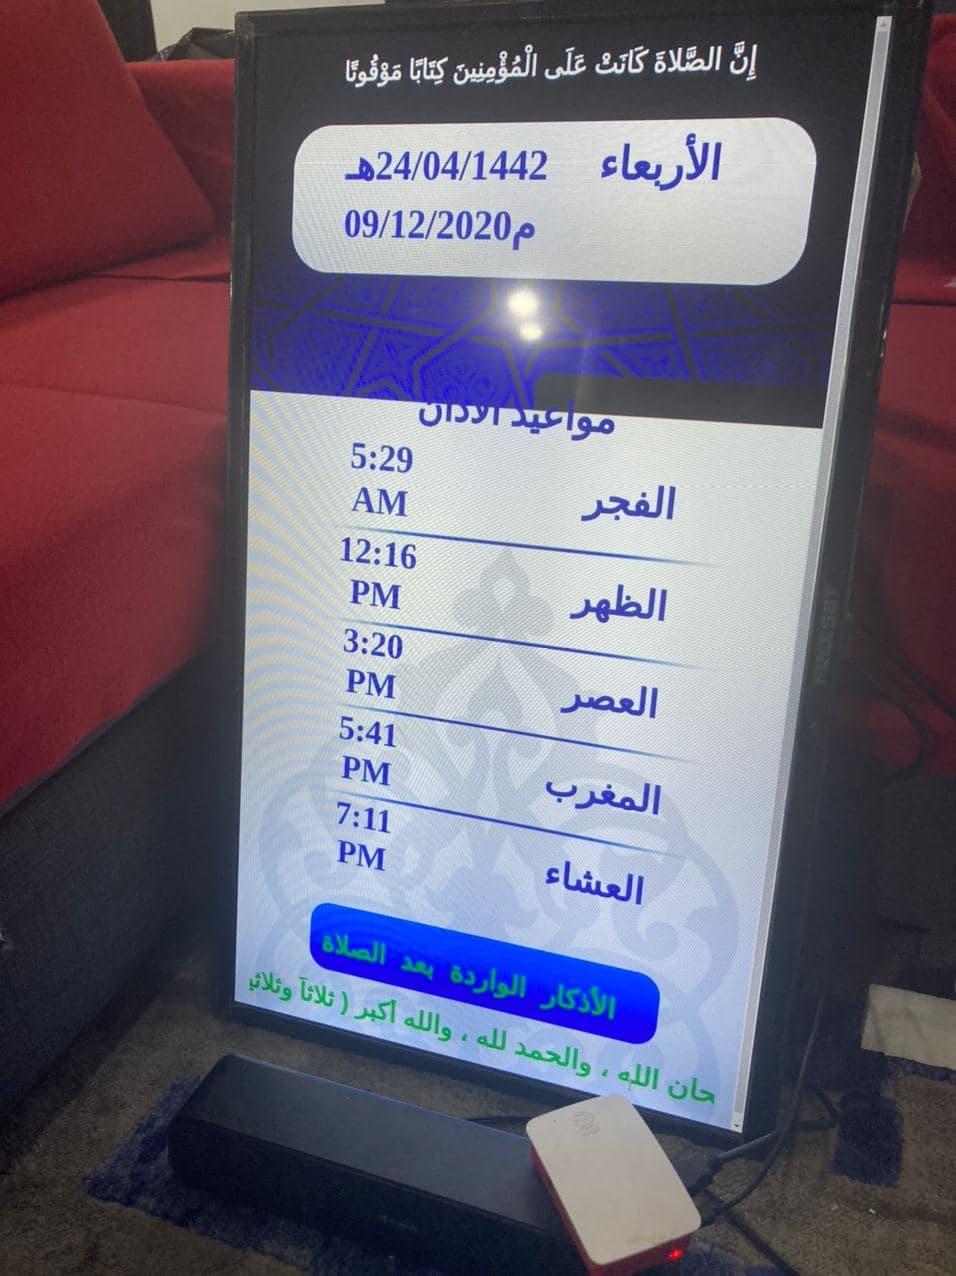
Chapter 4: Implementing the Watch Faces


To make the project looks better, I had the idea of adding watch faces to the LCD, so it looks nice looking to the user (well, better than the command line at least) so, I have hired a designer to design multiple faces to the watch, it should be empty with no data, as the data should be added through HTML, making the watch designs as background, and the other data such as prayer times could be added as HTML elements on top of the background.
Unfortunately, as of the time of writing this instruct able, my knowledge and experience in HTML is very limited so I won't be discussing much details because I lknow for a fact that I will things in a wrong way, and I don't want to confuse people. but if you have even a slight experience in JS and HTML you should know how to continue from this point. so far I have made a single face (the blue one). the plan is to make 14 watch faces! 7 faces for everyday of the week, and another 7 as another theme. as the first theme is supposed to be with Azkar rolling, and the other theme is supposed to have Islamic GIFS instead of the Azkar. regardless, I'll include all the designs in this instructable so you can download it.
Chapter5: Implementing a User Interface
In the last chapter of our journey, we will make some optional modifications to make the project even user friendly, in case we want to implement the project in a mosque or any public place. as we said before, each city has it's own timing for the prayers, and to make this project access for a wider verity of people, we will make a user interface so we can select our wanted city and theme once we power on the project.
To do this, we're going to use a python GUI library called "TKinter".
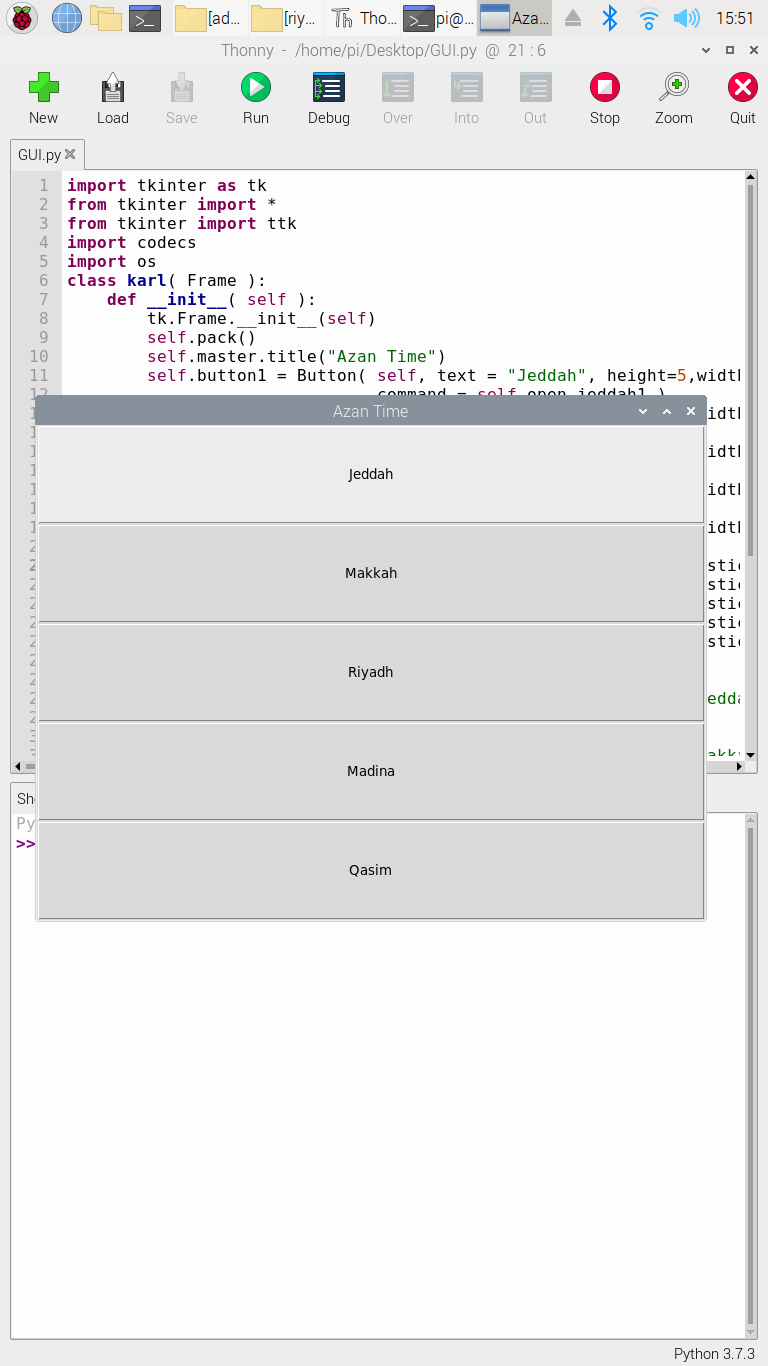
This is the code that I have implemented to give me the choice to choose between five cities in Saudi Arabia, including Makkah:
import tkinter as tk
from tkinter import *
from tkinter import ttk
import codecs
import os
class karl( Frame ):
    def __init__( self ):
        tk.Frame.__init__(self)
        self.pack()
        self.master.title("Azan Time")
        self.button1 = Button( self, text = "Jeddah", height=5,width = 80,
                               command = self.open_jeddah1 )
        self.button2 = Button( self, text = "Makkah", height=5,width = 80,
                               command = self.open_makkah1 )
        self.button3 = Button( self, text = "Riyadh", height=5,width = 80,
                               command = self.open_riyadh1 )
        self.button4 = Button( self, text = "Madina", height=5,width = 80,
                               command = self.open_madina1 )
        self.button5 = Button( self, text = "Qasim", height=5, width = 80,
                               command = self.open_qasaim1 )
        self.button1.grid( row = 0, column = 1, columnspan = 2, sticky = W+E+N+S )
        self.button2.grid( row = 1, column = 1, columnspan = 2, sticky = W+E+N+S )
        self.button3.grid( row = 2, column = 1, columnspan = 2, sticky = W+E+N+S )
        self.button4.grid( row = 3, column = 1, columnspan = 2, sticky = W+E+N+S )
        self.button5.grid( row = 4, column = 1, columnspan = 2, sticky = W+E+N+S )
    def open_jeddah1(self):
        order = "sudo chromium-browser /home/pi/Desktop/Cities/jeddah/Sunday1.html --start-fullscreen --no-sandbox "
        os.system(order)
    def open_makkah1(self):
        order = "sudo chromium-browser /home/pi/Desktop/Cities/makkah/Sunday1.html --start-fullscreen --no-sandbox -test-type "
        os.system(order)
    def open_riyadh1(self):
        order = "sudo chromium-browser /home/pi/Desktop/Cities/riyadh/Sunday1.html --start-fullscreen --no-sandbox -test-type "
        os.system(order)
    def open_madina1(self):
        order = "sudo chromium-browser /home/pi/Desktop/Cities/madina/Sunday1.html --start-fullscreen --no-sandbox -test-type "
        os.system(order)
    def open_qasaim1(self):
        order = "sudo chromium-browser /home/pi/Desktop/Cities/qasaim/Sunday1.html --start-fullscreen --no-sandbox -test-type "
        os.system(order)
def main():
    karl().mainloop()
if __name__ == '__main__':
    main()
The code might look big, but editing it is very easy. we basically made a new window, put five names buttons and defined five funcions to be called upon each button press. once you press the button, the program will open the corresponding HTML file in the Cities folder, which each city HTML has the city coordinates when it gets the time from praytimes(). once you press the button, the python code will excute a linux code in which it will open the HTML file using the chromium browser, and you'll have the watch face ready to display, with full screen option on.
(Optional): Adding a Speaker Switch


As we saw, when the prayer time comes the Azan sound play, and the sound comes out of the default sound output (HDMI or AV output) and since we are putting it on HDMI output, the sound will come from the LCD. but, what if our LCD sound isn't enough? for example, what if we want to implement this inside a real mosque? with wide outside speakers? then we can add one more VERY easy step to accomplish that. for an already build speaker sound system, we only need to turn it ON and OFF, and take the already existing microphone and put it next to the LCD speakers.
Doing so is easy. we will use the pre-existing mosque microphone that's connected to the loud speaker, we will just need the raspberryPi to control the power that switch the whole sound system ON and OFF. to do so, we're going to need to use an SSR: SOLID STATE RELAY. these types of relays can acts as a switch, much like the average blue relay, the difference is SSRs could withstand a large amount of AC Amperage through it, which is not applicable in the blue ones (usually max 10A), and the SSRs needs only two wires instead of 3: DC+ and DC- and that's it! on the other end of the SSR we can connect the speaker system power cable, that way, when we give voltage to the SSR, it will close the AC circuit of the speaker system, or we shut down the voltage to make an open circuit, turning off the speakers.
there's one catch tho, the RaspberryPi pins outputs 3.3v, not 5v that we need to control the SSR. so we need a transistor to take the signal from the RPi pin, and 5V from the RPi 5v pin. to do so we need:
1-Solid State Relay (anything above 25A is good)
2-2n2222 npn transistor
3-220ohm resistor
follow the fritzing circuit for connection.
now in the code, we will add some stuff that makes this work. first, before the while loop, we'll add some lines to initialize the GPIO pins:
In the import section, add:
import RPi.GPIO as GPIO
Before the while loop, add:
GPIO.setmode(GPIO.BOARD)<br>GPIO.setwarnings(False)
relay = 40
GPIO.setup(ledPin, GPIO.OUT)
Now, in the while loop, for every play Azan command, we need to turn on the relay, wait for 10 seconds, finish the playing the Azan and then turn off the relay. we only need to add two lines, the first one is:
GPIO.output(ledPin, GPIO.HIGH)
time.sleep(10)
this one should be added after every if statement (IDENTATION IS IMPORTANT!), the other line is:
GPIO.output(ledPin, GPIO.LOW)
This one should be added after the "continue" line. it should look like this for every Azan time:
	        if currTime == FAJR:
		GPIO.output(ledPin, GPIO.HIGH)
                time.sleep(10)
                mixer.init()
                mixer.music.load('/home/pi/Desktop/Adhan-fajr.wav')
                mixer.music.play()
                while mixer.music.get_busy() == True:
                        continue
		GPIO.output(ledPin, GPIO.LOW)
Do this for every Azan time. this should make it such that whenever the time is prayer time, it will turn on the relay, wait 10 seconds, play the Azan (on speakers) and after it finish the Azan it will turn off. simple as that! Save your file and run the program and you'll have your project fully done!