Raspberry Pi TV

In this Instructable you will learn how to use a TV tuner USB and the incredible Raspberry Pi. The reason I created this setup is because I have been using KODI for a few years now and I am ready to make the quantum leap into turning my over the air TV stations into an PiTV setup for all my devices. Also I am sick of different TVs not getting the same channels and the PVR(Personal Video Recorder) ability is nice too.
Recommended Equipment:
- Raspberry Pi 3
- 5V 2.5A Power Supply adapter LINK(ebay) NOTE: Most have a high AMP power supply since the tuner card will use a lot of energy.
- Hauppauge-WinTV-HVR-Hybrid-TV-Stick-950Q LINK(ebay) (if you want to view more than one channel at a time by more tuners)
Recommended Software:
- OSMC (Operating System) - OSMC is KODI on top of a Debian OS assuming built on top of Raspbian. Side Note: You can use Raspbian without OSMC. Raspbian is Raspberry Pi's native OS but that would be if you only want to use this setup as a Backend without a GUI. Think of Raspbian as the vanilla install.
- Tvheadend - TV streaming server and recorder for Linux.
WinRAR - archive manager.
SD Card Formatter by sdcard.org. This formats a SD correctly.
Win32 Disk Imager - This program is designed to write a raw disk image to a removable device or backup a removable device to a raw image file.
PuTTY - PuTTY is an SSH and telnet client.
Download/Install Tools/Flash Image to SD
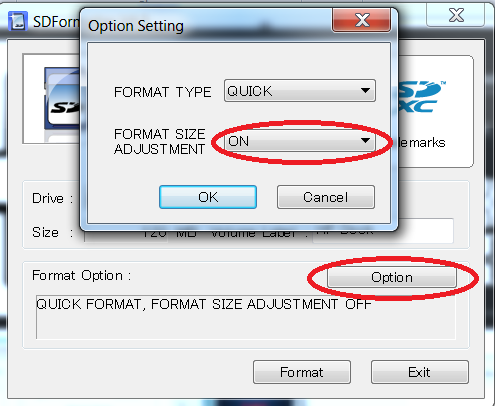
First we will need to make sure your SD card is cleaned so we will need to use a SD Card formater.
Go to sdcard.org and download the program called, "SD Card Formatter." Run the installer and open the program. Insert your SD card, select the SD card and press Option then for Format Type chose, "Full" not quick and turn on Format Size Adjustment. Then click Format. The reason we are using the format adjustment is because Windows can't see Linux partitions. This is a safe steps for a good fresh install. Also Format type full this will remove all the data not just the headers of the SD.
Downloading the OSMC img file. Go to https://osmc.tv/download/ scroll down look for, "Disk images" button. and for the Raspberry Pi 3 image. Current image 2017.04-1 HASH 00fd63eb62f65d53e5f6a2ec4d45dee7
You should get something like OSMC_TGT_rbp2_20170504.img.gz you will need to extract the IMG file. To do this you will need WinRar.
You can download WinRAR from many sources, I usually like to get them from the site publisher’s site rarlab.com. click download and install For more info try http://www.newsgroupreviews.com/winrar-installation.html
Now, with WinRar Installed go back to your downloaded file and extract the IMG file. remember where you saved it.
Go to https://sourceforge.net/projects/win32diskimager/ click download and install. Run the installer and open the Win32DiskImager utility; you may need to run this as administrator. Right-click on the file, and select Run as administrator. Select the image file you extracted earlier. Select the drive letter of the SD card in the device box. Be careful to select the correct drive; if you get the wrong one you can destroy the data on your computer's hard disk! If you are using an SD card slot in your computer and can't see the drive in the Win32DiskImager window, try using an external SD adapter. Click Write and wait for the write to complete. Exit the Win32DiskImager and eject the SD card.Boot your Pi using the SD card.
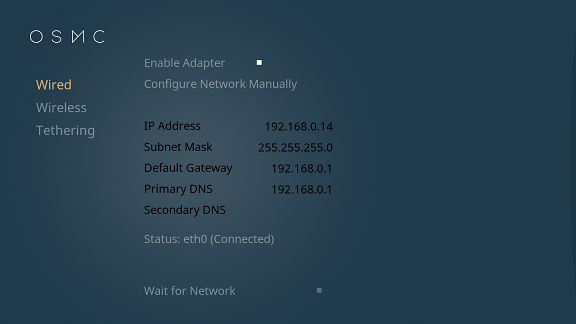
As part of the OSMC installer you can specify networking options and as part of the first boot the system will attempt to configure it. You will need the IP. By default both wired and wireless connection will default to DHCP configuration. Note you must turn on SSH. OSMC will ask you if you want to enable SSH on the first boot.
Go to https://www.chiark.greenend.org.uk/~sgtatham/putty/latest.html click download and install. Run the installer and open the PuTTY utility. You will need to be on the same network as the Pi. With the IP of your OSMC log in withthe info below.
USER: osmc
PASS: osmc
You are now at a Linux terminal prompt. The first thing to most Linux projects like this is become current. AKA get updated.
Type "sudo apt-get update" hit enter
From this point on I am going to use >COMMAND when referencing The Linux terminal prompt. AKA your PuTTY session.
example: >ifconfig Just type "ifconfig" then hit enter. the result should be your networking information.
Tuner Driver/firmware Setup
First you must have a device that will work in your area. If you are in the US such as me, you must have a device that can handle ATSC a set of standards related to digital TV. Remember when TVs went to digital years ago....
Plug in your USB TV Tuner. If you do not plug in your tuner last it will be harder to view your device in the logs.
So lets look at the logs or messages. We need to look at the dmesg and find the tuner device.
>dmesg
Since I own a Hauppauge USB Tuner. I can grep for Hauppauge.
>dmesg | grep -i Hauppauge
OUTPUT:
[ 2.710895] usb 1-1.5: Manufacturer: Hauppauge
[ 6.441623] tveeprom 3-0050: Hauppauge model 72001, rev B3F0, serial# 4034574834 [ 7.389218] input: au0828 IR (Hauppauge HVR950Q) as /devices/platform/soc/3f980000.usb/usb1/1-1/1-1.5/rc/rc0/input0 [ 7.390578] rc rc0: au0828 IR (Hauppauge HVR950Q) as /devices/platform/soc/3f980000.usb/usb1/1-1/1-1.5/rc/rc0 [ 7.458826] au0828: Remote controller au0828 IR (Hauppauge HVR950Q) initalized [ 7.458833] au0828: Registered device AU0828 [Hauppauge HVR950Q]
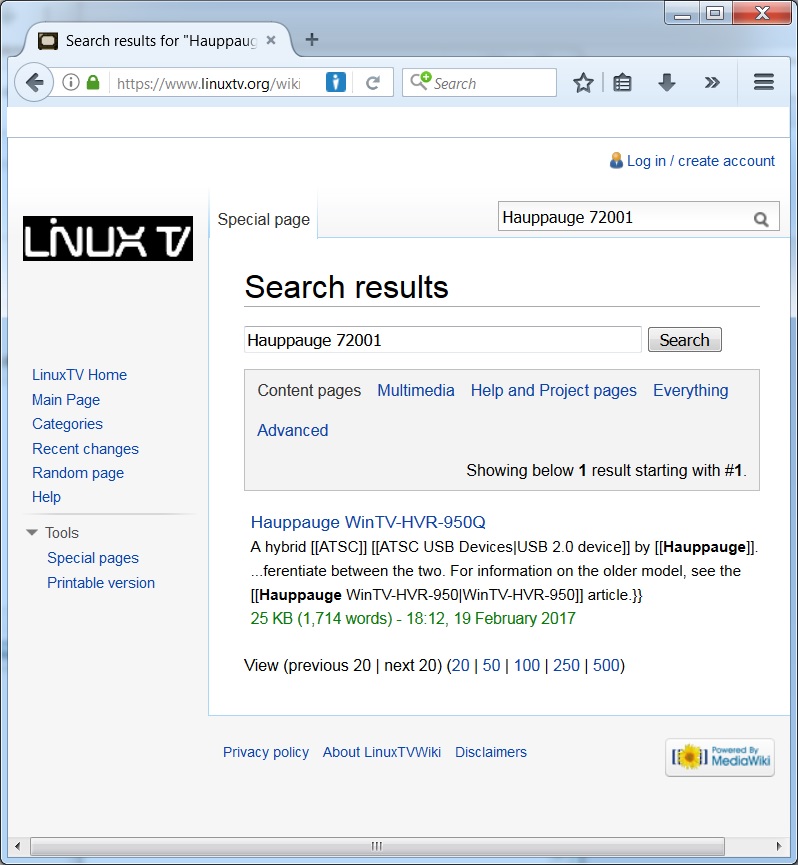
Look for your model of the device. Mine is 72001. Go to https://www.linuxtv.org/wiki/index.php search for your device. My search parameters was, "Hauppauge 72001".
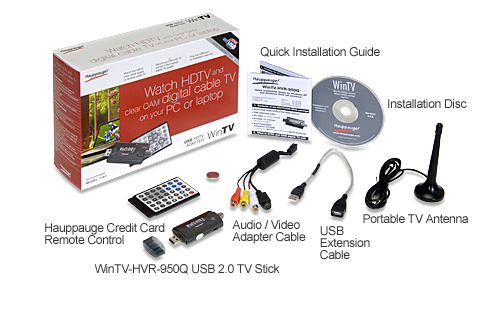
Here is the crazy part about this device. The unit packaged as a "WinTV HVR 950Q, model 1176" So the text on the device doesn't match what the dmesg shows. LABELS LIE!!!!! I am sure it's a marketing thing. Why change the hardware when you can just change the label and people will think it's new.
So now since we have matched the device and the LinuxTV driver we need to load the driver into the OS. These steps are only for this device your firmware commands will be different since you might not have the same device.
#Goes to the home directory.
>cd ~
#downloading the driver from kernellabs using wget.
>sudo wget http://www.kernellabs.com/firmware/xc5000/dvb-fe-...
#Loads the driver/firmware into the OS using a move command.
>sudo mv dvb-fe-xc5000-1.6.114.fw /lib/firmware/
#reboots the Pi
>init 6
Kernel 2.6.31 firmware issues
When running this kernel version, loading of the firmware takes very long, and prevents SOFTWARE from working properly. To deal with this problem you can use xc5000's no_poweroff=1 module option, to prevent the device from sleeping (after which firmware has to be reloaded)
To view your setting:
>cat /sys/module/xc5000/parameters/no_poweroff
0 # <--- default is automatic poweroff enabled
To turn on no power.
echo -n 1 > /sys/module/xc5000/parameters/no_poweroff
>cat /sys/module/xc5000/parameters/no_poweroff
1 # <--- poweroff is now disabled
Build/install Tvheadend Server
We could make this hard and have to build/make the Tvheadend Server and it would take hours but it looks like thanks to Jonathan Thomson. He has setup a BuildBot script that updates Bintray within 24 hours of the main branch of Tvheadend code being added to Github.
Lets setup the update repository.
#View your repository source list.
>cat /etc/apt/sources.list
#Make a backup of your current sources.list
>sudo cat /etc/apt/sources.list > sources.list.bkup
#we are echoing text, that contains stable release information of Jonathan Thomson build of Tvheadend into the sources.list
>sudo echo "deb https://dl.bintray.com/djbenson/deb wheezy stable (for the stable wheezy branch)" >>/etc/apt/sources.list
#we are echoing text, that contains unstable release information of Jonathan Thomson build of Tvheadend into the sources.list
>sudo echo "deb https://dl.bintray.com/djbenson/deb wheezy unstable (for the unstable/nightly wheezy branch)" >>/etc/apt/sources.list
NOTE: Remember, even if you are running Jessie, you MUST add the wheezy repository to get the builds. Jonathan Thomson will move to Jessie at some point but for now wheezy builds work fine on Jessie and cover the two most used Raspberry Pi operating systems in use at the moment.
#The following may be necessary on a clean Debian install (thanks to Mike Somerville for this tip)
>sudo apt-key adv --keyserver hkp://keyserver.ubuntu.com:80 --recv-keys 379CE192D401AB61
#lets let the updates from Jonathan Thomson repository
>sudo apt-get update
#Lets install the Tvheadend Server
>sudo apt-get install tvheadend
If everything is working you should see the process running. To check run command below.
>ps -ef|grep -i Tvheadend|grep -va "grep"
OUTPUT:
hts 506 1 0 Jun13 ? 00:04:07 /usr/bin/tvheadend -f -u hts -g video
#If tvheadend doesn't install well such as Jonathan Thomson repository isn't working.
#use these Dependencies
>sudo apt-get -y install zlib1g
>sudo apt-get -y install libc6
>sudo apt-get -y install libssl1.0.0
>sudo apt-get -y install libdbus-1-3
>sudo apt-get -y install liburiparser1
>sudo apt-get -y install libavahi-common3
>sudo apt-get -y install libavahi-client3
#install git
>sudo apt-get -y install git
#Download .deb packages from github.
>git clone https://github.com/VeggieVampire/rpitv
>cd rpitv
#install packages manually
>sudo dpkg -i tvheadend_4.1-2426~gef89ef8_armhf.deb
>sudo apt-get --install tvheadend_4.1-2426~gef89ef8_armhf.deb
>sudo apt-get --install -f
#lThis is how to ist if tvheadend package is installed
>sudo dpkg -l tvheadend
#Check if Tvheadend is running
>ps -ef|grep -i Tvheadend|grep -va "grep"
OUTPUT: hts 506 1 0 Jun13 ? 00:04:07 /usr/bin/tvheadend -f -u hts -g video
Configure Tvheadend Server
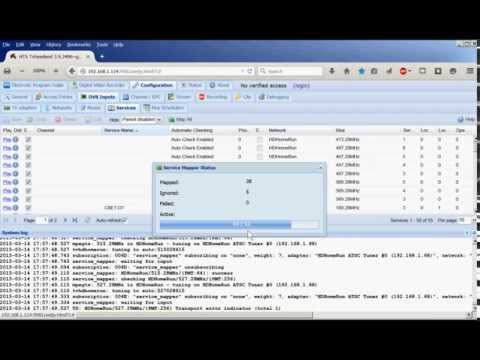
At this point you should have TVheadend server setup and all we have to do is configure it. Use the OSMC IP that you connected too with Putty for "YOUIPAdd"
1. (OSMC) SYSTEM-->Settings-->Add-ons-->Get
Add-ons-->All Add-ons-->Program Add-ons-->hdhomerun-->Install
2. (OSMC) SYSTEM-->Settings-->Add-ons-->Get Add-ons-->All Add-ons-->Program Add-ons-->hdhomerun-->Configure-->Tuner settings-->Refresh tuners...(press me) - this should detect your tuners, if it dosn't you need to resolve this issue before continuing.
3. (OSMC) SYSTEM-->Settings-->Add-ons-->Get Add-ons-->All Add-ons-->Services-->tvheadend-->Install
4. (OSMC) SYSTEM-->System info-->Summary-->IP address - write this number down, it will be YouIPAdd in the next step
5. (WIN) Open Web Browser (Firefox or Chrome) and go to http://YouIPAdd:9981
6.* (WIN) Configuration-->DVB Inputs-->Networks-->Add-->ATSC Network
A. Network Name = OTA
B. uncheck skip initial scan
C. Pre-defined Muxes = United States: us-ATSC-center-frequencies-8VSB
D. leave all other settings at the defaults
E. click Create
7.* (WIN) Configuration-->DVB Inputs-->TV adapters-->HDHomeRun(MAC address) -
A. Network Type = ATSC
B. Save
8.* (WIN) Configuration-->DVB Inputs-->TV adapters-->HDHomeRun(MAC address) - -->HDHomeRun ATSC Tuner #0 ()
A. check Enabled
B. Networks = OTA
C. leave all other settings at the defaults
D. click save
9. (WIN) repeat step 7 if you have additional tuners to configure in the same physical HDHomeRun device (i.e. HDHomeRun ATSC Tuner #1, HDHomeRun ATSC Tuner #2)
10. (OSMC) reboot OSMC and wait a minute for all services to load in the background
11. (WIN) Open IE (Internet Explorer) and go to http://YouIPAdd:9981
12. (WIN) Configuration-->DVB Inputs-->Networks
A. look at Muxes - this is the number of "feeds" your tuner currently knows about
B. look at Scan Q length - this number needs to reach 0 before tvheadend had scanned and determined what is available and useable for each Mux
1. in my experience 1 scan at 1 point in time in not enough to get every available channel. I personally would wait an hour or two and then repeat steps 9 - 11 a
couple of times. This would take a few hours but will be much easier than trying to fix missing channels later (trust me, I went down this wrong road many times).
13. (WIN) Configuration-->DVB Inputs-->Networks-->OTA-->check Skip Inital Scan
A. this will prevent any additional Mux discovery in the future
B. if you don't do this step channels will take a while to be available after every OSMC reboot before they can record when you get in to the DVR pieces
14. (WIN) Configuration-->DVB Inputs-->TV adapters-->HDHomeRun(MAC address) - -->HDHomeRun ATSC Tuner #0 ()
A. uncheck Initial Scan
B. leave all other settings at the defaults
C. click save
15. (WIN) repeat step 13 if you have additional tuners to configure in the same physical HDHomeRun device (i.e. HDHomeRun ATSC Tuner #1, HDHomeRun ATSC Tuner #2)
16. (WIN) Configuration-->DVB Inputs-->Serives
A. Hide (drop down) = None
B. Per page (drop down) = All
C. click on Map All
1. check all boxes
2. click Map
3. wait for the progress bar to reach 100% and then click the "x" (this dialog box won't close itself)
17. (OSMC) SYSTEM-->Settings-->Add-ons-->Disabled Add-ons-->Tvheadend HTSP Client-->Enable
18. (OSMC) SYSTEM-->Settings-->Live TV-->General
A. check Enabled
1. you should see an import of the channels
2. if the import was successful a new main menu item will appear called TV
19. (OSMC) TV-->Channels-->
A. you should see live channel on your screen within a second or two depending on your hardware
20. (other machines you want to run the TVheadend Client (frontend) on) repeat steps 17 -19
A. make sure you go to SYSTEM-->Settings-->Add-ons-->Enabled Add-ons-->PVR clients-->Tvheadend HTSP Client-->Configure - to point the frontend to the backend IP address (and port if you changed it)
The Config steps are from http://openelec.tv/forum/79-tvheadend/74150-latest...