Raspberry Pi Robot Controlled Over Bluetooth
by ZRob314 in Circuits > Raspberry Pi
96576 Views, 112 Favorites, 0 Comments
Raspberry Pi Robot Controlled Over Bluetooth

This tutorial is based on a previous Instructable -
Building robots with Raspberry Pi and Python
The aim is to present an example of how to setup a Bluetooth serial connection with Arduino to control a Raspberry Pi robot. But lets take it one step further and add Python to generate sounds based on the commands sent over Bluetooth. So basically we are going to send messages from a Android App over Bluetooth to a Arduino, then relay the messages from Arduino (USB) to the Raspberry PI where Python will play sounds based on those messages. So one example would be to send the robot a command like move forward and have it play some cool robot noises from the Raspberry PI. So lets get started...
Parts List
We are going to use the same parts from this previous tutorial for the robot base. ( Robot base, Raspberry Pi, Arduino Uno, motor driver, battery, etc )
https://www.instructables.com/id/Building-robots-with-Raspberry-Pi-and-Python/
And we are going to add the following parts to the list.
Bluetooth modem http://www.zagrosrobotics.com/shop/item.aspx?itemid=883
Speaker Some type of powered speaker with a 3.5 speaker jack
https://www.instructables.com/id/Building-robots-with-Raspberry-Pi-and-Python/
And we are going to add the following parts to the list.
Bluetooth modem http://www.zagrosrobotics.com/shop/item.aspx?itemid=883
Speaker Some type of powered speaker with a 3.5 speaker jack
Python Installation and Robot Base Setup

Older versions of the Raspbian image have had issues with sound output to the 3.5 speaker jack so it is recommended to install the Noobs v1.2.1 image or later.
NOOBS
There is alot of information on setting up and configuring your Raspbian image here
Python is pre-installed, but we can check our Python version by using the terminal to verify.
Copy and paste in the LXterm
python --version
For the examples we are going to go over it is recommended that you use Python version 2.6.
***If Python is not installed on your system you can use apt-get granted your Raspberry Pi is connected to the Internet.***
Copy and paste in the LXterm
sudo apt-get install python2.6
Also for the examples in this tutorial we need to install some of the the dependent libraries for our scripts to work.
Copy paste in the LXterm
sudo apt-get install python-serial
Also you may or may not have to set the Raspberry Pi's output to the 3.5 audio jack with the command line
Copy paste in the LXterm
amixer cset numid=3 1
Next download the Sound files below then add a folder labeled Sounds to " /home/pi " and add the .wav files to it (Ex. /home/pi/Sounds/forward.wav )
Sound files
Next download and add the following Python script to " /home/pi "
zagbot-bt.py
Now we have to make the python script executable with a chmod command
Copy and paste in LXterm
sudo chmod +x /home/pi/zagbot-bt.py
The program should now be executable. Next download and upload the following sketch with the Arduino IDE 1.0.4 or above to you Arduino Uno.
Arduino Robot Base Sketch
zagbotbt.ino
If you are unfamiliar with Arduino and its IDE you can read up on it here.
Arduino
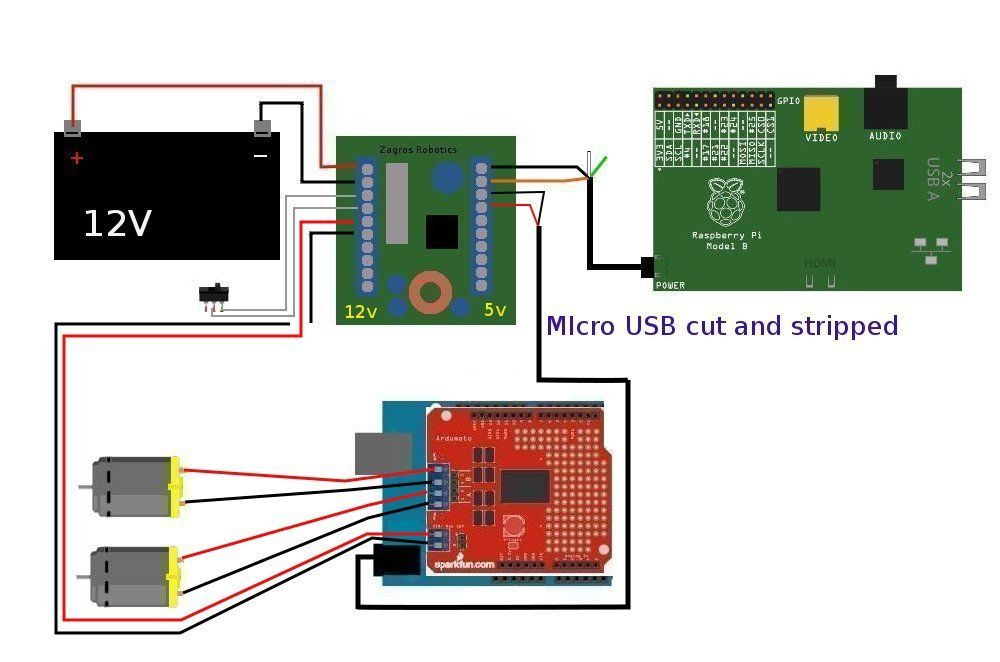
And lastly refer to the wiring diagram above for setting up the power connections to the robot base.
Arduino and Bluetooth Wiring
After you have assembled your robot base, the next step is to wire up your Arduino Uno to the Bluetooth Silvermate. Since we are going to be using the USB port to receive data. We are going to use the software serial library to add another serial line to the Arduino Uno to receive the Bluetooth data. Here is the wiring diagram.
*If your Bluetooth module is different than the one I have suggested refer to documentation, or data sheets that are associated with your Bluetooth module to properly install it.*
Arduino PIN (TX)2 -- Silvermate RX
Arduino PIN (RX)3 -- Silvermate TX
Arduino PIN 5V -- Silvernate VCC
Arduino PIN GND -- Silvernate GND
Silvermate CTS -- Silvermate RTS
Android App

Here is a basic Android app that sends string commands via bluetooth to our Arduino Uno. Of coarse you can always write you own .apk to Incorporate a more advanced interface using your phones accelerometer, or touchscreen using sliders for motor speed and direction. Transfer the .apk to the sd card on your phone or tablet and use an app like ES file explorer to gain access into the SD card and install the .apk.
ES FIle Tutorial -- https://www.youtube.com/watch?v=myOW8YrcSzg
Max_Control App -- https://www.box.com/s/8b06bcee9ec84ec70a72
ES FIle Tutorial -- https://www.youtube.com/watch?v=myOW8YrcSzg
Max_Control App -- https://www.box.com/s/8b06bcee9ec84ec70a72
Testing Our Robot

Now that the hardware and software setup is complete we can test the robot.
Connect all USB and power cables to the robot base, Raspberry Pi, and speaker.
Launch the zagbot-bt.py by double clicking the file or via the command line in LxTerm
Copy and paste into LxTerm
python /home/pi/zagbot-bt.py
*** If you have errors or issues connecting Python to Arduino, you can edit line 7 in zagbot-bt.py "/dev/ttyACM0" to whatever port is assigned to you Arduino. You can check this by going into /dev on your Raspberry Pi, then plugging in your Arduino and checking for any new assigned ports. ***
Next launch the App from your android device
You now should be able to control the robot and hear sounds coming from the Raspberry Pi. Try editing the Python file to add your own sounds or edit the Arduino sketch to change the control .
Conclusion
Hopefully you were able to connect your Raspberry Pi robot to your Android device, and begin to understand how you can use Python in your future robotic projects. I suggest looking at the Python documentation page for more examples and guides. Here is a little video of the completed robot.